![[アップデート] ベアメタルインスタンス以外でもネステッド仮想化が使えるようになったので試してみた](https://images.ctfassets.net/ct0aopd36mqt/wp-thumbnail-bac3d29aa65f45576f73094798087ee5/039ad6f8a7d8f18da47986d21c447f48/amazon-ec2?w=3840&fm=webp)
[アップデート] ベアメタルインスタンス以外でもネステッド仮想化が使えるようになったので試してみた
はじめに
皆様こんにちは、あかいけです。
2026年2月12日、EC2のAPIにネステッド仮想化のオプションが追加されました。
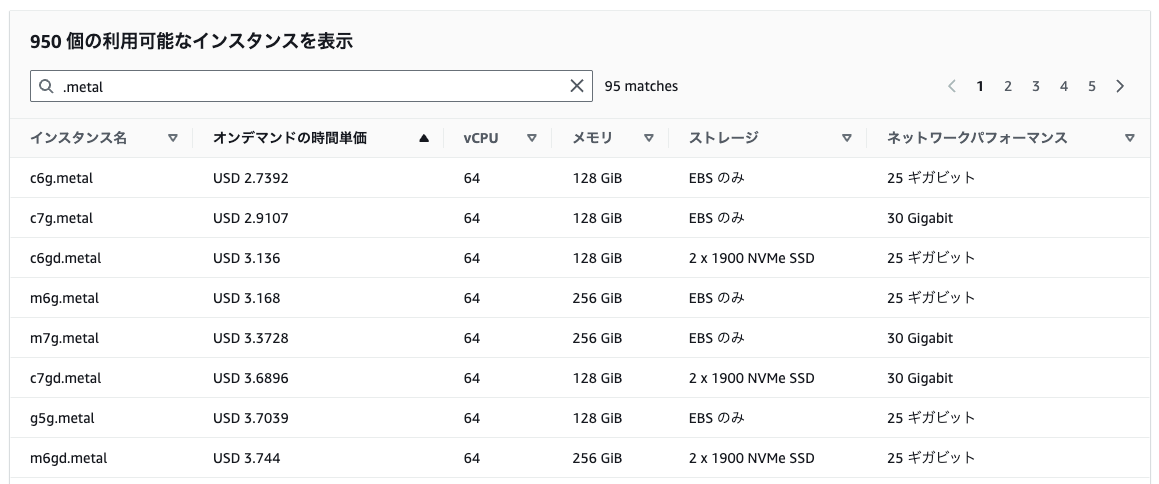
これまでEC2インスタンス上でネステッド仮想化を利用するには、ベアメタルインスタンスを使用する必要がありました。
またベアメタルは最小のものでも、他のインスタンスタイプと比べるとコストが高かったんですよね…。
(以下は東京リージョンの例です)
しかし今回のアップデートにより、第8世代Intelインスタンス(c8i、m8i、r8iなど)でネステッド仮想化が利用可能になりました。
というわけで今回は、EC2ネステッド仮想化を有効化して、
合わせてFirecracker(AWS製の軽量microVM)を動かすところまで検証してみました。
対応インスタンスタイプ
ネステッド仮想化に対応しているのは、第8世代Intelベースのインスタンスタイプです。
なお本記事冒頭のAPIの変更ログには記載されていませんでしたが、以下ドキュメントにて確認できました。
AWS CLIでの確認方法
念の為AWS CLIでも確認してみましょう。
インスタンスタイプはdescribe-instance-typesコマンドで確認できます。
aws ec2 describe-instance-types \
  --filters "Name=processor-info.supported-features,Values=nested-virtualization" \
  --query "sort(InstanceTypes[].InstanceType)" \
  --region ap-northeast-1
結果は以下でドキュメントの記載通り、
第8世代Intelベースのインスタンスタイプのみ対応していることが確認できました。
[
    "c8i-flex.12xlarge",
    "c8i-flex.16xlarge",
    "c8i-flex.2xlarge",
    "c8i-flex.4xlarge",
    "c8i-flex.8xlarge",
    "c8i-flex.large",
    "c8i-flex.xlarge",
    "c8i.12xlarge",
    "c8i.16xlarge",
    "c8i.24xlarge",
    "c8i.2xlarge",
    "c8i.32xlarge",
    "c8i.48xlarge",
    "c8i.4xlarge",
    "c8i.8xlarge",
    "c8i.96xlarge",
    "c8i.large",
    "c8i.xlarge",
    "c8id.12xlarge",
    "c8id.16xlarge",
    "c8id.24xlarge",
    "c8id.2xlarge",
    "c8id.32xlarge",
    "c8id.48xlarge",
    "c8id.4xlarge",
    "c8id.8xlarge",
    "c8id.96xlarge",
    "c8id.large",
    "c8id.xlarge",
    "m8i.12xlarge",
    "m8i.16xlarge",
    "m8i.24xlarge",
    "m8i.2xlarge",
    "m8i.32xlarge",
    "m8i.48xlarge",
    "m8i.4xlarge",
    "m8i.8xlarge",
    "m8i.96xlarge",
    "m8i.large",
    "m8i.xlarge",
    "m8id.12xlarge",
    "m8id.16xlarge",
    "m8id.24xlarge",
    "m8id.2xlarge",
    "m8id.32xlarge",
    "m8id.48xlarge",
    "m8id.4xlarge",
    "m8id.8xlarge",
    "m8id.96xlarge",
    "m8id.large",
    "m8id.xlarge",
    "r8i-flex.12xlarge",
    "r8i-flex.16xlarge",
    "r8i-flex.2xlarge",
    "r8i-flex.4xlarge",
    "r8i-flex.8xlarge",
    "r8i-flex.large",
    "r8i-flex.xlarge",
    "r8i.12xlarge",
    "r8i.16xlarge",
    "r8i.24xlarge",
    "r8i.2xlarge",
    "r8i.32xlarge",
    "r8i.48xlarge",
    "r8i.4xlarge",
    "r8i.8xlarge",
    "r8i.96xlarge",
    "r8i.large",
    "r8i.xlarge",
    "r8id.12xlarge",
    "r8id.16xlarge",
    "r8id.24xlarge",
    "r8id.2xlarge",
    "r8id.32xlarge",
    "r8id.48xlarge",
    "r8id.4xlarge",
    "r8id.8xlarge",
    "r8id.96xlarge",
    "r8id.large",
    "r8id.xlarge"
]
API変更点
今回のアップデートで、EC2 APIのCpuOptionsにNestedVirtualizationフィールドが追加されました。
CpuOptionsの構造
| フィールド | 型 | 説明 |
|---|---|---|
| CoreCount | Integer | CPUコア数 |
| ThreadsPerCore | Integer | コアあたりのスレッド数 |
| AmdSevSnp | String | AMD SEV-SNPの有効/無効 |
| NestedVirtualization | String | ネステッド仮想化の有効/無効(今回追加) |
影響を受けるAPI
以下の8つのAPIでネステッド仮想化の設定や確認ができるようになりました。
| API | 用途 |
|---|---|
RunInstances |
インスタンス起動時に設定 |
ModifyInstanceCpuOptions |
既存インスタンスの設定変更(停止状態で実行) |
DescribeInstances |
インスタンスの現在の設定を確認 |
DescribeInstanceTypes |
対応インスタンスタイプの確認 |
CreateLaunchTemplate |
起動テンプレートで設定 |
CreateLaunchTemplateVersion |
起動テンプレートの新バージョンで設定 |
DescribeLaunchTemplateVersions |
起動テンプレートの設定を確認 |
GetLaunchTemplateData |
既存インスタンスから起動テンプレートデータを取得 |
検証してみた
それでは実際にネステッド仮想化を有効にしたインスタンスを起動して、Firecrackerを動かしてみます。
なお2026/2/13時点ではマネジメントコンソール上では設定できなそうだったので、AWS CLI試してみます。
AWS CLIのバージョンについて
検証する際に、CloudShellのデフォルトCLI(v2.33.6)ではNestedVirtualizationパラメータが認識されませんでした。
aws --version
aws-cli/2.33.6 Python/3.13.11 Linux/6.1.159-182.297.amzn2023.x86_64 exec-env/CloudShell exe/x86_64.amzn.2023
Parameter validation failed:
Unknown parameter in CpuOptions: "NestedVirtualization", must be one of: CoreCount, ThreadsPerCore, AmdSevSnp
そのため最新版(v2.33.21)にアップデートしたところ、解決しました。
なので同じエラーが出た方はAWS CLIを最新バージョンにしてみてください。
# ホームディレクトリにCLIをインストール
curl "https://awscli.amazonaws.com/awscli-exe-linux-x86_64.zip" -o "awscliv2.zip"
unzip -o awscliv2.zip
./aws/install -i ~/aws-cli -b ~/bin --update
echo 'export PATH=~/bin:$PATH' >> ~/.bashrc
source ~/.bashrc
aws --version
aws-cli/2.33.21 Python/3.13.11 Linux/6.1.159-182.297.amzn2023.x86_64 exec-env/CloudShell exe/x86_64.amzn.2023
1.ネステッド仮想化有効でインスタンス起動
まずはRunInstances APIを利用する、run-instancesコマンドでEC2を作成します。
--cpu-options NestedVirtualization=enabledを指定してインスタンスを起動します。
利用するインスタンスプロファイル、サブネット、セキュリティグループは事前に作成しておきます。
# 環境変数を設定
AMI_ID=$(aws ec2 describe-images \
  --owners amazon \
  --filters "Name=name,Values=al2023-ami-2023*-x86_64" "Name=architecture,Values=x86_64" \
  --query "Images | sort_by(@, &CreationDate)[-1].ImageId" \
  --output text \
  --region ap-northeast-1)

INSTANCE_PROFILE="ec2-ssm-role" # SSM Session Manager接続用 IAMロール
SUBNET_ID="subnet-xxxxxxxxx"
SG_ID="sg-xxxxxxxxx"

# ネステッド仮想化有効でインスタンス起動
aws ec2 run-instances \
  --instance-type m8i.large \
  --image-id ${AMI_ID} \
  --iam-instance-profile Name=${INSTANCE_PROFILE} \
  --subnet-id ${SUBNET_ID} \
  --security-group-ids ${SG_ID} \
  --cpu-options NestedVirtualization=enabled \
  --tag-specifications 'ResourceType=instance,Tags=[{Key=Name,Value=nested-virt-enabled}]' \
  --region ap-northeast-1
レスポンスのCpuOptionsを確認すると、NestedVirtualizationがenabledになっています。
"CpuOptions": {
    "CoreCount": 1,
    "ThreadsPerCore": 2,
    "NestedVirtualization": "enabled"
}
2.比較用にネステッド仮想化無効のインスタンスも起動
比較検証のため、NestedVirtualization=disabledのインスタンスも起動しておきます。
aws ec2 run-instances \
  --instance-type m8i.large \
  --image-id ${AMI_ID} \
  --iam-instance-profile Name=${INSTANCE_PROFILE} \
  --subnet-id ${SUBNET_ID} \
  --security-group-ids ${SG_ID} \
  --cpu-options NestedVirtualization=disabled \
  --tag-specifications 'ResourceType=instance,Tags=[{Key=Name,Value=nested-virt-disabled}]' \
  --region ap-northeast-1
"CpuOptions": {
    "CoreCount": 1,
    "ThreadsPerCore": 2,
    "NestedVirtualization": "disabled"
}
3.設定の確認
両インスタンスのネステッド仮想化設定を確認します。
# nested-virt-*のインスタンスIDを取得
INSTANCE_IDS=$(aws ec2 describe-instances \
  --filters "Name=tag:Name,Values=nested-virt-*" "Name=instance-state-name,Values=running,pending" \
  --query "Reservations[].Instances[].InstanceId" \
  --output text \
  --region ap-northeast-1)

# 取得したIDでCPU Optionsを確認
aws ec2 describe-instances \
  --instance-ids ${INSTANCE_IDS} \
  --query "Reservations[].Instances[].{Name:Tags[?Key=='Name'].Value|[0],InstanceId:InstanceId,NestedVirt:CpuOptions.NestedVirtualization}" \
  --output table \
  --region ap-northeast-1
---------------------------------------------------------------
|                      DescribeInstances                      |
+----------------------+------------------------+-------------+
|      InstanceId      |         Name           | NestedVirt  |
+----------------------+------------------------+-------------+
|  i-04bcb6070c6f00747 |  nested-virt-disabled  |  disabled   |
|  i-03b4642ffd5fd31d0 |  nested-virt-enabled   |  enabled    |
+----------------------+------------------------+-------------+
ネステッド仮想化の違いを確認
両インスタンスにSSM Session Managerで接続し、KVM関連の状態を比較してみます。
KVMデバイスの存在確認
ネステッド仮想化が有効な場合のみ、/dev/kvmデバイスが存在しています。
ls -la /dev/kvm
sh-5.2$ ls -la /dev/kvm
crw-rw-rw-. 1 root kvm 10, 232 Feb 13 14:23 /dev/kvm
sh-5.2$ ls -la /dev/kvm
ls: cannot access '/dev/kvm': No such file or directory
CPUフラグの確認
Intel VT-x(vmx)フラグが有効な場合のみ、CPUレベルで仮想化支援が利用可能です。
grep -E 'vmx|svm' /proc/cpuinfo | head -1
sh-5.2$ grep -E 'vmx|svm' /proc/cpuinfo | head -5flags           : fpu vme de pse tsc msr pae mce cx8 apic sep mtrr pge mca cmov pat pse36 clflush mmx fxsr sse sse2 ss ht syscall nx pdpe1gb rdtscp lm constant_tsc arch_perfmon rep_good nopl xtopology nonstop_tsc cpuid aperfmperf tsc_known_freq pni pclmulqdq monitor vmx ssse3 fma cx16 pdcm pcid sse4_1 sse4_2 x2apic movbe popcnt tsc_deadline_timer aes xsave avx f16c rdrand hypervisor lahf_lm abm 3dnowprefetch cpuid_fault ssbd ibrs ibpb stibp ibrs_enhanced tpr_shadow flexpriority ept vpid ept_ad fsgsbase tsc_adjust bmi1 avx2 smep bmi2 erms invpcid avx512f avx512dq rdseed adx smap avx512ifma clflushopt clwb avx512cd sha_ni avx512bw avx512vl xsaveopt xsavec xgetbv1 xsaves avx_vnni avx512_bf16 wbnoinvd ida arat vnmi avx512vbmi umip pku ospke waitpkg avx512_vbmi2 gfni vaes vpclmulqdq avx512_vnni avx512_bitalg tme avx512_vpopcntdq rdpid bus_lock_detect cldemote movdiri movdir64b md_clear serialize amx_bf16 avx512_fp16 amx_tile amx_int8 flush_l1d arch_capabilitiesvmx flags       : vnmi preemption_timer posted_intr invvpid ept_x_only ept_ad ept_1gb ept_5level flexpriority apicv tsc_offset vtpr mtf vapic ept vpid unrestricted_guest vapic_reg vid shadow_vmcs pml tsc_scaling usr_wait_pause
flags           : fpu vme de pse tsc msr pae mce cx8 apic sep mtrr pge mca cmov pat pse36 clflush mmx fxsr sse sse2 ss ht syscall nx pdpe1gb rdtscp lm constant_tsc arch_perfmon rep_good nopl xtopology nonstop_tsc cpuid aperfmperf tsc_known_freq pni pclmulqdq monitor vmx ssse3 fma cx16 pdcm pcid sse4_1 sse4_2 x2apic movbe popcnt tsc_deadline_timer aes xsave avx f16c rdrand hypervisor lahf_lm abm 3dnowprefetch cpuid_fault ssbd ibrs ibpb stibp ibrs_enhanced tpr_shadow flexpriority ept vpid ept_ad fsgsbase tsc_adjust bmi1 avx2 smep bmi2 erms invpcid avx512f avx512dq rdseed adx smap avx512ifma clflushopt clwb avx512cd sha_ni avx512bw avx512vl xsaveopt xsavec xgetbv1 xsaves avx_vnni avx512_bf16 wbnoinvd ida arat vnmi avx512vbmi umip pku ospke waitpkg avx512_vbmi2 gfni vaes vpclmulqdq avx512_vnni avx512_bitalg tme avx512_vpopcntdq rdpid bus_lock_detect cldemote movdiri movdir64b md_clear serialize amx_bf16 avx512_fp16 amx_tile amx_int8 flush_l1d arch_capabilitiesvmx flags       : vnmi preemption_timer posted_intr invvpid ept_x_only ept_ad ept_1gb ept_5level flexpriority apicv tsc_offset vtpr mtf vapic ept vpid unrestricted_guest vapic_reg vid shadow_vmcs pml tsc_scaling usr_wait_pause
sh-5.2$ grep -E 'vmx|svm' /proc/cpuinfo | head -5
KVMモジュールの確認
ネステッド仮想化有効の場合、kvmとkvm_intelモジュールがロードされています。
lsmod | grep kvm
sh-5.2$ lsmod | grep kvm
kvm_intel             421888  0
kvm                  1351680  1 kvm_intel
irqbypass              12288  1 kvm
sh-5.2$ lsmod | grep kvm
Firecrackerでmicro VMを起動してみる
ここまででKVMが有効化されていることは確認できましたが、
せっかくなのでネステッド仮想化が有効なインスタンスで、Firecracker(AWS製の軽量microVM)を使ってゲストVMを起動してみます。
Firecrackerとは
FirecrackerはAWSが開発したオープンソースの仮想化技術で、AWS LambdaやAWS Fargateの基盤として使用されています。
KVMを使用して軽量なmicroVMを高速に起動できるのが特徴です。
本記事での手順は以下ドキュメントを参照しています。
1.Firecrackerのインストール
ARCH="$(uname -m)"
release_url="https://github.com/firecracker-microvm/firecracker/releases"
latest=$(basename $(curl -fsSLI -o /dev/null -w %{url_effective} ${release_url}/latest))

curl -L ${release_url}/download/${latest}/firecracker-${latest}-${ARCH}.tgz | tar -xz

sudo mv release-${latest}-${ARCH}/firecracker-${latest}-${ARCH} /usr/local/bin/firecracker
sudo mv release-${latest}-${ARCH}/jailer-${latest}-${ARCH} /usr/local/bin/jailer
以下コマンドでバージョンが表示されればOKです。
firecracker --version
2026-02-13T14:58:50.237291230 [anonymous-instance:main] Firecracker exiting successfully. exit_code=0
2.カーネルとrootfsの準備
Firecracker公式のCIアーティファクトからカーネルとrootfsをダウンロードします。
CI_VERSION=${latest%.*}

# カーネルを取得
KERNEL=$(curl -fsSL "https://s3.amazonaws.com/spec.ccfc.min?prefix=firecracker-ci/${CI_VERSION}/${ARCH}/vmlinux-" \
  | grep -oP "(?<=<Key>)firecracker-ci/${CI_VERSION}/${ARCH}/vmlinux-[0-9]+\.[0-9]+\.[0-9]+(?=</Key>)" \
  | sort -V | tail -1)

# rootfs(squashfs)を取得
ROOTFS_SQUASHFS=$(curl -fsSL "https://s3.amazonaws.com/spec.ccfc.min?prefix=firecracker-ci/${CI_VERSION}/${ARCH}/ubuntu-" \
  | grep -oP "(?<=<Key>)firecracker-ci/${CI_VERSION}/${ARCH}/ubuntu-[0-9.]+\.squashfs(?=</Key>)" \
  | sort -V | tail -1)

curl -fsSL -o vmlinux.bin "https://s3.amazonaws.com/spec.ccfc.min/${KERNEL}"
curl -fsSL -o rootfs.squashfs "https://s3.amazonaws.com/spec.ccfc.min/${ROOTFS_SQUASHFS}"
Firecrackerはext4形式のrootfsが必要なため、squashfsから変換します。
sudo dnf install -y squashfs-tools
unsquashfs rootfs.squashfs
truncate -s 1G rootfs.ext4
sudo mkfs.ext4 -d squashfs-root -F rootfs.ext4
Parallel unsquashfs: Using 2 processors
7798 inodes (9786 blocks) to write

[================================================================================================================================================================================================-] 9786/9786 100%

created 7079 files
created 1466 directories
created 717 symlinks
created 0 devices
created 0 fifos
created 0 sockets
mke2fs 1.46.5 (30-Dec-2021)
Discarding device blocks: done
Creating filesystem with 262144 4k blocks and 65536 inodes
Filesystem UUID: b590c0f5-e25d-4086-b0a9-d6ea8bc214b9
Superblock backups stored on blocks:
        32768, 98304, 163840, 229376

Allocating group tables: done
Writing inode tables: done
Creating journal (8192 blocks): done
Copying files into the device: done
Writing superblocks and filesystem accounting information: done
3.KVMデバイスの権限設定
sudo setfacl -m u:${USER}:rw /dev/kvm
ls -la /dev/kvm
crw-rw-rw-+ 1 root kvm 10, 232 Feb 13 14:57 /dev/kvm
4.Firecrackerの設定と起動
設定ファイルを作成して、microVMを起動します。
cat > vm-config.json <<EOF
{
  "boot-source": {
    "kernel_image_path": "./vmlinux.bin",
    "boot_args": "console=ttyS0 reboot=k panic=1 pci=off"
  },
  "drives": [{
    "drive_id": "rootfs",
    "path_on_host": "./rootfs.ext4",
    "is_root_device": true,
    "is_read_only": false
  }],
  "machine-config": {
    "vcpu_count": 1,
    "mem_size_mib": 256
  }
}
EOF
firecracker --api-sock /tmp/firecracker.socket --config-file vm-config.json
数秒間、起動処理のログが流れて…
2026-02-13T16:20:26.537932986 [anonymous-instance:main] Running Firecracker v1.14.1
2026-02-13T16:20:26.538193079 [anonymous-instance:main] Listening on API socket ("/tmp/firecracker.socket").
2026-02-13T16:20:26.538373815 [anonymous-instance:fc_api] API server started.
2026-02-13T16:20:26.548660637 [anonymous-instance:main] Artificially kick devices
2026-02-13T16:20:26.548677019 [anonymous-instance:fc_vcpu 0] Received a VcpuEvent::Resume message with immediate_exit enabled. immediate_exit was disabled before proceeding
2026-02-13T16:20:26.548716526 [anonymous-instance:main] Successfully started microvm that was configured from one single json
2026-02-13T16:20:26.574100739 [anonymous-instance:fc_vcpu 0] vcpu: IO write @ 0xcf8:0x4 failed: bus_error: MissingAddressRange
2026-02-13T16:20:26.574148966 [anonymous-instance:fc_vcpu 0] vcpu: IO read @ 0xcfc:0x2 failed: bus_error: MissingAddressRange
[    0.000000] Linux version 6.1.155 (root@0e0250f7f2f2) (gcc (Ubuntu 11.4.0-1ubuntu1~22.04.2) 11.4.0, GNU ld (GNU Binutils for Ubuntu) 2.38) #1 SMP PREEMPT_DYNAMIC Tue Nov 18 09:27:27 UTC 2025
[    0.000000] Command line: console=ttyS0 reboot=k panic=1 pci=off pci=off root=/dev/vda rw virtio_mmio.device=4K@0xc0001000:6
[    0.000000] KASLR disabled
[    0.000000] x86/split lock detection: #DB: warning on user-space bus_locks
[    0.000000] BIOS-provided physical RAM map:
[    0.000000] BIOS-e820: [mem 0x0000000000000000-0x000000000009fbff] usable
[    0.000000] BIOS-e820: [mem 0x000000000009fc00-0x00000000000fffff] reserved
[    0.000000] BIOS-e820: [mem 0x0000000000100000-0x000000000fffffff] usable
[    0.000000] BIOS-e820: [mem 0x00000000eec00000-0x00000000febfffff] reserved
プロンプトが表示されました。
正常に起動できてそうですね。
Ubuntu 24.04.3 LTS ubuntu-fc-uvm ttyS0

ubuntu-fc-uvm login: root (automatic login)

Welcome to Ubuntu 24.04.3 LTS (GNU/Linux 6.1.155 x86_64)

 * Documentation:  https://help.ubuntu.com
 * Management:     https://landscape.canonical.com
 * Support:        https://ubuntu.com/pro

This system has been minimized by removing packages and content that are
not required on a system that users do not log into.

To restore this content, you can run the 'unminimize' command.

The programs included with the Ubuntu system are free software;
the exact distribution terms for each program are described in the
individual files in /usr/share/doc/*/copyright.

Ubuntu comes with ABSOLUTELY NO WARRANTY, to the extent permitted by
applicable law.

root@ubuntu-fc-uvm:~#
microVMであることの確認
起動したVM内で以下のコマンドを実行して、KVM上で動作していることを確認してみます。
みた感じ、Firecrackerを使ってKVMベースのVMで動作していることがわかります。
root@ubuntu-fc-uvm:~# systemd-detect-virt
kvm
root@ubuntu-fc-uvm:~# dmesg | grep -i "firecracker\|kvm"
[    0.000000] Hypervisor detected: KVM
[    0.000000] kvm-clock: Using msrs 4b564d01 and 4b564d00
[    0.000001] kvm-clock: using sched offset of 37019422 cycles
[    0.000026] clocksource: kvm-clock: mask: 0xffffffffffffffff max_cycles: 0x1cd42e4dffb, max_idle_ns: 881590591483 ns
[    0.014759] Booting paravirtualized kernel on KVM
[    0.020964] kvm-guest: PV spinlocks disabled, single CPU
[    0.279668] clocksource: Switched to clocksource kvm-clock
[    0.992762] systemd[1]: Detected virtualization kvm.
root@ubuntu-fc-uvm:~# lscpu | grep -E "Hypervisor|Model name"
Model name:                              Intel(R) Xeon(R) Processor
Hypervisor vendor:                       KVM
おまけ:既存インスタンスへの適用
なお作成後のインスタンスにネステッド仮想化を有効化することも可能で、modify-instance-cpu-optionsコマンドで変更できます。
ただし、インスタンスが停止状態である必要があります。
# インスタンスを停止
aws ec2 stop-instances --instance-ids ${INSTANCE_ID}
aws ec2 wait instance-stopped --instance-ids ${INSTANCE_ID}
- 無効化してみる
aws ec2 modify-instance-cpu-options \
  --instance-id ${INSTANCE_ID} \
  --nested-virtualization disabled  \
  --region ap-northeast-1
{
    "InstanceId": "i-0a9ae55440f193dd1",
    "NestedVirtualization": "disabled"
}
- 有効化してみる
aws ec2 modify-instance-cpu-options \
  --instance-id ${INSTANCE_ID} \
  --nested-virtualization enabled \
  --region ap-northeast-1
{
    "InstanceId": "i-0a9ae55440f193dd1",
    "NestedVirtualization": "enabled"
}
さいごに
以上、EC2ネステッド仮想化機能を使ってFirecrackerでmicroVMを起動してみました。
これまでEC2上でKVMを使おうとすると、ベアメタルインスタンス一択で「ちょっと試してみたい…」という場合でも、ハードルが高かったんですよね…。
それが今回のアップデートでベアメタルインスタンス以外で、しかもlargeサイズから使えるようになったのは中々嬉しいところです。
この記事が誰かのお役に立てば幸いです。