
Security Command Center の IaC 検証を GitHub Actions で実行してみた
前回、Security Command Center(SCC)の IaC 検証を gcloud scc iac-validation-reports create で手元から叩き、違反入りの Terraform plan がどんな JSON を返すのかを試しました。
今回はこれを GitHub Actions に組み込みます。PR を出したタイミングで Terraform plan を自動検証し、違反があれば job を落として PR を止めます。
検証結果の SARIF は artifact として保存し、ダウンロードして中身を確認します。
参考にしたのは GitHub Actions 連携の公式チュートリアルです。
使うもの
CI で Google 製の GitHub Action google-github-actions/analyze-code-security-scc を使います。
ローカルで gcloud scc iac-validation-reports create を直接叩く方法もありますが、CI ではこの専用 Action を使うのが標準です。
前提
- SCC が Premium または Enterprise で、組織レベルで有効化されていること(プロジェクトレベルでは使えません)
- 検証用のセキュリティポスチャー(組織ポリシーや Security Health Analytics のモジュールをまとめたもの)を組織で作成し、対象プロジェクトにデプロイしておくこと。IaC 検証はデプロイ済みポスチャーに対して走るので、これが無いとカスタムルール分の違反が出ません
- API は
securityposture.googleapis.comとsecuritycentermanagement.googleapis.comを有効化済み - GitHub リポジトリに、ポスチャーのルールに違反する
main.tfを置く
以降の <...> は環境に合わせて置き換える値です(<ORGANIZATION_ID>、<PROJECT_ID>、<PROJECT_NUMBER>、<POOL_ID> など)。
サービスアカウントとロールを準備する
SA と WIF を Terraform で作ります。
ただし PR でスキャンする terraform/ とは別構成にし、ステートファイルも分けます。
スキャン対象と混ぜると、ブートストラップ用のリソースまで検証されてしまいます。CI が動く前に存在している必要がある設定でもあるため、置き場所を分けました。
ここでは bootstrap/ に置きます。
bootstrap/   # SA・WIF(このセクション。スキャン対象とは別ステート)
terraform/   # スキャン対象(違反する main.tf)
provider と変数を定義します。
terraform {
  required_version = ">= 1.15"

  required_providers {
    google = {
      source  = "hashicorp/google"
      version = "~> 6.0"
    }
  }
}
variable "project_id" {
  description = "サービスアカウントと WIF プールを作るプロジェクト ID"
  type        = string
}

variable "organization_id" {
  description = "Shift-Left Validator ロールを付与する組織 ID"
  type        = string
}

variable "github_repository" {
  description = "認証を許可する GitHub リポジトリ(owner/repo 形式)"
  type        = string
}

variable "pool_id" {
  description = "Workload Identity プール ID"
  type        = string
  default     = "github-pool"
}

variable "provider_id" {
  description = "Workload Identity プロバイダ ID"
  type        = string
  default     = "github-provider"
}
検証用サービスアカウントを作り、組織レベルで「Security Posture Shift-Left Validator」ロール(実 ID は roles/securityposture.reportCreator)を付与します。
実機でハマったのは付与先です。このロールは組織レベルでしか付与できません。プロジェクトに付けると Role ... is not supported for this resource で弾かれます。IaC 検証レポートは organizations/<ORG>/locations/global 配下のリソースで、gcloud scc iac-validation-reports create も Action も org スコープしか取りません。権限は組織に対して評価されるので、付与先も組織になります。ロールの権限は securityposture.reports.create / get / list と operations.get だけで、検証レポートの作成と参照に限られます(書き込みや enforce はできません)。
# 検証用サービスアカウント
resource "google_service_account" "scc_iac_validator" {
  project      = var.project_id
  account_id   = "scc-iac-validator"
  display_name = "SCC IaC Validator"
}

# 組織レベルで Shift-Left Validator ロール(実 ID は reportCreator)を付与
resource "google_organization_iam_member" "report_creator" {
  org_id = var.organization_id
  role   = "roles/securityposture.reportCreator"
  member = "serviceAccount:${google_service_account.scc_iac_validator.email}"
}
組織レベルの IAM 設定には resourcemanager.organizations.setIamPolicy(Organization Administrator 相当)が要ります。terraform apply を実行するアカウントにこの権限が無いと、この binding だけ失敗します。
Workload Identity 連携を設定する
GitHub Actions から鍵レスに認証するため、同じ bootstrap/ にプールとプロバイダを足し、GitHub の OIDC を信頼させます。サービスアカウントキー JSON は使いません。bootstrap/main.tf に以下を追記します。
# Workload Identity プール
resource "google_iam_workload_identity_pool" "github" {
  project                   = var.project_id
  workload_identity_pool_id = var.pool_id
  display_name              = "GitHub Actions Pool"
}

# GitHub OIDC プロバイダ
resource "google_iam_workload_identity_pool_provider" "github" {
  project                            = var.project_id
  workload_identity_pool_id          = google_iam_workload_identity_pool.github.workload_identity_pool_id
  workload_identity_pool_provider_id = var.provider_id
  display_name                       = "GitHub Actions Provider"

  attribute_mapping = {
    "google.subject"       = "assertion.sub"
    "attribute.repository" = "assertion.repository"
  }

  # 指定したリポジトリ以外のトークンを弾く(無いと全リポジトリを信頼してしまう)
  attribute_condition = "assertion.repository == '${var.github_repository}'"

  oidc {
    issuer_uri = "https://token.actions.githubusercontent.com"
  }
}

# 該当リポジトリの principal に workloadIdentityUser を付与
resource "google_service_account_iam_member" "wif_binding" {
  service_account_id = google_service_account.scc_iac_validator.name
  role               = "roles/iam.workloadIdentityUser"
  member             = "principalSet://iam.googleapis.com/${google_iam_workload_identity_pool.github.name}/attribute.repository/${var.github_repository}"
}
ワークフローに貼る値は output で受け取ります。
output "workload_identity_provider" {
  description = "ワークフローの workload_identity_provider に指定する値"
  value       = google_iam_workload_identity_pool_provider.github.name
}

output "service_account_email" {
  description = "ワークフローの service_account に指定する値"
  value       = google_service_account.scc_iac_validator.email
}
apply し、outputの値を控えておきます。
cd bootstrap
terraform init
terraform apply
terraform output workload_identity_provider
workload_identity_provider output は projects/<PROJECT_NUMBER>/locations/global/workloadIdentityPools/<POOL_ID>/providers/<PROVIDER_ID> 形式で返ります。<PROJECT_NUMBER> を手で調べる必要はありません。
この値と service_account_email output を GitHub のリポジトリ Secrets(GCP_WIF_PROVIDER / GCP_SERVICE_ACCOUNT)に登録し、ワークフローからは ${{ secrets.GCP_WIF_PROVIDER }} のように参照します。実機では、この設定で auth ステップがキーレスで通ることを確認しました。
attribute_condition を入れておくと、指定リポジトリ以外の OIDC トークンでは SA を借用できません。
ワークフローを書く
PR で terraform/ 配下が変わったときに走るワークフローです。
permissions には WIF 用の id-token: write が要ります。識別子(組織 ID・プロジェクト番号・プロジェクト ID・SA メール)は public リポジトリに直書きしたくないため、Secrets から渡します(GCP_WIF_PROVIDER / GCP_SERVICE_ACCOUNT / GCP_ORGANIZATION_ID / GCP_PROJECT_ID)。スキャン対象の Terraform も var.project_id にしておき、CI では TF_VAR_project_id を Secret から注入します。
ubuntu-latest の Terraform プリインストールに依存しないように hashicorp/setup-terraform を入れます。terraform_wrapper: false にしておかないと terraform show -json の出力にラッパーのログが混ざります。
name: IaC Security Scan

on:
  pull_request:
    paths:
      - 'terraform/**'

jobs:
  security-scan:
    runs-on: ubuntu-latest
    permissions:
      contents: 'read'
      id-token: 'write'
    steps:
      - uses: 'actions/checkout@v6'

      - name: 'Authenticate to Google Cloud'
        id: 'auth'
        uses: 'google-github-actions/auth@v3'
        with:
          workload_identity_provider: '${{ secrets.GCP_WIF_PROVIDER }}'
          service_account: '${{ secrets.GCP_SERVICE_ACCOUNT }}'

      - name: 'Set up Terraform'
        uses: 'hashicorp/setup-terraform@v4'
        with:
          terraform_wrapper: false

      - name: 'Generate Terraform Plan'
        env:
          TF_VAR_project_id: '${{ secrets.GCP_PROJECT_ID }}'
        run: |
          cd terraform
          terraform init
          terraform plan -out=tfplan
          terraform show -json tfplan > tf_plan.json

      - name: 'Analyze Code Security'
        id: 'analyze-code-security-scc'
        uses: 'google-github-actions/analyze-code-security-scc@v1'
        with:
          organization_id: '${{ secrets.GCP_ORGANIZATION_ID }}'
          scan_file_ref: './terraform/tf_plan.json'
          iac_type: 'terraform'
          scan_timeout: '3m'
          ignore_violations: false
          failure_criteria: 'Critical:1,High:1,Medium:1,Low:1,Operator:OR'
          fail_silently: false

      - if: |-
          ${{ !cancelled() && steps.analyze-code-security-scc.outputs.iac_scan_result_sarif_path != '' }}
        uses: 'actions/upload-artifact@v7'
        with:
          name: 'sarif'
          path: '${{ steps.analyze-code-security-scc.outputs.iac_scan_result_sarif_path }}'
artifact 出力ステップは公式 README の例に従いました。if で iac_scan_result_sarif_path が空でないときだけ実行するので、Analyze Code Security が違反で失敗した後でも artifact は残ります(job は失敗のまま)。
必須入力は organization_id / scan_file_ref / iac_type の3つです。合否を決めるのは failure_criteria で、重大度別のしきい値と AND/OR を指定します(挙動は後述)。各入力の一覧と意味はAction の READMEにまとまっているので、そちらを参照してください。
出力は iac_scan_result(passed / failed / error)と iac_scan_result_sarif_path です。SARIF は違反0件でも生成され、その場合 results が空配列になります(後述の「修正して通す」で確認しました)。この path を actions/upload-artifact で artifact 化し、ダウンロードして中身を確認します。
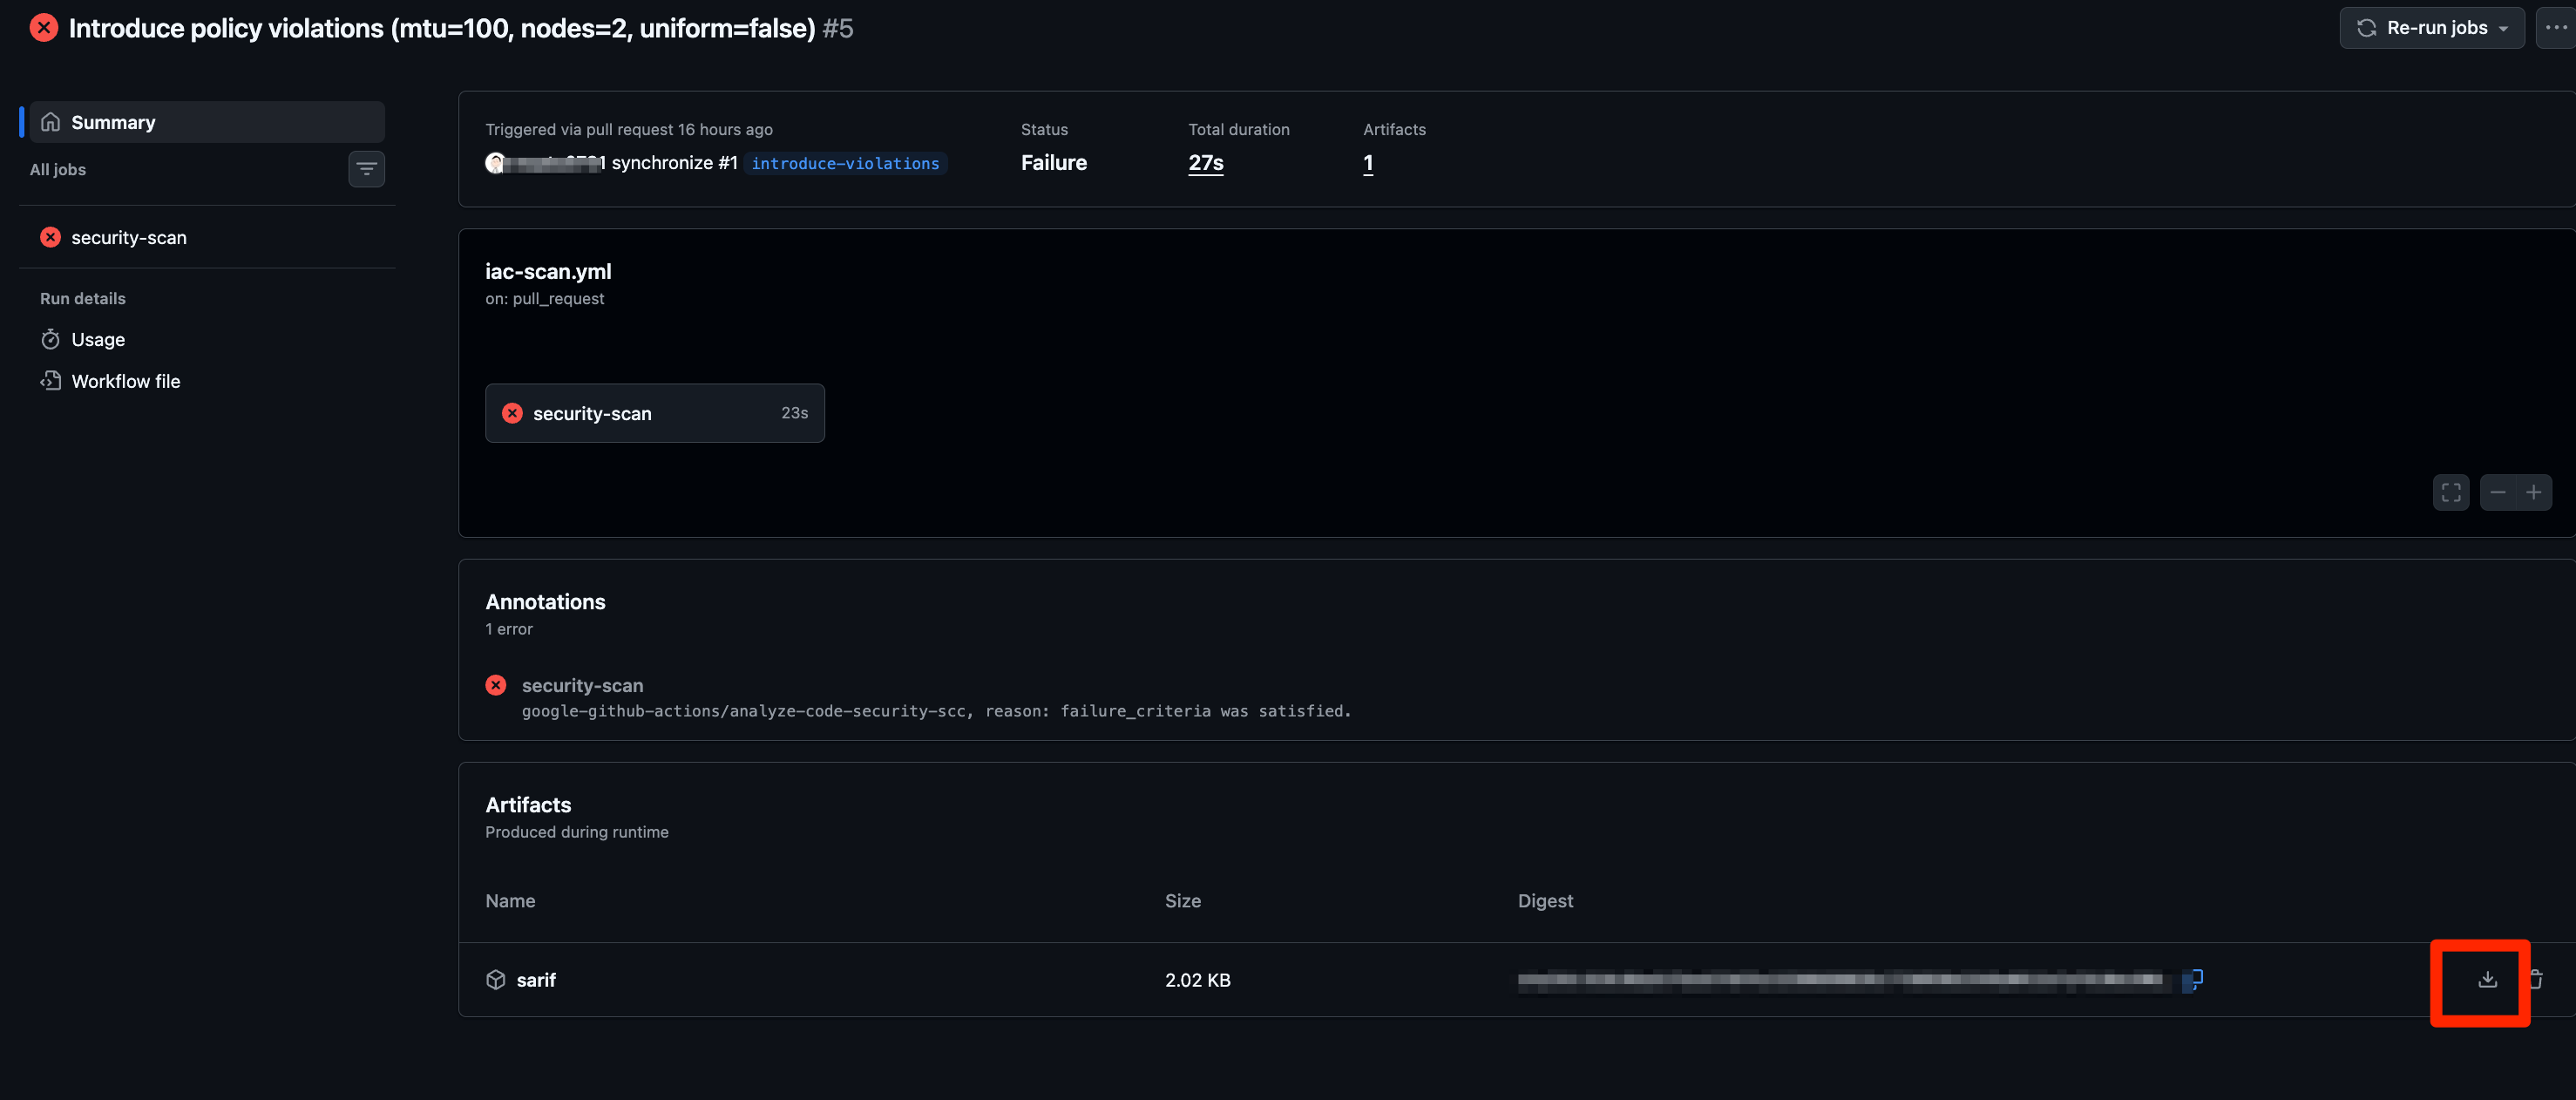
違反入りの PR を作って job を止める
ポスチャーのルールにすべて違反する main.tf(mtu=100、ノード数 2、均一バケットレベルアクセス無効)を使い、PR を出します。
想定どおり job が失敗しました。
Analyze Code Security ステップのログは次のように出ます。
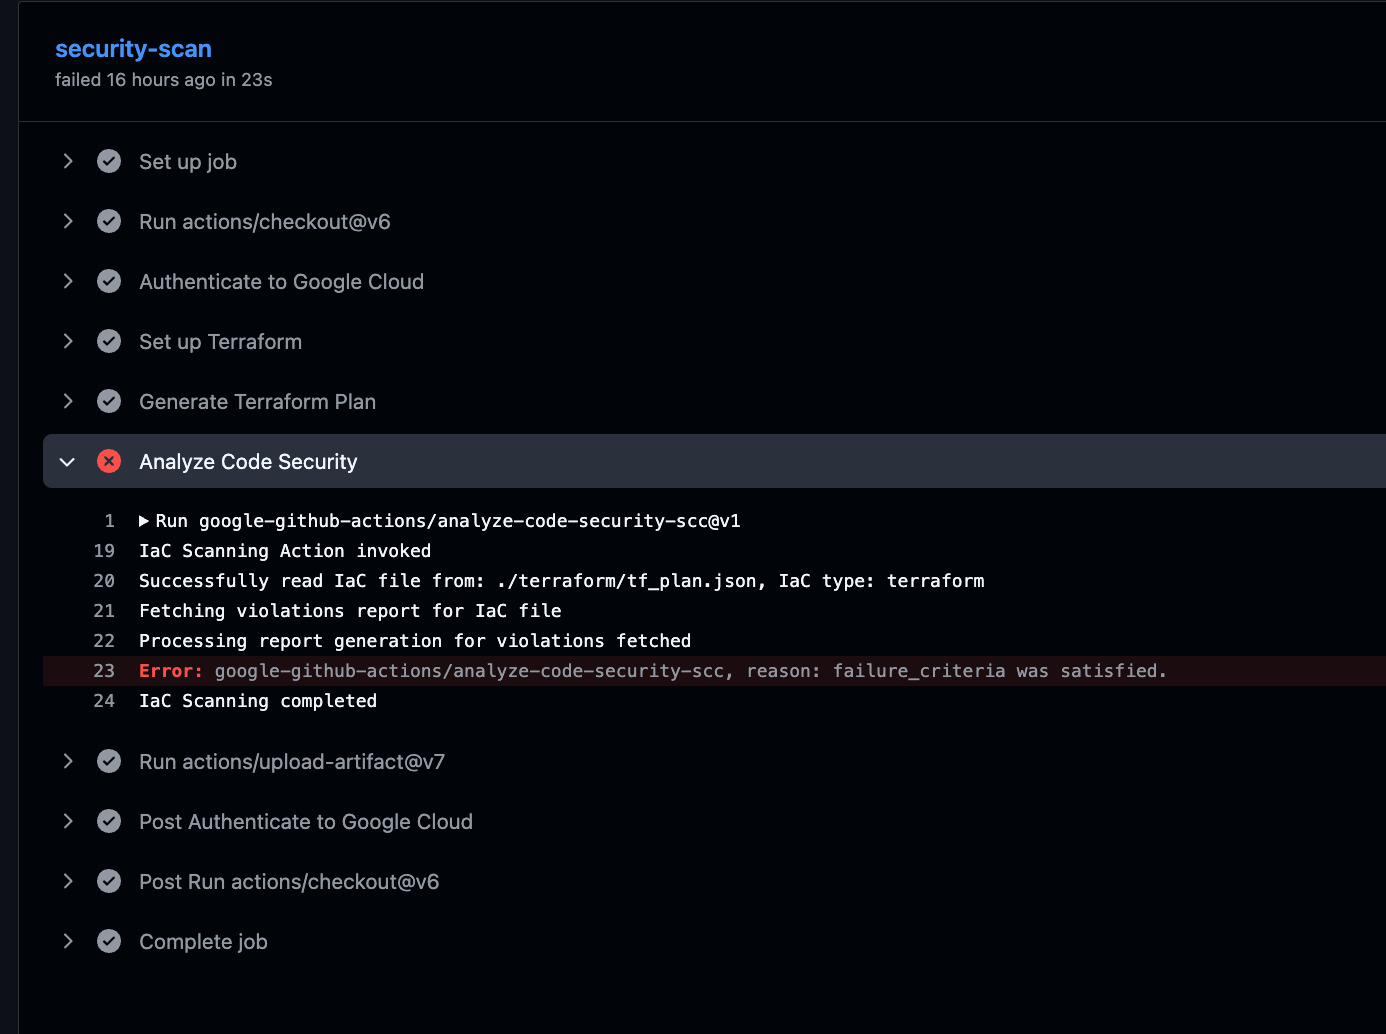
IaC Scanning Action invoked
Successfully read IaC file from: ./terraform/tf_plan.json, IaC type: terraform
Fetching violations report for IaC file
Processing report generation for violations fetched
##[error]google-github-actions/analyze-code-security-scc, reason: failure_criteria was satisfied.
IaC Scanning completed
failure_criteria was satisfied で step が失敗し、job が失敗、PR チェックが赤、という流れです。実行ログには違反の件数や内訳は出ません(出るのは「failure_criteria を満たした」だけ)。件数を確認するには artifact の SARIF を開きます。
artifact の SARIF(results)には5件入っていました。results[].ruleId には SCC 側の識別子(effective なモジュール名やカスタム制約のパス)が入り、message.text に違反内容、properties.assetType にアセット種別が入ります。
| severity | constraintType | 対象 |
|---|---|---|
| HIGH | SECURITY_HEALTH_ANALYTICS_CUSTOM_MODULE(fixedMTU) | network(mtu=100) |
| HIGH | ORG_POLICY_CUSTOM(fixedNodeCount) | nodePool(count=2) |
| HIGH | ORG_POLICY(uniformBucketLevelAccess) | bucket |
| MEDIUM | SECURITY_HEALTH_ANALYTICS_MODULE(BUCKET_POLICY_ONLY_DISABLED) | bucket |
| LOW | SECURITY_HEALTH_ANALYTICS_MODULE(BUCKET_LOGGING_DISABLED) | bucket |
failure_criteria で合否を調整する
ここまでの検証で実機の違反は HIGH×3 / MEDIUM×1 / LOW×1 の5件、デフォルト設定で job が失敗することが分かりました。failure_criteria は「重大度ごとのしきい値」と「Operator(AND/OR)」で合否を決めます。実測した5件に当てはめると、しきい値ごとの合否は次のように整理できます(README の仕様ベース。各パターンを個別に再実行したわけではありません)。
- デフォルト
Critical:1,High:1,Medium:1,Low:1,Operator:OR… どれか1つでもしきい値に達すれば失敗。HIGH が3件あるので失敗 High:1,Operator:OR… HIGH が1件以上で失敗。MEDIUM/LOW は無視。失敗のままCritical:1,Operator:OR… Critical のみで判定。Critical は0件なので、違反は出ていても job は通る(検出はするが落とさない運用)- Operator を
ANDにすると、指定した重大度すべてがしきい値に達したときだけ失敗する
検出はしたいが特定の重大度だけで止めたい、という調整がここでできます。
SARIF を artifact で確認する
検証結果の SARIF は actions/upload-artifact で artifact に保存し、Actions の実行画面からダウンロードして開きます。
違反版では runs[0].results に5件入り、各 result は以下の形でした。
{
  "ruleId": "projects/<PROJECT_NUMBER>/locations/global/effectiveSecurityHealthAnalyticsCustomModules/<ID>",
  "message": { "text": "Asset type: compute.googleapis.com/Network has a violation, next steps: Only create networks whose MTU is 1000." },
  "locations": [
    { "logicalLocations": [{ "fullyQualifiedName": "//compute.googleapis.com/projects/<PROJECT_ID>/global/networks/example-network-1" }] }
  ],
  "properties": { "assetType": "compute.googleapis.com/Network" }
}
locations が logicalLocations(Google Cloud アセットのパス)である点がポイントです。
SCC の IaC 検証は「どのクラウドアセットがどのポリシーに違反したか」を返すので、ソースのファイルや行ではなくアセットを指します。
Terraform を修正して job を通す
修正(mtu=1000、ノード数 3、均一アクセス有効と logging 追加)を入れて再 PR すると、違反が0件になり job が通りました。Analyze Code Security ステップは failure_criteria was satisfied を出さずに IaC Scanning completed で正常終了します。
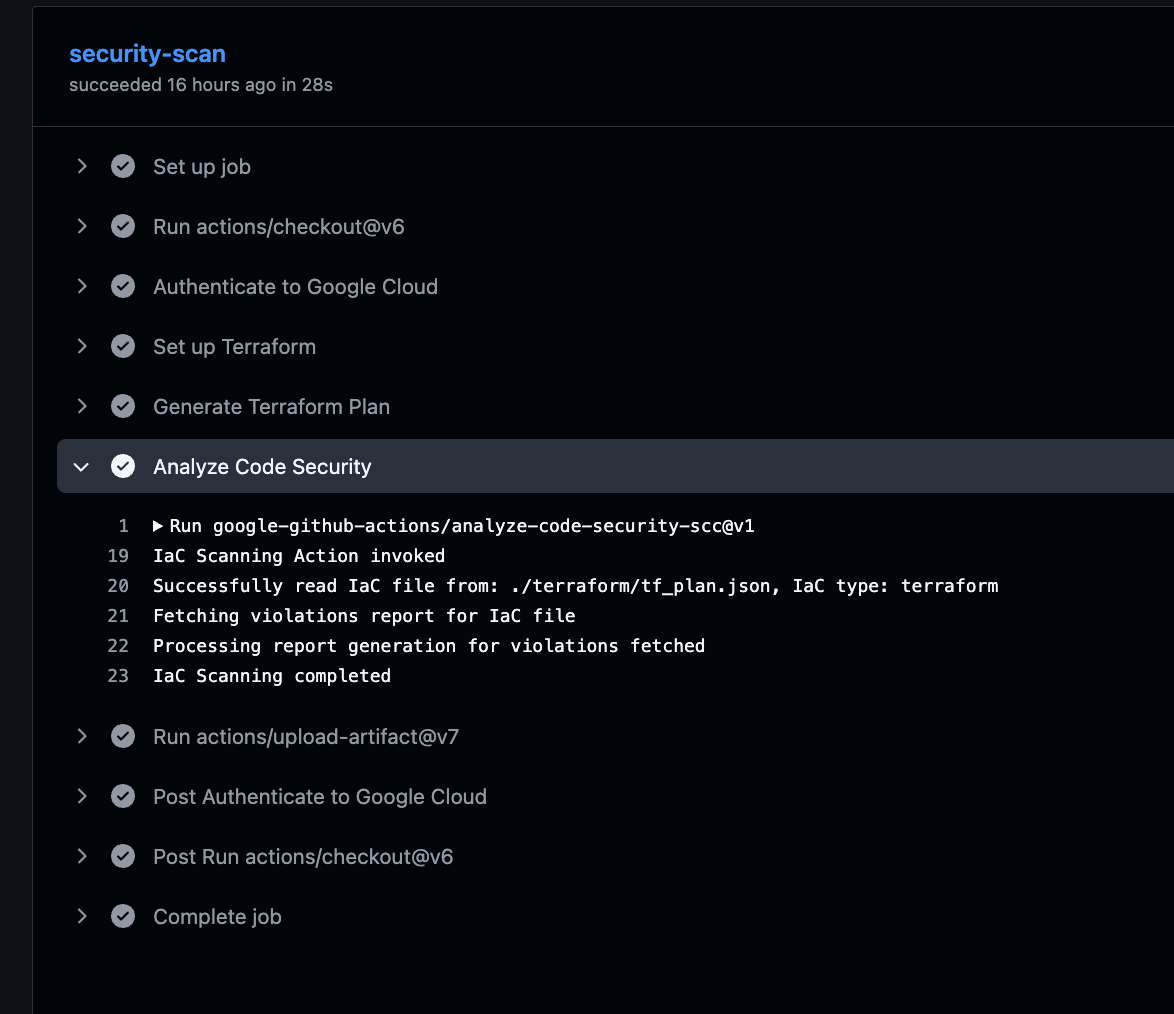
SARIF 自体は生成され、results が空配列(0件)になりました(「違反検出時のみ生成」ではありません)。
おわりに
SCC の IaC 検証を、PR トリガーの GitHub Actions に組み込みました。違反があれば job が落ちて PR を止められます。検証結果の SARIF は artifact で確認できます。
ポスチャーを組織に1つ用意しておけば、あとは PR を出すだけで違反を止められるので、ガードレールとして手軽に使えそうです。


