![[iOS] UIPresentationControllerを使用してカスタムダイアログを実装する](https://devio2023-media.developers.io/wp-content/uploads/2015/01/ios_ui.png)
[iOS] UIPresentationControllerを使用してカスタムダイアログを実装する
この記事は公開されてから1年以上経過しています。情報が古い可能性がありますので、ご注意ください。
はじめに
こんにちは。モバイルアプリサービス部の平屋です。
iOSアプリでカスタムダイアログを実装する方法はいくつかありますが、本記事ではiOS 8で追加されたUIPresentationControllerを使用してカスタムダイアログを実装する方法を紹介します。
検証環境
本記事は以下の環境で検証を行っています。
- macOS Sierra 10.13.2
- Xcode Version 9.3 (9E145)
[1] UIPresentationControllerのサブクラスを実装する
さっそく実装を紹介していきます。
まずはUIPresentationControllerのサブクラスを作成します。UIPresentationControllerは「ビューコントローラーをどのように表示するか」などを管理するクラスです。
本記事のサンプルアプリでは、ダイアログの後ろに表示する半透明のオーバーレイやレイアウトに関する処理を実装します。
class DialogPresentationController: UIPresentationController {

    /// 呼び出し元のViewControllerの上に重ねるオーバーレイ
    private let overlayView = UIView()

    override func presentationTransitionWillBegin() {
        super.presentationTransitionWillBegin()

        // 表示トランジション開始前の処理
        overlayView.frame = containerView!.bounds
        overlayView.backgroundColor = .black
        overlayView.alpha = 0.0
        containerView!.insertSubview(overlayView, at: 0)
        presentedViewController.transitionCoordinator?.animate(alongsideTransition: { [unowned self] _ in
            self.overlayView.alpha = 0.5
        })
    }

    override func dismissalTransitionWillBegin() {
        super.dismissalTransitionWillBegin()

        // 非表示トランジション開始前の処理
        presentedViewController.transitionCoordinator?.animate(alongsideTransition: { [unowned self] _ in
            self.overlayView.alpha = 0.0
        })
    }

    override func dismissalTransitionDidEnd(_ completed: Bool) {
        super.dismissalTransitionDidEnd(completed)

        // 非表示トランジション終了時の処理
        if completed {
            overlayView.removeFromSuperview()
        }
    }

    override var frameOfPresentedViewInContainerView : CGRect {
        return containerView!.bounds
    }

    override func containerViewWillLayoutSubviews() {
        super.containerViewWillLayoutSubviews()

        /// レイアウト開始前の処理
        overlayView.frame = containerView!.bounds
        presentedView!.frame = frameOfPresentedViewInContainerView
    }
}
[2] UIViewControllerAnimatedTransitioningに適合したクラスを実装する
次に、UIViewControllerAnimatedTransitioningに適合したクラスを作成します。
UIViewControllerAnimatedTransitioningはカスタム遷移アニメーションのメソッドの集合です。
画面遷移アニメーションに関する処理を実装します。
class DialogAnimationController : NSObject, UIViewControllerAnimatedTransitioning {

    let forPresented: Bool

    init(forPresented: Bool) {
        self.forPresented = forPresented
    }

    // アニメーション時間
    func transitionDuration(using transitionContext: UIViewControllerContextTransitioning?) -> TimeInterval {
        return 0.2
    }

    func animateTransition(using transitionContext: UIViewControllerContextTransitioning) {
        if (forPresented) {
            presentAnimateTransition(transitionContext: transitionContext)
        } else {
            dismissAnimateTransition(transitionContext: transitionContext)
        }
    }

    // 表示時に使用するアニメーション
    func presentAnimateTransition(transitionContext: UIViewControllerContextTransitioning) {
        let viewController = transitionContext.viewController(forKey: UITransitionContextViewControllerKey.to)!
        let containerView = transitionContext.containerView
        containerView.addSubview(viewController.view)
        viewController.view.alpha = 0.0
        viewController.view.transform = CGAffineTransform(scaleX: 1.1, y: 1.1)

        UIView.animate(withDuration: transitionDuration(using: transitionContext),
                       delay: 0,
                       options: [.curveEaseOut],
                       animations: {
                        viewController.view.alpha = 1.0
                        viewController.view.transform = CGAffineTransform.identity
        },
                       completion: { finished in
                        transitionContext.completeTransition(true)
        })
    }

    // 非表示時に使用するアニメーション
    func dismissAnimateTransition(transitionContext: UIViewControllerContextTransitioning) {
        let viewController = transitionContext.viewController(forKey: UITransitionContextViewControllerKey.from)!

        UIView.animate(withDuration: transitionDuration(using: transitionContext),
                       animations: {
                        viewController.view.alpha = 0.0
        },
                       completion: { finished in
                        transitionContext.completeTransition(true)
        })
    }
}
[3] ダイアログ用のビューコントローラーを実装する
ダイアログのビューを管理するビューコントローラーを作成します。
本記事のサンプルアプリでは、「プレゼンテーションスタイルの指定」や「UIViewControllerTransitioningDelegateのメソッド」などを実装します。
UIViewControllerTransitioningDelegateのメソッドでは、[1]や[2]で実装したクラスのインスタンスを提供します。
class CustomDialogViewController: UIViewController, UIViewControllerTransitioningDelegate {

    required init?(coder aDecoder: NSCoder) {
        super.init(coder: aDecoder)
        modalPresentationStyle = .custom
        transitioningDelegate = self
    }

    override func viewDidLoad() {
        super.viewDidLoad()
        view.backgroundColor = .clear
    }

    @IBAction func okButtonDidTap(_ sender: Any) {
        dismiss(animated: true)
    }

    @IBAction func transparentButtonDidTap(_ sender: Any) {
        dismiss(animated: true)
    }

    // MARK: - UIViewControllerTransitioningDelegate

    func presentationController(forPresented presented: UIViewController, presenting: UIViewController?, source: UIViewController) -> UIPresentationController? {
        return DialogPresentationController(presentedViewController: presented, presenting: presenting)
    }

    func animationController(forPresented presented: UIViewController, presenting: UIViewController, source: UIViewController) -> UIViewControllerAnimatedTransitioning? {
        return DialogAnimationController(forPresented: true)
    }

    func animationController(forDismissed dismissed: UIViewController) -> UIViewControllerAnimatedTransitioning? {
        return DialogAnimationController(forPresented: false)
    }
}
[4] ダイアログを表示する処理を実装する
最後に、ダイアログを表示する処理を実装します。
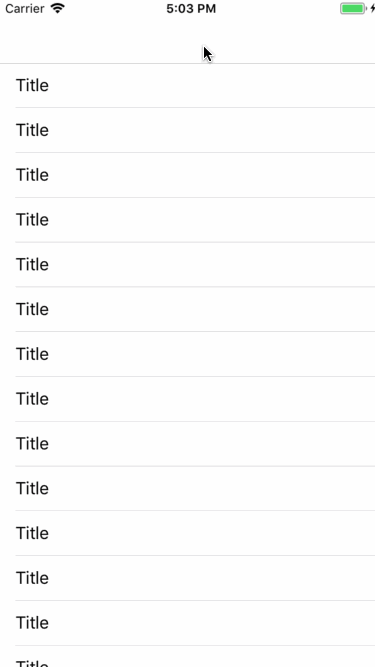
class ViewController: UITableViewController {

    // ...

    override func tableView(_ tableView: UITableView, didSelectRowAt indexPath: IndexPath) {
        tableView.deselectRow(at: indexPath, animated: true)
        let dialogViewController = storyboard?.instantiateViewController(withIdentifier: "CustomDialogViewController")
        present(dialogViewController!, animated: true)
    }
}
さいごに
本記事では、UIPresentationControllerを使用してカスタムダイアログを実装する方法を紹介しました。
サンプルコードは以下のリポジトリで公開してます。
参考資料
- UIPresentationController
- UIViewControllerAnimatedTransitioning
- UIViewControllerTransitioningDelegate
関連記事
遷移元のビューが透過で見えるモーダルビュー(UIPresentationControllerを使わないで、既存の画面遷移をいじる感じで実装してみました)