[iOS 7] [UI Dynamics] UIDynamicAnimatorとビヘイビアの使い方〜UICollisionBehavior〜
この記事は公開されてから1年以上経過しています。情報が古い可能性がありますので、ご注意ください。
前回のおさらい
前回の[iOS 7] [UI Dynamics] UIDynamicAnimatorとビヘイビアの使い方〜UIGravityBehavior〜では、重力に従ったアニメーションを行うためのクラスであるUIGravityBehaviorを解説しました。
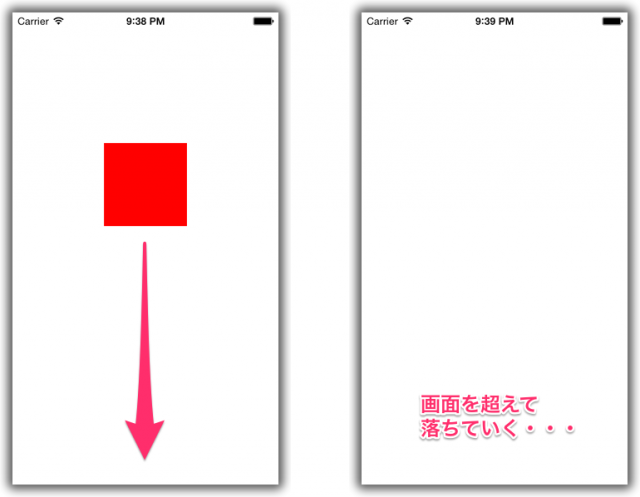
前回のサンプルコードの実行結果を見て分かる通り、UIGravityBehaviorだけでは、画面を超えて落下運動してしまいます。
前回のViewController.m
#import "ViewController.h"

@interface ViewController ()

@property (nonatomic) UIDynamicAnimator *animator;

@end

@implementation ViewController

- (void)viewDidLoad
{
    [super viewDidLoad];

    // アニメーションさせるビュー(赤い四角)
    UIView *myView = [[UIView alloc] initWithFrame:CGRectMake(110.0, 0.0, 100.0, 100.0)];
    myView.backgroundColor = [UIColor redColor];
    [self.view addSubview:myView];

    self.animator = [[UIDynamicAnimator alloc] initWithReferenceView:self.view];

    UIGravityBehavior *gravityBeahvior = [[UIGravityBehavior alloc] initWithItems:@[myView]];
    [self.animator addBehavior:gravityBeahvior];
}

@end
そもそも、物体の衝突判定をプログラムで書くのは非常に大変です。
そんな衝突判定を簡単に実装できるようにしてくれるのが、今回解説するUICollisionBehaviorです!
境界線を設定する
上のソースコードを実行して分かる通り、アニメーション対象のビューは画面外に消えてしまいます。実際には画面外に出ても尚、落下し続けています。これを防ぐには、境界線を定義する必要があります。境界線を画面(すなわちUIViewControllerのview)に設定することで、画面外に出ないようにしなければなりません。
そこで、ViewController.mを以下のように変更してみましょう。
#import "ViewController.h"

@interface ViewController ()

@property (nonatomic) UIDynamicAnimator *animator;

@end

@implementation ViewController

- (void)viewDidLoad
{
    [super viewDidLoad];

    // アニメーションさせるビュー(赤い四角)
    UIView *myView = [[UIView alloc] initWithFrame:CGRectMake(110.0, 0.0, 100.0, 100.0)];
    myView.backgroundColor = [UIColor redColor];
    [self.view addSubview:myView];

    self.animator = [[UIDynamicAnimator alloc] initWithReferenceView:self.view];

    UIGravityBehavior *gravityBeahvior = [[UIGravityBehavior alloc] initWithItems:@[myView]];
    [self.animator addBehavior:gravityBeahvior];

    UICollisionBehavior *collisionBehavior = [[UICollisionBehavior alloc] initWithItems:@[myView]];
    collisionBehavior.translatesReferenceBoundsIntoBoundary = YES;

    [self.animator addBehavior:collisionBehavior];
}

@end
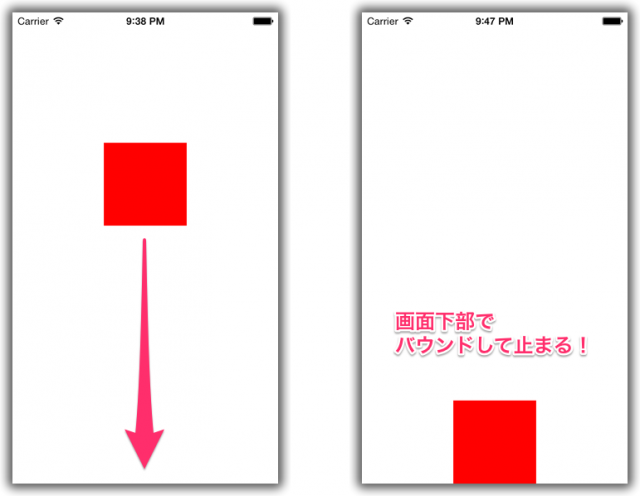
実行してみてください。実行すると、赤いビューは今まで通り落下しますが、画面下部で少しバウンドして止まるはずです。
たったこれだけです。たったこれだけで境界線を設定することができます!UICollisionBehaviorすげー!
ちなみに、26行目でtranslatesReferenceBoundsIntoBoundaryプロパティにYESを設定していますが、こうすることでUIDynamicAnimatorのインスタンスを生成する際に指定したアニメーションの基準となるビューを境界として使用することができます。ようするに、今回はself.viewを渡していますから、画面いっぱいが境界となります。
他のビューとの衝突判定
それでは落下させるビューの他に新たにビューを配置したらどうなるでしょうか?実際に置いてみましょう。
#import "ViewController.h"

@interface ViewController ()

@property (nonatomic) UIDynamicAnimator *animator;

@end

@implementation ViewController

- (void)viewDidLoad
{
    [super viewDidLoad];

    // アニメーションさせるビュー(赤い四角)
    UIView *myView = [[UIView alloc] initWithFrame:CGRectMake(110.0, 0.0, 100.0, 100.0)];
    myView.backgroundColor = [UIColor redColor];
    [self.view addSubview:myView];

    // 障害物となるビュー(青い棒)
    UIView *otherView = [[UIView alloc] initWithFrame:CGRectMake(0.0, 250.0, 320.0, 10.0)];
    otherView.backgroundColor = [UIColor blueColor];
    [self.view addSubview:otherView];

    self.animator = [[UIDynamicAnimator alloc] initWithReferenceView:self.view];

    UIGravityBehavior *gravityBeahvior = [[UIGravityBehavior alloc] initWithItems:@[myView]];
    [self.animator addBehavior:gravityBeahvior];

    UICollisionBehavior *collisionBehavior = [[UICollisionBehavior alloc] initWithItems:@[myView]];
    collisionBehavior.translatesReferenceBoundsIntoBoundary = YES;
    [self.animator addBehavior:collisionBehavior];
}

@end
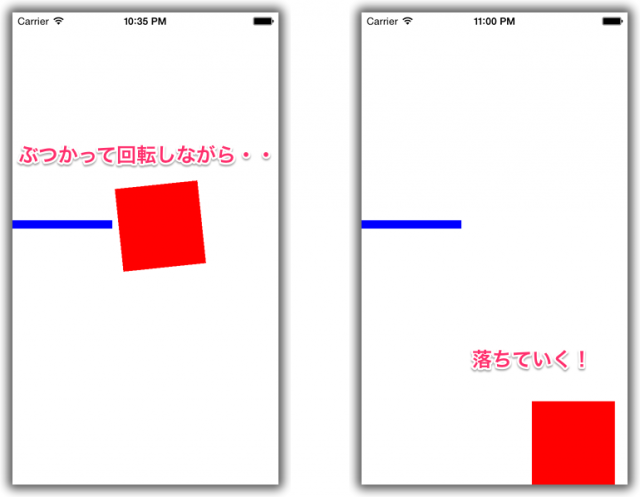
さて、実行してみると・・・
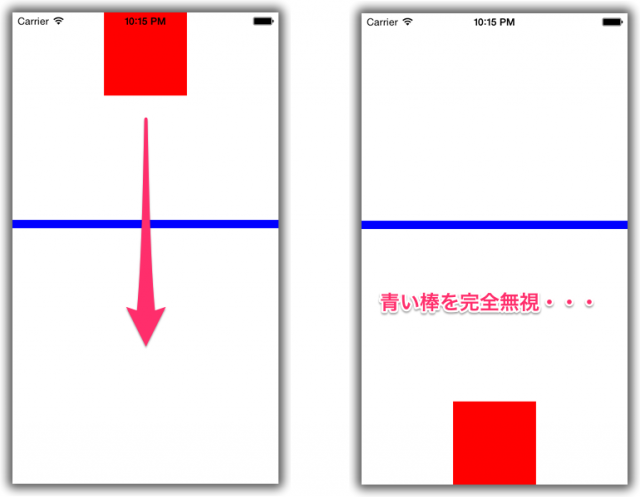
完全無視ですね(笑)ここで前回の記事で複数のビューを落下させていた箇所を思い出しましょう。
UICollisionBehaviorのイニシャライザでも引数にビューの配列を渡していますよね。そうです、これにotherViewも渡してあげればいいです。
#import "ViewController.h"

@interface ViewController ()

@property (nonatomic) UIDynamicAnimator *animator;

@end

@implementation ViewController

- (void)viewDidLoad
{
    [super viewDidLoad];

    // アニメーションさせるビュー(赤い四角)
    UIView *myView = [[UIView alloc] initWithFrame:CGRectMake(110.0, 0.0, 100.0, 100.0)];
    myView.backgroundColor = [UIColor redColor];
    [self.view addSubview:myView];

    // 障害物となるビュー(青い棒)
    UIView *otherView = [[UIView alloc] initWithFrame:CGRectMake(0.0, 250.0, 320.0, 10.0)];
    otherView.backgroundColor = [UIColor blueColor];
    [self.view addSubview:otherView];

    self.animator = [[UIDynamicAnimator alloc] initWithReferenceView:self.view];

    UIGravityBehavior *gravityBeahvior = [[UIGravityBehavior alloc] initWithItems:@[myView]];
    [self.animator addBehavior:gravityBeahvior];

    UICollisionBehavior *collisionBehavior = [[UICollisionBehavior alloc] initWithItems:@[myView, otherView]];
    collisionBehavior.translatesReferenceBoundsIntoBoundary = YES;
    [self.animator addBehavior:collisionBehavior];
}

@end
実行してみましょう。実行してみると、以下のように青い棒にぶつかり、一緒に落ちていきますね(何か思ってたのと違うけどw)。
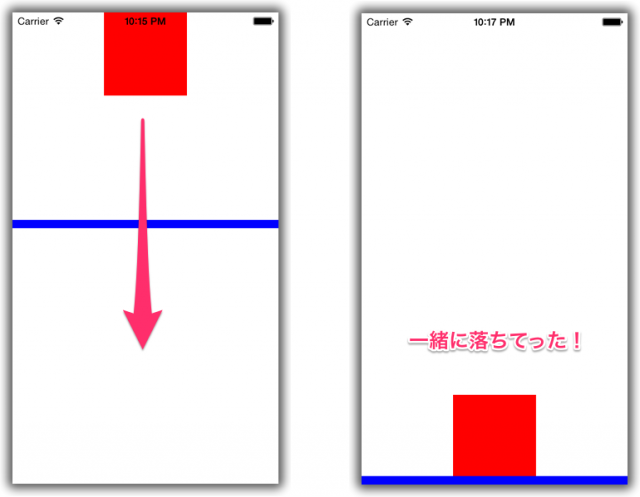
このように、他のビューとの衝突判定もひじょーーに簡単に実装できることが分かります。
境界を追加する
青い棒のビューの上に乗っかるようにするにはどうしたら良いでしょう?これも非常に簡単です。
この場合、青い棒のビュー(otherView)はアニメーションしないので、UICollisionBehaviorのイニシャライザに渡す必要はありません。
代わりに- addBoundaryWithIdentifier:fromPoint:toPoint:メソッドを使用して以下のように書きます。
#import "ViewController.h"

@interface ViewController ()

@property (nonatomic) UIDynamicAnimator *animator;

@end

@implementation ViewController

- (void)viewDidLoad
{
    [super viewDidLoad];

    // アニメーションさせるビュー(赤い四角)
    UIView *myView = [[UIView alloc] initWithFrame:CGRectMake(110.0, 0.0, 100.0, 100.0)];
    myView.backgroundColor = [UIColor redColor];
    [self.view addSubview:myView];

    // 障害物となるビュー(青い棒)
    UIView *otherView = [[UIView alloc] initWithFrame:CGRectMake(0.0, 250.0, 320.0, 10.0)];
    otherView.backgroundColor = [UIColor blueColor];
    [self.view addSubview:otherView];

    self.animator = [[UIDynamicAnimator alloc] initWithReferenceView:self.view];

    UIGravityBehavior *gravityBeahvior = [[UIGravityBehavior alloc] initWithItems:@[myView]];
    [self.animator addBehavior:gravityBeahvior];

    UICollisionBehavior *collisionBehavior = [[UICollisionBehavior alloc] initWithItems:@[myView]];
    collisionBehavior.translatesReferenceBoundsIntoBoundary = YES;

    // otherViewの矩形を境界線として追加する
    CGPoint toPoint = CGPointMake(otherView.frame.origin.x + otherView.frame.size.width, otherView.frame.origin.y);
    [collisionBehavior addBoundaryWithIdentifier:@"otherView"
                                       fromPoint:otherView.frame.origin
                                         toPoint:toPoint];

    [self.animator addBehavior:collisionBehavior];
}

@end
実行すると、青い棒のビューの上に赤いビューが乗っかって止まりますね。
このように、- addBoundaryWithIdentifier:fromPoint:toPoint:メソッドを用いることで目に見えない境界線を追加することができます。
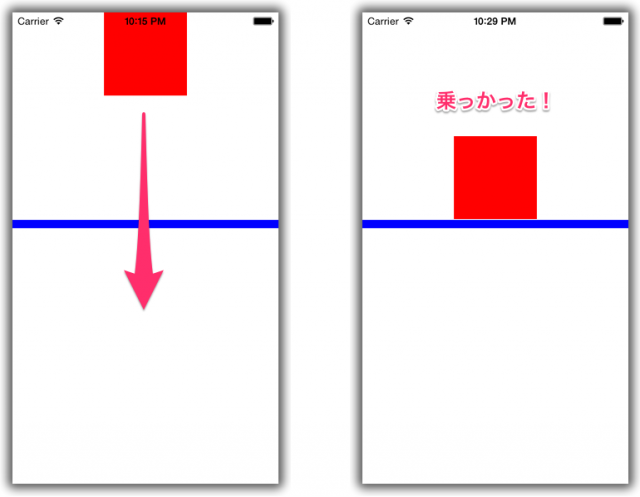
さらに今度はotherViewを短くしてみましょう。
    // 障害物となるビュー(青い棒)
    UIView *otherView = [[UIView alloc] initWithFrame:CGRectMake(0.0, 250.0, 120.0, 10.0)]; // 幅を120.0に変更
    otherView.backgroundColor = [UIColor blueColor];
    [self.view addSubview:otherView];
それっぽい動きしますよね。これを自力でプログラミングしろとなると、結構ぞっとしますよね。
でも、iOS 7からはたったこれだけのソースコードを書くだけで実現できてしまいます。
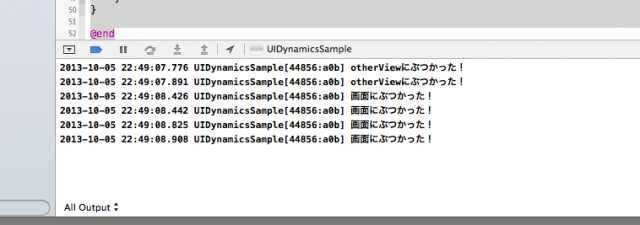
衝突が発生したことを検知する
衝突が発生したことを検知するには、UICollisionBehaviorDelegateプロトコルで定義されるデリゲートメソッドで実現できます。
ViewController.mを以下のように変更してみましょう。
#import "ViewController.h"

@interface ViewController () <UICollisionBehaviorDelegate>

@property (nonatomic) UIDynamicAnimator *animator;

@end

@implementation ViewController

- (void)viewDidLoad
{
    [super viewDidLoad];

    // アニメーションさせるビュー(赤い四角)
    UIView *myView = [[UIView alloc] initWithFrame:CGRectMake(110.0, 0.0, 100.0, 100.0)];
    myView.backgroundColor = [UIColor redColor];
    [self.view addSubview:myView];

    // 障害物となるビュー(青い棒)
    UIView *otherView = [[UIView alloc] initWithFrame:CGRectMake(0.0, 250.0, 120.0, 10.0)];
    otherView.backgroundColor = [UIColor blueColor];
    [self.view addSubview:otherView];

    self.animator = [[UIDynamicAnimator alloc] initWithReferenceView:self.view];

    UIGravityBehavior *gravityBeahvior = [[UIGravityBehavior alloc] initWithItems:@[myView]];
    [self.animator addBehavior:gravityBeahvior];

    UICollisionBehavior *collisionBehavior = [[UICollisionBehavior alloc] initWithItems:@[myView]];
    collisionBehavior.translatesReferenceBoundsIntoBoundary = YES;
    collisionBehavior.collisionDelegate = self;

    // otherViewの矩形を境界線として追加する
    CGPoint toPoint = CGPointMake(otherView.frame.origin.x + otherView.frame.size.width, otherView.frame.origin.y);
    [collisionBehavior addBoundaryWithIdentifier:@"otherView"
                                       fromPoint:otherView.frame.origin
                                         toPoint:toPoint];

    [self.animator addBehavior:collisionBehavior];
}

- (void)collisionBehavior:(UICollisionBehavior *)behavior beganContactForItem:(id<UIDynamicItem>)item withBoundaryIdentifier:(id<NSCopying>)identifier atPoint:(CGPoint)p
{
    if (identifier) {
        NSLog(@"%@にぶつかった!", identifier);
    } else {
        NSLog(@"画面にぶつかった!");
    }
}

@end
実行すると、以下のように衝突のタイミングでログが出るはずです。
まとめ
以上、UICollisionBehaviorについて簡単に解説しました。ご覧の通り、非常に強力な機能であることが分かります。
たぶんこの機能を知っているかどうかで工数に大きな差ができてしまいます。是非マスターしましょう!自分も頑張ってマスターします。
次回はUISnapBehaviorあたりを解説できればいいなーと思ってます!


