![[iOS 8] SpriteKit でミニゲームをつくる #8 ボタンみたいなスプライト](https://devio2023-media.developers.io/wp-content/uploads/2014/06/ios81.png)
[iOS 8] SpriteKit でミニゲームをつくる #8 ボタンみたいなスプライト
この記事は公開されてから1年以上経過しています。情報が古い可能性がありますので、ご注意ください。
ボタンみたいなスプライト
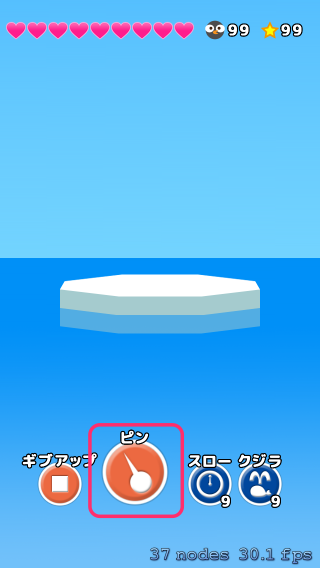
今回は「ピン」をタップしてハンドリングできるようにスプライトをボタンのようにしてみます。
下の画像の赤枠の部分です。
まず前提として、今回のゲームではマルチタップは使わないので、できないよう設定を変更しておきます。
GameViewController.swift 内の viewDidLoad メソッドに1行追加します。
    override func viewDidLoad() {
        super.viewDidLoad()

        let skView = self.view as SKView
        skView.multipleTouchEnabled = false

        .............
        .............

    }
では、本題のボタンですが、
SpriteKitでは、cocos2dxでいうところの「MenuButton」が見当たりませんでした。。。
さらに、Sprite Editor内でも配置できるボタンが見当たらなかったので、強引にスプライトをラップしてボタンのような振る舞いができるようにボタンぽいクラスを自作してみました。
こんな感じです。
import SpriteKit

class SpriteButton {

    weak var button:SKSpriteNode!
    var upTexture:SKTexture!
    var downTexture:SKTexture!
    var buttonDidTouchBlock: dispatch_block_t!

    init(button:SKSpriteNode!,
        atlas:SKTextureAtlas!,
        upTexture:String!,
        downTexture:String!,
        block: dispatch_block_t!)
    {
        self.button = button
        self.upTexture = atlas.textureNamed(upTexture)
        self.downTexture = atlas.textureNamed(downTexture)
        buttonDidTouchBlock = block

        button.texture = self.upTexture
    }

    deinit {
        button = nil
        upTexture = nil
        downTexture = nil
        buttonDidTouchBlock = nil
    }

    func buttonDidTouch(p: CGPoint) {
        if button.containsPoint(p) {
            if buttonDidTouchBlock != nil {
                buttonDidTouchBlock()
            }
        }
        changeUpTexture()
    }

    func checkAndChangeTexture(p: CGPoint) {
        if button.containsPoint(p) {
            changeDownTexture()
        } else {
            changeUpTexture()
        }
    }

    func changeUpTexture() {
        button.texture = upTexture
    }

    func changeDownTexture() {
        button.texture = downTexture
    }

    // MARK: - touch
    func touchesBegan(touch: UITouch!) {
        let location = touch.locationInNode(button.parent)
        checkAndChangeTexture(location)
    }

    func touchesMoved(touch: UITouch!) {
        let location = touch.locationInNode(button.parent)
        checkAndChangeTexture(location)
    }

    func touchesEnded(touch: UITouch!) {
        let location = touch.locationInNode(button.parent)
        buttonDidTouch(location)
    }

    func touchesCancelled(touch: UITouch!) {
        changeUpTexture()
    }

}
使い方はこんな感じ。
import SpriteKit

class GameScene: SKScene {

    var pinSpriteButton:SpriteButton!

    override func didMoveToView(view: SKView) {
        // レイヤーを取得する。
        let consoleLayer = childNodeWithName("consoleLayer")

        // テクスチャアトラスを取得する。
        let assetsAtlas = SKTextureAtlas(named: "assets")

        // ボタンを生成する。
        pinSpriteButton = SpriteButton(
            button: consoleLayer?.childNodeWithName("pinButton") as SKSpriteNode!,
            atlas: assetsAtlas,
            upTexture: "btn_pin_up",
            downTexture: "btn_pin_down",
            block: pinButtonDidTouch
        )
    }

    func pinButtonDidTouch() {
        println("pinButtonDidTouch")
    }

    override func willMoveFromView(view: SKView) {
        super.willMoveFromView(view)

        // 保持してると危なさそうなのでnilにしときます。
        pinSpriteButton = nil
    }

    override func touchesBegan(touches: NSSet, withEvent event: UIEvent) {
        pinSpriteButton.touchesBegan(touches.anyObject() as UITouch)
    }

    override func touchesMoved(touches: NSSet, withEvent event: UIEvent) {
        pinSpriteButton.touchesMoved(touches.anyObject() as UITouch)
    }

    override func touchesEnded(touches: NSSet, withEvent event: UIEvent) {
        pinSpriteButton.touchesEnded(touches.anyObject() as UITouch)
    }

    override func touchesCancelled(touches: NSSet, withEvent event: UIEvent) {
        pinSpriteButton.touchesCancelled(touches.anyObject() as UITouch)
    }
}
作っている途中に、「実は簡単にボタンを使う方法があるのでは、、、」とか、
「ストーリボードにUIButtonを置いて制御した方がよかったのでは、、、」とか、
いろいろ思いましたが、一応完成したので使ってみます。
でも、使い勝手が悪すぎる。。。
次回へつづく。ではでは。


