![[k8s]JupyterHubを使ったマルチユーザー環境をHelmを使って簡単にデプロイする](https://devio2023-media.developers.io/wp-content/uploads/2016/04/jupyter-sq-text.jpg)
[k8s]JupyterHubを使ったマルチユーザー環境をHelmを使って簡単にデプロイする
この記事は公開されてから1年以上経過しています。情報が古い可能性がありますので、ご注意ください。
コンニチハ、千葉です。
マルチユーザーで利用するための、Jupyter環境を検証しています。今回は、Kubernetes上にJupyterHub環境をデプロイしてみます。 JupyterHubとは、認証機能、Jupyter環境をユーザーごとに立ち上げしプロキシしてくれるような素敵な機能です。
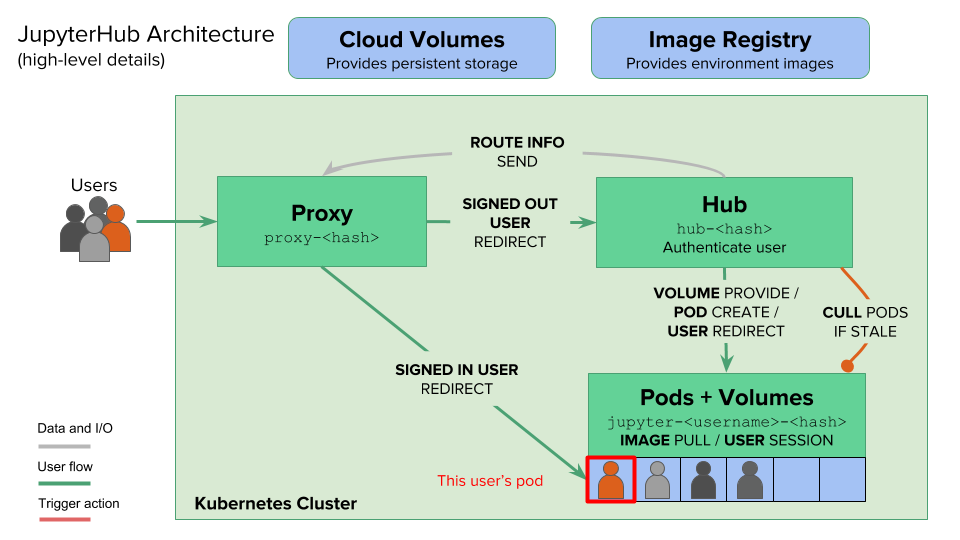 参考:https://zero-to-jupyterhub.readthedocs.io/en/latest/architecture.html
JupyterHubは、Kubernetes上に簡単にデプロイできる仕組みが用意されています。ハードルは全然高くないです。 デプロイ方法としては、Kubernetesでのパッケージ管理Helm(yum的存在)を使ってJupyterHubチャート(チャートはrpm的存在)をデプロイします。
やってみた
Jupyter Hubのセットアップ
Helmの設定
Helmをインストールします。Helmとは、Kubernetes用のパッケージマネージャーです。yumやapt-getのようなもので、今回はKubernetes環境にJyupter Hubをインストールするために利用します。
では、早速インストールしていきましょう。
$ curl https://raw.githubusercontent.com/kubernetes/helm/master/scripts/get | bash
  % Total    % Received % Xferd  Average Speed   Time    Time     Time  Current
                                 Dload  Upload   Total   Spent    Left  Speed
100  7001  100  7001    0     0  21231      0 --:--:-- --:--:-- --:--:-- 21279
Downloading https://get.helm.sh/helm-v2.14.1-darwin-amd64.tar.gz
Preparing to install helm and tiller into /usr/local/bin
Password:
helm installed into /usr/local/bin/helm
tiller installed into /usr/local/bin/tiller
Run 'helm init' to configure helm.
Helmを初期化します。まずは、Helm用のサービスアカウントを作成します。tillerはHelmにてパッケージをデプロイするためのコンポーネントです。
$ kubectl --namespace kube-system create serviceaccount tiller
serviceaccount "tiller" created
ServiceAccountのtillerに対して、Admin権限を付与します。
$ kubectl create clusterrolebinding tiller --clusterrole cluster-admin --serviceaccount=kube-system:tiller
clusterrolebinding.rbac.authorization.k8s.io "tiller" created
Helmを初期化します。
$ helm init --service-account tiller --wait
Creating /Users/chiba.jun/.helm
Creating /Users/chiba.jun/.helm/repository
Creating /Users/chiba.jun/.helm/repository/cache
Creating /Users/chiba.jun/.helm/repository/local
Creating /Users/chiba.jun/.helm/plugins
Creating /Users/chiba.jun/.helm/starters
Creating /Users/chiba.jun/.helm/cache/archive
Creating /Users/chiba.jun/.helm/repository/repositories.yaml
Adding stable repo with URL: https://kubernetes-charts.storage.googleapis.com
Adding local repo with URL: http://127.0.0.1:8879/charts
$HELM_HOME has been configured at /Users/chiba.jun/.helm.

Tiller (the Helm server-side component) has been installed into your Kubernetes Cluster.

Please note: by default, Tiller is deployed with an insecure 'allow unauthenticated users' policy.
To prevent this, run `helm init` with the --tiller-tls-verify flag.
For more information on securing your installation see: https://docs.helm.sh/using_helm/#securing-your-helm-installation
tillerのポートに外部からアクセスできないように変更します(tillerが悪用されないように)。具体的にはローカルホスト、つまりHelmからのアクセスのみ受け付けるように変更します。
$ kubectl patch deployment tiller-deploy --namespace=kube-system --type=json --patch='[{"op": "add", "path": "/spec/template/spec/containers/0/command", "value": ["/tiller", "--listen=localhost:44134"]}]'
deployment.extensions "tiller-deploy" patched
これでインストール完了です。Helmのバージョンを確認してみます。
$ helm version
Client: &version.Version{SemVer:"v2.14.1", GitCommit:"5270352a09c7e8b6e8c9593002a73535276507c0", GitTreeState:"clean"}
Server: &version.Version{SemVer:"v2.14.1", GitCommit:"5270352a09c7e8b6e8c9593002a73535276507c0", GitTreeState:"clean"}
参考:https://zero-to-jupyterhub.readthedocs.io/en/latest/setup-helm.html
JupyterHubのインストール
まずは、config.yamlを準備します。Helmチャートのためのセキュリティトークンを生成し、ファイルを作成します。
$ openssl rand -hex 32
生成された文字列を元に、config.yamlを作成します。
proxy:
  secretToken: "<RANDOM_HEX>"
Helmリポジトリにjupyterhubを追加します。
$ helm repo add jupyterhub https://jupyterhub.github.io/helm-chart/
"jupyterhub" has been added to your repositories
$ helm repo update
Hang tight while we grab the latest from your chart repositories...
...Skip local chart repository
...Successfully got an update from the "jupyterhub" chart repository
...Successfully got an update from the "stable" chart repository
Update Complete.
jhubチャートをインストールします。(Helmがyumのようなリポジトリ管理ツールとすると、チャートはrpmなどのパッケージに相当するものです)
$ RELEASE=jhub
$ NAMESPACE=jhub

$ helm upgrade --install $RELEASE jupyterhub/jupyterhub \
  --namespace $NAMESPACE  \
  --version=0.8.2 \
  --values config.yaml
podが起動しているか確認します。
$ kubectl get pod --namespace jhub
NAME                     READY   STATUS    RESTARTS   AGE
hub-cdf4b465b-5jvbg      1/1     Running   2          85s
proxy-5b9fcd5dcf-kg8qd   1/1     Running   0          85s
JupyterHubにアクセスするためのIPアドレスを確認します。
$ kubectl get service --namespace jhub
NAME           TYPE           CLUSTER-IP       EXTERNAL-IP   PORT(S)                      AGE
hub            ClusterIP      10.101.208.220   <none>        8081/TCP                     2m22s
proxy-api      ClusterIP      10.109.132.225   <none>        8001/TCP                     2m21s
proxy-public   LoadBalancer   10.103.123.195   localhost     80:32617/TCP,443:32702/TCP   2m21s
proxy-publicのIPに対して、ブラウザから接続してみます。EXTERNAL-IPがlocalhostになってるので、localhostでアクセしてみます。

アクセスできました!デフォルトだとOSユーザーでログインできるようになっているので、OSにされているユーザーでログインしてみました。


JupyterHubでは、ユーザーごとにコンテナが起動しマルチユーザー環境を簡単に構築できます。ログインしたので、コンテナが起動されているはずです。コマンドで確認してみます。
$ kubectl get pod --namespace jhub
NAME                     READY   STATUS    RESTARTS   AGE
hub-cdf4b465b-5jvbg      1/1     Running   4          19m
jupyter-chiba-2ejun      1/1     Running   0          64s
proxy-5b9fcd5dcf-kg8qd   1/1     Running   1          19m
ログインしたユーザー用にコンテナ(jupyter-chiba-2ejun)が起動されていますね!
参考:https://zero-to-jupyterhub.readthedocs.io/en/latest/setup-jupyterhub.html
作った環境の削除
テストで使った環境は削除しましょう。ここからは削除方法なのでスキップしても構いません。
$ RELEASE=jhub
$ NAMESPACE=jhub

$ helm delete $RELEASE --purge
release "jhub" deleted

$ kubectl delete namespace $NAMESPACE
namespace "jhub" deleted
最後に
Helmを使って、Kubernetes環境にJupyterHubをデプロイしてみました。結構簡単にデプロイできました。これで、マルチユーザーでJupyterを利用できそうです。 あとは、Ldap認証やユーザー専用の永続ストレージも欲しくなりそうなので、そのあたりを検証してみたいと思います。