![[Update] การใช้งาน IoT Core](https://images.ctfassets.net/ct0aopd36mqt/wp-thumbnail-06e039aecab973a68134b7db69ff9ffd/bd37c8691e5a1f5e3b239f6e8a3888af/aws-iot-core?w=3840&fm=webp)
[Update] การใช้งาน IoT Core
この記事は公開されてから1年以上経過しています。情報が古い可能性がありますので、ご注意ください。
สวัสดีครับ POP จากบริษัท Classmethod (Thailand) ครับ
ครั้งนี้จะมาเขียนบทความอัปเดตเกี่ยวกับ IoT Core ครับ
ข้อกำหนดเบื้องต้น
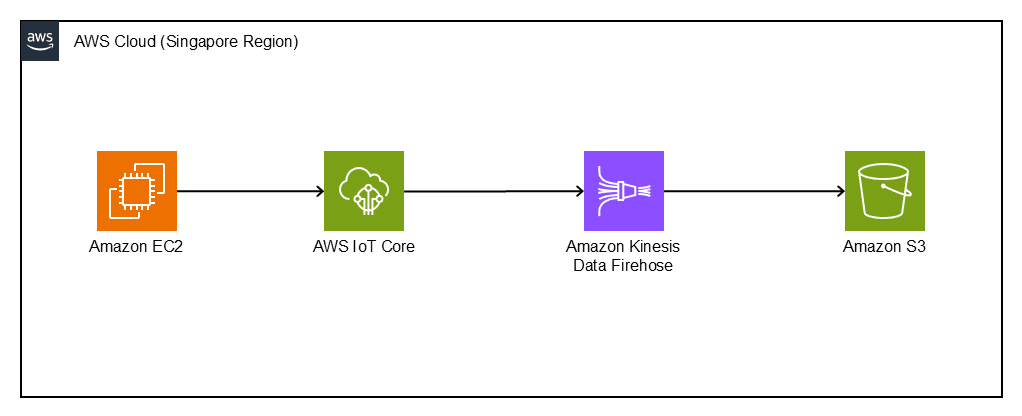
ครั้งนี้จะมาทดลองใช้งานบริการ IoT Core โดยทั่วไปเราจะมีการเชื่อมต่อกับอุปกรณ์ IoT ภายนอกต่างๆ แต่ในครั้งนี้เราจะจำลองอุปกรณ์โดยใช้ EC2 แทนครับ
หากต้องการศึกษาเกี่ยวกับ IoT Core เพิ่มเติม สามารถอ่านได้ที่ลิงก์ด้านล่างนี้
แผนภาพโครงสร้าง
สร้าง IoT Core
ขั้นตอนนี้จะดำเนินการใน Singapore Region
เข้ามาที่หน้าจอ AWS IoT แล้วดำเนินการดังนี้
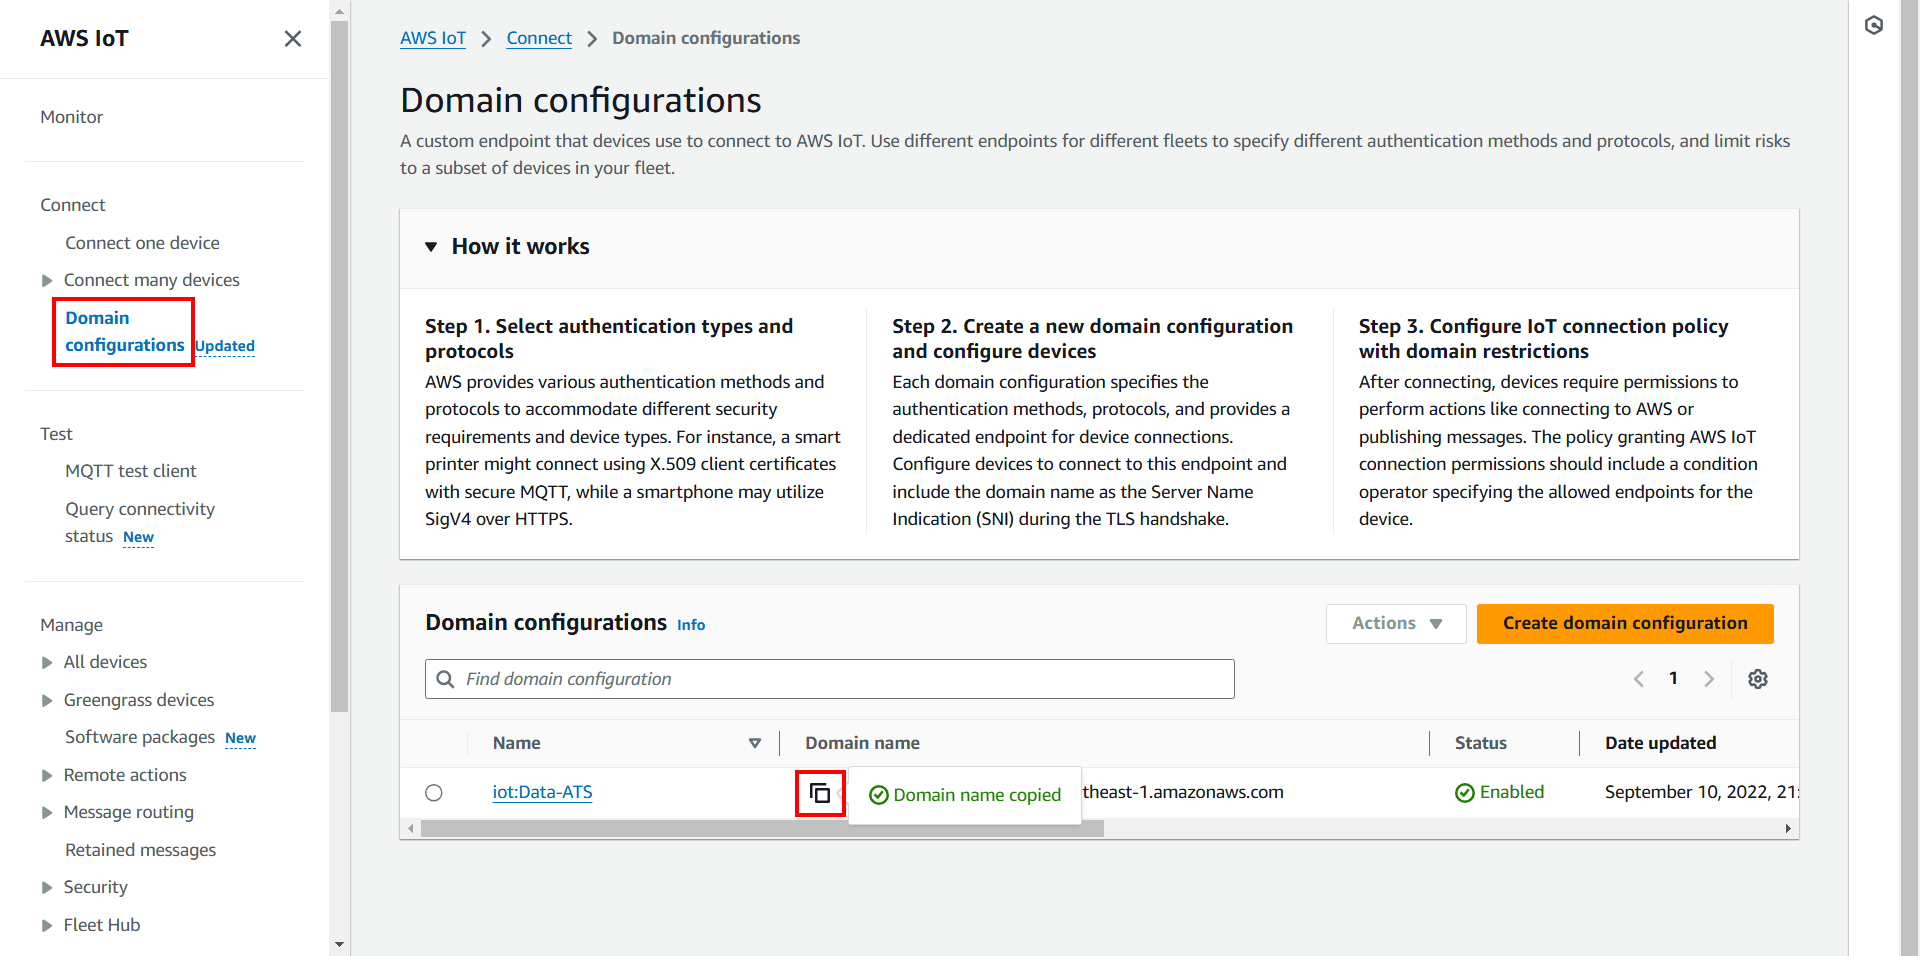
คัดลอก Domain name ของ IoT
คลิก Domain configurations จากเมนูด้านซ้าย แล้วคลิกไอคอนคัดลอกในช่อง Domain name ที่มีการตั้งค่าไว้แล้วในหัวข้อ Domain configurations ครั้งนี้คือ iot:Data-ATS
[your-endpoint]-ats.iot.[region].amazonaws.com
แล้วบันทึกเตรียมไว้ที่ใดที่นึง เช่น Notepad
ตั้งค่า Log
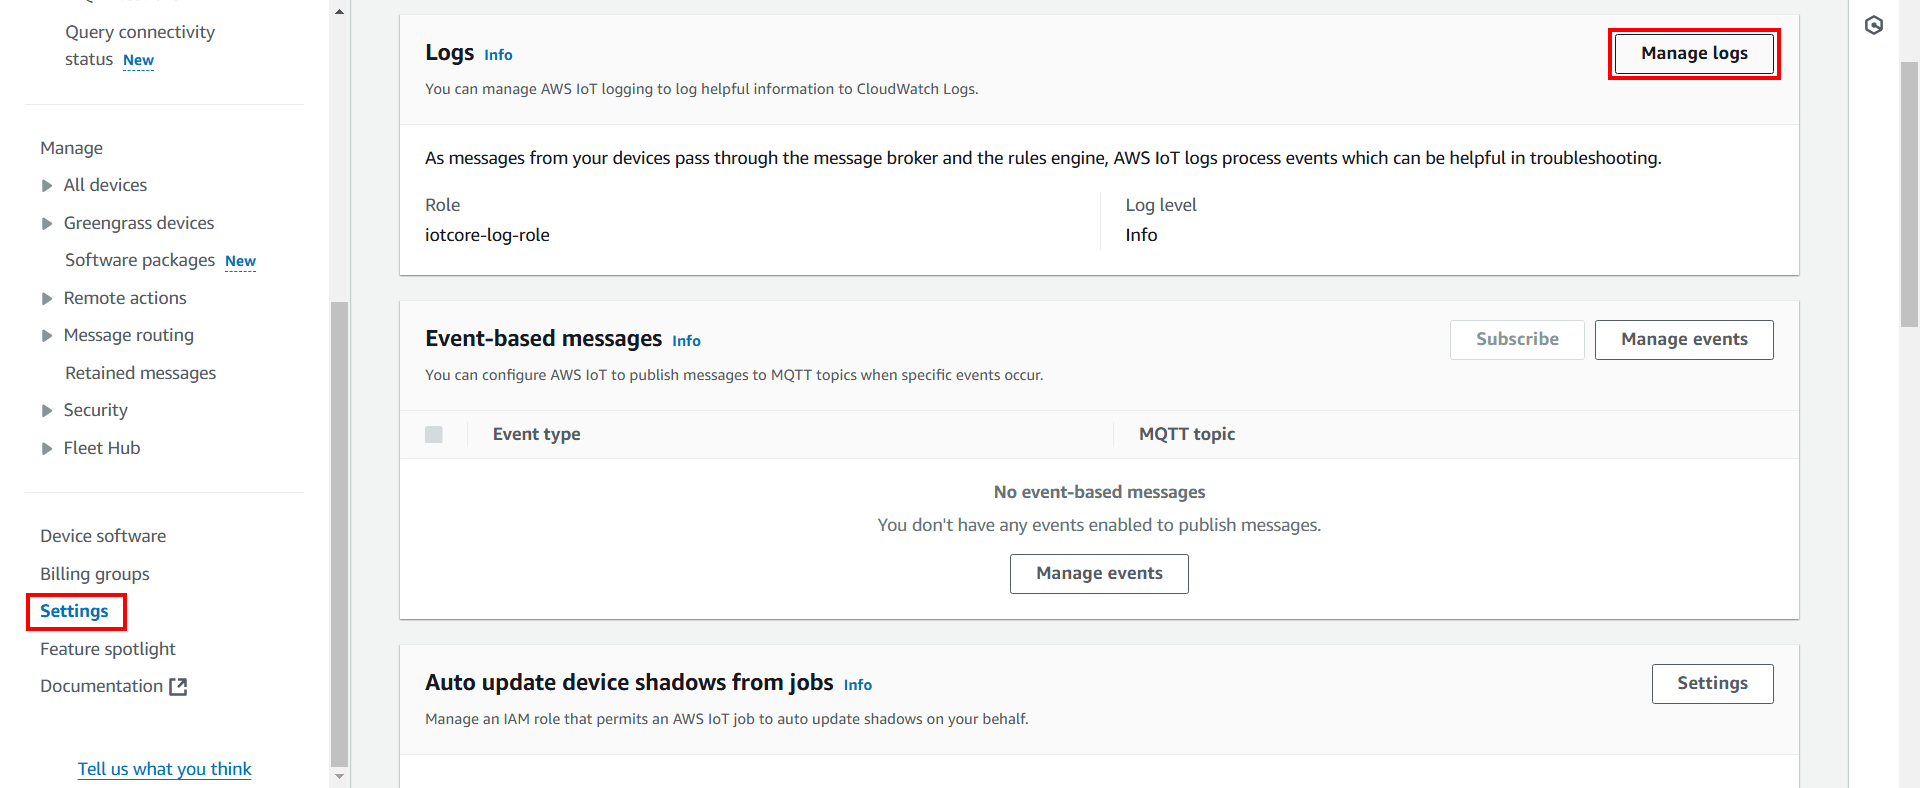
คลิก Settings จากเมนูด้านซ้าย แล้วคลิก Manage logs
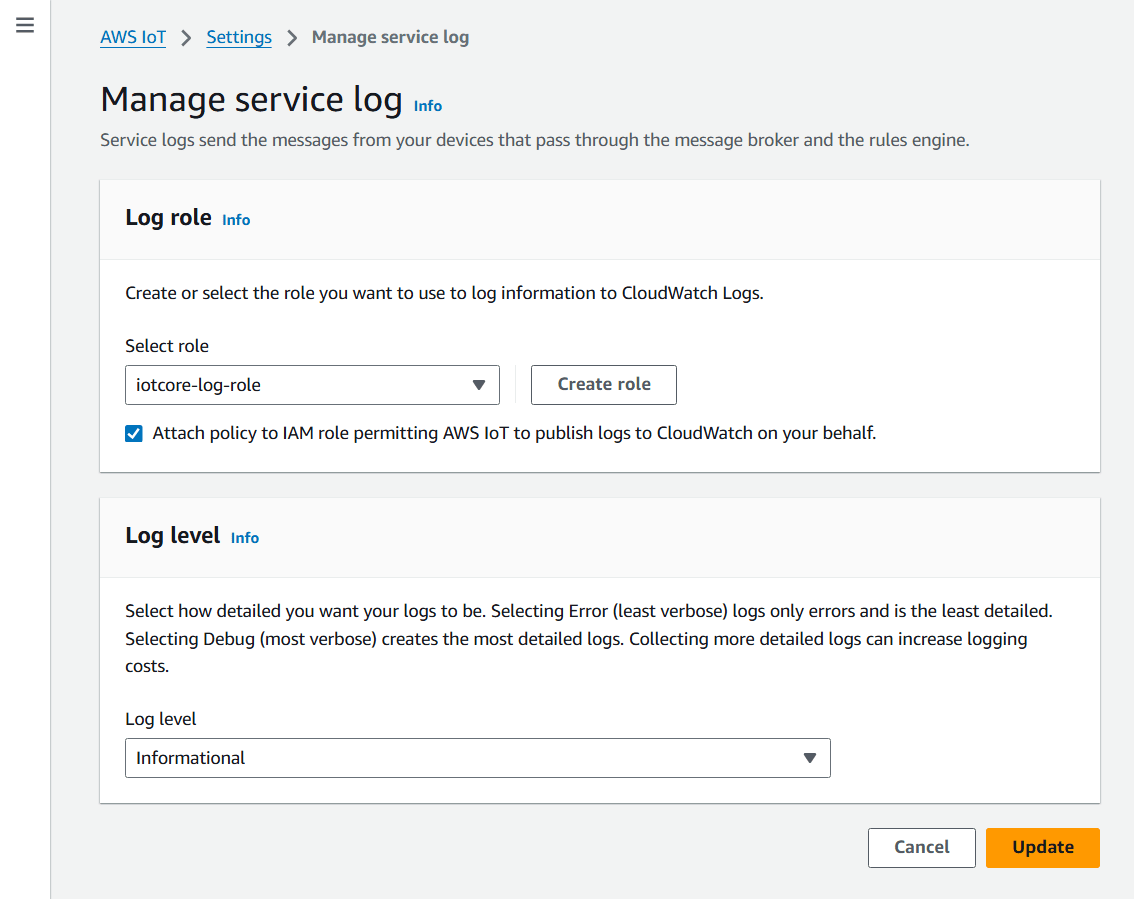
หากยังไม่มี IAM Role สำหรับ IoT Core ให้คลิก Create role
แล้วจะมีหน้าจอ Dialog แสดงขึ้นมา ให้ป้อน Role name ที่ต้องการ เช่น "iotcore-log-role" แล้วคลิก Create
Role ก็จะถูกสร้างโดยอัตโนมัติตามรูปภาพด้านล่างนี้ แล้วคลิก Update ด้านล่างสุด
เมื่อเข้ามาหน้าจอ IAM Role ตามชื่อที่ถูกสร้างขึ้น เราสามารถตรวจสอบ Policy และ Trust relationships ได้ตามด้านล่างนี้
Policy name: aws-iot-role-logging_xxxxxxxxxxxxx
{
    "Version": "2012-10-17",
    "Statement": [
        {
            "Effect": "Allow",
            "Action": [
                "logs:CreateLogGroup",
                "logs:CreateLogStream",
                "logs:PutLogEvents",
                "logs:PutMetricFilter",
                "logs:PutRetentionPolicy"
            ],
            "Resource": [
                "arn:aws:logs:*:[aws-account-id]:log-group:*:log-stream:*"
            ]
        }
    ]
}
Trust relationships
{
    "Version": "2012-10-17",
    "Statement": [
        {
            "Effect": "Allow",
            "Principal": {
                "Service": "iot.amazonaws.com"
            },
            "Action": "sts:AssumeRole"
        }
    ]
}
สร้าง AWS IoT policies
เลือก Security > Policies จากเมนูด้านซ้าย แล้วคลิก Create policy
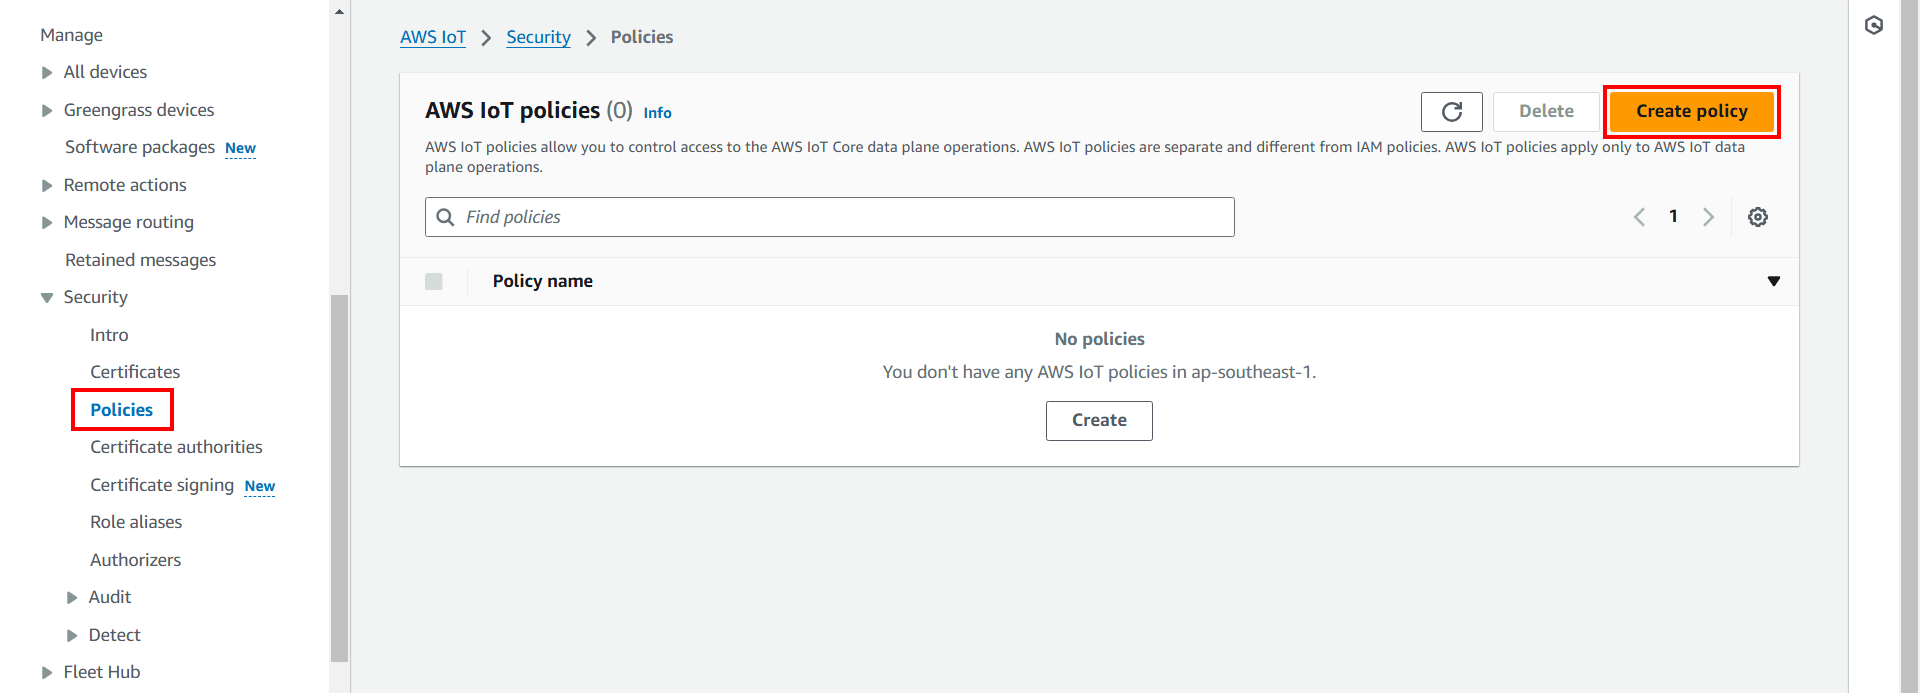
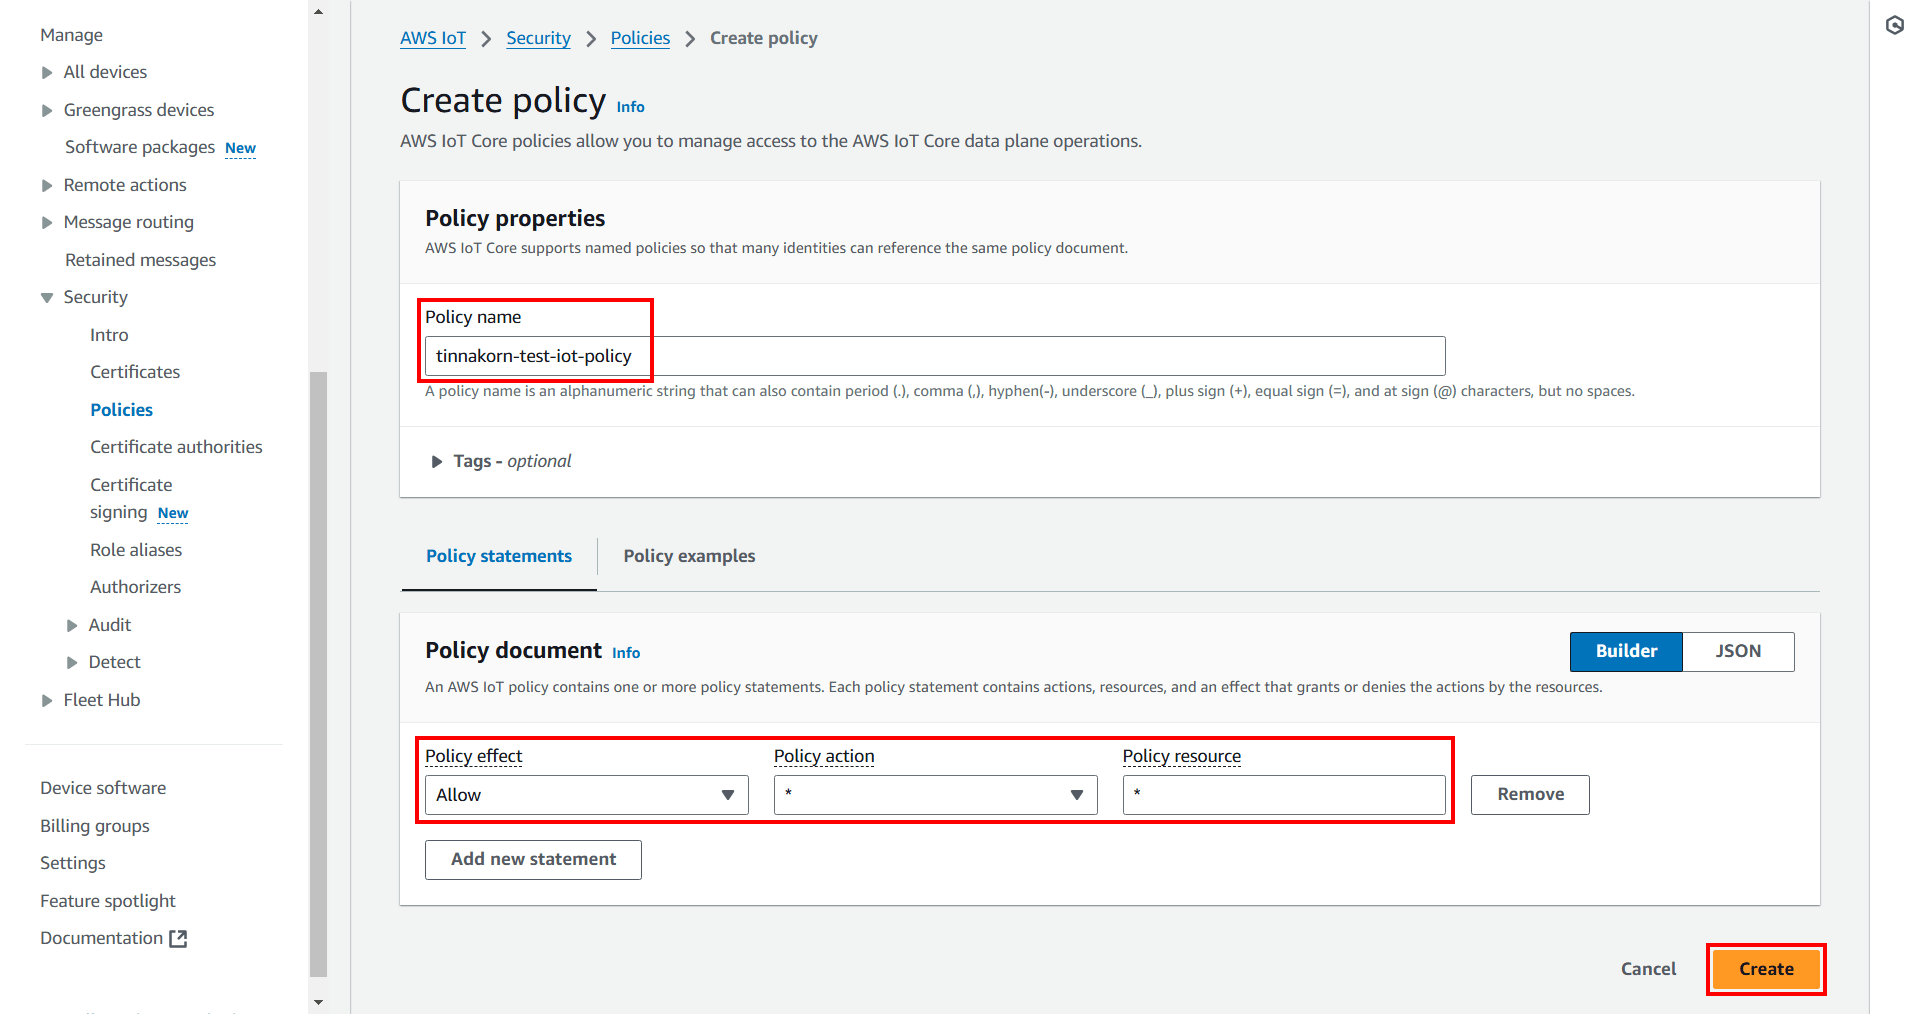
แล้วจะตั้งค่าหน้าจอ Create policy ดังนี้
Policy properties
・Policy name: tinnakorn-test-iot-policy
แท็บ Policy statements
Policy document
・Policy effect: Allow
・Policy action: *
・Policy resource: *
คลิก Create ด้านล่างสุด
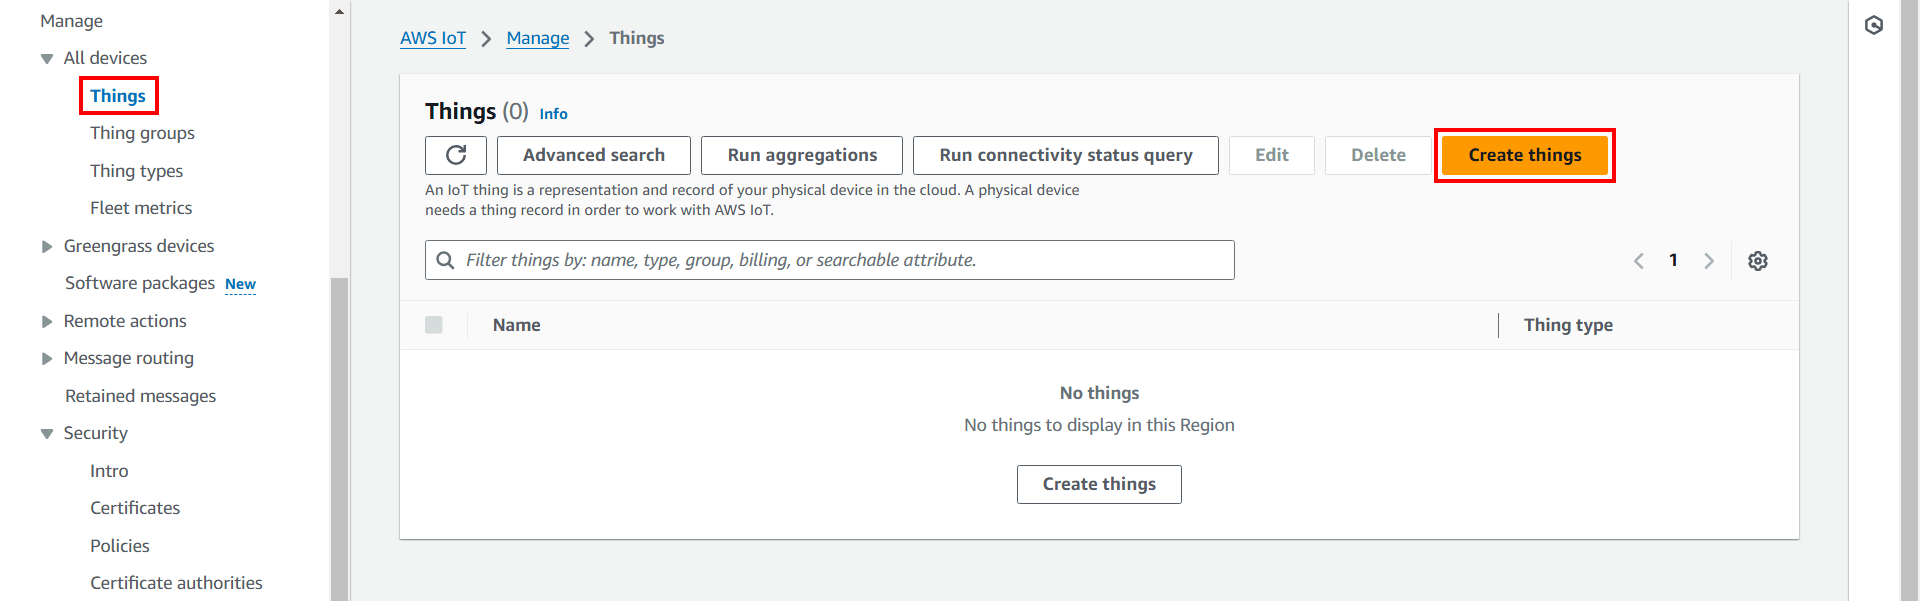
สร้าง Things
เลือก All devices > Things จากเมนูด้านซ้าย แล้วคลิก Create things
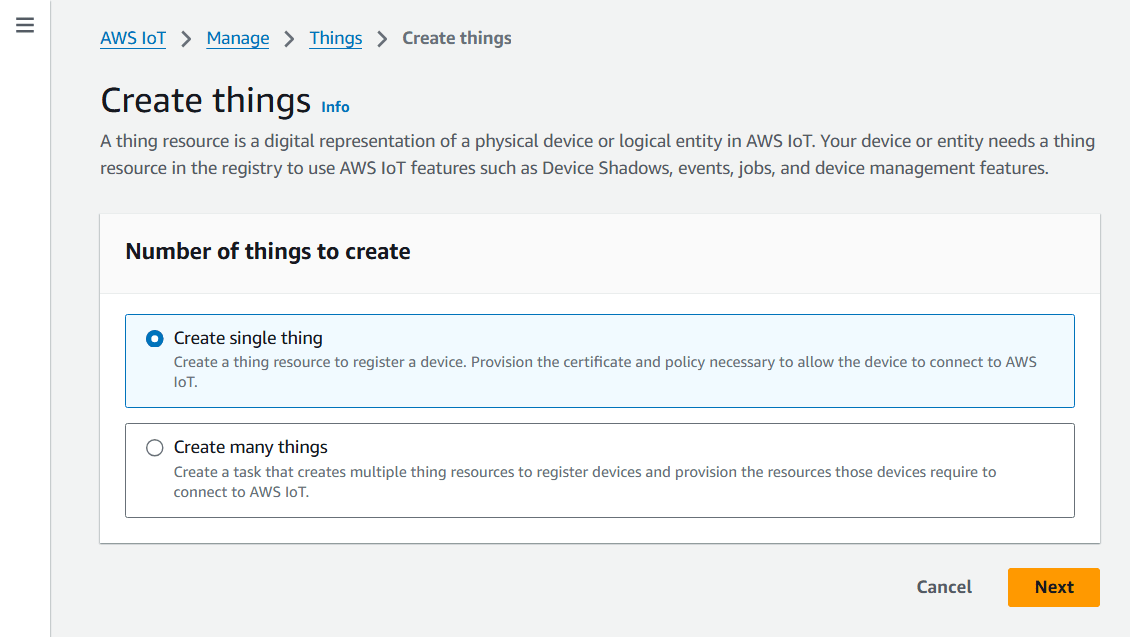
แล้วจะตั้งค่าหน้าจอ Create things ดังนี้
Number of things to create
・เลือก Create single thing
・คลิก Next
แล้วจะตั้งค่าในแต่ละ Step ดังนี้
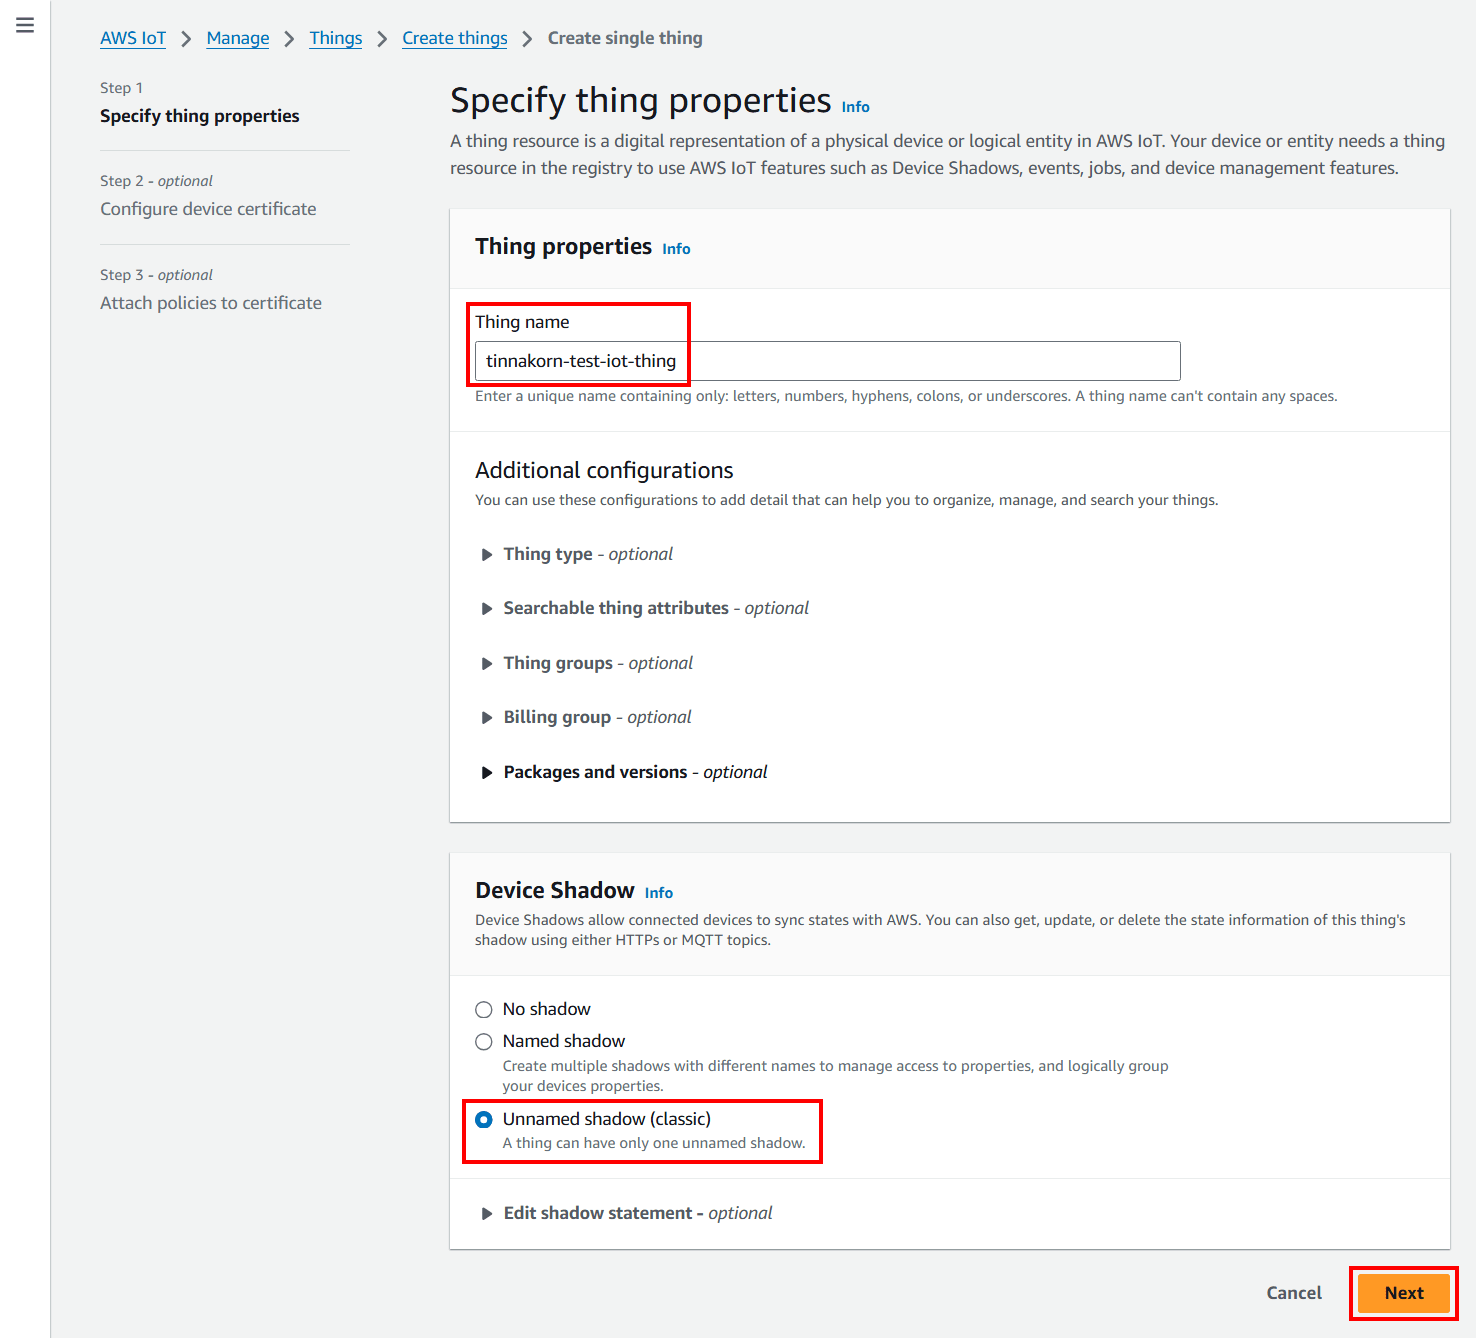
Step 1
Specify thing properties
Thing properties
・Thing name: tinnakorn-test-iot-thing
Device Shadow
・เลือก Unnamed shadow (classic)
・คลิก Next
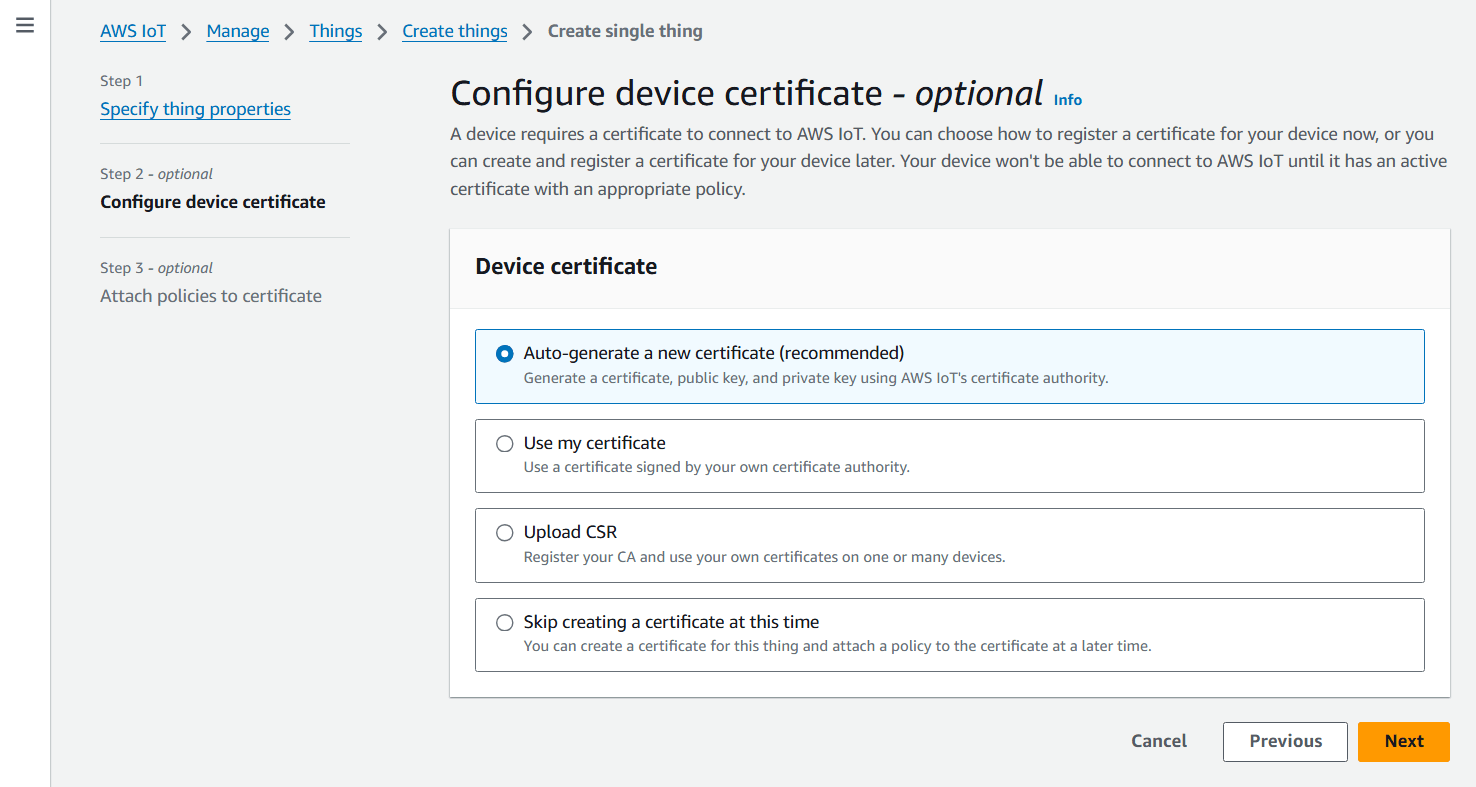
Step 2 - optional
Configure device certificate
Device certificate
・เลือก Auto-generate a new certificate (recommended)
・คลิก Next
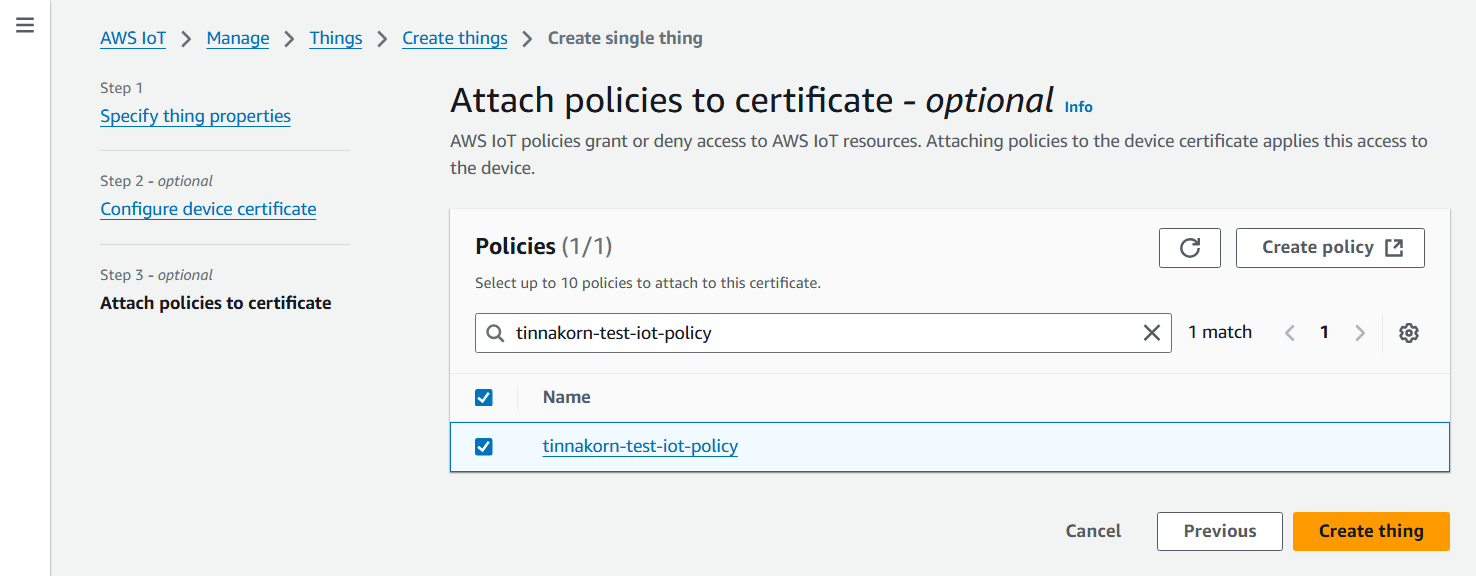
Step 3 - optional
Attach policies to certificate
・Policies: ค้นหาและติ๊ก ✅️ Policy ที่สร้างเตรียมไว้ (ครั้งนี้คือ tinnakorn-test-iot-policy)
・คลิก Create thing
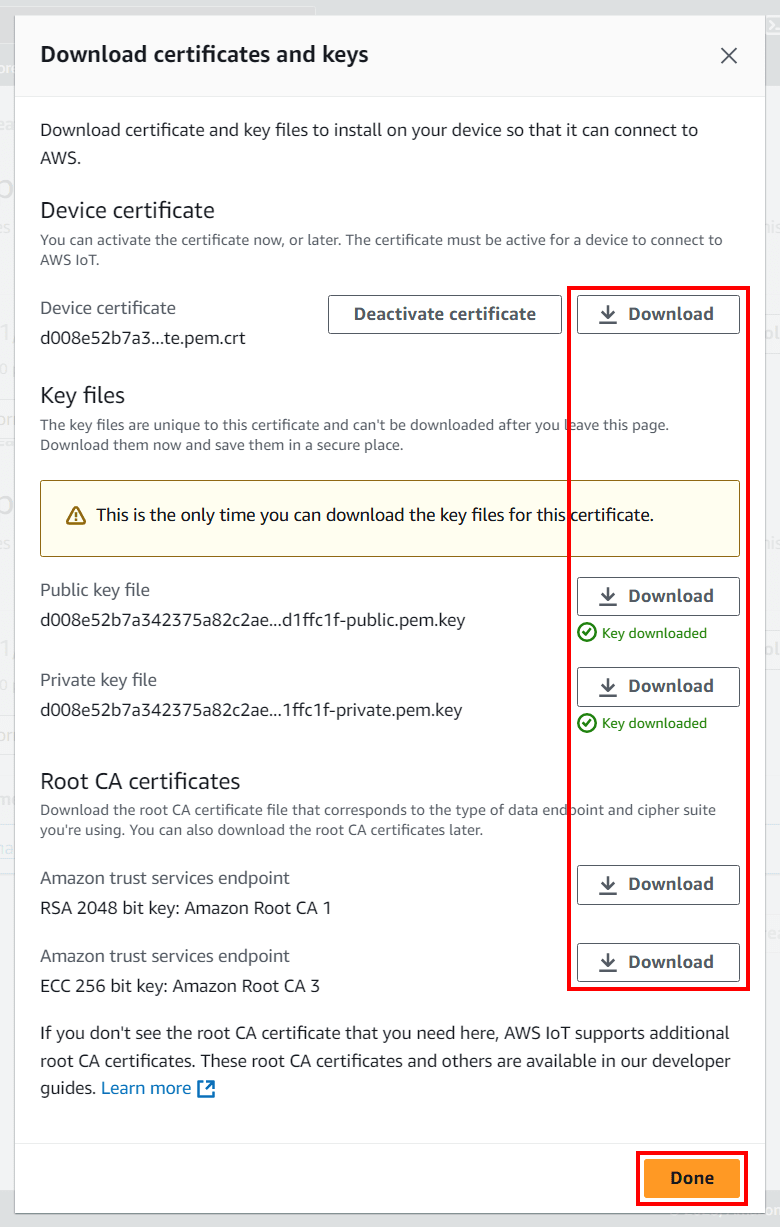
แล้วระบบจะสร้าง Certificate ทั้งหมด 5 อัน ให้ดาวน์โหลดไฟล์ทั้งหมด แล้ว คลิก Done
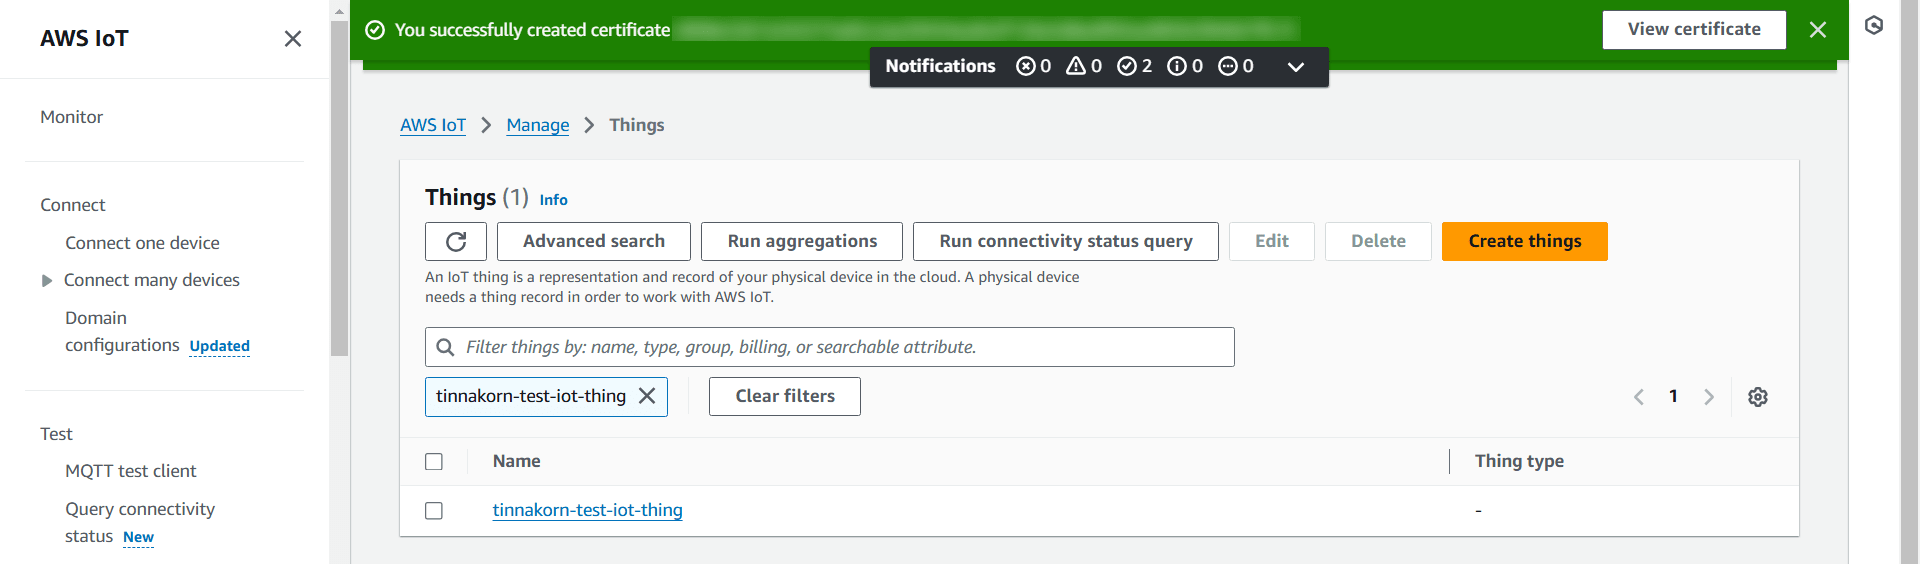
เพียงเท่านี้ก็จะได้ Things ตามนี้
สร้าง EC2 Instance
ขั้นตอนนี้จะสร้าง EC2 Instance สำหรับใช้เชื่อมต่อกับ Firehose
ดูตัวอย่างได้ที่ลิงก์ด้านล่างนี้
ตัวอย่างการสร้าง EC2 Instance ในบทความนี้
Region:
Thailand※Launch instances
Name and tags
・Name:tinnakorn-test-ec2(ป้อนชื่อตามต้องการ)Application and OS Images (Amazon Machine Image)
・Amazon Machine Image (AMI):Amazon Linux 2023 AMIInstance type
・Instance type:t2.micro(เลือกสเปคตามต้องการ)Key pair (login)
・Key pair name - required:tinnakorn-test-ec2Network settings
Firewall (security groups)
・Security group name - required:tinnakorn-test-ec2(ตั้งชื่อที่ต้องการ)
・Description - required:tinnakorn-test-ec2(ป้อนตามต้องการ)
Inbound security groups rules
▼ Security group rule 1 (TCP, 22, xx.xx.xx.xx/32)
Type:ssh ▼| Source type:My IP ▼| Source:xx.xx.xx.xx/32 ✕Configure storage
1x:8GiBgp3Root volume (Default)
การเชื่อมต่อกับ EC2 Instance ด้วย PuTTY
ดูตัวอย่างได้ที่ลิงก์ด้านล่างนี้
ดูเฉพาะหัวข้อนี้: การเชื่อมต่อกับ EC2 Instance ด้วย PuTTY
เตรียม EC2 Instance สำหรับ IoT Core
รันคำสั่งนี้เพื่อเปลี่ยนไปเป็นผู้ใช้ ec2-user
sudo su - ec2-user
แล้วรันคำสั่ง Update server ให้เป็นปัจจุบันเสมอ
sudo yum update -y
ตรวจสอบเวอร์ชัน Python
ต่อไปตรวจสอบเวอร์ชัน Python ว่าตอนนี้มีอยู่ในเซิร์ฟเวอร์หรือไม่
python3 --version
ติดตั้ง pip สำหรับ Python 3
รันคำสั่งติดตั้ง pip สำหรับ Python 3 บนระบบปฏิบัติการที่ใช้ YUM (เช่น CentOS 7) หรือ DNF (เช่น Amazon Linux 2023 (AL2023))
sudo yum install -y python3-pip
ติดตั้ง AWS IoT SDK สำหรับ Python (awsiotsdk)
รันคำสั่งติดตั้ง AWS IoT SDK สำหรับ Python (awsiotsdk) โดยใช้ pip3 ที่เป็นตัวจัดการแพ็กเกจของ Python 3
pip3 install --user awsiotsdk
ดาวน์โหลดไฟล์จำลองอุปกรณ์ IoT
รันคำสั่งดาวน์โหลดไฟล์ iot_dummy_device1.py จาก GitHub Repository ลงใน EC2 Instance
wget https://raw.githubusercontent.com/classmethod-thailand/cmth_seminar/develop/iot_core_webinar/iot_dummy_device1.py
อัปโหลดไฟล์ Device certificate และ Key files ไปยัง EC2 Instance
ครั้งนี้จะอัปโหลดไฟล์ Device certificate(1 ไฟล์), Key files(2 ไฟล์) และ Root CA certificates(2 ไฟล์) รวมทั้งหมด 5 ไฟล์ที่ดาวน์โหลดมาหลังจากสร้าง Things จาก Local PC ไปยัง EC2 Instance ด้วยโปรแกรม WinSCP
Path ของแต่ละฝั่ง
สีแดง = ฝั่ง Local PC (เลือก Path ที่บันทึกไฟล์ทั้งหมด 5 ไฟล์)
สีเขียว = ฝั่ง Server (ค่าเริ่มต้นจะเป็นec2-user)

ดูตัวอย่างได้ที่ลิงก์ด้านล่างนี้
ตั้งค่าไฟล์จำลองอุปกรณ์ IoT
รันคำสั่งแก้ไขไฟล์ (vi + file_name)
vi iot_dummy_device1.py
แล้วแก้ไขไฟล์ดังนี้
・กดปุ่ม i ที่แป้นพิมพ์ ให้ "iot_dummy_device1.py" 59L, 1958B ที่อยู่ด้านล่างซ้ายเปลี่ยนเป็น --INSERT--
・แล้วแก้ไขไฟล์โดยเปลี่ยน [ENDPOINT, CLIENT_ID, PATH_TO_CERTIFICATE, PATH_TO_PRIVATE_KEY] ให้เป็นข้อมูลของเรา เช่น
» ENDPOINT = Domain name ที่คัดลอกเตรียมไว้ในตอนแรก
» CLIENT_ID = ชื่อ Thing ที่สร้างตรียมไว้ในตอนแรก (ครั้งนี้คือ tinnakorn-test-iot-thing)
» PATH_TO_CERTIFICATE = ชื่อไฟล์ Device certificate ที่ลงท้ายด้วยนามสกุล certificate.pem.crt
» PATH_TO_PRIVATE_KEY = ชื่อไฟล์ Key files ที่ลงท้ายด้วยนามสกุล private.pem.key
» PATH_TO_AMAZON_ROOT_CA_1 = ชื่อไฟล์ Root CA certificates ที่ลงท้ายด้วยนามสกุล .pem
・แล้วกดปุ่ม Esc ให้คำว่า -- INSERT -- หายไป และพิมพ์ :x + Enter เพื่อบันทึกและออกจากไฟล์
Output (Example)
from awscrt import io, mqtt, auth, http
from awsiot import mqtt_connection_builder
import json
import datetime
import random
import math

# Setting
ENDPOINT = "xxxxxxxxxxxxx-ats.iot.ap-southeast-1.amazonaws.com"
CLIENT_ID = "tinnakorn-test-iot-thing"
PATH_TO_CERTIFICATE = "d008e52b7a342375a82c2ae3943xxxxxxxxxxxxxxxxxxxxxxxxxxxxxxxxxxxxx-certificate.pem.crt"
PATH_TO_PRIVATE_KEY = "d008e52b7a342375a82c2ae3943xxxxxxxxxxxxxxxxxxxxxxxxxxxxxxxxxxxxx-private.pem.key"
PATH_TO_AMAZON_ROOT_CA_1 = "AmazonRootCA1.pem"
TOPIC = "test/" + CLIENT_ID

# Initialize resources
event_loop_group = io.EventLoopGroup(1)
host_resolver = io.DefaultHostResolver(event_loop_group)
client_bootstrap = io.ClientBootstrap(event_loop_group, host_resolver)
mqtt_connection = mqtt_connection_builder.mtls_from_path(
    endpoint         = ENDPOINT,
    cert_filepath    = PATH_TO_CERTIFICATE,
    pri_key_filepath = PATH_TO_PRIVATE_KEY,
    client_bootstrap = client_bootstrap,
    ca_filepath      = PATH_TO_AMAZON_ROOT_CA_1,
    client_id        = CLIENT_ID,
    clean_session    = False,
    keep_alive_secs  = 6
)
print("Connecting to {} with client ID '{}'...".format(
    ENDPOINT, CLIENT_ID))
# Make the connect() call
connect_future = mqtt_connection.connect()
# Future.result() waits until a result is available

"ไม่ได้แสดงส่วนล่าง"
:x
รันสคริปต์ Python เพื่อเชื่อมต่อ EC2 กับ AWS IoT Core และส่งข้อมูลจำลอง
python3 iot_dummy_device1.py
หากสามารถเชื่อมต่อกันได้จะแสดงหน้าจอแบบนี้
[ec2-user@ip-xx-xx-xx-xx ~]$ python3 iot_dummy_device1.py
Connecting to a1c7l810qoyj7h-ats.iot.ap-southeast-1.amazonaws.com with client ID 'tinnakorn-test-iot-thing'...
Connected!
Begin Publish
Published: '{"distance": 5.770702302862063, "datetime": "2025-02-26 08:51:47"}' to the topic: test/tinnakorn-test-iot-thing
Begin Disconnect
[ec2-user@ip-xx-xx-xx-xx ~]$
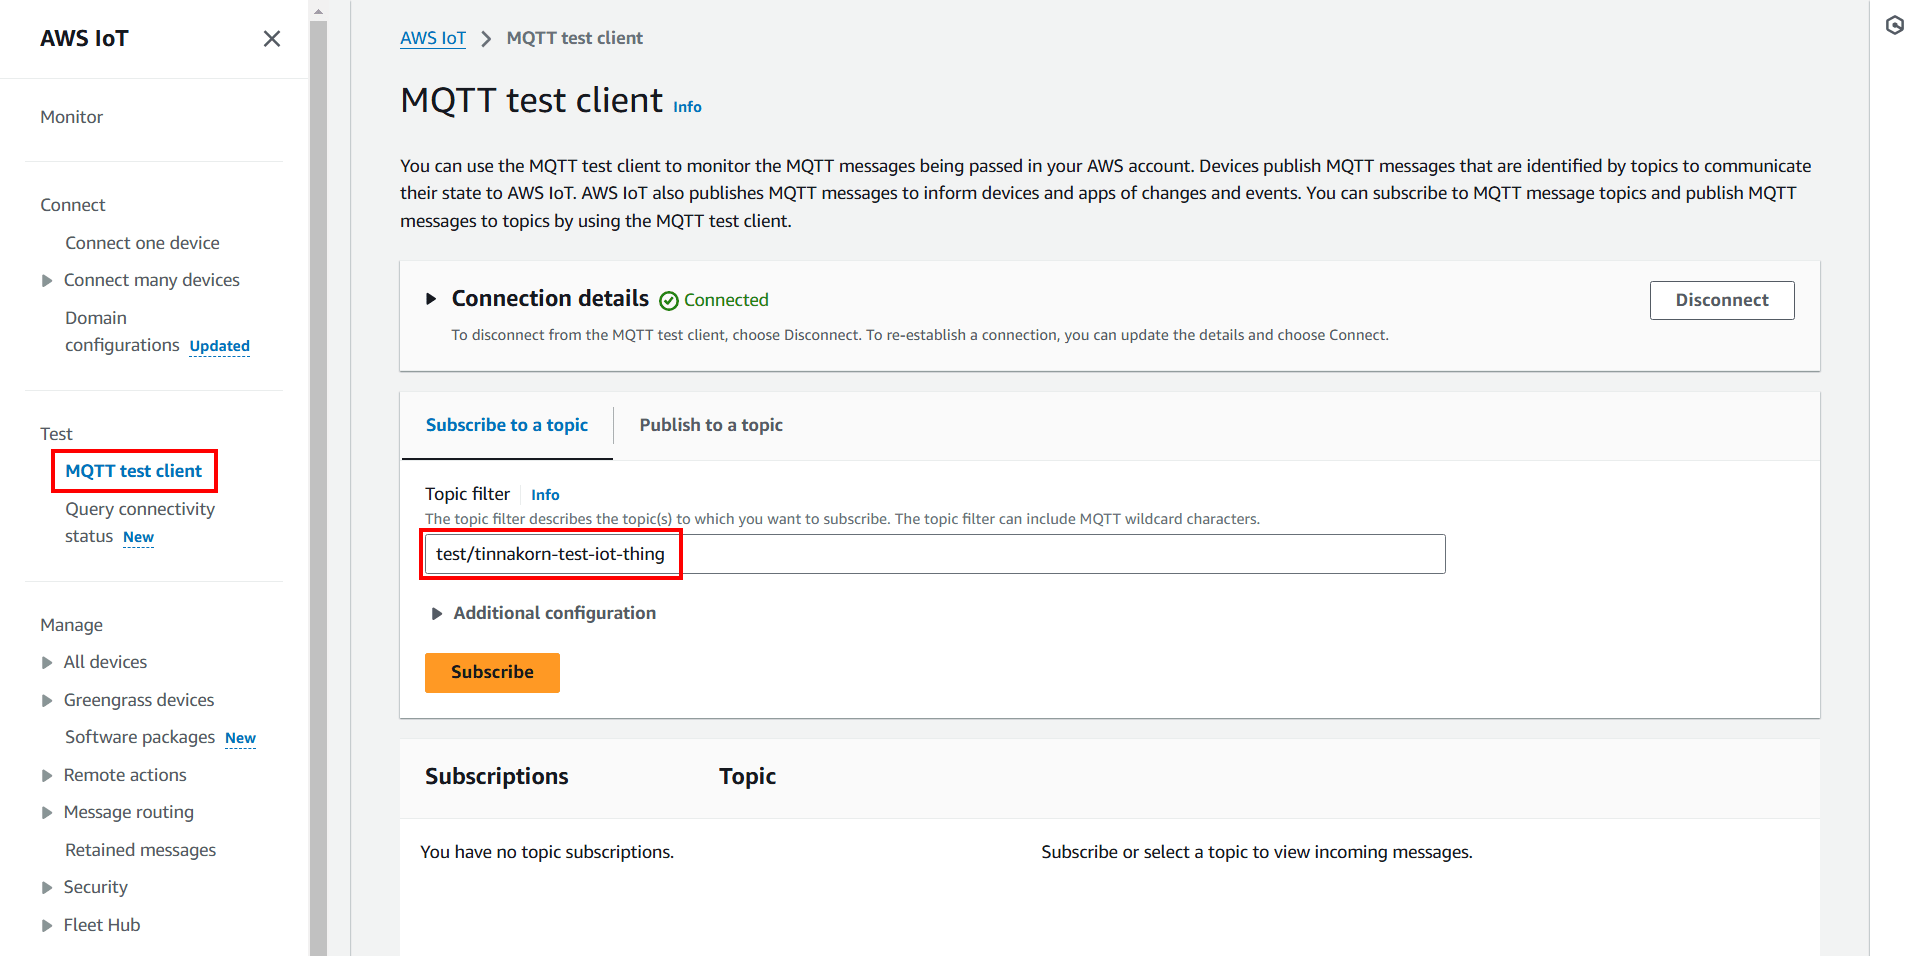
ทดสอบการส่งข้อมูลด้วย MQTT test client
มาที่หน้าจอบริการ AWS IoT แล้วคลิก MQTT test client ในหัวข้อ Test จากเมนูด้านซ้าย แล้วตั้งค่าดังนี้
・เลือกแท็บ Subscribe to a topic
・Topic filter: test/tinnakorn-test-iot-thing (ในส่วนนี้ต้องเหมือนกับ TOPIC = "test/" + CLIENT_ID (CLIENT_ID = tinnakorn-test-iot-thing))
from awscrt import io, mqtt, auth, http
from awsiot import mqtt_connection_builder
import json
import datetime
import random
import math

# Setting
ENDPOINT = "xxxxxxxxxxxxx-ats.iot.ap-southeast-1.amazonaws.com"
CLIENT_ID = "tinnakorn-test-iot-thing"
PATH_TO_CERTIFICATE = "d008e52b7a342375a82c2ae3943xxxxxxxxxxxxxxxxxxxxxxxxxxxxxxxxxxxxx-certificate.pem.crt"
PATH_TO_PRIVATE_KEY = "d008e52b7a342375a82c2ae3943xxxxxxxxxxxxxxxxxxxxxxxxxxxxxxxxxxxxx-private.pem.key"
PATH_TO_AMAZON_ROOT_CA_1 = "AmazonRootCA1.pem"
TOPIC = "test/" + CLIENT_ID    # ส่วนนี้คือชื่อที่ป้อนใน Topic filter ตามรูปภาพด้านบน ครั้งนี้คือ "test/tinnakorn-test-iot-thing"

"ไม่ได้แสดงส่วนล่าง"
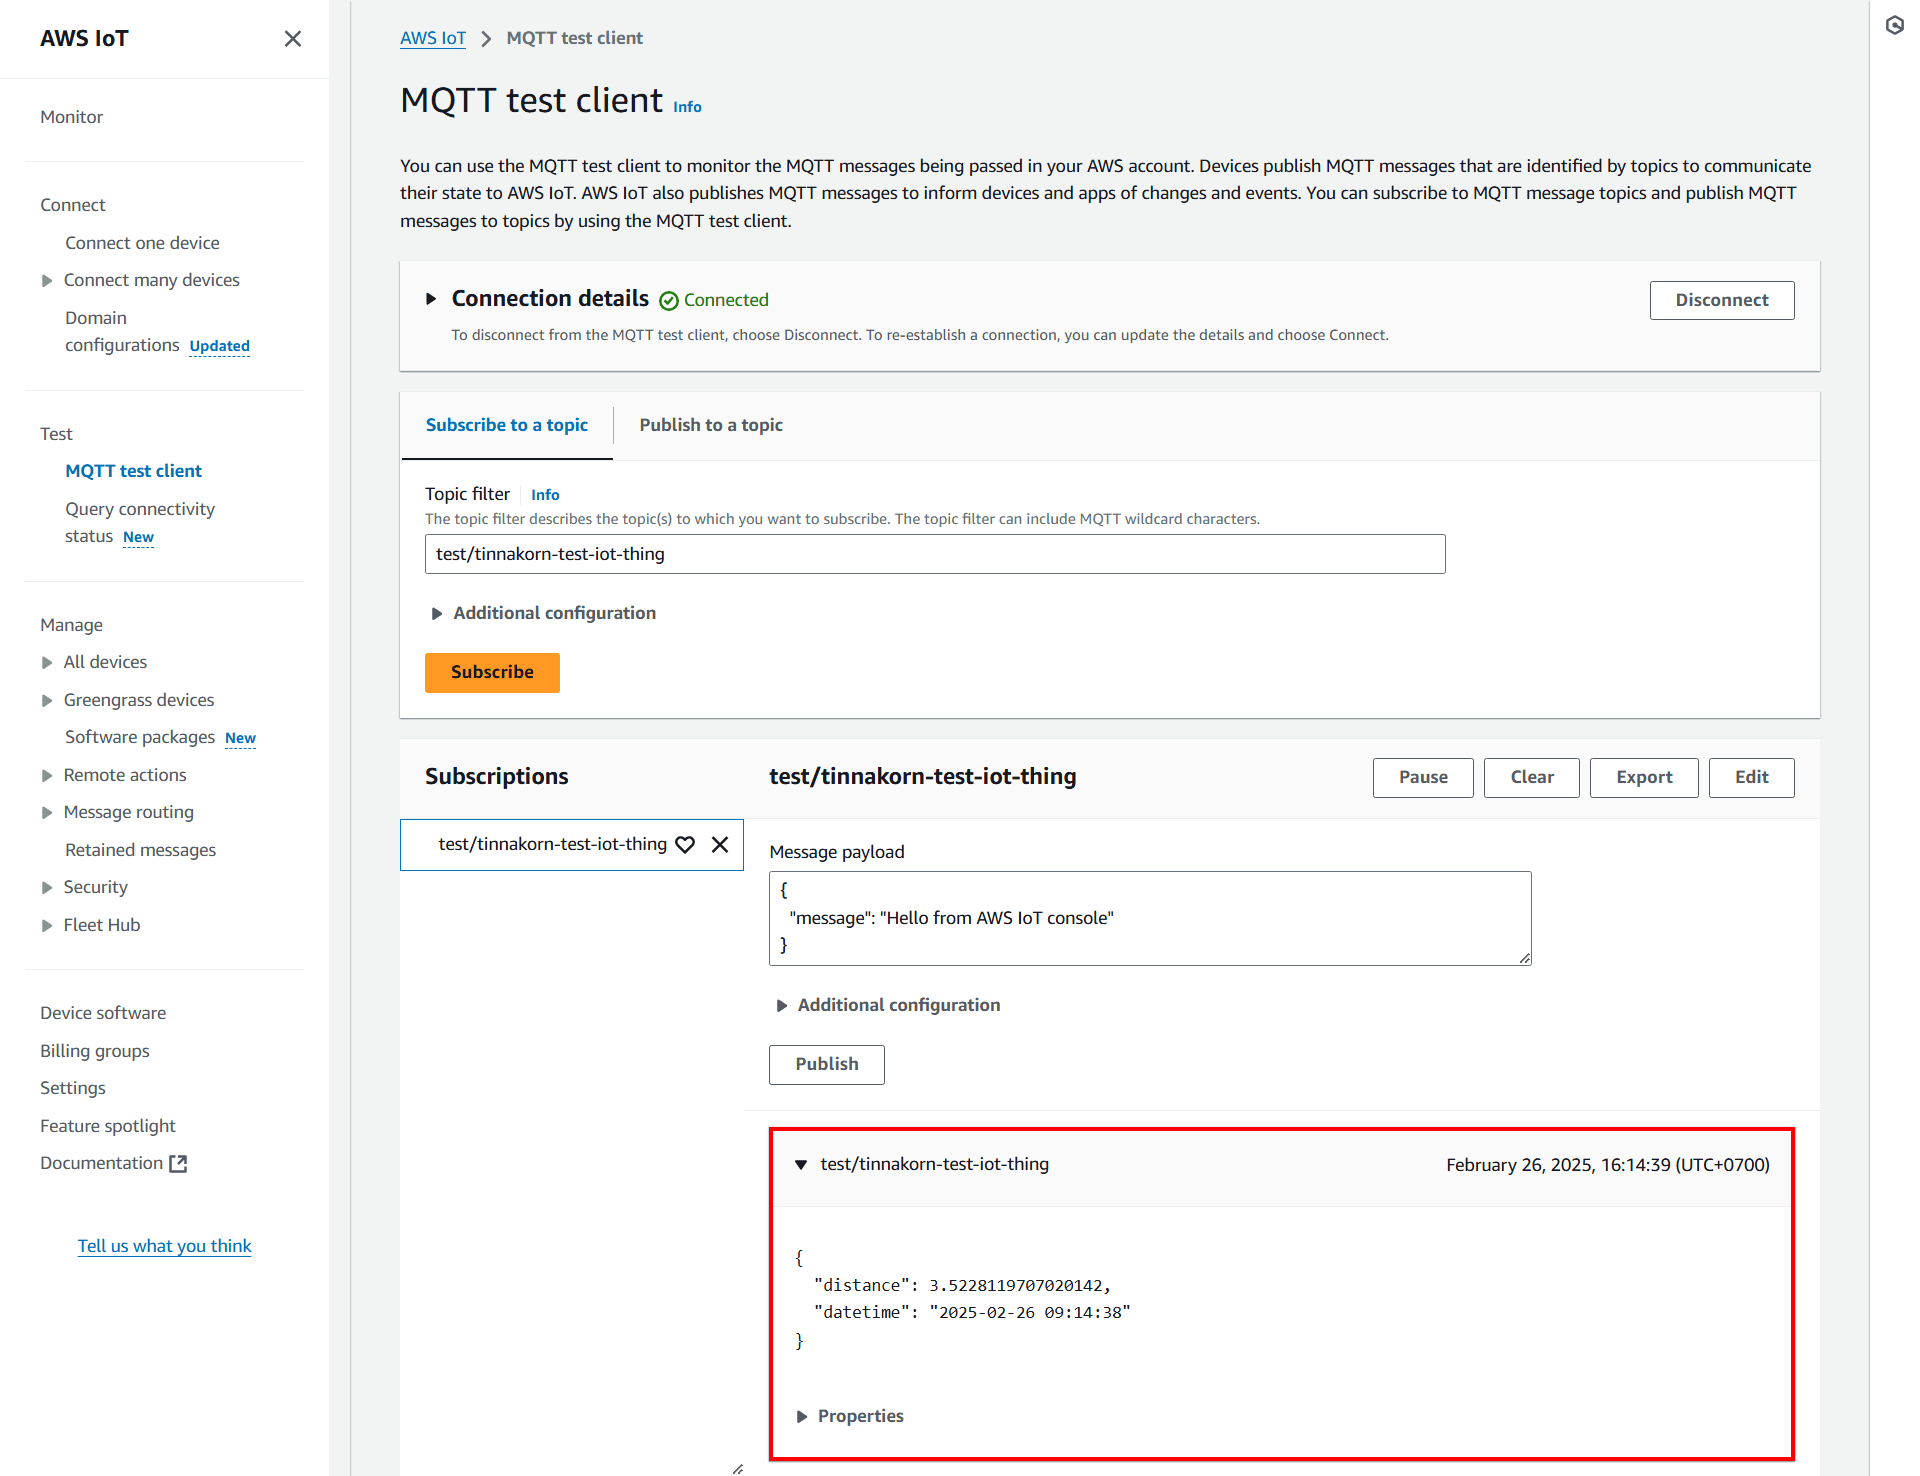
แล้วคลิก Subscribe
เมื่อ Subscribe เสร็จแล้วจะแสดงหน้าจอแบบนี้ แล้วให้รันคำสั่งนี้อีกครั้งเพื่อส่งข้อมูลจาก EC2 ไปยัง AWS IoT Core
python3 iot_dummy_device1.py
จนถึงตอนนี้หากตั้งค่าถูกต้องทั้งหมดจะแสดงหน้าจอแบบนี้
เพียงเท่านี้ก็ถือว่าเตรียม IoT Core เสร็จแล้ว
เตรียม Amazon S3 และ Amazon Data Firehose ที่ใช้สำหรับ IoT Core
สร้าง S3 Bucket ใน Amazon S3
สร้าง S3 Bucket ใน Amazon S3 เพื่อใช้ร่วมกับ Firehose และจัดเก็บข้อมูลที่ส่งจาก EC2 ไปยัง AWS IoT Core
・General purpose buckets: tinnakorn-test-s3
ดูตัวอย่างได้ที่ลิงก์ด้านล่างนี้
สร้าง Firehose stream ใน Amazon Data Firehose
สร้าง Firehose stream เชื่อมต่อกับ S3 Bucket เพื่อส่งข้อมูลไปเก็บไว้ที่ S3 Bucket
ดูตัวอย่างได้ที่ "ตัวอย่างการสร้าง Firehose stream ในบทความนี้" และลิงก์ด้านล่างนี้
ตัวอย่างการสร้าง Firehose stream ในบทความนี้
Choose source and destination
・Source:Direct PUT
・Destination:Amazon S3(หลังจากเลือกนี้แล้ว หัวข้อ "Firehose stream name" จะแสดงขึ้นมาด้านล่างอัตโนมัติ)Firehose stream name
・Firehose stream name:tinnakorn-test-firehoseDestination settings
・S3 bucket:tinnakorn-test-s3(เลือก S3 bucket ที่สร้างขึ้นสำหรับใช้งานร่วมกับ Firehose)Buffer hints, compression, file extension and encryption
・Buffer interval:60seconds
เมื่อเตรียม Amazon S3 และ Amazon Data Firehose ที่ใช้สำหรับ IoT Core เสร็จแล้ว ดำเนินการขั้นตอนถัดไป
สร้าง Rules ใน IoT Core
การสร้าง Rule ใน AWS IoT Core เป็นการกำหนดเงื่อนไขเพื่อเชื่อมต่อ IoT Core กับ Firehose
โดย Rule จะช่วยให้สามารถ ส่งข้อมูลจาก IoT Core ไปยัง Firehose เพื่อจัดเก็บหรือประมวลผลข้อมูลต่อไปได้
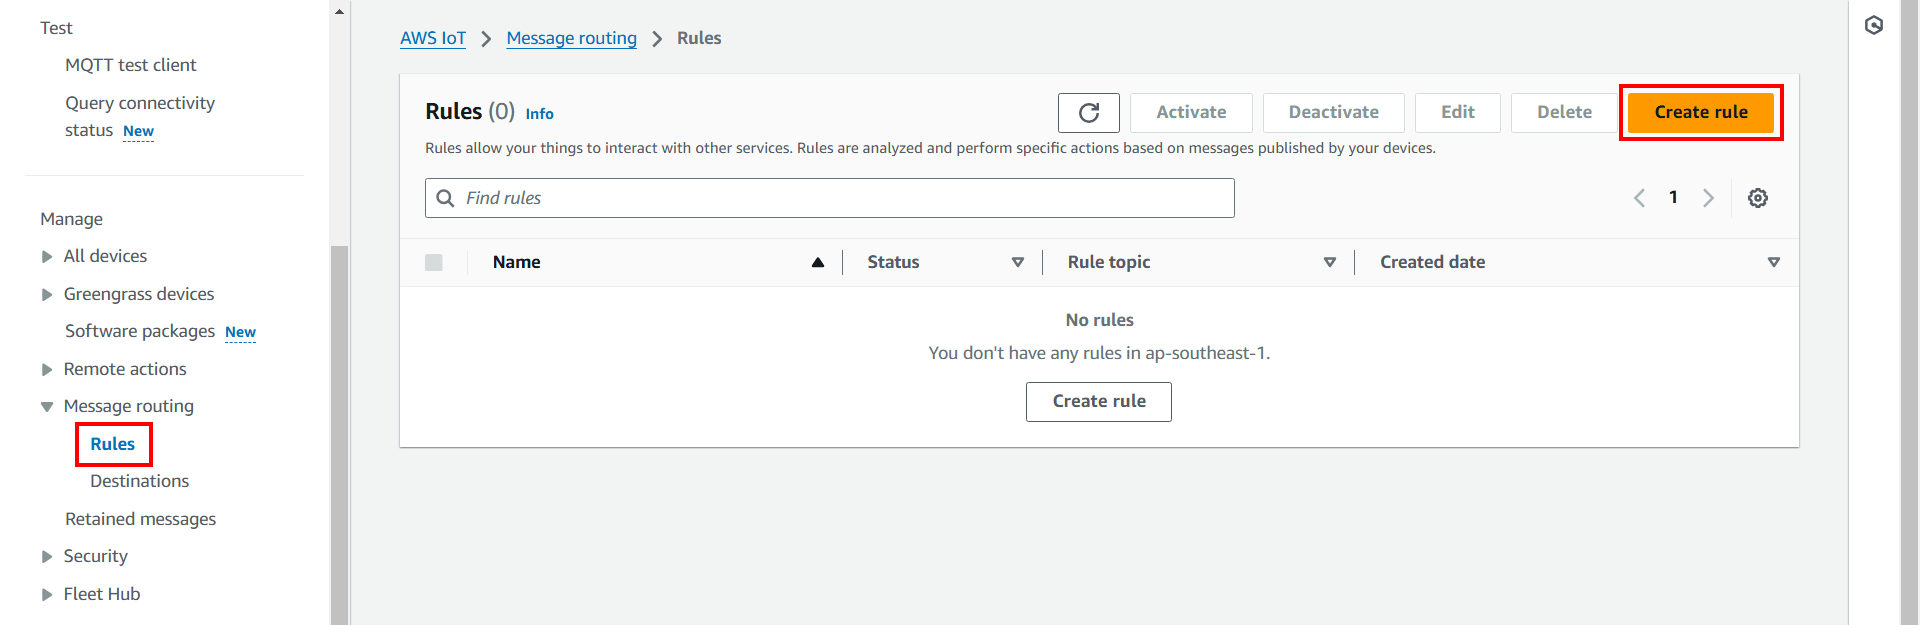
เข้ามาที่หน้าจอ AWS IoT แล้วจะตั้งค่าดังนี้
คลิก Message routing > Rules จากเมนูด้านซ้าย แล้วคลิก Create rule
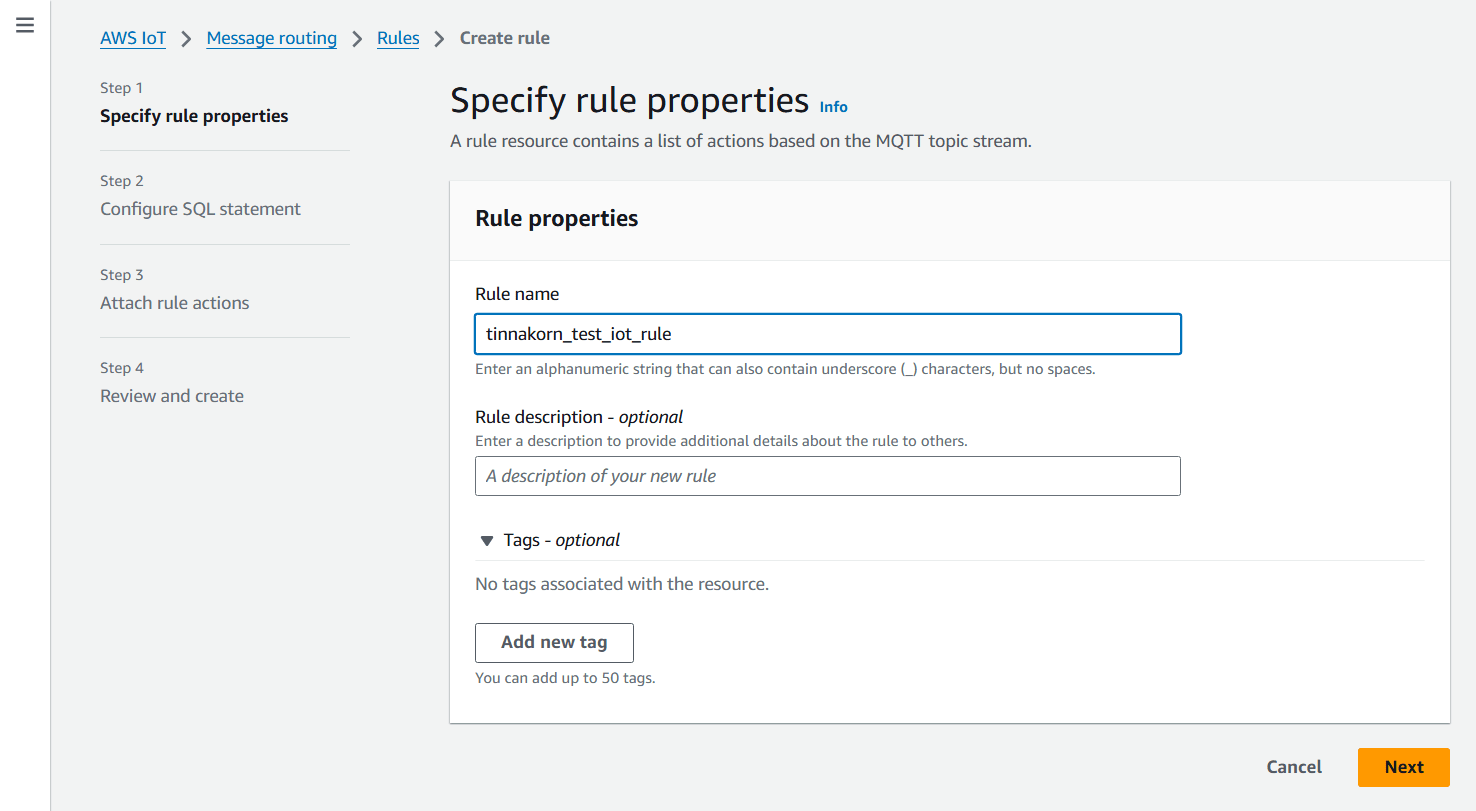
Step 1
Specify rule properties
Rule properties
・Rule name: tinnakorn_test_iot_rule
แล้วคลิก Next ด้านล่างสุด
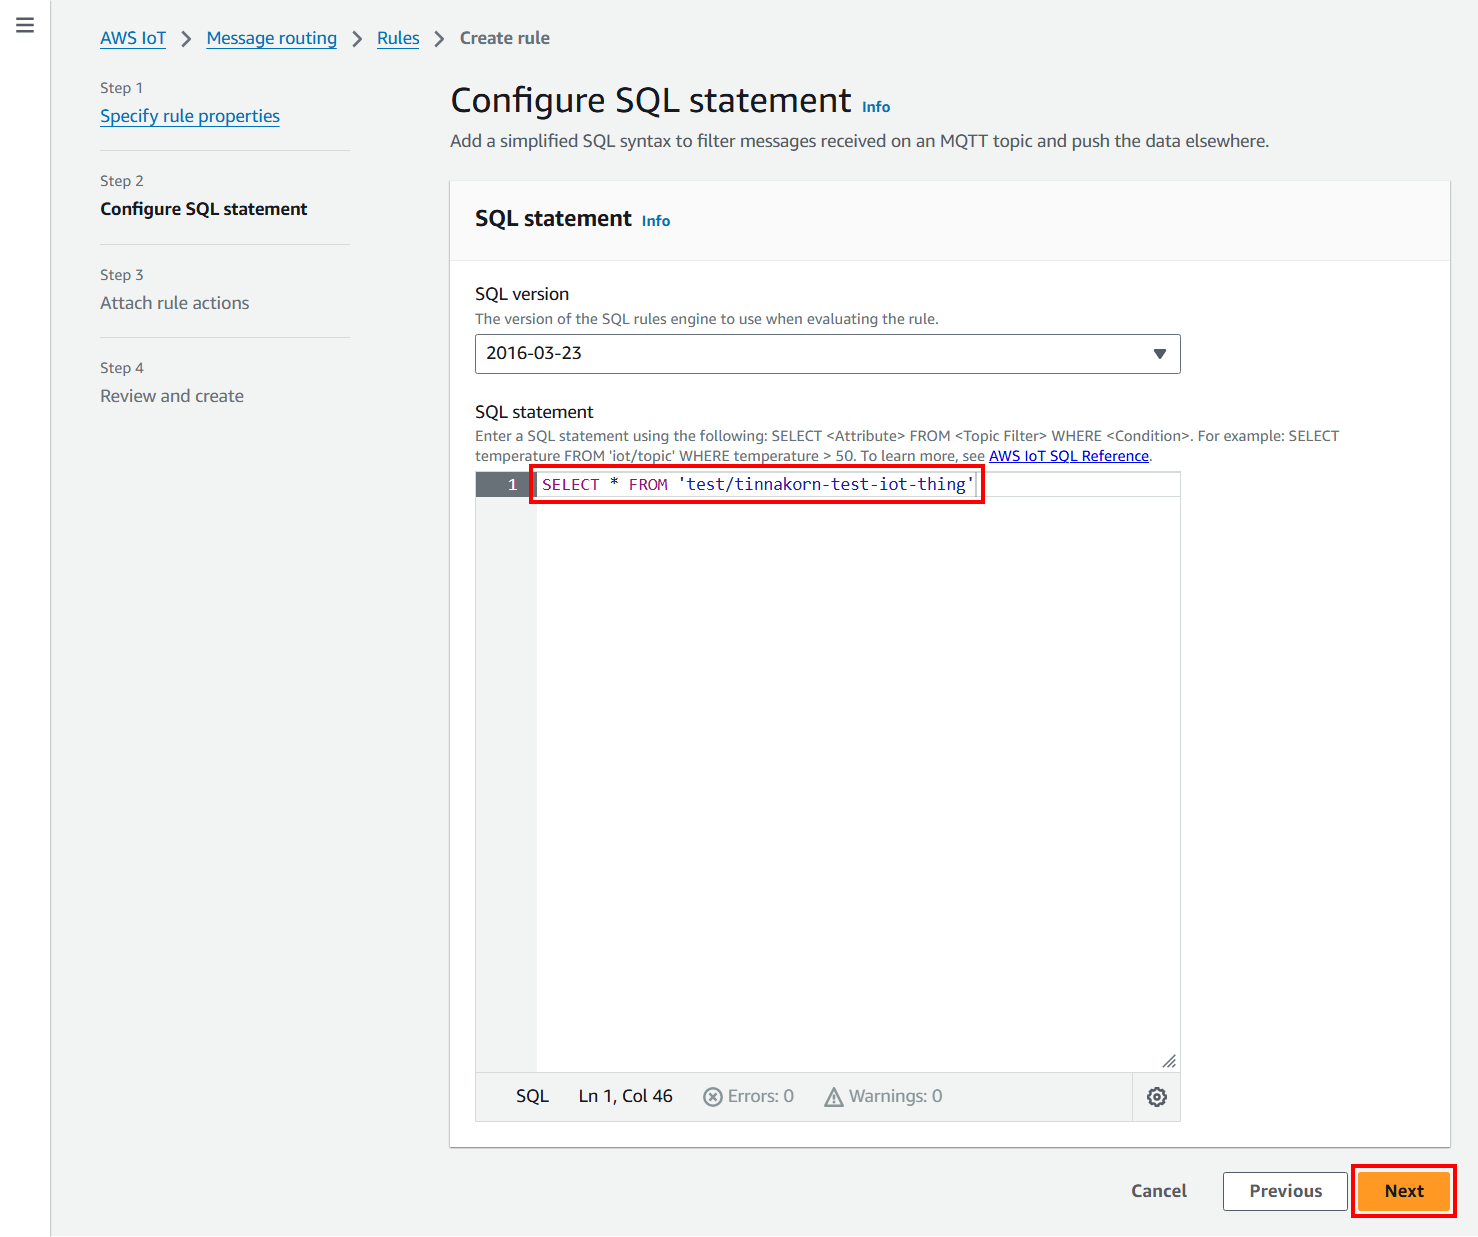
Step 2
Configure SQL statement
SQL statement
・SQL version: 2016-03-23
・SQL statement:
SELECT * FROM 'test/tinnakorn-test-iot-thing'
แล้วคลิก Next ด้านล่างสุด
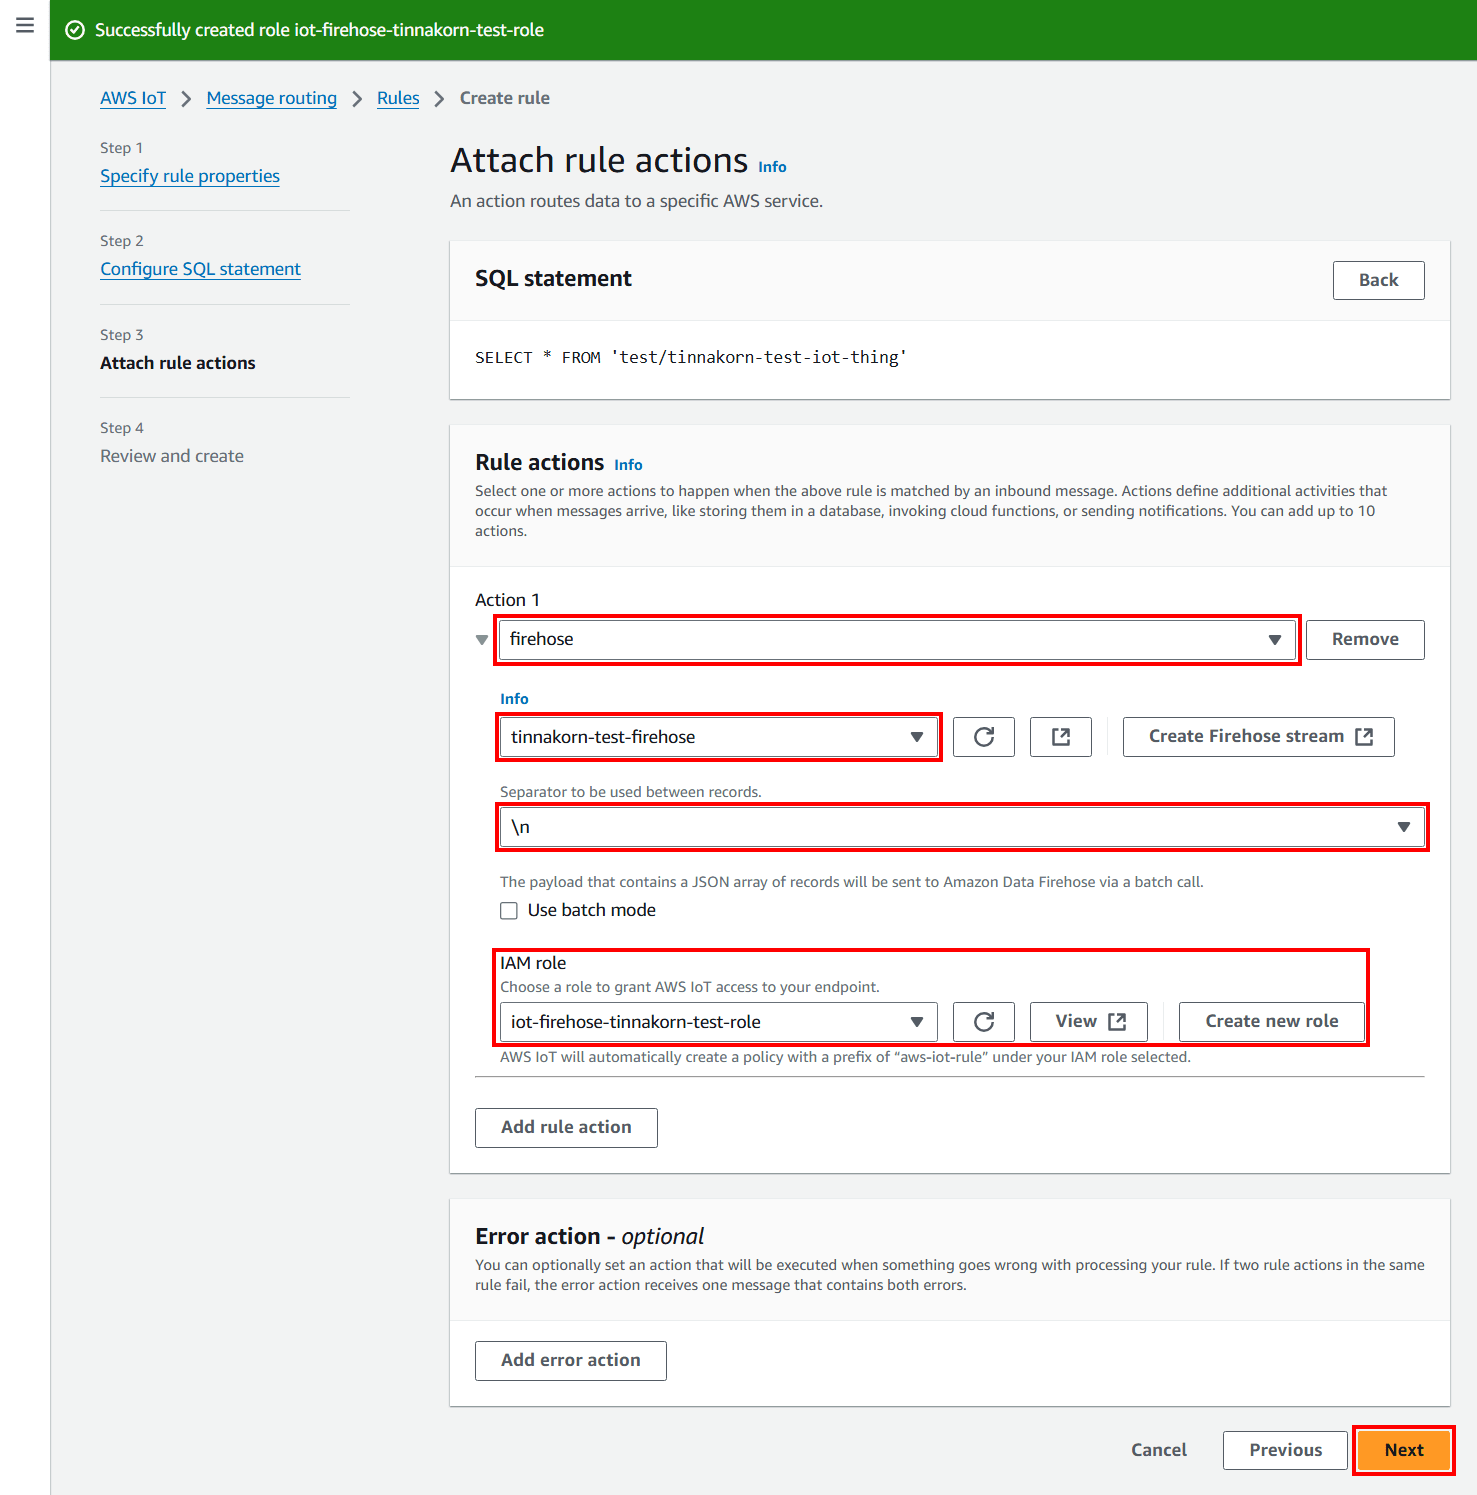
Step 3
Attach rule actions
Rule actions
・Action 1: firehose
・Stream name: tinnakorn-test-firehose
・Separator: \n
・IAM role: คลิก Create new role แล้วป้อนชื่อที่ต้องการ เช่น iot-firehose-tinnakorn-test-role
แล้วคลิก Next ด้านล่างสุด
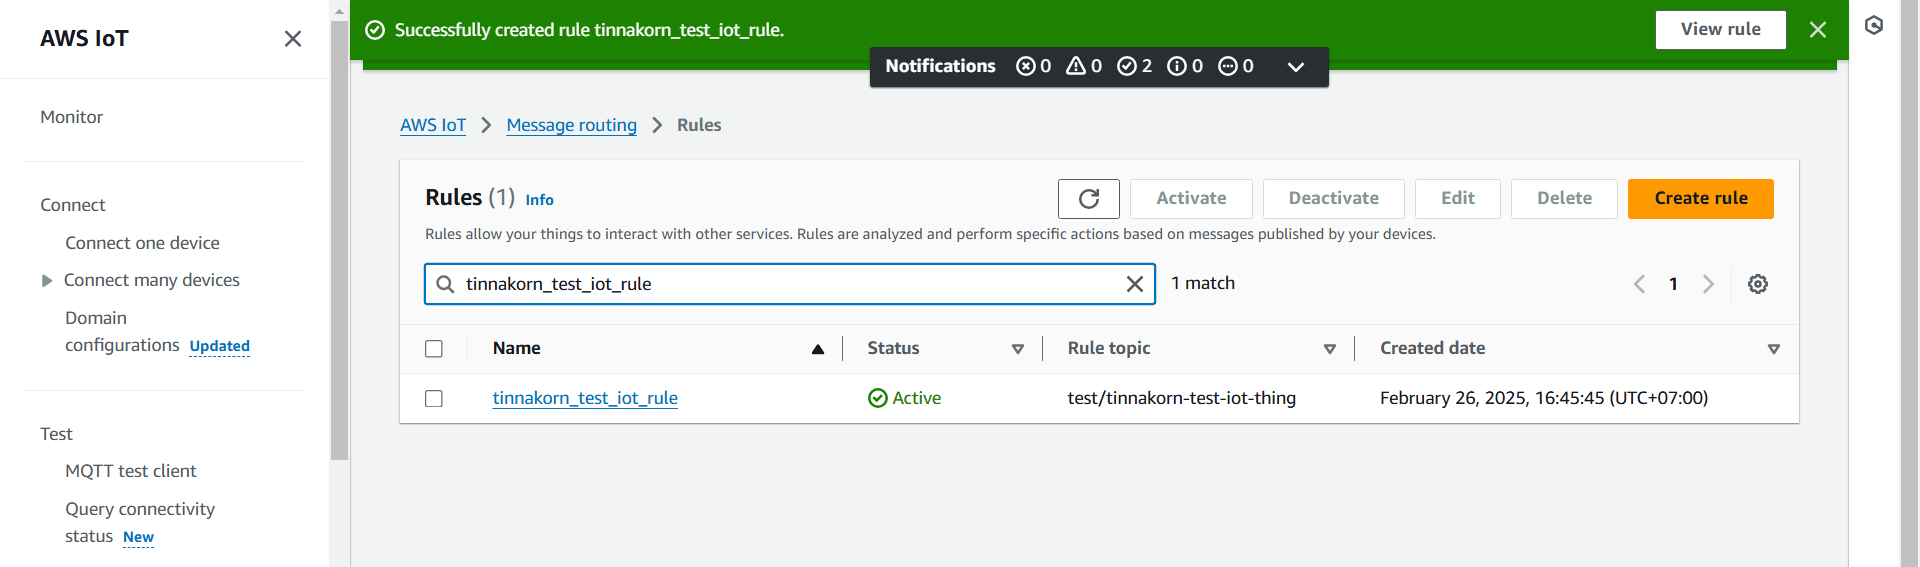
Step 4
Review and create
・ตรวจสอบการตั้งค่าและคลิก Create ด้านล่างสุด
แล้วจะได้ Rule แบบนี้ เพียงเท่านี้ IoT Core ก็พร้อมใช้งานแล้ว
ทดสอบการทำงาน IoT Core
การบวนการทำงานของ IoT Core ที่สร้างมีดังนี้
ทดสอบโดยรันคำสั่งนี้ใน Terminal EC2 Instance อีกครั้งเพื่อส่งข้อมูลไปยัง IoT Core และดูว่าข้อมูลส่งไปถึง Amazon S3 และมีการเก็บข้อมูลหรือไม่ แล้วรอประมาณ 1 นาทีตามที่ตั้งค่าไว้ตอนสร้าง
python3 iot_dummy_device1.py
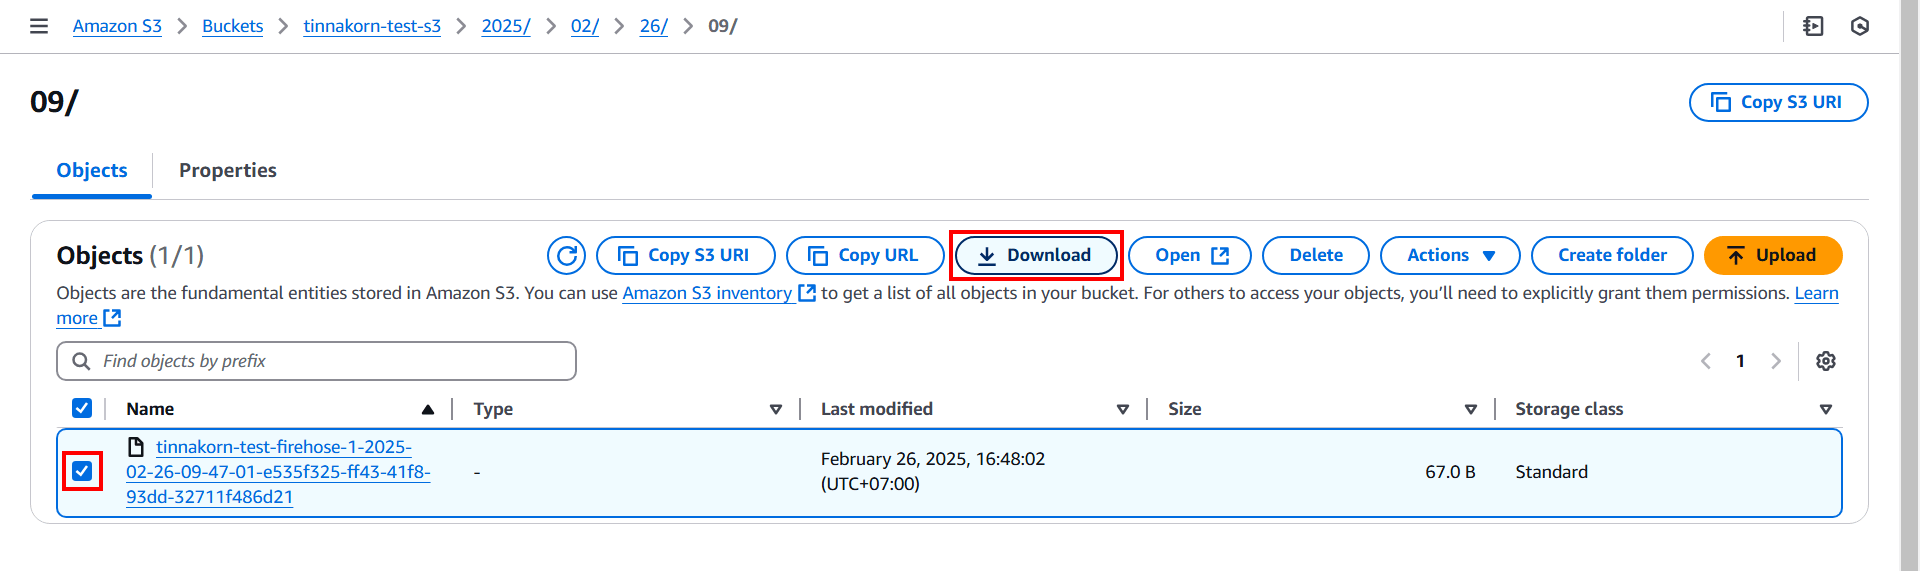
จากนั้นกลับไปตรวจสอบที่ S3 Bucket ใน Amazon S3 ของเราว่ามีข้อมูลเพิ่มขึ้นมาหรือไม่
ถ้ามีข้อมูลเพิ่มขึ้นมาแบบนี้แสดงว่าการทำงานของ IoT Core ถูกต้องสมบูรณ์
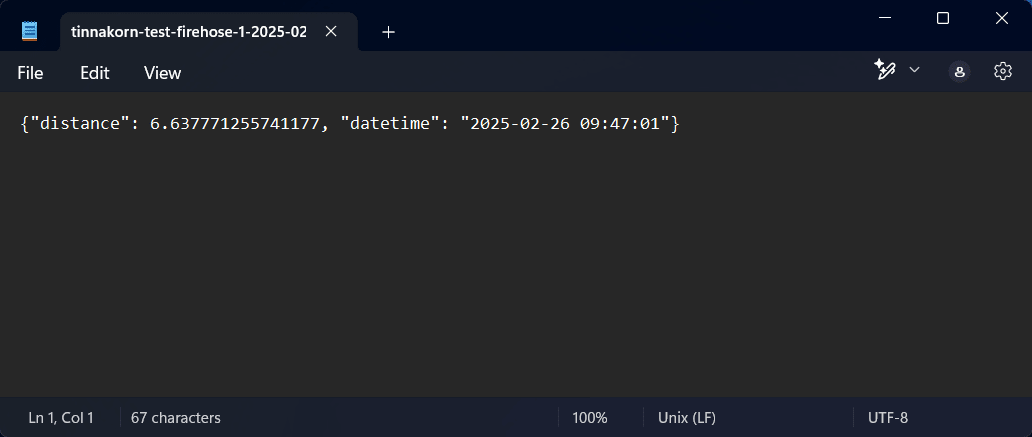
ทีนี้ก็ดาวน์โหลดไฟล์มาตรวจสอบ
เปิดไฟล์ที่ดาวน์โหลดจากขั้นตอนที่แล้ว จะเห็นว่าเป็นข้อมูลที่ส่งไปในรูปแบบนี้
ลบ Resource
หากเราไม่ต้องการใช้งานแล้วก็ควรจะลบ Resource เพื่อประหยัดค่าใช้จ่ายโดยดูวิธีการลบในหัวข้อนี้ได้เลย
- EC2
- Instances
- Key pairs
- Security Groups
- IoT Core
- Security > Policies
- Manage (All devices) > Things
- Message routing > Rules
- Amazon Data Firehose
- Firehose streams
- Identity and Access Management (IAM)
- Roles
- Policies
- Amazon S3
- General purpose buckets
- CloudWatch
- Log groups
การ Terminate Instance, ลบ Key Pair และลบ Security Group ใน EC2
ดูวิธีการลบ Resource ใน EC2 เช่น Instance, Key Pair และ Security Group ได้ที่ลิงก์ด้านล่างนี้
ลบ IoT Core
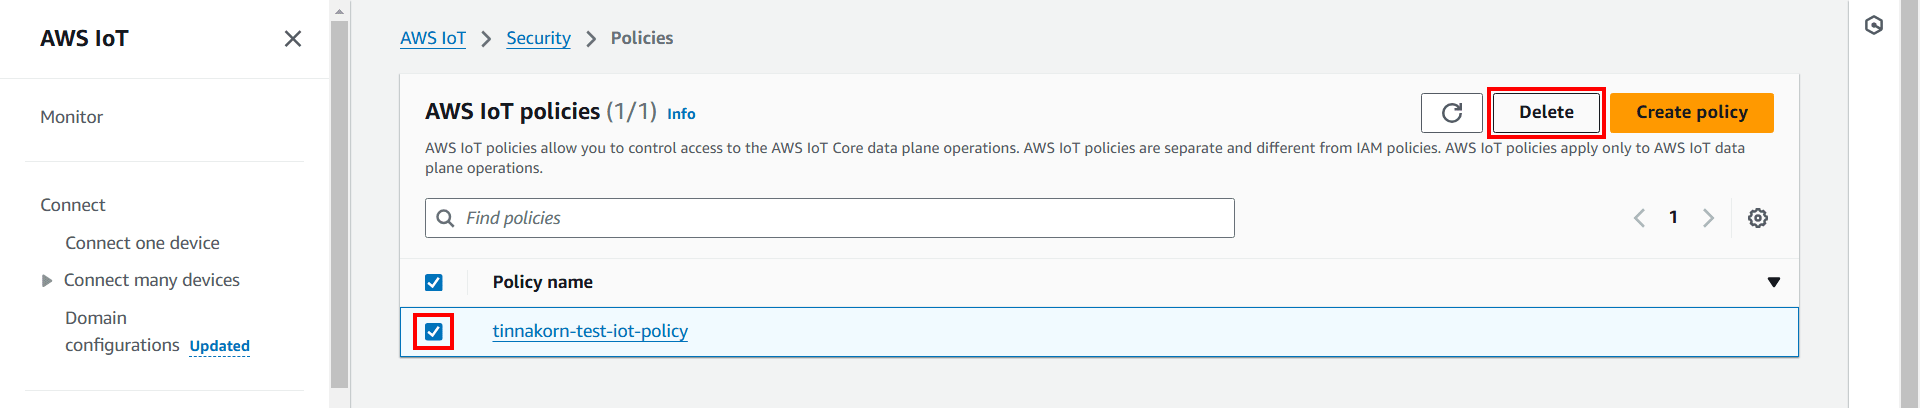
ลบ Policy ใน Security
เข้าไปหน้าจอ AWS IoT > Security > Policies ติ๊กชื่อ Policy ของเรา แล้วเลือก Delete และลบตามคำแนะนำในหน้าจอ pop-up
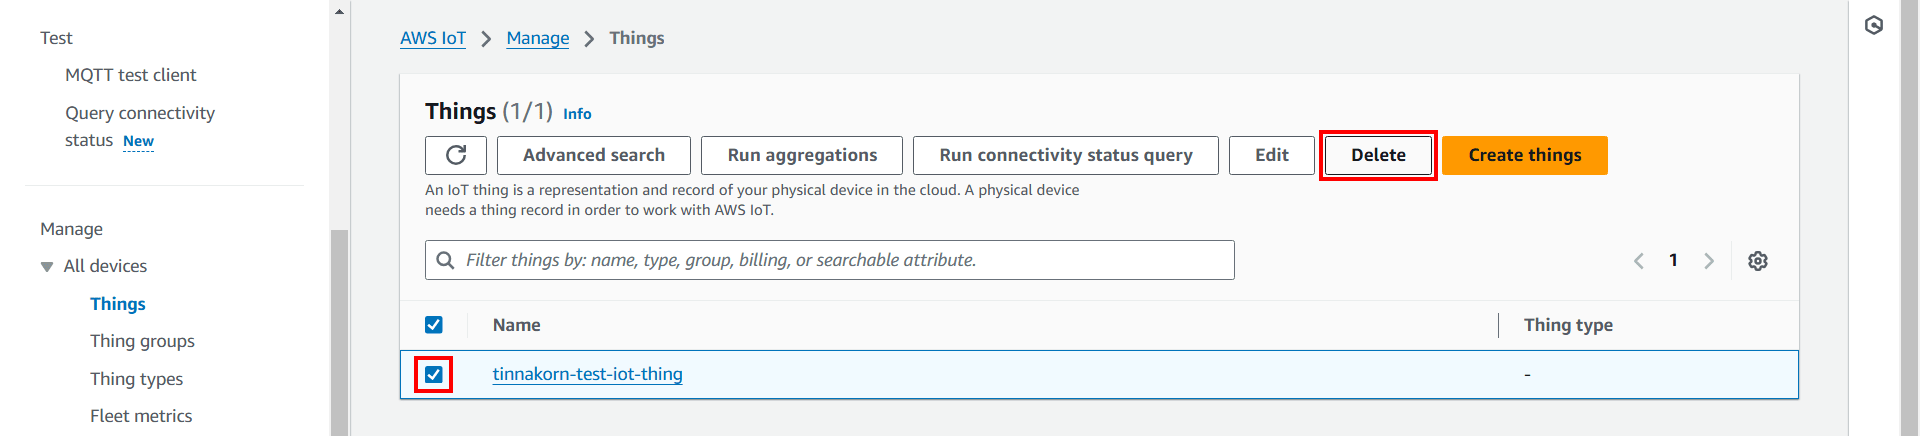
ลบ Things ใน All devices
เข้าไปหน้าจอ AWS IoT > Manage (All devices) > Things ติ๊กชื่อ Thing ของเรา แล้วเลือก Delete และลบตามคำแนะนำในหน้าจอ pop-up
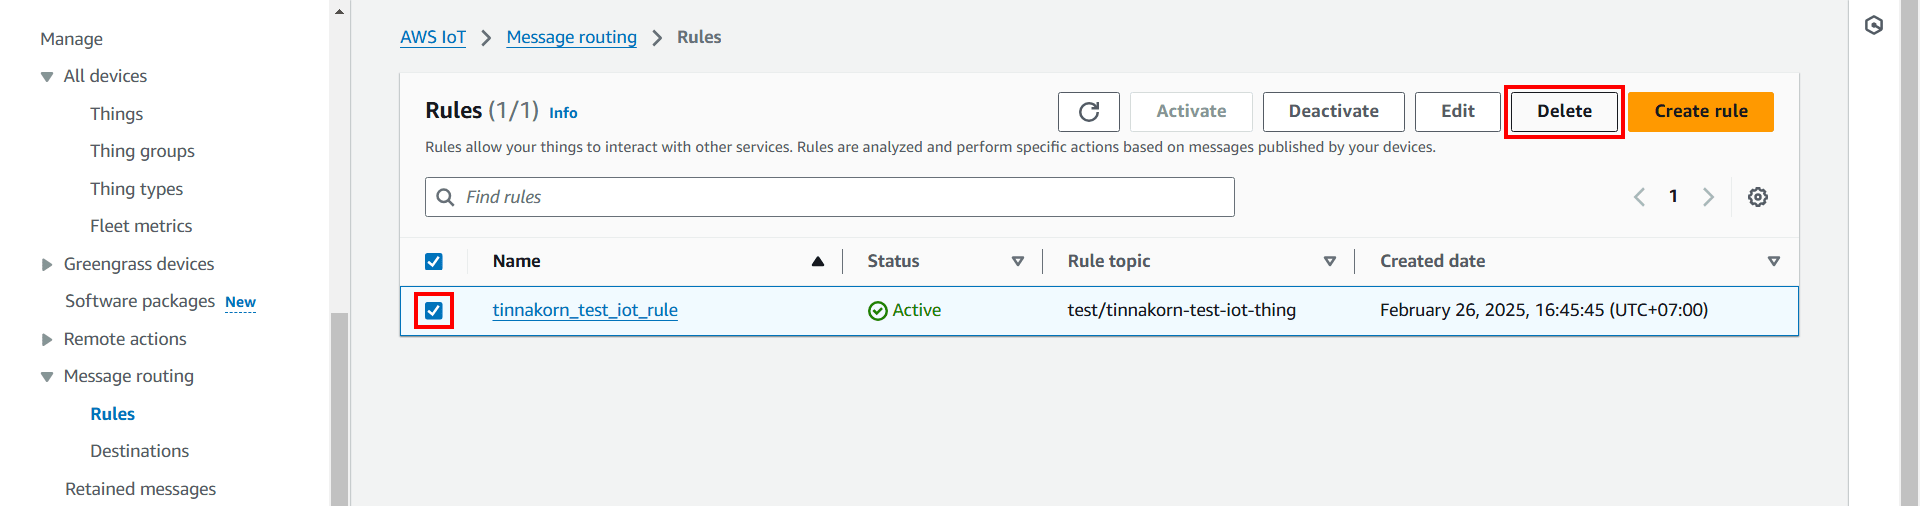
ลบ Rules ใน Message routing
เข้าไปหน้าจอ AWS IoT > Message routing > Rules ติ๊กชื่อ Rule ของเรา แล้วเลือก Delete และลบตามคำแนะนำในหน้าจอ pop-up
ลบ Firehose stream ใน Amazon Data Firehose
ดูตัวอย่างที่นี่เฉพาะหัวข้อนี้: ลบ Firehose stream ใน Amazon Data Firehose
ลบ Identity and Access Management (IAM)
ลบ Roles และ Policies โดยดูตัวอย่างที่ลิงก์ด้านล่างนี้
ดูตัวอย่างที่นี่เฉพาะหัวข้อนี้: ลบ Identity and Access Management (IAM)
ลบ Bucket ใน Amazon S3
ดูตัวอย่างที่นี่เฉพาะหัวข้อนี้: ลบ Bucket ใน Amazon S3
ลบ CloudWatch
เข้ามาที่หน้าจอบริการ [CloudWatch > Logs > Log groups] แล้วค้นหาและลบ Log groups ตามรายการในตารางด้านล่างนี้ โดย [เลือกติ๊ก ✅️ Log group ที่จะลบ > คลิก Actions > Delete log group(s)]
| Log groups |
|---|
| /aws/kinesisfirehose/[firehose_name] |
| AWSIotLogsV2 |
เพียงเท่านี้ก็สามารถลบ Resource ที่ไม่ต้องการได้ทั้งหมดแล้ว
ผมหวังว่าบทความนี้จะเป็นประโยชน์ให้กับผู้อ่านได้นะครับ
POP (Tinnakorn Maneewong) จากบริษัท Classmethod (Thailand) ครับ !