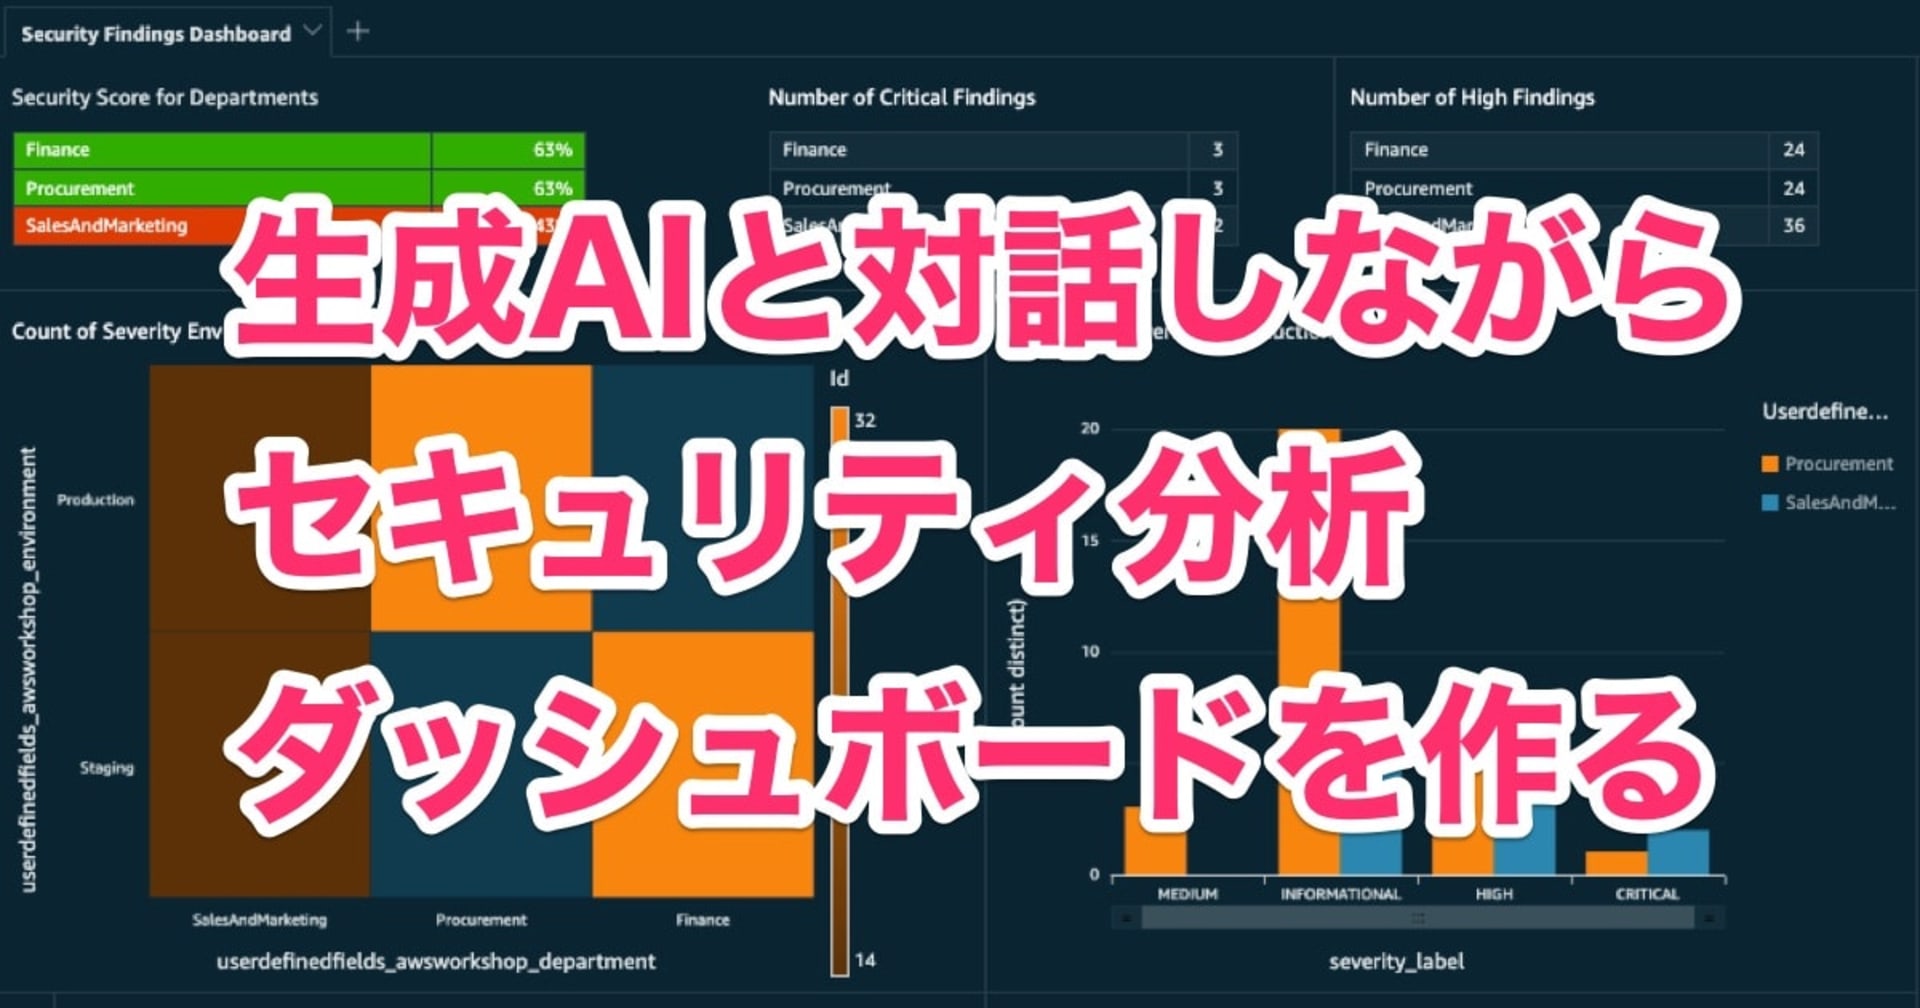
Markdownで管理できるBIツール "Evidence" を使ってSecurity Hubレポートを作ってみる
この記事は公開されてから1年以上経過しています。情報が古い可能性がありますので、ご注意ください。
Evidenceは Markdownでコード管理できるオープンソースのBIツールです。
さまざまな種類のデータソースを扱えます。 Markdownページ内に記載したSQLステートメントを基に、 データソースに対してクエリを実行します。 クエリ結果をグラフ化してウェブサイトとして出力できます。
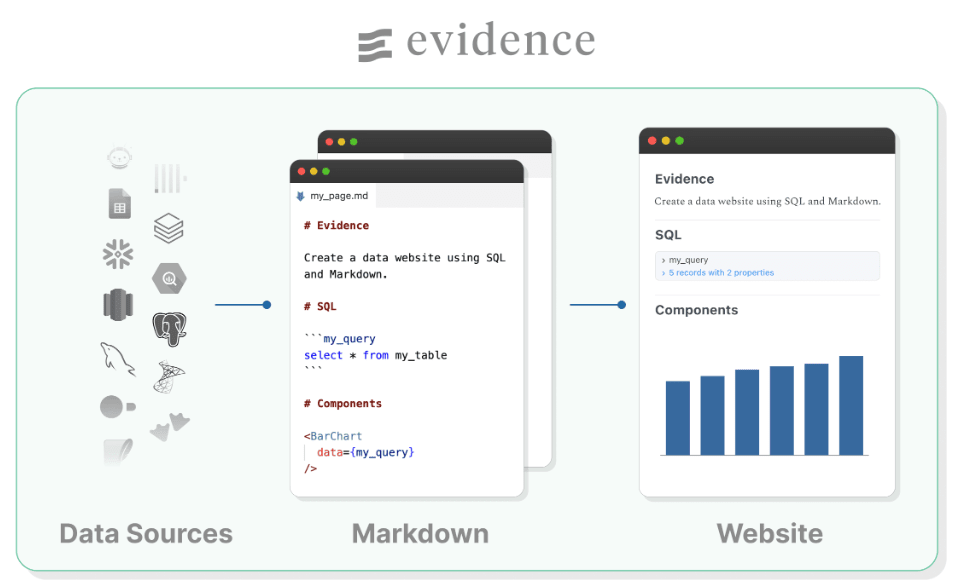
画像引用: How does Evidence work? | Evidence Docs
出力は静的サイトとして生成されるため、 取り回しが良いのが特徴です。 デプロイ、共有が容易です。
本ブログではEvidenceに入門してみます。
1サンプルとして Security Hub チェック結果(データソースはCSV)のレポートを作成して、 ローカル上にウェブサイトを構築しました。
Evidenceのセットアップ
まずは Install Evidence ページとおりに進めて、 プロジェクトの雛形を作成します。
今回はコマンドラインからインストールします。
npx degit evidence-dev/template my-project
cd my-project
npm install
# added 1287 packages in 21s
#
# $ npm run sources
#
# > my-evidence-project@0.0.1 sources
# > evidence sources
#
# ✔ Loading plugins & sources
# -----
#   [Processing] needful_things
#   needful_things ⚠ No results returned.
#   orders ✔ Finished, wrote 10000 rows.
# -----
# [INFO]:    Evaluated sources, saving manifest
# [INFO]:    ✅ Done!
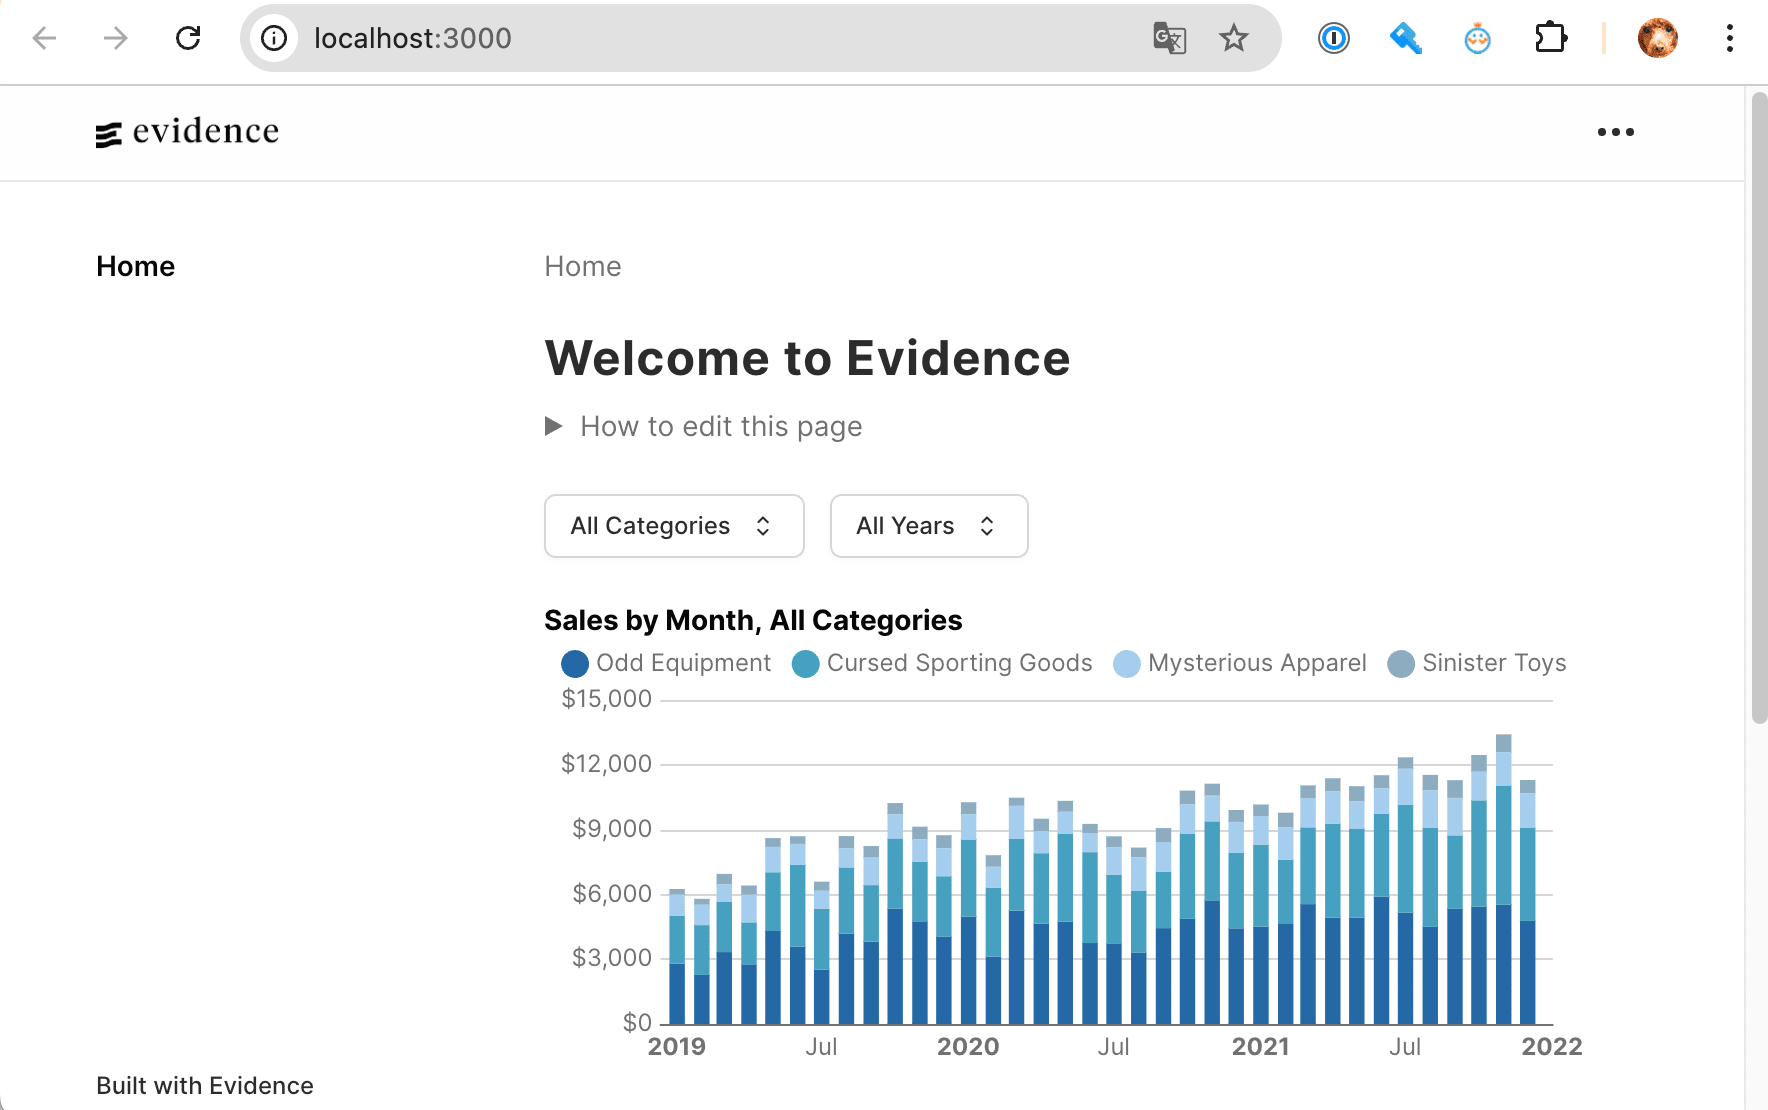
インストール後、 npm run sources && npm run dev を実行するとローカルサーバーが起動します。
npm run sources
# > my-evidence-project@0.0.1 sources
# > evidence sources
#
# ✔ Loading plugins & sources
# -----
#   [Processing] needful_things
#   needful_things ⚠ No results returned.
#   orders ✔ Finished, wrote 10000 rows.
# -----
# [INFO]:    Evaluated sources, saving manifest
# [INFO]:    ✅ Done!

npm run dev
# > my-evidence-project@0.0.1 dev
# > evidence dev --open /
#
# Forced re-optimization of dependencies
#
#   VITE v5.4.14  ready in 1697 ms
#
#   ➜  Local:   http://localhost:3000/
#   ➜  Network: use --host to expose
#   ➜  press h + enter to show help
データソースの準備と登録
(準備) CSVの作成
データソースとして Security Hubの AWS Foundational Security Best Practices v1.0.0 (AFSBP) 標準 チェック結果を使います。
Pythonスクリプトを実行して、 1アカウント内にあるAFSBP検出結果を全てCSVに保存しました。
(参考) AFSBP検出結果を全て取得してCSV保存するPythonスクリプト
import boto3
import csv
import logging
from operator import itemgetter
from datetime import datetime

logging.basicConfig(level=logging.INFO)
sh_client = boto3.client('securityhub')

def generate_sh_failed_findings_csv(file_path):
    header = ['ControlID', 'ControlTitle', 'Severity',
              'AccountName', 'AccountID',
              'ResourceType', 'ResourceID', 'ResourceNameTag',
              'ComplianceStatus', 'RecordStatus', 'WorkflowStatus']
    findings = []
    # securityhub.GetFindings 実行
    paginator = sh_client.get_paginator('get_findings')
    response_iterator = paginator.paginate(
        Filters={
            'ProductFields': [
                {
                    'Key': 'StandardsArn',
                    'Value': 'arn:aws:securityhub:::standards/aws-foundational-security-best-practices/v/1.0.0',
                    'Comparison': "EQUALS"
                }
            ],
            'RecordState': [
                {
                    'Value': 'ACTIVE',
                    'Comparison': 'EQUALS'
                }
            ]
        }
    )
    # CSV作成のための配列作成
    page_count = 0
    for page in response_iterator:
        page_count = page_count + 1
        logging.info(f'fetching page#{page_count}...')
        for finding in page.get('Findings'):
            resource_name = ''
            if finding.get('Resources')[0].get('Tags'):
                resource_name = finding.get('Resources')[0].get('Tags').get('Name')
            findings.append([
                finding.get('Compliance').get('SecurityControlId'),
                finding.get('Title'),
                finding.get('Severity').get('Label'),
                finding.get('AwsAccountName'),
                finding.get('AwsAccountId'),
                finding.get('Resources')[0].get('Type'),
                finding.get('Resources')[0].get('Id'),
                resource_name,
                finding.get('Compliance').get('Status'),
                finding.get('RecordState'),
                finding.get('Workflow').get('Status')
            ])
    # CSV出力
    rows = [header] + sorted(findings, key=itemgetter(0,3))
    with open(file_path, 'w', newline='') as csvfile:
        writer = csv.writer(csvfile, quoting=csv.QUOTE_ALL)
        writer.writerows(rows)

def main():
    datetime_now = datetime.now().strftime('%Y-%m-%d_%H-%M-%S')
    file_path = f'all_afsbp.csv'
    logging.info(f'[start] timestamp: {datetime_now}')
    generate_sh_failed_findings_csv(file_path)
    logging.info(f'[end] output: {file_path}')

main()
head all_afsbp.csv
# "ControlID","ControlTitle","Severity","AccountName","AccountID","ResourceType","ResourceID","ResourceNameTag","ComplianceStatus","RecordStatus","WorkflowStatus"
# "ACM.1","ACM.1 Imported and ACM-issued certificates should be renewed after a specified time period","INFORMATIONAL","EXAMPLE_ACCOUNT","111111111111","AwsCertificateManagerCertificate","arn:aws:acm:us-east-1:111111111111:certificate/xxxxx","","PASSED","ACTIVE","RESOLVED"
# "ACM.1","ACM.1 Imported and ACM-issued certificates should be renewed after a specified time period","MEDIUM","EXAMPLE_ACCOUNT","111111111111","AwsCertificateManagerCertificate","arn:aws:acm:us-east-1:111111111111:certificate/xxxxx","","FAILED","ACTIVE","NEW"
# "ACM.1","ACM.1 Imported and ACM-issued certificates should be renewed after a specified time period","INFORMATIONAL","EXAMPLE_ACCOUNT","111111111111","AwsCertificateManagerCertificate","arn:aws:acm:us-east-1:111111111111:certificate/xxxxx","","PASSED","ACTIVE","RESOLVED"
# "ACM.1","ACM.1 Imported and ACM-issued certificates should be renewed after a specified time period","INFORMATIONAL","EXAMPLE_ACCOUNT","111111111111","AwsCertificateManagerCertificate","arn:aws:acm:us-east-1:111111111111:certificate/xxxxx","","PASSED","ACTIVE","RESOLVED"
# "ACM.1","ACM.1 Imported and ACM-issued certificates should be renewed after a specified time period","INFORMATIONAL","EXAMPLE_ACCOUNT","111111111111","AwsCertificateManagerCertificate","arn:aws:acm:us-east-1:111111111111:certificate/xxxxx","","PASSED","ACTIVE","RESOLVED"
# "ACM.1","ACM.1 Imported and ACM-issued certificates should be renewed after a specified time period","MEDIUM","EXAMPLE_ACCOUNT","111111111111","AwsCertificateManagerCertificate","arn:aws:acm:us-east-1:111111111111:certificate/xxxxx","","FAILED","ACTIVE","NEW"
# "ACM.1","ACM.1 Imported and ACM-issued certificates should be renewed after a specified time period","INFORMATIONAL","EXAMPLE_ACCOUNT","111111111111","AwsCertificateManagerCertificate","arn:aws:acm:us-east-1:111111111111:certificate/xxxxx","","PASSED","ACTIVE","RESOLVED"
# "ACM.1","ACM.1 Imported and ACM-issued certificates should be renewed after a specified time period","MEDIUM","EXAMPLE_ACCOUNT","111111111111","AwsCertificateManagerCertificate","arn:aws:acm:us-east-1:111111111111:certificate/xxxxx","","FAILED","ACTIVE","NEW"
# "ACM.1","ACM.1 Imported and ACM-issued certificates should be renewed after a specified time period","INFORMATIONAL","EXAMPLE_ACCOUNT","111111111111","AwsCertificateManagerCertificate","arn:aws:acm:ap-northeast-1:111111111111:certificate/xxxxx","","PASSED","ACTIVE","RESOLVED"
CSVの列名と内容は以下のとおりです。
| # | 列名 | 内容 |
|---|---|---|
| 1 | ControlID | コントロールID |
| 2 | ControlTitle | コントロールのタイトル |
| 3 | Severity | 重要度(CRITICAL, HIGH, MEDIUM など) |
| 4 | AccountName | AWSアカウント名 |
| 5 | AccountID | AWSアカウントID |
| 6 | ResourceType | リソースタイプ |
| 7 | ResourceID | リソースID(ARN) |
| 8 | ResourceNameTag | Nameタグの値 |
| 9 | ComplianceStatus | コンプライアンスステータス |
| 10 | RecordStatus | レコードステータス(ACTIVEのみ) |
| 11 | WorkflowStatus | ワークフローステータス(NEW, NOTIFIED, SUPPRESSED など) |
データソースの登録
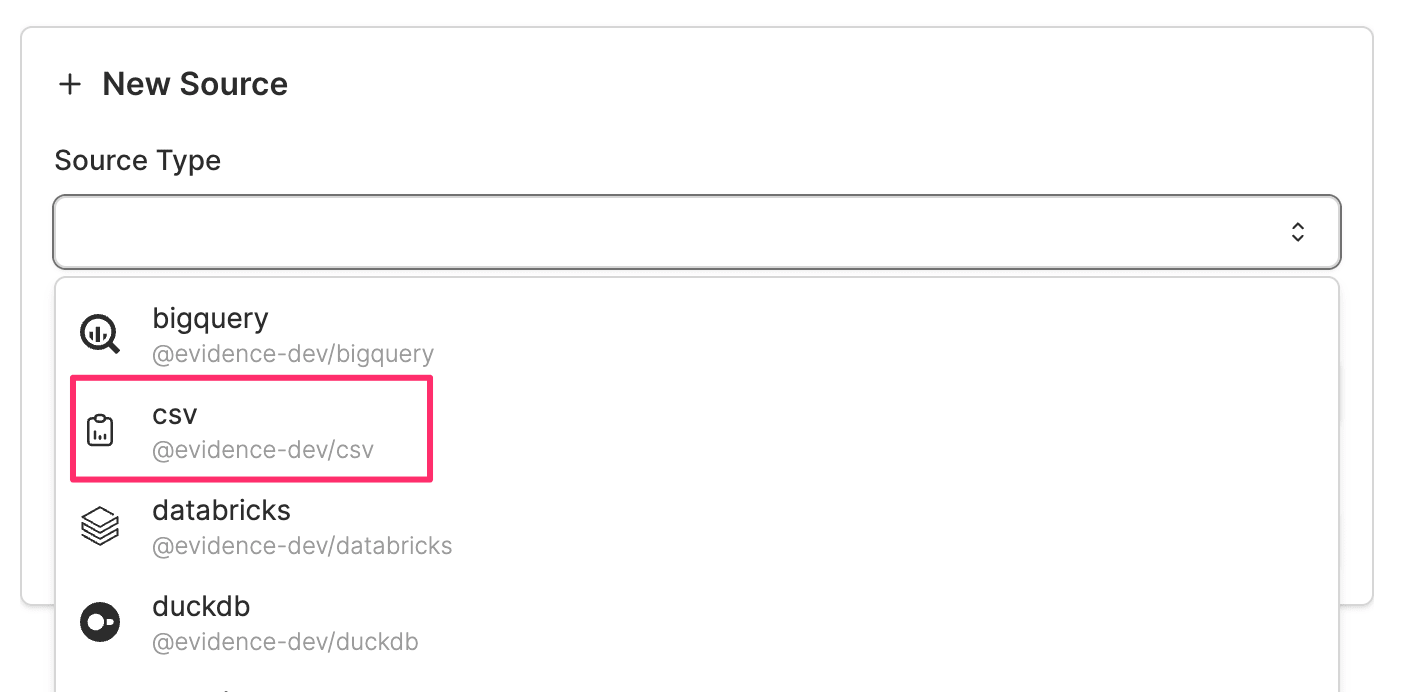
settings( localhost:3000/settings/ ) にアクセスして、 [New Source] を選択します。

Source Type として [csv] を選択して、 Directory Name を適当に記載します(例: securityhub )
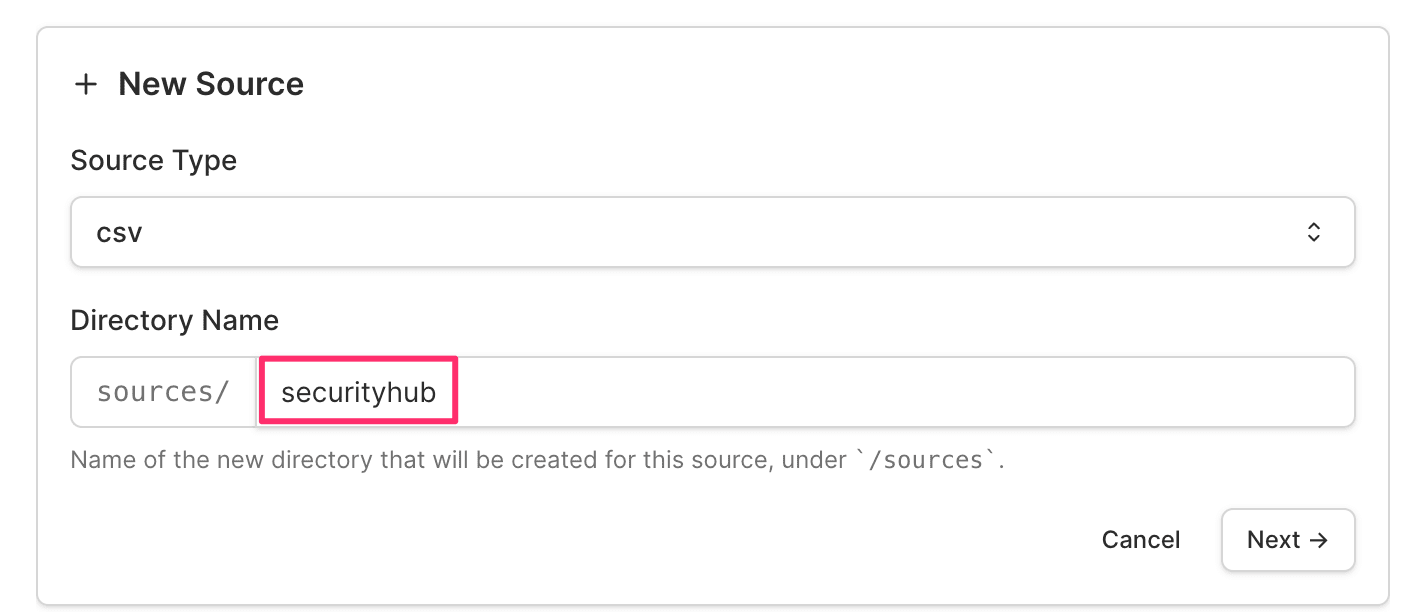
その後 [Test Configuration] ➔ [Save] と選択していって、 Connected と記載が出たらOKです。
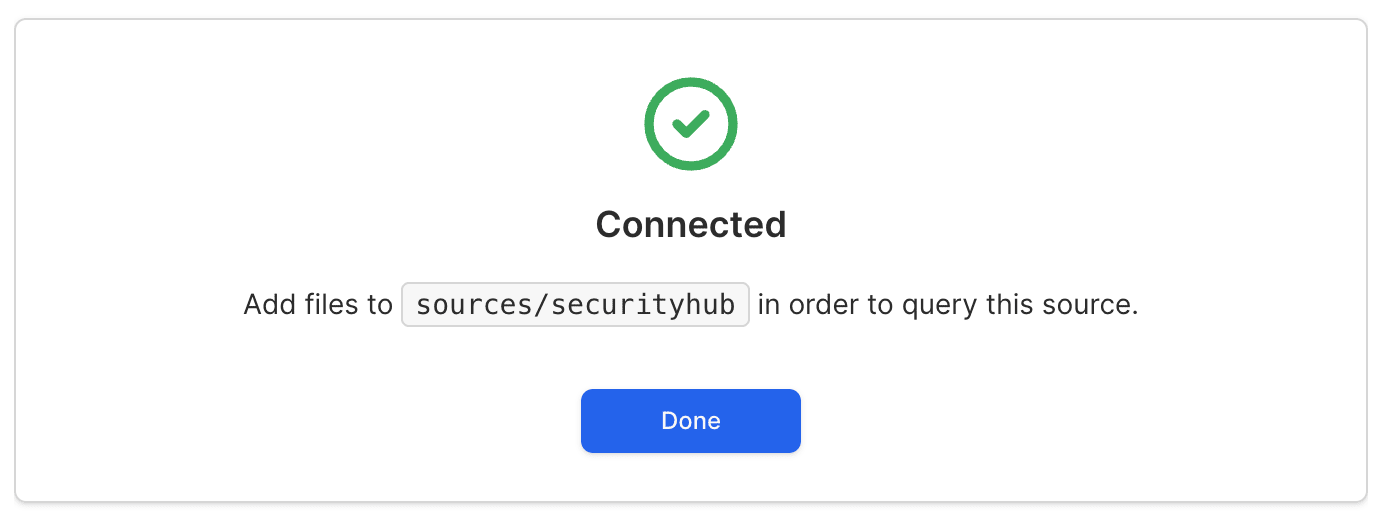
この時点で sources/securityhub ディレクトリに、 接続に必要な設定ファイルが自動生成されています。
ls sources/securityhub
# connection.options.yaml
# connection.yaml

cat sources/securityhub/connection.yaml
# # This file was automatically generated
# name: securityhub
# type: csv
# options: {}

cat sources/securityhub/connection.options.yaml
# # This file was automatically generated
# # Do not edit this file manually; instead use npx evidence-sdk sources edit
#
# # It should *not* be source controlled, as it likely contain credentials or other sensitive configuration values.
# # Values in this file are base64 encoded; https://it-tools.tech/base64-string-converter has an excellent encoder / decoder tool.
# # Base64 is NOT encryption, and should not be treated as secure
# {}
先ほど事前に作成したCSVをこのディレクトリに入れておきます。
ls -1 sources/securityhub
# all_afsbp.csv ← CSVを投下した
# connection.options.yaml
# connection.yaml
表示テストとして pages/index.md に以下テキストを加えます。
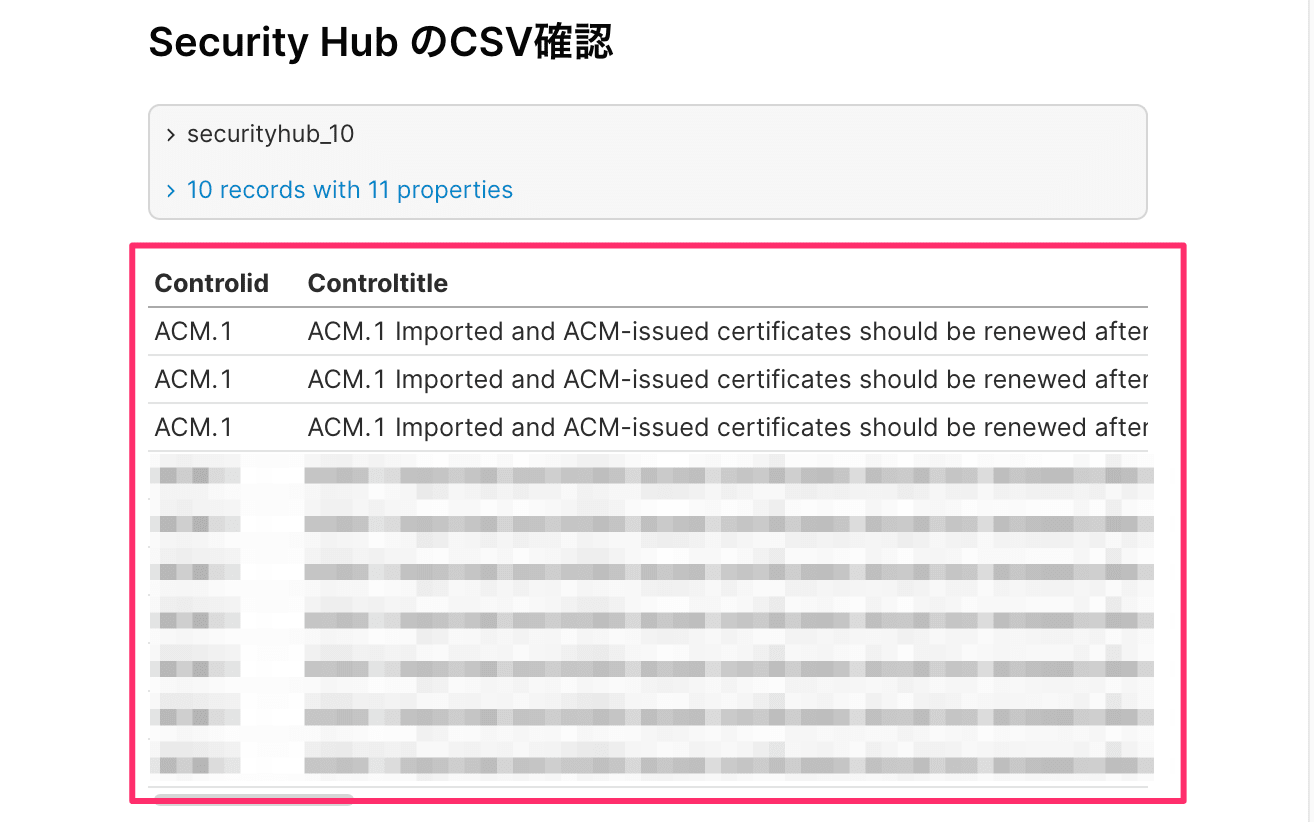
## Security Hub のCSV確認

```sql securityhub_10
  select *
  from securityhub.all_afsbp
  limit 10
```

<DataTable data={securityhub_10}/>
再度 npm run source && npm run dev を実行します。
ローカルサーバーにて表示が確認できました!
Security Hub レポートを作ってみた
pages/index.md を書き換えて、 以下のようなページを作成してみました。
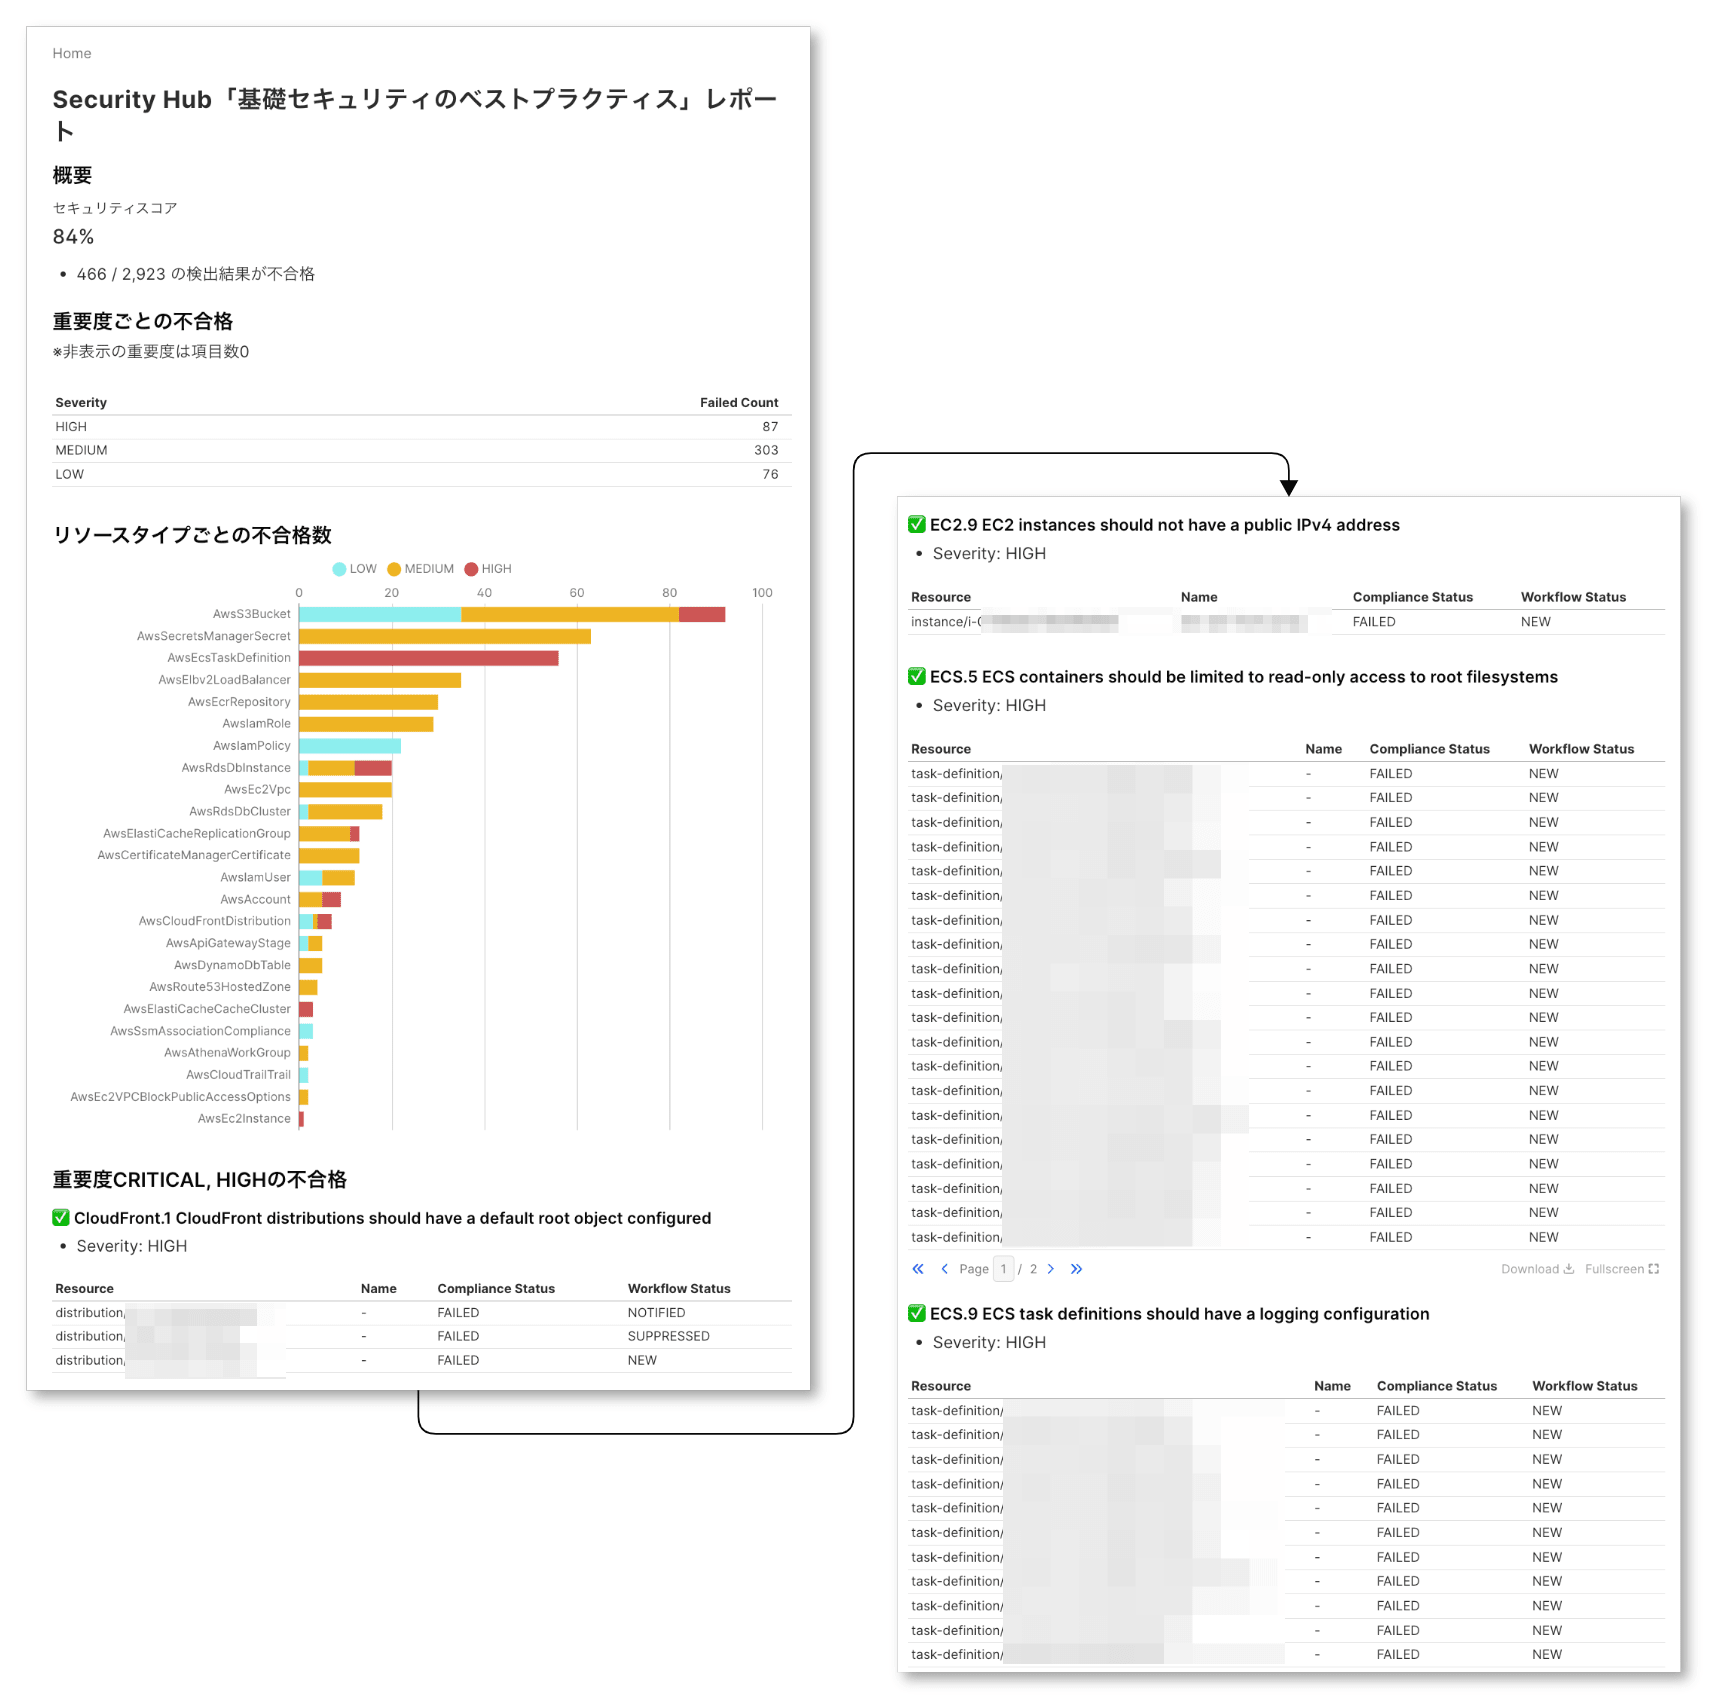
セクションごとに使用したSQLやコンポーネントを紹介します。
概要(セキュリティスコア)
## 概要

```sql overview
SELECT
  COUNT(*) as num_all_findings,
  COUNT(CASE WHEN ComplianceStatus = 'PASSED' THEN 1 END) as num_passed_findings,
  COUNT(CASE WHEN ComplianceStatus = 'FAILED' THEN 1 END) as num_failed_findings,
  COUNT(CASE WHEN ComplianceStatus = 'PASSED' THEN 1 END) / COUNT(*) as security_score,
FROM securityhub.all_afsbp;
```

<BigValue
  data={overview}
  value=security_score
  fmt='0%'
  title="セキュリティスコア"
/>

- <Value data={overview} column=num_failed_findings/> / <Value data={overview} column=num_all_findings/> の検出結果が不合格
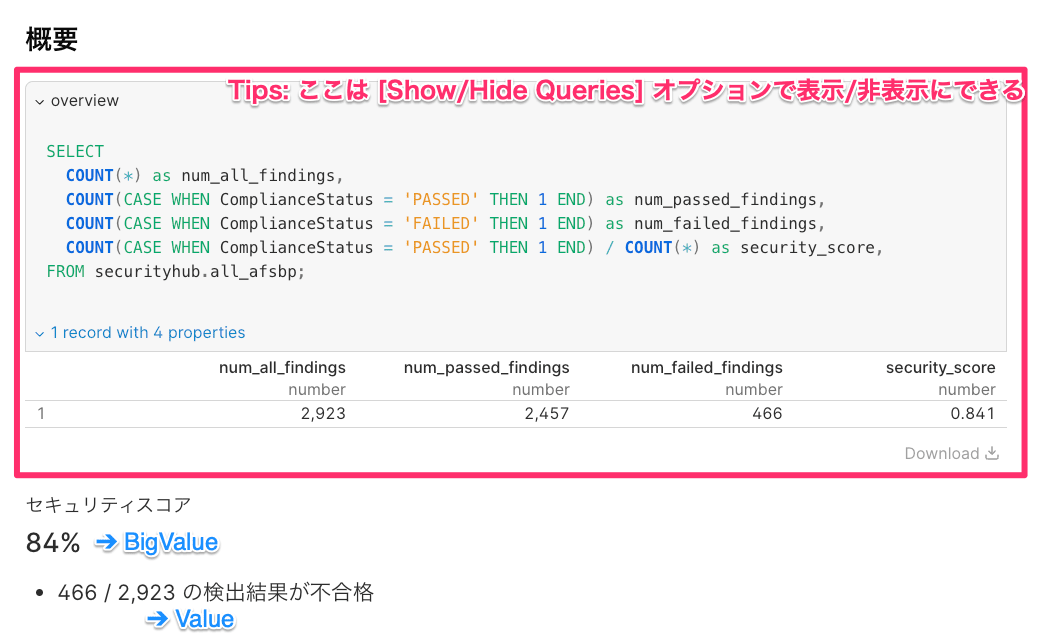
Markdown内に記載するSQLクエリは DuckDBのSQLです。
Big Value を使うことで、大きな値を表示できます。
Valueはテキスト内にクエリした結果をインライン表示させるときに便利です。
重要度ごとの不合格数
## 重要度ごとの不合格

※非表示の重要度は項目数0

```sql failed_per_severity
SELECT
  Severity,
  COUNT(*) as failed_count
FROM securityhub.all_afsbp
WHERE ComplianceStatus = 'FAILED'
GROUP BY Severity
ORDER BY
  CASE
    WHEN Severity = 'CRITICAL' THEN 1
    WHEN Severity = 'HIGH' THEN 2
    WHEN Severity = 'MEDIUM' THEN 3
    WHEN Severity = 'LOW' THEN 4
    ELSE 5
  END;
```

<DataTable data={failed_per_severity}/>
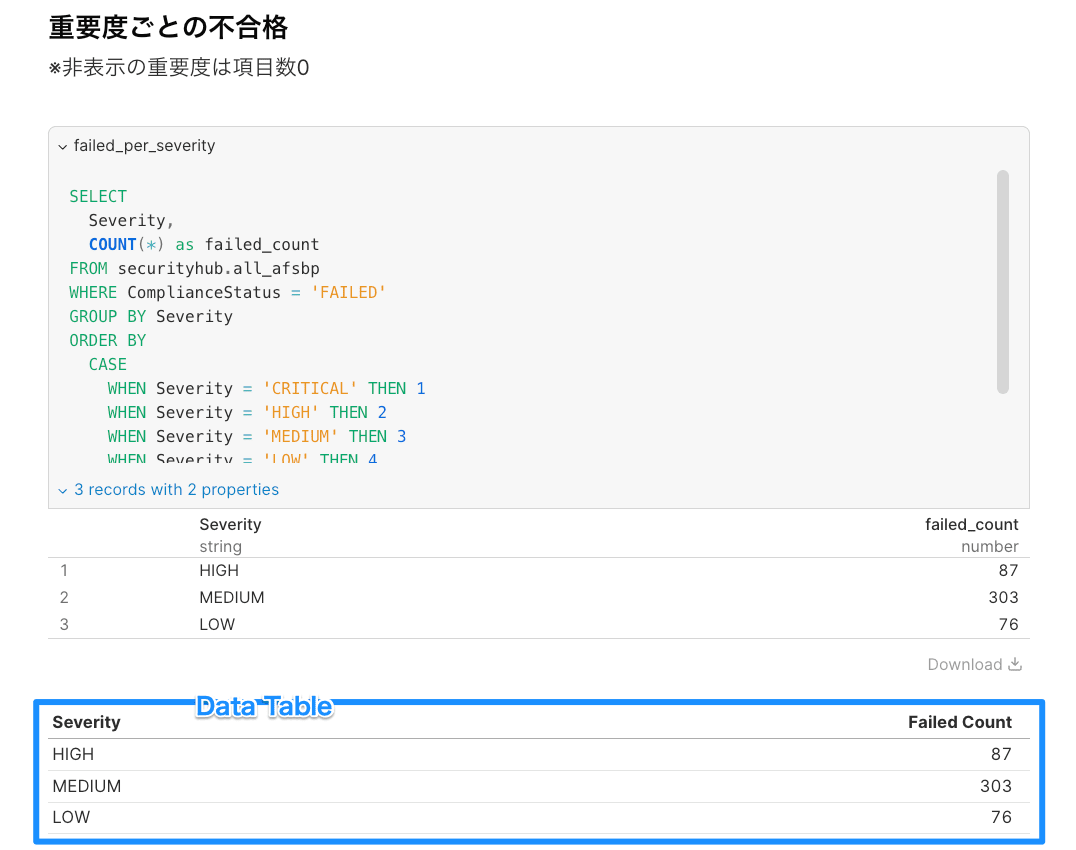
Data Table を使ってテーブルを表示します。
リソースタイプごとの不合格数
## リソースタイプごとの不合格数

```sql failed_per_resourcetype
SELECT
  ResourceType,
  Severity,
  COUNT(*) as failed_count
FROM securityhub.all_afsbp
WHERE ComplianceStatus = 'FAILED'
GROUP BY ResourceType, Severity;
```

<BarChart
  data={failed_per_resourcetype}
  x=ResourceType
  y=failed_count
  series=Severity
  swapXY=true
  seriesOrder={["LOW","MEDIUM","HIGH","CRITICAL"]}
  colorPalette={[
    '#8deeee',
    '#eeb422',
    '#cd5555',
    '#8b0000',
    ]}
/>
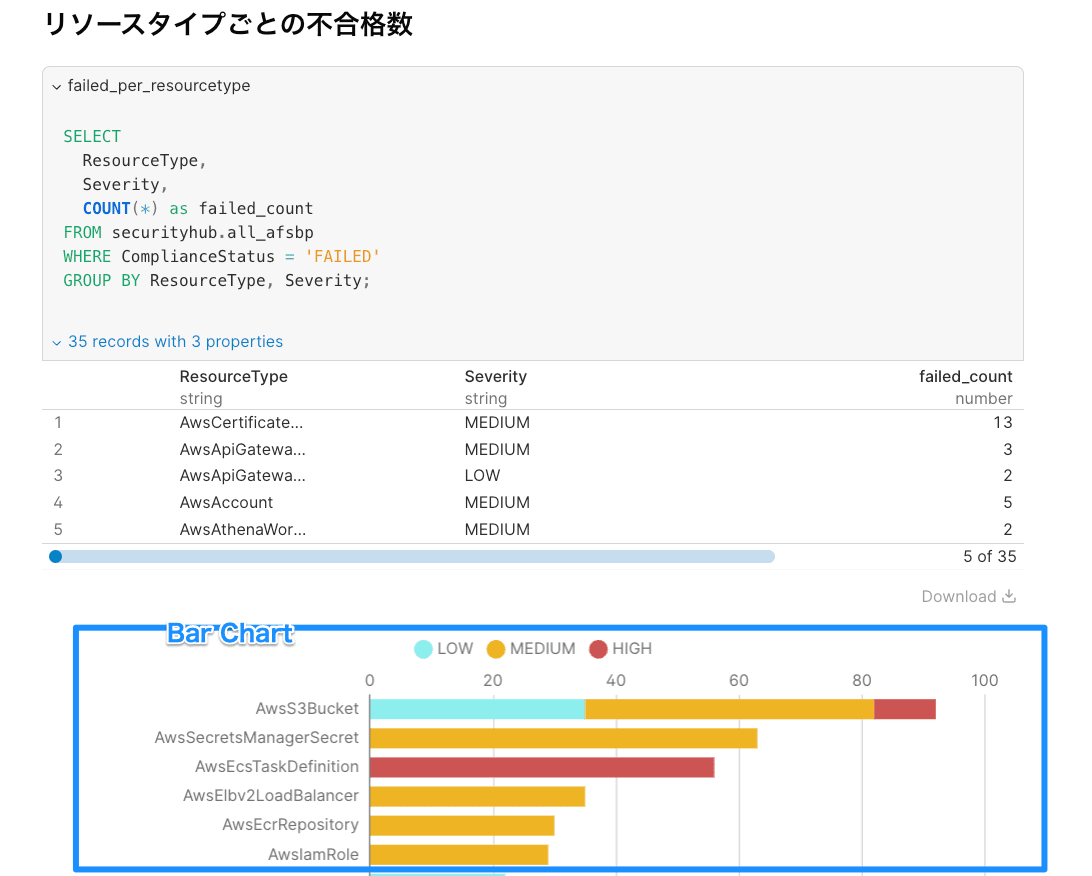
Bar Chart で棒グラフを作成します。 重要度ごとの積み上げグラフにしています。
重要度CRITICAL, HIGHの不合格
## 重要度CRITICAL, HIGHの不合格

```sql failed_titles_critical_high
SELECT DISTINCT ControlTitle, Severity
FROM securityhub.all_afsbp
WHERE
  ComplianceStatus = 'FAILED'
  AND ( Severity = 'CRITICAL' OR Severity = 'HIGH' );
```

```sql failed_resources_critical_high
SELECT
  Severity,
  regexp_replace(ResourceID, '^arn:aws:[^:]*:[^:]*:[^:]*:', '') as Resource,
  ResourceNameTag,
  ComplianceStatus,
  WorkflowStatus,
  ControlTitle,
FROM securityhub.all_afsbp
WHERE
  ComplianceStatus = 'FAILED'
  AND ( Severity = 'CRITICAL' OR Severity = 'HIGH' );
```

{#each failed_titles_critical_high as control}

### ✅️️️ {control.ControlTitle}

- Severity: {control.Severity}

<DataTable data={failed_resources_critical_high.where(`ControlTitle = '${control.ControlTitle}'`)} rows=20 >
  <Column id=Resource title="Resource"/>
  <Column id=ResourceNameTag title="Name"/>
  <Column id=ComplianceStatus title="Compliance Status"/>
  <Column id=WorkflowStatus title="Workflow Status"/>
</DataTable>

{/each}
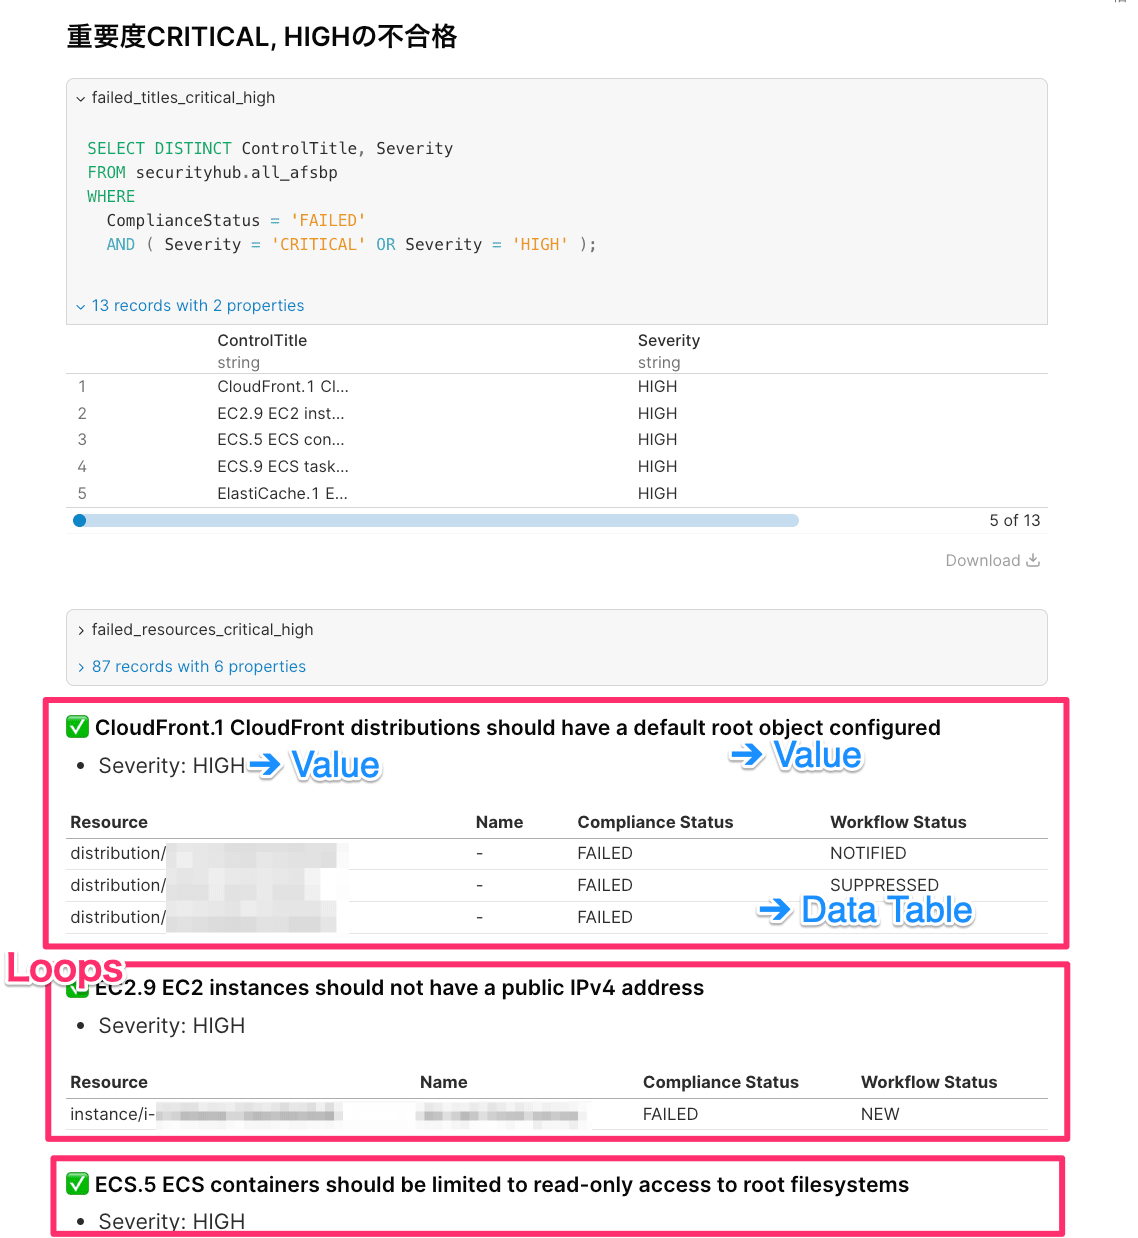
Loops ( {#each} ... {/each} ) 機能で繰り返しを実現できます。
また、 Data Table 内の failed_resources_critical_high.where(`ControlTitle = '${control.ControlTitle}'`) 部分は Query Functions 機能です。 .where() はクエリ結果を更にフィルタリングする際に役に立ちます。
おわりに
Evidenceを使って Security Hub のスコアを可視化してみました。
Markdownでコード管理できるのは非常に魅力的です。 動作も非常に軽いです。
また、 npm run build コマンドで 静的サイトを生成できます。 ビルド成果物をS3やその他のホスティングサービスに 格納して、簡単に共有できるのも良い体験です (参考: Deployment Overview | Evidence)。
BIツールの1候補として、今後検討したいところです。
以上、参考になれば幸いです。
参考