
AWS SAM CLI の .NET 10 対応で Native AOT オプションが選択できるようになっていたので使ってみた
いわさです。
先日、AWS Lambda の API が .NET 10 をサポートしている気配を感じたので検証してブログを書きました。
この時はまだマネジメントコンソール上から新規関数作成時に .NET 10 ランタイムを選択は出来なかったのですが、先程確認してみたところマネジメントコンソールにも追加されていました。
そんな中、AWS SAM CLI も .NET 10 をサポートしまして、具体的には v1.151.0 でsam initで .NET 10 のテンプレートが追加されていたりします。
試しにこいつを使ってみたところ、どうやら今回から SAM CLI のオプションで Native AOT の有効・無効を選択できるようになっているみたいで、ちょっと触ってみたので紹介します。
v1.151.0 からクイックスタートテンプレートに追加
AWS SAM CLI のリリースノートに記載されているとおり、2025 年 12 月 18 日リリースの v1.151.0 で .NET 10 ランタイムのサポートが追加されています。
ということでまずはローカルの AWS SAM CLI をバージョンアップしましょう。
% sam --version
SAM CLI, version 1.151.0
バージョンアップ後、sam initコマンドでクイックスタートテンプレートを眺めてみます。
% sam init -a arm64
Which template source would you like to use?
1 - AWS Quick Start Templates
2 - Custom Template Location
Choice: 1
Choose an AWS Quick Start application template
1 - Hello World Example
2 - Data processing
3 - Hello World Example with Powertools for AWS Lambda
4 - Multi-step workflow
5 - Scheduled task
6 - Standalone function
7 - Serverless API
8 - Infrastructure event management
9 - Lambda Response Streaming
10 - GraphQLApi Hello World Example
11 - Full Stack
12 - Durable Functions
13 - Lambda EFS example
14 - Serverless Connector Hello World Example
15 - Multi-step workflow with Connectors
16 - Hello World Durable Function Example
17 - DynamoDB Example
18 - Machine Learning
Template: 1
Use the most popular runtime and package type? (python3.14 and zip) [y/N]:
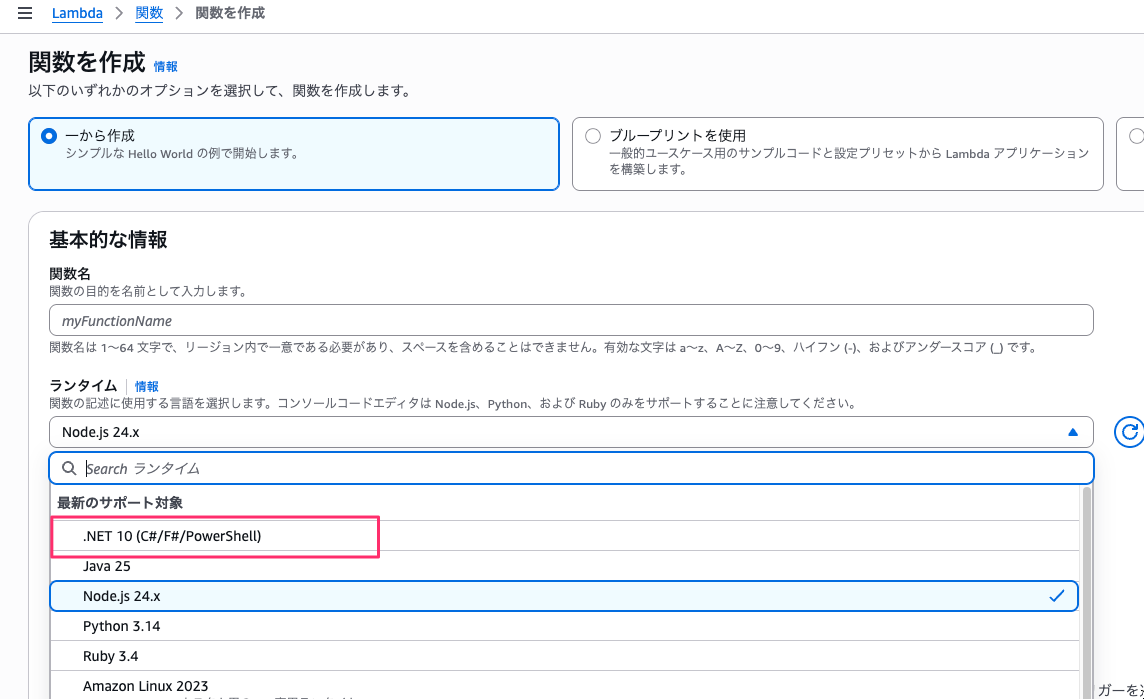
Which runtime would you like to use?
1 - dotnet10
2 - dotnet8
3 - dotnet6
4 - go (provided.al2)
5 - go (provided.al2023)
6 - graalvm.java11 (provided.al2)
7 - graalvm.java17 (provided.al2)
8 - java25
9 - java21
10 - java17
11 - java11
12 - java8.al2
13 - nodejs24.x
14 - nodejs22.x
15 - nodejs20.x
16 - python3.9
17 - python3.14
18 - python3.13
19 - python3.12
20 - python3.11
21 - python3.10
22 - ruby3.4
23 - ruby3.3
24 - ruby3.2
25 - rust (provided.al2)
26 - rust (provided.al2023)
Runtime: 1
.NET 10 がありますね。
そのまま選択して進めてみると、なんと今回は .NET 用に追加のオプションがあって、通常のテンプレートか Native AOT を有効化したテンプレートかを選べるみたいです。
What package type would you like to use?
        1 - Zip
        2 - Image
Package type: 1

Based on your selections, the only dependency manager available is cli-package.
We will proceed copying the template using cli-package.

Select your starter template
        1 - Hello World Example
        2 - Hello World Example using native AOT
Template: 1
Native AOT 周りは後ほど触ってみましょう。
まずは普通に作成してみます。
作成された関数が以下です。
using System.Collections.Generic;
using System.Linq;
using System.Threading.Tasks;
using System.Net.Http;
using System.Text.Json;

using Amazon.Lambda.Core;
using Amazon.Lambda.APIGatewayEvents;

// Assembly attribute to enable the Lambda function's JSON input to be converted into a .NET class.
[assembly: LambdaSerializer(typeof(Amazon.Lambda.Serialization.SystemTextJson.DefaultLambdaJsonSerializer))]

namespace HelloWorld;

public class Function
{

    private static readonly HttpClient client = new HttpClient();

    private static async Task<string> GetCallingIP()
    {
        client.DefaultRequestHeaders.Accept.Clear();
        client.DefaultRequestHeaders.Add("User-Agent", "AWS Lambda .Net Client");

        var msg = await client.GetStringAsync("http://checkip.amazonaws.com/").ConfigureAwait(continueOnCapturedContext:false);

        return msg.Replace("\n","");
    }

    public async Task<APIGatewayProxyResponse> FunctionHandler(APIGatewayProxyRequest apigProxyEvent, ILambdaContext context)
    {

        var location = await GetCallingIP();
        var body = new Dictionary<string, string>
        {
            { "message", "hello world" },
            { "location", location }
        };

        return new APIGatewayProxyResponse
        {
            Body = JsonSerializer.Serialize(body),
            StatusCode = 200,
            Headers = new Dictionary<string, string> { { "Content-Type", "application/json" } }
        };
    }
}
まぁ普通ですね。いつもどおりって感じです。
csprojも眺めてみましょう。
<Project Sdk="Microsoft.NET.Sdk">
  <PropertyGroup>
    <TargetFramework>net10.0</TargetFramework>
    <ImplicitUsings>enable</ImplicitUsings>
    <Nullable>enable</Nullable>
    <GenerateRuntimeConfigurationFiles>true</GenerateRuntimeConfigurationFiles>
    <AWSProjectType>Lambda</AWSProjectType>
    <!-- This property makes the build directory similar to a publish directory and helps the AWS .NET Lambda Mock Test Tool find project dependencies. -->
    <CopyLocalLockFileAssemblies>true</CopyLocalLockFileAssemblies>
    <!-- Generate ready to run images during publishing to improve cold start time. -->
    <PublishReadyToRun>true</PublishReadyToRun>
  </PropertyGroup>
  <ItemGroup>
    <PackageReference Include="Amazon.Lambda.Core" Version="2.2.0" />
    <PackageReference Include="Amazon.Lambda.Serialization.SystemTextJson" Version="2.4.0" />
    <PackageReference Include="Amazon.Lambda.APIGatewayEvents" Version="2.7.0" />
  </ItemGroup>
</Project>
TargetFrameworkにnet10.0が指定されています。
.NET 10 ですね。
このままビルドしてデプロイしてみましょう。
% cd hoge1222dotnet1
% sam build
Starting Build use cache

:

... publish: /usr/local/share/dotnet/sdk/9.0.102/Sdks/Microsoft.NET.Sdk/targets/Microsoft.NET.TargetFrameworkInference.targets(166,5): error NETSDK1045: The current .NET SDK does not
support targeting .NET 10.0.  Either target .NET 9.0 or lower, or use a version of the .NET SDK that supports .NET 10.0. Download the .NET SDK from https://aka.ms/dotnet/download
[/Users/iwasa.takahito/work/hoge1222samcli/hoge1222dotnet1/src/HelloWorld/HelloWorld.csproj]
ERROR: The dotnet publish command return unsuccessful error code

Build Failed
Error: DotnetCliPackageBuilder:RunPackageAction - Dotnet CLI Failed:
ビルドに失敗しました。
ローカルに .NET 10 をインストールしてなかったです。.NET 9 のままだったかも。バージョンを確認してみましょう。
% dotnet --version
9.0.102
やはり。
ということでローカルの .NET を 10 に更新します。以下からインストーラーを入手しましょう。
% dotnet --version
10.0.101
良さそうですね。
ではsam buildからsam deployまでをもう一度試してみましょう。
% sam build
Starting Build use cache
Cache is invalid, running build and copying resources for following functions (HelloWorldFunction)
Building codeuri: /Users/iwasa.takahito/work/hoge1222samcli/hoge1222dotnet1/src/HelloWorld runtime: dotnet10 architecture: arm64 functions: HelloWorldFunction
Workflow DotnetCliPackageBuilder does not support value "False" for building in source. Using default value "True".

:

Build Succeeded

Built Artifacts  : .aws-sam/build
Built Template   : .aws-sam/build/template.yaml

Commands you can use next
=========================
[*] Validate SAM template: sam validate
[*] Invoke Function: sam local invoke
[*] Test Function in the Cloud: sam sync --stack-name {{stack-name}} --watch
[*] Deploy: sam deploy --guided
ビルドできましたね。デプロイもこのまましちゃいます。
% sam deploy
Managed S3 bucket: aws-sam-cli-managed-default-samclisourcebucket-b2ke18r5t3j
Auto resolution of buckets can be turned off by setting resolve_s3=False
To use a specific S3 bucket, set --s3-bucket=<bucket_name>
Above settings can be stored in samconfig.toml
Uploading to 2bfe33e49b47d948b25159937011a164 54208 / 54208 (100.00%)
Deploying with following values
===============================
Stack name : hoge1222dotnet1
Region : ap-northeast-1
Confirm changeset : True
Disable rollback : False
Deployment s3 bucket : aws-sam-cli-managed-default-samclisourcebucket-b2ke18r5t3j
Capabilities : ["CAPABILITY_IAM"]
Parameter overrides : {}
Signing Profiles : {}
:
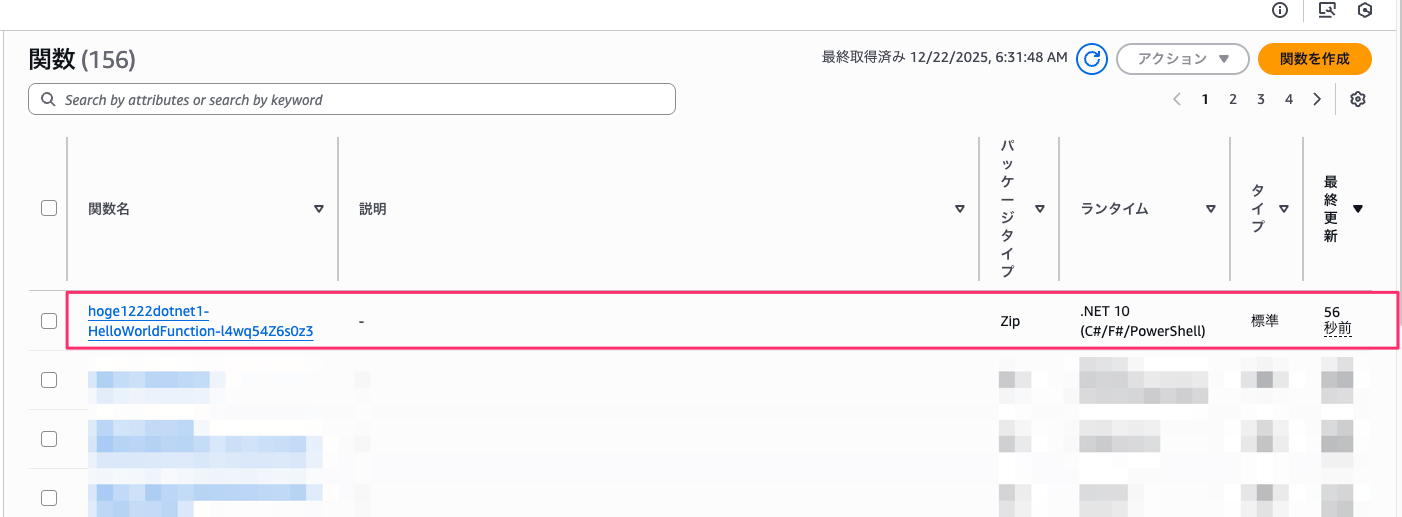
Successfully created/updated stack - hoge1222dotnet1 in ap-northeast-1
デプロイも成功しました。
マネジメントコンソールを見てみると、次のように .NET 10 の関数がデプロイされたことが確認できます。
Natvie AOT を使ってみる
では SAM CLI で Native AOT のテンプレートが用意されているのでこちらも使ってみましょう。
思い返せば前までも一応テンプレートは用意されていたような気もします。
ちなみに Native AOT というのは、.NET 7 以降で使えるようになったビルドオプションで、JIT ではなくて事前にネイティブコンパイルしておくことで実行時の JIT コンパイルが不要になって起動時間が早くなるというものです。
Lambda などではコールドスタート時間の短縮が期待できます。
これまではプロジェクトファイルをいじって事前準備が必要だったのですが、SAM CLI からテンプレート初期化するだけで Natvie AOT を有効化した Lambda 関数が作成できるみたいです。作成できるというか有効化されたテンプレートが提供されているだけではあるのですが。
試してみましょう。
Which runtime would you like to use?
        1 - dotnet10
        2 - dotnet8
        3 - dotnet6
        4 - go (provided.al2)
        5 - go (provided.al2023)
        6 - graalvm.java11 (provided.al2)
        7 - graalvm.java17 (provided.al2)
        8 - java25
        9 - java21
        10 - java17
        11 - java11
        12 - java8.al2
        13 - nodejs24.x
        14 - nodejs22.x
        15 - nodejs20.x
        16 - python3.9
        17 - python3.14
        18 - python3.13
        19 - python3.12
        20 - python3.11
        21 - python3.10
        22 - ruby3.4
        23 - ruby3.3
        24 - ruby3.2
        25 - rust (provided.al2)
        26 - rust (provided.al2023)
Runtime: 1

What package type would you like to use?
        1 - Zip
        2 - Image
Package type: 1

Based on your selections, the only dependency manager available is cli-package.
We will proceed copying the template using cli-package.

Select your starter template
        1 - Hello World Example
        2 - Hello World Example using native AOT
Template: 2
2 - Hello World Example using native AOTを選択しました。
通常版と関数の内容が違っていますね。
Lambda で .NET ランタイムを使う場合、通常はクラスライブラリハンドラーを使います。名前空間とクラス名、メソッド名を指定しますよね。
それとは別で実行可能アセンブリハンドラーの指定もできます。この場合はMainメソッドの中に関数コードを配置してやります。その上で Lambda ランタイムをブートストラップする必要があって、LambdaBootstrapBuilderが提供されています。[1]
using System.Collections.Generic;
using System.Linq;
using System.Threading.Tasks;
using System.Net.Http;
using System.Text.Json;
using System.Text.Json.Serialization;

using Amazon.Lambda.Core;
using Amazon.Lambda.RuntimeSupport;
using Amazon.Lambda.APIGatewayEvents;
using Amazon.Lambda.Serialization.SystemTextJson;

namespace HelloWorldAot;

public class Function
{
    private static readonly HttpClient client = new HttpClient();

    /// <summary>
    /// The main entry point for the Lambda function. The main function is called once during the Lambda init phase. It
    /// initializes the .NET Lambda runtime client passing in the function handler to invoke for each Lambda event and
    /// the JSON serializer to use for converting Lambda JSON format to the .NET types.
    /// </summary>
    private static async Task Main()
    {
        Func<APIGatewayHttpApiV2ProxyRequest, ILambdaContext, Task<APIGatewayHttpApiV2ProxyResponse>> handler = FunctionHandler;
        await LambdaBootstrapBuilder.Create(handler, new SourceGeneratorLambdaJsonSerializer<LambdaFunctionJsonSerializerContext>())
            .Build()
            .RunAsync();
    }

    private static async Task<string> GetCallingIP()
    {
        client.DefaultRequestHeaders.Accept.Clear();
        client.DefaultRequestHeaders.Add("User-Agent", "AWS Lambda .Net Client");

        var msg = await client.GetStringAsync("http://checkip.amazonaws.com/").ConfigureAwait(continueOnCapturedContext:false);

        return msg.Replace("\n","");
    }

    public static async Task<APIGatewayHttpApiV2ProxyResponse> FunctionHandler(APIGatewayHttpApiV2ProxyRequest apigProxyEvent, ILambdaContext context)
    {

        var location = await GetCallingIP();
        var body = new Dictionary<string, string>
        {
            { "message", "hello world" },
            { "location", location }
        };

        return new APIGatewayHttpApiV2ProxyResponse
        {
            Body = JsonSerializer.Serialize(body, typeof(Dictionary<string, string>), LambdaFunctionJsonSerializerContext.Default),
            StatusCode = 200,
            Headers = new Dictionary<string, string> { { "Content-Type", "application/json" } }
        };
    }
}

[JsonSerializable(typeof(APIGatewayHttpApiV2ProxyRequest))]
[JsonSerializable(typeof(APIGatewayHttpApiV2ProxyResponse))]
[JsonSerializable(typeof(Dictionary<string, string>))]
public partial class LambdaFunctionJsonSerializerContext : JsonSerializerContext
{
    // By using this partial class derived from JsonSerializerContext, we can generate reflection free JSON Serializer code at compile time
    // which can deserialize our class and properties. However, we must attribute this class to tell it what types to generate serialization code for.
    // See https://docs.microsoft.com/en-us/dotnet/standard/serialization/system-text-json-source-generation
}
そしてプロジェクトファイルでは次のように Native AOT の使用が明示されています。
PublishAotがTrueになっていますね。
<Project Sdk="Microsoft.NET.Sdk">
  <PropertyGroup>
    <OutputType>exe</OutputType>
    <TargetFramework>net10.0</TargetFramework>
    <ImplicitUsings>enable</ImplicitUsings>
    <Nullable>enable</Nullable>
    <AWSProjectType>Lambda</AWSProjectType>
    <AssemblyName>bootstrap</AssemblyName>
    <!-- This property makes the build directory similar to a publish directory and helps the AWS .NET Lambda Mock Test Tool find project dependencies. -->
    <CopyLocalLockFileAssemblies>true</CopyLocalLockFileAssemblies>
    <!-- Generate native aot images during publishing to improve cold start time. -->
    <PublishAot>true</PublishAot>
		<!-- StripSymbols tells the compiler to strip debugging symbols from the final executable if we're on Linux and put them into their own file.
		This will greatly reduce the final executable's size.-->
		<StripSymbols>true</StripSymbols>
  </PropertyGroup>
  <ItemGroup>
    <PackageReference Include="Amazon.Lambda.Core" Version="2.2.0" />
    <PackageReference Include="Amazon.Lambda.RuntimeSupport" Version="1.10.0" />
    <PackageReference Include="Amazon.Lambda.Serialization.SystemTextJson" Version="2.4.0" />
    <PackageReference Include="Amazon.Lambda.APIGatewayEvents" Version="2.7.0" />
  </ItemGroup>
</Project>
そして StripSynbols も True になっています。
こちらを False にすると実行可能ファイルにデバッグシンボルが含まれるようになりファイルサイズが大きくなります。
これをビルドしてみましょう。
% cd hoge1222dotnet2
% sam build
Starting Build use cache

:

Build Succeeded

Built Artifacts  : .aws-sam/build
Built Template   : .aws-sam/build/template.yaml

Commands you can use next
=========================
[*] Validate SAM template: sam validate
[*] Invoke Function: sam local invoke
[*] Test Function in the Cloud: sam sync --stack-name {{stack-name}} --watch
[*] Deploy: sam deploy --guided
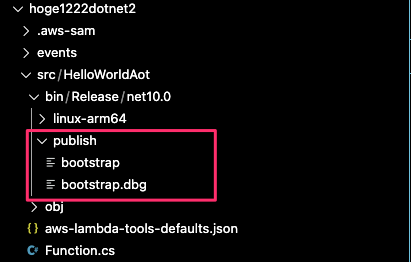
出来ましたね。publish フォルダを見てみると実行ファイルアセンブリが作成されています。
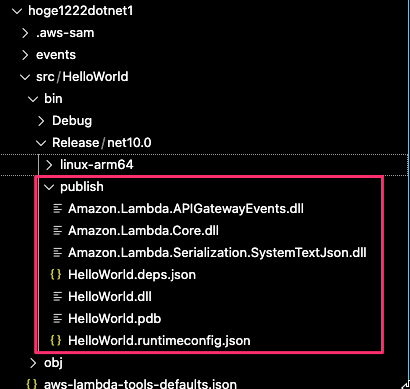
通常は次のように.dll拡張子のクラスライブラリが配置されるのです。
このままデプロイもしちゃいましょう。
.NET 10 の関数が作成されていますね。
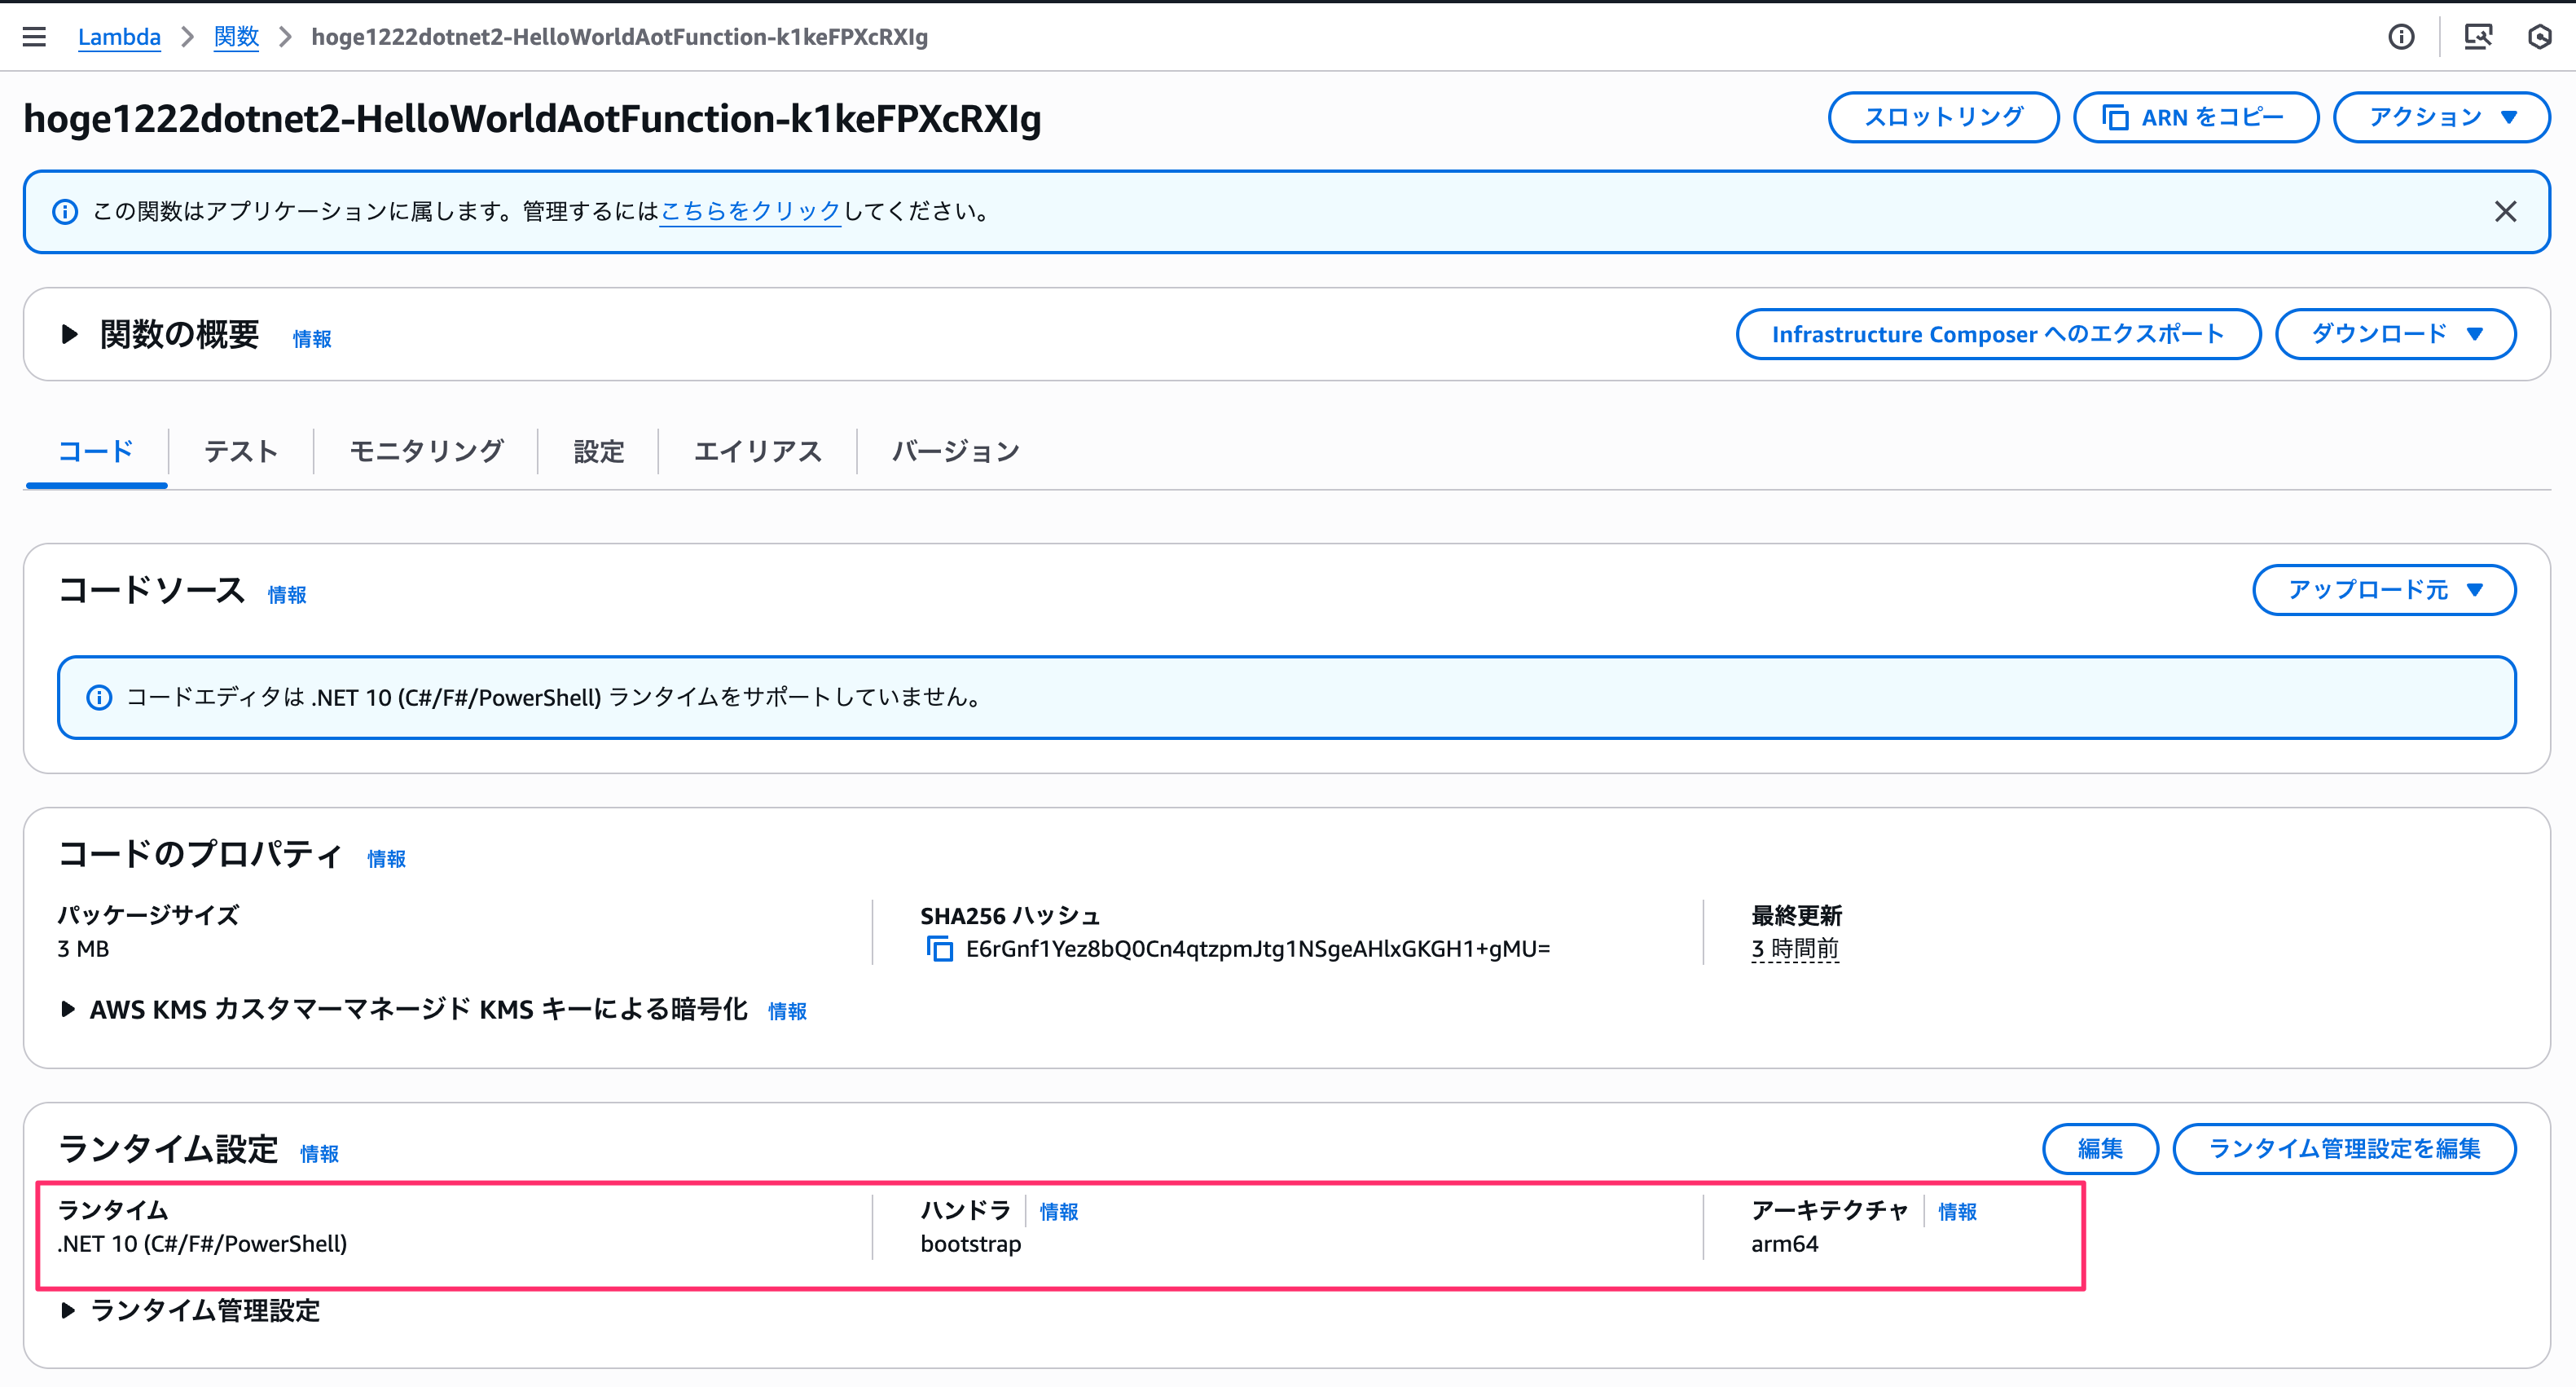
そしてハンドラはbootstrapが指定されています。
実行可能アセンブリの場合はアセンブリ名を指定する必要があるのでこのような感じになっています。そしてMainメソッドが実行される感じですね。
さいごに
本日は AWS SAM CLI の .NET 10 対応で Native AOT オプションが選択できるようになっていたので使ってみました。
.NET 10 は最新 LTS バージョンなので、今後の新規作成で .NET 6 や .NET 8 を SAM CLI で選択する必要はないですね。.NET 10 を基本的に使っていきましょう。
なお、Native AOT のパフォーマンスは今回は評価していません。
.NET は SnapStart オプションも有料で使うことが出来ますが比較してみたいですね。


