Service Brokerを利用してKubernetes(EKS)からAWSのリソースを作成する
この記事は公開されてから1年以上経過しています。情報が古い可能性がありますので、ご注意ください。
kubernetes好きのみなさん、Service Brokerは使っていますか?
Service Brokerを使えば、KubernetesのAPI経由でAWSやGCPなどの外部リソース(RDSやS3など)を管理することができます。なかなか面白い機能です。 ということで本日は、Service Broker(とService Catalog)を利用してAWSのリソースを作成する方法を紹介したいと思います。
現時点で管理できるAWSのリソースは以下になります。
- dynamodb AWS Service Broker - Amazon DynamoDB
- sqs AWS Servicebroker - Amazon SQS
- s3 AWS Service Broker - Amazon S3
- sns AWS Service Broker - Amazon SNS
- polly AWS Service Broker - Amazon Polly
- kinesis AWS Service Broker - Amazon Kinesis Data Stream
- elasticache AWS Service Broker - Amazon ElastiCache for memcached
- kms AWS Service Broker - KMS Key
- route53 AWS Service Broker - Amazon Route 53
- rdspostgresql AWS Service Broker - Amazon RDS for PostgreSQL
- emr AWS Service Broker - Amazon EMR
- rdsmariadb AWS Service Broker - Amazon RDS for MariaDB
- athena AWS Service Broker - Amazon Athena
- redshift AWS Service Broker - Amazon Redshift
- rekognition AWS Service Broker - Amazon Rekognition
- lex AWS Service Broker - Amazon Lex
- translate AWS Service Broker - Amazon Translate
- rdsmysql AWS Service Broker - Amazon RDS for MySQL
こちらのドキュメントを元に進めていきます。
今回構築する環境および実施内容のイメージ
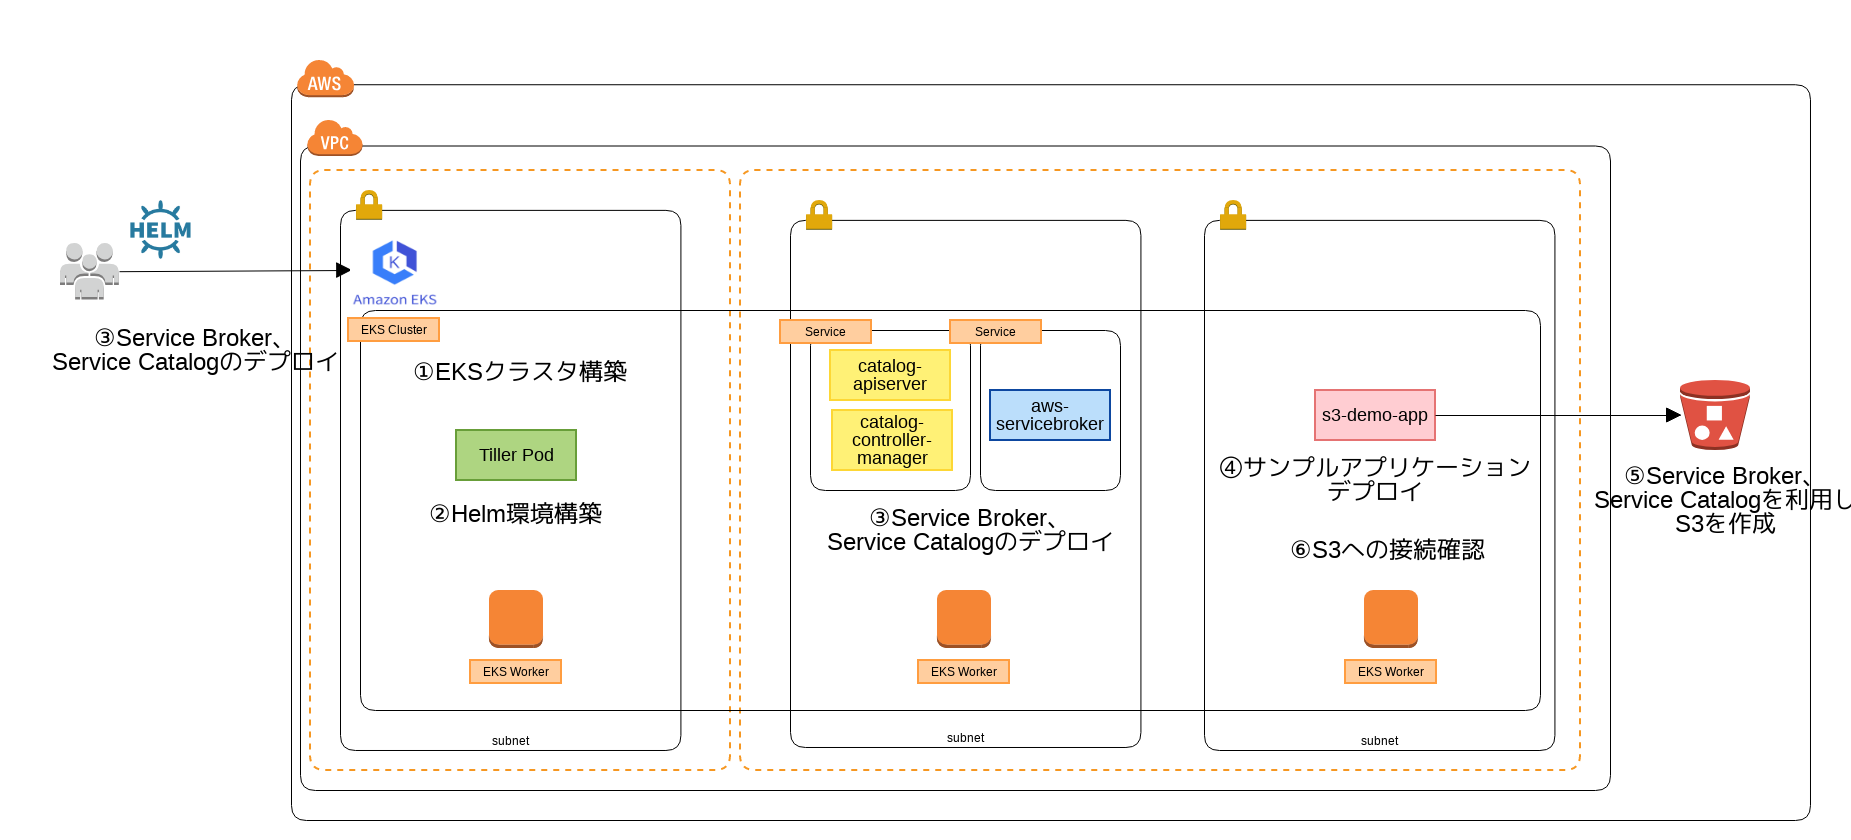
今回は以下の作業を実施します。
- EKSクラスタ構築
- Helm環境構築
- Service Broker、Service Catalogのデプロイ
- サンプルアプリケーションデプロイ
- Service Broker、Service Catalogを利用しS3を作成
- サンプルアプリケーションからのS3への接続確認
では早速やっていきましょう!
EKSクラスタを構築する
以下を参考に東京リージョンにEKSクラスタを構築します。
3つのWorkerノードをクラスタ化した状態からスタートします。 kubectlでの実行結果は以下のようになります。
$ kubectl get nodes
NAME                                                 STATUS     ROLES    AGE   VERSION
ip-192-168-168-64.ap-northeast-1.compute.internal    NotReady   <none>   0s    v1.11.5
ip-192-168-176-167.ap-northeast-1.compute.internal   NotReady   <none>   1s    v1.11.5
ip-192-168-220-213.ap-northeast-1.compute.internal   NotReady   <none>   1s    v1.11.5

$ kubectl get all
NAME                 TYPE        CLUSTER-IP   EXTERNAL-IP   PORT(S)   AGE
service/kubernetes   ClusterIP   10.100.0.1   <none>        443/TCP   19m
Helm環境構築
Service Broker、Service CatalogのデプロイにはHelmを利用します。まずはHelmを利用するため初期処理を行います。
#kube-systemにserviceaccountを作成
$ kubectl create serviceaccount tiller --namespace kube-system
serviceaccount/tiller created

#serviceaccountにRoleを紐付け
$ kubectl create clusterrolebinding tiller \
--clusterrole=cluster-admin \
--serviceaccount=kube-system:tiller
clusterrolebinding.rbac.authorization.k8s.io/tiller created

#EKSクラスタ上にtillerをデプロイ
$ helm init --service-account tiller
$HELM_HOME has been configured at /Users/jogan.naoki/.helm.

Tiller (the Helm server-side component) has been installed into your Kubernetes Cluster.

Please note: by default, Tiller is deployed with an insecure 'allow unauthenticated users' policy.
To prevent this, run `helm init` with the --tiller-tls-verify flag.
For more information on securing your installation see: https://docs.helm.sh/using_helm/#securing-your-helm-installation
Happy Helming!
デプロイが完了すると名前空間kube-systemにtillerのpodが作成されます。
$ kubectl get pods -n kube-system -l name=tiller
NAME                             READY   STATUS    RESTARTS   AGE
tiller-deploy-57f988f854-vdx6q   1/1     Running   0          1m
Service Broker、Service Catalogをデプロイする
次にEKSクラスタ上にService BrokerおよびServiceCatalogをデプロイします。
Service Brokerとは
Service Brokerは、開発者からの要求を受けてAWSやGCPなどの各種リソース(RDSやS3など)を作成するAPIサーバーです。Service Brokerは各プロバイダー毎に用意されています。AWSの場合、Service BrokerはCloudFormationにより必要なリソースを作成します。
Service Brokerは大きく分けて以下2つのリソースを作成します。
- Service Instance
- 対象のリソースを作成(RDSやS3など)
- k8sのマニュフェスト(kind: ServiceInstance)として定義
- Service Binding
- Service Instanceへの接続情報を作成
- k8sのマニュフェスト(kind: ServiceBinding)として定義
Service Catalogとは
Service Catalogは、KubernetesのAPIサーバーからの要求を受けてService Brokerを実行するAPIサーバーです。 KubernetesのAPIからリソースを作成する際には、Service Catalogを経由してService Brokerが呼び出されます。
Service Catalogのデプロイ
まずはService Catalogの方からデプロイしていきます。
#リポジトリを追加
$ helm repo add svc-cat https://svc-catalog-charts.storage.googleapis.com

#Service Catalogをデプロイ
$ helm install svc-cat/catalog \
    --name catalog --namespace catalog --wait
NAME:   catalog
LAST DEPLOYED: Wed Dec 26 04:59:51 2018
NAMESPACE: catalog
STATUS: DEPLOYED

RESOURCES:
==> v1beta1/APIService
NAME                           AGE
v1beta1.servicecatalog.k8s.io  2s

==> v1/RoleBinding
servicecatalog.k8s.io:apiserver-authentication-reader  2s
service-catalog-controller-manager-cluster-info        2s
service-catalog-controller-manager-leader-election     2s

==> v1/Role
servicecatalog.k8s.io:cluster-info-configmap             2s
servicecatalog.k8s.io:leader-locking-controller-manager  2s

==> v1/ServiceAccount
service-catalog-apiserver           2s
service-catalog-controller-manager  2s

==> v1/Pod(related)

NAME                                                 READY  STATUS             RESTARTS  AGE
catalog-catalog-apiserver-58dd7744c5-bshgk           0/2    ContainerCreating  0         1s
catalog-catalog-controller-manager-755b8b54d4-nsj86  0/1    ContainerCreating  0         2s

==> v1/Secret

NAME                            AGE
catalog-catalog-apiserver-cert  2s

==> v1/Service
catalog-catalog-apiserver  2s

==> v1beta1/Deployment
catalog-catalog-apiserver           2s
catalog-catalog-controller-manager  2s

==> v1/ClusterRole
servicecatalog.k8s.io:apiserver           2s
servicecatalog.k8s.io:controller-manager  2s

==> v1/ClusterRoleBinding
servicecatalog.k8s.io:apiserver                 2s
servicecatalog.k8s.io:apiserver-auth-delegator  2s
servicecatalog.k8s.io:controller-manager        2s
デプロイが完了すると名前空間catalogにapi-serverとcontroller-managerのpodが作成されます。
$ kubectl get pods -n catalog
NAME                                                  READY   STATUS    RESTARTS   AGE
catalog-catalog-apiserver-58dd7744c5-bshgk            2/2     Running   0          2m
catalog-catalog-controller-manager-755b8b54d4-nsj86   1/1     Running   2          2m
Service Brokerのデプロイ
Service BrokerもService Catalogと同様にHelmを利用してデプロイを行います。 Service Brokerを利用するためにはService Broker用のIAMユーザーとDynamoDBのテーブルが必要になるため、CloudFormationを利用しそれらのリソースを作成します。
$ REGION=ap-northeast-1

# テンプレートのダウンロード
$ wget https://raw.githubusercontent.com/awslabs/aws-servicebroker/master/setup/prerequisites.yaml

# スタックの作成
$ STACK_ID=$(aws cloudformation create-stack \
             --capabilities CAPABILITY_IAM \
             --template-body file://prerequisites.yaml \
             --stack-name  aws-service-broker-prerequisites \
             --output text --query "StackId" \
             --region ${REGION})
$ until \
    ST=$(aws cloudformation describe-stacks \
        --region ${REGION} \
        --stack-name ${STACK_ID} \
        --query "Stacks[0].StackStatus" \
        --output text); \
        echo $ST; echo $ST | grep "CREATE_COMPLETE"
    do sleep 5
done

# BrokerUserの名前を取得
$ BUSERNAME=$(aws cloudformation describe-stacks \
             --region ${REGION} \
             --stack-name ${STACK_ID} \
             --query "Stacks[0].Outputs[0].OutputValue" \
             --output text)

# BrokerUserのアクセスキー、シークレットアクセスキーを作成
$ aws iam create-access-key \
    --user-name ${BUSERNAME} \
    --output json \
    --query 'AccessKey.{KEY_ID:AccessKeyId,SECRET_ACCESS_KEY:SecretAccessKey}'
Helmを使用してService Brokerをデプロイします。
#リポジトリを追加
$ helm repo add aws-sb https://awsservicebroker.s3.amazonaws.com/charts

#アクセスキー、シークレットアクセスキーを指定しService Brokerをデプロイ
$ helm install aws-sb/aws-servicebroker \
    --wait \
    --name aws-servicebroker \
    --namespace aws-sb \
    --version 1.0.0-beta.3 \
    --set aws.region=${REGION} \
    --set aws.accesskeyid=<ACCESS_KEY_ID> \
    --set aws.secretkey=<SECRET_ACCESS_KEY>
NAME:   aws-servicebroker
LAST DEPLOYED: Wed Dec 26 05:11:06 2018
NAMESPACE: aws-sb
STATUS: DEPLOYED

RESOURCES:
==> v1/Service
NAME               AGE
aws-servicebroker  3s

==> v1beta1/Deployment
aws-servicebroker  3s

==> v1beta1/ClusterServiceBroker
aws-servicebroker  2s

==> v1/Pod(related)

NAME                                READY  STATUS             RESTARTS  AGE
aws-servicebroker-6cc7d9cbb8-rwwb9  0/1    ContainerCreating  0         3s

==> v1/Secret

NAME                           AGE
aws-servicebroker-credentials  3s
aws-servicebroker-cert         3s

==> v1/ServiceAccount
aws-servicebroker-service  3s
aws-servicebroker-client   3s

==> v1beta1/ClusterRole
access-aws-servicebroker  3s
aws-servicebroker         3s

==> v1beta1/ClusterRoleBinding
aws-servicebroker         3s
aws-servicebroker-client  3s


NOTES:
For more information on usage, see https://github.com/awslabs/aws-servicebroker/docs/
デプロイが完了すると名前空間aws-sbにservicebrokerのpodが作成されます。
$ kubectl get ClusterServiceBrokers
NAME                URL                                                  STATUS   AGE
aws-servicebroker   https://aws-servicebroker.aws-sb.svc.cluster.local   Ready    47s

$ kubectl get pods -n aws-sb
NAME                                 READY   STATUS    RESTARTS   AGE
aws-servicebroker-6cc7d9cbb8-rwwb9   1/1     Running   0          56s
利用可能なサービスは以下のコマンドにて確認することができます。
kubectl get ClusterServiceClasses -o=custom-columns=NAME:.spec.externalName,DESCRIPTION:.spec.description
NAME            DESCRIPTION
dynamodb        AWS Service Broker - Amazon DynamoDB
sqs             AWS Servicebroker - Amazon SQS
s3              AWS Service Broker - Amazon S3
sns             AWS Service Broker - Amazon SNS
polly           AWS Service Broker - Amazon Polly
kinesis         AWS Service Broker - Amazon Kinesis Data Stream
elasticache     AWS Service Broker - Amazon ElastiCache for memcached
kms             AWS Service Broker - KMS Key
route53         AWS Service Broker - Amazon Route 53
rdspostgresql   AWS Service Broker - Amazon RDS for PostgreSQL
emr             AWS Service Broker - Amazon EMR
rdsmariadb      AWS Service Broker - Amazon RDS for MariaDB
athena          AWS Service Broker - Amazon Athena
redshift        AWS Service Broker - Amazon Redshift
rekognition     AWS Service Broker - Amazon Rekognition
lex             AWS Service Broker - Amazon Lex
translate       AWS Service Broker - Amazon Translate
rdsmysql        AWS Service Broker - Amazon RDS for MySQL
サンプルアプリケーションをデプロイする
S3へ接続するアプリケーションをデプロイします。後ほどS3への接続情報を環境変数から取得するようにマニュフェストを変更しますが、まずはS3のリソースがない状態で接続確認をします。接続エラーになることが期待値です。
---
apiVersion: v1
kind: Namespace
metadata:
  name: s3-demo
---
apiVersion: apps/v1
kind: Deployment
metadata:
  name: s3-demo
  namespace: s3-demo
spec:
  selector:
    matchLabels:
      app: s3-demo
  replicas: 1
  template:
    metadata:
      labels:
        app: s3-demo
    spec:
      containers:
      - name: s3-demo
        image: awsservicebroker/s3-demo:latest
        ports:
        - containerPort: 8080
デプロイが完了すると名前空間s3-demoにs3-demoのpodが作成されます。
$ kubectl apply -f sample.yaml
namespace/s3-demo created
deployment.apps/s3-demo created

$ kubectl get pods -n s3-demo
NAME                      READY   STATUS    RESTARTS   AGE
s3-demo-c755848dd-xxmqr   1/1     Running   0          2m
サンプルアプリケーション内でローカルホストにアクセスします。
$ kubectl exec \
    $(kubectl get pods -o name --namespace s3-demo | awk -F '/' '{print $2}') \
    --namespace s3-demo -- \
    curl -s http://127.0.0.1:8080 | jq .

{
  "data": {
    "delete": {
      "data": [
        "skipped"
      ],
      "success": false
    },
    "put": {
      "data": [
        "skipped"
      ],
      "success": false
    },
    "describe": {
      "data": [
        "skipped"
      ],
      "success": false
    },
    "list": {
      "data": [
        "skipped"
      ],
      "success": false
    },
    "cleanup": {
      "data": [
        "<class 'AssertionError'> Required secrets are not present in environment variables. ENVIRONMENT: environ({'X_SCLS': 'rh-python35 ', 'KUBERNETES_PORT': 'tcp://10.100.0.1:443', 'KUBERNETES_SERVICE_PORT_HTTPS': '443', 'XDG_DATA_DIRS': '/opt/rh/rh-python35/root/usr/share:/usr/local/share:/usr/share', 'HOSTNAME': 's3-demo-c755848dd-xxmqr', 'PKG_CONFIG_PATH': '/opt/rh/rh-python35/root/usr/lib64/pkgconfig', '_': '/opt/rh/rh-python35/root/usr/bin/python', 'KUBERNETES_PORT_443_TCP_ADDR': '10.100.0.1', 'KUBERNETES_PORT_443_TCP_PORT': '443', 'KUBERNETES_SERVICE_HOST': '10.100.0.1', 'KUBERNETES_PORT_443_TCP': 'tcp://10.100.0.1:443', 'LD_LIBRARY_PATH': '/opt/rh/rh-python35/root/usr/lib64', 'MANPATH': '/opt/rh/rh-python35/root/usr/share/man:', 'KUBERNETES_PORT_443_TCP_PROTO': 'tcp', 'SHLVL': '1', 'KUBERNETES_SERVICE_PORT': '443', 'PATH': '/opt/rh/rh-python35/root/usr/bin:/usr/local/sbin:/usr/local/bin:/usr/sbin:/usr/bin:/sbin:/bin', 'PWD': '/usr/src/sample-app/src', 'HOME': '/', 'BOTTLE_LOCKFILE': '/tmp/bottle.u1e4h9oe.lock', 'BOTTLE_CHILD': 'true'})\n\nTraceback (most recent call last):\n  File \"app.py\", line 56, in test_method\n    assert items['success'], items['error']\nAssertionError: Required secrets are not present in environment variables. ENVIRONMENT: environ({'X_SCLS': 'rh-python35 ', 'KUBERNETES_PORT': 'tcp://10.100.0.1:443', 'KUBERNETES_SERVICE_PORT_HTTPS': '443', 'XDG_DATA_DIRS': '/opt/rh/rh-python35/root/usr/share:/usr/local/share:/usr/share', 'HOSTNAME': 's3-demo-c755848dd-xxmqr', 'PKG_CONFIG_PATH': '/opt/rh/rh-python35/root/usr/lib64/pkgconfig', '_': '/opt/rh/rh-python35/root/usr/bin/python', 'KUBERNETES_PORT_443_TCP_ADDR': '10.100.0.1', 'KUBERNETES_PORT_443_TCP_PORT': '443', 'KUBERNETES_SERVICE_HOST': '10.100.0.1', 'KUBERNETES_PORT_443_TCP': 'tcp://10.100.0.1:443', 'LD_LIBRARY_PATH': '/opt/rh/rh-python35/root/usr/lib64', 'MANPATH': '/opt/rh/rh-python35/root/usr/share/man:', 'KUBERNETES_PORT_443_TCP_PROTO': 'tcp', 'SHLVL': '1', 'KUBERNETES_SERVICE_PORT': '443', 'PATH': '/opt/rh/rh-python35/root/usr/bin:/usr/local/sbin:/usr/local/bin:/usr/sbin:/usr/bin:/sbin:/bin', 'PWD': '/usr/src/sample-app/src', 'HOME': '/', 'BOTTLE_LOCKFILE': '/tmp/bottle.u1e4h9oe.lock', 'BOTTLE_CHILD': 'true'})\n"
      ],
      "success": false
    },
    "idempotency": {
      "data": [
        "skipped"
      ],
      "success": false
    }
  },
  "success": false
}
S3への接続情報がなく接続エラーになっていることが確認できます。
Service BrokerでS3を作成する
長くなりましたが、ここからが本題です。
Service Instanceを作成する
Service BrokerでAWSリソース(今回はS3)を作成していきます。マニュフェストのkindにはServiceInstanceを指定します。
---
apiVersion: servicecatalog.k8s.io/v1beta1
kind: ServiceInstance
metadata:
  name: s3-bucket
  namespace: s3-demo
spec:
  clusterServiceClassExternalName: s3
  clusterServicePlanExternalName: production
$ kubectl apply -f s3-instance.yaml
applyコマンドを実行するとService BrokerによりCloudFormationのスタックが作成されます。
$ aws cloudformation list-stacks \
--region ${REGION} \
--query 'StackSummaries[?starts_with(StackName,`aws-service-broker-s3-`)]'
リソースとしてS3接続用のIAMユーザー、アプリケーションから利用するバケット、ログ出力用バケットなどが作成されていることが確認できます。
$ aws cloudformation list-stack-resources --stack-name aws-service-broker-s3-fea82c42-0886-11e9-b9da-d64a8ddc537f
{
    "StackResourceSummaries": [
        {
            "LogicalResourceId": "AWSSBInjectedIAMUser",
            "PhysicalResourceId": "aws-service-broker-s3-fea82c4-AWSSBInjectedIAMUser-157F7JFDXYBJZ",
            "ResourceType": "AWS::IAM::User",
            "LastUpdatedTimestamp": "2018-12-25T20:53:16.723Z",
            "ResourceStatus": "CREATE_COMPLETE",
            "DriftInformation": {
                "StackResourceDriftStatus": "NOT_CHECKED"
            }
        },
        {
            "LogicalResourceId": "AWSSBInjectedIAMUserCreator",
            "PhysicalResourceId": "8yjQMzE60v2VTKci",
            "ResourceType": "AWS::CloudFormation::CustomResource",
            "LastUpdatedTimestamp": "2018-12-25T20:53:24.276Z",
            "ResourceStatus": "CREATE_COMPLETE",
            "DriftInformation": {
                "StackResourceDriftStatus": "NOT_CHECKED"
            }
        },
        {
            "LogicalResourceId": "AWSSBInjectedIAMUserLambda",
            "PhysicalResourceId": "aws-service-broker-s3-fea-AWSSBInjectedIAMUserLamb-15ZFO1CIXQ4E3",
            "ResourceType": "AWS::Lambda::Function",
            "LastUpdatedTimestamp": "2018-12-25T20:53:04.306Z",
            "ResourceStatus": "CREATE_COMPLETE",
            "DriftInformation": {
                "StackResourceDriftStatus": "NOT_CHECKED"
            }
        },
        {
            "LogicalResourceId": "AWSSBInjectedIAMUserPolicy1",
            "PhysicalResourceId": "aws-s-AWSS-ZHLYW6ND0HON",
            "ResourceType": "AWS::IAM::Policy",
            "LastUpdatedTimestamp": "2018-12-25T20:53:40.185Z",
            "ResourceStatus": "CREATE_COMPLETE",
            "DriftInformation": {
                "StackResourceDriftStatus": "NOT_CHECKED"
            }
        },
        {
            "LogicalResourceId": "AWSSBInjectedIAMUserRole",
            "PhysicalResourceId": "aws-service-broker-s3-fea-AWSSBInjectedIAMUserRole-EZ05D6ALCNE0",
            "ResourceType": "AWS::IAM::Role",
            "LastUpdatedTimestamp": "2018-12-25T20:53:00.581Z",
            "ResourceStatus": "CREATE_COMPLETE",
            "DriftInformation": {
                "StackResourceDriftStatus": "NOT_CHECKED"
            }
        },
        {
            "LogicalResourceId": "LoggingBucket",
            "PhysicalResourceId": "aws-service-broker-s3-fea82c42-0886-loggingbucket-1t7a125eh3wok",
            "ResourceType": "AWS::S3::Bucket",
            "LastUpdatedTimestamp": "2018-12-25T20:53:03.125Z",
            "ResourceStatus": "CREATE_COMPLETE",
            "DriftInformation": {
                "StackResourceDriftStatus": "NOT_CHECKED"
            }
        },
        {
            "LogicalResourceId": "S3bucket",
            "PhysicalResourceId": "aws-service-broker-s3-fea82c42-0886-11e9-s3bucket-1nz2ok59ku2mi",
            "ResourceType": "AWS::S3::Bucket",
            "LastUpdatedTimestamp": "2018-12-25T20:53:27.871Z",
            "ResourceStatus": "CREATE_COMPLETE",
            "DriftInformation": {
                "StackResourceDriftStatus": "NOT_CHECKED"
            }
        }
    ]
}
また、以下のコマンドよりEKSクラスタでの状態も確認することができます。
$ kubectl get ServiceInstance/s3-bucket -n s3-demo -o yaml
apiVersion: servicecatalog.k8s.io/v1beta1
kind: ServiceInstance
metadata:
  annotations:
    kubectl.kubernetes.io/last-applied-configuration: |
      {"apiVersion":"servicecatalog.k8s.io/v1beta1","kind":"ServiceInstance","metadata":{"annotations":{},"name":"s3-bucket","namespace":"s3-demo"},"spec":{"clusterServiceClassExternalName":"s3","clusterServicePlanExternalName":"production"}}
  creationTimestamp: "2018-12-25T20:52:30Z"
  finalizers:
  - kubernetes-incubator/service-catalog
  generation: 1
  name: s3-bucket
  namespace: s3-demo
  resourceVersion: "69"
  selfLink: /apis/servicecatalog.k8s.io/v1beta1/namespaces/s3-demo/serviceinstances/s3-bucket
  uid: fea82ca2-0886-11e9-b9da-d64a8ddc537f
spec:
  clusterServiceClassExternalName: s3
  clusterServiceClassRef:
    name: 19b87923-2c60-5381-aac5-5d86196c3d21
  clusterServicePlanExternalName: production
  clusterServicePlanRef:
    name: 362c5420-aa86-506a-8f31-1aa8a92375b8
  externalID: fea82c42-0886-11e9-b9da-d64a8ddc537f
  updateRequests: 0
  userInfo:
    groups:
    - system:masters
    - system:authenticated
    uid: ""
    username: kubernetes-admin
status:
  asyncOpInProgress: true
  conditions:
  - lastTransitionTime: "2018-12-25T20:52:30Z"
    message: The instance is being provisioned asynchronously
    reason: Provisioning
    status: "False"
    type: Ready
  currentOperation: Provision
  deprovisionStatus: Required
  inProgressProperties:
    clusterServicePlanExternalID: 362c5420-aa86-506a-8f31-1aa8a92375b8
    clusterServicePlanExternalName: production
    userInfo:
      groups:
      - system:masters
      - system:authenticated
      uid: ""
      username: kubernetes-admin
  observedGeneration: 1
  operationStartTime: "2018-12-25T20:52:30Z"
  orphanMitigationInProgress: false
  provisionStatus: ""
  reconciledGeneration: 0
Service Bindingを作成する
EKSクラスタからS3にアクセスできるように認証情報をバインドします。
---
apiVersion: servicecatalog.k8s.io/v1beta1
kind: ServiceBinding
metadata:
  name: s3-binding
  namespace: s3-demo
spec:
  instanceRef:
    name: s3-bucket
$ kubectl apply -f s3-binding.yaml
コマンドが正常に終了するとSercretにS3への接続情報が保存されます。
$ kubectl describe secrets/s3-binding -n s3-demo
Name:         s3-binding
Namespace:    s3-demo
Labels:       <none>
Annotations:  <none>

Type:  Opaque

Data
====
BUCKET_ARN:                76 bytes
BUCKET_NAME:               63 bytes
LOGGING_BUCKET_NAME:       63 bytes
S3_AWS_ACCESS_KEY_ID:      20 bytes
S3_AWS_SECRET_ACCESS_KEY:  40 bytes
S3_REGION:                 14 bytes
最後にPodからS3へ接続できることを確認するためサンプルアプリケーションを変更していきます。
まずは環境変数にSecretの値を設定するようマニュフェストを修正します。
---
apiVersion: v1
kind: Namespace
metadata:
  name: s3-demo
---
apiVersion: apps/v1
kind: Deployment
metadata:
  name: s3-demo
  namespace: s3-demo
spec:
  selector:
    matchLabels:
      app: s3-demo
  replicas: 1
  template:
    metadata:
      labels:
        app: s3-demo
    spec:
      containers:
      - name: s3-demo
        image: awsservicebroker/s3-demo:latest
        ports:
        - containerPort: 8080
        env:
        - name: S3_AWS_ACCESS_KEY_ID
          valueFrom: { secretKeyRef: { name: s3-binding, key: S3_AWS_ACCESS_KEY_ID  } }
        - name: S3_AWS_SECRET_ACCESS_KEY
          valueFrom: { secretKeyRef: { name: s3-binding, key: S3_AWS_SECRET_ACCESS_KEY } }
        - name: S3_REGION
          valueFrom: { secretKeyRef: { name: s3-binding, key: S3_REGION } }
        - name: BUCKET_ARN
          valueFrom: { secretKeyRef: { name: s3-binding, key: BUCKET_ARN } }
        - name: BUCKET_NAME
          valueFrom: { secretKeyRef: { name: s3-binding, key: BUCKET_NAME } }
        - name: LOGGING_BUCKET_NAME
          valueFrom: { secretKeyRef: { name: s3-binding, key: LOGGING_BUCKET_NAME } }
再度、サンプルアプリケーションをapplyします。
$ kubectl apply -f sample.yaml
先ほどと同様にサンプルアプリケーション内でローカルホストにアクセスします。
$ kubectl exec \
    $(kubectl get pods -o name --namespace s3-demo | awk -F '/' '{print $2}') \
    --namespace s3-demo -- \
    curl -s http://127.0.0.1:8080 | jq .

{
  "success": true,
  "data": {
    "idempotency": {
      "success": true,
      "data": [
        "Put an additional item with duplicate item_id",
        "Verified describe has updated content",
        "Verified list does not contain duplicates",
        "Successfully tested idempotency"
      ]
    },
    "put": {
      "success": true,
      "data": [
        "Successfully put item"
      ],
      "response": null
    },
    "delete": {
      "success": true,
      "data": [
        "Successfully deleted item"
      ],
      "response": null
    },
    "cleanup": {
      "success": true,
      "data": [
        "Successfully cleaned up all items"
      ]
    },
    "list": {
      "success": true,
      "data": [
        "Successfully listed items"
      ],
      "response": [
        "test"
      ]
    },
    "describe": {
      "success": true,
      "data": [
        "Successfully described item"
      ],
      "response": {
        "content": "test_content",
        "item_id": "test"
      }
    }
  }
}
サンプルアプリケーションからS3へ接続できていることが確認できました!!
さいごに
Service Brokerを利用してKubernetes(EKS)からAWSのリソースを作成する方法を紹介しました。
Service BrokerによるAWSのリソースの作成は、Kubernetesのマニュフェストの書き方さえ理解できれば誰でも簡単に実施することができます。この仕組みをうまく利用すれば、アプリケーションエンジニアがインフラエンジニアに頼らず解決できることが増えるのではないでしょうか。