「レジなし無人冷蔵庫」アフィン変換した画像と背景を合成してデータセットを作成する
この記事は公開されてから1年以上経過しています。情報が古い可能性がありますので、ご注意ください。
1 はじめに
CX事業本部の平内(SIN)です。
Amazon Web Services ブログでは、「レジなし無人販売冷蔵庫を構築についての記事」が公開されています。
レジなし無人販売冷蔵庫を構築できる、This is my Smart Cooler プログラムを公開しました
こちらでは、「お客様自らがレジなし無人販売冷蔵庫を迅速に構築し学習や体験ができる This is my Smart Cooler プログラムを発表します。」ということで、そのレシピがGithubで公開されています。
レジ無し無人販売冷蔵庫 構築レシピ
「これを真似てみたい」ということで、ここまで作業を進めています。
今回は、冷蔵庫内の商品を検出するためのモデルの学習用データセットの作成をやってみました。
上記のレシピでは、ペットボトルを上から見た画像と冷蔵庫内の背景画像を組み合わせてデータセットを作成する手法が紹介されています。今回もこちらを習う形で進めています。
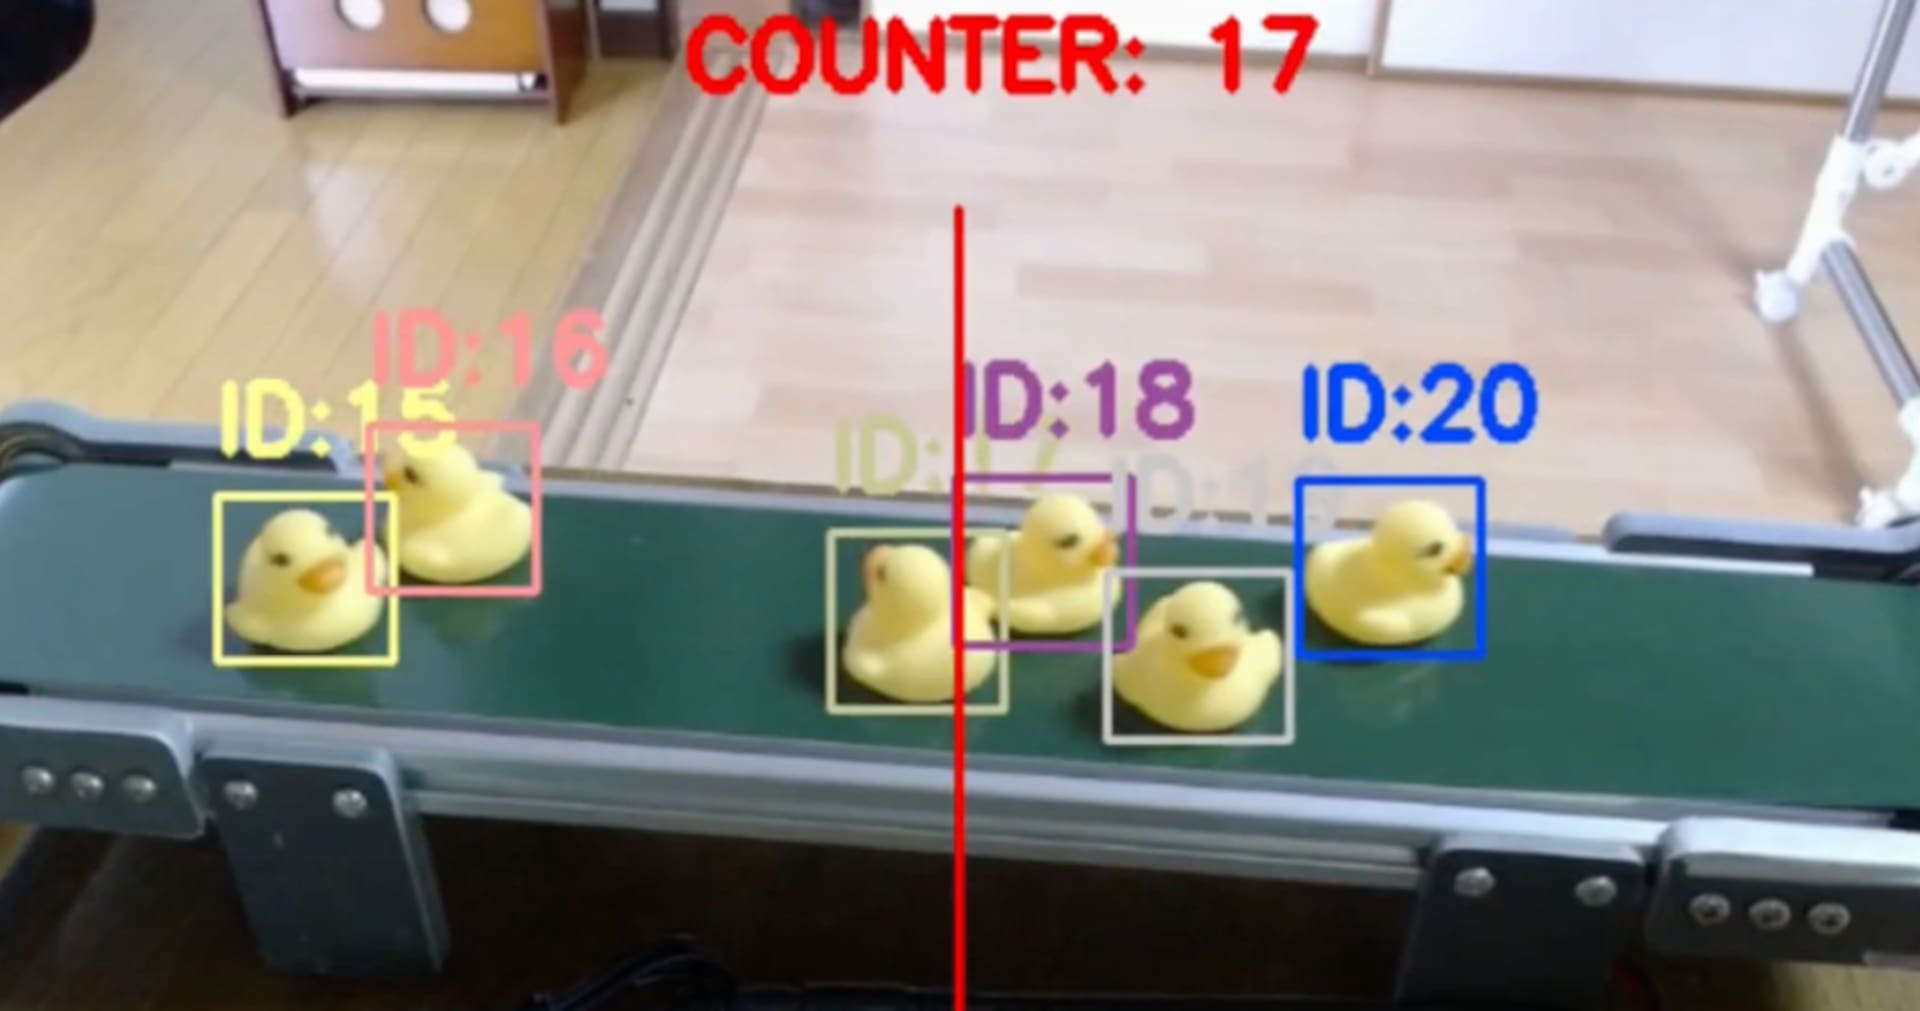
最初に、データを生成している様子です。 画像とアノテーション情報はファイルに保存しますが、作業の状況が把握しやすいように、アノテーションを描画して、確認画面に出しています。
2 元画像
(1) 背景
背景として使用する画像は、庫内のWebカメラで撮影した画像で、明るさなどが違う画像を複数用意しました。

(2) 商品
商品画像は、いろいろな置き方で庫内に配置して、複数撮影しています。

撮影した画像は、プレビューで開いて、商品単位で選択コピーしてPowerPointに貼り付けます。


PowerPointでは、円形のトリミングだと、「図形に合わせてトリミング」-「円」で簡単に作成できます。

トリミングした画像を右クリックで「図として保存」すると、背景が透過となったpngが保存できます。

各商品ごと、クラス名となるフォルダに分けて保存しています。


3 合成
商品画層をアフィン変換して、背景と合成しているコードです。
透過PNGとして保存した商品を簡単に合成できるように、画像の読み込み段階ではアルファチャンネルが有効になっています。(合成後、アルファチャンネルは削除されています)
基準となる背景画像は、640✕480で、商品の方は、それを基準にそれぞれ縮小しています。
出力は、後で使いやすいようにAmazon SageMaker Ground Truthで物体検出のデータセットを作成した場合と同じ形式にしました。
"""
下記を参考にさせて頂きました。
https://github.com/aws-samples/smart-cooler/blob/master/_ml_model_package/synthetic-dataset.ipynb
"""

import json
import glob
import random
import os
import shutil
import math
import numpy as np
import cv2
from PIL import Image

MAX = 200 # 各クラスごとに生成する数量
WIDTH = 640
HEIGHT = 480
CLASS_NAME=["jagabee", "seafood", "butamen", "kyo_udon", "koara"]
PRODUCT_SIZE=[150, 185, 150, 185, 120]
BACK_PATH = "./backgrounds"
PRODUCT_PATH = "./products"
OUTPUT_PATH = "./output"
S3Bucket = "s3://ground_truth_dataset"
manifestFile = "output.manifest"
COLORS = [(0,0,175),(175,0,0),(0,175,0),(175,175,0),(0,175,175)]

def euler_to_mat(yaw, pitch, roll):
    c, s = math.cos(yaw), math.sin(yaw)
    M = np.matrix([[  c, 0.,  s], [ 0., 1., 0.], [ -s, 0.,  c]])

    c, s = math.cos(pitch), math.sin(pitch)
    M = np.matrix([[ 1., 0., 0.], [ 0.,  c, -s], [ 0.,  s,  c]]) * M

    c, s = math.cos(roll), math.sin(roll)
    M = np.matrix([[  c, -s, 0.], [  s,  c, 0.], [ 0., 0., 1.]]) * M
    return M

def make_affine_transform(from_shape, to_shape,
                        min_scale, max_scale,
                        scale_variation=1.0,
                        rotation_variation=1.0,
                        translation_variation=1.0):

    from_size = np.array([[from_shape[1], from_shape[0]]]).T
    to_size = np.array([[to_shape[1], to_shape[0]]]).T

    scale = random.uniform((min_scale + max_scale) * 0.5 -
                            (max_scale - min_scale) * 0.5 * scale_variation,
                            (min_scale + max_scale) * 0.5 +
                            (max_scale - min_scale) * 0.5 * scale_variation)
    roll = random.uniform(-1.0, 1.0) * rotation_variation
    pitch = random.uniform(-0.15, 0.15) * rotation_variation
    yaw = random.uniform(-0.15, 0.15) * rotation_variation

    M = euler_to_mat(yaw, pitch, roll)[:2, :2]
    h = from_shape[0]
    w = from_shape[1]
    corners = np.matrix([[-w, +w, -w, +w],
                            [-h, -h, +h, +h]]) * 0.5
    skewed_size = np.array(np.max(M * corners, axis=1) -
                                np.min(M * corners, axis=1))

    scale *= np.min(to_size / skewed_size)

    trans = (np.random.random((2,1)) - 0.5) * translation_variation
    trans = ((2.0 * trans) ** 5.0) / 2.0
    trans = (to_size - skewed_size * scale) * trans

    center_to = to_size / 2.
    center_from = from_size / 2.

    M = euler_to_mat(yaw, pitch, roll)[:2, :2]
    M *= scale
    M = np.hstack([M, trans + center_to - M * center_from])
    return M

# アフィン変換
def transform(backImage, productImage, productSize):
    M = make_affine_transform(
                        from_shape=productImage.shape,
                        to_shape=backImage.shape,
                        min_scale=1.0,
                        max_scale=1.0,
                        rotation_variation=3.5,
                        scale_variation=2.0,
                        translation_variation=0.98)
    object_topleft = tuple(M.dot(np.array((0, 0) + (1, ))).tolist()[0])
    object_topright = tuple(M.dot(np.array((productSize, 0) + (1,))).tolist()[0])
    object_bottomleft = tuple(M.dot(np.array((0,productSize) + (1,))).tolist()[0])
    object_bottomright = tuple(M.dot(np.array((productSize, productSize) + (1,))).tolist()[0])

    object_tups = (object_topleft, object_topright, object_bottomleft, object_bottomright)
    object_xmin = (min(object_tups, key=lambda item:item[0])[0])
    object_xmax = (max(object_tups, key=lambda item:item[0])[0])
    object_ymin = (min(object_tups, key=lambda item:item[1])[1])
    object_ymax = (max(object_tups, key=lambda item:item[1])[1])
    rect = ((int(object_xmin),int(object_ymin)),(int(object_xmax),int(object_ymax)))

    productImage =  cv2.warpAffine(productImage, M, (backImage.shape[1], backImage.shape[0]))
    return productImage, rect

# 背景画像の取得
def getBackImage(backPath):
    imagePath = random.choice(glob.glob(backPath + '/*.png'))
    return cv2.imread(imagePath, cv2.IMREAD_UNCHANGED)

# 商品画像の取得
def getProductImage(productPath, index):
    class_name = CLASS_NAME[index]
    imagePath = random.choice(glob.glob(productPath + '/' + class_name + '/*.png'))
    return cv2.imread(imagePath, cv2.IMREAD_UNCHANGED)

# 商品画像のサイズ調整
def resizeImage(img, size):
    org_h, org_w = img.shape[:2]
    imageArray = np.zeros((org_h, org_w, 4), np.uint8)
    img = cv2.resize(img, (size, size))
    imageArray[0:size, 0:size] = img
    return imageArray

# 背景と商品の合成
def margeImage(backImg, productImg):
    # PIL形式で重ねる
    back_pil = Image.fromarray(backImg)
    product_pil = Image.fromarray(productImg)
    back_pil.paste(product_pil, (0, 0), product_pil)
    return np.array(back_pil)

# エフェクト(Gauss)
def addGauss(img, level):
    return cv2.blur(img, (level * 2 + 1, level * 2 + 1))

# エフェクト(Noise)
def addNoiseSingleChannel(single):
    diff = 255 - single.max()
    noise = np.random.normal(0, random.randint(1, 100), single.shape)
    noise = (noise - noise.min())/(noise.max()-noise.min())
    noise= diff*noise
    noise= noise.astype(np.uint8)
    dst = single + noise
    return dst

# エフェクト(Noise)
def addNoise(img):
    img = img.astype('float64')
    img[:,:,0] = addNoiseSingleChannel(img[:,:,0])
    img[:,:,1] = addNoiseSingleChannel(img[:,:,1])
    img[:,:,2] = addNoiseSingleChannel(img[:,:,2])
    return img.astype('uint8')

# バウンディングボックス描画
def box(frame, rect, target):
    ((x1,y1),(x2,y2)) = rect
    label = "{}".format(CLASS_NAME[target])
    img = cv2.rectangle(frame,(x1, y1), (x2, y2), COLORS[target],2)
    img = cv2.rectangle(img,(x1, y1), (x1 + 150,y1-20), COLORS[target], -1)
    cv2.putText(img,label,(x1+2, y1-2), cv2.FONT_HERSHEY_SIMPLEX, 0.5, (255,255,255), 1, cv2.LINE_AA)
    return img

# manifest生成(1行)
def createManifest(imgName, width, height, class_id, className, rect):
    ((x1,y1),(x2,y2)) = rect
    date = "0000-00-00T00:00:00.000000"

    return {
        "source-ref": "{}/{}".format(S3Bucket, imgName),
        "boxlabel": {
            "image_size": [
                {
                    "width": width,
                    "height": height,
                    "depth": 3
                }
            ],
            "annotations": [
                {
                    "class_id": class_id,
                    "width": x2 - x1,
                    "top": y1,
                    "height": y2 - y1,
                    "left": x1
                }
            ]
        },
        "boxlabel-metadata": {
            "job-name": "xxxxxxx",
            "class-map": {
                str(class_id): className
            },
            "human-annotated": "yes",
            "objects": {
                "confidence": 1
            },
            "creation-date": date,
            "type": "groundtruth/object-detection"
        }
    }


def main():

    # 出力先の初期化
    if os.path.exists(OUTPUT_PATH):
        shutil.rmtree(OUTPUT_PATH)
    os.mkdir(OUTPUT_PATH)

    # manifest
    manifests = ''

    for class_id in range(len(CLASS_NAME)):
        for i in range(MAX):
            # 背景画像の取得
            backImage = getBackImage(BACK_PATH)

            # 商品画像のサイズ
            productSize = PRODUCT_SIZE[class_id]

            # 商品画像の取得
            productImage = getProductImage(PRODUCT_PATH, class_id)
            productImage = resizeImage(productImage, productSize)

            # アフィン変換
            productImage, rect =  transform(backImage, productImage, productSize)

            # 合成
            image = margeImage(backImage, productImage)

            # アルファチャンネル削除
            image = cv2.cvtColor(image, cv2.COLOR_BGRA2BGR)

            # エフェクト(gauss)
            image = addGauss(image, random.randint(0, 2))

            # エフェクト(Noise)
            image = addNoise(image)

            # 画像名
            fileName = "{}{:03d}.png".format(CLASS_NAME[class_id], i)

            # 画像保存
            cv2.imwrite("{}/{}".format(OUTPUT_PATH, fileName), image)
            # manifest追加
            manifests += json.dumps(createManifest(fileName, WIDTH, HEIGHT, class_id, CLASS_NAME[class_id], rect)) + '\n'

            # バウンディングボックス描画(確認用)
            image = box(image, rect, class_id)

            # 表示(確認用)
            cv2.imshow("frame",image)
            cv2.waitKey(1)

    # manifest 保存
    with open('{}/{}'.format(OUTPUT_PATH, manifestFile), 'w') as f:
        f.write(manifests)

main()
4 RecordIO形式
SageMakerの組み込みアルゴリズム(ObjectDetection)で使用するためのRecordIO形式への変換は、以下を使用する予定です。
5 最後に
今回は、データセットの作成を行ってみました。まだ、モデル作成がうまく行っているわけではないので、元画像の収集も含めて、まだまだ仕様錯誤が必要になると思います。
「レジなし無人販売冷蔵庫」作成のための作業ですが、まだまだ、道のりは、遠いです。