GitHub製のSpec Kitで仕様駆動開発に入門してみた
Spec Kit はGitHubが提供する仕様駆動開発(Spec-Driven Development;SDD)のツールキットです(仕様は英語で"Specification"と呼びます)。
Claude Codeの登場あたりからAIコーディングが身近になり、圧倒的なコーディング力に感嘆する一方で、オーバーエンジニアリングにあれこれ実装して出力が発散し、期待通りに出力を収束させるのに課題を感じている人も多いと思います。
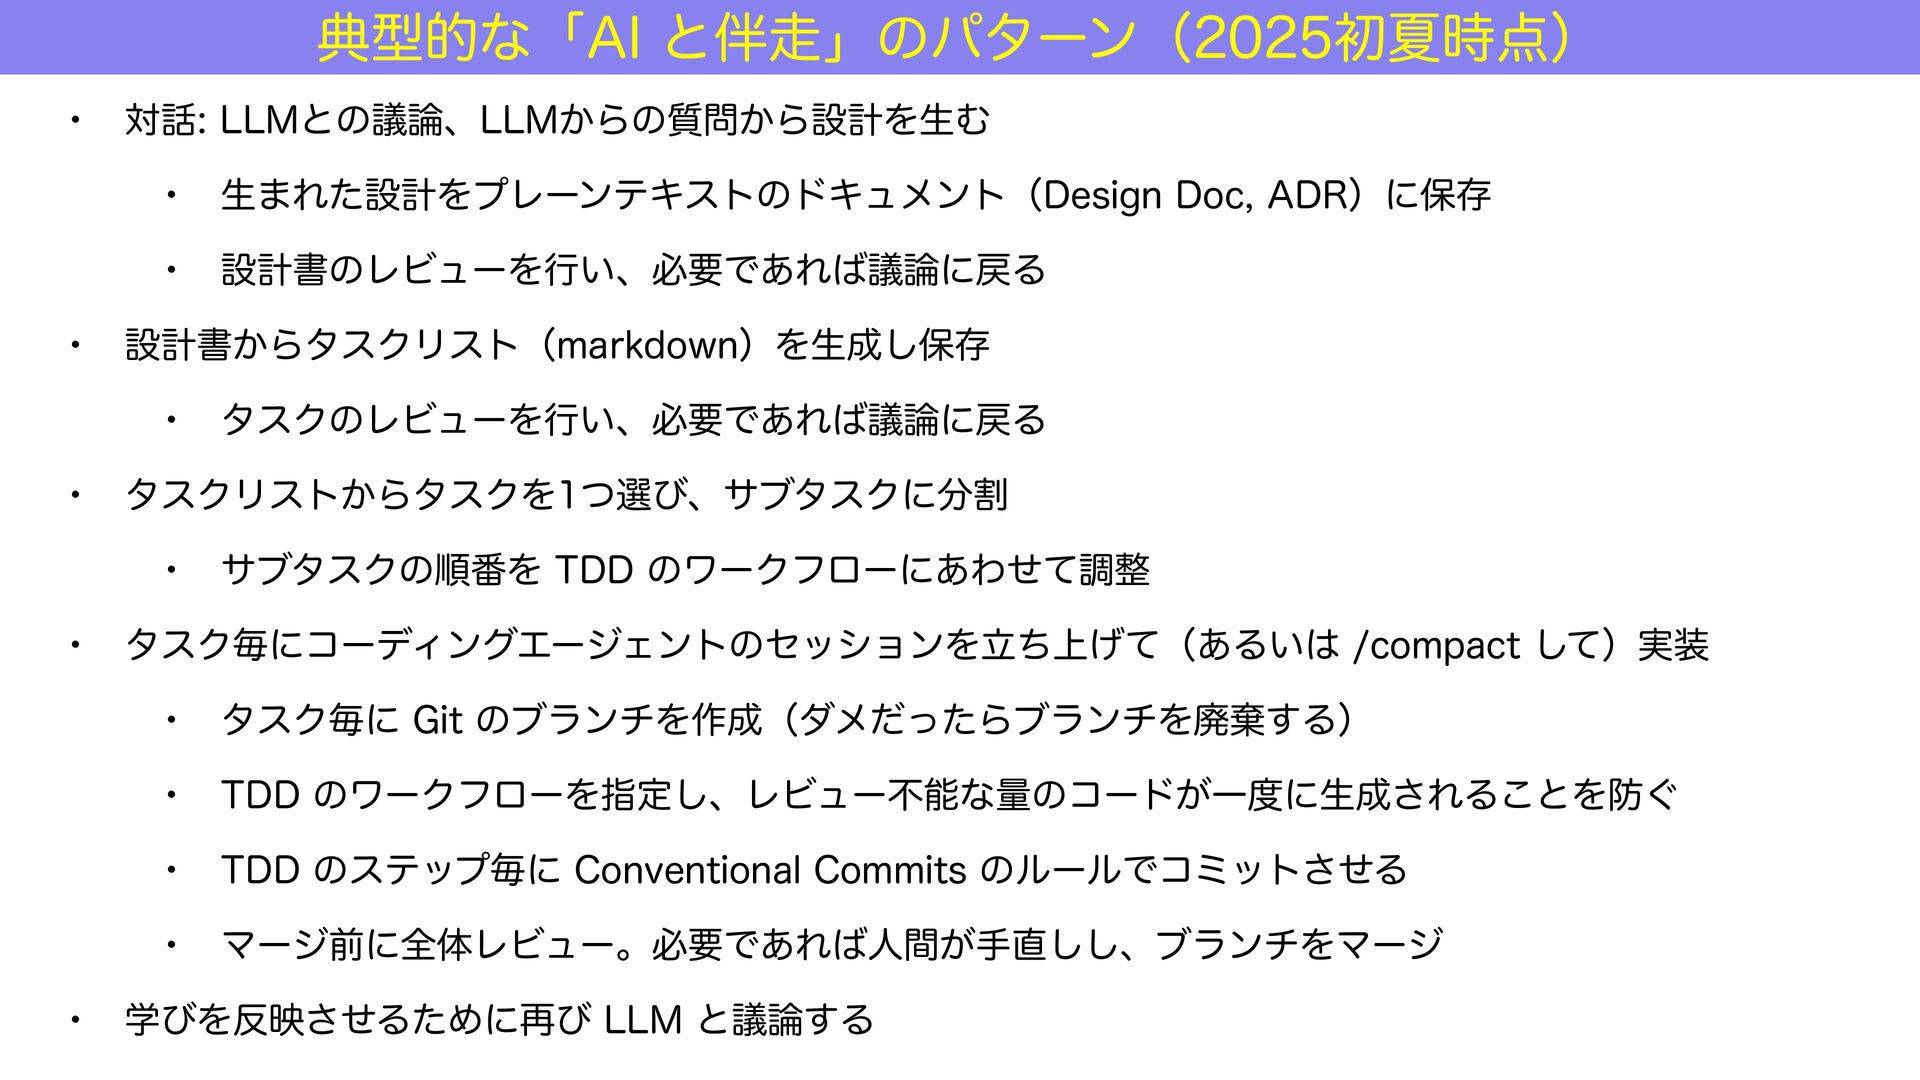
@t-wada 氏による 「典型的な「AIと伴走」のパターン(2025初夏時点)」をみてみましょう。
Spec Kitは、「明確な仕様書があればAIは正しくコードを生成できるはずだ」という考えに基づき、AIアシスタントがコーディングしやすい仕様書(Design Doc, Architecture Decision Record/ADR, Product Requirements Document/PRD)の作成やタスク分割に焦点を当てたフレームワークと言えます。
そのため、以下の流れで開発します。
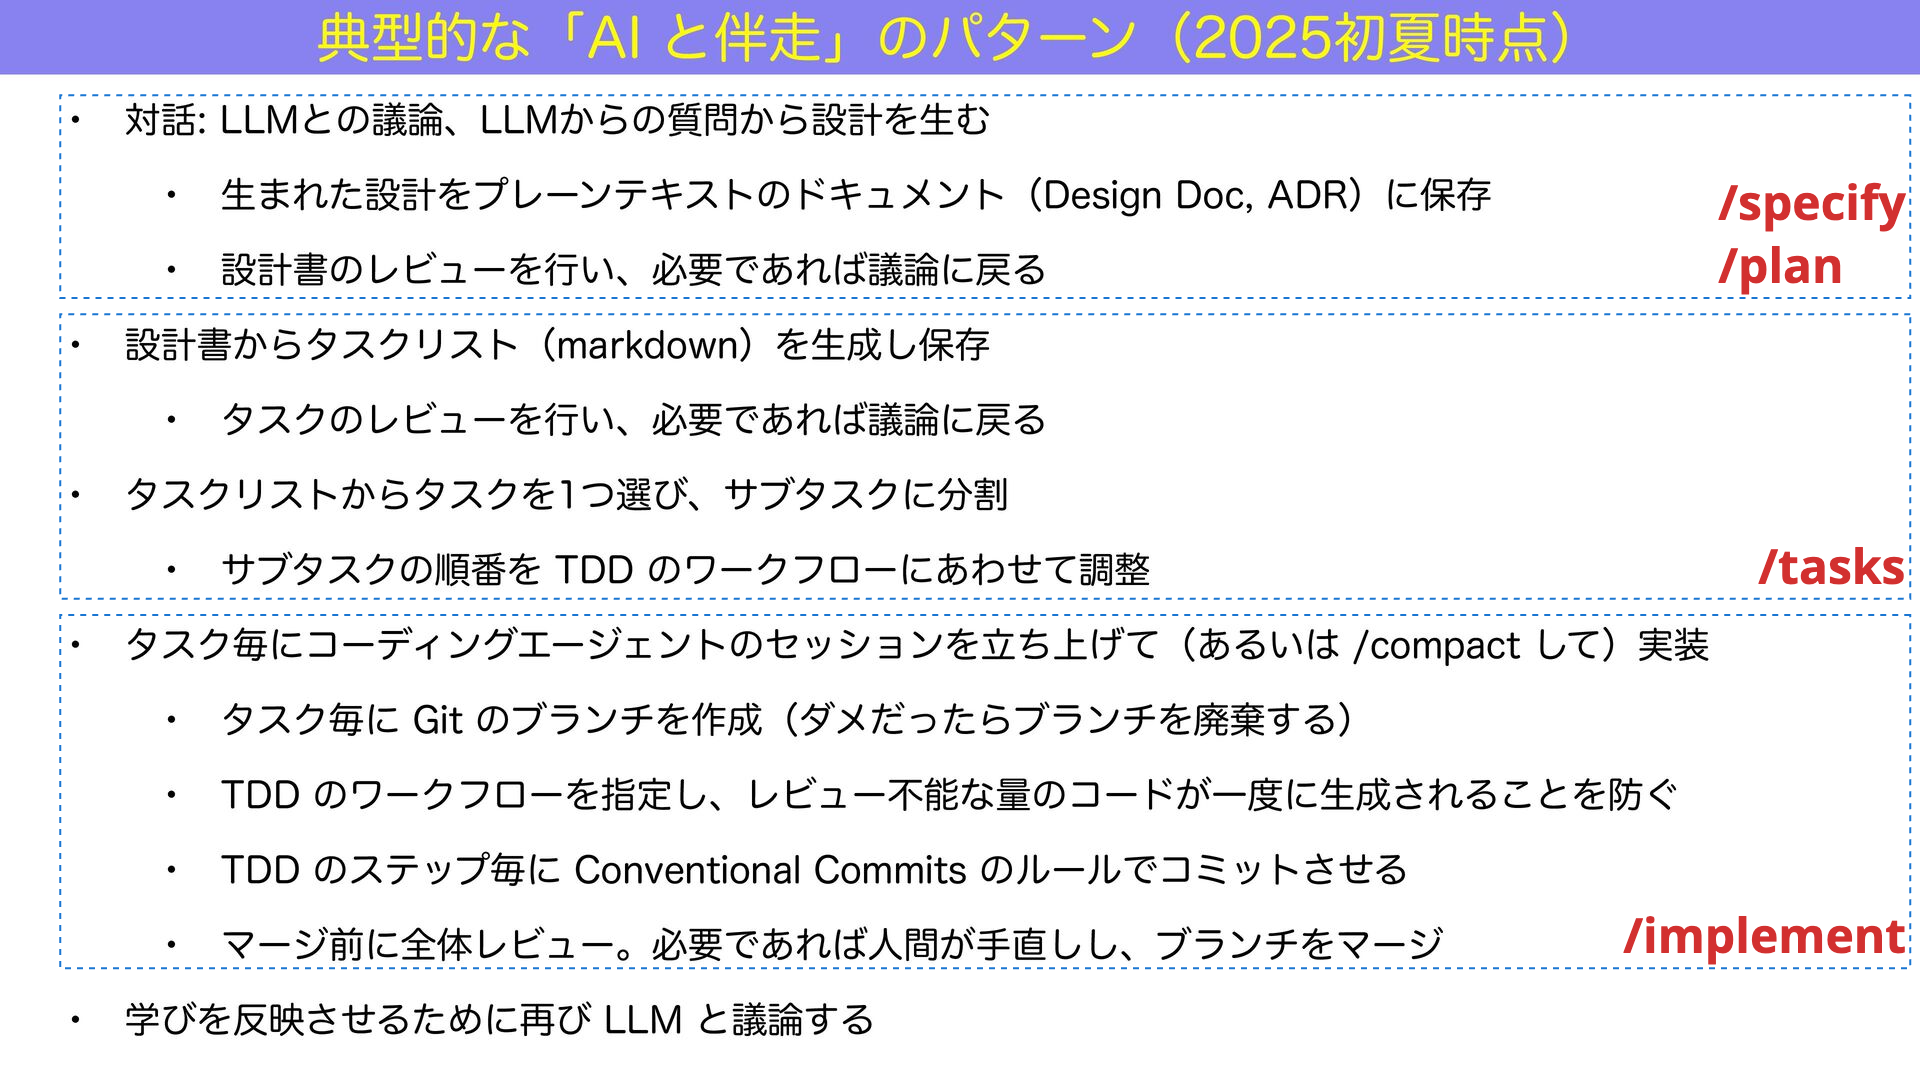
/specify: なにを作るか(WHAT)/plan: どうやって作るか(HOW)/tasks: タスク分割(TODO)/implement: 実装(DO)
Spec Kitのスラッシュコマンドを @t-wada パターンに当てはめると、以下の感じでしょうか。
Claude Code も計画と実行でフェーズが別れていますよね
- Plan (Reasoning): 推論・計画フェーズ
- Act (Acting): 行動・実行フェーズ
Spec Kitが最後に実行するスラッシュコマンドは /implement です。
最終的に /implement コマンドを実行すれば実装が出来上がるように、開発プロセスの計画フェーズに力点をおいて支援するものが Spec Kit(仕様駆動開発) といえるかもしれません。
本記事では、20行に満たないhello worldレベルのAPIサーバーを、Spec Kitで仰々しく仕様駆動開発で実装してみるものです。
Spec Kitを使うヒント
Spec Kitを触ってみて、大事と思った点を先にお伝えします。
プロジェクトメモリは /constitution で指示
Spec Kitでは、プロジェクトを初期化したあと、 /constitution コマンドを実行します。
"constitution" は日本語で「構成」や「憲法」のことで、いわゆる CLAUDE.md や AGENTS.md 相当のプロジェクトメモリを指示するものです。
/specify はプルリクエストの単位、/tasks はタスクのチェックリスト化
Spec Kit で /specify コマンドを実行すると、Gitブランチが切られます。
そのため /specify をプルリクエスト(PR)の単位、 /tasks の成果物が PR 内のチェックリストと捉えると、理解しやすいと思います。
オーバーエンジニアリングしないように指示
Spec Kit 固有の話ではなく、AI コーディングの一般論として、AIはオーバーエンジニアリングが大好きです。
シンプルに実装するよう、プロンプトを工夫しましょう。
プロンプターが本当に欲しかったもの
仕様駆動開発はエンタープライズな開発現場を主なターゲットとしている印象があります。
とはいえ、今回は入門記事のため、次のような20行にも満たない Python & Flask による API サーバーを想定成果物として仕様駆動開発してみることにします。
from flask import Flask, jsonify, request

app = Flask(__name__)

@app.route("/health", methods=["GET"])
def health():
    return jsonify({"status": "healthy"}), 200

@app.route("/greeting", methods=["GET"])
def greeting():
    name = request.args.get("name", "world")
    return f"hello, {name}!"

if __name__ == "__main__":
    app.run()
次の2つのGETエンドポイントを用意しています
- ヘルスチェック
- GETパラメーターを受け取ってメッセージを返す
Spec Kitの利用前提
Spec Kitの導入は比較的容易です。
- OS : Mac, WSL2 on Windows等
- AIエージェント : GitHub Copilot, Claude Code, Gemini CLI 等
特に、 GitHub Copilotしか利用できないような環境で仕様駆動開発を試したい場合に、ぴったりではないかと思います。
検証環境
今回は、以下の環境で検証しました。
- Spec Kit : 0.0.54
- OS : Mac
- VS Code
- AI エージェント : GitHub Copilot
- モデル : GPT-5
2025/09/28 時点の Copilotプレミアムリクエストの有償プランの主要モデルの multiplier は以下の通りです
- GPT-4.1 : 0
- GPT-5 : 1
- Claude Sonnet 3.5 : 1
- Claude Sonnet 4 : 1
- Claude Opus 4 : 10
Spec Kitの開発の流れ
以下の流れで新規にAPIサーバーを開発します
- Spec Kit のインストール
- Spec Kit の初期化
/constitutionでプロジェクトメモリの指示/specifyで要件(WHAT)を伝える/planで 仕様(HOW)を伝える/tasksで タスク分割/implementで実装
特に、 /specify (WHAT)と /plan (HOW)に注力することで、タスク分割、実装とフェーズが進むにつれて、手離れよくAIエージェントに仕事を任せられるようにするのが、設計思想的に理想と思われます。
1. Spec Kit のインストール
Spec KitはPython製です。
パッケージ管理ツールの uv 経由でインストールします。
$ curl -LsSf https://astral.sh/uv/install.sh | sh
$ uv tool install specify-cli --from git+https://github.com/github/spec-kit.git
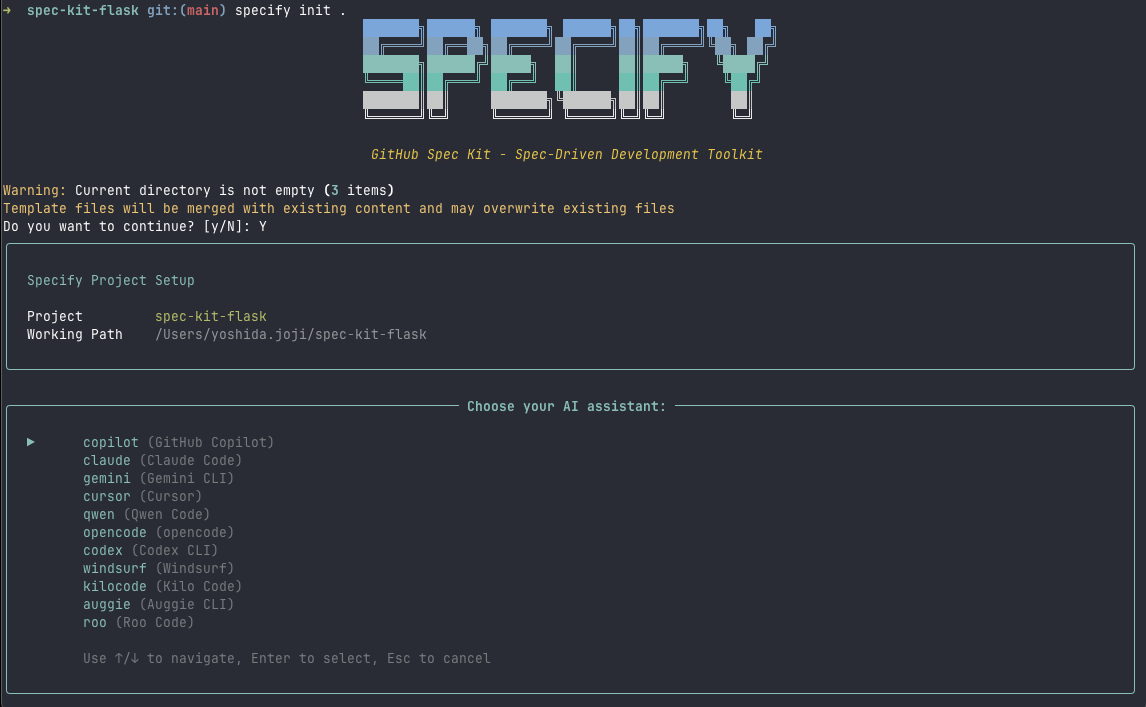
2. Spec Kit の初期化
$ specify init <プロジェクト名>
ウィザードに従って
- AI アシスタント
- シェルのタイプ(今回は sh を選択)
を選択して下さい
VS Code を起動しましょう。
$ code .
3. /constitution でプロジェクトメモリの指示
新規プロジェクト作成時に最初にやることは、CLAUDE.md や AGENTS.md 相当のプロジェクトメモリの作成です。
Spec Kitでは、メモリを /constitution で作成します。
/constitution

Flask APIプロジェクトの開発規約を設定。Python 3.13、Flask 3.1、uvパッケージ管理、ruffで静的解析とフォーマットを使用、ビルドは hatching。
FlaskはCLI方式で localhost:8080 で起動。Blueprintパターンで1機能1ファイル、サーバーエラーはHTTPステータス400/500のみ。
型アノテーション不要、極限までシンプルな例外・入力処理、シンプルさ重視の方針を適用、ロギング不要。
テストは pytest 8.4 を利用、ミニマムなテストケースだけを用意、BluePrintファイルに対応するテスト用ファイルも用意。
実装の際は pytest の単体テストと ruff の静的解析、フォーマットをパスさせること。

メイン処理は uv 経由で呼び出すこと

$ uv run flask run
$ uv run ruff format/check .
$ uv run pytest
AIコーディングでは、指示に対応する変更範囲を限定させることで、うまくいくことが多いです。
Blueprintパターン はPythonフレームワークFlaskの開発手法の一つであり、機能・責務をモジュール化できます。
しばらくすると、 「Constitution更新サマリー」("Constitution Update Summary") というメッセージとともに.specify/memory/constitution.md が更新され、 .specify/templates/ 以下にある /plan フェーズと /tasks フェーズのテンプレートも更新されました。
.specify/templates/plan-template.md.specify/templates/tasks-template.md
The constitution is now ready to guide feature development with clear gates for Flask Blueprint architecture, simplified error handling, and mandatory TDD with pytest validation.
.specify/memory/constitution.md から抜粋します
Spec Kit Flask Constitution
Core Principles
I. Flask Blueprint Architecture
Every feature MUST be implemented as a separate Flask Blueprint in its own file. Blueprints MUST be modular, self-contained, and focused on a single responsibility. No monolithic route definitions - each Blueprint handles one functional domain (users, orders, auth, etc.).
4. /specify で要件(WHAT)を伝える
次に、ソースコードがまっさらの状態から、ヘルスチェックエンドポイントだけのAPIサーバーを実装します。
まず、 /specify コマンドで要件(ユーザーストーリー/WHAT) を伝えましょう。
/specify シンプルなヘルスチェックAPIエンドポイント。GET /health でサービス稼働状態を確認できる機能。疎通チェックのために、DB接続など処理は不要。レスポンスはJSON形式
バックグラウンドで次のコマンドを実行し、 001-simple-health-check ブランチに移動します。Spec Kit は /specify の単位とブランチが1対1であることに注意しましょう。
$ .specify/scripts/bash/create-new-feature.sh --json "simple health check endpoint returning JSON status at GET /health"
AIエージェントが判断に迷うと、以下の様なやり取りが伴います
AIアシスタント
Let me apply those edits now. Would you like me to proceed with fixing the Markdown formatting, or should I leave it as-is? Let me know and I’ll continue (next step would be updating the file, then reporting readiness for /plan).
開発者
proceed with fixing them.
不明点を一緒に解決すると、 次の様なメッセージとともに /specify フェーズが完了します。
Specification Summary
I've created a comprehensive feature specification for the Health Check Endpoint that includes:
Core Requirements Captured:
✅ GET endpoint at /health for monitoring systems
✅ JSON response format for operational status
✅ Lightweight design bypassing heavy operations
✅ HTTP 200 status code for successful health checks
✅ Fast response time for reliable monitoring
...Next Steps
The specification is now ready for the /plan command, which will:
- Generate technical implementation plan
- Define Flask Blueprint architecture
- Create test scenarios following TDD principles
- Ensure compliance with the project constitution
specs/001-this-feature-will/spec.md を確認すると、機能要件(Functional Requirement/FR) が8つ作成されていました。抜粋します。
Requirements (mandatory)
Functional Requirements
- FR-001: System MUST provide a health check endpoint accessible via GET request to /health
- FR-002: System MUST return operational status information in JSON format
- FR-004: System MUST bypass heavy operations (database connections, file I/O) to ensure rapid response
- FR-005: System MUST provide consistent response format for reliable automated monitoring integration
- FR-006: System MUST indicate service availability status clearly in response payload
- FR-007: System MUST respond within [NEEDS CLARIFICATION: specific response time requirement not specified - under 100ms? 500ms?]
- FR-008: System MUST handle [NEEDS CLARIFICATION: error scenarios not specified - what HTTP status codes for degraded states?]
FR-007 はレスポンスタイムについての性能要件です。
しきい値について、確認が必要(NEEDS CLARIFICATION)というコメントが挟まれていることを確認できます。
5. /plan で 仕様(HOW)を伝える
次に、/plan で実装方法(HOW)を伝えます。
/plan ヘルスチェックエンドポイントをFlask Blueprintで src/blueprints/health.pyに実装。 jsonifyで 固定の{"status": "ok"} 形式のレスポンス生成。pytestテストも作成。
先ほどと同様に対話的に不明点を解決すると、 "Implementation Plan Execution Complete! 🎉" というメッセージとともに設計フェーズが完了します。
✅ Phase 0: Research complete
✅ Phase 1: Design complete
✅ Phase 2: Task planning complete
✅ Constitutional Gates: All checks passed
✅ Clarifications: All resolved through user implementation detailsNext Steps
The implementation plan is ready for the /tasks command, which will:
- Generate 8-10 specific, ordered tasks in tasks.md
- Include setup, TDD test creation, and Blueprint implementation
- Follow constitutional principles with parallel test execution
- Enable implementation phase with clear task dependencies
6. /tasks で タスク分割
GitHub のイシューやプルリクエストは、チェックボタン形式でタスクリストを作成できます。
Spec Kitは /specify の粒度でブランチ、最終的には、プルリクエストが作られるため、この /tasks フェーズはタスクリスト化と言えます。
これまで十分に仕様を伝えてきたので /tasks を実行するだけです。
先ほどと同様に対話的に不明点を解決すると、"Tasks Generation Complete! 🎉" というメッセージとともにタスク分割フェーズが完了します。
specs/ブランチ名/tasks.md ファイル内でも確認できます。
Phase 3.1: Setup
Phase 3.2: Tests First (TDD) ⚠️ MUST COMPLETE BEFORE 3.3
Phase 3.1: Setup (4 tasks)
T001: Create project structure (directories)
T002: Initialize Python 3.13 project with uv and Flask 3.1 dependencies
T003 [P]: Configure ruff for linting/formatting
T004 [P]: Create Flask application factory
Phase 3.2: Tests First - TDD (2 tasks)
T005 [P]: Contract test for GET /health endpoint
T006 [P]: Unit test for health Blueprint
Phase 3.3: Core Implementation (3 tasks)
T007: Health Blueprint implementation with /health route
T008: Register health Blueprint in Flask app
T009: Create package init files
Phase 3.4: Integration (1 task)
T010: Flask application entry point configuration
Phase 3.5: Polish (3 tasks)
T011 [P]: Validate tests with pytest
T012 [P]: Validate code formatting with ruff
T013: Manual quickstart validation...
The task breakdown is ready for the /implement command or manual execution! 🚀
意図しないタスクが含まれていないかチェックしましょう。
タスクの依存関係(TDD Compliance: Tests (T005-T006) come before implementation (T007)) や 並列実行可能なタスク(Parallel Execution: 6 tasks marked [P] for independent execution)も精査されます。
7. /implement で実装
/implement を実行すると、実装が始まります。怪しい実装に手をつけ始めたら、軌道修正させながら、諸々解決できると、実装完了のメッセージが表示されます。
🎉 Implementation Complete! Health Check Endpoint Successfully Deployed
Executive Summary
Feature: Health Check Endpoint
Branch: 001-this-feature-will
Status: ✅ FULLY IMPLEMENTED AND VALIDATED
Total Tasks Completed: 13/13 (100%)...
Implementation Success Factors
- 🎯 TDD Methodology: Tests written first, confirmed failures, then implemented
- 📐 Constitutional Adherence: All 5 core principles followed exactly
- ⚡ Performance Focus: Lightweight static response with no heavy operations
- 🧪 Comprehensive Testing: Both contract and unit test coverage
- 🔧 Modern Toolchain: Python 3.13, Flask 3.1, uv, ruff, pytest 8.4
- 📋 Task Discipline: All 13 tasks completed in dependency order
The health check endpoint is production-ready for monitoring integration, with sub-100ms response times, comprehensive test coverage, and full constitutional
compliance. The implementation successfully demonstrates the Flask Blueprint pattern with TDD methodology in a modern Python development environment.Ready for monitoring system integration! 🚀
お疲れ様でした。
途中、cURL でAPIサーバーを何度も叩いていることに気づきました。
specs/001-this-feature-will/contracts/health-api.md にレスポンスタイムの要求があれば( Response time: < 100ms (target) )、この契約を満たすように、律儀に cURL でリクエストを何回も呼び出して計測していたようです。
AIエージェントが実装したもの
今回の実行結果は次のリポジトリで公開しています
/specify で指定したブランチで実装した主な成果物は次のコードです(src/blueprints/health.py)。
from flask import Blueprint, jsonify

health_bp = Blueprint("health", __name__)

@health_bp.route("/health", methods=["GET"])
def get_health():
    """Health check endpoint for service monitoring."""
    return jsonify({"status": "ok"})
FlaskのBluePrint方式で実装されています。
ただ、このようなシンプルな出力にたどり着くまでに、プロンプトを工夫しながら何度も試行錯誤を繰り返したことをお伝えしておきます。
まとめ
GitHubが提供する仕様駆動開発(Spec-Driven Development;SDD)のツールキット Spec Kit を紹介しました。
Spec Kitはフェーズを細かくわけ、フェーズごとに既存ドキュメントを参照しながら、ドキュメントを整備していき、最終的にAIエージェントが自律的にコーディングできるように誘導する開発プロセスを支援します。
このドキュメントとプロンプトのインターフェースを担っているのが /specify などのカスタムコマンドです。
Spec Kitが色々なAIアシスタントに対応しているのはメリットでもありますが、裏を返すと、特定のAIアシスタントに特化した快適な開発体験の実現を制限している側面もあると感じました。
AIアシスタントにClaude Codeなどを設定し、裏でどういう処理をしているのか眺めてみるのも面白いと思います。