Step Functionsのタスク状態内でのフィルターによる入出力を整理してみた
この記事は公開されてから1年以上経過しています。情報が古い可能性がありますので、ご注意ください。
こんにちは、CX事業本部 IoT事業部の若槻です。
今回は、AWS Step Functionsのタスク内で使用できるフィルターによる入出力についてまとめてみました。
タスク内で使用可能なフィルター
ステートマシンではタスクをワークフローの各ステップとして使用します。タスクは各ステップの状態(State)を表し、ステートマシンのInputが各タスク内で順番に処理されます。タスク内ではワーカーを使用でき、Lambda関数の実行など多数の種類のAWSサービスをワーカーとすることができます。
そして、ステートマシンのタスク内では下記のフィルターフィールドをオプションとして使用可能です。。これらをタスク内のワーカーの前後で使用することによりデータの変換が行えるため、柔軟なデータフローを実現することができます。
| 適用順 | どんな時に使用するか | |
|---|---|---|
| InputPath | 1 | State InputのJsonの一部のみをワーカーの入力に使用したい場合 |
| Parameters | 2 | ワーカーの入力パラメータを作成したい場合 |
| ResultSelector | 3 | ワーカーの結果のJsonの一部を出力に使用したい場合 |
| ResultPath | 4 | ワーカーの結果をState Inputに合成したい場合 |
| OutputPath | 5 | ワーカーの結果のJsonの一部のみをState OutPutに使用したい場合 |
フィルターが適用される位置を図示したものが下記です。公式ドキュメントからの引用ですがこれがとても分かりやすいです。
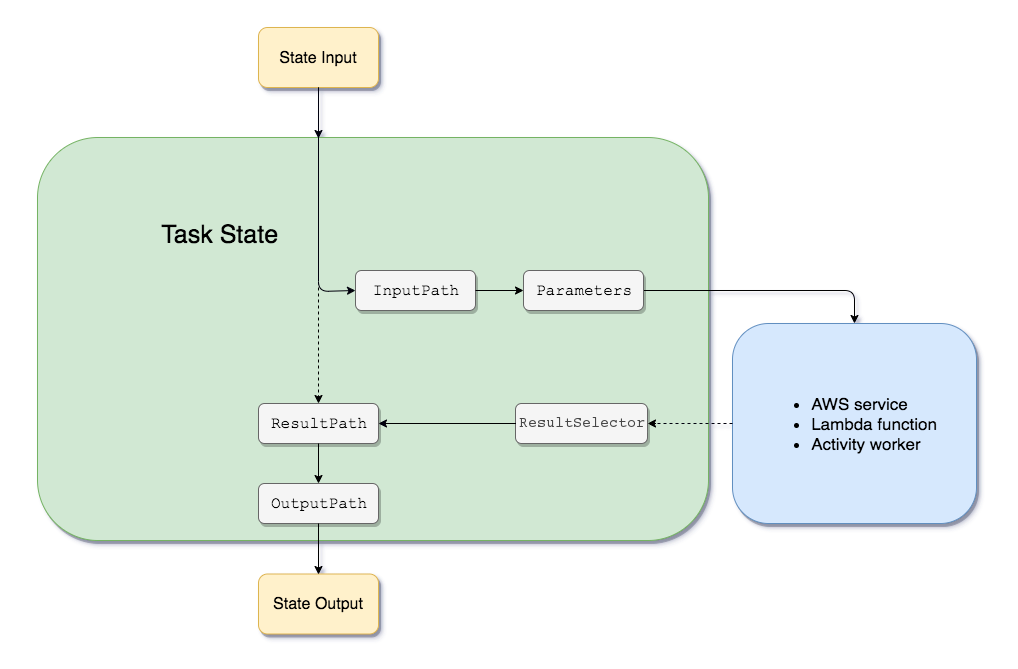
Step Functions の入出力処理 - AWS Step Functionsより引用。
入出力シミュレート
それではState InputからState Outputまでのフィルターやワーカーを経た前後の入出力された値をシミュレートしてみます。
- State Input
- InputPath後のState Input
- Parameters後のState Input
- Task Result
- ResultSelector後のTask Result
- ResultPath後のTask Result
- OutputPath後のTask Result
- State Output(7と同一)
上記を前述の図上で表すと下記のようになります。

State Input
Stateの入力です。
{
  "version": 4,
  "library": {
    "movies": [
      {
        "genre": "crime",
        "director": "Quentin Tarantino",
        "title": "Reservoir Dogs",
        "year": 1992
      },
      {
        "genre": "action",
        "director": "Brian De Palma",
        "title": "Mission: Impossible",
        "year": 1996,
        "staring": [
          "Tom Cruise"
        ]
      }
    ],
    "metadata": {
      "lastUpdated": "2020-05-27T08:00:00.000Z"
    },
    "stringJson": "{\"arr\": [1, 2, 3, 4, 5], \"bool\": true, \"null\": null, \"number\": 1}"
  }
}
上記がInputPathの入力に使用されます。
InputPath
InputPathフィルター
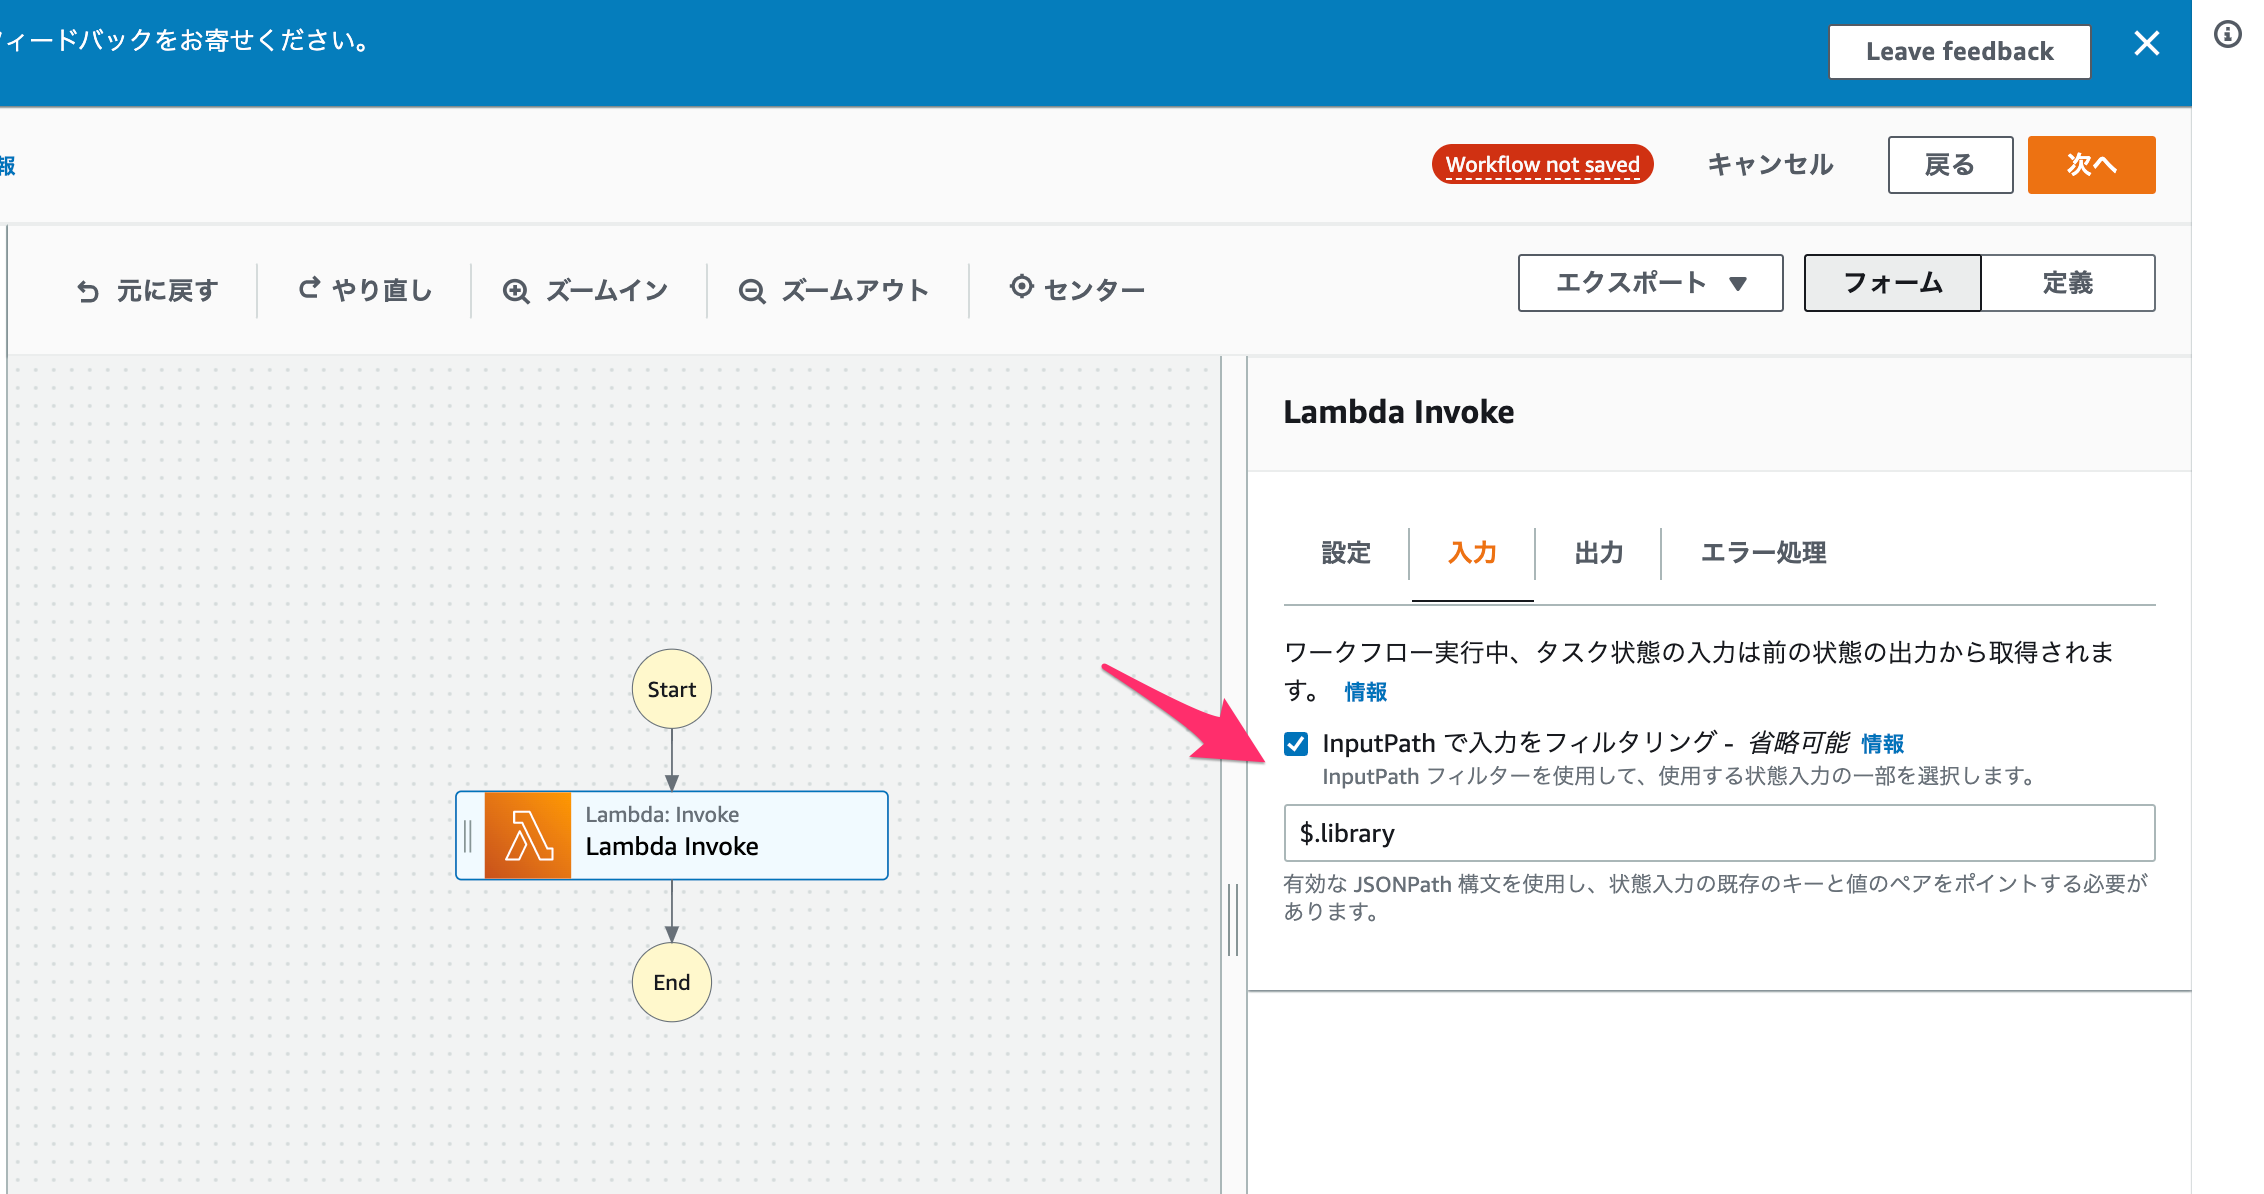
InputPathでState Inputのフィルターを下記のように指定します。
$.library
Workflow Studio上だと下記部分の設定です。
InputPath後のState Input
State InputのうちInputPathフィルターで指定したフィールドがフィルターされます。
{
  "movies": [
    {
      "genre": "crime",
      "director": "Quentin Tarantino",
      "title": "Reservoir Dogs",
      "year": 1992
    },
    {
      "genre": "action",
      "director": "Brian De Palma",
      "title": "Mission: Impossible",
      "year": 1996,
      "staring": [
        "Tom Cruise"
      ]
    }
  ],
  "metadata": {
    "lastUpdated": "2020-05-27T08:00:00.000Z"
  },
  "stringJson": "{\"arr\": [1, 2, 3, 4, 5], \"bool\": true, \"null\": null, \"number\": 1}"
}
上記がParameterの入力に使用されます。
Parameters
Parametersフィールド
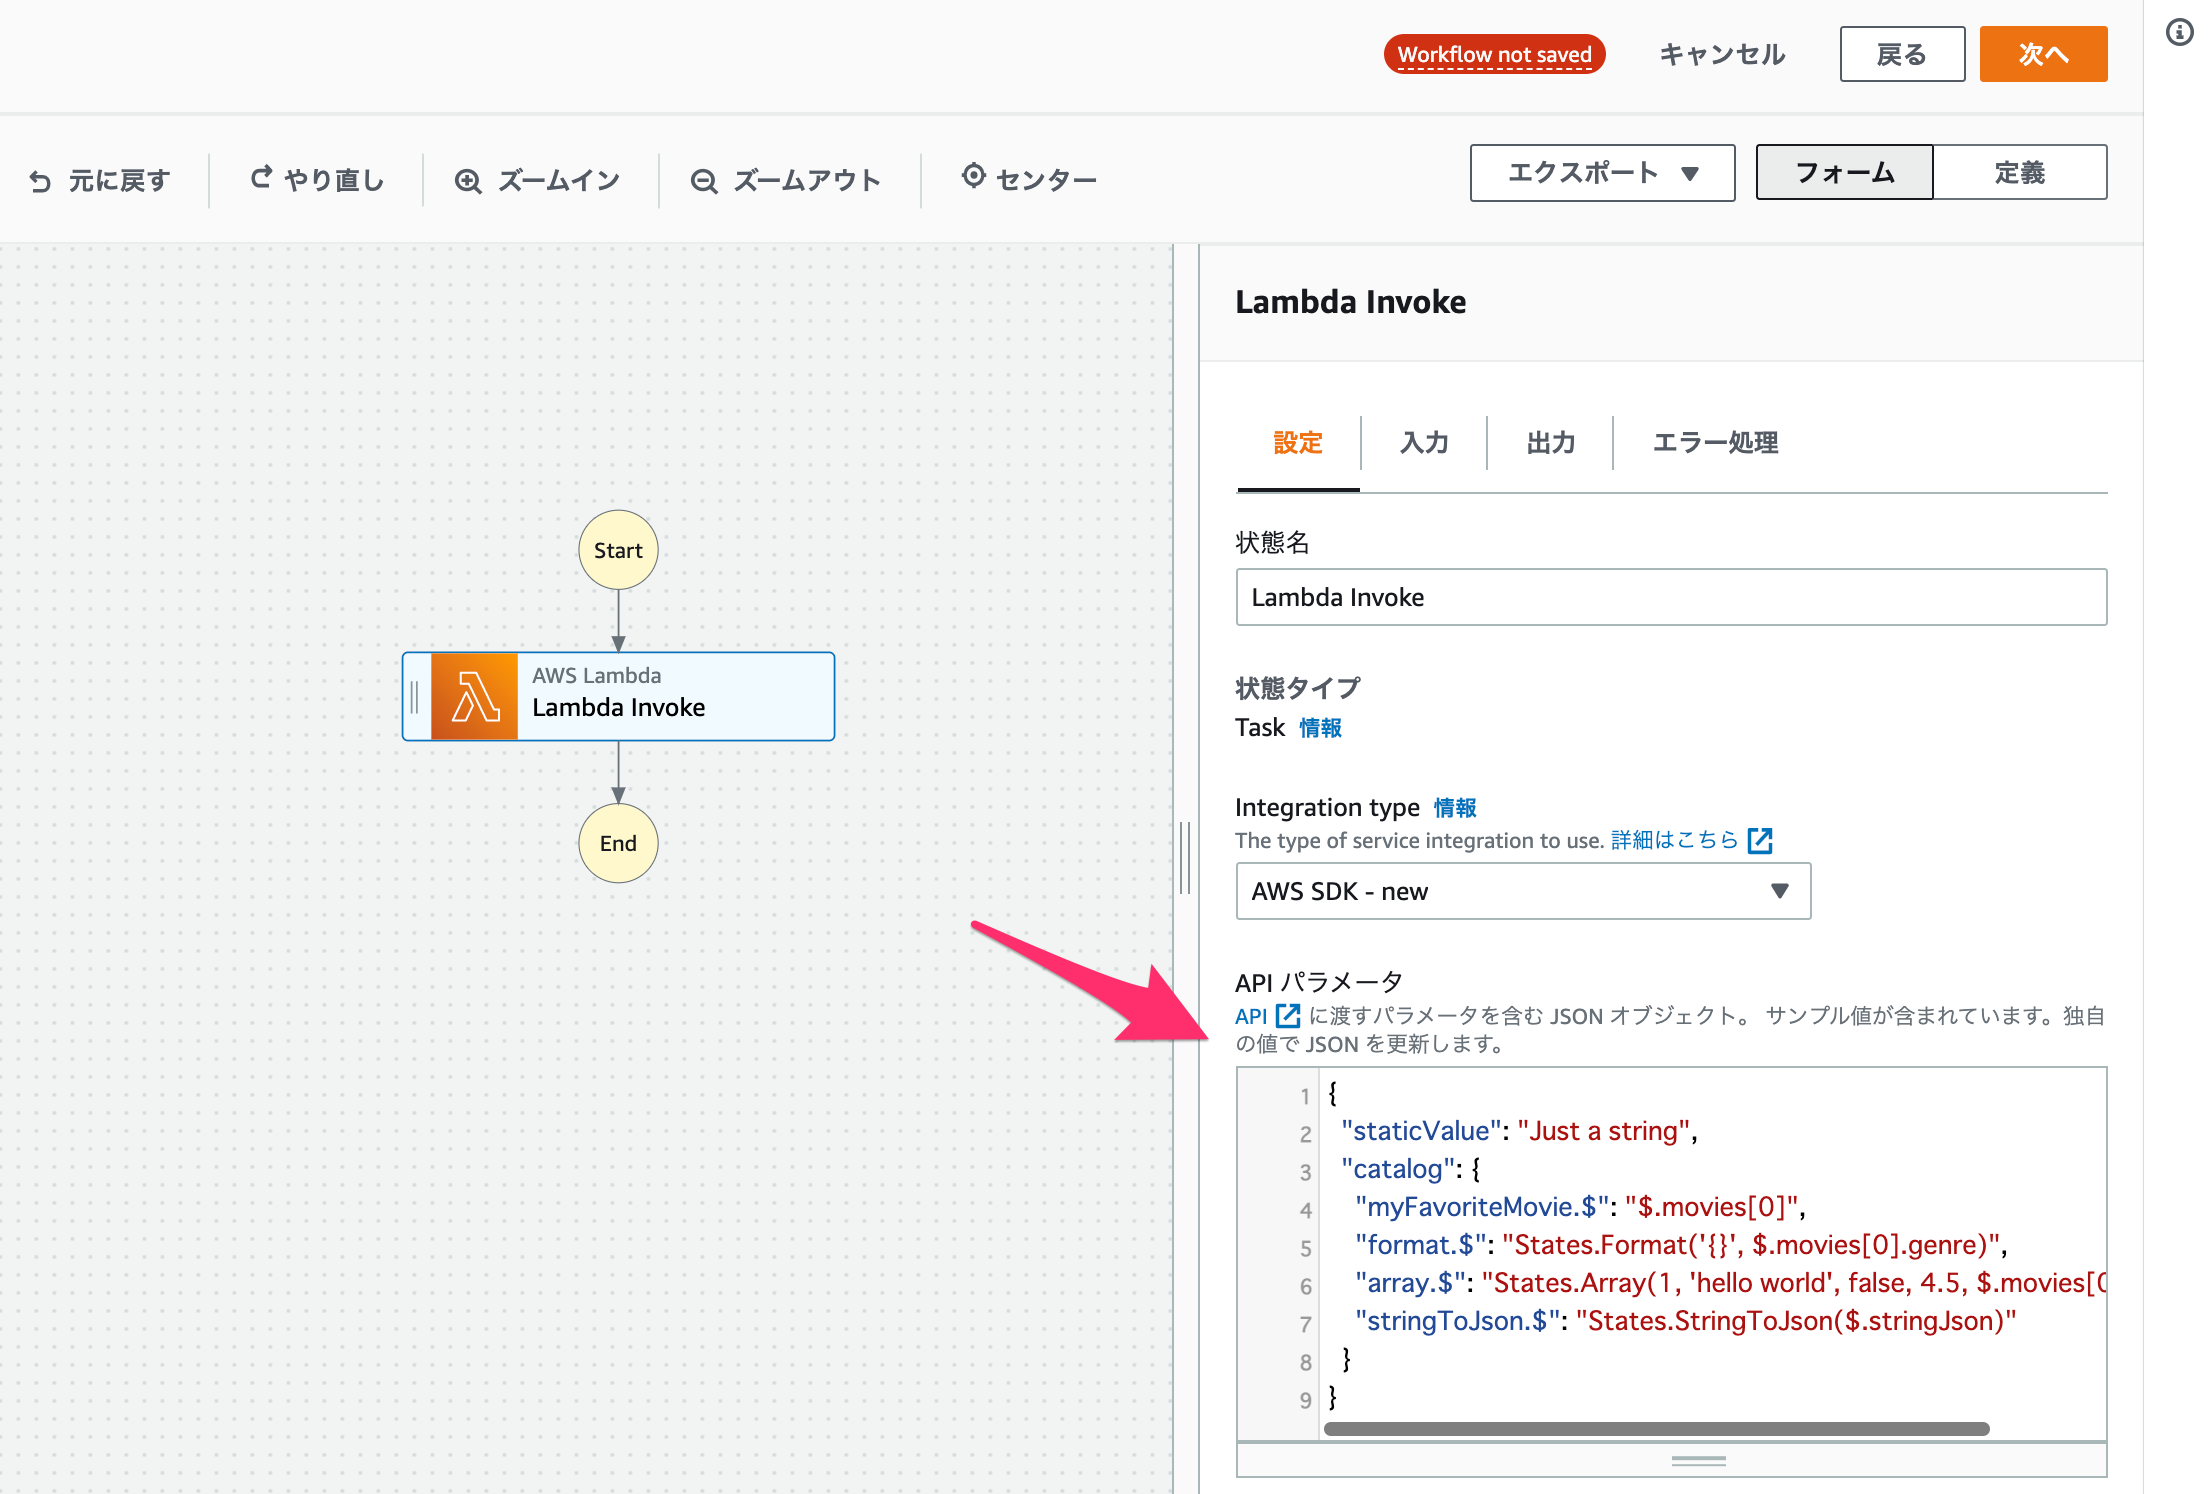
Parametersでワーカーの入力パラメータを下記のように指定します。
{
  "staticValue": "Just a string",
  "catalog": {
    "myFavoriteMovie.$": "$.movies[0]",
    "format.$": "States.Format('{}', $.movies[0].genre)",
    "array.$": "States.Array(1, 'hello world', false, 4.5, $.movies[0].genre)",
    "stringToJson.$": "States.StringToJson($.stringJson)"
  }
}
Workflow Studio上だと下記部分の設定です。
Parameters後のState Input
{
  "staticValue": "Just a string",
  "catalog": {
    "myFavoriteMovie": {
      "genre": "crime",
      "director": "Quentin Tarantino",
      "title": "Reservoir Dogs",
      "year": 1992
    },
    "format": "crime",
    "array": [
      1,
      "hello world",
      false,
      4.5,
      "crime"
    ],
    "stringToJson": {
      "arr": [
        1,
        2,
        3,
        4,
        5
      ],
      "bool": true,
      "null": null,
      "number": 1
    }
  }
}
上記がTaskの入力に使用されます。
Task Result
Taskの出力結果です。Lambda関数などのアクションの戻り値に該当します。
{
  "ExecutedVersion": "$LATEST",
  "Payload": {
    "statusCode": "200",
    "body": "hello, world!"
  },
  "SdkHttpMetadata": {
    "HttpHeaders": {
      "Connection": "keep-alive",
      "Content-Length": "43",
      "Content-Type": "application/json",
      "Date": "Thu, 16 Apr 2020 17:58:15 GMT",
      "X-Amz-Executed-Version": "$LATEST",
      "x-amzn-Remapped-Content-Length": "0",
      "x-amzn-RequestId": "88fba57b-adbe-467f-abf4-daca36fc9028",
      "X-Amzn-Trace-Id": "root=1-5e989cb6-90039fd8971196666b022b62;sampled=0"
    },
    "HttpStatusCode": 200
  },
  "SdkResponseMetadata": {
    "RequestId": "88fba57b-adbe-467f-abf4-daca36fc9028"
  },
  "StatusCode": 200
}
上記がResultSelectorの入力に使用されます。
ResultSelector
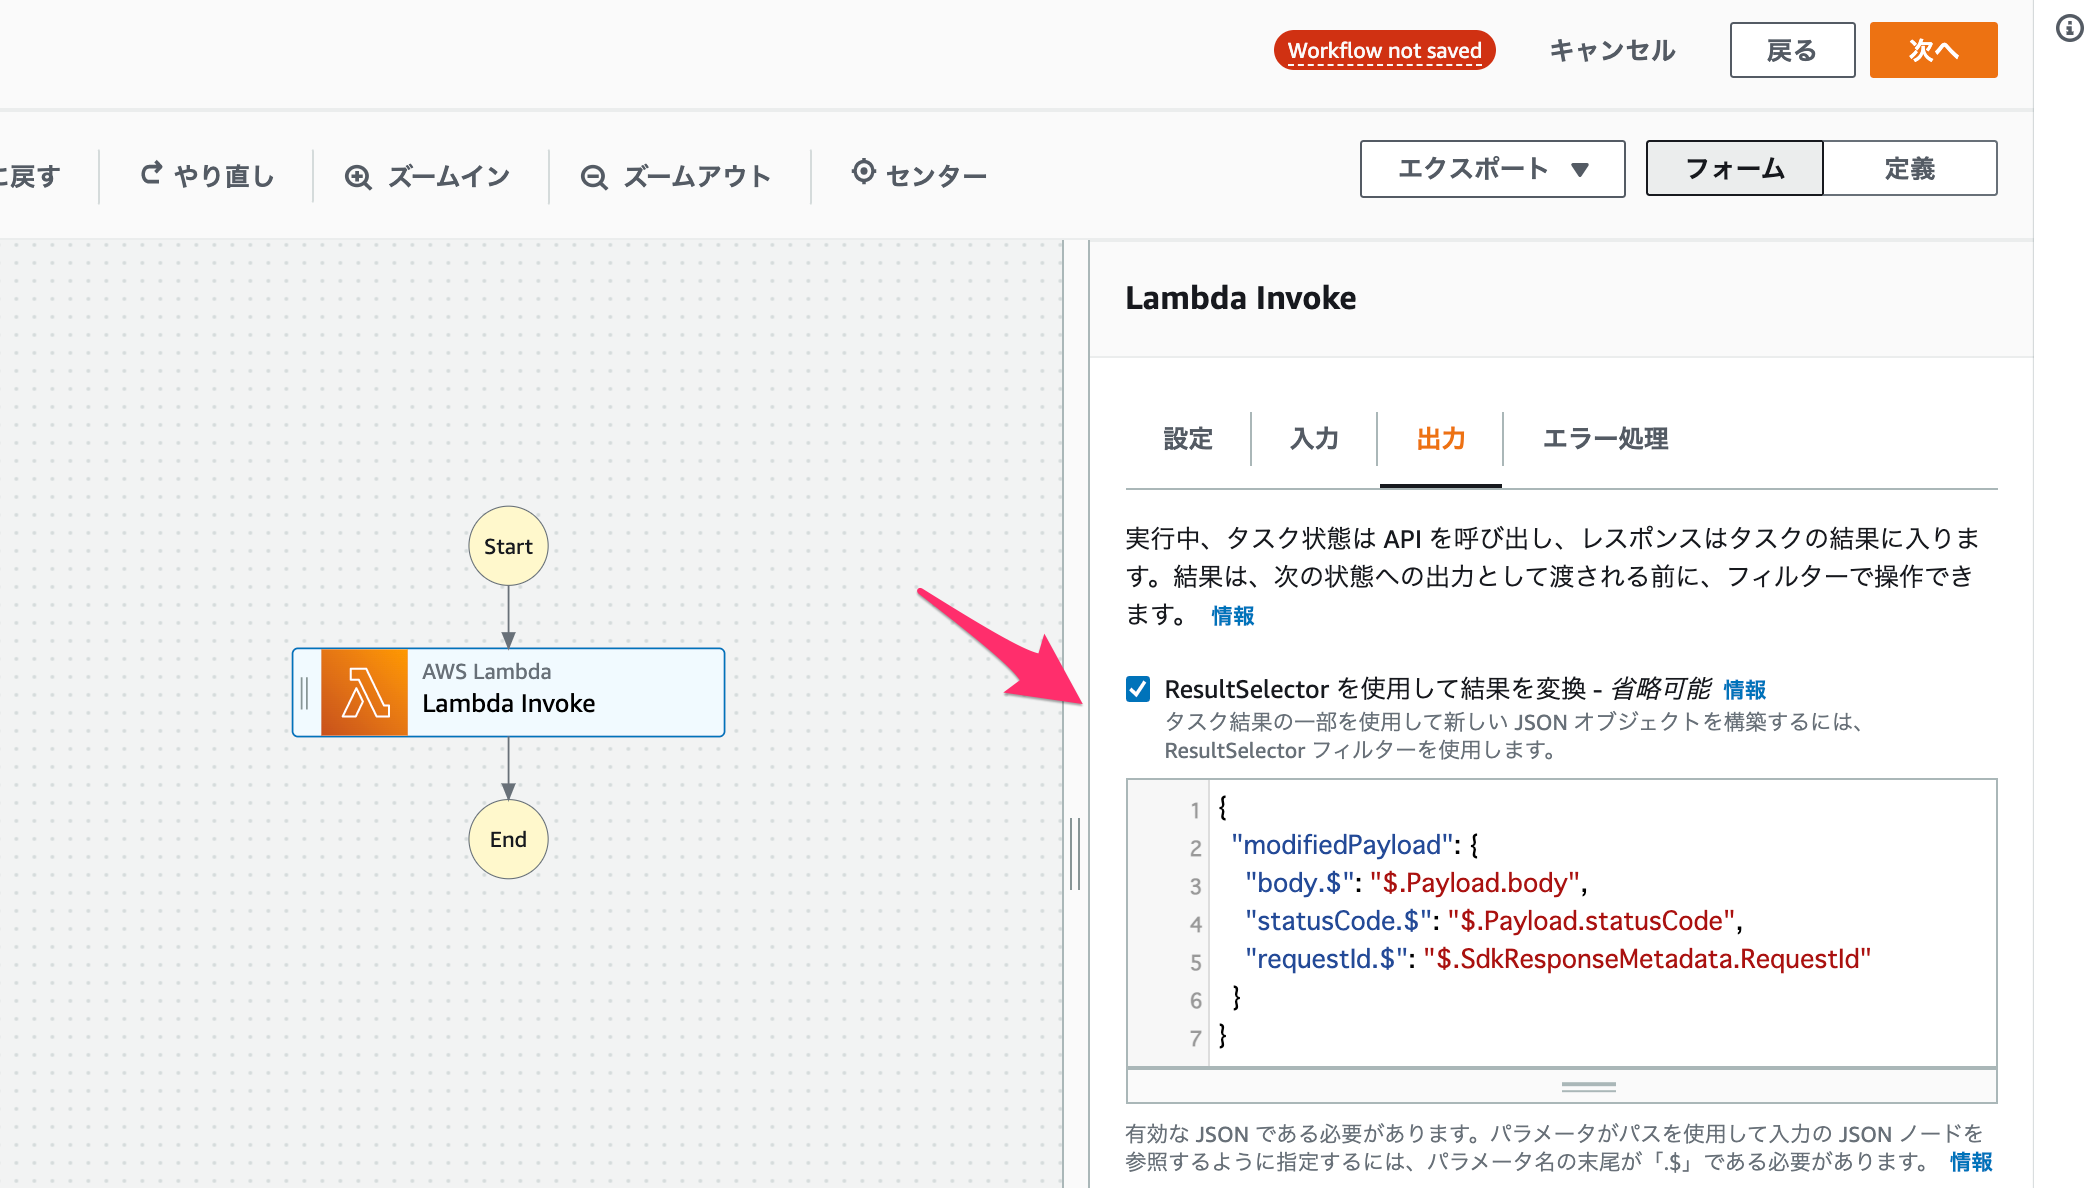
ResultSelectorフィルター
ResultSelectorでワーカーの結果のフィルターを下記のように指定します。
{
  "modifiedPayload": {
    "body.$": "$.Payload.body",
    "statusCode.$": "$.Payload.statusCode",
    "requestId.$": "$.SdkResponseMetadata.RequestId"
  }
}
Workflow Studio上だと下記部分の設定です。
ResultSelector後のTask Result
{
  "modifiedPayload": {
    "body": "hello, world!",
    "statusCode": "200",
    "requestId": "88fba57b-adbe-467f-abf4-daca36fc9028"
  }
}
ResultPath
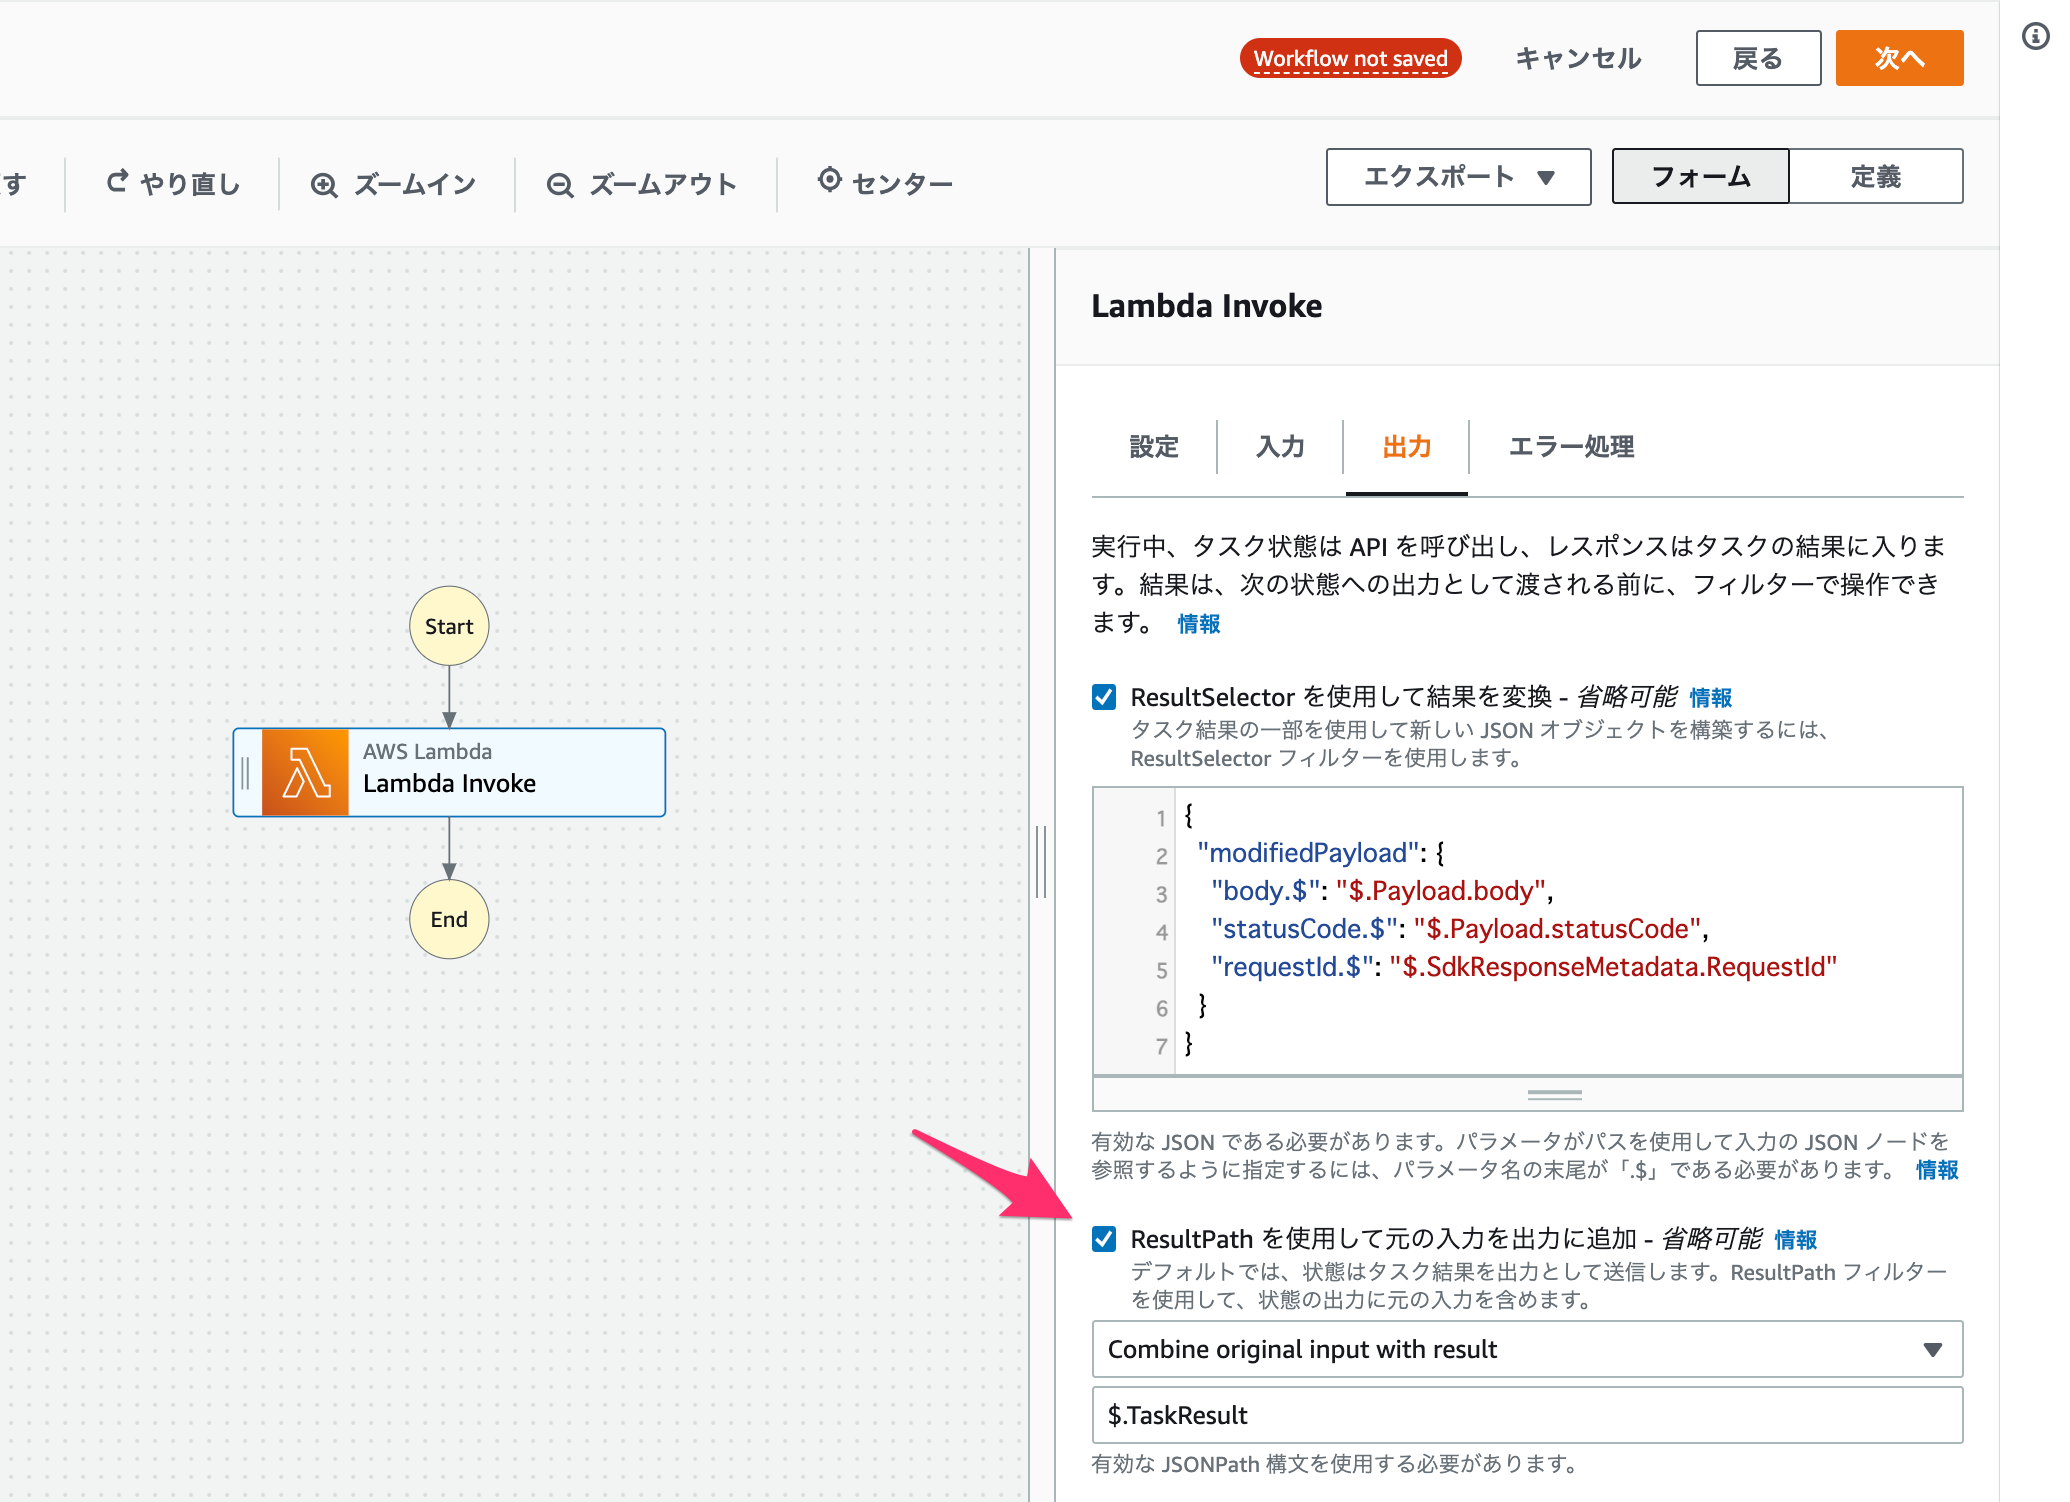
ResultPathフィルター
ResultPathでワーカーの結果のState Inputへの合成を下記のように指定します。
$.TaskResult
Workflow Studio上だと下記部分の設定です。
ResultPath後のTask Result
{
  "version": 4,
  "library": {
    "movies": [
      {
        "genre": "crime",
        "director": "Quentin Tarantino",
        "title": "Reservoir Dogs",
        "year": 1992
      },
      {
        "genre": "action",
        "director": "Brian De Palma",
        "title": "Mission: Impossible",
        "year": 1996,
        "staring": [
          "Tom Cruise"
        ]
      }
    ],
    "metadata": {
      "lastUpdated": "2020-05-27T08:00:00.000Z"
    },
    "stringJson": "{\"arr\": [1, 2, 3, 4, 5], \"bool\": true, \"null\": null, \"number\": 1}"
  },
  "TaskResult": {
    "modifiedPayload": {
      "body": "hello, world!",
      "statusCode": "200",
      "requestId": "88fba57b-adbe-467f-abf4-daca36fc9028"
    }
  }
}
OutputPath
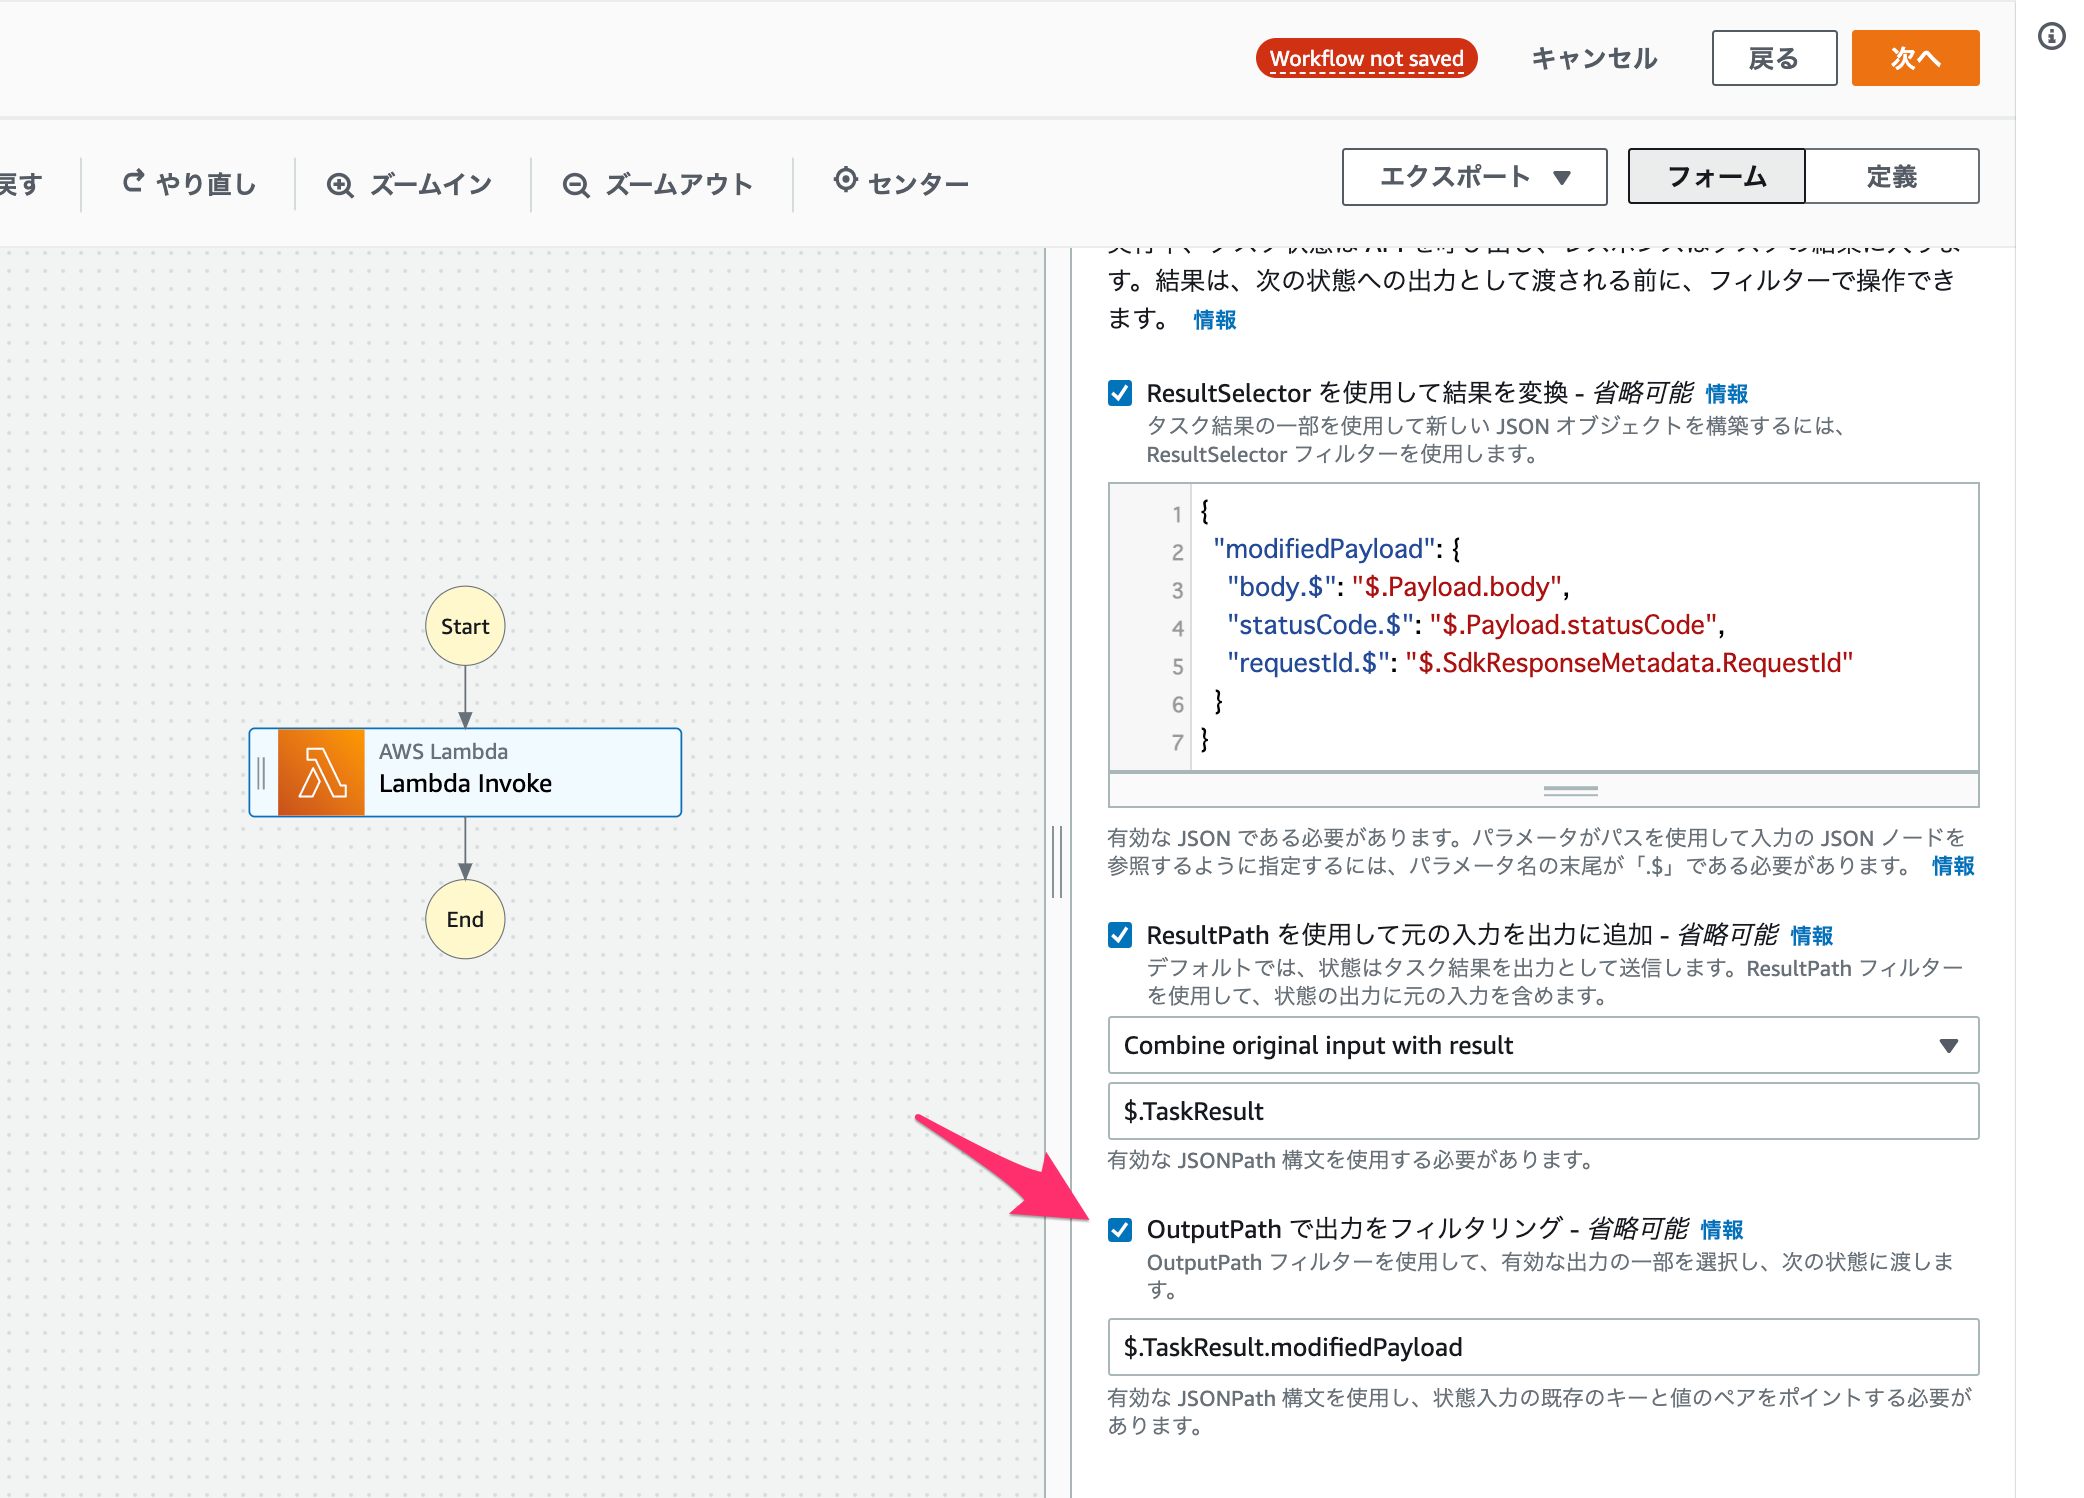
OutputPathフィルター
OutputPathでタスク結果のフィルターを下記のように指定します。
$.TaskResult.modifiedPayload
Workflow Studio上だと下記部分の設定です。
OutputPath後のTask Result
{
  "body": "hello, world!",
  "statusCode": "200",
  "requestId": "88fba57b-adbe-467f-abf4-daca36fc9028"
}
State Output
最終的な状態出力です。
{
  "body": "hello, world!",
  "statusCode": "200",
  "requestId": "88fba57b-adbe-467f-abf4-daca36fc9028"
}
データフローシミュレーターが便利
Step Functionsのデータフローシミュレーターという機能を使用すると、入出力データとフィルターを指定して、タスク内での各フィルターの入出力データをシミュレートできます。
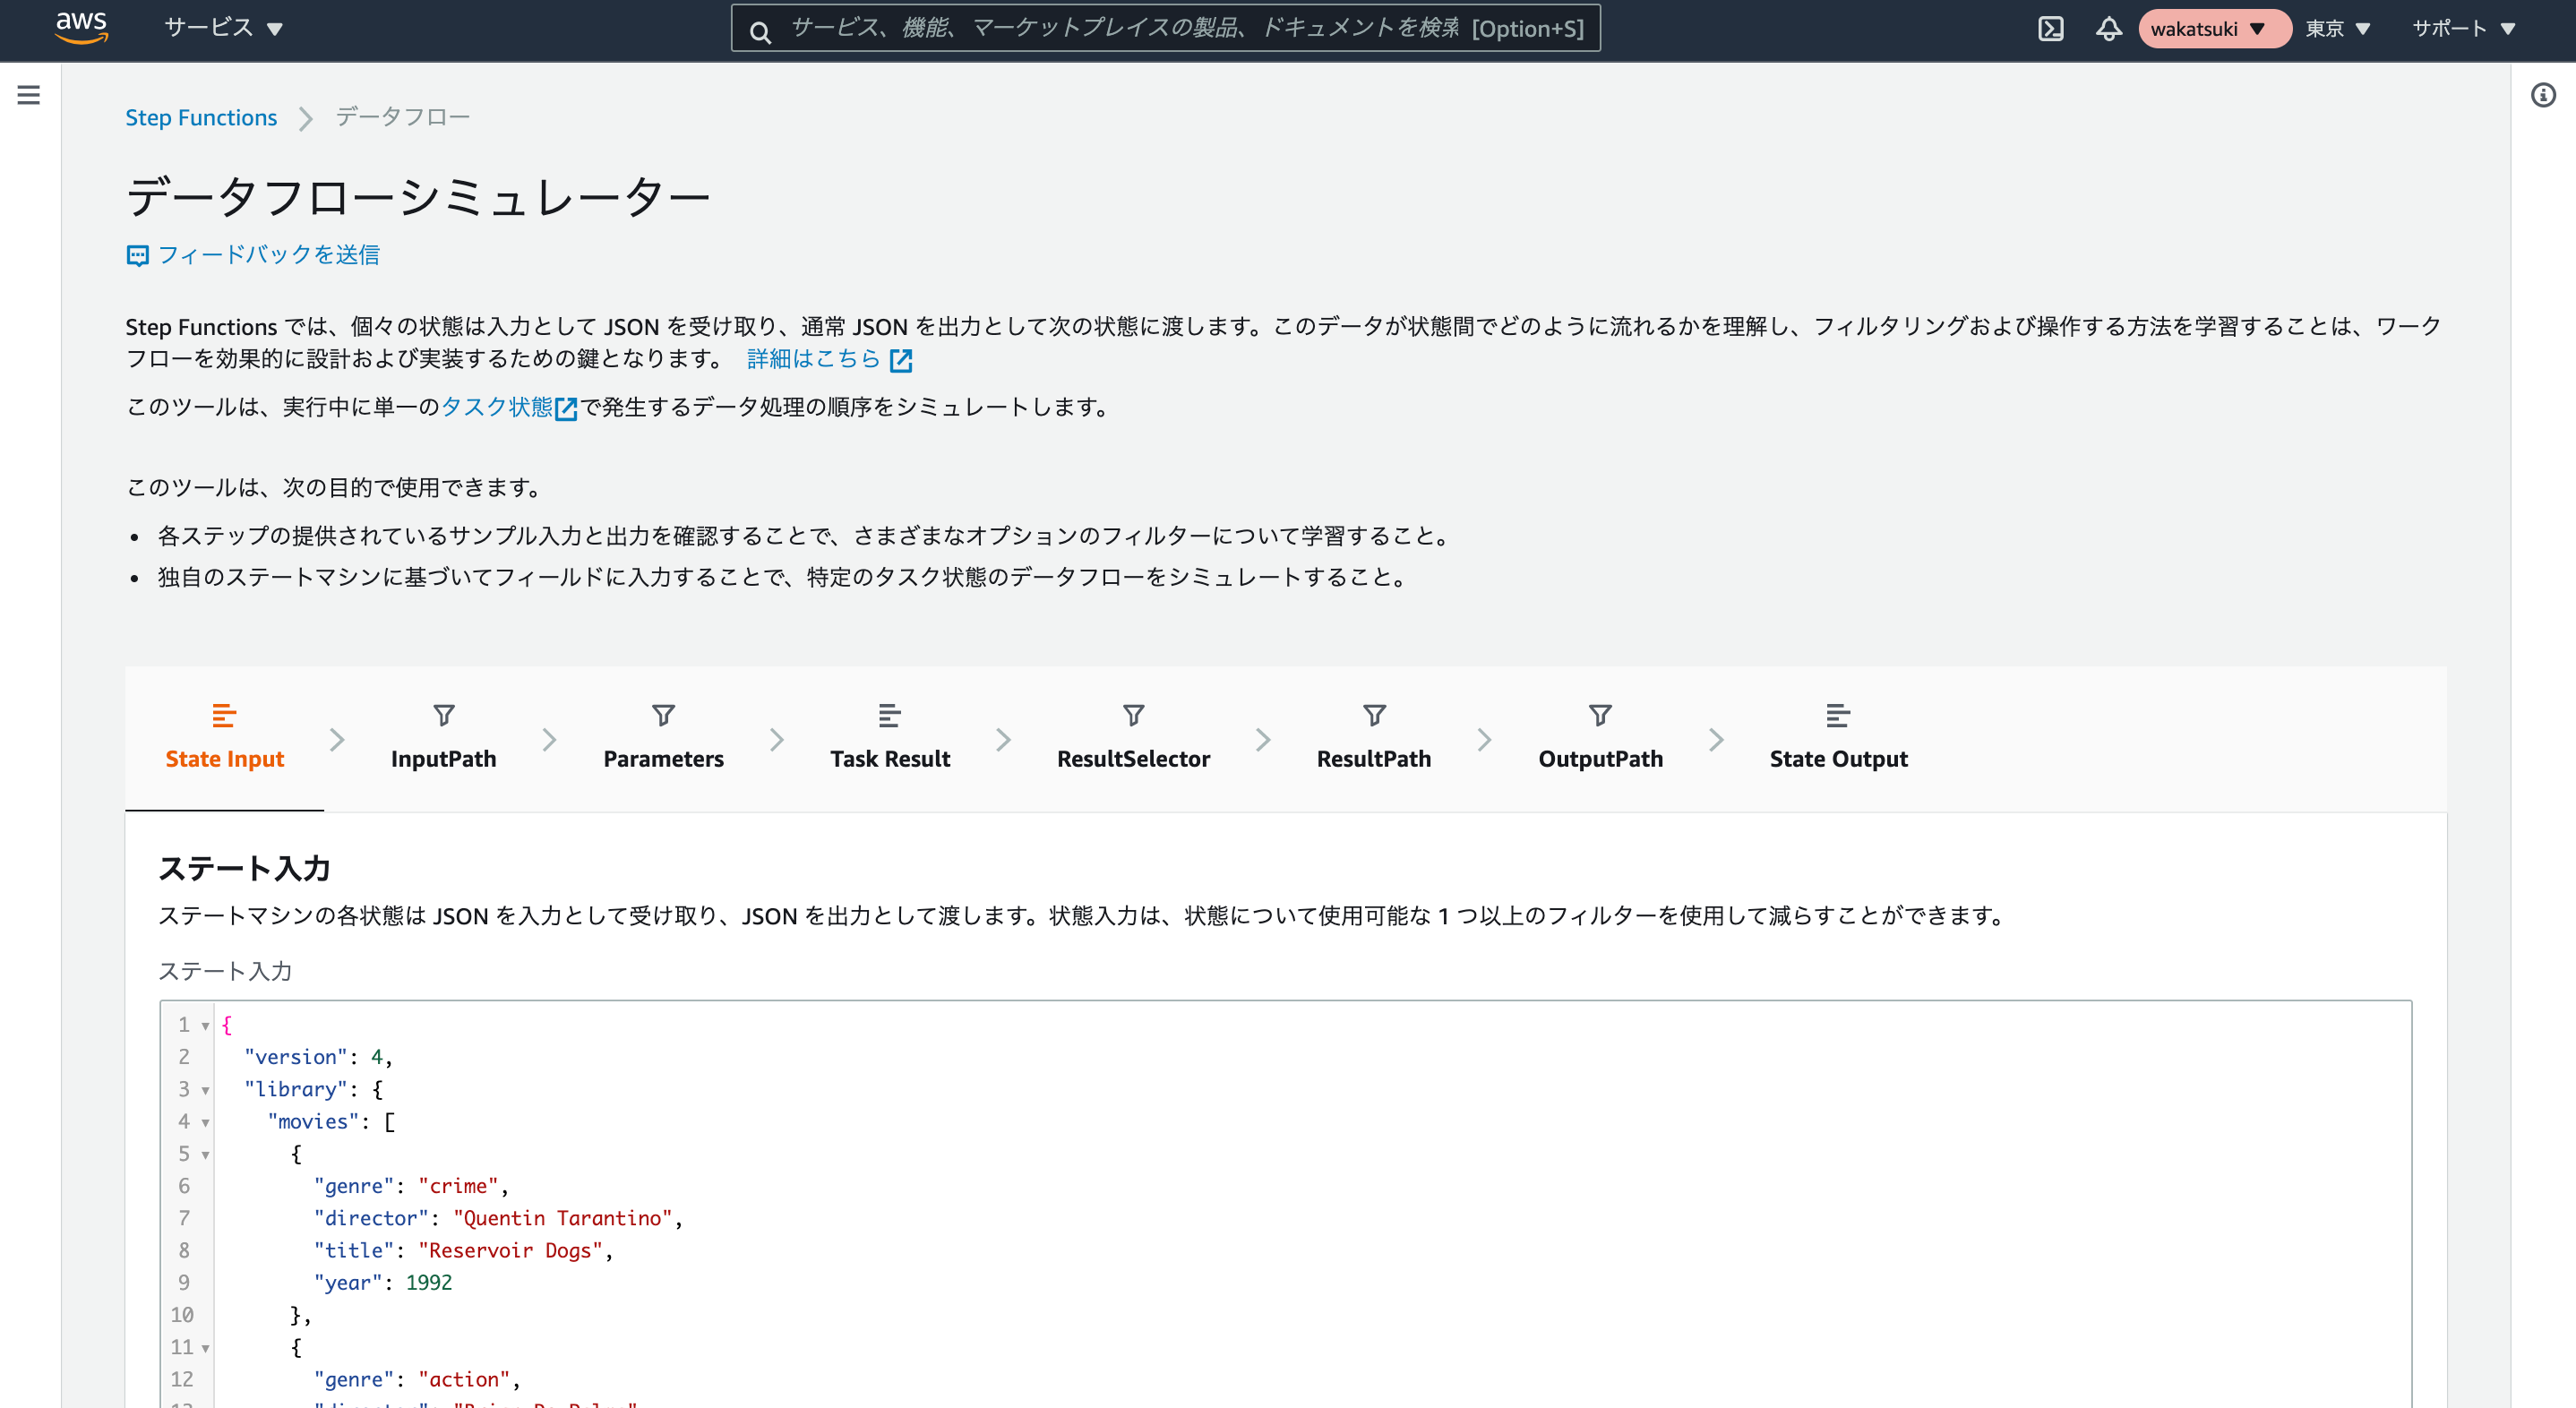
これを使えばステートマシンをテスト実行しなくてもフィルターの検証ができるので便利です。
ItemsPathとは
ここまで紹介したフィルターフィールドとは別に、ItemsPathというフィールドがあります。
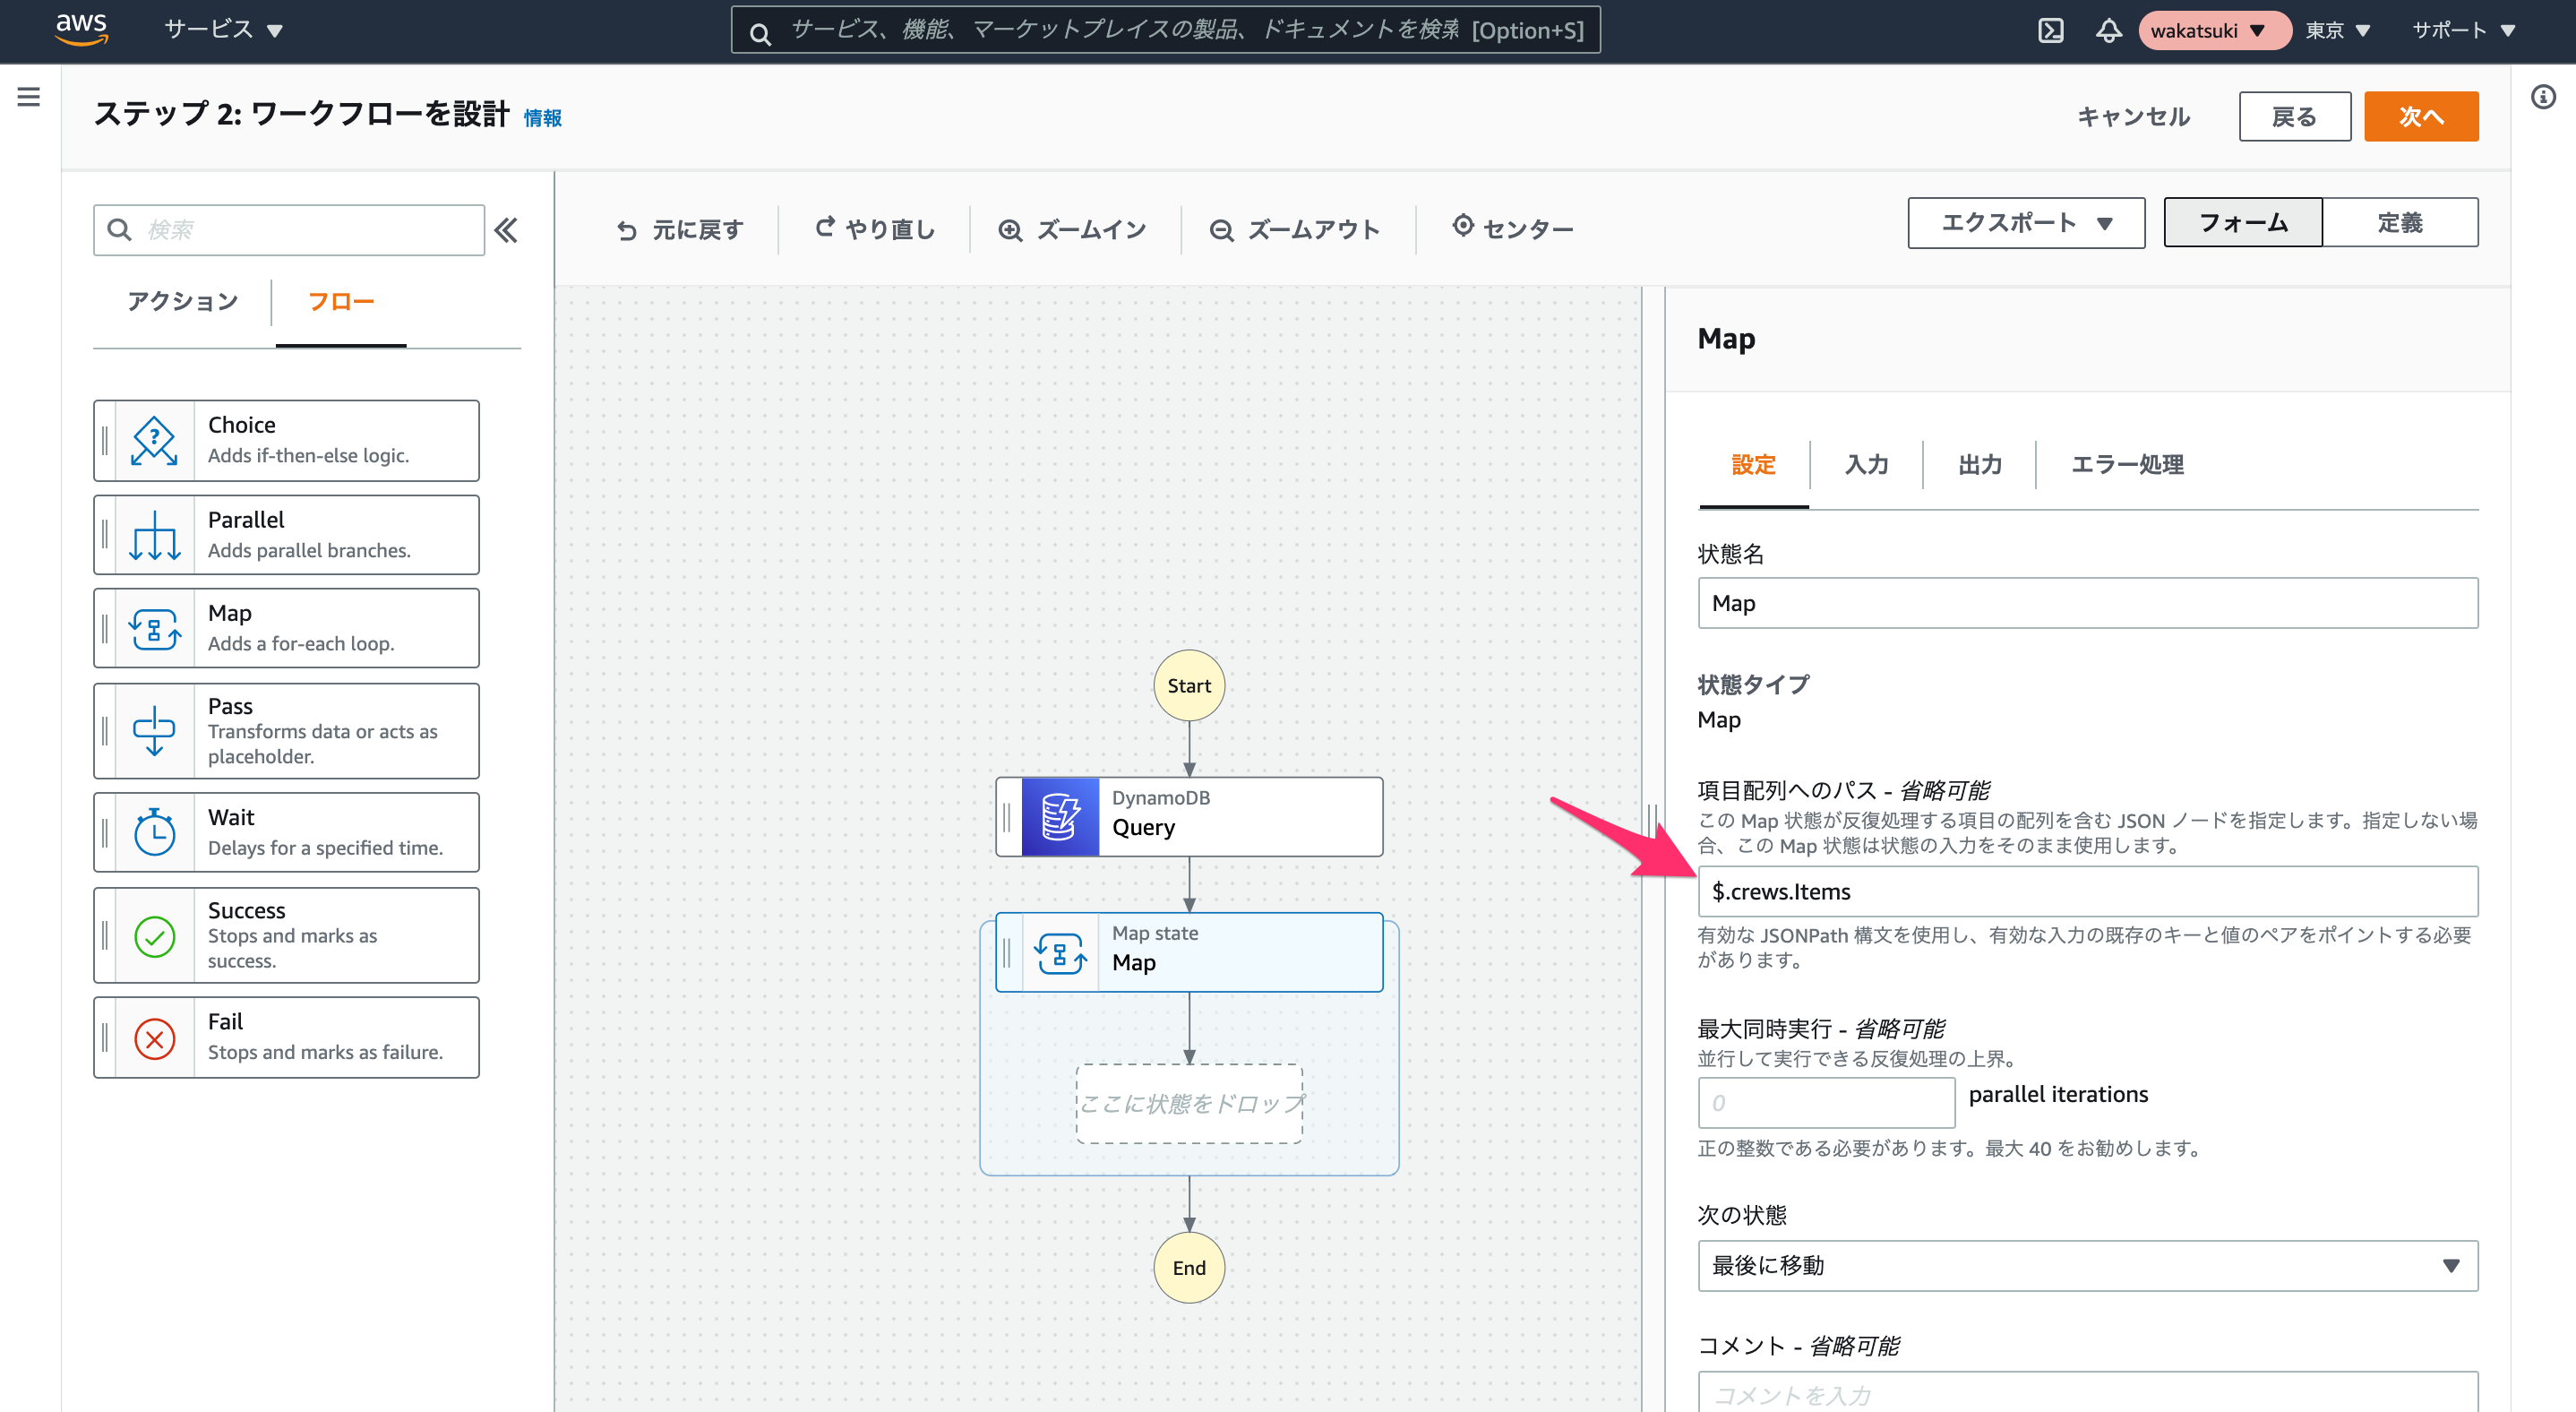
ItemsPathはMap状態でのみ使用できるフィールドです。前タスクの結果のJson内の配列となる部分をItemsPathで指定することにより、Map内で繰り返し実行される各タスクのInputのイテレータを指定できます。
Workflow Studio上だと下記部分の設定です。
参考
以上