
TerraformでEC2を作成してAWS IoT Coreを気軽に試せる環境を作ってみた
この記事は公開されてから1年以上経過しています。情報が古い可能性がありますので、ご注意ください。
はじめに
コンサルティング部の神野です。
AWS IoT Coreを気軽に試せる環境が欲しくなりませんか?
デバイスで検証する前にクラウド上のEC2をデバイスに見立ててコードが実行できるのか確認したい時などあると思います。
今回はTerraformを使って手軽にEC2をAWS IoT CoreのThingとして扱えるよう環境を構築してみました。
構築
作成するシステム構成図
- EC2をThingと見立てて、インターネットへの通信はNAT Gatewayを介して行うためプライベートサブネットに配置
- EC2の操作はブラウザのSession Manager上から実施
- デバイス証明書を発行し、Secrets Manager経由でEC2に格納

作成するシステム構成図
前提
今回はTerraformを使用するため事前にインストールが必要になります。
使用したバージョンは下記となります。
- Terraform・・・v1.9.4(provider registry.terraform.io/hashicorp/aws v5.61.0)
ディレクトリ構成
.
├── ec2.tf # VPCやEC2など作成
├── iot.tf # IoT Thingや証明書など作成
├── main.tf # providerの設定のみ
├── scripts
│   ├── iot_pubsub.py # デバイス上で実行するスクリプト
│   └── setup.sh # ユーザーデータスクリプト
構築のソースコードは下記Githubにアップロードしているので、必要に応じてご参照ください。
main.tf
providerブロックなど基本的な箇所のみ記載します。
# Terraformのバージョンと必要なプロバイダーを指定
terraform {
  required_version = ">=0.13"
  required_providers {
    aws = {
      source  = "hashicorp/aws"
      version = "~>5.61.0"
    }
  }
}

# AWSプロバイダーの設定
provider "aws" {
  region  = "ap-northeast-1"
}
ec2.tf
このファイルではVPCやEC2を構築していきます。
今回Session Managerを使用するので鍵は発行しておりません。
EC2にアタッチするインスタンスプロファイルはSession ManagerとSecrets Managerにアクセスできるマネージドポリシーのみ付与しています。
セキュリティグループはアウトバウンドの通信のみ許可しています。
# 現在のAWSリージョンとアカウントIDを取得
data "aws_region" "current" {}
data "aws_caller_identity" "current" {}

# VPCの作成
resource "aws_vpc" "vpc" {
  cidr_block           = "10.0.0.0/16"
  enable_dns_support   = true
  enable_dns_hostnames = true
}

# パブリックサブネットの作成
resource "aws_subnet" "public_subnet" {
  vpc_id                  = aws_vpc.vpc.id
  cidr_block              = "10.0.1.0/24"
  availability_zone       = "ap-northeast-1a"
  map_public_ip_on_launch = true
}

# プライベートサブネットの作成
resource "aws_subnet" "private_subnet" {
  vpc_id            = aws_vpc.vpc.id
  cidr_block        = "10.0.2.0/24"
  availability_zone = "ap-northeast-1a"
}

# インターネットゲートウェイの作成
resource "aws_internet_gateway" "this" {
  vpc_id = aws_vpc.vpc.id
}

# Elastic IPの作成(NAT Gateway用)
resource "aws_eip" "nat_eip" {
  domain     = "vpc"
  depends_on = [aws_internet_gateway.this]
}

# NAT Gatewayの作成
resource "aws_nat_gateway" "this" {
  allocation_id = aws_eip.nat_eip.id
  subnet_id     = aws_subnet.public_subnet.id
}

# パブリックルートテーブルの作成
resource "aws_route_table" "public" {
  vpc_id = aws_vpc.vpc.id

  route {
    cidr_block = "0.0.0.0/0"
    gateway_id = aws_internet_gateway.this.id
  }
}

# プライベートルートテーブルの作成
resource "aws_route_table" "private" {
  vpc_id = aws_vpc.vpc.id

  route {
    cidr_block     = "0.0.0.0/0"
    nat_gateway_id = aws_nat_gateway.this.id
  }
}

# パブリックルートテーブルの関連付け
resource "aws_route_table_association" "public" {
  subnet_id      = aws_subnet.public_subnet.id
  route_table_id = aws_route_table.public.id
}

# プライベートルートテーブルの関連付け
resource "aws_route_table_association" "private" {
  subnet_id      = aws_subnet.private_subnet.id
  route_table_id = aws_route_table.private.id
}

# セキュリティグループの作成
resource "aws_security_group" "allow_outbound" {
  name        = "allow_outbound"
  description = "Allow outbound traffic"
  vpc_id      = aws_vpc.vpc.id

  egress {
    from_port   = 0
    to_port     = 0
    protocol    = "-1"
    cidr_blocks = ["0.0.0.0/0"]
  }
}

# テンプレートファイルの読み込みとローカル変数の設定
locals {
  iot_pubsub_script = templatefile("${path.module}/scripts/iot_pubsub.py", {
    # IoTエンドポイントを設定
    iot_endpoint = data.aws_iot_endpoint.example.endpoint_address
  })

  setup_script = templatefile("${path.module}/scripts/setup.sh", {
    iot_pubsub_script = local.iot_pubsub_script
    aws_region        = data.aws_region.current.name
  })
}

# IAMロールの作成
resource "aws_iam_role" "ec2_iot_role" {
  name = "ec2_iot_role"
  assume_role_policy = jsonencode({
    Version = "2012-10-17"
    Statement = [{
      Action = "sts:AssumeRole"
      Effect = "Allow"
      Principal = {
        Service = "ec2.amazonaws.com"
      }
    }]
  })
}

# IAMロールにポリシーをアタッチ
resource "aws_iam_role_policy_attachment" "secrets_manager_access" {
  policy_arn = "arn:aws:iam::aws:policy/SecretsManagerReadWrite"
  role       = aws_iam_role.ec2_iot_role.name
}

resource "aws_iam_role_policy_attachment" "ssm_managed_instance_core" {
  policy_arn = "arn:aws:iam::aws:policy/AmazonSSMManagedInstanceCore"
  role       = aws_iam_role.ec2_iot_role.name
}

# IAMインスタンスプロファイルの作成
resource "aws_iam_instance_profile" "ec2_iot_profile" {
  name = "ec2_iot_profile"
  role = aws_iam_role.ec2_iot_role.name
}

# EC2インスタンスの作成(プライベートサブネットに配置)
resource "aws_instance" "iot_example" {
  ami                    = "ami-00c79d83cf718a893"
  instance_type          = "t3.micro"
  subnet_id              = aws_subnet.private_subnet.id
  iam_instance_profile   = aws_iam_instance_profile.ec2_iot_profile.name
  user_data              = local.setup_script
  vpc_security_group_ids = [aws_security_group.allow_outbound.id]
}
iot.tf
Thingの作成やデバイス証明書、またそれに紐づくポリシーなど作成し紐付けを行います。
作成したデバイス証明書はSecrets Managerに格納します。
デバイス証明書へ付与した権限は必要なトピック(my/test/topic)に絞って通信を許可しています。
# デバイス証明書を作成し、アクティブに設定
resource "aws_iot_certificate" "cert" {
  active = true
}

# IoTデバイス(Thing)を作成
resource "aws_iot_thing" "example" {
  name = "example-thing"
}

# IoTポリシーを作成
# このポリシーは特定のトピックに対する操作を許可
resource "aws_iot_policy" "pubsub" {
  name = "PubSubToSpecificTopic"
  policy = jsonencode({
    Version = "2012-10-17"
    Statement = [
      {
        # 特定のクライアントの接続を許可
        Effect   = "Allow"
        Action   = ["iot:Connect"]
        Resource = ["arn:aws:iot:${data.aws_region.current.name}:${data.aws_caller_identity.current.account_id}:client/${aws_iot_thing.example.name}"]
      },
      {
        # 特定のトピックへの発行と受信を許可
        Effect   = "Allow"
        Action   = ["iot:Publish", "iot:Receive"]
        Resource = ["arn:aws:iot:${data.aws_region.current.name}:${data.aws_caller_identity.current.account_id}:topic/my/test/topic"]
      },
      {
        # 特定のトピックフィルターへのサブスクリプションを許可
        Effect   = "Allow"
        Action   = ["iot:Subscribe"]
        Resource = ["arn:aws:iot:${data.aws_region.current.name}:${data.aws_caller_identity.current.account_id}:topicfilter/my/test/topic"]
      }
    ]
  })
}

# ポリシーを証明書にアタッチ
resource "aws_iot_policy_attachment" "attach_policy_to_cert" {
  policy = aws_iot_policy.pubsub.name
  target = aws_iot_certificate.cert.arn
}

# 証明書をThingにアタッチ
resource "aws_iot_thing_principal_attachment" "attach_cert_to_thing" {
  principal = aws_iot_certificate.cert.arn
  thing     = aws_iot_thing.example.name
}

# 証明書情報を保存するためのSecrets Managerシークレットを作成
resource "aws_secretsmanager_secret" "iot_cert" {
  name = "iot_certificate_test"
  force_overwrite_replica_secret = true
  recovery_window_in_days = 0
}

# 証明書情報をシークレットに保存
resource "aws_secretsmanager_secret_version" "iot_cert" {
  secret_id = aws_secretsmanager_secret.iot_cert.id
  secret_string = jsonencode({
    certificate_pem = aws_iot_certificate.cert.certificate_pem
    private_key     = aws_iot_certificate.cert.private_key
  })
}

# IoTのエンドポイントを取得
data "aws_iot_endpoint" "example" {
  endpoint_type = "iot:Data-ATS"
}
iot_pubsub.py
トピックmy/test/topicにPublish/Subscribeを行うシンプルな機能を実装します。
import time
import json
from AWSIoTPythonSDK.MQTTLib import AWSIoTMQTTClient
import boto3

# IoT Coreのエンドポイント
iot_endpoint = "${iot_endpoint}"

# IoTクライアントの作成
myMQTTClient = AWSIoTMQTTClient("example-thing")
myMQTTClient.configureEndpoint(iot_endpoint, 8883)

# 認証情報の設定
myMQTTClient.configureCredentials(
    "/home/ec2-user/root-ca.pem",
    "/home/ec2-user/private.key",
    "/home/ec2-user/certificate.pem"
)

# IoT Coreに接続
myMQTTClient.connect()

# トピックにメッセージを公開
def publish_message():
    message = {"message": "Hello from EC2!"}
    myMQTTClient.publish("my/test/topic", json.dumps(message), 1)
    print(f"Published: {message}")

# トピックを購読
def customCallback(client, userdata, message):
    print(f"Received message from topic {message.topic}: {message.payload}")

myMQTTClient.subscribe("my/test/topic", 1, customCallback)

# メインループ
try:
    while True:
        publish_message()
        time.sleep(5)
except KeyboardInterrupt:
    print("Disconnecting...")
    myMQTTClient.disconnect()
setup.sh
EC2のユーザーデータで実行するシェルファイルです。処理の要点は下記となります。
- PythonやAWS SDKなどの必要なライブラリのインストール
- Secrets Managerから証明書を取得しEC2内に格納
- AmazonRootCA証明書をダウンロード
iot_pubsub.pyの作成- 取得した証明書を使用できるよう権限の設定
#!/bin/bash

# システムを更新し、必要なパッケージをインストール
yum update -y
yum install -y python3 python3-pip jq
pip3 install AWSIoTPythonSDK boto3

# Secrets Managerからデバイス証明書の情報を取得
SECRET=$(aws secretsmanager get-secret-value --secret-id iot_certificate_test --region ${aws_region} --query SecretString --output text)

# 証明書と秘密鍵を抽出
echo $SECRET | jq -r '.certificate_pem' > /home/ec2-user/certificate.pem
echo $SECRET | jq -r '.private_key' > /home/ec2-user/private.key

# ルートCAをダウンロード
curl https://www.amazontrust.com/repository/AmazonRootCA1.pem -o /home/ec2-user/root-ca.pem

# PythonスクリプトをEC2インスタンスにコピー
cat <<EOT > /home/ec2-user/iot_pubsub.py
${iot_pubsub_script}
EOT

# 適切な権限を設定
chown ec2-user:ec2-user /home/ec2-user/*.pem /home/ec2-user/*.key /home/ec2-user/*.py
chmod 600 /home/ec2-user/*.pem /home/ec2-user/*.key
chmod 644 /home/ec2-user/*.py
これで一通り準備が整ったので、環境を作成します。
環境作成
planコマンドを実行して問題なく構築できるか確認します。
terraform plan

# リソースの作成計画が出力されるが省略
...

Plan: 23 to add, 0 to change, 0 to destroy.
問題なさそうですね!applyで実際に環境を構築します。
terraform apply

# リソースの作成完了について出力されるが省略
...

Apply complete! Resources: 23 added, 0 changed, 0 destroyed.
無事作成できたので、実際に動かして確認してみます。
動作確認
Session Manager
マネジメントコンソールから該当のEC2インスタンスへログインして操作します。
ec2-userでログインiot_pubsub.pyファイルを実行
# ec2-userでログイン
sudo su --login ec2-user

# pythonのスクリプトを実行
python3 iot_pubsub.py

# 実行ログ
Published: {'message': 'Hello from EC2!'}
Received message from topic my/test/topic: b'{"message": "Hello from EC2!"}'
用意したスクリプトは適切に実行されていますね!
AWS IoT Core
AWS IoT Coreの機能で備わっている「MQTTテストクライアント」で、トピックmy/test/topicについてEC2↔︎AWS IoT Core間のMQTT通信が疎通できているか確認します。
Subscribe
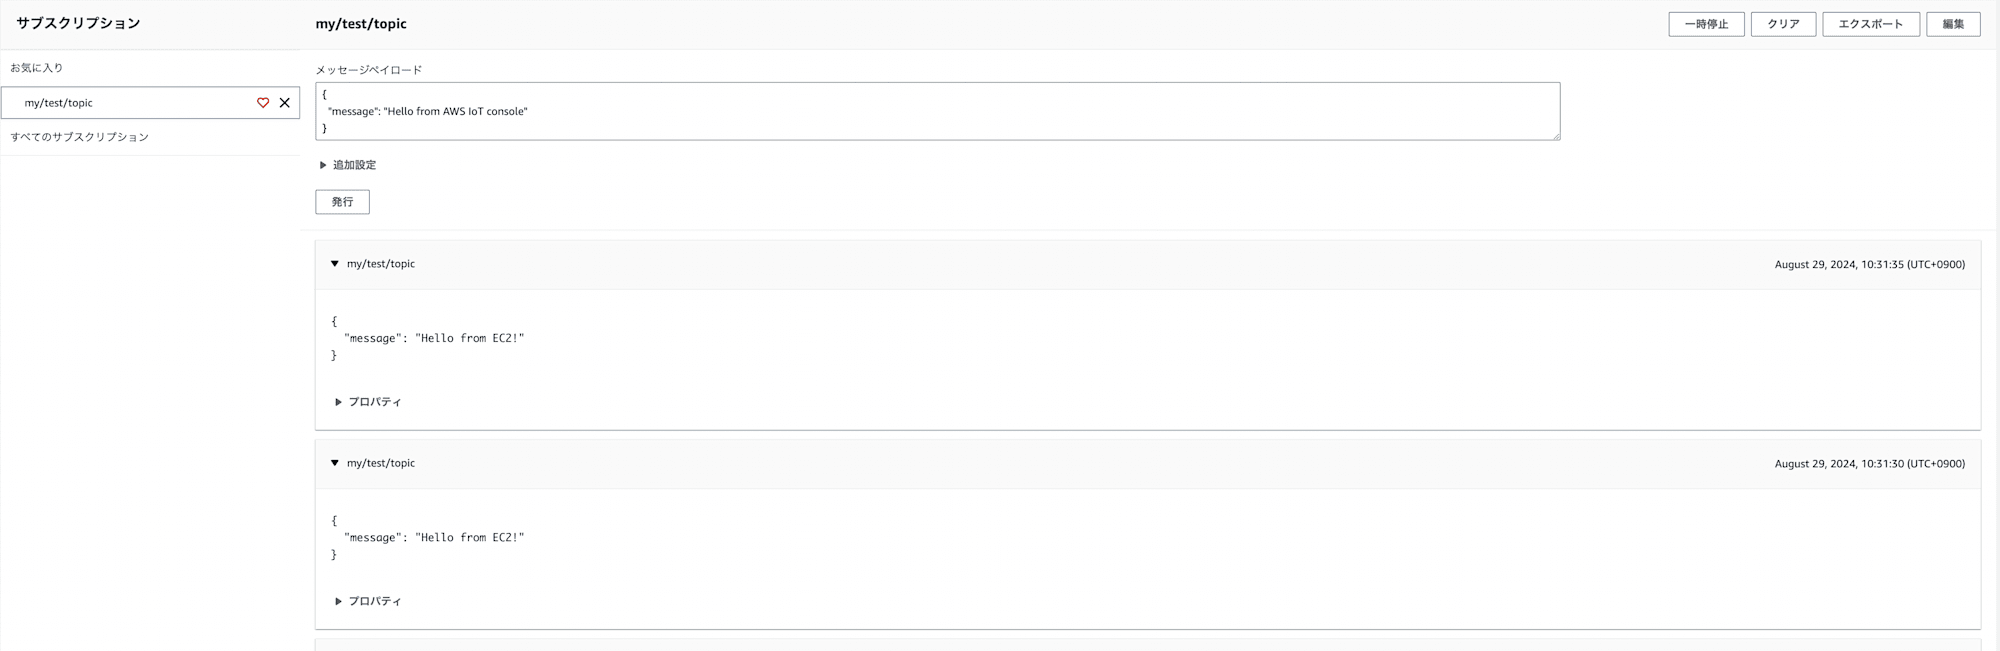
コンソールでトピック:my/test/topicをSubscribe
コンソールでEC2から送信されたメッセージを確認できました!
Publish
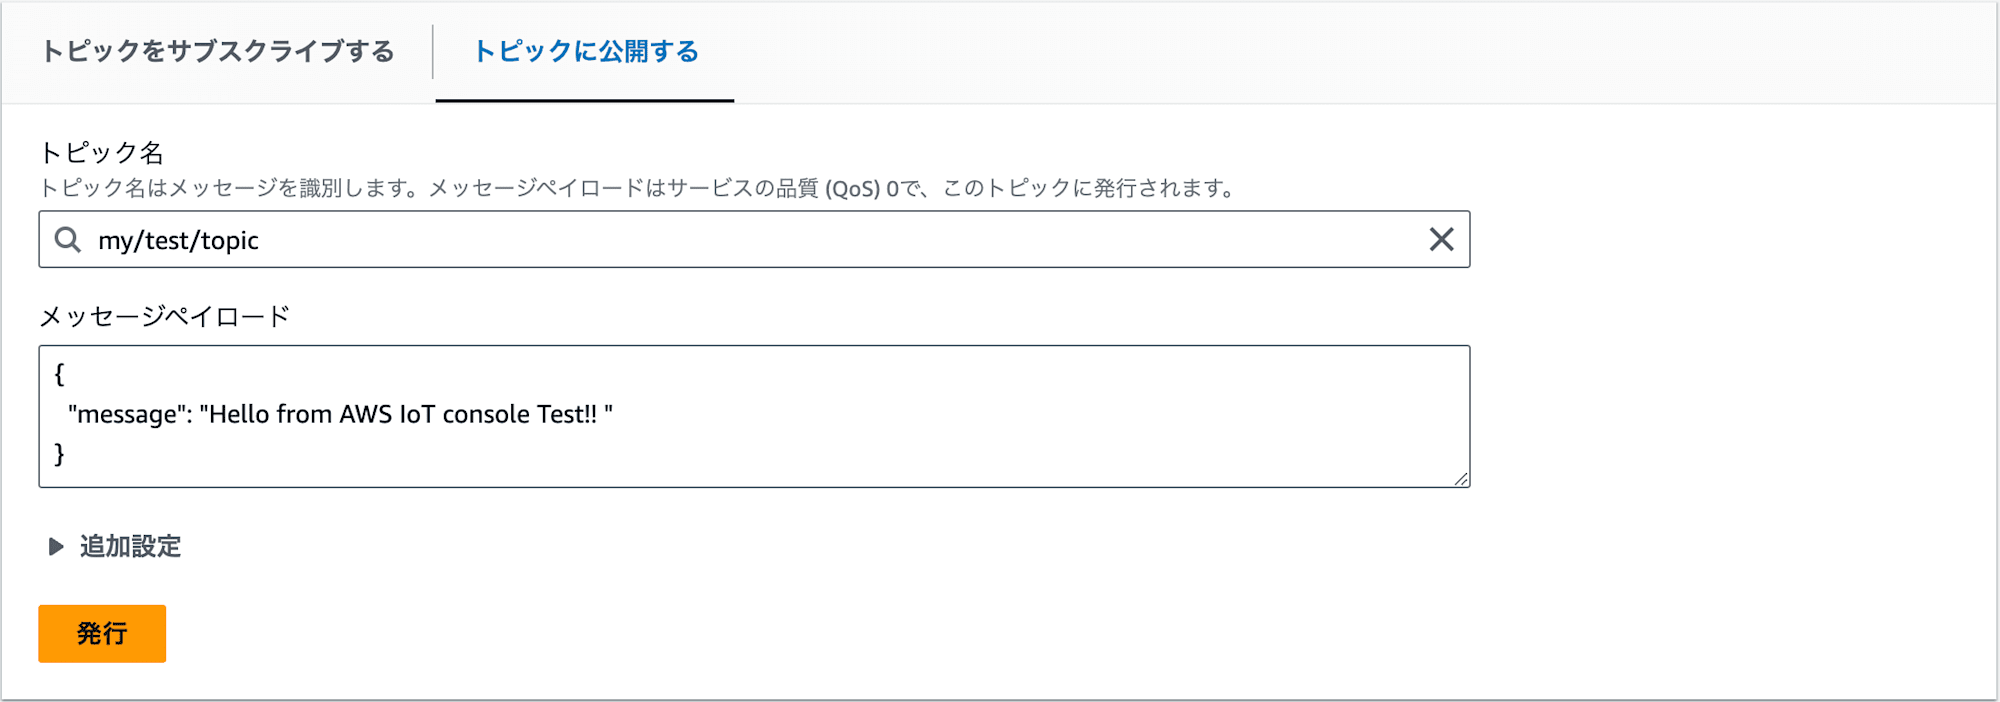
コンソールからトピック:my/test/topicへPublish
「トピックに公開するタブ」を押下し、
- トピック名:
my/test/topic - メッセージペイロード:
{
  "message": "Hello from AWS IoT console Test!! "
}
を入力して発行を押下後、Session ManagerでEC2が該当のメッセージを受信できているか確認します。

Session Managerの画面
デバイス側でもAWS IoT Coreから送信されたメッセージを受信できていますね!
これでEC2↔︎AWS IoT Core間でのMQTT通信が問題なく成立していることを確認できました!
おわりに
AWS IoT Coreを手軽に試す環境としてEC2をThingに見立ててTerraformで作成する方法はいかがだったでしょうか?
今回は単純なPubSubの通信確認だけだったので、実際にやりたい機能の検証など本記事をベースにして自分でアレンジして進められるかと思います!
この記事が少しでも参考になったら幸いです。


