Titanium Mobile + Appcelerator Cloud Servicesで作る簡単モバイルアプリケーション
この記事は公開されてから1年以上経過しています。情報が古い可能性がありますので、ご注意ください。
モバイルアプリケーションのクロスプラットフォーム開発ができるTitanium Mobileと モバイル向けクラウドのAppcelerator Cloud Servicesを使用してみました。
今回は特に、Titanium MobileでAppcelerator Cloud Servicesをどれくらい簡単に利用でき、それがクロスプラットフォームで動作することを確認してみました。
ちなみにAppcelerator Cloud ServicesはREST APIで提供され、iOS, Android, JavascriptのSDKも提供されていますので、単独で利用が可能です。
また今回Titanium Mobileで開発する為の環境設定などの説明は省きますが、Titanium Studio2.1.2で開発をしています。
プロジェクト作成
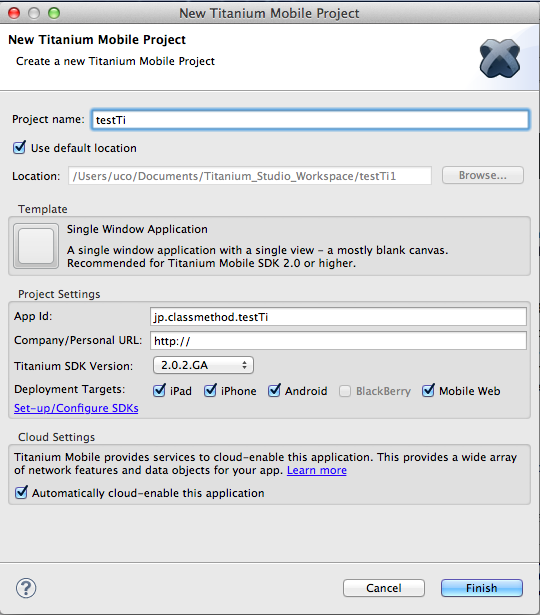
Titanium Studioでは、Titanium Mobile+Appcelerator Cloud Servicesのプロジェクトが簡単に作成でき、手間なく開発をスタートすることができました。
今回はSingle Window Applicationをプロジェクトテンプレートとして利用します。
プロジェクトの設定
- Project Name、App Idを設定します。
- Project Settings -> Development Targetsを選択します。
- Cloud Setting -> Automatically cloud-enable this applicationにチェックを入れます。
作成されるプロジェクト
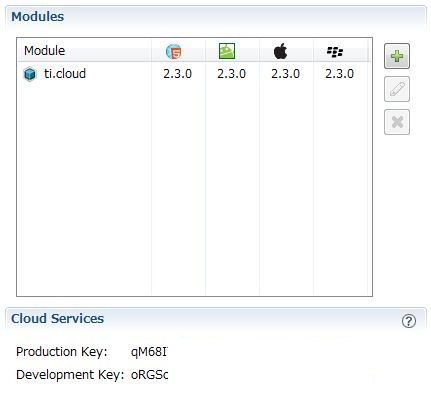
Modulesに ti.cloud が追加され、サービス利用に必要なProduction Key, Development Keyが発行、設定されます。
Users APIの利用: 1.ユーザー作成
ユーザー情報を入力して、作成する画面と作成後のメッセージ画面を作成します。ユーザー情報作成のAPIを呼び出します。
最初に表示されるViewであるResources/ui/common/FirstView.jsにコードを追加しました。
コード
//FirstView Component Constructor
function FirstView() {
    //create object instance, a parasitic subclass of Observable
    var self = Ti.UI.createView();

    // ユーザー名のTextField
    var userNameText = Ti.UI.createTextField({
        top : 10,
        height : 'auto',
        width : '90%',
        borderStyle : Ti.UI.INPUT_BORDERSTYLE_ROUNDED,
        hintText : 'Name'
    });
    self.add(userNameText);

    // パスワードのTextField
    var passText = Ti.UI.createTextField({
        top : 50,
        height : 'auto',
        width : '90%',
        borderStyle : Ti.UI.INPUT_BORDERSTYLE_ROUNDED,
        passwordMask : true,
        hintText : 'Password'
    });
    self.add(passText);

    // API呼び出しのボタン
    var button = Ti.UI.createButton({
        top : 100,
        height : 'auto',
        width : 200,
        title : 'ユーザー作成'
    });

    var Cloud = require('ti.cloud');
    Cloud.debug = true;

    var username;
    var pass;

    // ユーザー作成API呼び出し
    button.title = 'ユーザー作成';
    button.addEventListener('click', function(e) {
        username = userNameText.value;
        pass = passText.value;
        Cloud.Users.create({
            username : username,
            password : pass,
            password_confirmation : pass
        }, function(e) {
            if (e.success) {
                // 作成後に表示するWindow
                var resultWindow = Ti.UI.createWindow({
                    backgroundColor : '#ffffff'
                });
                var messageLabel = Ti.UI.createLabel({
                    top : 10,
                    width : 'auto',
                    height : 'auto',
                    text : 'ユーザーを作成しました。'
                });
                resultWindow.add(messageLabel);
                resultWindow.open();
            } else {
                alert('Faild to create user! ' + e.message);
            }
        })
    });
    self.add(button);
    return self;
}

module.exports = FirstView;
実行結果
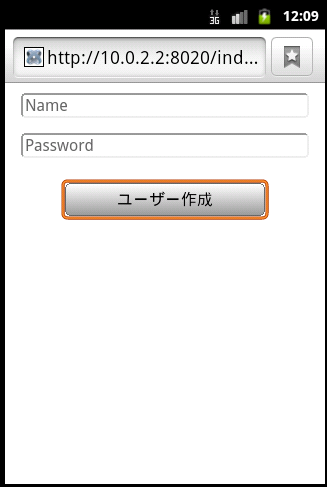
iPhoneエミュレーター、Androidエミュレーター、AndroidエミュレーターのWebブラウザで問題なく動作することが確認できました。
iPhoneエミュレーターによる実行結果
Androidエミュレーターによる画面
AndroidエミュレーターのWebブラウザ
管理画面での確認
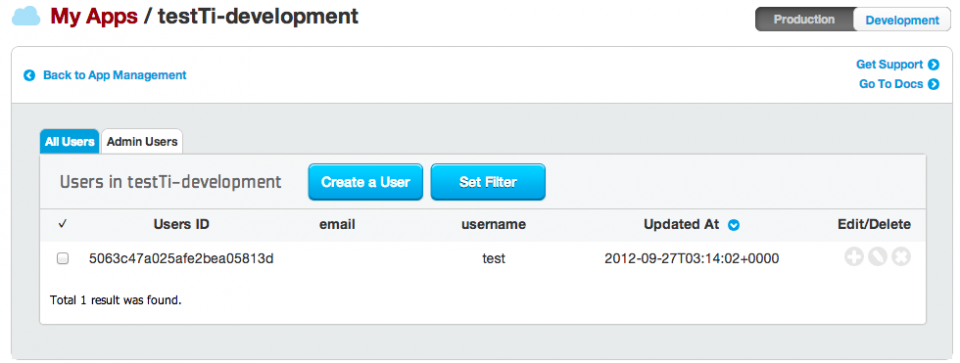
作成されたデータは、appceleratorの管理画面 My Appsで確認することができます。
- 左上のプルダウンメニューからmy appsを選択します。
- 該当するアプリケーションのManage ACSを選択します。
- App Managementで、Usersを選択します。
※左上のモードは、Developmentを選択します。
Users APIの利用: 2.ログイン
次に、コードを追加します。
起動後、ユーザー情報がローカルに保存されていればメッセージを、保存されていなければ1と同じユーザー作成の為のコンポーネントを表示させます。
コード
//FirstView Component Constructor
function FirstView() {
    //create object instance, a parasitic subclass of Observable
    var self = Ti.UI.createView();

    var Cloud = require('ti.cloud');
    Cloud.debug = true;

    // ローカルのユーザー情報を取得
    var username = Ti.App.Properties.getString('USER_NAME');
    var pass = Ti.App.Properties.getString('PASS');
    if (username && pass) {
        // ログインAPI呼び出し
        Cloud.Users.login({
            login : username,
            password : pass
        }, function(e) {
            if (e.success) {
                // メッセージラベル
                var messageLabel = Ti.UI.createLabel({
                    top : 10,
                    width : 'auto',
                    height : 'auto',
                    text : 'ログインしました。'
                });
                self.add(messageLabel);
            } else {
                alert('Faild to login ' + e.message);
            }
        });
    } else {
        // ユーザー作成用のコンポーネント作成
        var userNameText = Ti.UI.createTextField({
            top : 10,
            height : 'auto',
            width : '90%',
            borderStyle : Ti.UI.INPUT_BORDERSTYLE_ROUNDED,
            hintText : 'Name'
        });
        self.add(userNameText);

        var passText = Ti.UI.createTextField({
            top : 50,
            height : 'auto',
            width : '90%',
            borderStyle : Ti.UI.INPUT_BORDERSTYLE_ROUNDED,
            passwordMask : true,
            hintText : 'Password'
        });
        self.add(passText);

        var button = Ti.UI.createButton({
            top : 100,
            height : 'auto',
            width : 200
        });

        // ユーザー作成API呼び出し
        button.title = 'ユーザー作成';
        button.addEventListener('click', function(e) {
            username = userNameText.value;
            pass = passText.value;
            Cloud.Users.create({
                username : username,
                password : pass,
                password_confirmation : pass
            }, function(e) {
                if (e.success) {
                    // ユーザー情報をローカルに保存
                    Ti.App.Properties.setString('USER_NAME', username);
                    Ti.App.Properties.setString('PASS', pass);
                    // 結果メッセージ表示の画面を作成
                    var resultWindow = Ti.UI.createWindow({
                        backgroundColor : '#ffffff'
                    });
                    var messageLabel = Ti.UI.createLabel({
                        top : 10,
                        width : 'auto',
                        height : 'auto',
                        text : 'ユーザーを作成しました。'
                    });
                    resultWindow.add(messageLabel);
                    resultWindow.open();
                } else {
                    alert('Faild to create user! ' + e.message);
                }
            })
        });
        self.add(button);
    }
    return self;
}

module.exports = FirstView;
実行結果
こちらも、iPhoneエミュレーター、Androidエミュレーター、AndroidエミュレーターのWebブラウザで問題なく動作することが確認できました。
ローカルにユーザー情報がある場合の起動後の画面
まとめ
Titanium StudioでTitanium Mobile + Appcelerator Cloud Servicesの開発はとても簡単にできました。
プロジェクト作成時にAppcelerator Cloud Servicesを利用する設定をしておけば、必要な設定は自動でしてくれます。
※ただし利用するAPIによっては、自分で追加の設定が必要なものもあります。
Appcelerator Cloud Servicesは今回利用したUsers、基本的なデータストアやイメージストアの他は、ソーシャルに特化したものが多いようです。
ソーシャルモバイルアプリを作る時、Titanium Mobileでは基本的なAPIを利用したい時にも便利だと思います。


