[iOS 8/Xcode 6] Interface Builder の新機能 Live rendering
この記事は公開されてから1年以上経過しています。情報が古い可能性がありますので、ご注意ください。
カスタム View のライブレンダリング
Xcode 6 の Interface Builder では Live rendering という機能が追加され、フレームワークに含まれているカスタム View の見た目をライブレンダリングできるようになりました。
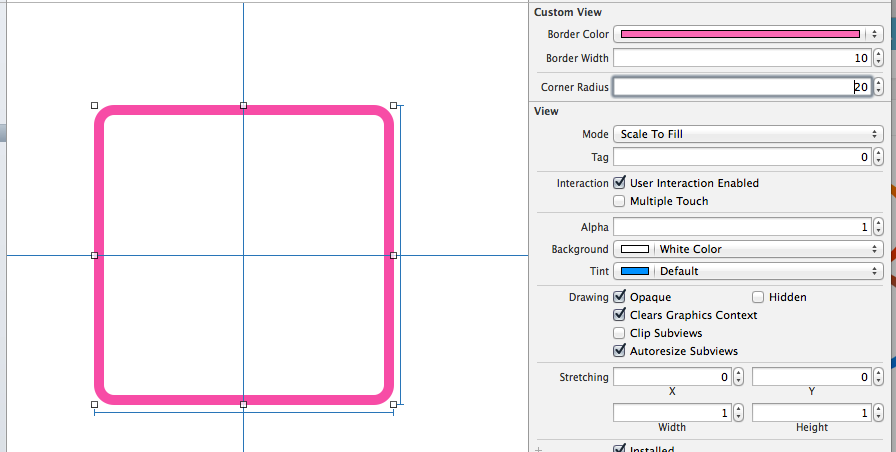
カスタムプロパティは Attributes Inspector に自動で追加され、値を変更するだけですぐに反映されるようになりました。ビルドしなくても確認できるのは、すごく時間削減になりますね!
ライブレンダリングを試してみる
1.フレームワークの作成
それではカスタム View を作成し、実際にライブレンダリングを試してみましょう。
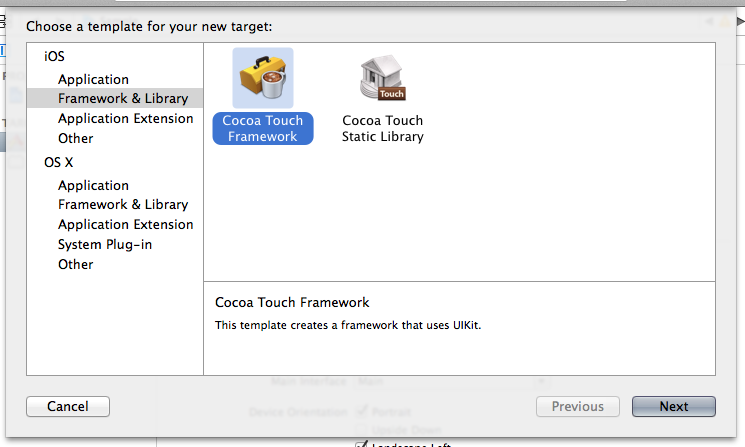
ライブレンダリングを行えるカスタム View はフレームワークにまとめられている必要があるので、まずはフレームワークを作成します。プロジェクト作成時(ワークスペースの場合はターゲット作成時)に Cocoa Touch Framework を選択しましょう。
2.カスタム View の作成
次にカスタム View を作ります。CustomView.swift という Swift ファイルを新規作成し、次のように実装します。
import UIKit

@IBDesignable class CustomView : UIView {

    @IBInspectable var borderColor: UIColor = UIColor.clearColor() {
        didSet {
            layer.borderColor = borderColor.CGColor
        }
    }

    @IBInspectable var borderWidth: CGFloat = 0 {
        didSet {
            layer.borderWidth = borderWidth
        }
    }

    @IBInspectable var cornerRadius: CGFloat = 0 {
        didSet {
            layer.cornerRadius = cornerRadius
        }
    }

}
ライブレンダリングに対応させるには、クラス宣言の前に @IBDesignable を付与します。さらに Attributes Inspector で表示したいプロパティ宣言の前に @IBInspectable を付与します。
ちなみに、Objective-C の場合は次のようになります。
#import <UIKit/UIKit.h>

IB_DESIGNABLE
@interface OCCustomView : UIView

@property (nonatomic) IBInspectable UIColor *borderColor;
@property (nonatomic) IBInspectable CGFloat borderWidth;
@property (nonatomic) IBInspectable CGFloat cornerRadius;

@end
#import "OCCustomView.h"

@implementation OCCustomView

- (instancetype)initWithFrame:(CGRect)frame
{
    if (!(self = [super initWithFrame:frame])) return self;
    _borderColor = [UIColor blackColor];
    _borderWidth = 0;
    _cornerRadius = 0;
    return self;
}

- (void)setBorderColor:(UIColor *)borderColor
{
    _borderColor = borderColor;
    self.layer.borderColor = _borderColor.CGColor;
}

- (void)setBorderWidth:(CGFloat)borderWidth
{
    _borderWidth = borderWidth;
    self.layer.borderWidth = _borderWidth;
}

- (void)setCornerRadius:(CGFloat)cornerRadius
{
    _cornerRadius = cornerRadius;
    self.layer.cornerRadius = cornerRadius;
}

@end
Interface Builder でカスタム View を設定する
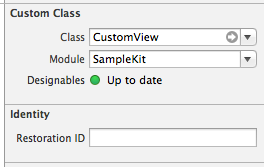
カスタム View が出来上がったら、次に Interface Builder (Story Board など) で View を配置し、Identity Inspector を開き Custom Class に作成したカスタム View のクラス名を設定します。問題無ければ「Designables」プロパティが緑色のマークになり「Up to date」と表示されます。クラスが参照できなかったり、コンパイルエラーがあると「Warning」や「Failed」になります。
「Up to date」状態を確認したら Attributes Inspector を開きます。すると一番上のセクションにカスタム View のプロパティ設定が表示されているはずです。ここの値を変更すると見た目がリアルタイムでレンダリングされます。

ちなみにこの値は Identity Inspector の User Defined Runtime Attributes にも反映されます。この項目は Xcode 5 以前からありましたが、これをさらに機能拡張したのがライブレンダリングという感じでしょうか。
また、ライブレンダリングに対応している値は次の通りです。
- Int
- CGFloat
- Double
- String
- Bool
- CGPoint
- CGSize
- CGRect
- UIColor
- UIImage
まとめ
フレームワーク化しなければいけない点が少し手間ですが、カスタム View にいろいろな設定値を設け、見た目をカスタマイズさせたい場合にかなり役立ちそうな機能ですね。ライブラリとして提供する予定のプロジェクトなどに適応しておくと良いと思います。
