GitLab RunnerでCI/CDしてみる(前編)
この記事は公開されてから1年以上経過しています。情報が古い可能性がありますので、ご注意ください。
はじめに
サーバーレス開発部@大阪の岩田です。 私の所属しているサーバーレス開発部では、ソースコード管理には主にCodeCommitやGitHubが利用されているのですが、現在私が従事しているプロジェクトではお客様からの指定でGitLabを使用しています。 開発の過程でGitLab環境でのCI/CDについて調査する機会があったので、内容をブログにまとめてみました。
この前編ではCI/CD環境を構築し、SAMのサンプルアプリを対象にCI/CDを回すところまでやってみます。
※後編へのリンクを追記しました
GitLab環境でのCI/CD
GitLab環境でのCI/CDにはGitLab CI/CDが利用できます。 こちらのエントリにあるように、以前はGitLab本体とは別にGitLabCIというツールが存在したのですが、GitLabのversion 8.0以後GitLab CI/CDが完全にGitLabに統合されており、デフォルトで全てのプロジェクトで利用することができます。
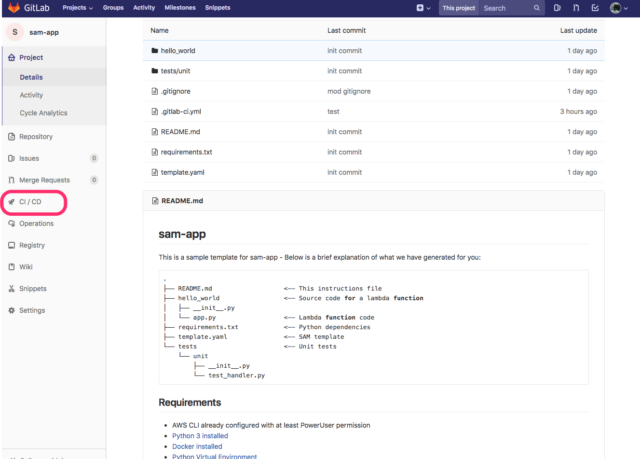
下記のようにGitLabのプロジェクトのメニューからGitLab CI/CDの機能にアクセスすることが可能です、
GitLab Runnerについて
GitLab CI/CD自体は、CI/CDを支援するためのツールで、ビルド等の各種ジョブの実行はGitLab Runnerと呼ばれる別のツールが実行します。 GitLab上でのコミットを検知してGitLab Runnerがジョブを実行、ジョブの結果がGitLab(GitLab CI/CD)から確認できるといった仕組みです。
GitLab RunnerはGo言語で実装されており、Linux,Mac,Windowsといった様々なプラットフォーム上で動作させることが可能です。
GitLab Runnerの種類
GitLab Runnerには
- Shared Runners
- Specific Runners
という2つの動作モードが存在します。 Shared Runnersはプロジェクトをまたいで共有して利用できるタイプのRunnerで、Specific Runnerは特定のプロジェクトに紐付けて専用利用するタイプのRunnerです。 それぞれ下記のようなメリットが考えられます。
Shared Runners
- プロジェクト毎にいちいちRunnerの環境を構築しなくても良くなる
- Runnerがアイドリング状態で遊び続け、リソースが無駄になることを抑止できる
Specific Runners
- 自分のプロジェクトのビルドを実行する際に、他のプロジェクトのビルドが完了するまで待たされることが無い
- Runnerにプロジェクト固有の設定を追加できる
- 別ユーザーと隔離された環境で自分のプロジェクトのジョブを実行できるのでセキュリティレベルを担保しやすい
executor
GitLab Runnerにはジョブの実行方式であるexecutorを選択することができます。 executorには
- Shell
- Docker
- Docker Machine and Docker Machine SSH (autoscaling)
- Parallels
- VirtualBox
- SSH
- Kubernetes
の7種類が用意されており、実行したいジョブの内容に応じて適切なexecutorを選択することができます。 名前からある程度想像できると思いまずが、例えばShellであればGitLab Runnerがインストールされたホスト上でBash等のShellベースでジョブを実行します。 executorによって利用できるGitlab Runnerの機能が異なるのですが、使える機能が豊富で、ビルド環境をクリーンに保つことのできるDockerやKubernetesを選択しておくのが無難だと思います。
パイプライン
GitLab Runnerはパイプライン方式でジョブを実行します。 プロジェクトのパイプラインには複数のステージが存在し、さらに各ステージには複数のジョブを登録することができます。 ステージ内のジョブがすべて成功した場合、パイプラインは次のステージに進みます。 下記の公式ドキュメントの引用画像を見て頂くと、イメージが湧きやすいと思います。

GitLab Runnerの構環境築
それでは実際にGitLab Runnerの環境を構築してみます。 今回はAmazonLinux2のt2.microインスタンス上にSpecific Runnersの環境を構築しました。 以後公式ドキュメントの手順に従って作業を進めていきます。
Dockerのインストール
今回はGitLab RunnerのexecutorにDockerを採用するので、まずDockerをインストールして起動しておきます。
sudo yum install -y docker
sudo systemctl enable docker
sudo systemctl start docker
GitLab Runnerのインストール
次に、GitLab Runner本体をインストールします。
sudo wget -O /usr/local/bin/gitlab-runner https://gitlab-runner-downloads.s3.amazonaws.com/latest/binaries/gitlab-runner-linux-amd64
sudo chmod +x /usr/local/bin/gitlab-runner
sudo useradd --comment 'GitLab Runner' --create-home gitlab-runner --shell /bin/bash
sudo /usr/local/bin/gitlab-runner install --user=gitlab-runner --working-directory=/home/gitlab-runner
sudo systemctl enable gitlab-runner
sudo systemctl start gitlab-runner
インストールできたら、念のためGitlab Runnerが稼働していることを確認します。
[ec2-user@ip-172-31-19-124 ~]$ sudo systemctl status gitlab-runner.service
● gitlab-runner.service - GitLab Runner
   Loaded: loaded (/etc/systemd/system/gitlab-runner.service; enabled; vendor preset: disabled)
   Active: active (running) since 水 2018-06-27 01:25:34 UTC; 1s ago
 Main PID: 3888 (gitlab-runner)
    Tasks: 5
   Memory: 5.1M
   CGroup: /system.slice/gitlab-runner.service
           └─3888 /usr/local/bin/gitlab-runner run --working-directory /home/gitlab-runner --config /etc/gitlab-runner/config.toml --service gitlab-runner --syslog --user gitlab-runner

 6月 27 01:25:34 ip-172-31-19-124.ap-northeast-1.compute.internal gitlab-runner[3888]: time="2018-06-27T01:25:34Z" level=info msg="Running in system-mode."
 6月 27 01:25:34 ip-172-31-19-124.ap-northeast-1.compute.internal gitlab-runner[3888]: time="2018-06-27T01:25:34Z" level=info msg="Running in system-mode."
 6月 27 01:25:34 ip-172-31-19-124.ap-northeast-1.compute.internal gitlab-runner[3888]: time="2018-06-27T01:25:34Z" level=info
 6月 27 01:25:34 ip-172-31-19-124.ap-northeast-1.compute.internal gitlab-runner[3888]: time="2018-06-27T01:25:34Z" level=info
 6月 27 01:25:34 ip-172-31-19-124.ap-northeast-1.compute.internal gitlab-runner[3888]: time="2018-06-27T01:25:34Z" level=info msg="Configuration loaded" builds=0
 6月 27 01:25:34 ip-172-31-19-124.ap-northeast-1.compute.internal gitlab-runner[3888]: time="2018-06-27T01:25:34Z" level=info msg="Configuration loaded" builds=0
 6月 27 01:25:34 ip-172-31-19-124.ap-northeast-1.compute.internal gitlab-runner[3888]: time="2018-06-27T01:25:34Z" level=warning msg="'metrics_server' configuration entry is deprecated a... instead"
 6月 27 01:25:34 ip-172-31-19-124.ap-northeast-1.compute.internal gitlab-runner[3888]: time="2018-06-27T01:25:34Z" level=warning msg="'metrics_server' configuration entry is deprecated a... instead"
 6月 27 01:25:34 ip-172-31-19-124.ap-northeast-1.compute.internal gitlab-runner[3888]: time="2018-06-27T01:25:34Z" level=info msg="Metrics server disabled"
 6月 27 01:25:34 ip-172-31-19-124.ap-northeast-1.compute.internal gitlab-runner[3888]: time="2018-06-27T01:25:34Z" level=info msg="Metrics server disabled"
Hint: Some lines were ellipsized, use -l to show in full.
[ec2-user@ip-172-31-19-124 ~]$
OKです!
GitLab Runnerの登録
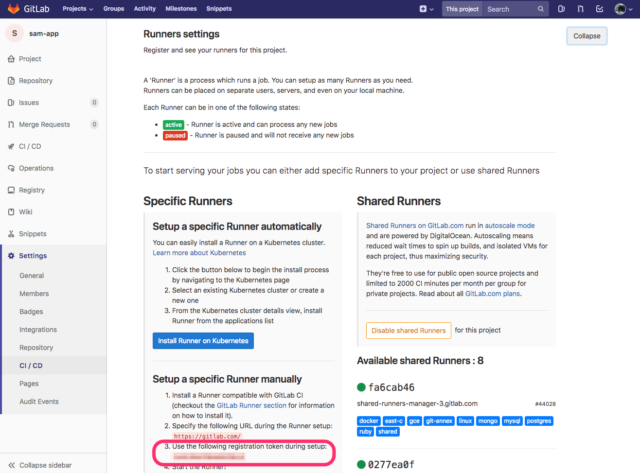
ソース管理に使用しているGitLabに先ほどインストールしたGitLab Runnerを登録します。 登録時に必要になるので、事前にGitLabの画面からトークンを確認しておきます。 トークンはGitLabの画面の「Settings」→「CI/CD」→「Runnsers settings」から確認できます。
トークンが確認できたら登録を行います。
gitlab-runner registerというコマンドで対話形式で登録していきます。
[ec2-user@ip-172-31-19-124 ~]$ sudo /usr/local/bin/gitlab-runner register
Running in system-mode.

Please enter the gitlab-ci coordinator URL (e.g. https://gitlab.com/):
https://gitlab.com/
Please enter the gitlab-ci token for this runner:
さっき確認したトークン
Please enter the gitlab-ci description for this runner:
[ip-172-31-19-124.ap-northeast-1.compute.internal]: for blog
Please enter the gitlab-ci tags for this runner (comma separated):

Registering runner... succeeded                     runner=5zhEJRnk
Please enter the executor: docker, shell, docker+machine, docker-ssh+machine, kubernetes, docker-ssh, parallels, ssh, virtualbox:
docker
Please enter the default Docker image (e.g. ruby:2.1):
python:3.6.5
Runner registered successfully. Feel free to start it, but if it's running already the config should be automatically reloaded!
[ec2-user@ip-172-31-19-124 ~]$
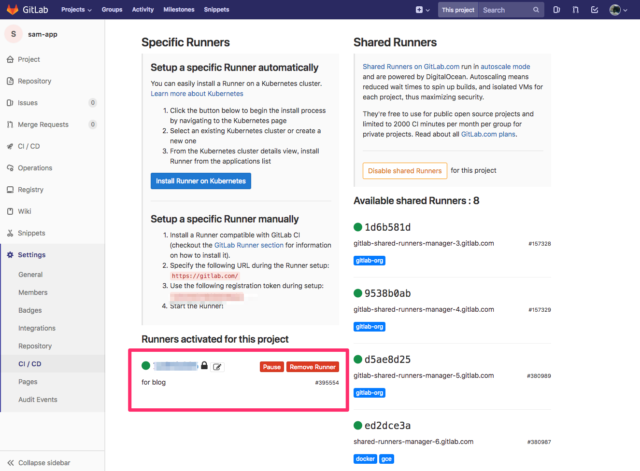
ハイライトしている箇所が自分で入力した箇所です。 登録完了後にGitLabの画面を再読み込みすると、登録したGitlab Runnerを確認することができます。
これでGitlab Runnerの準備ができました!
GitLab RunnerによるCI/CDの実践
GitLab Runnerの準備ができたので、実際にGitlab Runnerに各種のジョブを実行させてみます。 今回はSAM CLIで作成したpython3.5の雛形アプリでCI/CDを試してみます。
雛形アプリの作成
下記のコマンドで雛形アプリを作成します。
sam init --runtime python3.6
作成された雛形のREADME.mdを確認すると、テストとデプロイに関してそれぞれ下記のような記載があります。
### Installing dependencies [AWS Lambda requires a flat folder](https://docs.aws.amazon.com/lambda/latest/dg/lambda-python-how-to-create-deployment-package.html) with the application as well as its dependencies. Therefore, we need to have a 2 step process in order to enable local testing as well as packaging/deployment later on - This consist of two commands you can run as follows:
pip install -r requirements.txt -t hello_world/build/
cp hello_world/*.py hello_world/build/
1. Step 1 install our dependencies into ``build`` folder 2. Step 2 copies our application into ``build`` folder
We use **Pytest** for testing our code and you can install it using pip:
pip install pytestNext, we run ``pytest`` against our ``tests`` folder to run our initial unit tests:
python -m pytest tests/ -v
今回はこの手順をGitLab Runnerで自動化していきます。
パイプラインの定義
GitLab Runnerでジョブを実行させるにはリポジトリ直下に.gitlab-ci.ymlというファイルを用意して設定を記述していきます。
今回はお試しなので、下記のような適当なファイルを用意しました。
image: python:3.6.5
variables:
    S3_BUCKET: デプロイに使うS3バケット
    AWS_DEFAULT_REGION: ap-northeast-1
stages:
    - test
    - deploy
unittest:
    stage: test
    script:
        - pip install pytest
        - pip install -r requirements.txt
        - python -m pytest tests/ -v
deploy:
    stage: deploy
    script:
        - pip install awscli
        - pip install -r requirements.txt -t hello_world/build/
        - cp hello_world/*.py hello_world/build/
        - aws cloudformation package --template-file template.yaml --output-template-file output.yaml  --s3-bucket ${S3_BUCKET}
        - aws cloudformation deploy --template-file output.yaml --stack-name demo --capabilities CAPABILITY_IAM
記述している内容は下記の通りです。
image
ジョブの実行に使うDockerイメージを指定します。 各ジョブごとに個別に指定することも可能です。
variables
パイプライン全体で使用する環境変数を定義しています。 ここで定義した環境変数はGitLab Runnerが起動するDockerコンテナの中から参照することが可能です。
stages
パイプラインのステージを定義します。 今回はtest,deployという2つのステージを定義しており、testステージが正常に終了すればdeployステージに進むような構成としています。
unittest
unittestという名前のジョブを定義しています。
stage:testの部分で、このジョブが先ほど定義したtestステージに所属していることを定義しています。
scriptに記述しているコマンドが、実際に実行するジョブの中身です。
pipで必要なライブラリを導入してpytestでテストを実行しています。
deploy
deployという名前のジョブを定義しています。 このジョブではAWS CLIを使用してSAMアプリのパッケージ化とデプロイを行います。
環境変数の設定
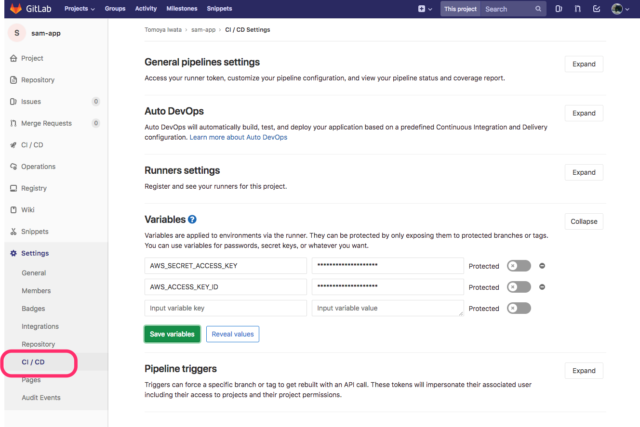
デプロイにはAWS CLIを使用しているので、GitLab RunnerがAWS CLIを実行できるように、事前にIAMユーザーを作成した上で、環境変数AWS_ACCESS_KEY_IDとAWS_SECRET_ACCESS_KEYをセットします。
環境変数のセットはGitLabの「Settings」から行えます。
今回はお試しなので、セキュリティ周りはあまり考慮していませんが、本来は下記のエントリにあるようにAssume用のユーザーを作ってAssume Roleするのが良いと思います。
このファイルをコミットして、GitLabへプッシュすると・・・
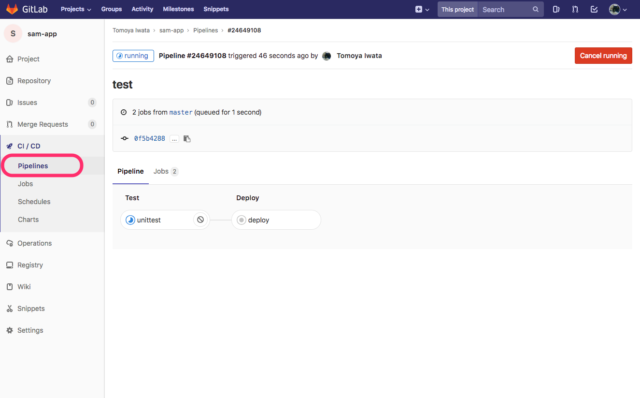
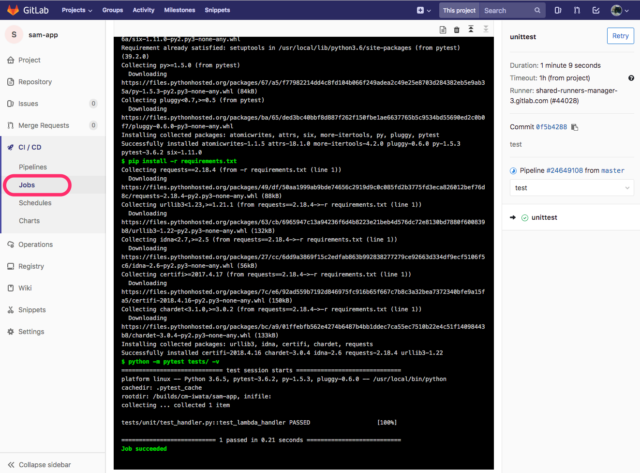
GitLab Runnerが更新を検知してパイプラインが動き出しました。 パイプラインの各ジョブは下記のようにGitLabの画面からログを確認することができます。 こちらはunittestのログです↓
同じくデプロイのログです↓
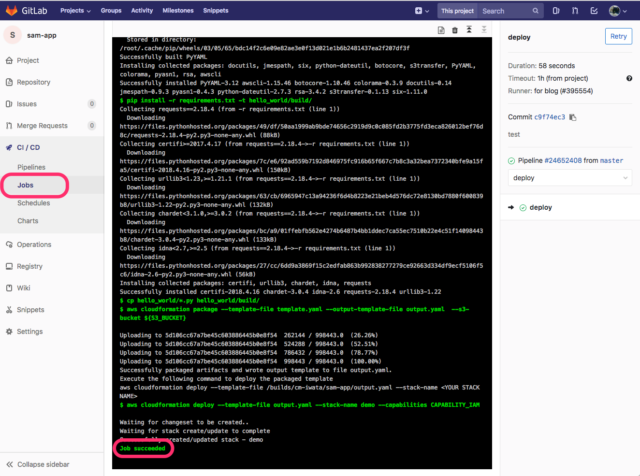
job succeededと表示されていれば正常終了です。
念のためマネジメントコンソールから確認してみます。
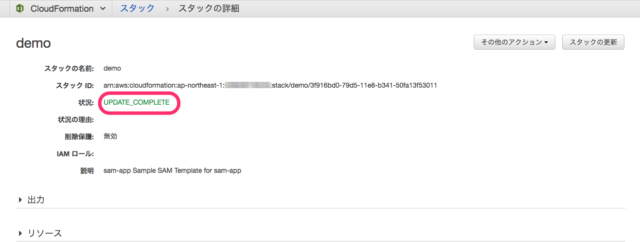
CloudFormationのスタック作成(更新)が正常に終了しています。
動作確認
最後に、先ほどデプロイされたSAMアプリの動作を確認してみます。
CloudFormationのOutPutsにHelloWorldApiとしてAPIのエンドポイントが出力されているので、curlコマンドでアクセスしてみます。
https://xxxxxxx.execute-api.ap-northeast-1.amazonaws.com/Prod/hello/
{"message": "hello world", "location": "xxx.xxx.xxx.xxx"}
正常に稼働しています。 GitLab Runnerを使用したCI/CD成功です!
まとめ
Gitlab Runnerを利用したCI/CDを試してみました。 まずは適当な設定で試して見ましたが、次回のエントリではもう少し掘り下げて実践的な内容を試していきたいと思います。


