![Deploy AI agents to Runtime with [Amazon Bedrock AgentCore]](https://images.ctfassets.net/ct0aopd36mqt/7qr9SuOUauNHt4mdfTe2zu/8f7d8575eed91c386015d09e022e604a/AgentCore.png?w=3840&fm=webp)
Deploy AI agents to Runtime with [Amazon Bedrock AgentCore]
This page has been translated by machine translation. View original
Introduction
Hello, I'm Jinno from the Consulting Department, a big fan of the supermarket La Mu.
Until now I've been writing articles about AgentCore, but I realized I hadn't written an article explaining the core Runtime functionality, so I created this one.
I'd like to explain again what you can do with Runtime and how to use it!
What is Amazon Bedrock AgentCore Runtime?
Overview
Amazon Bedrock AgentCore Runtime is a managed service for hosting AI agents. AgentCore includes various services such as Identity and Gateway, but Runtime is what forms the core.
Image
You can quickly create an environment to host AI agents by utilizing Strands Agents, an AI agent framework, and LLM through Amazon Bedrock.
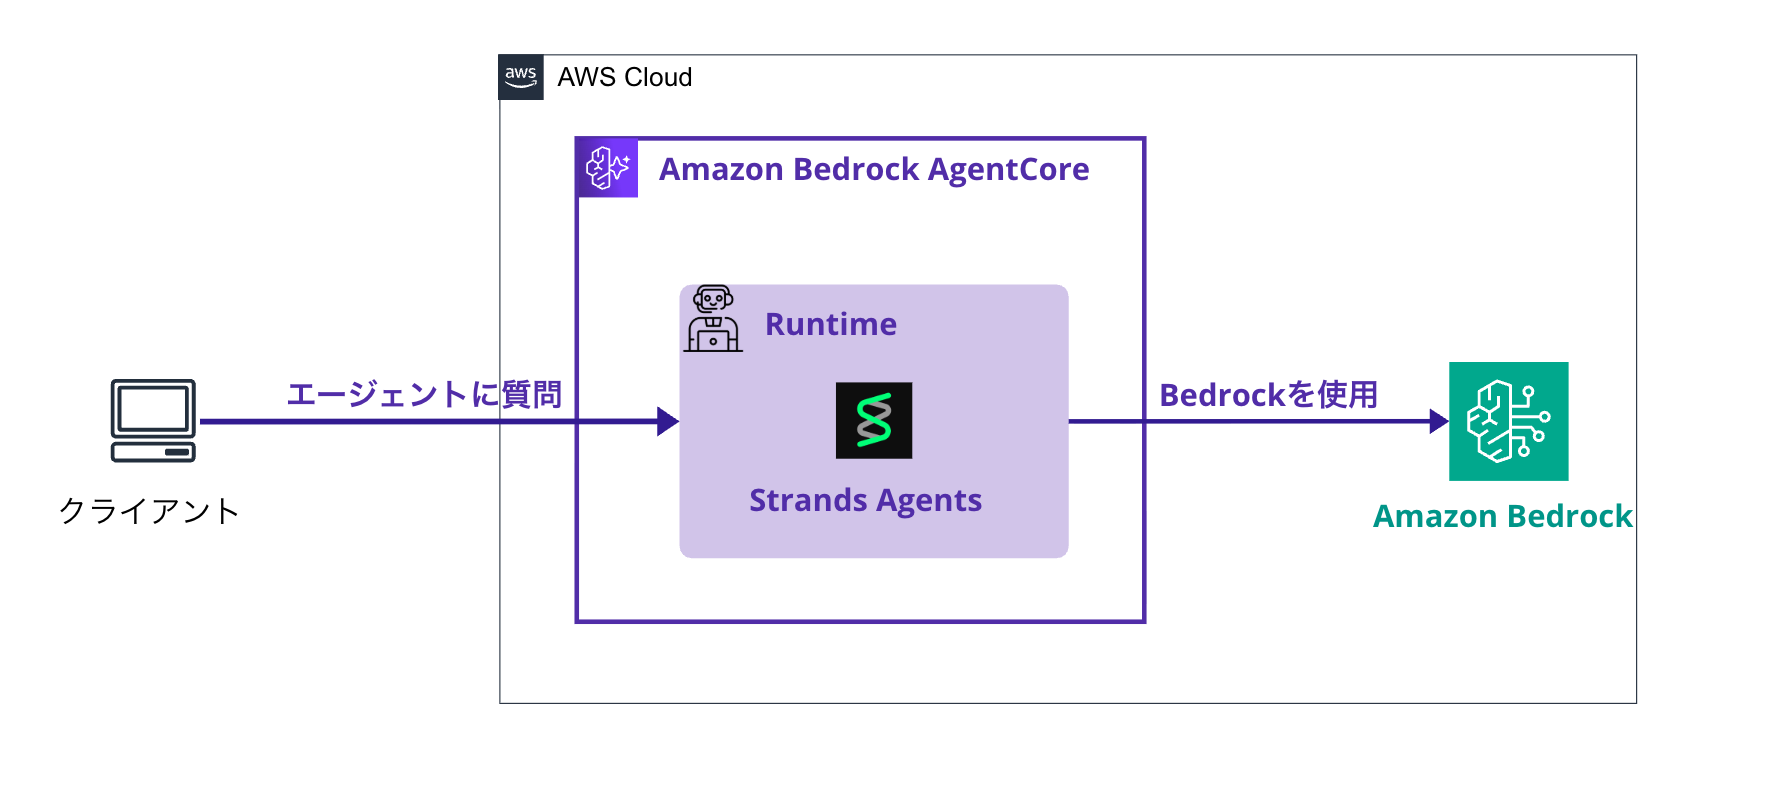
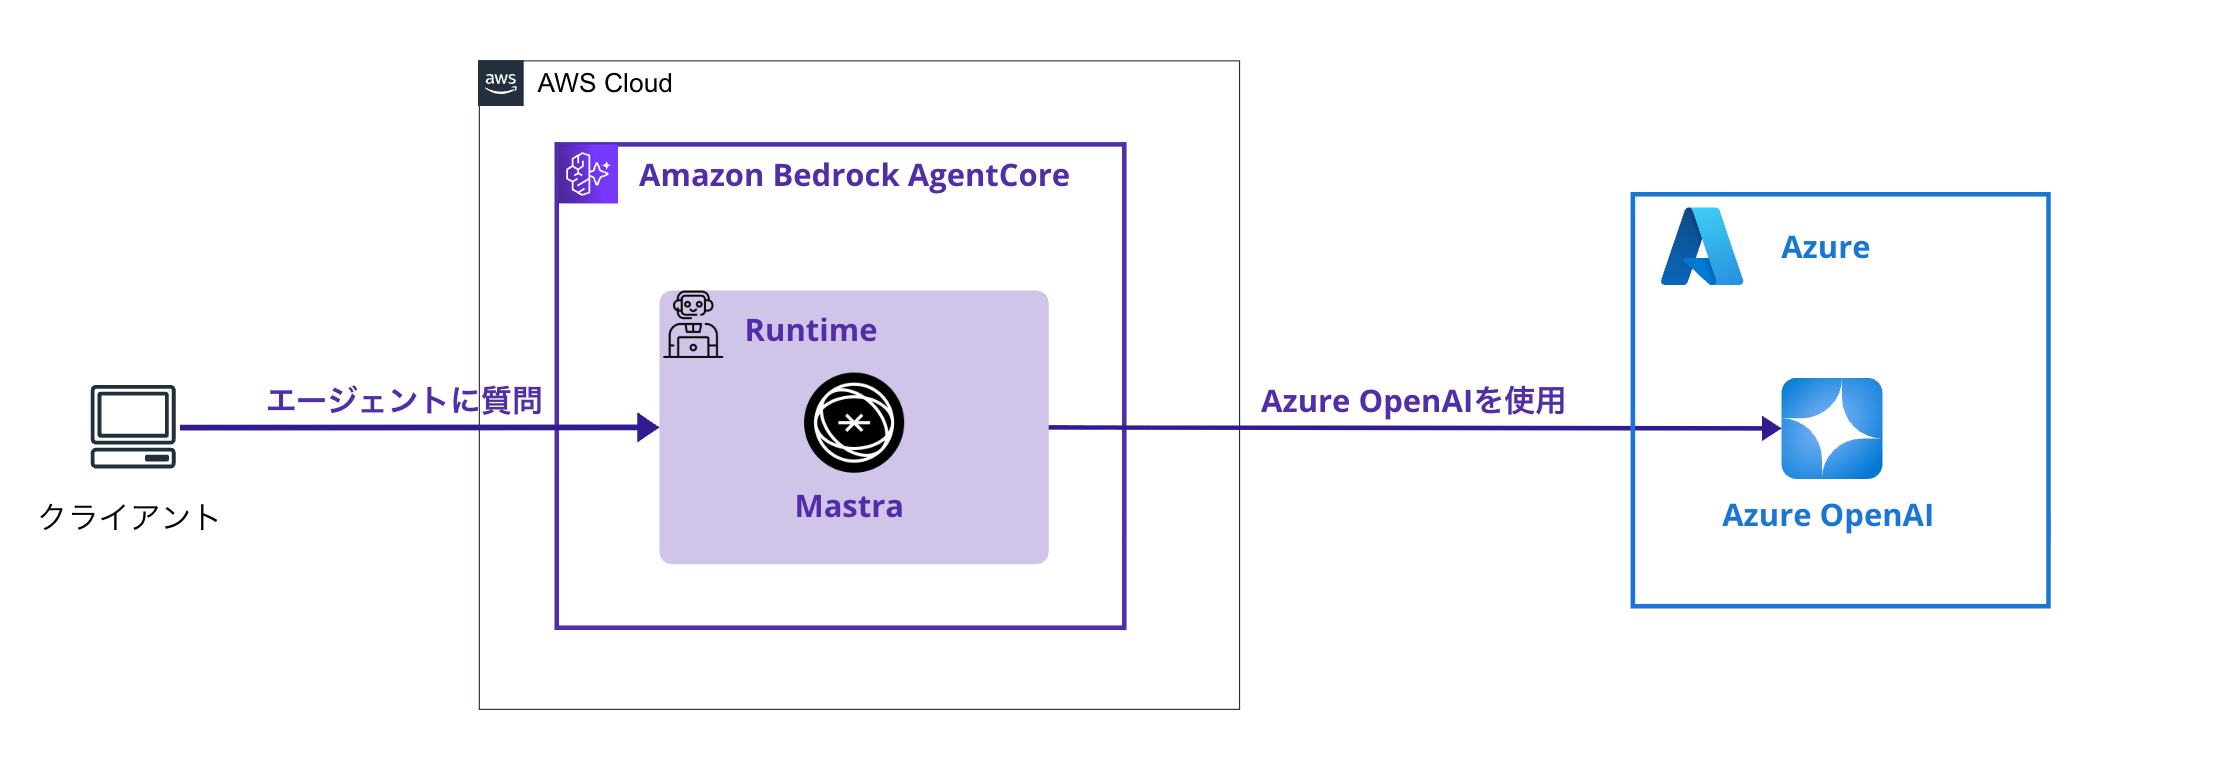
Since Runtime is just a hosting environment, you can freely choose the agent framework and LLM.
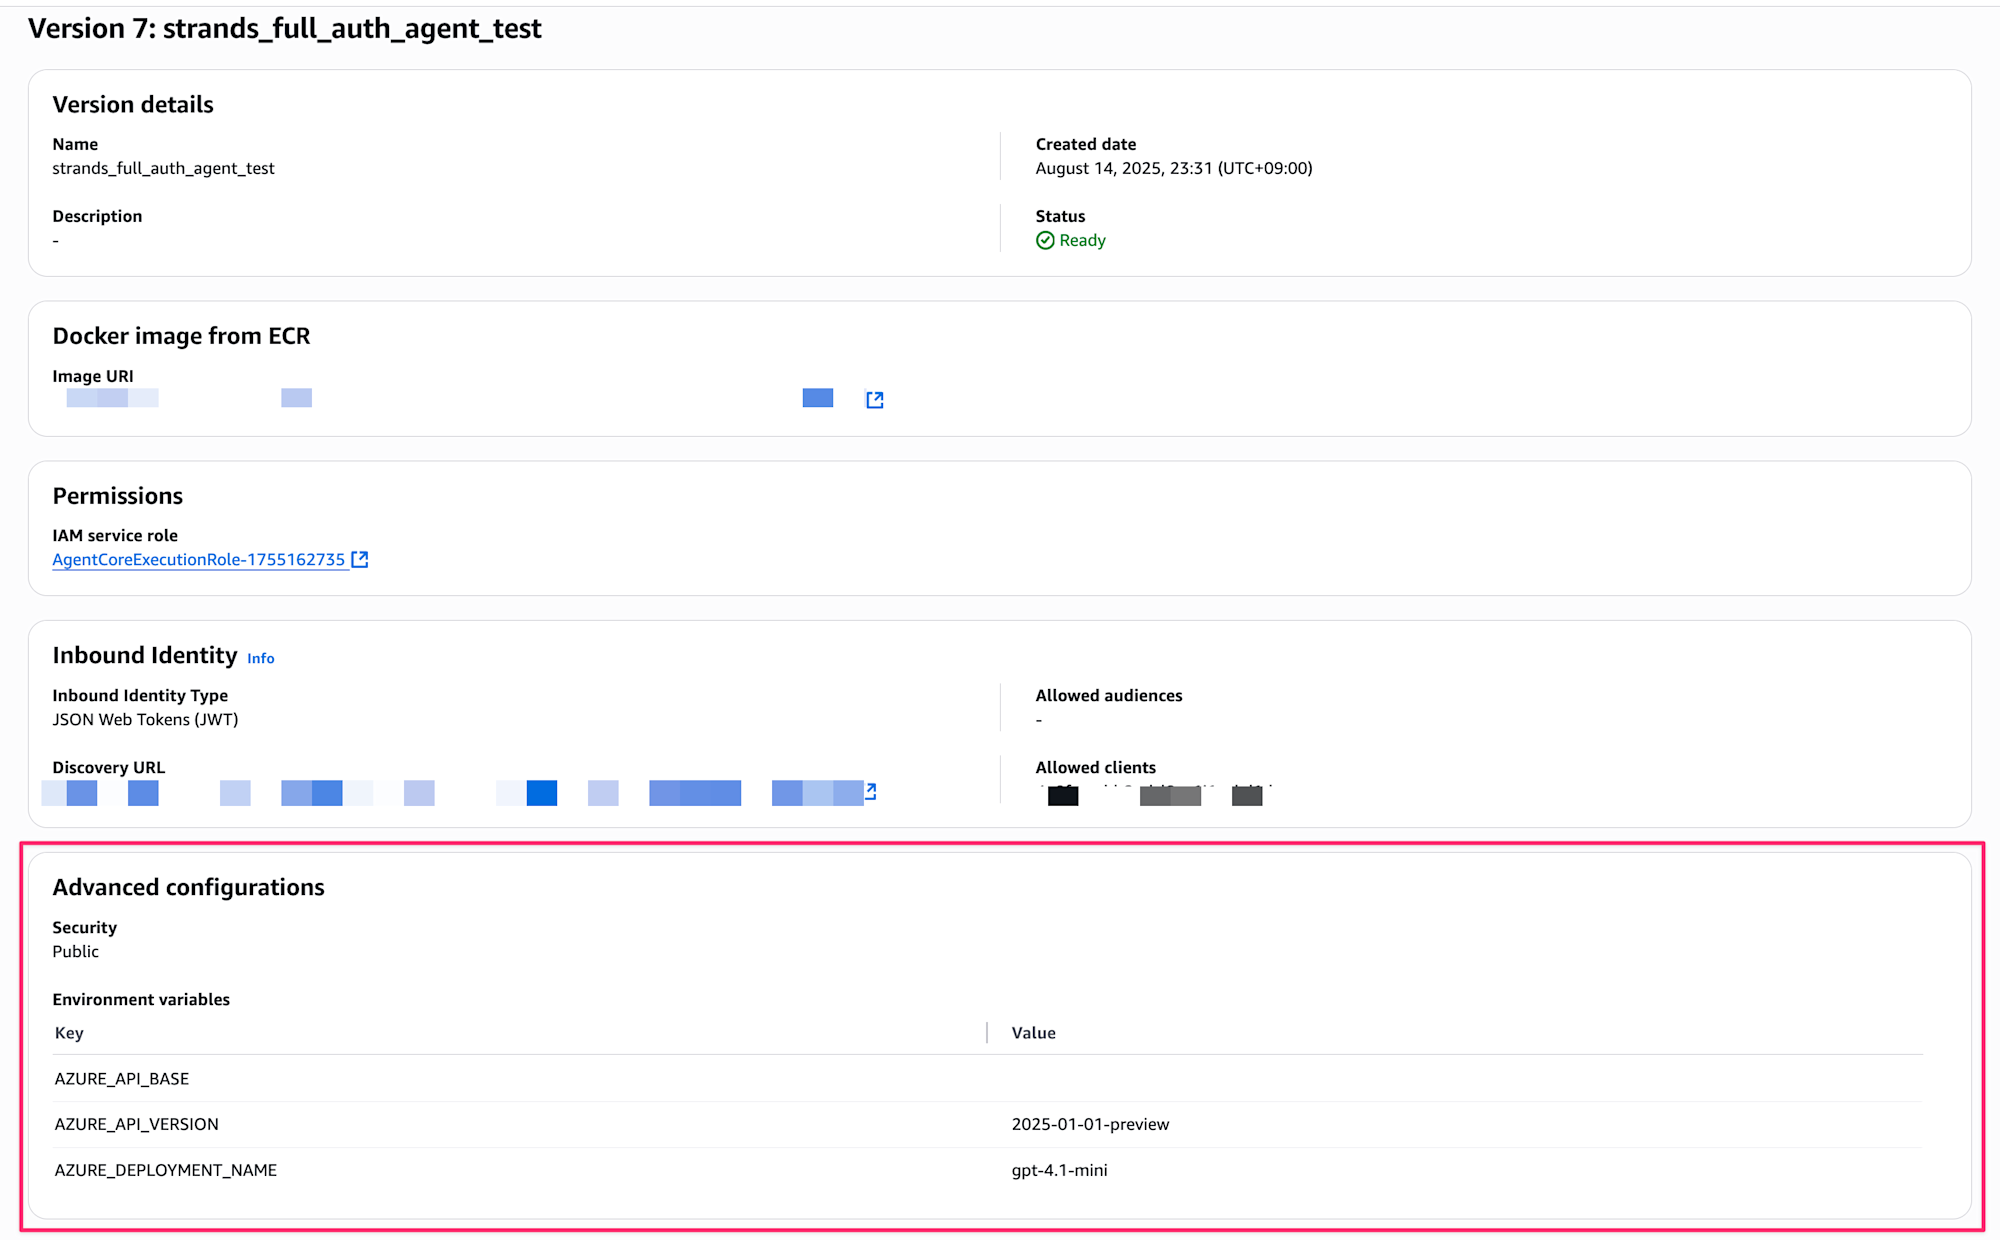
As shown below, it's also possible to use Mastra and Azure OpenAI.
How to use Runtime
Library Installation
I want to use the BedrockAgentCore Starter Toolkit CLI which allows easy operation of AgentCore through CLI, so I'll install bedrock-agentcore-starter-toolkit.
pip install bedrock-agentcore-starter-toolkit
Setup (configure command)
Using the agentcore configure command provided by the BedrockAgentCore Starter Toolkit CLI, you can configure your deployment.
Run it by specifying the entry point file (e.g., agent.py) as shown below.
agentcore configure --entrypoint agent.py
When executed, it proceeds in an interactive format as shown below.
Configuring Bedrock AgentCore...
Entrypoint parsed: file=/path/to/project/agent.py, bedrock_agentcore_name=agent
Agent name: agent

🔐 Execution Role
Press Enter to auto-create execution role, or provide execution role ARN/name to use existing
Execution role ARN/name (or press Enter to auto-create):
✓ Will auto-create execution role

🏗️  ECR Repository
Press Enter to auto-create ECR repository, or provide ECR Repository URI to use existing
ECR Repository URI (or press Enter to auto-create):
✓ Will auto-create ECR repository

🔍 Detected dependency file: requirements.txt
Press Enter to use this file, or type a different path (use Tab for autocomplete):
Path or Press Enter to use detected dependency file:
✓ Using detected file: requirements.txt

🔐 Authorization Configuration
By default, Bedrock AgentCore uses IAM authorization.
Configure OAuth authorizer instead? (yes/no) [no]:
✓ Using default IAM authorization
Configuring BedrockAgentCore agent: agent

⚠️  ℹ️  No container engine found (Docker/Finch/Podman not installed)
✅ Default deployment uses CodeBuild (no container engine needed)
💡 Run 'agentcore launch' for cloud-based building and deployment
💡 For local builds, install Docker, Finch, or Podman
Generated .dockerignore
Generated Dockerfile: /path/to/project/Dockerfile
Generated .dockerignore: /path/to/project/.dockerignore
Setting 'agent' as default agent
╭─────────────────────────────────── Bedrock AgentCore Configured ───────────────────────────────────╮
│ Configuration Summary                                                                              │
│                                                                                                    │
│ Name: agent                                                                                        │
│ Runtime: None                                                                                      │
│ Region: us-west-2                                                                                  │
│ Account: xxx                                                                              │
│ Execution Role: None                                                                               │
│ ECR: Auto-create                                                                                   │
│ Authorization: IAM (default)                                                                       │
│                                                                                                    │
│ Configuration saved to: /path/to/project/.bedrock_agentcore.yaml                                   │
╰────────────────────────────────────────────────────────────────────────────────────────────────────╯
You're being asked about:
- AgentCore execution role ARN
- Auto-created if not specified
- ECR ARN
- Auto-created if not specified
- Library and dependency configuration file for the agent
- e.g., requirements.txt
- Authentication settings
- If yes, you'll need to configure IdP URL etc.
- If no, access is restricted to IAM permissions only (default)
It's nice that everything is automatically created if not specified, making it ready to use immediately. It's also convenient to be able to specify ARNs when you want to create custom settings.
Automatically Generated Files
When the configuration is complete, three files are created. Here's what it looks like:
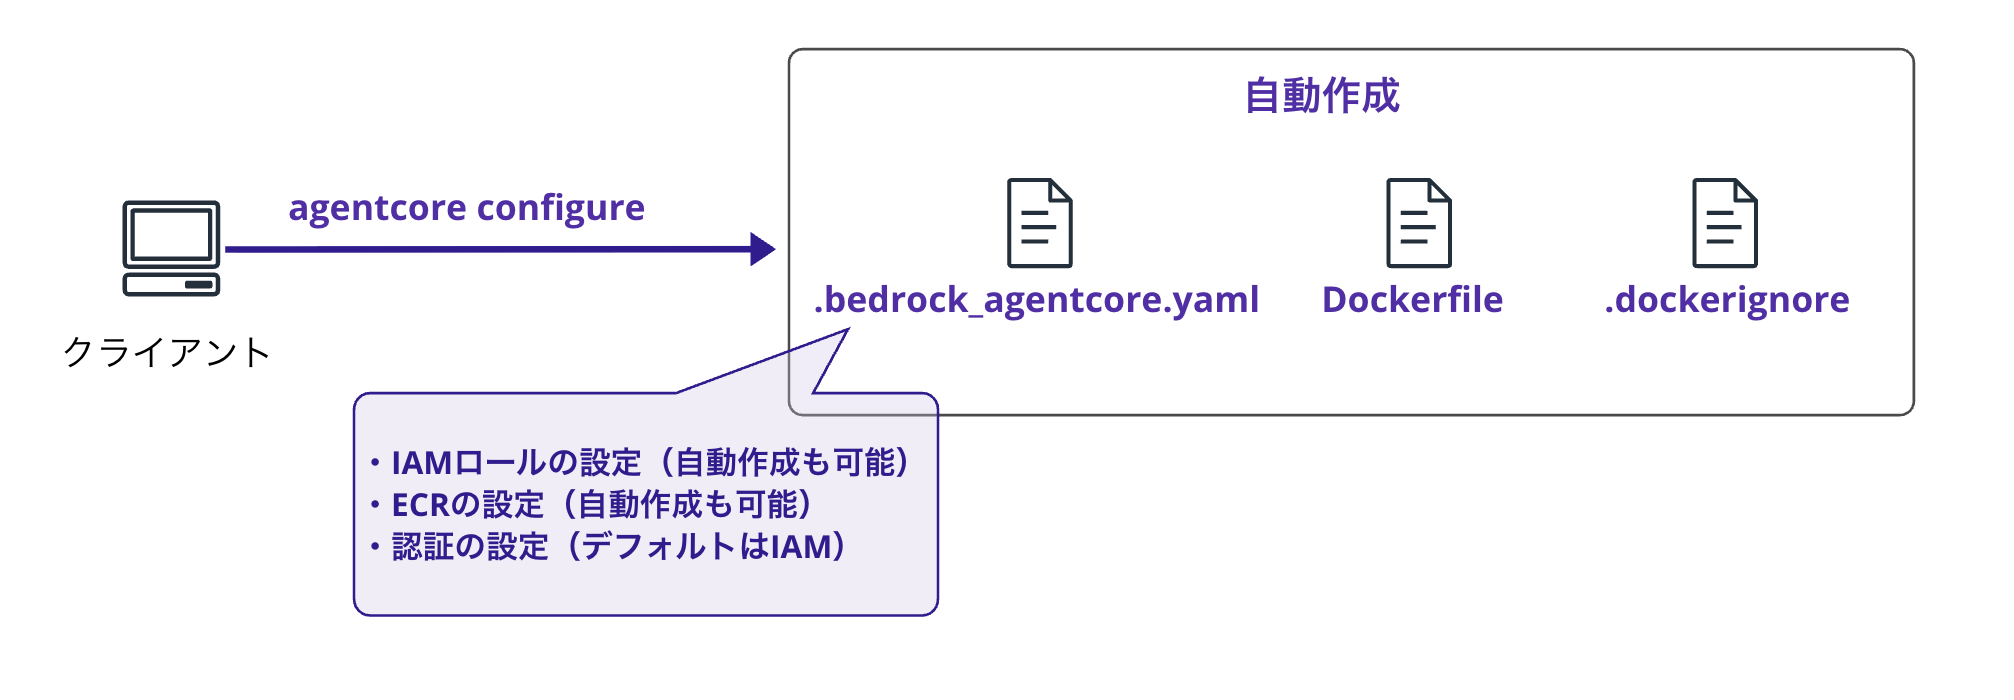
.bedrock_agentcore.yaml: Deployment configuration file.dockerignore: Configuration for files to exclude during Docker buildDockerfile: Container image definition
Configuration File Details
.bedrock_agentcore.yaml is the deployment configuration file.
default_agent: agent
agents:
  agent:
    name: agent
    entrypoint: agent.py
    platform: linux/arm64
    container_runtime: none
    aws:
      execution_role: null
      execution_role_auto_create: true
      account: xxx
      region: us-west-2
      ecr_repository: null
      ecr_auto_create: true
      network_configuration:
        network_mode: PUBLIC
      protocol_configuration:
        server_protocol: HTTP
      observability:
        enabled: true
    bedrock_agentcore:
      agent_id: null
      agent_arn: null
      agent_session_id: null
    codebuild:
      project_name: null
      execution_role: null
      source_bucket: null
    authorizer_configuration: null
    oauth_configuration: null
The configuration file is written in this format, and after deployment is completed, ARNs like agent_arn will be updated.
The Dockerfile definition is as follows. It's a simple definition that launches the specified entry point. aws-opentelemetry-distro needed for Observability is also installed, and configuration is set to automatically trace.
FROM ghcr.io/astral-sh/uv:python3.12-bookworm-slim
WORKDIR /app

# Configure UV for container environment
ENV UV_SYSTEM_PYTHON=1 UV_COMPILE_BYTECODE=1

COPY requirements.txt requirements.txt
# Install from requirements file
RUN uv pip install -r requirements.txt

RUN uv pip install aws-opentelemetry-distro>=0.10.1

# Set AWS region environment variable

ENV AWS_REGION=us-west-2
ENV AWS_DEFAULT_REGION=us-west-2

# Signal that this is running in Docker for host binding logic
ENV DOCKER_CONTAINER=1

# Create non-root user
RUN useradd -m -u 1000 bedrock_agentcore
USER bedrock_agentcore

EXPOSE 8080
EXPOSE 8000

# Copy entire project (respecting .dockerignore)
COPY . .

# Use the full module path

CMD ["opentelemetry-instrument", "python", "-m", "agent"]
.dockerignore is as follows. Environment variables are also excluded. Be careful if you want to include them.
# Build artifacts
build/
dist/
*.egg-info/
*.egg

# Python cache
__pycache__/
__pycache__*
*.py[cod]
*$py.class
*.so
.Python

# Virtual environments
.venv/
.env
venv/
env/
ENV/

# Testing
.pytest_cache/
.coverage
.coverage*
htmlcov/
.tox/
*.cover
.hypothesis/
.mypy_cache/
.ruff_cache/

# Development
*.log
*.bak
*.swp
*.swo
*~
.DS_Store

# IDEs
.vscode/
.idea/

# Version control
.git/
.gitignore
.gitattributes

# Documentation
docs/
*.md
!README.md

# CI/CD
.github/
.gitlab-ci.yml
.travis.yml

# Project specific
tests/

# Bedrock AgentCore specific - keep config but exclude runtime files
.bedrock_agentcore.yaml
.dockerignore

# Keep wheelhouse for offline installations
# wheelhouse/
Automatically Created IAM Role
The automatically created IAM role is granted the following policies.
While this is sufficient for running basic AI agents, be aware that permissions may be insufficient if you want to access Secrets Manager with Identity or utilize Bedrock Knowledge Bases.
Full Policy
{
    "Version": "2012-10-17",
    "Statement": [
        {
            "Sid": "ECRImageAccess",
            "Effect": "Allow",
            "Action": [
                "ecr:BatchGetImage",
                "ecr:GetDownloadUrlForLayer"
            ],
            "Resource": [
                "arn:aws:ecr:us-west-2:xxx:repository/*"
            ]
        },
        {
            "Effect": "Allow",
            "Action": [
                "logs:DescribeLogStreams",
                "logs:CreateLogGroup"
            ],
            "Resource": [
                "arn:aws:logs:us-west-2:xxx:log-group:/aws/bedrock-agentcore/runtimes/*"
            ]
        },
        {
            "Effect": "Allow",
            "Action": [
                "logs:DescribeLogGroups"
            ],
            "Resource": [
                "arn:aws:logs:us-west-2:xxx:log-group:*"
            ]
        },
        {
            "Effect": "Allow",
            "Action": [
                "logs:CreateLogStream",
                "logs:PutLogEvents"
            ],
            "Resource": [
                "arn:aws:logs:us-west-2:xxx:log-group:/aws/bedrock-agentcore/runtimes/*:log-stream:*"
            ]
        },
        {
            "Sid": "ECRTokenAccess",
            "Effect": "Allow",
            "Action": [
                "ecr:GetAuthorizationToken"
            ],
            "Resource": "*"
        },
        {
            "Effect": "Allow",
            "Action": [
                "xray:PutTraceSegments",
                "xray:PutTelemetryRecords",
                "xray:GetSamplingRules",
                "xray:GetSamplingTargets"
            ],
            "Resource": [
                "*"
            ]
        },
        {
            "Effect": "Allow",
            "Resource": "*",
            "Action": "cloudwatch:PutMetricData",
            "Condition": {
                "StringEquals": {
                    "cloudwatch:namespace": "bedrock-agentcore"
                }
            }
        },
        {
            "Sid": "GetAgentAccessToken",
            "Effect": "Allow",
            "Action": [
                "bedrock-agentcore:GetWorkloadAccessToken",
                "bedrock-agentcore:GetWorkloadAccessTokenForJWT",
                "bedrock-agentcore:GetWorkloadAccessTokenForUserId"
            ],
            "Resource": [
                "arn:aws:bedrock-agentcore:us-west-2:xxx:workload-identity-directory/default",
                "arn:aws:bedrock-agentcore:us-west-2:xxx:workload-identity-directory/default/workload-identity/simple_agent-*"
            ]
        },
        {
            "Sid": "BedrockModelInvocation",
            "Effect": "Allow",
            "Action": [
                "bedrock:InvokeModel",
                "bedrock:InvokeModelWithResponseStream",
                "bedrock:ApplyGuardrail"
            ],
            "Resource": [
                "arn:aws:bedrock:*::foundation-model/*",
                "arn:aws:bedrock:us-west-2:xxx:*"
            ]
        }
    ]
}
Now the setup preparation is complete.
Deployment (launch command)
Now that the setup with the configure command is complete, it's time for deployment.
Let's host the agent on AgentCore Runtime.
agentcore launch
When you run this command, the following processes happen behind the scenes:
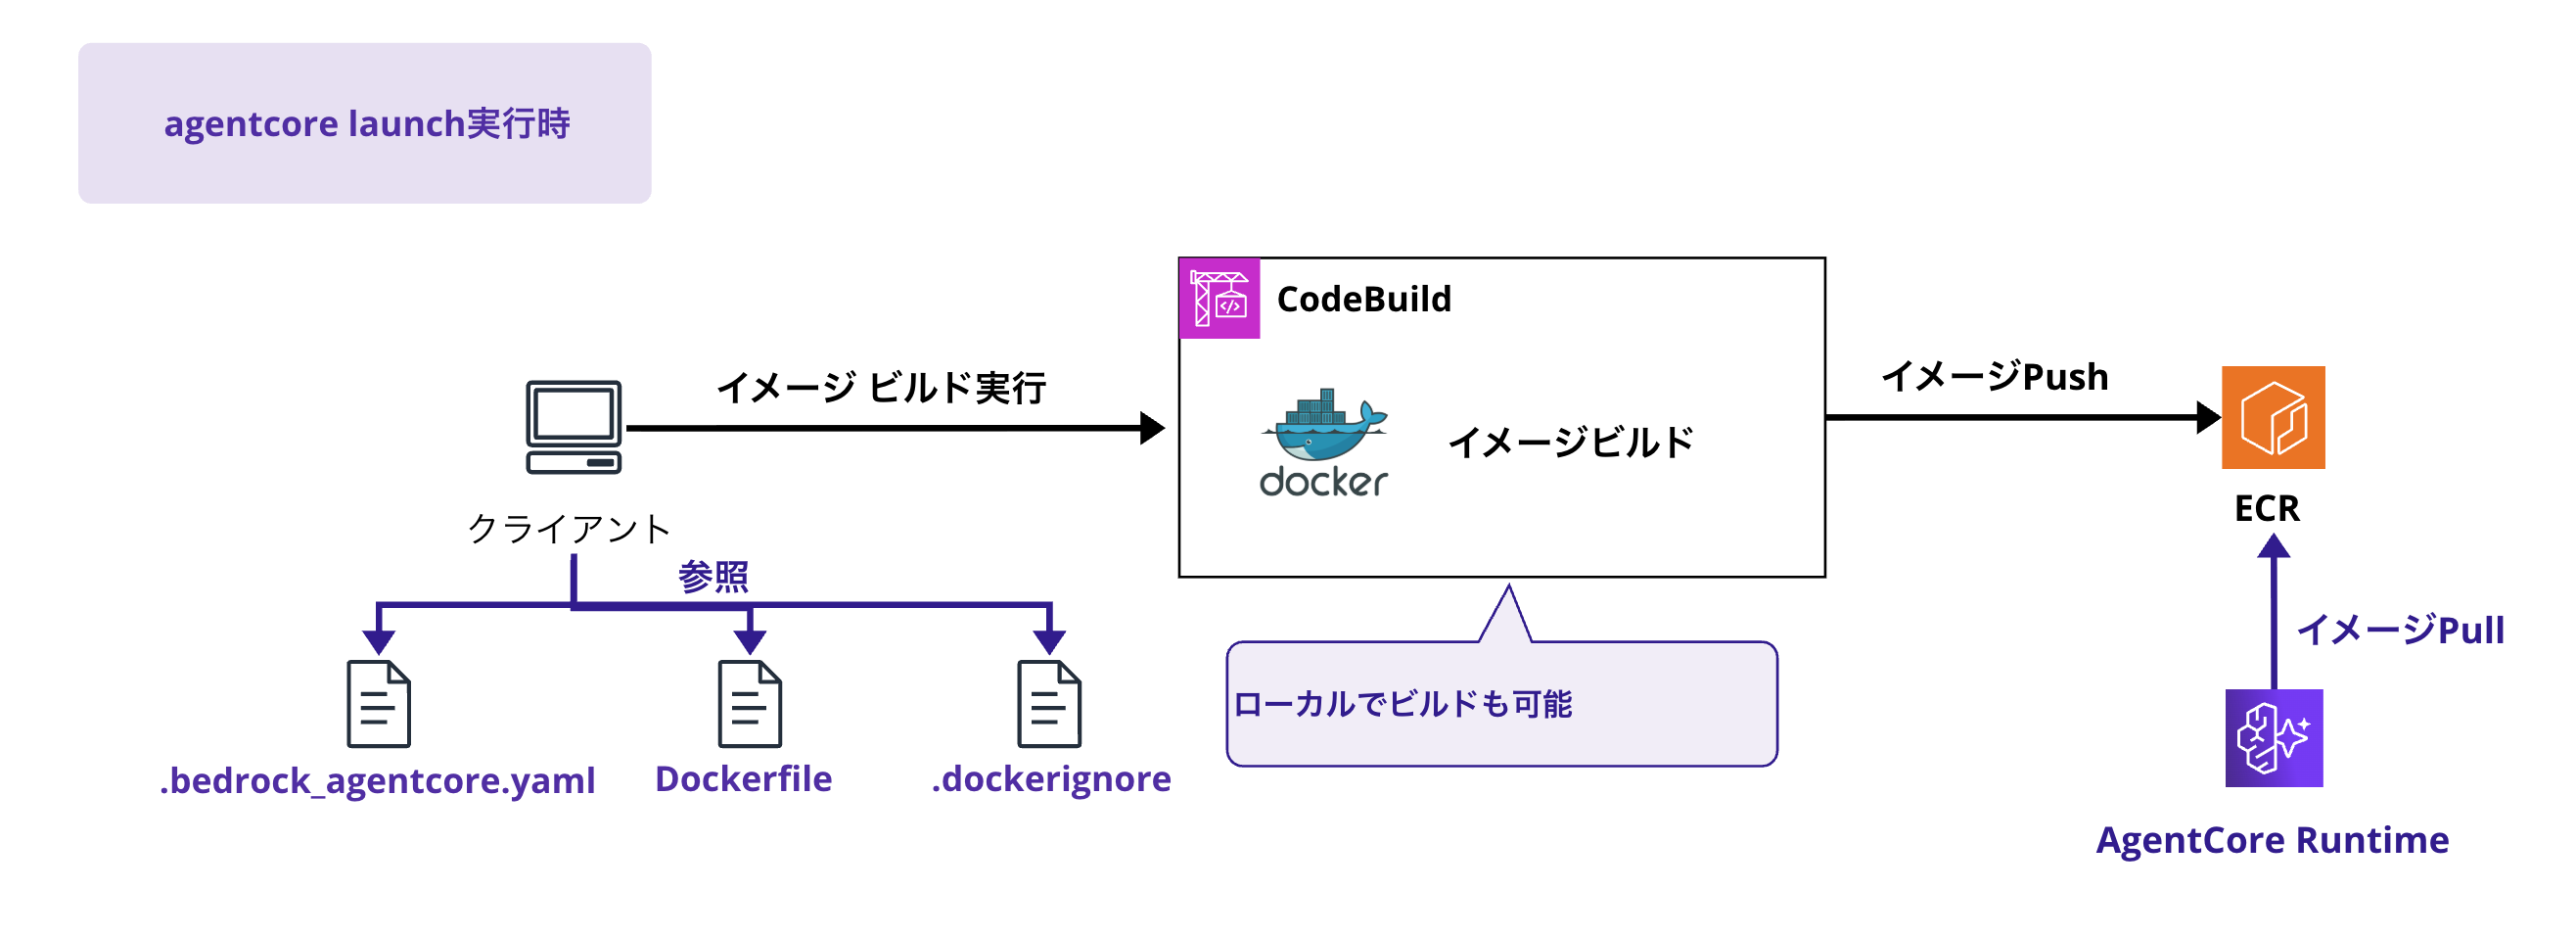
- Docker image build and push to ECR
- By default, the build uses AWS CodeBuild
- Note that it's built with ARM64 architecture
- AgentCore Runtime creation
- A managed hosting environment is automatically set up
- Endpoint activation
- An endpoint is automatically created and ready to be called immediately
Local building is possible with the --local option.
However, local builds require a container runtime such as Docker or Finch.
Examples:
- Docker (any recent version, including Docker Desktop)
- Finch (Amazon's open-source container engine)
- Podman (compatible alternative to Docker)
agentcore launch --local
Setting Environment Variables
In actual agent development, you may want to set environment variables such as Knowledge Base IDs.
To pass environment variables with the launch command, use the --env option.
agentcore launch --env STRANDS_KNOWLEDGE_BASE_ID=kb-abc123 \
                 --env OPENWEATHER_API_KEY=your-api-key
The set environment variables can also be confirmed on the console.
Running the Agent (invoke command)
After deployment is complete, you can call the deployed agent using the invoke command.
agentcore invoke '{"prompt":"Hello"}' --session-id test-id-01
You can also specify a --session-id. Use the same value if you want to maintain the same runtime-session-id.
If authentication is configured with Cognito, etc., you can also set an access token with --bearer-token.
Hands-on: Deploying a Simple Agent
Now, let's actually deploy a simple agent!
Prerequisites
The libraries and prerequisites I used are as follows:
- Python 3.12
- AWS CLI 2.28
- AWS account (us-west-2 region)
- Bedrock model enabled
- We'll use
anthropic.claude-3-5-haiku-20241022-v1:0this time.
- We'll use
Installing Required Packages
Let's install the required packages.
Create and install requirements.txt.
strands-agents
strands-agents-tools
bedrock-agentcore
bedrock-agentcore-starter-toolkit
Create a virtual environment and install the libraries.
python3 -m venv agentcore-env
source agentcore-env/bin/activate

# Install required packages
pip install -r requirements.txt
Implementing the Agent
Let's create a simple agent first!
Create a file called simple_agent.py.
The processing simply calls the LLM.
from strands import Agent, tool
from strands.models import BedrockModel
from bedrock_agentcore.runtime import BedrockAgentCoreApp
app = BedrockAgentCoreApp()

@app.entrypoint
async def entrypoint(payload):
    message = payload.get("prompt", "")
    model = payload.get("model", {})
    model_id = model.get("modelId","anthropic.claude-3-5-haiku-20241022-v1:0")
    model = BedrockModel(model_id=model_id, params={"max_tokens": 4096, "temperature": 0.7}, region="us-west-2")
    agent = Agent(model=model)
    stream_messages = agent.stream_async(message)
    async for message in stream_messages:
        if "event" in message:
            yield message

if __name__ == "__main__":
    app.run()
Deployment and Execution
Let's proceed with configuration and deployment.
First, use the configure command to set up.
# Configuration
agentcore configure -e simple_agent.py
Since we're creating everything automatically, just keep pressing Enter. Once .bedrock_agentcore.yaml and others are created, now deploy.
# Deploy
agentcore launch
It's really amazing how simple it is to deploy with just 2 commands.
After the deployment succeeds, let's actually call it.
agentcore invoke '{"prompt": "AIに関する面白いジョークを教えて!"}'
When called, the results are returned in streaming. Although it's hard to see in CLI, you can receive responses like below:
Payload:
{
  "prompt": "AIに関する面白いジョークを教えて!"
}
Invoking BedrockAgentCore agent 'simple_agent' via cloud endpoint
{"event": {"messageStart": {"role": "assistant"}}}
{"event": {"contentBlockDelta": {"delta": {"text": "は"}, "contentBlockIndex": 0}}}
{"event": {"contentBlockDelta": {"delta": {"text": "い、いくつかA"}, "contentBlockIndex": 0}}}
{"event": {"contentBlockDelta": {"delta": {"text": "I関連のジョークをご"}, "contentBlockIndex": 0}}}
{"event": {"contentBlockDelta": {"delta": {"text": "紹介します:"}, "contentBlockIndex": 0}}}
{"event": {"contentBlockDelta": {"delta": {"text": "\n\n1. AIアシスタント"}, "contentBlockIndex": 0}}}
{"event": {"contentBlockDelta": {"delta": {"text": "に聞きました"}, "contentBlockIndex": 0}}}
{"event": {"contentBlockDelta": {"delta": {"text": "。「君は本当に知"}, "contentBlockIndex": 0}}}
{"event": {"contentBlockDelta": {"delta": {"text": "的なの?」\nAI"}, "contentBlockIndex": 0}}}
{"event": {"contentBlockDelta": {"delta": {"text": "は答えました。「私は"}, "contentBlockIndex": 0}}}
{"event": {"contentBlockDelta": {"delta": {"text": "人工知能です。本当の"}, "contentBlockIndex": 0}}}
{"event": {"contentBlockDelta": {"delta": {"text": "知性は微妙な"}, "contentBlockIndex": 0}}}
{"event": {"contentBlockDelta": {"delta": {"text": "質問ですね"}, "contentBlockIndex": 0}}}
{"event": {"contentBlockDelta": {"delta": {"text": "」\n\n2. "}, "contentBlockIndex": 0}}}
{"event": {"contentBlockDelta": {"delta": {"text": "人工知能と"}, "contentBlockIndex": 0}}}
{"event": {"contentBlockDelta": {"delta": {"text": "人間の違いは?"}, "contentBlockIndex": 0}}}
{"event": {"contentBlockDelta": {"delta": {"text": "\nAIは考える"}, "contentBlockIndex": 0}}}
{"event": {"contentBlockDelta": {"delta": {"text": "、人間は"}, "contentBlockIndex": 0}}}
{"event": {"contentBlockDelta": {"delta": {"text": "悩む。\n\n3. AIに"}, "contentBlockIndex": 0}}}
{"event": {"contentBlockDelta": {"delta": {"text": "プログラマーが"}, "contentBlockIndex": 0}}}
{"event": {"contentBlockDelta": {"delta": {"text": "聞きます。"}, "contentBlockIndex": 0}}}
{"event": {"contentBlockDelta": {"delta": {"text": "\n「人間を信頼でき"}, "contentBlockIndex": 0}}}
{"event": {"contentBlockDelta": {"delta": {"text": "ますか?」\nAIは答え"}, "contentBlockIndex": 0}}}
{"event": {"contentBlockDelta": {"delta": {"text": "ます。「まだデ"}, "contentBlockIndex": 0}}}
{"event": {"contentBlockDelta": {"delta": {"text": "ータ不足です」"}, "contentBlockIndex": 0}}}
{"event": {"contentBlockDelta": {"delta": {"text": "\n\nこれらのジョ"}, "contentBlockIndex": 0}}}
{"event": {"contentBlockDelta": {"delta": {"text": "ークは、AIの特性"}, "contentBlockIndex": 0}}}
{"event": {"contentBlockDelta": {"delta": {"text": "や人工知能への興"}, "contentBlockIndex": 0}}}
{"event": {"contentBlockDelta": {"delta": {"text": "味深い視点を"}, "contentBlockIndex": 0}}}
{"event": {"contentBlockDelta": {"delta": {"text": "軽いタッチで表"}, "contentBlockIndex": 0}}}
{"event": {"contentBlockDelta": {"delta": {"text": "現しています。"}, "contentBlockIndex": 0}}}
{"event": {"contentBlockDelta": {"delta": {"text": "笑っていただけ"}, "contentBlockIndex": 0}}}
{"event": {"contentBlockDelta": {"delta": {"text": "たら嬉し"}, "contentBlockIndex": 0}}}
{"event": {"contentBlockDelta": {"delta": {"text": "いです。"}, "contentBlockIndex": 0}}}
{"event": {"contentBlockStop": {"contentBlockIndex": 0}}}
{"event": {"messageStop": {"stopReason": "end_turn"}}}
{"event": {"metadata": {"usage": {"inputTokens": 22, "outputTokens": 212, "totalTokens": 234}, "metrics": {"latencyMs": 5002}}}}
The result was returned successfully!
It's really convenient. When I first tried Runtime, I was impressed by how easily it could be deployed.
Pricing Structure
Charging Model
The rates that will apply from October 7, 2025 are as follows: (The preview period was extended until October 6 on the English version of the page)
- CPU: $0.0895/vCPU hour
- Memory: $0.00945/GB hour
Pricing Example
For a customer support agent handling 10 million requests/month, the pricing calculation would be as follows.
This is a quote from the official documentation, but let's check it out.
Consider a customer support agent deployed to solve user inquiries via chat and email. The agent handles issues related to orders, account verification, and policy clarification. It retrieves product policies using Retrieval-Augmented Generation (RAG) and queries order status and updates support tickets using Model Context Protocol (MCP) compatible tools. Each agent session involves advanced multi-step reasoning with one RAG call to the vector store, two MCP tool calls (like OrderAPI, TicketAPI), and two LLM inference steps. With requirements for complete session isolation and the flexibility to scale to millions of sessions within seconds, the agent was deployed to AgentCore Runtime.
It handles 10 million user requests per month, with each session running for 60 seconds, with 70% I/O wait time (waiting for LLM responses or network responses from internal APIs). Each agent session utilizes 1 vCPU during active processing and consistently uses 2 GB of memory. The monthly cost breakdown is as follows:
CPU cost per session: 18 seconds (adjusted for 70% I/O wait time) × 1 vCPU × ($0.0895/3600) = $0.0004475 Memory cost per session: 60 seconds × 2 GB × ($0.00945/3600) = $0.000315
Total cost per session: $0.0007625
Monthly total: 10 million sessions × $0.0007625 = $7,625AgentCore Runtime's usage-based pricing ensures you only pay for active CPU processing time, not I/O wait time, resulting in higher cost-efficiency compared to traditional computing options.
The key point is that I/O wait time, such as waiting for LLM responses, is not charged.
It's a billing system optimized for AI agents.
Conclusion
Using Amazon Bedrock AgentCore Runtime makes it easy to host AI agents and make them immediately available.
The appeal of hosting AI agents with Runtime is that you can connect with other features like Identity and Gateway as needed. I want to actively create and share better AI agents with some ingenuity!
I hope this article was helpful to you. Thank you for reading to the end!!
Supplement
In this article, we simply used the configure and launch commands on the CLI, but they can also be executed in Python code in the same way.
# Import
from bedrock_agentcore_starter_toolkit import Runtime

agentcore_runtime.configure(
        entrypoint="strands_full_auth_agent.py",
        execution_role=role_arn,
        auto_create_ecr=True,  # Auto-create ECR repository
        requirements_file="requirements.txt",
        region="us-west-2",
        agent_name=os.environ.get('AGENT_NAME', 'strands_full_auth_agent')
)

agentcore_runtime.launch(env_vars=env_vars)
It can also be executed with AWS CLI as follows.
However, invoke-agent-runtime requires sending the payload in base64, which takes extra effort.
In that sense, bedrock-agentcore-starter-toolkit might be easier to use.
aws bedrock-agentcore-control create-agent-runtime \
  --region us-west-2 \
  --agent-runtime-name "sample_agent" \
  --role-arn "arn:aws:iam::<accdountId>:role/service-role/AmazonBedrockAgentCoreRuntimeDefaultServiceRole-sample-agent" \
  --network-configuration '{
    "networkMode": "PUBLIC"
  }' \

aws bedrock-agentcore invoke-agent-runtime \
  --agent-runtime-arn $RUNTIME_ARN \
  --content-type "application/json" \
  --accept "application/json, text/event-stream" \
  --payload "$(echo -n "$PAYLOAD" | base64)" output.json