![[iOS] UICollectionViewを使って月表示のカレンダー画面をつくる](https://devio2023-media.developers.io/wp-content/uploads/2015/01/ios_ui.png)
[iOS] UICollectionViewを使って月表示のカレンダー画面をつくる
この記事は公開されてから1年以上経過しています。情報が古い可能性がありますので、ご注意ください。
はじめに
本記事では月表示のカレンダー画面の実装方法について解説します。
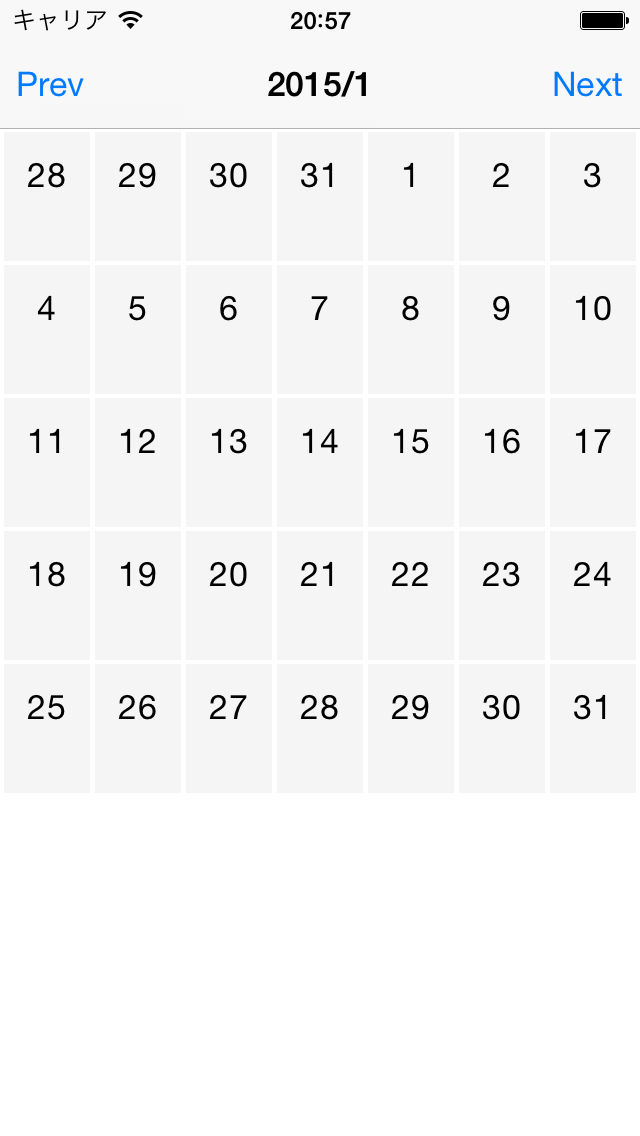
月表示のカレンダー画面は格子状のレイアウトなので、UICollectionViewを使って実装します。
実装すること
UICollectionViewを使って月表示のカレンダー画面を作るにあたって、最低限実装する必要があるものは以下の3つです。
- 必要なセルの数を計算する
- セルを作成する
- レイアウトを作る
1.必要なセルの数を計算する
UICollectionViewDataSourceプロトコルのcollectionView:numberOfItemsInSection:メソッド内でセルの数を計算して値を返却します。
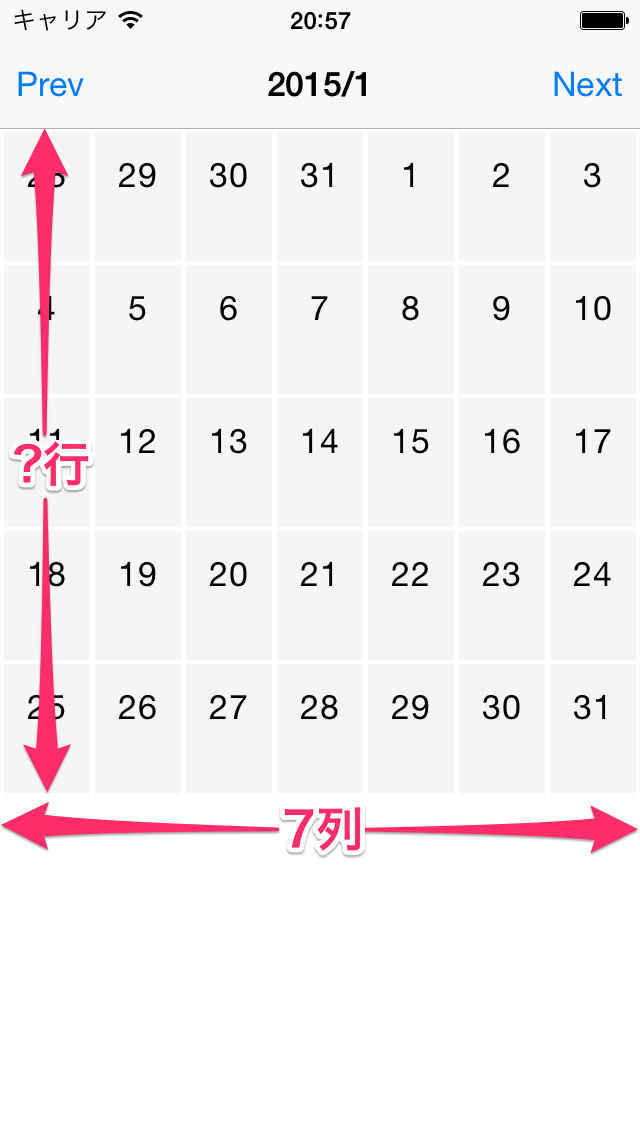
週の数を計算する
月に週が何個あるかを計算してみましょう。
今回はNSCalendarクラスのrangeOfUnit:inUnit:forDate:メソッドを使ってみます。
- (NSRange)rangeOfUnit:(NSCalendarUnit)smaller
                inUnit:(NSCalendarUnit)larger
               forDate:(NSDate *)date;
このメソッドの定義は以下のような感じです。
dateを含むlargerユニットの中で、smaller ユニットが取りうる範囲を返却する
例えば、以下のように引数を与えると今月の週の数を計算できます。 返却値はNSRange型なので、lengthを確認すれば週の数がわかります。
NSRange rangeOfWeeks =
[[NSCalendar currentCalendar] rangeOfUnit:NSCalendarUnitWeekOfMonth
                                   inUnit:NSCalendarUnitMonth
                                  forDate:[NSDate date]];
これでセル数を計算できそうです。
以下のコードはサンプルプロジェクトの「collectionView:numberOfItemsInSection:」メソッドの実装になります。(self.firstDateOfMonthはカレンダーで表示中の月の初日を指すNSDateオブジェクトです)
- (NSInteger)collectionView:(UICollectionView *)collectionView
     numberOfItemsInSection:(NSInteger)section
{
    // calculate number of weeks
    NSRange rangeOfWeeks =
    [[NSCalendar currentCalendar] rangeOfUnit:NSCalendarUnitWeekOfMonth
                                       inUnit:NSCalendarUnitMonth
                                      forDate:self.firstDateOfMonth];
    NSUInteger numberOfWeeks = rangeOfWeeks.length;
    NSInteger numberOfItems = numberOfWeeks * DaysPerWeek;

    return numberOfItems;
}
2.セルを作成する
UICollectionViewDataSourceプロトコルのcollectionView:cellForItemAtIndexPath:メソッド内でセルを作成して返却します。
今回のサンプルプロジェクトのセルには日番号表示用のラベルだけ追加することにします。
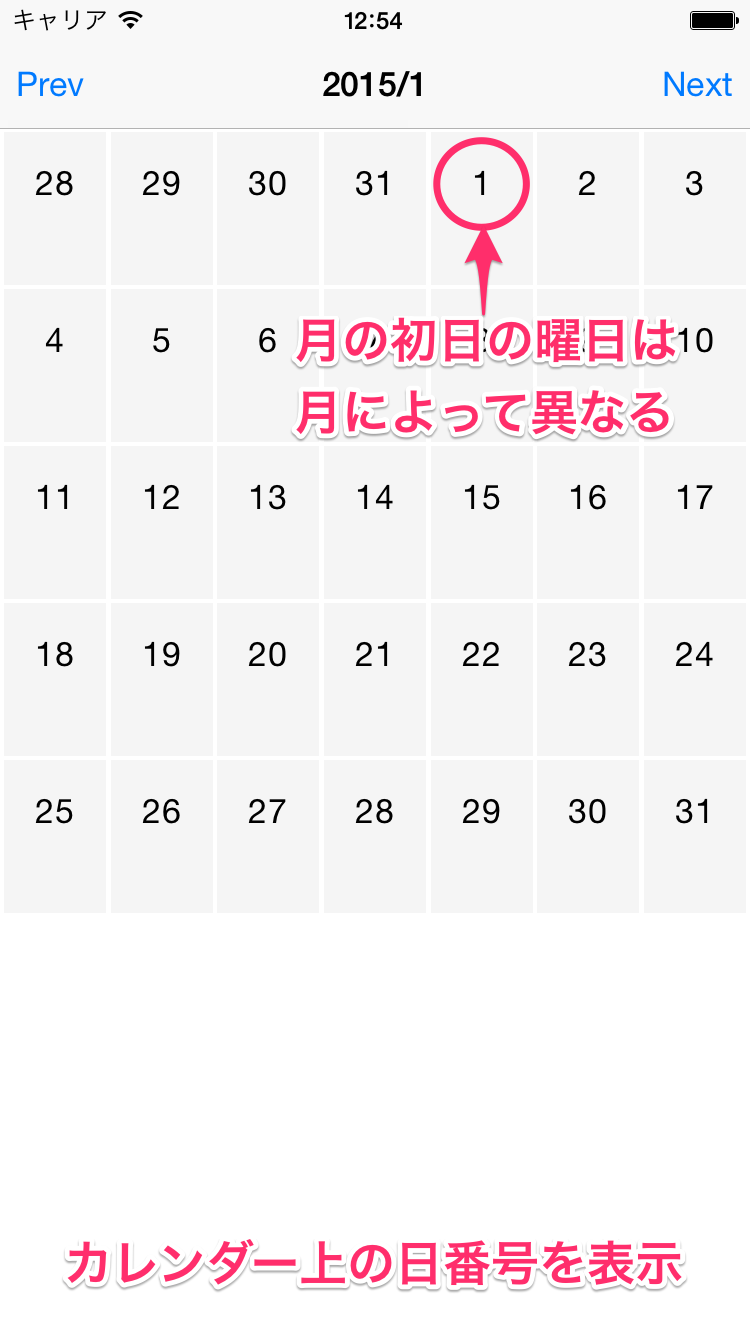
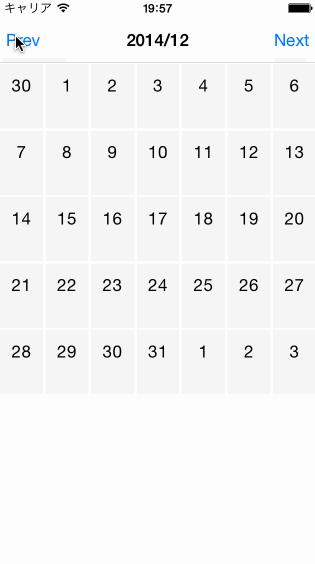
しかし、「セルのインデックス」が0はじまりなのに対して、「月の初日が週の何日目か(何個目のセルから当月が始まるのか)」は月によって異なります。「セルのインデックス」から「日番号」へ変換するメソッドが必要そうです。

「セルのインデックス」から「日番号」へ変換
月の初日が週の何日目かを計算してみます。
今回はNSCalendarクラスのordinalityOfUnit:inUnit:forDate:メソッドを使ってみます。
- (NSUInteger)ordinalityOfUnit:(NSCalendarUnit)smaller
                        inUnit:(NSCalendarUnit)larger
                       forDate:(NSDate *)date;
このメソッドの定義は以下のような感じです。
dateを含むlargerユニットの中で、smallerユニットは何番目であるかを返却する
例えば、以下のように引数を与えると今月の1日が何日目であるかを計算できます。
NSInteger ordinalityOfFirstDay =
[[NSCalendar currentCalendar] rangeOfUnit:NSCalendarUnitDay
                                   inUnit:NSCalendarUnitWeekOfMonth
                                  forDate:[NSDate date]];
「月の初日が週の何日目か」がわかるようになりました。これで、どのインデックスのセルにどの日付のデータを渡すのかを計算できます。
以下のコードはサンプルプロジェクトで使用している「インデックスから日付へ変換するメソッド」になります。(self.firstDateOfMonthはカレンダーで表示中の月の初日を指すNSDateオブジェクトです)
- (NSDate *)dateForCellAtIndexPath:(NSIndexPath *)indexPath
{
    // 「月の初日が週の何日目か」を計算する
    NSInteger ordinalityOfFirstDay =
    [[NSCalendar currentCalendar] ordinalityOfUnit:NSCalendarUnitDay
                                            inUnit:NSCalendarUnitWeekOfMonth
                                           forDate:self.firstDateOfMonth];

    // 「月の初日」と「indexPath.item番目のセルに表示する日」の差を計算する
    NSDateComponents *dateComponents = [NSDateComponents new];
    dateComponents.day = indexPath.item - (ordinalityOfFirstDay - 1);

    NSDate *date =
    [[NSCalendar currentCalendar] dateByAddingComponents:dateComponents
                                                  toDate:self.firstDateOfMonth
                                                 options:0];
    return date;
}
collectionView:cellForItemAtIndexPath:メソッドでは以下のようにdateForCellAtIndexPath:メソッドを使用しています。
- (UICollectionViewCell *)collectionView:(UICollectionView *)collectionView
                  cellForItemAtIndexPath:(NSIndexPath *)indexPath
{
    DayCell *cell =
    [collectionView dequeueReusableCellWithReuseIdentifier:ReuseIdentifier
                                              forIndexPath:indexPath];

    NSDateFormatter *formatter = [NSDateFormatter new];
    formatter.dateFormat = @"d";

    cell.label.text =
    [formatter stringFromDate:[self dateForCellAtIndexPath:indexPath]];

    return cell;
}
3.レイアウトを作る
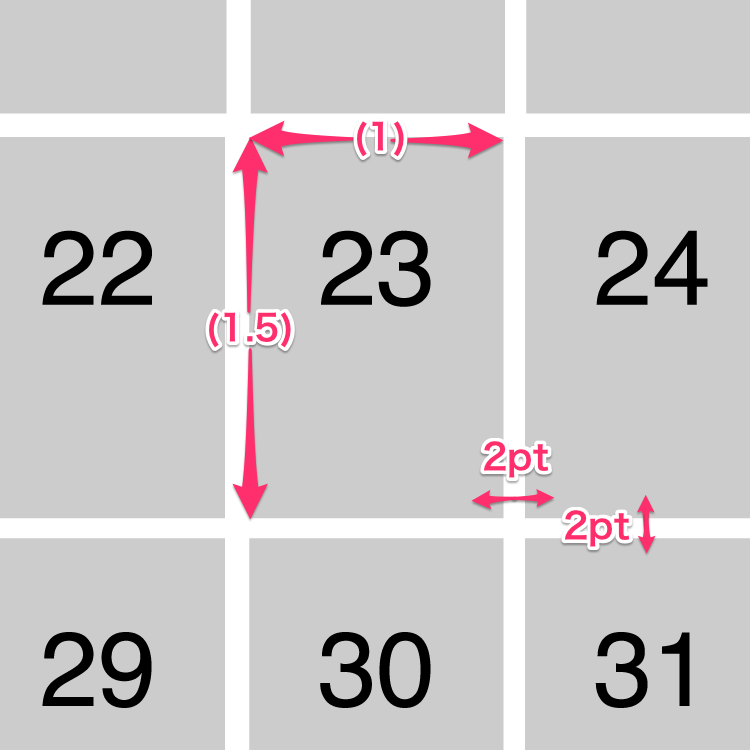
レイアウトのオブジェクトはデフォルトのUICollectionViewFlowLayoutを使用します。UICollectionViewの背景を白に、UICollectionViewCellの背景をグレーにすることで、幅2ポイントの罫線が見えるようにします。
UICollectionViewDelegateFlowLayoutで定義されているメソッドを実装し、セルのサイズやセル間のマージンなどを計算して返却するようにします。
collectionView:layout:sizeForItemAtIndexPath:メソッドではセルのサイズを返却します。
// セルのサイズを返却する
- (CGSize)collectionView:(UICollectionView *)collectionView
                  layout:(UICollectionViewLayout *)collectionViewLayout
  sizeForItemAtIndexPath:(NSIndexPath *)indexPath
{
    NSInteger numberOfMargin = 8;
    CGFloat width =
    floorf((collectionView.frame.size.width - CellMargin * numberOfMargin) / DaysPerWeek);

    CGFloat height = width * 1.5f;

    return CGSizeMake(width, height);
}
その他のメソッドでセル間のマージンなどを返却します。
// セクションの上下左右のマージンを返却する
- (UIEdgeInsets)collectionView:(UICollectionView *)collectionView
                        layout:(UICollectionViewLayout*)collectionViewLayout
        insetForSectionAtIndex:(NSInteger)section
{
    return UIEdgeInsetsMake(CellMargin, CellMargin, CellMargin, CellMargin);
}

// は垂直方向のセル間のマージンの最小値を返却する
- (CGFloat)collectionView:(UICollectionView *)collectionView
                   layout:(UICollectionViewLayout*)collectionViewLayout
    minimumLineSpacingForSectionAtIndex:(NSInteger)section
{
    return CellMargin;
}

// 水平方向のセル間のマージンの最小値を返却する
- (CGFloat)collectionView:(UICollectionView *)collectionView
                   layout:(UICollectionViewLayout*)collectionViewLayout
    minimumInteritemSpacingForSectionAtIndex:(NSInteger)section
{
    return CellMargin;
}
まとめ
「必要なセルの数を計算する」や「セルを作成する」などの基礎部分は意外とすんなり作れました。 「幅1pxの罫線を引く」等のこだわりがある場合は、レイアウトのクラスを自分で作る必要が出てきて実装がちょっと大変になりそうです。
今回作成したサンプルプロジェクトは以下のリポジトリで公開しています。記事内で説明していない部分などはこちらをご確認ください。