AWS Glue 5.1 + dbt-glue で Apache Iceberg のデータパイプラインを構築してみた
クラウド事業本部の石川です。以前から気になっていた aws-samples/dbt-glue を使って、AWS Glue 5.1(Spark 3.5.6 / Iceberg 1.10.0)上で dbt のプロジェクトを構築してみました。スタースキーマ(fact / dim)を Apache Iceberg で構築し、incremental + merge 戦略まで一通り体験しました。今回はこの構成をご紹介します。
dbt-glue とは
dbt-glue は AWS が公式公開している dbt 用の AWS Glue アダプターです。dbt(data build tool)の SQL ベースのデータ変換を、AWS Glue Spark Engine 上で動かせるようにします。通信は Glue Interactive Sessions API を介して行われ、dbt CLI 実行のたびに Glue 上で Spark セッションが起動からモデルが Spark SQL として実行されます。Glue ETL Job として永続登録するのではなく、必要なときだけセッションを使う設計です。
構築するアーキテクチャ
ローカルから dbt CLI と AWS CLI を使い、AWS 側に Glue・S3・IAM・Glue Catalog のリソース一式を構成します。
手順
Step 1. S3 バケットを 2 つ作成する
S3 バケットを2つを作成しました。
dbt-glue-sample-raw-{ACCOUNT_ID}-ap-northeast-1(rawバケット / ソース CSV 配置)dbt-glue-sample-warehouse-{ACCOUNT_ID}-ap-northeast-1(Iceberg 配置)
Step 2. IAM Role を作成する
GlueInteractiveSessionRole を作成します。Trusted entity type は Custom trust policy を選び、以下を貼り付けます。
{
  "Version": "2012-10-17",
  "Statement": [
    { "Effect": "Allow", "Principal": { "Service": "glue.amazonaws.com" }, "Action": "sts:AssumeRole" },
    { "Effect": "Allow", "Principal": { "AWS": "arn:aws:iam::{ACCOUNT_ID}:root" }, "Action": "sts:AssumeRole" }
  ]
}
dbt-glue が IAM ユーザー経由で AssumeRole する経路で使われます。マネージドポリシー AWSGlueServiceRole を付与してロールを作成したあと、インラインポリシーで以下の 4 セットを追加します。
- raw バケットへの read 権限
- warehouse バケットへの read/write 権限(
s3:Abort*を含む — S3A のマルチパートアップロード対策) - Glue Catalog の DDL/DML 権限
lakeformation:GetDataAccess
具体的な JSON は後述の参考リンクから手順書を参照してください。
Step 3. Glue Database を作成する
Glue Database を以下のとおり作成します。
| 項目 | 値 |
|---|---|
| Name | ecommerce_dbt |
| Location URI | s3://dbt-glue-sample-warehouse-{ACCOUNT_ID}-ap-northeast-1/warehouse/ |
Location URI を warehouse バケットに向けます。dbt-glue が Iceberg テーブルを書き込む際の既定パスになります。
Step 4. Glue Tables を 7 つ作成する
以下の 7 テーブルを作成します。
| テーブル | カラム数 | パーティション |
|---|---|---|
customers |
10 | なし |
products |
10 | なし |
product_categories |
5 | なし |
marketing_campaigns |
8 | なし |
orders |
13 | dt (string) |
order_items |
9 | dt (string) |
payments |
8 | dt (string) |
すべてのテーブル共通で以下を設定します。
| 項目 | 値 |
|---|---|
| Database | ecommerce_dbt |
| Table type | External table |
| Data store | S3 |
| Data format | CSV |
| Delimiter | , |
| Skip header rows | 1 |
S3 path はテーブル名と同じプレフィックス(例: s3://{raw-bucket}/customers/)になります。
Partition Projection の設定(パーティションテーブル 3 つ)
orders / order_items / payments の 3 テーブルには、Glue Crawler を使わずにパーティションを自動認識させるための Partition Projection を設定します。
| Key | Value |
|---|---|
projection.enabled |
true |
projection.dt.type |
date |
projection.dt.format |
yyyy-MM-dd |
projection.dt.range |
2026-01-01,NOW |
projection.dt.interval |
1 |
projection.dt.interval.unit |
DAYS |
storage.location.template |
s3://{raw-bucket}/{table}/dt=${dt}/ |
{table} はテーブル名、${dt} はそのままの文字列で書きます。
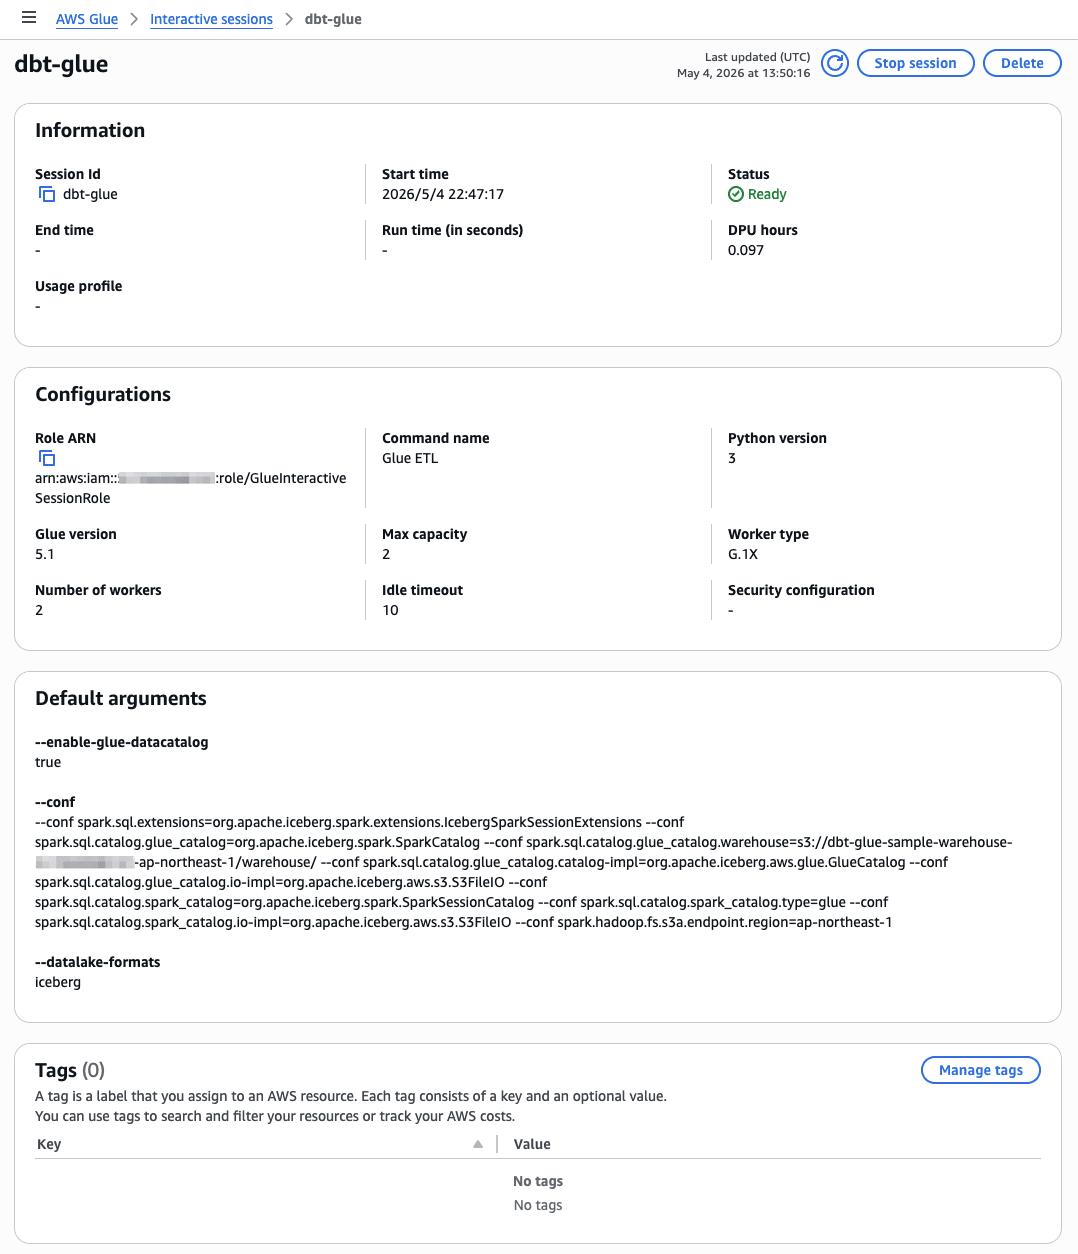
Step 5. Glue Interactive Sessions の作成
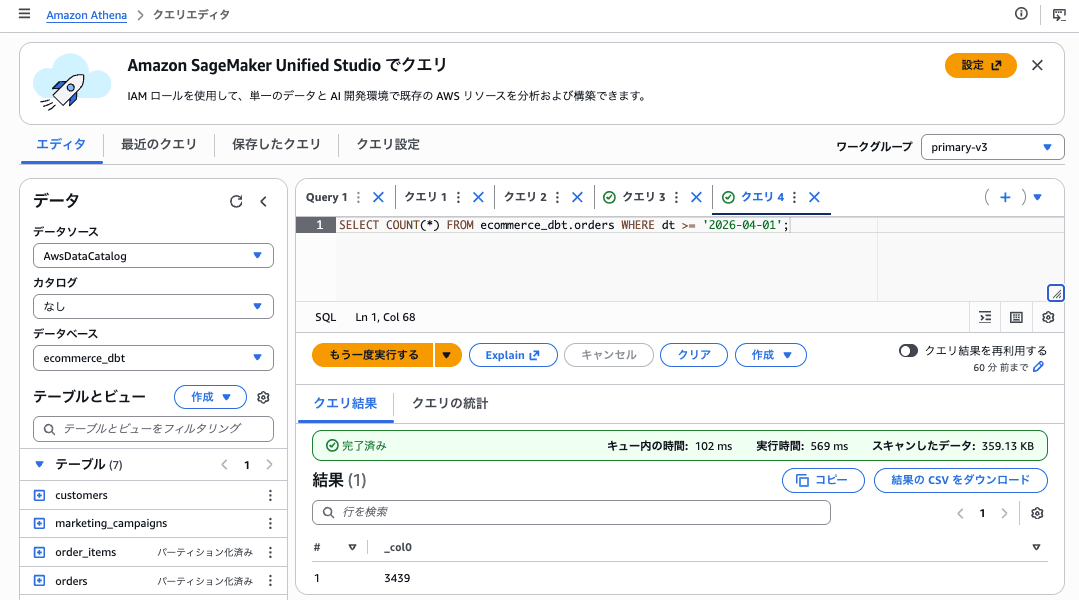
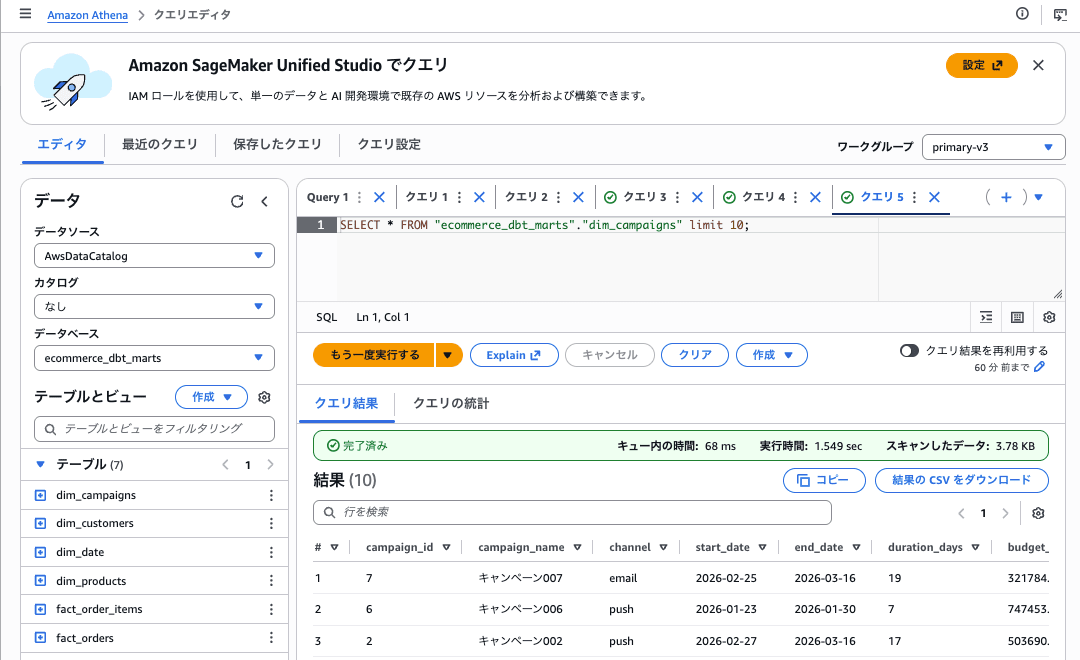
Step 6. Athena で動作確認する
Amazon Athena の Query editor で以下を実行し、テーブルが正しく読めることを確認します。
Step 7. dbt プロジェクトを作成して動作確認
~/.dbt/profiles.yml は、以下のとおりです。
ecommerce:
  target: dev
  outputs:
    dev:
      type: glue
      role_arn: arn:aws:iam::{ACCOUNT_ID}:role/GlueInteractiveSessionRole
      region: ap-northeast-1
      workers: 2
      worker_type: G.1X
      schema: ecommerce_dbt
      database: ecommerce_dbt
      session_provisioning_timeout_in_seconds: 240
      idle_timeout: 10
      glue_version: "5.1"
      datalake_formats: iceberg
      conf: >-
        --conf spark.sql.extensions=org.apache.iceberg.spark.extensions.IcebergSparkSessionExtensions
        --conf spark.sql.catalog.glue_catalog=org.apache.iceberg.spark.SparkCatalog
        --conf spark.sql.catalog.glue_catalog.warehouse=s3://dbt-glue-sample-warehouse-{ACCOUNT_ID}-ap-northeast-1/warehouse/
        --conf spark.sql.catalog.glue_catalog.catalog-impl=org.apache.iceberg.aws.glue.GlueCatalog
        --conf spark.sql.catalog.glue_catalog.io-impl=org.apache.iceberg.aws.s3.S3FileIO
        --conf spark.sql.catalog.spark_catalog=org.apache.iceberg.spark.SparkSessionCatalog
        --conf spark.sql.catalog.spark_catalog.type=glue
        --conf spark.sql.catalog.spark_catalog.io-impl=org.apache.iceberg.aws.s3.S3FileIO
        --conf spark.hadoop.fs.s3a.endpoint.region=ap-northeast-1
      glue_session_reuse: true
      location: s3://dbt-glue-sample-warehouse-{ACCOUNT_ID}-ap-northeast-1/warehouse/
dbt_project/dbt_project.yml は、以下のとおりです。
name: 'ecommerce'
version: '1.0.0'
config-version: 2

profile: 'ecommerce'

model-paths: ["models"]
seed-paths: ["seeds"]
test-paths: ["tests"]
analysis-paths: ["analyses"]
macro-paths: ["macros"]
snapshot-paths: ["snapshots"]

clean-targets:
  - "target"
  - "dbt_packages"

vars:
  raw_database: "ecommerce_dbt"

models:
  ecommerce:
    staging:
      +materialized: view
      +schema: staging
    intermediate:
      +materialized: view
      +schema: intermediate
    marts:
      +materialized: table
      +schema: marts
      +file_format: iceberg
      +table_properties:
        format-version: '2'
        write.parquet.compression-codec: zstd

seeds:
  ecommerce:
    +file_format: iceberg
    +schema: seeds
    +quote_columns: false
    country_region_codes:
      +column_types:
        region_code: string
        country_code: string
        region_name: string
        timezone: string
    order_status_codes:
      +column_types:
        order_status: string
        description: string
        is_final: boolean
    payment_method_codes:
      +column_types:
        payment_method: string
        description: string
    payment_status_codes:
      +column_types:
        payment_status: string
        description: string
        is_success: boolean
    sales_channels:
      +column_types:
        channel: string
        description: string
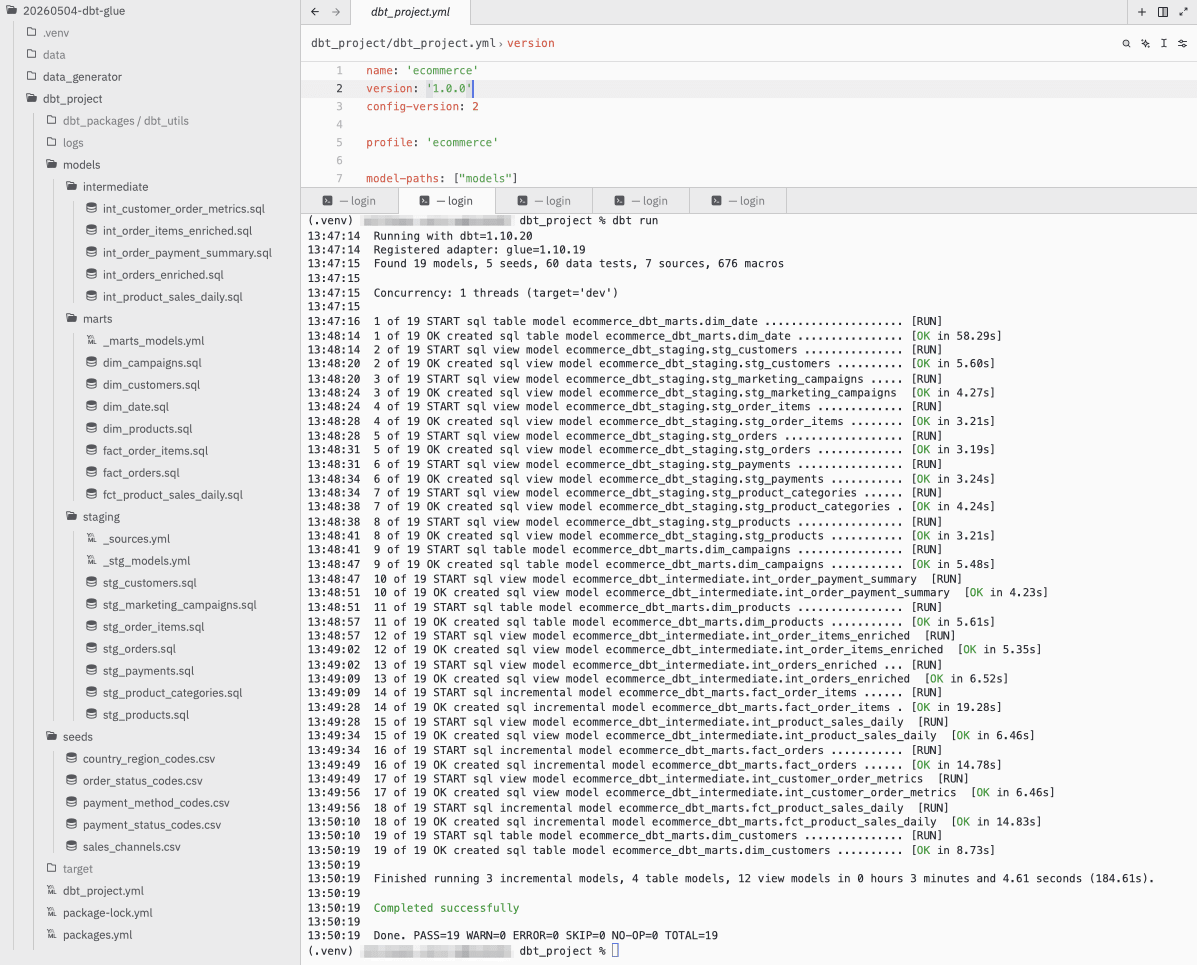
dbt run すると、インタラクティブにGlueが呼び出されて実行されます。
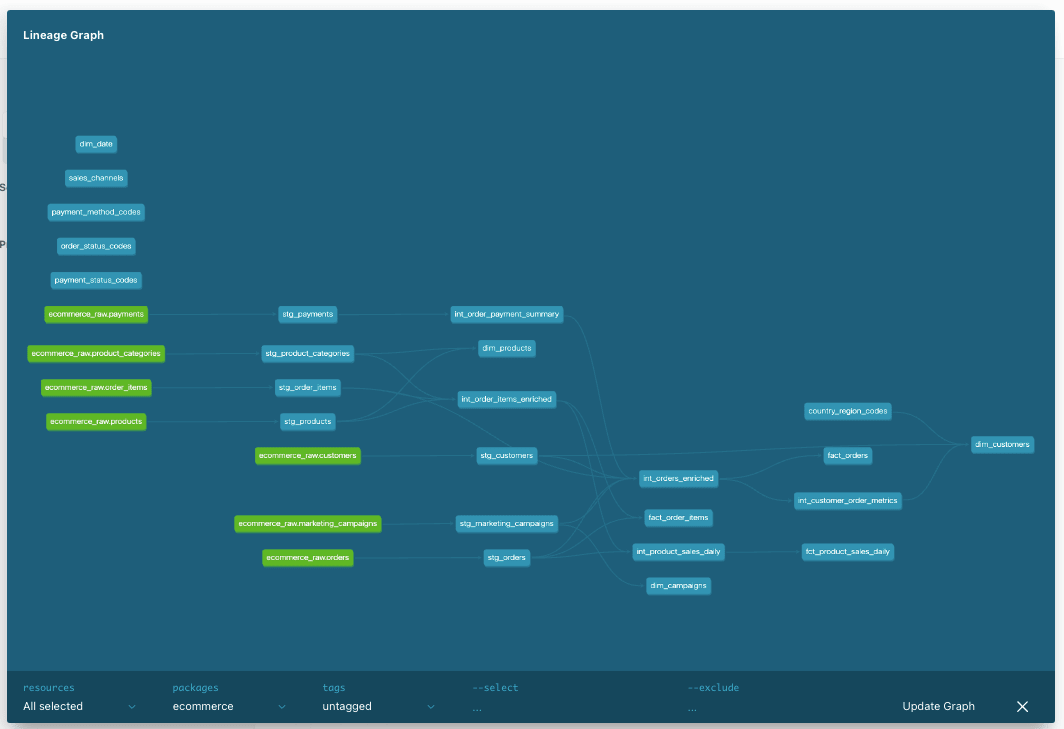
dbt docs generateを実行して、データリネージを作成しました。以下のようなデータパイプラインをdbt-glueで実現できました。
Step 8. 作成されたモデルを確認する
最後に
dbt-glue + AWS Glue 5.1 + Apache Iceberg の検証環境をご紹介しました。dbt-glue は IAM ユーザーから AssumeRole するため、Trust Policy に Service: glue.amazonaws.com だけだと AccessDenied になります。AWS: arn:aws:iam::{ACCOUNT_ID}:root も合わせて許可していなかったため、ハマってしまいました。しかし、それ以外、AWS Glue のインタラクティブセッションは、想像していた以上にdbtの相性が良く驚きました。