![[アップデート] Amazon SageMaker Unified Studio が IAM ベースドメインでサポートした Data Lineage を試してみました](https://images.ctfassets.net/ct0aopd36mqt/wp-thumbnail-4e6e510f2f74e1cc7d0ec360f38d138a/c00e9d7f4e47022543b37632bc20bcc0/amazon-sagemaker?w=3840&fm=webp)
[アップデート] Amazon SageMaker Unified Studio が IAM ベースドメインでサポートした Data Lineage を試してみました

クラウド事業統括本部の石川です。Amazon SageMaker Unified Studio の IAM ベースドメインで OpenLineage 互換のデータリネージがサポートされましたので、実際にリネージイベントの投稿からグラフの可視化、削除まで試してみました。
Amazon SageMaker Unified Studio のデータリネージは、データが「どこから来て、どのように変換され、どこで使われているか」をリネージグラフとして可視化する機能です。これまで IAM Identity Center(IdC)ベースのドメインを中心に提供されていましたが、今回のアップデートで IAM ベースドメイン(IAM 認証でサインインするドメイン)でも利用できるようになりました。
Apache Spark on Amazon EMR、AWS Glue、SageMaker Visual ETL、ノートブックからのリネージイベント取得に対応するほか、API を使ったプログラマティックな公開・クエリ・管理も可能です。
OpenLineage 互換のデータリネージとは
OpenLineage は、データセット・ジョブ・実行(run)のメタデータを標準形式で収集するためのオープンスタンダードです。SageMaker Unified Studio のデータリネージはこの OpenLineage に互換で、現時点では RunEvent(ジョブ実行イベント)のみをサポートし、OpenLineage 1.22.0 以降に対応しています。
リネージグラフの各ノードは sourceIdentifier で一意に識別されます。主な形式は以下のとおりです。
- AWS Glue テーブル:
arn:aws:glue:<region>:<account-id>:table/<database>/<table-name> - SageMaker Catalog のアセット:
amazon.datazone.asset/<assetId> - その他のデータセット:
<namespace>/<name>(OpenLineage イベントの namespace と name の結合) - ジョブ実行:
<ジョブの namespace>.<ジョブ名>/<runId>
やってみた
前提条件
- SageMaker Unified Studio の IAM ベースドメイン(domainVersion: V2)作成済み
- 検証環境: ap-northeast-1(東京リージョン)、AWS CLI v2
- 実行ロールに
datazone:PostLineageEvent/datazone:GetLineageEvent/datazone:ListLineageEvents/datazone:DeleteLineageEvent/datazone:GetLineageNodeの権限が必要です
ステップ 1: ドメインが IAM ベースであることを確認する
対象ドメインの認証方式を確認します。singleSignOn.type が DISABLED であれば IAM ベースドメインです。
% aws datazone get-domain --identifier dzd-d3w2uawk8vo7a1
{
    "id": "dzd-d3w2uawk8vo7a1",
    "rootDomainUnitId": "ca101tbx027cex",
    "name": "Default_05252026_Domain",
    "description": "Use your IAM role to analyze and build with your existing AWS resources in a single data and AI development environment.",
    "singleSignOn": {
        "type": "DISABLED"
    },
    "arn": "arn:aws:datazone:ap-northeast-1:123456789012:domain/dzd-d3w2uawk8vo7a1",
    "status": "AVAILABLE",
    "portalUrl": "https://dzd-d3w2uawk8vo7a1.sagemaker.ap-northeast-1.on.aws",
    "createdAt": "2026-05-25T02:48:31.757000+09:00",
    "lastUpdatedAt": "2026-05-25T02:48:36.638000+09:00",
    "tags": {},
    "domainVersion": "V2",
    "serviceRole": "arn:aws:iam::123456789012:role/service-role/AmazonSageMakerAdminIAMExecutionRole_1"
}
ステップ 2: OpenLineage RunEvent を作成する
OpenLineage の RunEvent は、本来 Apache Spark の openlineage-spark(AWS Glue ETLジョブや Amazon EMR のジョブ)によって自動的に作られます。今回の検証の目的は PostLineageEvent API そのものの挙動を確認することだったため、Glue ジョブを実際に動かす代わりに、リスナーが吐くはずのイベントを手で書いて API に直接投げます。
「raw_sales テーブルを transform_sales_data ジョブで変換して clean_sales を作る」という架空のジョブ実行を表す RunEvent を JSON で作成します。START と COMPLETE のイベントペアを用意しました。以下は 列レベルリネージを表す columnLineage facet 付きのCOMPLETE イベントです。
complete_event.json
{
  "producer": "https://github.com/OpenLineage/OpenLineage",
  "schemaURL": "https://openlineage.io/spec/2-0-0/OpenLineage.json#/definitions/RunEvent",
  "eventType": "COMPLETE",
  "eventTime": "2026-07-09T16:23:25Z",
  "run": {
    "runId": "03a4de9d-fdd4-46b9-8467-9aa41d6c0ce6"
  },
  "job": {
    "namespace": "devio.blog.lineage-demo",
    "name": "transform_sales_data"
  },
  "inputs": [
    {
      "namespace": "devio.blog.lineage-demo",
      "name": "raw_sales",
      "facets": {
        "schema": {
          "_producer": "https://github.com/OpenLineage/OpenLineage",
          "_schemaURL": "https://openlineage.io/spec/facets/1-0-0/SchemaDatasetFacet.json",
          "fields": [
            { "name": "region", "type": "string" },
            { "name": "year", "type": "int" },
            { "name": "amount", "type": "double" },
            { "name": "created_at", "type": "timestamp" }
          ]
        }
      }
    }
  ],
  "outputs": [
    {
      "namespace": "devio.blog.lineage-demo",
      "name": "clean_sales",
      "facets": {
        "schema": {
          "_producer": "https://github.com/OpenLineage/OpenLineage",
          "_schemaURL": "https://openlineage.io/spec/facets/1-0-0/SchemaDatasetFacet.json",
          "fields": [
            { "name": "region", "type": "string" },
            { "name": "year", "type": "int" },
            { "name": "total_amount", "type": "double" },
            { "name": "created_at", "type": "timestamp" }
          ]
        },
        "columnLineage": {
          "_producer": "https://github.com/OpenLineage/OpenLineage",
          "_schemaURL": "https://openlineage.io/spec/facets/1-0-1/ColumnLineageDatasetFacet.json",
          "fields": {
            "region": {
              "inputFields": [
                { "namespace": "devio.blog.lineage-demo", "name": "raw_sales", "field": "region" }
              ]
            },
            "year": {
              "inputFields": [
                { "namespace": "devio.blog.lineage-demo", "name": "raw_sales", "field": "year" }
              ]
            },
            "total_amount": {
              "inputFields": [
                { "namespace": "devio.blog.lineage-demo", "name": "raw_sales", "field": "amount" }
              ]
            },
            "created_at": {
              "inputFields": [
                { "namespace": "devio.blog.lineage-demo", "name": "raw_sales", "field": "created_at" }
              ]
            }
          }
        }
      }
    }
  ]
}
ステップ 3: post-lineage-event でイベントを投稿する
作成した JSON を PostLineageEvent API にPOSTします。AWS CLI v2 のデフォルトでは blob 型パラメータが base64 として解釈されるため、--cli-binary-format raw-in-base64-out を付けると成功しました。
% aws datazone post-lineage-event \
    --domain-identifier dzd-d3w2uawk8vo7a1 \
    --cli-binary-format raw-in-base64-out \
    --event file://complete_event.json
{
    "id": "ct8js82043461l",
    "domainId": "dzd-d3w2uawk8vo7a1"
}
COMPLETE イベントも同様に投稿し、イベント ID ct8js82043461l が発行されました。
ステップ 4: list-lineage-events で処理状況を確認する
投稿したイベントの処理状況を確認します。
% aws datazone list-lineage-events --domain-identifier dzd-d3w2uawk8vo7a1
{
    "items": [
        {
            "id": "ct8js82043461l",
            "domainId": "dzd-d3w2uawk8vo7a1",
            "processingStatus": "SUCCESS",
            "eventTime": "2026-07-10T01:23:25+09:00",
            "eventSummary": {
                "openLineageRunEventSummary": {
                    "eventType": "COMPLETE",
                    "runId": "03a4de9d-fdd4-46b9-8467-9aa41d6c0ce6",
                    "job": {
                        "name": "transform_sales_data",
                        "namespace": "devio.blog.lineage-demo"
                    },
                    "inputs": [
                        {
                            "name": "raw_sales",
                            "namespace": "devio.blog.lineage-demo"
                        }
                    ],
                    "outputs": [
                        {
                            "name": "clean_sales",
                            "namespace": "devio.blog.lineage-demo"
                        }
                    ]
                }
            },
            "createdBy": "7cf1da49-6b49-4cf9-aa3a-2398ed6794a9",
            "createdAt": "2026-07-12T22:26:16.638000+09:00"
        }
    ]
}
今回の検証では、投稿から数十秒で processingStatus が SUCCESS になりました。
ステップ 5: get-lineage-event でイベント本文を取得する
GetLineageEvent API は、イベント本文(OpenLineage JSON)をファイルに出力する仕様のため、出力先ファイル(outfile)の指定が必須です。指定しないと ParamValidation エラーになります。
% aws datazone get-lineage-event \
    --domain-identifier dzd-d3w2uawk8vo7a1 \
    --identifier ct8js82043461l \
    event_body.json
{
    "domainId": "dzd-d3w2uawk8vo7a1",
    "id": "ct8js82043461l",
    "createdBy": "7cf1da49-6b49-4cf9-aa3a-2398ed6794a9",
    "processingStatus": "SUCCESS",
    "eventTime": "2026-07-09T16:23:25+00:00",
    "createdAt": "2026-07-12T13:26:16+00:00"
}
出力された event_body.json には、投稿した columnLineage facet を含む OpenLineage イベントが完全な形で保持されていました。
event_body.json
{
  "producer": "https://github.com/OpenLineage/OpenLineage",
  "schemaURL": "https://openlineage.io/spec/2-0-0/OpenLineage.json#/definitions/RunEvent",
  "eventType": "COMPLETE",
  "eventTime": "2026-07-09T16:23:25Z",
  "run": {
    "runId": "03a4de9d-fdd4-46b9-8467-9aa41d6c0ce6"
  },
  "job": {
    "namespace": "devio.blog.lineage-demo",
    "name": "transform_sales_data"
  },
  "inputs": [
    {
      "namespace": "devio.blog.lineage-demo",
      "name": "raw_sales",
      "facets": {
        "schema": {
          "_producer": "https://github.com/OpenLineage/OpenLineage",
          "_schemaURL": "https://openlineage.io/spec/facets/1-0-0/SchemaDatasetFacet.json",
          "fields": [
            { "name": "region", "type": "string" },
            { "name": "year", "type": "int" },
            { "name": "amount", "type": "double" },
            { "name": "created_at", "type": "timestamp" }
          ]
        }
      }
    }
  ],
  "outputs": [
    {
      "namespace": "devio.blog.lineage-demo",
      "name": "clean_sales",
      "facets": {
        "schema": {
          "_producer": "https://github.com/OpenLineage/OpenLineage",
          "_schemaURL": "https://openlineage.io/spec/facets/1-0-0/SchemaDatasetFacet.json",
          "fields": [
            { "name": "region", "type": "string" },
            { "name": "year", "type": "int" },
            { "name": "total_amount", "type": "double" },
            { "name": "created_at", "type": "timestamp" }
          ]
        },
        "columnLineage": {
          "_producer": "https://github.com/OpenLineage/OpenLineage",
          "_schemaURL": "https://openlineage.io/spec/facets/1-0-1/ColumnLineageDatasetFacet.json",
          "fields": {
            "region": {
              "inputFields": [
                { "namespace": "devio.blog.lineage-demo", "name": "raw_sales", "field": "region" }
              ]
            },
            "year": {
              "inputFields": [
                { "namespace": "devio.blog.lineage-demo", "name": "raw_sales", "field": "year" }
              ]
            },
            "total_amount": {
              "inputFields": [
                { "namespace": "devio.blog.lineage-demo", "name": "raw_sales", "field": "amount" }
              ]
            },
            "created_at": {
              "inputFields": [
                { "namespace": "devio.blog.lineage-demo", "name": "raw_sales", "field": "created_at" }
              ]
            }
          }
        }
      }
    }
  ]
}
ステップ 6: get-lineage-node でリネージノードを確認する
イベントの処理が完了すると、データセットやジョブ実行がリネージノードとして生成されます。ノードは sourceIdentifier(<namespace>/<name>)で参照できます。
% aws datazone get-lineage-node \
    --domain-identifier dzd-d3w2uawk8vo7a1 \
    --identifier "devio.blog.lineage-demo/clean_sales"
{
    "domainId": "dzd-d3w2uawk8vo7a1",
    "name": "clean_sales",
    "createdAt": "2026-07-12T22:26:32.099000+09:00",
    "createdBy": "7cf1da49-6b49-4cf9-aa3a-2398ed6794a9",
    "updatedAt": "2026-07-12T22:26:32.099000+09:00",
    "updatedBy": "7cf1da49-6b49-4cf9-aa3a-2398ed6794a9",
    "id": "ci3qdzxlqt823d",
    "typeName": "amazon.datazone.DatasetLineageNodeType",
    "typeRevision": "4",
    "sourceIdentifier": "devio.blog.lineage-demo/clean_sales",
    "eventTimestamp": "2026-07-10T01:23:25+09:00",
    "formsOutput": [
        {
            "formName": "DatasetSchemaForm",
            "typeName": "amazon.datazone.DatasetSchemaFormType",
            "typeRevision": "2",
            "content": "{\"schema\":{\"columns\":[{\"name\":\"region\",\"type\":\"string\"},{\"name\":\"year\",\"type\":\"int\"},{\"name\":\"total_amount\",\"type\":\"double\"},{\"name\":\"created_at\",\"type\":\"timestamp\"}]}}"
        },
        {
            "formName": "DatasetForm",
            "typeName": "amazon.datazone.DatasetFormType",
            "typeRevision": "4",
            "content": "{\"alternateIdentifiers\":[],\"datasetType\":\"TABLE\"}"
        },
        {
            "formName": "ColumnLineageForm",
            "typeName": "amazon.datazone.ColumnLineageFormType",
            "typeRevision": "5",
            "content": "{\"columns\":[{\"sourceColumns\":[{\"tableIdentifier\":\"devio.blog.lineage-demo/raw_sales\",\"transformations\":[],\"columnName\":\"region\"}],\"columnName\":\"region\"},{\"sourceColumns\":[{\"tableIdentifier\":\"devio.blog.lineage-demo/raw_sales\",\"transformations\":[],\"columnName\":\"year\"}],\"columnName\":\"year\"},{\"sourceColumns\":[{\"tableIdentifier\":\"devio.blog.lineage-demo/raw_sales\",\"transformations\":[],\"columnName\":\"amount\"}],\"columnName\":\"total_amount\"},{\"sourceColumns\":[{\"tableIdentifier\":\"devio.blog.lineage-demo/raw_sales\",\"transformations\":[],\"columnName\":\"created_at\"}],\"columnName\":\"created_at\"}]}"
        }
    ],
    "upstreamNodes": [
        {
            "id": "dm2rscxpbdzwnt"
        }
    ],
    "downstreamNodes": []
}
ColumnLineageForm に「total_amount 列は raw_sales の amount 列由来」という列レベルリネージが記録されています。列名のリネームも追跡できていることが分かります。
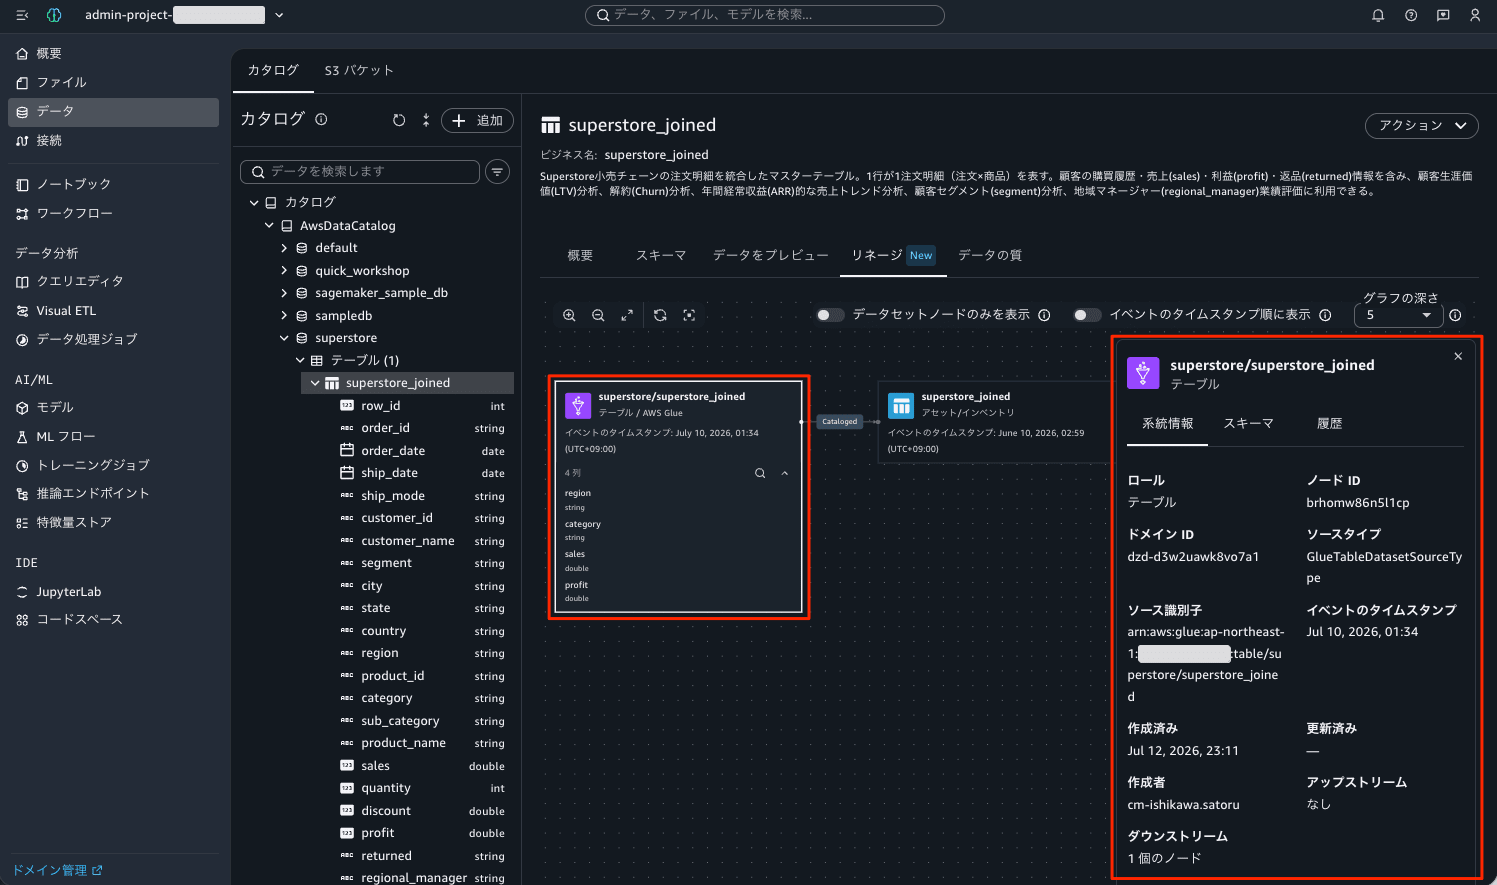
上流のノード dm2rscxpbdzwnt を辿ると、ジョブ実行ノード(amazon.datazone.JobRunLineageNodeType)で、sourceIdentifier は devio.blog.lineage-demo.transform_sales_data/03a4de9d-fdd4-46b9-8467-9aa41d6c0ce6 という <ジョブの namespace>.<ジョブ名>/<runId> 形式でした。リネージグラフの流れは下図のとおりです。
ステップ 7: SageMaker Unified Studio ポータルでリネージグラフを可視化する
次に、このリネージグラフをポータルで見てみます。ただし注意点があります。プログラマティックに投稿したリネージグラフは、グラフ内の少なくとも 1 ノードがアセットとしてカタログに存在しないと、Unified Studio の画面には表示されません。実際に、上記の合成イベントだけではポータルのどの画面からも辿れませんでした。
そこで、カタログにアセットとして存在する AWS Glue テーブル(superstore.superstore_joined)を input にしたリネージイベントを追加で投稿します。ポイントは、input データセットの namespace と name の結合が Glue テーブル ARN と一致するようにすることです。
asset_linked_event.json
{
  "producer": "https://github.com/OpenLineage/OpenLineage",
  "schemaURL": "https://openlineage.io/spec/2-0-0/OpenLineage.json#/definitions/RunEvent",
  "eventType": "COMPLETE",
  "eventTime": "2026-07-09T16:34:12Z",
  "run": { "runId": "03a4de9d-fdd4-46b9-8467-9aa41d6c0ce6" },
  "job": {
    "namespace": "devio.blog.lineage-demo",
    "name": "aggregate_superstore_sales"
  },
  "inputs": [
    {
      "namespace": "arn:aws:glue:ap-northeast-1:123456789012:table",
      "name": "superstore/superstore_joined",
      "facets": {
        "schema": {
          "_producer": "https://github.com/OpenLineage/OpenLineage",
          "_schemaURL": "https://openlineage.io/spec/facets/1-0-0/SchemaDatasetFacet.json",
          "fields": [
            { "name": "region", "type": "string" },
            { "name": "category", "type": "string" },
            { "name": "sales", "type": "double" },
            { "name": "profit", "type": "double" }
          ]
        }
      }
    }
  ],
  "outputs": [
    {
      "namespace": "devio.blog.lineage-demo",
      "name": "superstore_sales_summary",
      "facets": {
        "schema": {
          "_producer": "https://github.com/OpenLineage/OpenLineage",
          "_schemaURL": "https://openlineage.io/spec/facets/1-0-0/SchemaDatasetFacet.json",
          "fields": [
            { "name": "region", "type": "string" },
            { "name": "category", "type": "string" },
            { "name": "total_sales", "type": "double" },
            { "name": "total_profit", "type": "double" }
          ]
        },
        "columnLineage": {
          "_producer": "https://github.com/OpenLineage/OpenLineage",
          "_schemaURL": "https://openlineage.io/spec/facets/1-0-1/ColumnLineageDatasetFacet.json",
          "fields": {
            "region": { "inputFields": [ { "namespace": "arn:aws:glue:ap-northeast-1:123456789012:table", "name": "superstore/superstore_joined", "field": "region" } ] },
            "category": { "inputFields": [ { "namespace": "arn:aws:glue:ap-northeast-1:123456789012:table", "name": "superstore/superstore_joined", "field": "category" } ] },
            "total_sales": { "inputFields": [ { "namespace": "arn:aws:glue:ap-northeast-1:123456789012:table", "name": "superstore/superstore_joined", "field": "sales" } ] },
            "total_profit": { "inputFields": [ { "namespace": "arn:aws:glue:ap-northeast-1:123456789012:table", "name": "superstore/superstore_joined", "field": "profit" } ] }
          }
        }
      }
    }
  ]
}
この更新した JSON を PostLineageEvent API にPOSTします。AWS CLI v2 のデフォルトでは blob 型パラメータが base64 として解釈されるため、--cli-binary-format raw-in-base64-out を付けると成功しました。
% aws datazone post-lineage-event \
    --domain-identifier dzd-d3w2uawk8vo7a1 \
    --cli-binary-format raw-in-base64-out \
    --event file://asset_linked_event.json
{
    "id": "68i0e3q37dzcpl",
    "domainId": "dzd-d3w2uawk8vo7a1"
}
POST後、アセットの sourceIdentifier と一致したことで自動リンクされ、データセットノードの downstream にアセットノードが接続されました。
ポータルでデータエクスプローラーから対象テーブルを開くと、「リネージ」タブ(New バッジ付き)が追加されており、リネージグラフが表示されました。
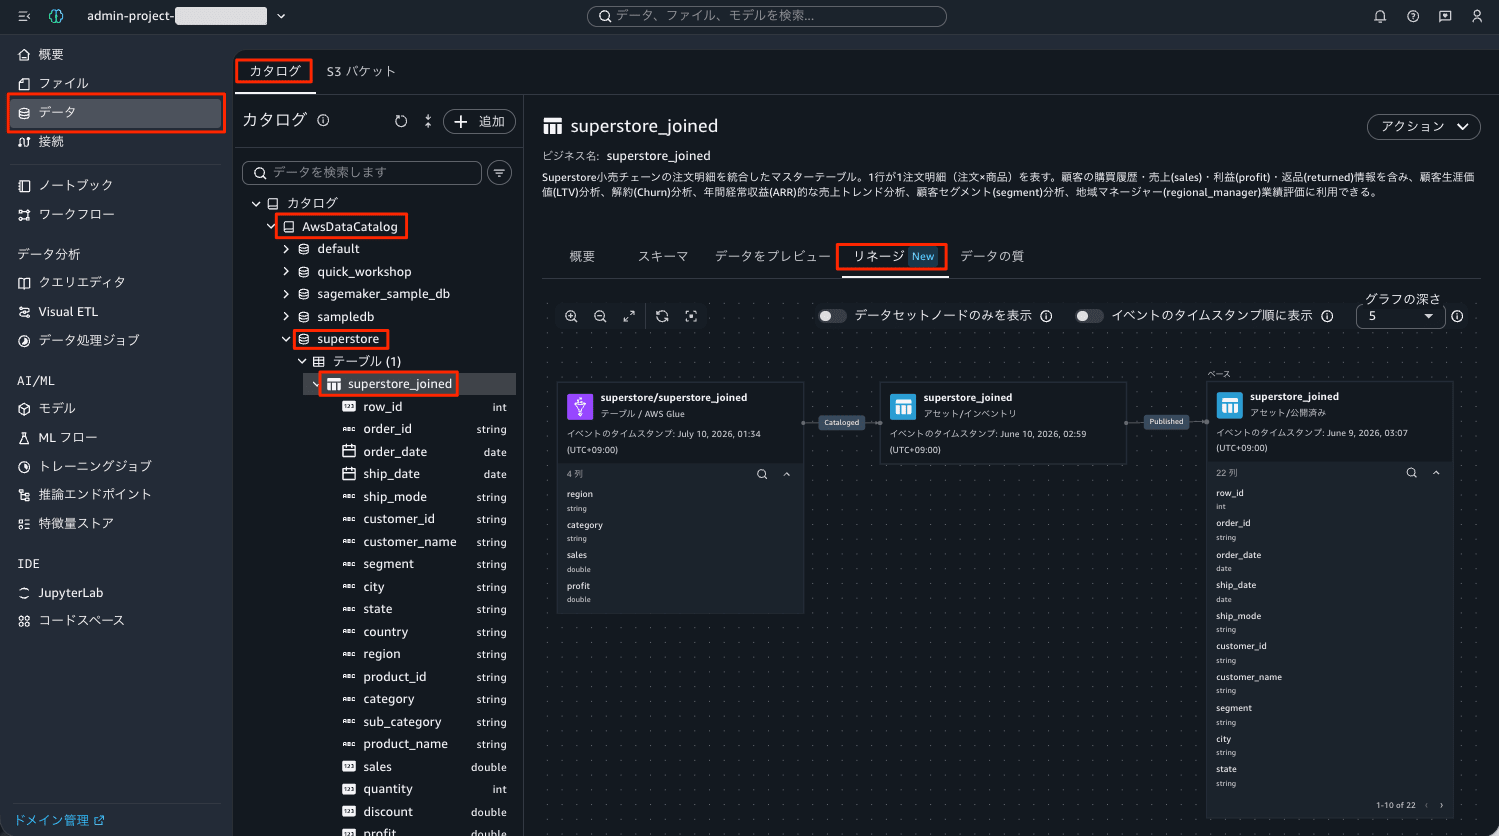
リネージタブでは、ドキュメントに記載のとおり以下の操作ができました。
- 「データセットノードのみを表示」トグル: ジョブ・ジョブ実行ノードを隠したシンプル表示
- 「イベントのタイムスタンプ順に表示」トグル: 列レベルリネージを含む詳細表示(Event Timestamp モード)
- 「グラフの深さ」セレクタ: 上流・下流を辿る深さを 1〜5 ホップで調整
- ノードクリックで詳細パネル(リネージ情報 / スキーマ / 履歴)を表示。ノード ID や sourceIdentifier は CLI の結果と一致
- ノードの展開アイコンで、グラフ内に列リストを表示
考察
検証を通して得られた知見をまとめます。
- IAM ベースドメイン(singleSignOn: DISABLED の V2 ドメイン)で、OpenLineage 互換のリネージイベントの投稿・取得・可視化・削除が一通り動作しました
--eventは blob 型パラメータのため、AWS CLI からは--cli-binary-format raw-in-base64-outの指定が必要です- ポータルでリネージグラフを表示するには、グラフ内の少なくとも 1 ノードがカタログのアセットである必要があります。dataset の namespace / name を Glue テーブル ARN の形式に合わせると、既存アセットに自動リンクされます
- 列レベルリネージは columnLineage facet で表現し、
ColumnLineageFormとして保存されます。列名のリネーム(amount → total_amount)も追跡できました - DeleteLineageEvent は非同期削除(DELETE_PENDING を経由)で、イベントに紐づくリネージノードも削除されます
- dbt や Apache Airflow など OpenLineage 対応ツールからのイベント連携も同じ API で実現できるため、Unified Studio の外で動くパイプラインのリネージも統合管理できそうです
最後に
Amazon SageMaker Unified Studio の IAM ベースドメインでデータリネージが利用可能になったことで、IdC(SSO)を構成していない環境でも、データの来歴追跡や影響分析ができるようになりました。PostLineageEvent API に OpenLineage イベントを送るだけでリネージグラフが構築でき、アセットと自動リンクされる仕組みも素直で扱いやすい印象です。
IAM 認証で SageMaker Unified Studio を運用している方は、まずは AWS Glue や Visual ETL の自動キャプチャから、次に独自パイプラインのプログラマティック連携へと段階的に試してみてはいかがでしょうか。この記事がどなたかのお役に立てば幸いです。