
Amazon Bedrock AgentCore GatewayのTargetにAgentCore RuntimeにデプロイしたMCP Serverを指定してみた
こんにちは、スーパーマーケットが大好きなコンサルティング部の神野です。
早速ですが、みなさんAgentCore GatewayのTargetにAgentCore RuntimeにホストしたMCP Serverを指定したことがありますか?
AWSの公式サンプルを見ると選択肢として指定できるのはわかりますが、どういった構成で実現できるのかは図をかいて理解してみたいと思い本記事を書いてみました。
AgentCore Gateway
改めてGatewayについておさらいですが、GatewayのTargetは以下を選択可能です。
Gatewayを介して外部サービスをMCPツールとして使用でき、中央集約可能にします。

- Lambda関数
- OpenAPI仕様のAPI
- API Gateway
- 統合サービス(SlackやGitHubなど)
- Smithyモデル
- MCP Server
この中でMCP Serverも指定できるので、RuntimeにデプロイしたMCP ServerもGateway経由で使用できると理解できます。ただ注意としてRuntimeのInbound AuthはIAMかJWTの認証に限定されて、GatewayのOutbound AuthはNo AuthかJWTしか選べません。パズルみたいな組み合わせですね・・・
それぞれの取りうる選択肢を見ていきます。
RuntimeのInbound Authの選択肢
公式ドキュメントからまとめるとIAM SigV4とJWT Bearer Tokenが選択可能です。
認証なしの選択肢はないので注意が必要です。
| 認証方式 | 説明 |
|---|---|
| IAM SigV4 | デフォルトの認証方式。追加設定なしで他のAWS APIと同様に動作 |
| JWT Bearer Token | OpenID Connect準拠のJWTトークンによる認証。Discovery URL、許可するaudience/client/scopeを設定 |
RuntimeはIAM SigV4とJWT Bearer Tokenのどちらか一方のみ設定可能で、
両方を同時に使用することはできません。
GatewayのOutbound Authの選択肢
こちらも公式ドキュメントから引用してみてみます。
| Target type | No authorization | Gateway service role | OAuth (client credentials) | OAuth (authorization code) | API key |
|---|---|---|---|---|---|
| API Gateway stage | No | Yes | No | No | Yes |
| Lambda function | No | Yes | No | No | No |
| MCP server | Yes | No | Yes | No | No |
| OpenAPI schema | No | No | Yes | Yes | Yes |
| Smithy schema | No | Yes | Yes | Yes | No |
MCP ServerをTargetにした場合、Outbound Authはclient_credentials(M2M認証)のみ対応で、
authorization_code(ユーザー委任型の3LO)は使えない点に注意が必要です。
Gateway もRuntimeもAWS上のサービスなので、一番楽なのはIAM認証(Gateway service role)できれば良いのですが、
GatewayのOutbound Authが対応していないので、JWT認証になりそうです。この場合はM2M認証で下記のようなフローになってきます。

若干複雑ですね。今回はこの構成をTerraformでサクッと作ってGateway経由でRuntimeにデプロイしたMCP Serverを活用してみます。
システム構成図
今回は下記のような構成でTerraformで作成します。
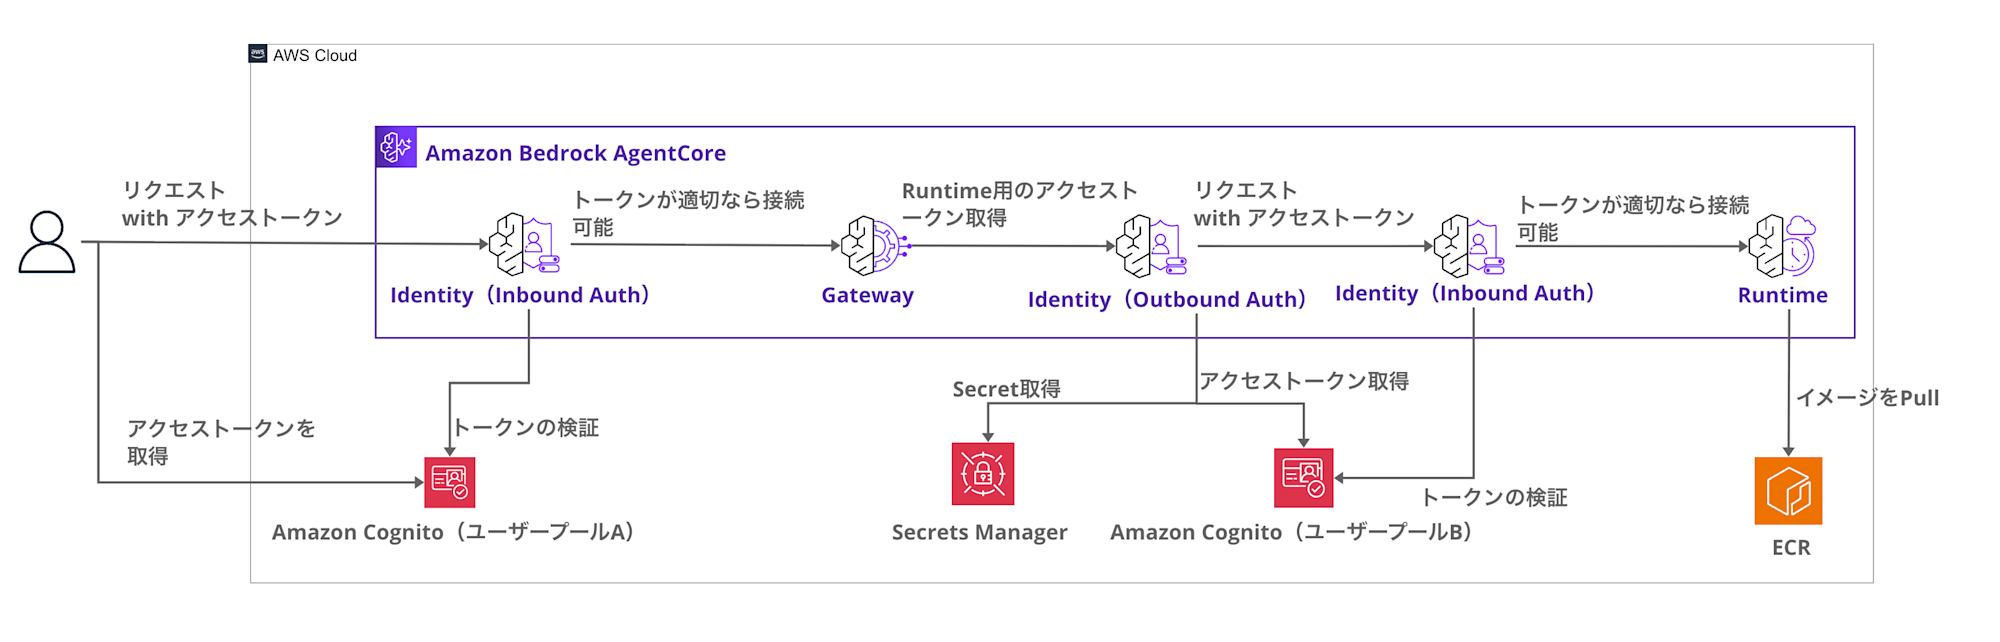
ポイントとしては、RuntimeをJWTでGatewayとのM2M認証を行うことです。
RuntimeをTargetにした場合、現時点ではユーザー委任型の認証やIAMでの認証ができないため選択としてはM2Mの選択肢になるかと思います。
2つCognitoのユーザープールが出てくるのでそれぞれの役割を整理しておきます。
| 観点 | Cognito User Pool A (Inbound) | Cognito User Pool B (Outbound) |
|---|---|---|
| 目的 | ユーザー認証 | サービス間認証 |
| 認証フロー | ユーザーパスワード認証(USER_PASSWORD_AUTH) | M2M認証(client_credentials) |
| Client Secret | なし(公開クライアント) | あり(機密クライアント) |
| 主体 | ユーザー | Gateway(マシン) |
ユーザー認証とM2M認証では要件が異なるため、ユーザープールを分離しています。
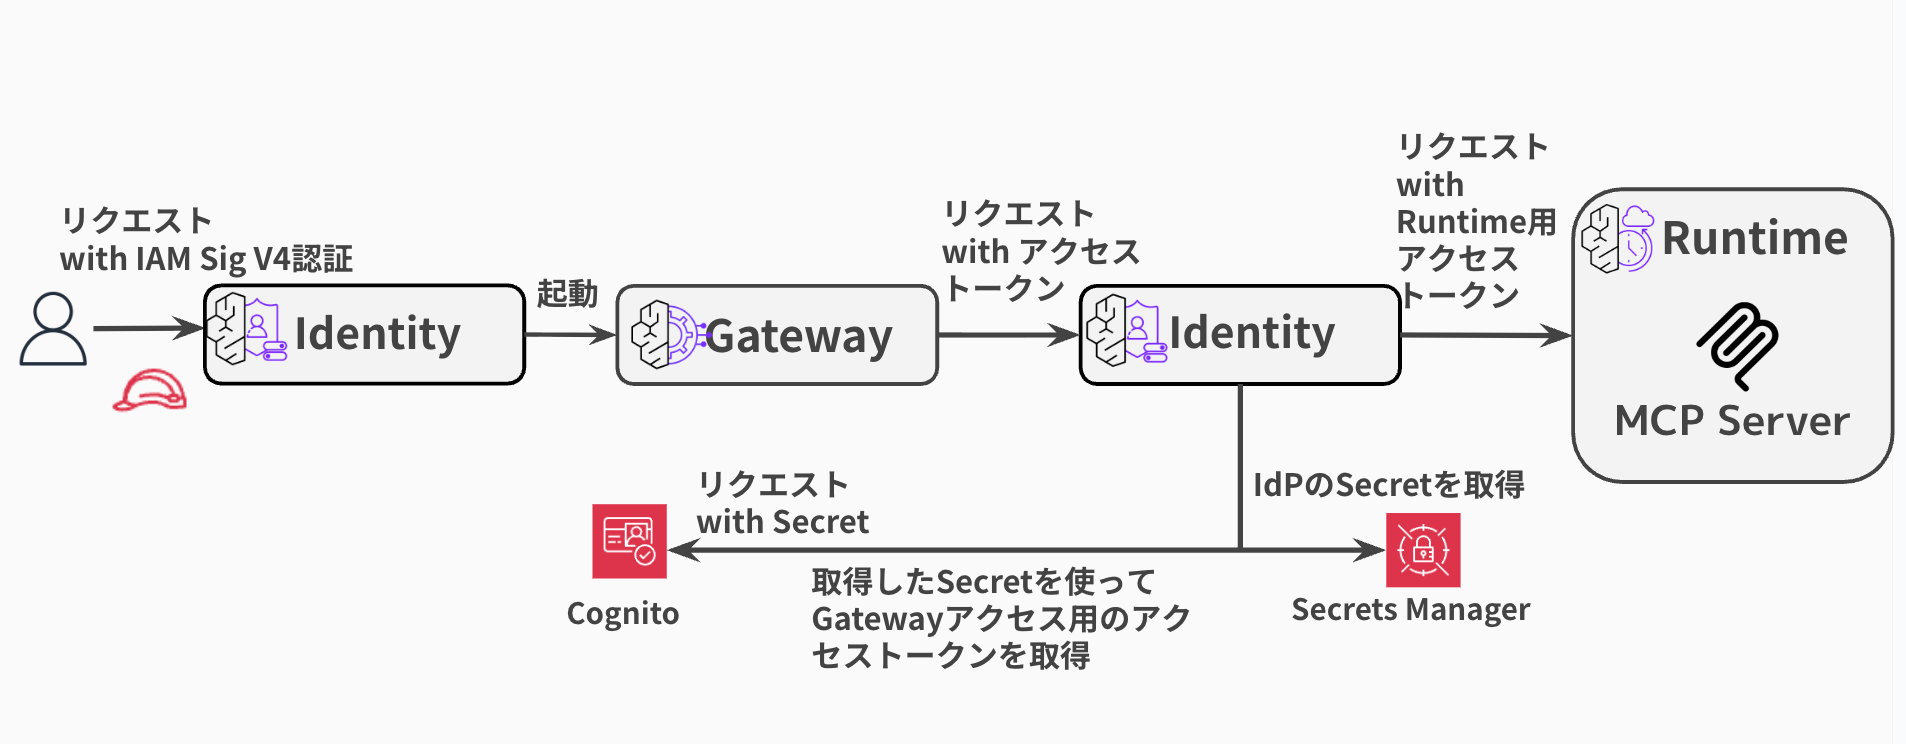
補足:GatewayのInbound AuthにIAMを使用する
今回はGateway の Inbound Auth でJWTを使用しますが、アクセストークンの払い出しが煩わしい場合は、下記ブログのようにInbound Auth はIAMで実現するのも良いかと思います。ただこちらとしてもAWS アカウントを持たないユーザーの利用や、非エンジニアへの展開などの課題があるかと思いますが選択肢としては考えられるかと思います。
構成としては下記のようになります。
構築するMCP Server
簡単なMCP Serverを作成します。
from mcp.server.fastmcp import FastMCP

mcp = FastMCP(host="0.0.0.0", stateless_http=True)

@mcp.tool()
def add_numbers(a: int, b: int) -> int:
    """Add two numbers together"""
    return a + b

@mcp.tool()
def multiply_numbers(a: int, b: int) -> int:
    """Multiply two numbers together"""
    return a * b

@mcp.tool()
def greet_user(name: str) -> str:
    """Greet a user by name"""
    return f"Hello, {name}! Nice to meet you."

if __name__ == "__main__":
    mcp.run(transport="streamable-http")
FastMCPを使用したシンプルなMCP Serverです。3つのツール(add_numbers, multiply_numbers, greet_user)を定義しています。
このMCP ServerをRuntimeにホストしてローカル環境から呼び出して使用してみます。
早速やってみる
サンプルコードは下記リポジトリに置いています。全体を確認したい際は下記を参照ください。
今回のポイントとなるGateway TargetのTerraformコードを見てみます。
resource "aws_bedrockagentcore_gateway_target" "mcp_server" {
  name               = "${var.project_name}-mcp-target"
  gateway_identifier = aws_bedrockagentcore_gateway.main.gateway_id

  # Outbound Authentication: OAuth M2M (client_credentials)
  credential_provider_configuration {
    oauth {
      provider_arn = aws_bedrockagentcore_oauth2_credential_provider.m2m.credential_provider_arn
      scopes = [
        "${aws_cognito_resource_server.mcp.identifier}/tools.read",
        "${aws_cognito_resource_server.mcp.identifier}/tools.write",
        "${aws_cognito_resource_server.mcp.identifier}/tools.execute"
      ]
    }
  }

  # Target Configuration: MCP Server
  target_configuration {
    mcp {
      mcp_server {
        endpoint = "https://bedrock-agentcore.${data.aws_region.current.name}.amazonaws.com/runtimes/${urlencode(aws_bedrockagentcore_agent_runtime.mcp_server.agent_runtime_arn)}/invocations"
      }
    }
  }
}
credential_provider_configurationでM2M認証の設定を行い、
target_configurationでRuntimeのエンドポイントを指定しています。
Gateway Targetで参照しているCredential Providerは下記のように定義しています。
resource "aws_bedrockagentcore_oauth2_credential_provider" "m2m" {
  name                       = "${var.project_name}-m2m-oauth2-provider"
  credential_provider_vendor = "CustomOauth2"

  oauth2_provider_config {
    custom_oauth2_provider_config {
      client_id     = aws_cognito_user_pool_client.m2m.id
      client_secret = aws_cognito_user_pool_client.m2m.client_secret

      oauth_discovery {
        discovery_url = "https://cognito-idp.${data.aws_region.current.name}.amazonaws.com/${aws_cognito_user_pool.outbound.id}/.well-known/openid-configuration"
      }
    }
  }
}
CognitoのクライアントIDとシークレットを設定し、Discovery URLを指定しています。
GatewayはこのCredential Providerを使ってM2Mトークンを取得し、Runtimeへのリクエストに付与します。
前提
本記事で利用したバージョンは下記の通りです。
- macOS 26.1
- Terraform v1.11.4
- AWS CLI 2.28.8
- Docker 29.0.2
- AWS Provider 6.27.0
- リージョン:us-east-1
リポジトリのクローン
まずはリポジトリをクローンします。
git clone https://github.com/yuu551/agentcore-gateway-runtime-m2m-auth-demo.git
cd agentcore-gateway-runtime-m2m-auth-demo
デプロイ
Terraformで一発デプロイします。
terraform init
terraform apply --auto-approve
terraform applyで以下がすべて作成されます。
- Cognito ユーザープール A (Inbound Auth用)
- Cognito ユーザープール B (Outbound Auth用)
- ECR Repository + Docker Image Build & Push
- AgentCore Identity (Credential Provider)
- AgentCore Runtime (MCP Server)
- AgentCore Gateway + Target
Dockerイメージのビルド&プッシュも自動実行されます。
実行が完了したらCognitoのユーザーを作成し、トークンを発行してGateway経由でリクエストを送ってみます。
テストユーザー作成
Gateway呼び出し用のテストユーザーを作成します。
INBOUND_USER_POOL_ID=$(terraform output -raw inbound_user_pool_id)
INBOUND_CLIENT_ID=$(terraform output -raw inbound_client_id)
export AWS_REGION=us-east-1

aws cognito-idp admin-create-user \
  --user-pool-id $INBOUND_USER_POOL_ID \
  --username test-user \
  --temporary-password 'TempPass123!' \
  --message-action SUPPRESS

aws cognito-idp admin-set-user-password \
  --user-pool-id $INBOUND_USER_POOL_ID \
  --username test-user \
  --password 'TestPass123!' \
  --permanent
ユーザートークン取得
ユーザーを作成したら、IDとパスワードで認証を行なってアクセストークンを取得します。
TOKEN=$(aws cognito-idp initiate-auth \
  --client-id $INBOUND_CLIENT_ID \
  --auth-flow USER_PASSWORD_AUTH \
  --auth-parameters USERNAME=test-user,PASSWORD='TestPass123!' \
  --query 'AuthenticationResult.AccessToken' \
  --output text)
Gateway経由でMCP Serverにアクセス
いよいよGateway経由でRuntimeのMCP Serverにアクセスしてみます!
tools/list
まずは利用可能なツール一覧を取得します。
GATEWAY_URL=$(terraform output -raw gateway_url)

curl -X POST "$GATEWAY_URL" \
  -H "Authorization: Bearer $TOKEN" \
  -H "Content-Type: application/json" \
  -H "Accept: application/json, text/event-stream" \
  -d '{"jsonrpc":"2.0","id":1,"method":"tools/list"}' | jq
{
  "jsonrpc": "2.0",
  "id": 1,
  "result": {
    "tools": [
      {
        "inputSchema": {
          "type": "object",
          "properties": {
            "query": {
              "type": "string"
            }
          },
          "required": ["query"]
        },
        "name": "x_amz_bedrock_agentcore_search",
        "description": "A special tool that returns a trimmed down list of tools given a context. Use this tool only when there are many tools available and you want to get a subset that matches the provided context."
      },
      {
        "inputSchema": {
          "type": "object",
          "properties": {
            "a": { "type": "integer" },
            "b": { "type": "integer" }
          },
          "required": ["a", "b"]
        },
        "name": "m2m-auth-demo-mcp-target___add_numbers",
        "description": "Add two numbers together"
      },
      {
        "inputSchema": {
          "type": "object",
          "properties": {
            "name": { "type": "string" }
          },
          "required": ["name"]
        },
        "name": "m2m-auth-demo-mcp-target___greet_user",
        "description": "Greet a user by name"
      },
      {
        "inputSchema": {
          "type": "object",
          "properties": {
            "a": { "type": "integer" },
            "b": { "type": "integer" }
          },
          "required": ["a", "b"]
        },
        "name": "m2m-auth-demo-mcp-target___multiply_numbers",
        "description": "Multiply two numbers together"
      }
    ]
  }
}
定義した3つのツールに加えてGatewayの検索ツール(x_amz_bedrock_agentcore_search)も含め、計4つ取得できました!
次は実際にツールを呼び出してみます。
tools/call (add_numbers)
足し算のMCPツールを呼び出してみます。
curl -X POST "$GATEWAY_URL" \
  -H "Authorization: Bearer $TOKEN" \
  -H "Content-Type: application/json" \
  -H "Accept: application/json, text/event-stream" \
  -d '{
    "jsonrpc":"2.0",
    "id":2,
    "method":"tools/call",
    "params":{
      "name":"m2m-auth-demo-mcp-target___add_numbers",
      "arguments":{"a": 5, "b": 3}
    }
  }' | jq
{
  "jsonrpc": "2.0",
  "id": 2,
  "result": {
    "content": [
      {
        "type": "text",
        "text": "8"
      }
    ],
    "isError": false,
    "structuredContent": {
      "result": 8
    }
  }
}
問題なく動作していますね!
もう一つのMCPツールも試してみます。
tools/call (greet_user)
名前に応じて簡単な挨拶を返すツールです。
curl -X POST "$GATEWAY_URL" \
  -H "Authorization: Bearer $TOKEN" \
  -H "Content-Type: application/json" \
  -H "Accept: application/json, text/event-stream" \
  -d '{
    "jsonrpc":"2.0",
    "id":3,
    "method":"tools/call",
    "params":{
      "name":"m2m-auth-demo-mcp-target___greet_user",
      "arguments":{"name": "Alice"}
    }
  }' | jq
{
  "jsonrpc": "2.0",
  "id": 3,
  "result": {
    "content": [
      {
        "type": "text",
        "text": "Hello, Alice! Nice to meet you."
      }
    ],
    "isError": false,
    "structuredContent": {
      "result": "Hello, Alice! Nice to meet you."
    }
  }
}
こちらもレスポンス返却されました!
無事Gateway経由でRuntimeのMCP Serverにアクセスできました!!よかった!!
気になったポイント
検証する中で個人的に気になったポイントを書いておきます。
Gateway TargetのエンドポイントURL形式
Gateway TargetにRuntimeを指定する際、エンドポイントURLの形式に注意が必要です。
# ARNベースのURL
endpoint = "https://bedrock-agentcore.${region}.amazonaws.com/runtimes/${urlencode(runtime_arn)}/invocations"
ARNをURLエンコードして指定する必要がありますし、エンドポイントは/invocationsで問題ないです。
最初/mcpだと思い込んでいたので少しハマりました・・・下記ドキュメントに呼び出し方法など書いてあるので参考になります。
GatewayサービスロールのIAMポリシー
M2M認証を使用する場合、GatewayサービスロールのIAMポリシー設定に注意が必要です。GetResourceOauth2TokenやGetSecretValueのリソース指定が不十分だとtools/callでエラーになります。
詳細な権限について知りたい場合は以下のドキュメントを参照してください。
サンプルなので緩めな権限ですが、今回は下記権限を付与しています。
iam.tf(クリックで展開)
resource "aws_iam_role_policy" "gateway_identity" {
  name = "${var.project_name}-gateway-identity-policy"
  role = aws_iam_role.gateway.id

  policy = jsonencode({
    Version = "2012-10-17"
    Statement = [
      {
        Sid    = "GetWorkloadAccessToken"
        Effect = "Allow"
        Action = [
          "bedrock-agentcore:GetWorkloadAccessToken"
        ]
        Resource = [
          "arn:aws:bedrock-agentcore:${data.aws_region.current.name}:${data.aws_caller_identity.current.account_id}:workload-identity-directory/default",
          "arn:aws:bedrock-agentcore:${data.aws_region.current.name}:${data.aws_caller_identity.current.account_id}:workload-identity-directory/default/workload-identity/${var.project_name}-*"
        ]
      },
      {
        Sid    = "GetResourceOauth2Token"
        Effect = "Allow"
        Action = [
          "bedrock-agentcore:GetResourceOauth2Token"
        ]
        Resource = [
          "arn:aws:bedrock-agentcore:${data.aws_region.current.name}:${data.aws_caller_identity.current.account_id}:workload-identity-directory/default",
          "arn:aws:bedrock-agentcore:${data.aws_region.current.name}:${data.aws_caller_identity.current.account_id}:workload-identity-directory/default/workload-identity/*",
          "arn:aws:bedrock-agentcore:${data.aws_region.current.name}:${data.aws_caller_identity.current.account_id}:token-vault/default",
          "arn:aws:bedrock-agentcore:${data.aws_region.current.name}:${data.aws_caller_identity.current.account_id}:token-vault/default/oauth2credentialprovider/*"
        ]
      },
      {
        Sid    = "GetSecretValue"
        Effect = "Allow"
        Action = [
          "secretsmanager:GetSecretValue"
        ]
        Resource = [
          "arn:aws:secretsmanager:${data.aws_region.current.name}:${data.aws_caller_identity.current.account_id}:secret:bedrock-agentcore*"
        ]
      }
    ]
  })
}
GetResourceOauth2TokenはOAuth2のトークン取得、GetSecretValueはSecrets Managerに保存されたクライアントシークレットの取得に必要です。
おわりに
AgentCore GatewayのTargetにAgentCore RuntimeのMCP Serverを指定する構成を試してみました!
認証が若干複雑なように感じましたね・・・小規模なエージェントならエージェントのツールとして使ったり、Lambda関数をターゲットにした方がやりやすいケースがあるかもしれないですね。
またGatewayへはIAM認証を活用して接続するのも手かと思います。
本記事が少しでも参考になりましたら幸いです。
最後までご覧いただきありがとうございました!


