Amplify Hostingを使用してGitHubリポジトリのコンテンツを公開してみた with ベーシック認証
この記事は公開されてから1年以上経過しています。情報が古い可能性がありますので、ご注意ください。
AWS事業本部 梶原@福岡オフィスです。
Amplify Hostingを使用してGitHubリポジトリに置かれているWebコンテンツを公開する手順を詳しく説明します。
目次
- GitHubのPAT(Personal Access Token)を取得する
- CloudFormationでAmplifyの環境を構築する
- 構築したサイトの表示確認、ベーシック認証有
1. GitHubのPAT(Personal Access Token)を取得する
まず、GitHubのリポジトリにアクセスするためのPAT(Personal Access Token)を取得します。
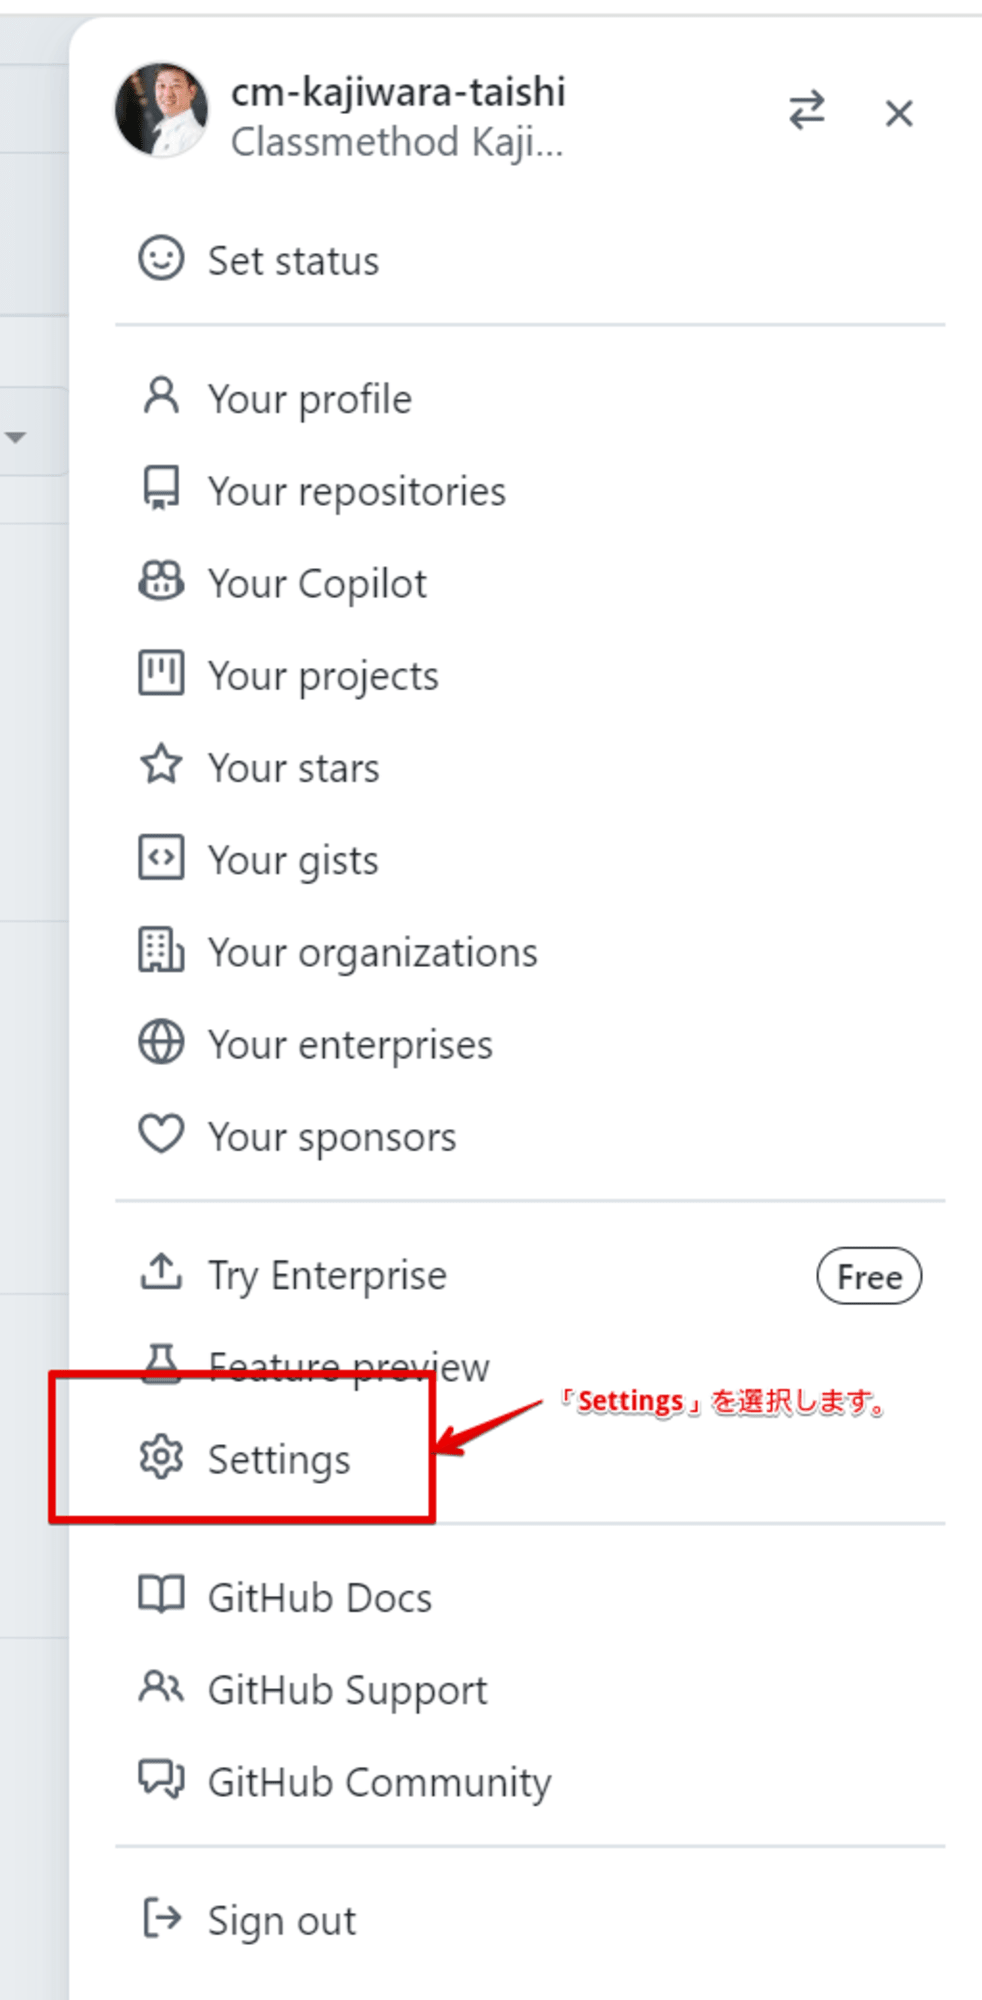
ステップ 1: GitHubにログイン
- GitHubのアカウントにログインします。
- 右上のプロフィールアイコンをクリックし、「Settings」を選択します。
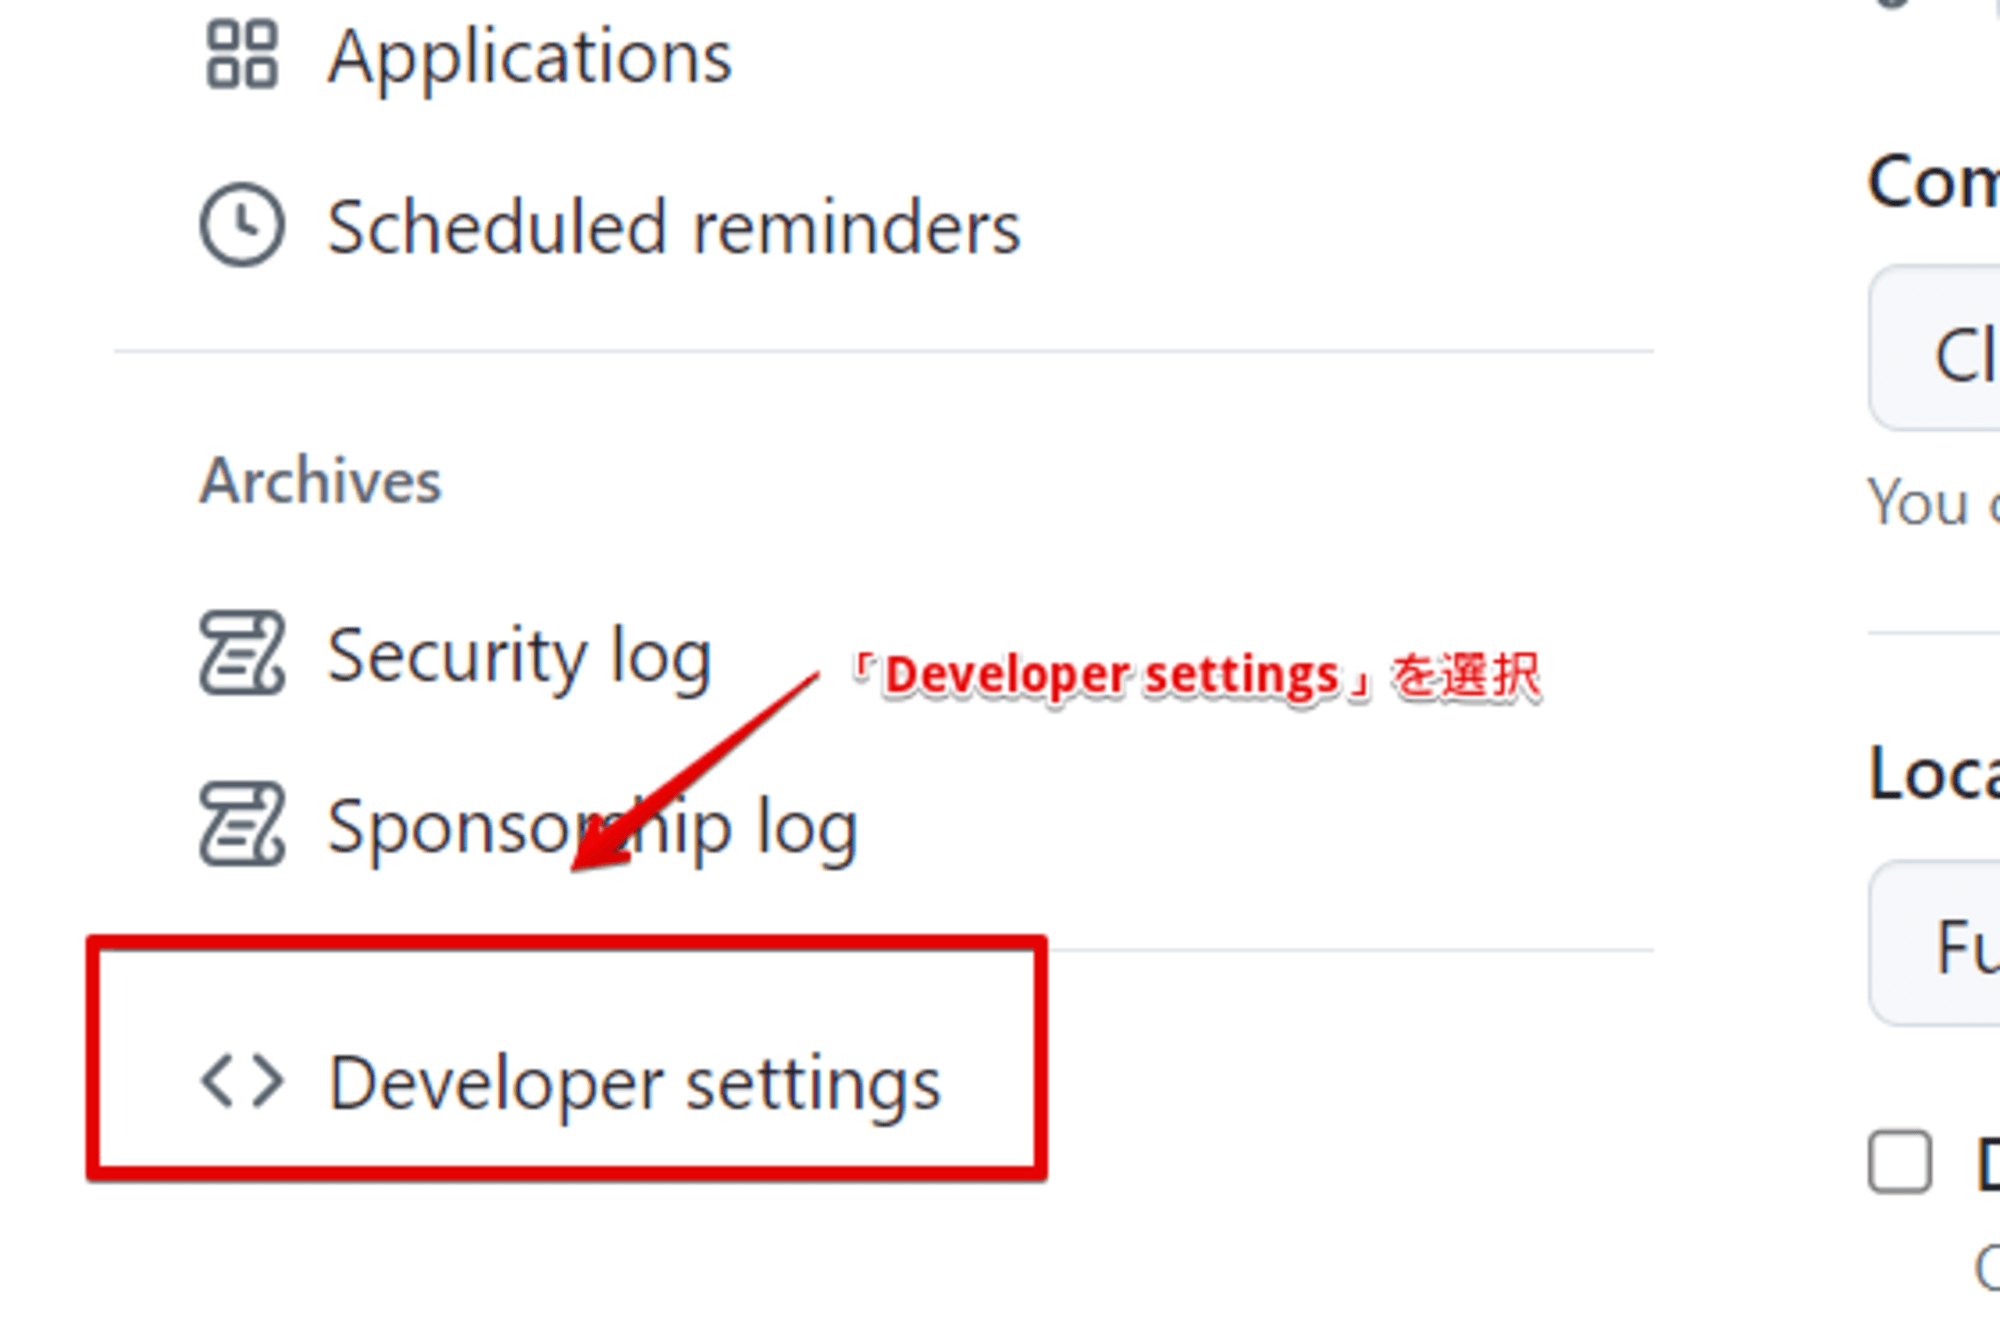
ステップ 2: トークンの生成
- 左側のメニューから「Developer settings」を選択します。
- 次に「Personal access tokens」を選択し、「Generate new token」をクリックします。

ステップ 3: トークンの設定
- トークンに名前を付け、必要な権限を選択します。今回はリポジトリへのアクセスが必要なので、「Repository access」で公開したいコンテンツが保存されているリポジトリを選択してください
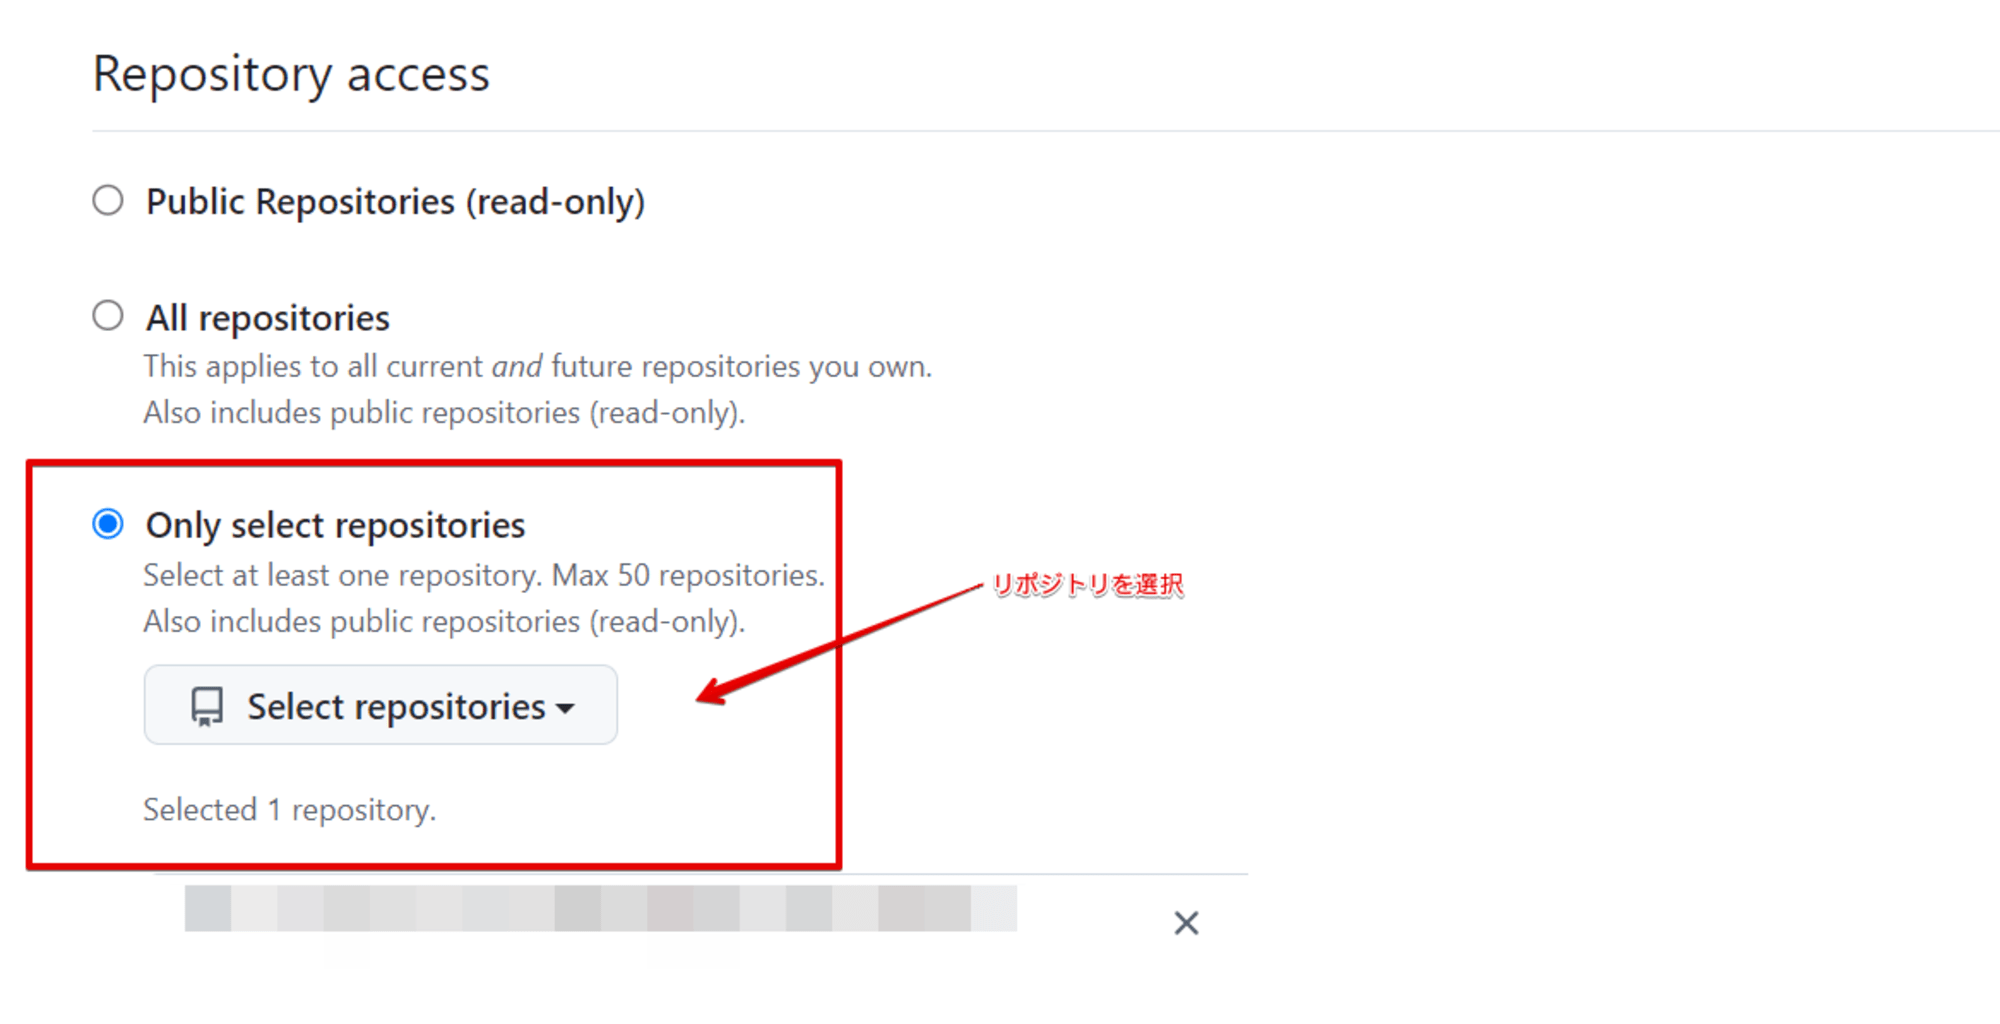
※コンテンツのリポジトリを後から作成する場合、またアクセストークンを複数のリポジトリで使用する場合は「All repositories」を選択してください
-
Permissions ではWebhooksの Read And Write権限を選択してください

-
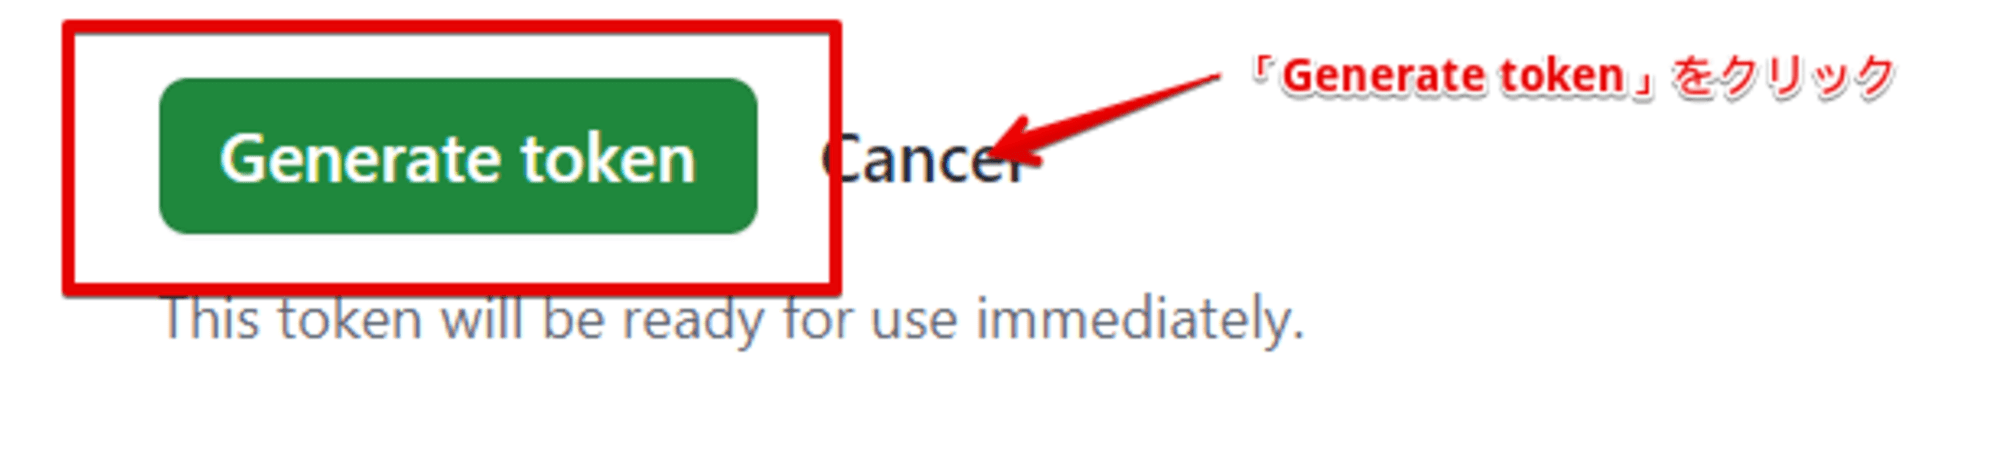
「Generate token」をクリックしてトークンを生成します。
ステップ 4: トークンの保存
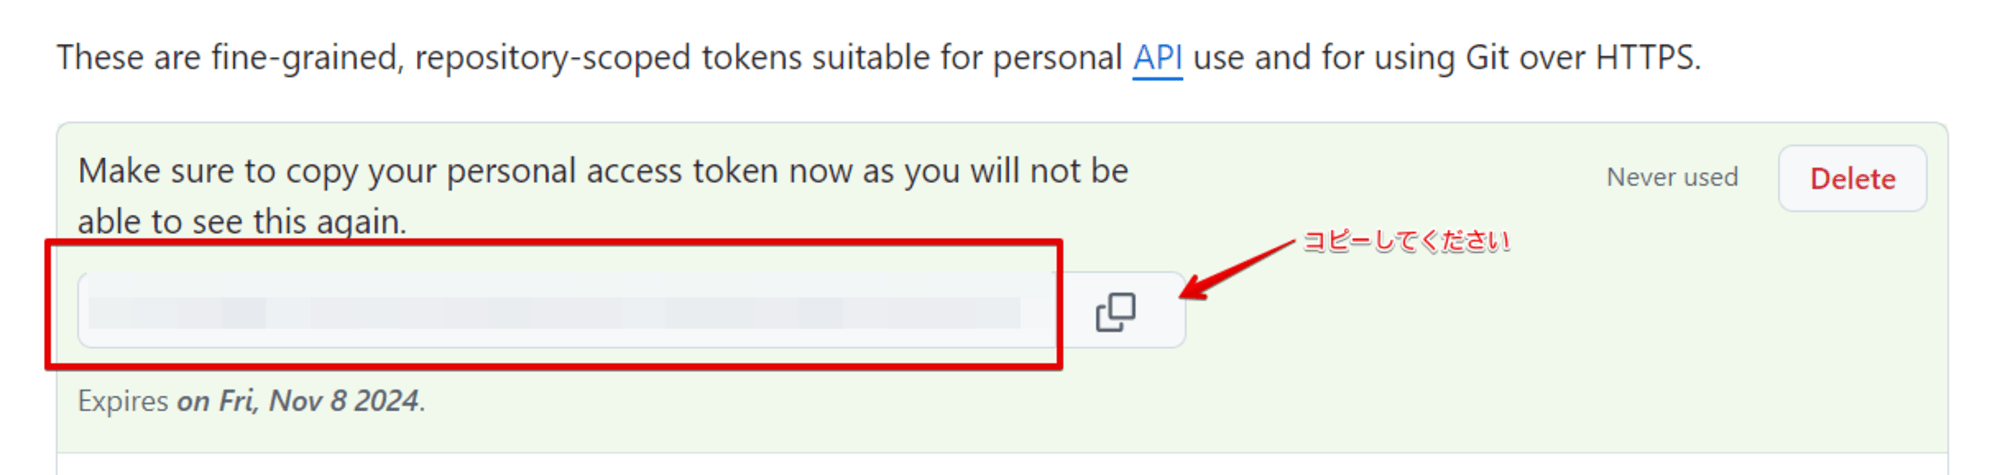
- 生成されたトークンをコピーし、安全な場所に保存します。このトークンは後で必要になります。
2. CloudFormationでAmplifyの環境を構築する
次に、AWS CloudFormationを使用してAmplifyの環境を構築します。
ステップ 1: GitHubリポジトリの準備
まず、GitHubリポジトリにWebコンテンツを配置します。以下のようなディレクトリ構造を持つリポジトリを作成してください。
your-repo/
├── document_root/
│   └── index.html
└── README.md
document_root/ 配下のコンテンツが公開ディレクトリとなります。
サンプル index.html
以下は、document_root/index.htmlのサンプルコードです。
<!DOCTYPE html>
<html lang="ja">
<head>
    <meta charset="UTF-8">
    <meta name="viewport" content="width=device-width, initial-scale=1.0">
    <title>Amplify Sample Page</title>
    <style>
        body {
            font-family: Arial, sans-serif;
            text-align: center;
            margin-top: 50px;
        }
        h1 {
            color: #333;
        }
    </style>
</head>
<body>
    <h1>Amplify Hosting Sample Page</h1>
    <p>このページはAWS Amplifyを使用してホスティングされています。</p>
</body>
</html>
ステップ 2: CloudFormationテンプレートの準備
次に、以下のCloudFormationテンプレートを用意します。このテンプレートはGitHubと連携し、Amplify環境を構築します。
AWSTemplateFormatVersion: '2010-09-09'
Description: 'Amplify Gen 2 Static Website Hosting'

Parameters:
  AppName:
    Type: String
    Description: 'Name of the Amplify app'
  GitHubToken:
    Type: String
    Description: 'GitHub personal access token'
    NoEcho: true
  RepositoryUrl:
    Type: String
    Description: 'GitHub repository URL (e.g., https://github.com/username/repository-name)'
  BranchName:
    Type: String
    Default: 'main'
    Description: 'Branch name to deploy'
  BaseDirectory:
    Type: String
    Description: 'Base directory for artifacts'
    Default: 'document_root/'
  BasicAuthUsername:
    Type: String
    Description: 'Username for Basic Authentication'
    Default: 'classmethod'
  BasicAuthPassword:
    Type: String
    Description: 'Password for Basic Authentication (minimum 7 characters)'
    NoEcho: true
    MinLength: 7
    AllowedPattern: '[A-Za-z0-9!@#$%^&*()_+=-]{7,}'
    ConstraintDescription: 'Password must be at least 7 characters long and can include letters, numbers, and special characters (!@#$%^&*()_+=-)'

Resources:
  AmplifyApp:
    Type: AWS::Amplify::App
    Properties:
      Name: !Ref AppName
      Repository: !Ref RepositoryUrl
      Description: 'Amplify Gen 2 Static Website'
      Platform: WEB
      EnableBranchAutoDeletion: true
      BuildSpec: !Sub |
        version: 1
        applications:
          - frontend:
              phases:
                build:
                  commands:
                    - echo "No build required for static site"
              artifacts:
                baseDirectory: ${BaseDirectory}
                files:
                  - '**/*'
              cache:
                paths: []
      CustomRules:
        - Source: '</^[^.]+$|\\.(?!(css|gif|ico|jpg|js|png|txt|svg|woff|woff2|ttf|map|json)$)([^.]+$)/>'
          Target: '/index.html'
          Status: '200'
      AccessToken: !Ref GitHubToken
      BasicAuthConfig:
        EnableBasicAuth: true
        Username: !Ref BasicAuthUsername
        Password: !Ref BasicAuthPassword

  AmplifyBranch:
    Type: AWS::Amplify::Branch
    Properties:
      AppId: !GetAtt AmplifyApp.AppId
      BranchName: !Ref BranchName
      EnableAutoBuild: true
      Framework: WEB
      Stage: PRODUCTION
      BasicAuthConfig:
        EnableBasicAuth: true
        Username: !Ref BasicAuthUsername
        Password: !Ref BasicAuthPassword

Outputs:
  AmplifyAppId:
    Description: 'Amplify App ID'
    Value: !GetAtt AmplifyApp.AppId
  AmplifyAppDefaultDomain:
    Description: 'Amplify App Default Domain'
    Value: !GetAtt AmplifyApp.DefaultDomain
ステップ 3: CloudFormationスタックの作成
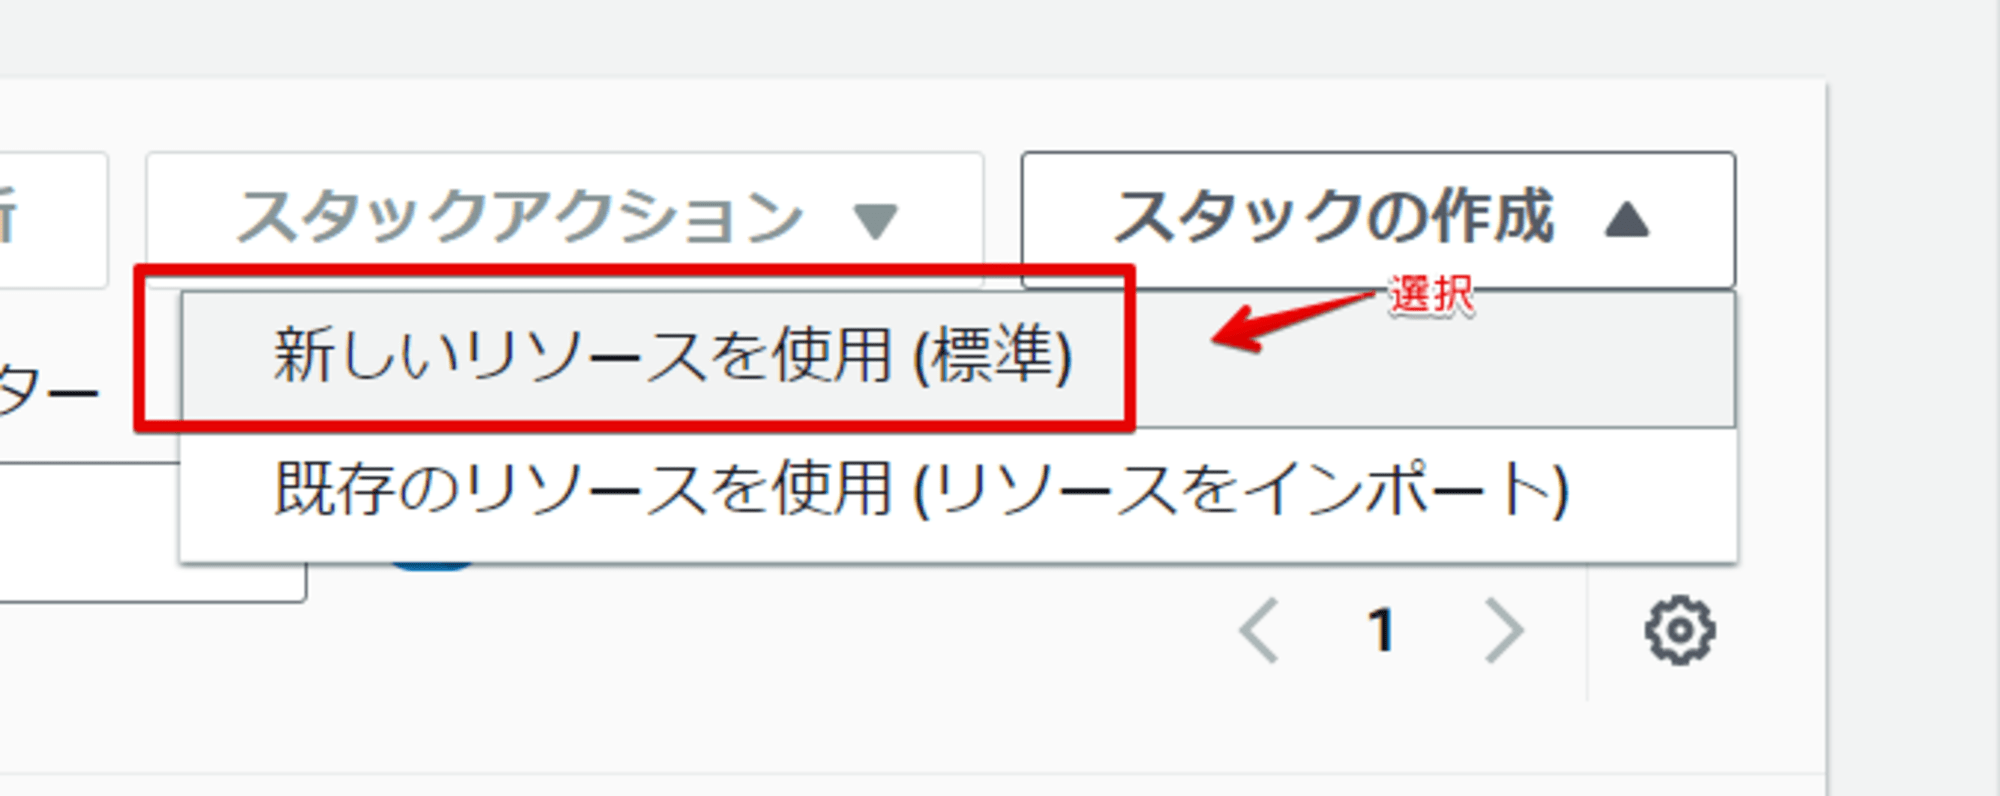
- AWSマネジメントコンソールにログインし、「CloudFormation」コンソールに移動します。
- 「スタックの作成」をクリックし、「新しいリソースを使用(標準)」を選択します。
ステップ 4: テンプレートのアップロード
- 「Template is ready」を選択し、「Upload a template file」をクリックして先ほどのテンプレートファイルをアップロードします。
ステップ 5: スタックの設定
- スタックの名前を入力し、以下のパラメータを入力します。
- AppName: Amplifyアプリケーションの名前
- GitHubToken: 先ほど取得したGitHubのPAT
- RepositoryUrl: GitHubリポジトリのURL(例:
https://github.com/username/repository-name) - BranchName: デプロイするブランチ名(デフォルトは
main) - BaseDirectory: コンテンツのベースディレクトリ(デフォルトは
document_root/) - BasicAuthUsername: Basic認証のユーザー名(デフォルトは
classmethod) - BasicAuthPassword: Basic認証のパスワード(最低7文字)
- 「Next」をクリックし、設定を確認して「Create stack」をクリックします。
ステップ 6: スタックの作成完了
- スタックの作成が完了するまで待ちます。ステータスが「CREATE_COMPLETE」となれば成功です。
3. 構築したサイトの表示確認、ベーシック認証有
CloudFormationを使用してAmplifyの環境を構築し、GitHubリポジトリのWebコンテンツをデプロイした後は、実際にサイトが正しく公開されているか確認します。
ステップ 1: Amplifyアプリケーションのデプロイ
- 作成直後の状態では、Amplifyのデプロイは行われていませんので、アプリケーションのデプロイを実施します。
ステップ 2: 表示確認&Basic認証の確認
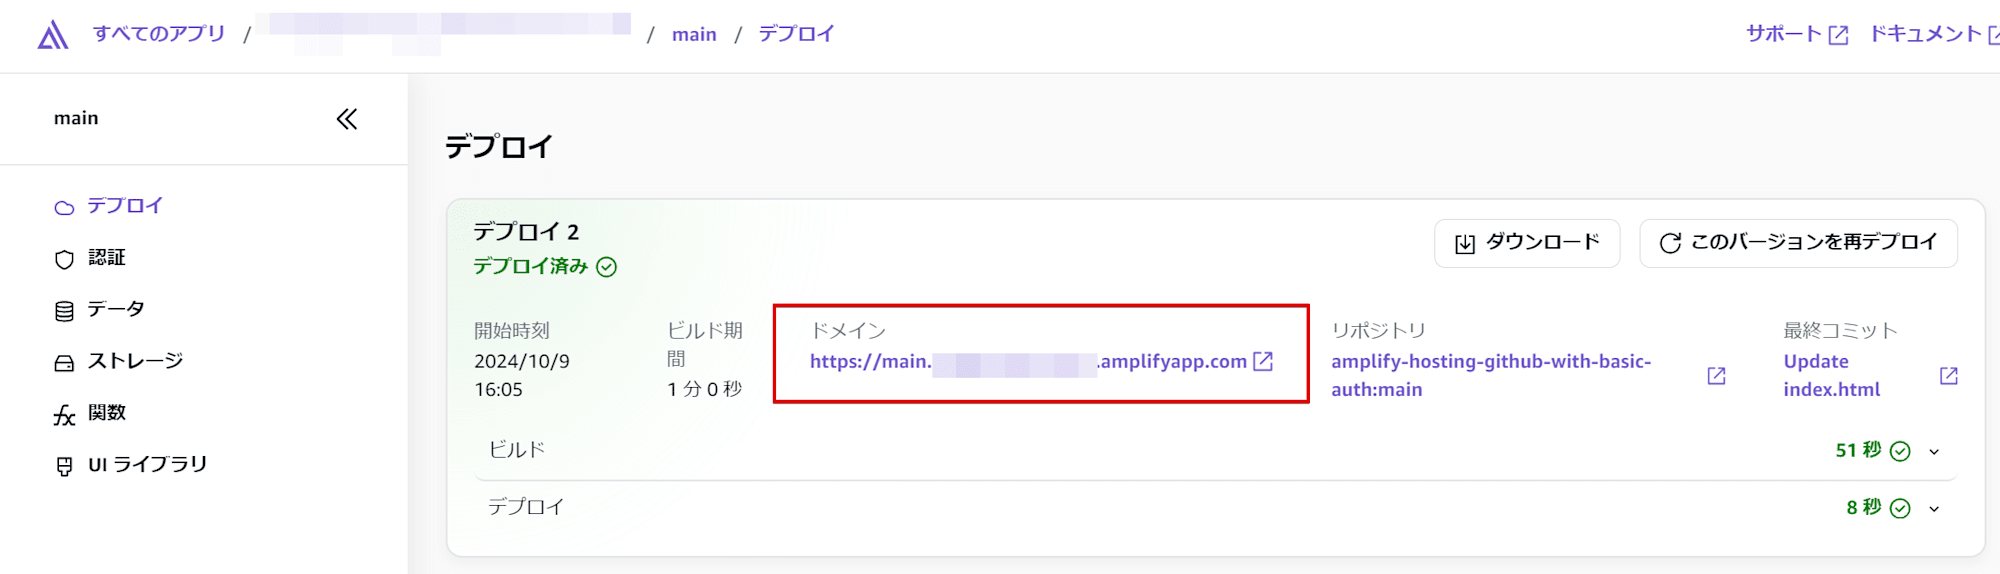
- デプロイしたドメイン(URL)をブラウザのアドレスバーに入力してアクセスします。
例:https://branchname.your-app-id.amplifyapp.com
-
Basic認証が有効になっているため、ドメインにアクセスすると認証ダイアログが表示されます。
-
CloudFormationテンプレートで指定したユーザー名とパスワードを入力してログインします。
- Username:
classmethod(デフォルト) - Password: CloudFormationテンプレートで指定したパスワード
- Username:
-
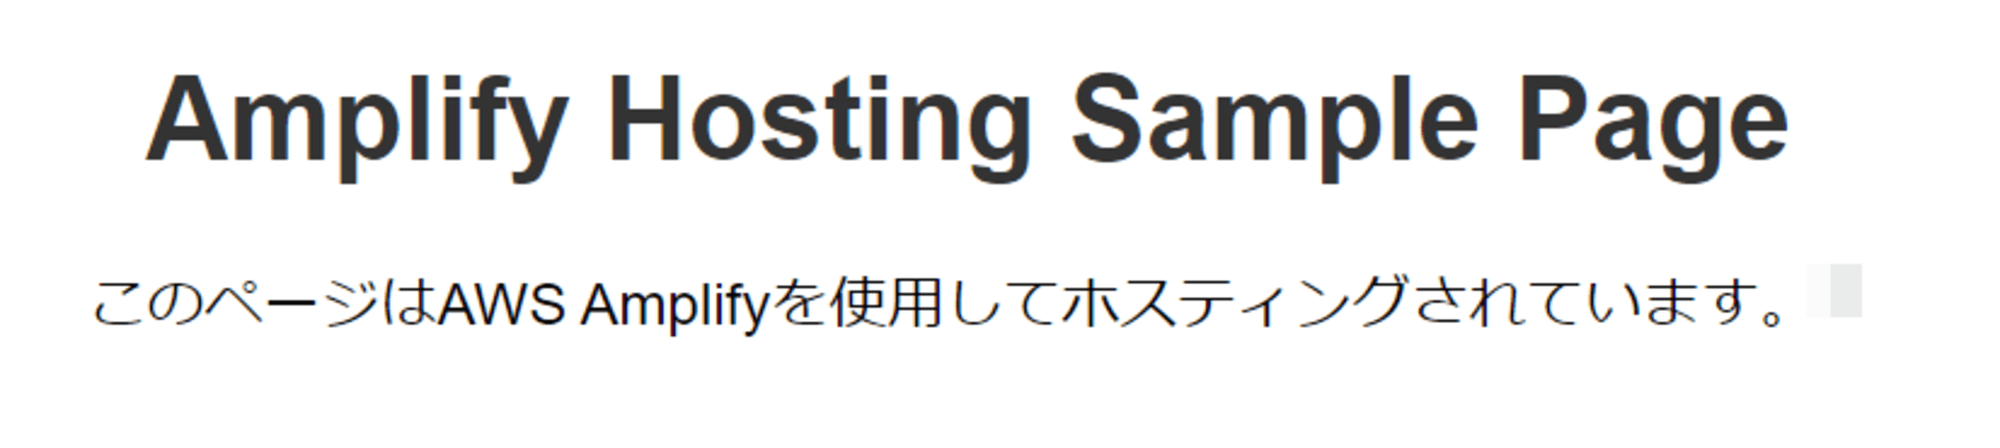
認証に成功すると、サイトのコンテンツが表示されます。
-
デプロイしたWebコンテンツ(index.html)が表示されているはずです。
ステップ 3: GitHub連携デプロイの確認
- GitHubリポジトリのコンテンツを更新し、正しく連携され、Amplifyへデプロイされているか確認します。
- Amlifyのコンソールにアクセスすると新しくデプロイが開始されています。
- リポジトリの最新のコミットが反映されていることを確認してください。
まとめ
これで、GitHubリポジトリのWebコンテンツをAmplify Hostingを使用して公開する環境が整い、サイトのアクセス確認も完了しました。Amplifyは自動的にリポジトリの変更を検知してデプロイを行います。
Basic認証を用いて、プライベートリポジトリの内容などを手軽に公開したいなどのユースケースに使えるかと思います。