EC2に起動したCisco ASAvインスタンスをASDMから操作する
この記事は公開されてから1年以上経過しています。情報が古い可能性がありますので、ご注意ください。

こんにちは、ももんが大好きの小山です。みなさんいかがお過ごしでしょうか?
きょうは、EC2に起動したCisco Adaptive Security Virtual Appliance (ASAv)をASDM (Adaptive Security Device Manager)から操作できるようにする方法についてご紹介します。
準備
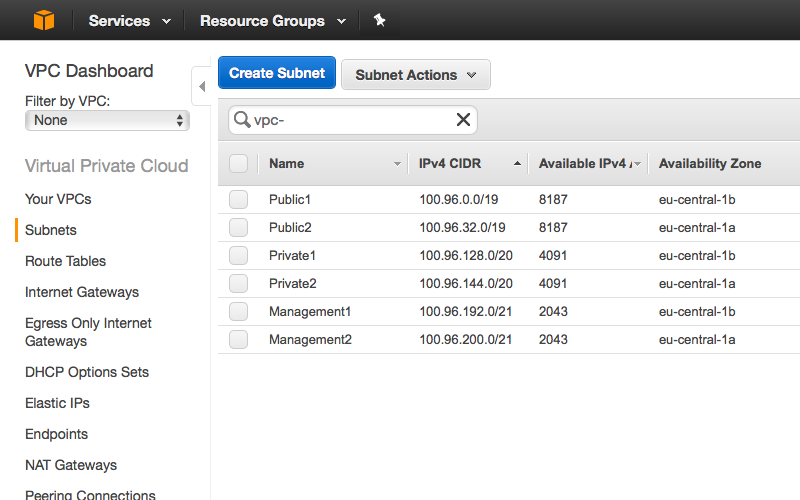
ASAvを起動するには、VPC上に少なくとも3つのサブネットが必要です。
- Public: ASAvのoutsideインターフェイスで使用します
- Private: ASAvのinsideインターフェイスで使用します
- Management: ASAvのmanagementインターフェイスで使用します
managementインターフェイスは、SSHやHTTP (ASDM) でASAvを操作するために使用します。通常managementインターフェイスはインターネットへの経路を持ちませんが、EC2ではmanagementインターフェイスにもインターネットへの経路を与えます。これは、ASAvの初回起動時にmanagementインターフェイスだけが有効な状態になるためです。
!
interface GigabitEthernet0/0
shutdown
no nameif
security-level 0
ip address 100.96.20.34 255.255.224.0
!
interface Management0/0
nameif management
security-level 100
ip address dhcp setroute
インターネット経由のSSH、HTTP (ASDM) 接続について詳しくは以下をご覧ください。
Deploying ASAv in AWS Public Cloud - YouTube
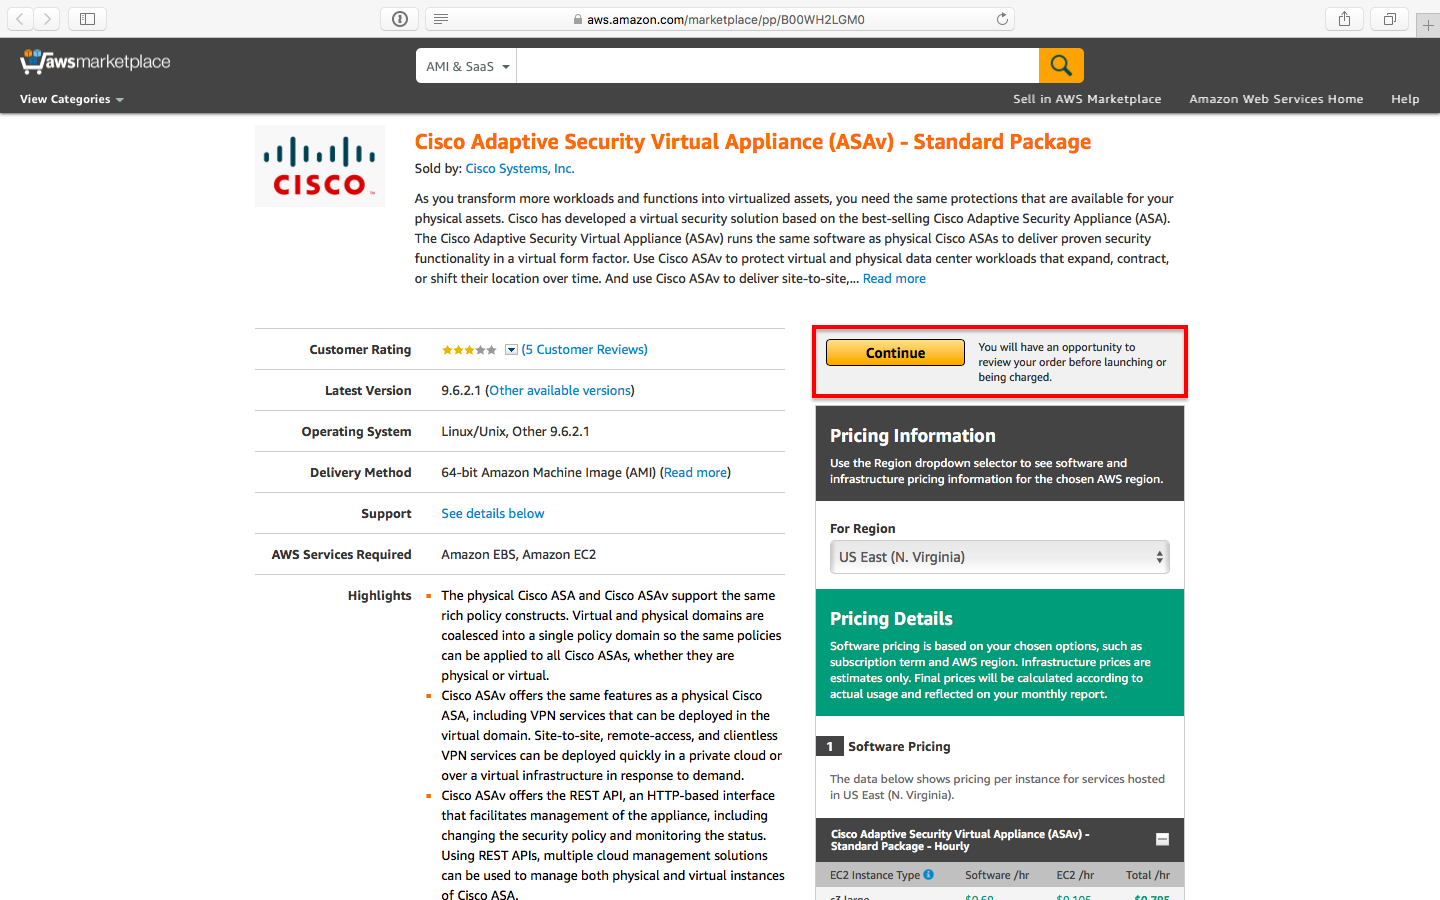
ASAvの購読
EC2でASAvを使用できるようにするため、AWS Marketplaceから目的に応じたサブスクリプションを購読する必要があります。既に使用可能なライセンスがある場合はBYOLを、従量課金のライセンスを使用したい場合はStandard Package (USD 0.69/h から) を購読しましょう。
Cisco Adaptive Security Virtual Appliance (ASAv) - BYOL
Cisco Adaptive Security Virtual Appliance (ASAv) - Standard Package
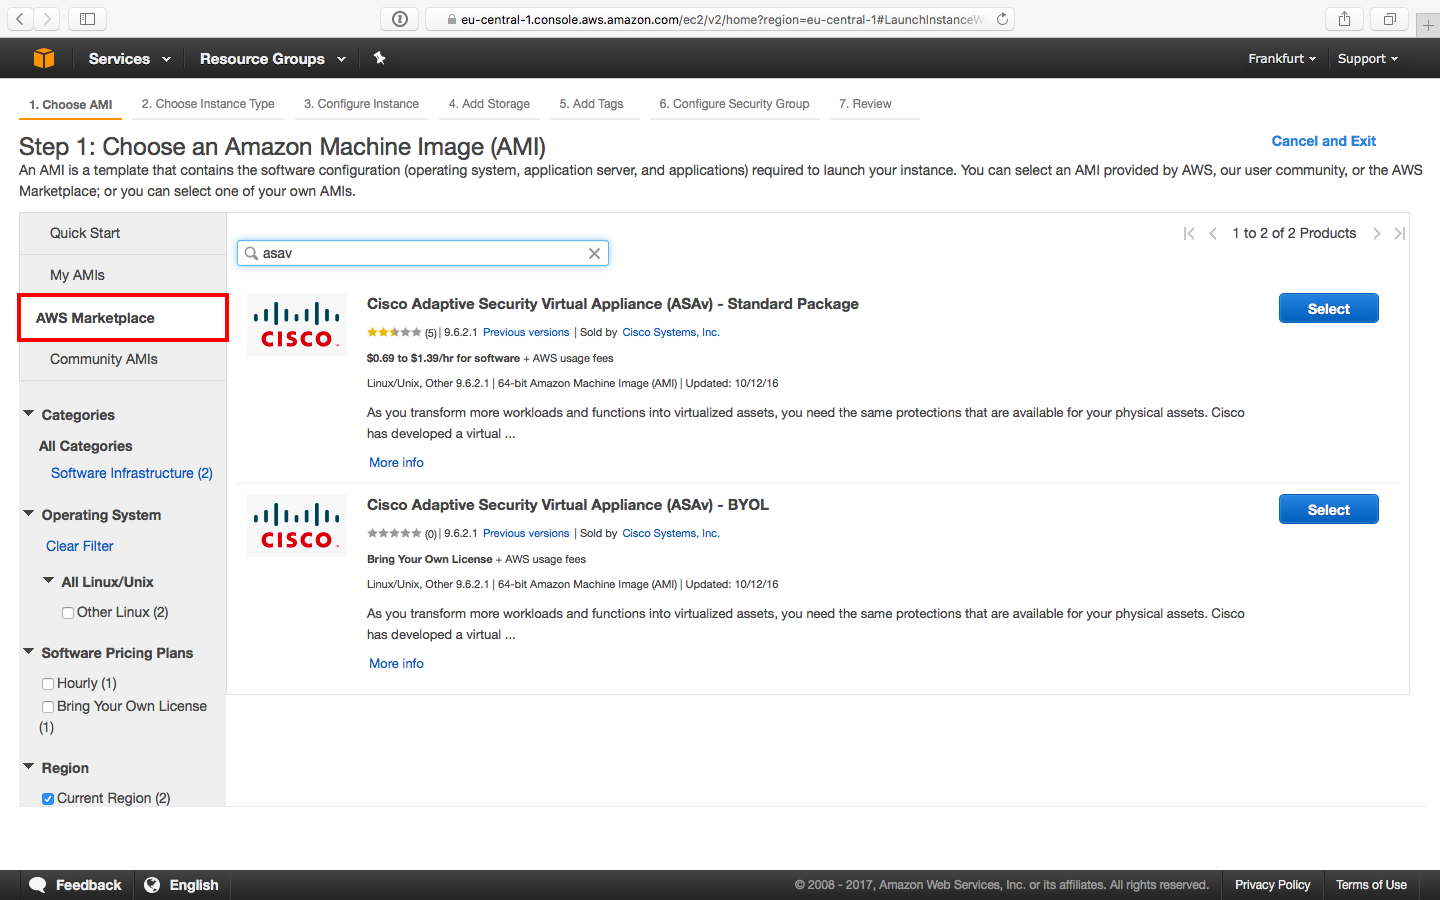
ASAvの起動
AWS Marketplaceからの購読が完了したら、EC2コンソールを開いてLaunch Instanceを選択します。AWS Marketplaceから "asav" などと検索して購読済みのサブスクリプションを選択しましょう。
サポートされるインスタンスタイプとインスタンスサイズは以下の通りです。ASAvインスタンスではインスタンスストアが必要ありませんから、余剰RIなど特別な事情がない場合にはC4ファミリから選びましょう。ASAv10とASAv30の違いについてはデータシートをご覧ください。
| インスタンスタイプ | EBS最適化 | ネットワーク性能 | ASAv | ライセンス/h | EC2利用料/h | ひと月あたり計 |
| c4.large | はい | Moderate | ASAv10 | USD 0.69 | USD 0.126 | USD 595.68 |
| c4.xlarge | はい | High | ASAv30 | USD 1.39 | USD 0.252 | USD 1198.66 |
| c3.large | いいえ | Moderate | ASAv10 | USD 0.69 | USD 0.128 | USD 597.14 |
| c3.xlarge | はい | Moderate | ASAv30 | USD 1.39 | USD 0.128 | USD 1200.85 |
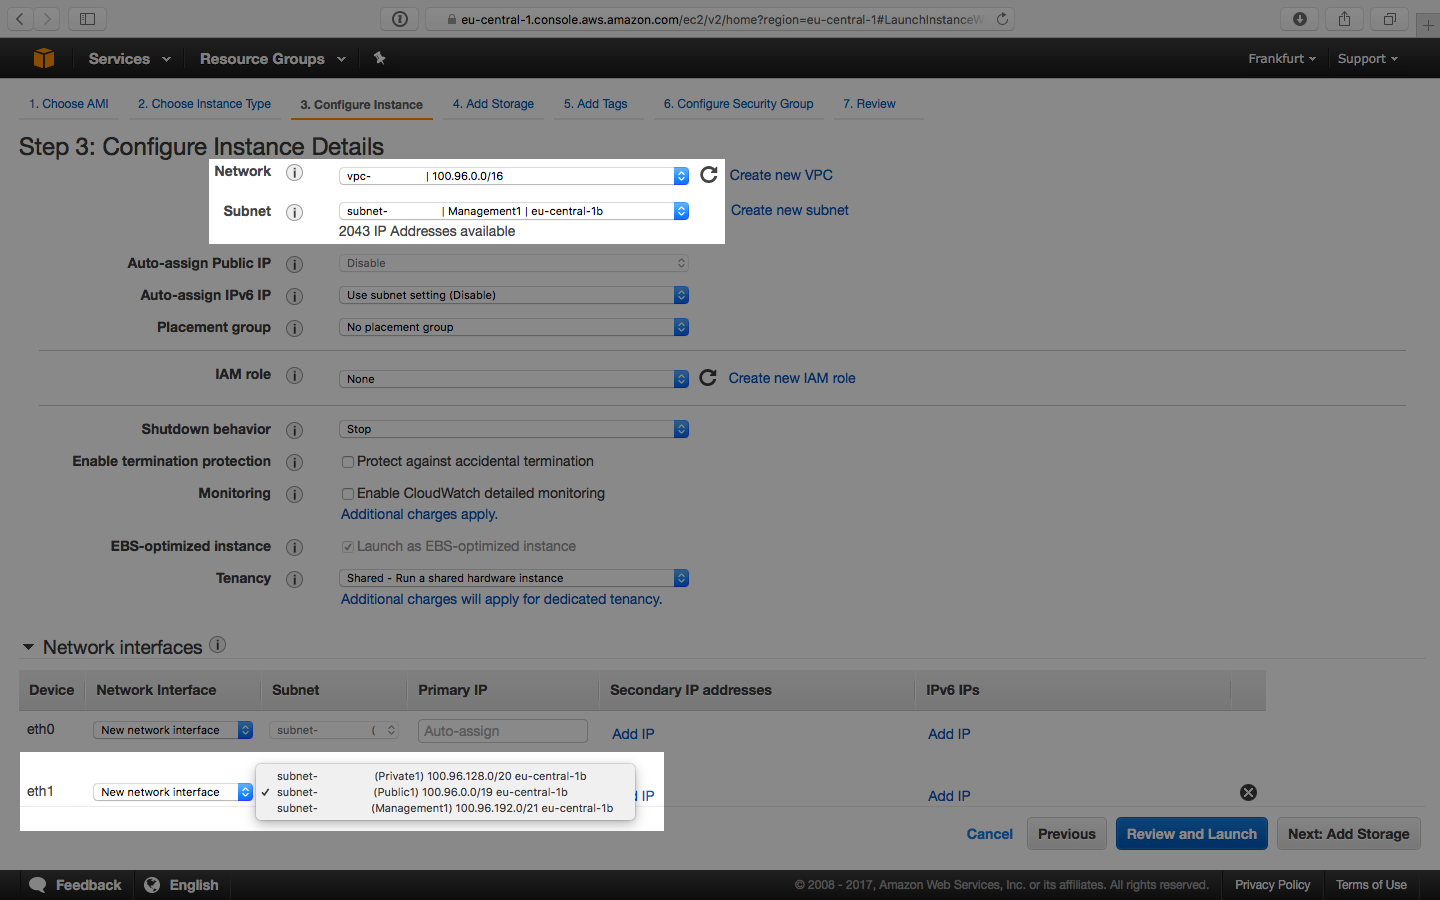
インスタンスの詳細では1つ目のインターフェイスに対してManagementサブネットを、2つ目のインターフェイスに対してはPublicサブネットを指定します。インスタンスタイプに関わらず、起動時に3つ以上のインターフェイスを与えることはできません。
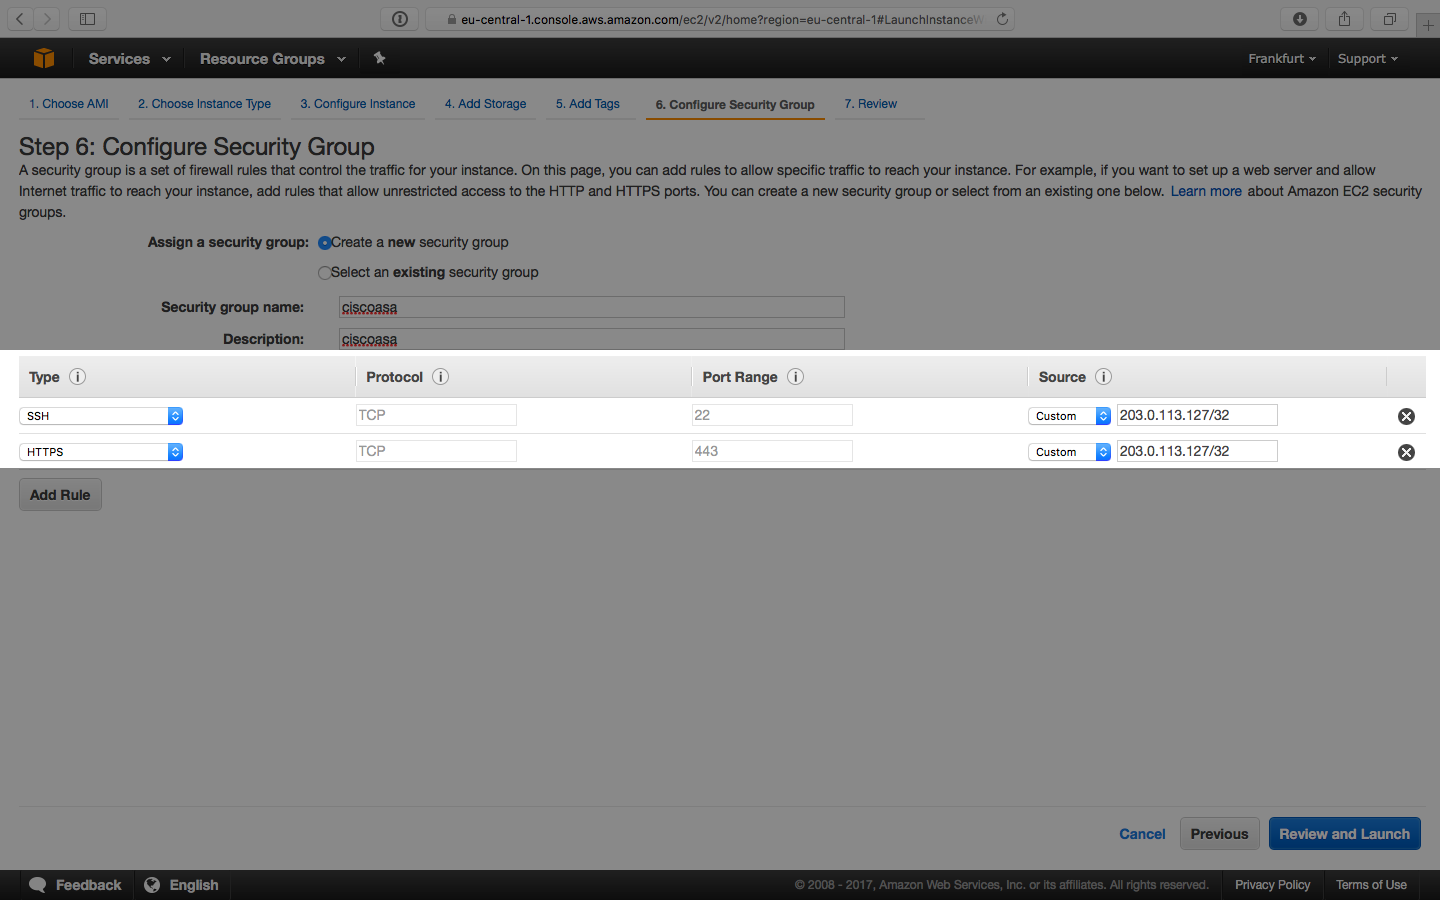
セキュリティグループではSSHとHTTPSを許可しましょう。
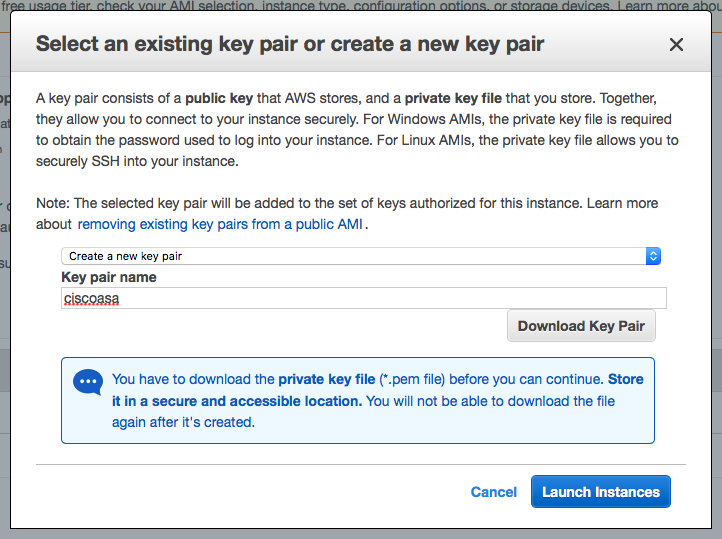
キーペアはSSHでASAvを操作するために必要です。起動直後のASAvをASDMで操作することはできませんから注意してください。
ASAvの起動には少し時間がかかります。初回起動時にはあらかじめ用意されたday0-configが読み込まれ、managementインターフェイスの有効化やSSH接続用の公開鍵登録などが行われます。ASAvに慣れてきたら、いつもの設定をday0-configにまとめてインスタンスのUser Dataとして渡すこともできます。
参考: Prepare the Day 0 Configuration File
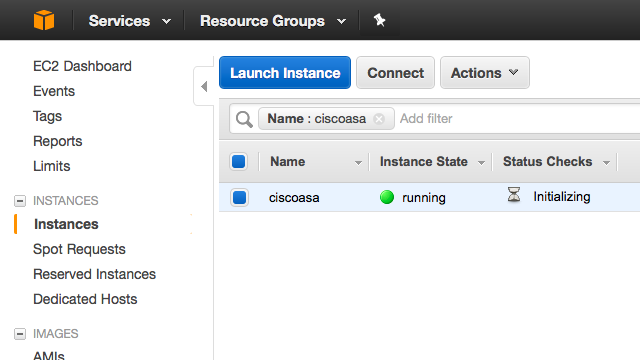
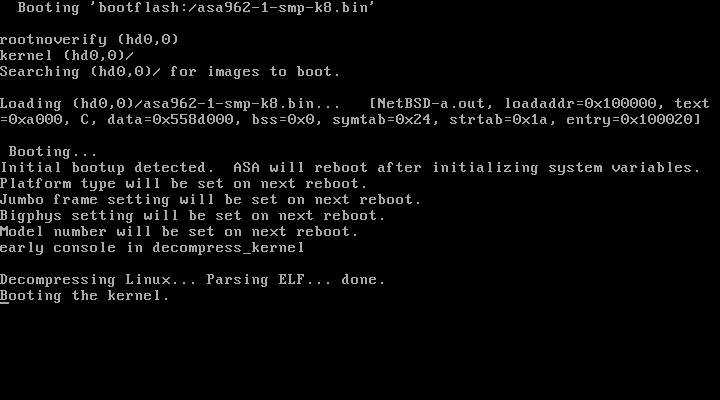
10分ほど待つとステータスチェックに成功します。

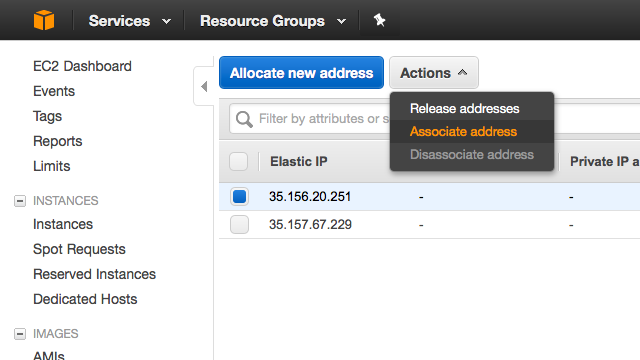
インターネットに接続するため、1つ目と2つ目のインターフェイスに対してそれぞれElastic IPアドレスを与えたら完了です。お疲れ様でした!
HTTP (ASDM) による管理の有効化
任意のSSHクライアントからASAvに接続しましょう。起動時に指定したキーペアでadminユーザとして接続します。
$ ssh -i ciscoasa.pem admin@ec2-198-51-100-127.eu-central-1.compute.amazonaws.com
Type help or '?' for a list of available commands.
ciscoasa>
以下のようなメッセージが表示された場合は、-oKexAlgorithms=+diffie-hellman-group1-sha1を指定します。
$ ssh -i ciscoasa.pem admin@ec2-198-51-100-127.eu-central-1.compute.amazonaws.com
Unable to negotiate with 198.51.100.127 port 22: no matching key exchange method found. Their offer: diffie-hellman-group1-sha1
$ ssh -i ciscoasa.pem -oKexAlgorithms=+diffie-hellman-group1-sha1 admin@ec2-198-51-100-127.eu-central-1.compute.amazonaws.com
Type help or '?' for a list of available commands.
ciscoasa>
ASAvのコンソールに接続しても、そのままでは大多数の操作を行うことができません。いわゆる特権モードへ移行するには、enableというコマンドを使います。ASAvでは0から15まで特権のレベルに応じたパスワードを設定でき、enableコマンドを使う際にも特権レベルを指定する必要があります。また、enableコマンドで特権レベルを省略した場合はenable 15として扱われます。
ciscoasa> ?

  clear       Reset functions
  enable      Turn on privileged commands
  exit        Exit from the EXEC
  help        Interactive help for commands
  login       Log in as a particular user
  logout      Exit from the EXEC
  no          Negate a command or set its defaults
  ping        Send echo messages
  quit        Exit from the EXEC
  show        Show running system information
  traceroute  Trace route to destination
ciscoasa> enable ?

  <0-15>  Enter optional privilege level (0-15)
  <cr>
ciscoasa> enable 15
Password: (初期パスワードは空です)
ciscoasa# ?

  aaa-server                     Specify a AAA server
  activate-tunnel-group-scripts  Reload ASDM generated scripts for
                                 username-from-certificate
  asdm                           Disconnect a specific ASDM session
  backup                         Backup configuration and images of the device
  blocks                         Set block diagnostic parameters
  call-home                      Testing Smart Call-Home configuration
  capture                        Capture inbound and outbound packets on one or
                                 more interfaces
  cd                             Change current directory
  change-password                Change password
  clear                          Reset functions
  client-update                  Execute client updates on all or specific
                                 tunnel-groups
  clock                          Manage the system clock
  cluster                        Cluster exec mode commands
  configure                      Configure using various methods
  (省略)
  write                          Write running configuration to memory,
network, or terminalenableコマンドでプロンプトが>から#に変化したら、現在の設定を参照してみましょう。すべての設定を参照するには、show running-confgと入力します。
ciscoasa# show running-config
: Saved

:
: Serial Number: 9AMF8M59WU1
: Hardware:   ASAv, 3776 MB RAM, CPU Xeon E5 series 2900 MHz, 1 CPU (2 cores)
:
ASA Version 9.6(2)1
!
hostname ciscoasa
enable password 8Ry2YjIyt7RRXU24 encrypted
xlate per-session deny tcp any4 any4
xlate per-session deny tcp any4 any6
xlate per-session deny tcp any6 any4
xlate per-session deny tcp any6 any6
xlate per-session deny udp any4 any4 eq domain
xlate per-session deny udp any4 any6 eq domain
xlate per-session deny udp any6 any4 eq domain
xlate per-session deny udp any6 any6 eq domain
names

!
interface GigabitEthernet0/0
 shutdown
 no nameif
 security-level 0
 ip address 100.96.9.0 255.255.224.0
!
interface Management0/0
 nameif management
 security-level 100
 ip address dhcp setroute
(省略)
Cryptochecksum:3e89ff5d40d3ff67134ca85749b5d40e
: end
続いて、managementインターフェイス経由でHTTP (ASDM) 接続を行えるように設定を変更しましょう。設定を開始するためには、configure terminalと入力します。
ciscoasa# configure terminal
ciscoasa(config)#
プロンプトがホスト名(config)に変わったら、以下の要領でDevice Managerに必要なHTTPサーバを開始し、managementインターフェイスにバインドします。
ciscoasa(config)# http server enable
ciscoasa(config)# http 0 0 management
ciscoasa(config)#
ASDMからASAvを操作するためには、空のenableパスワードを変更する必要があります。以下の要領でパスワードを変更したら、write memoryと入力してrunning-configの内容をディスクに書き込みましょう。ただし、設定自体はwrite memoryで保存する前でもrunning-configとして使用される点に注意してください。
ciscoasa(config)# enable password 新しいパスワード
ciscoasa(config)# write memory
Building configuration...
Cryptochecksum: 1271a417 30500fed 04f519ce 776a50d0

6906 bytes copied in 0.280 secs
[OK]
ciscoasa(config)#
以上でASDMを使用するための準備が整いました!
ASDMの入手
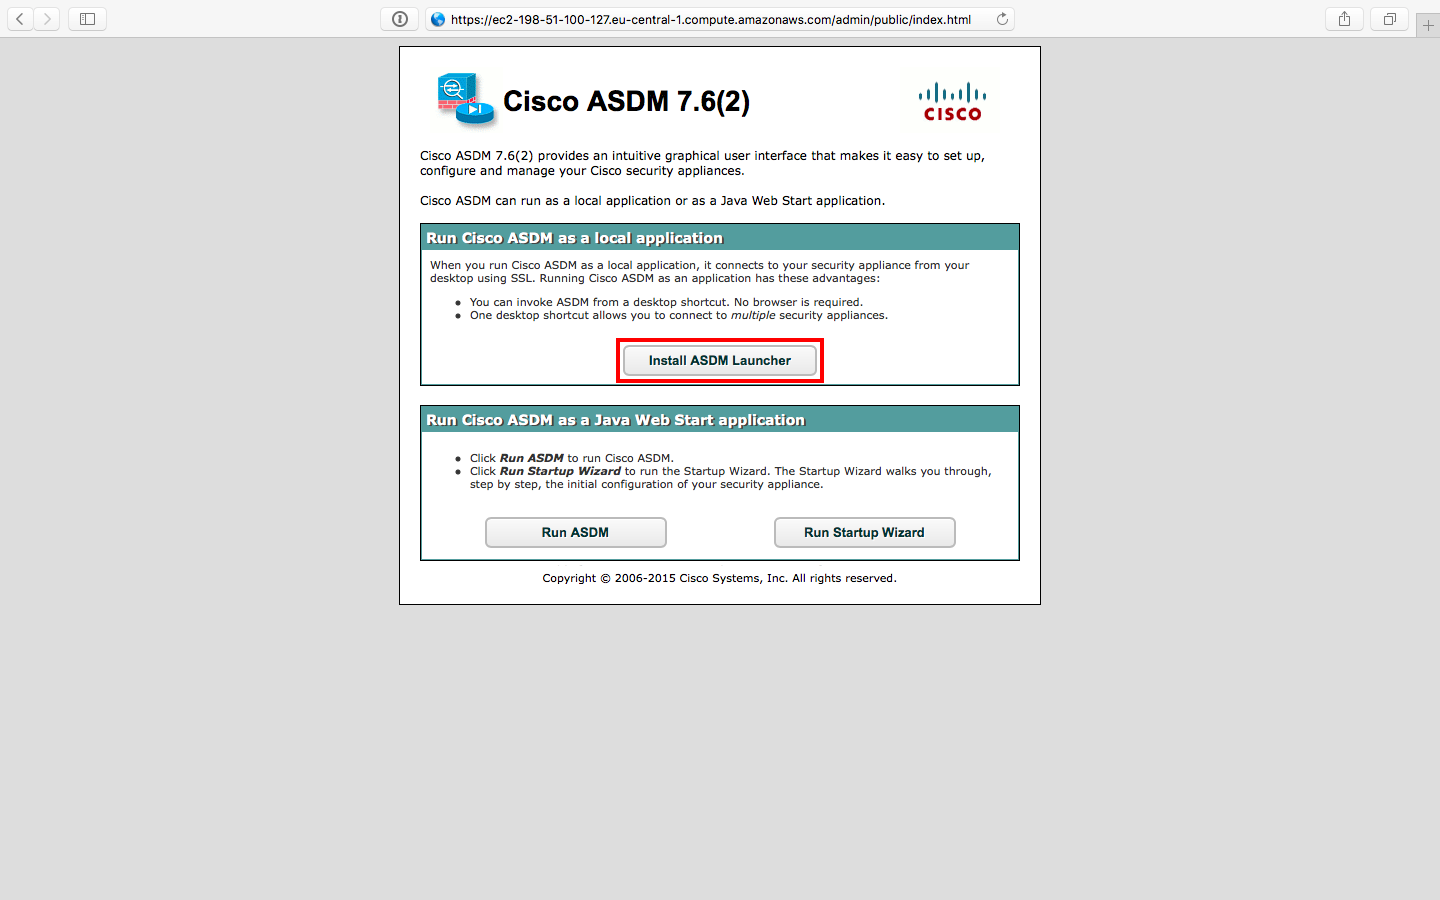
ASDMソフトウェアを入手するため、任意のブラウザからhttps://インスタンスのDNS名/admin/を開きます。表示されたページではInstall ASDM Launcherを選択しましょう。
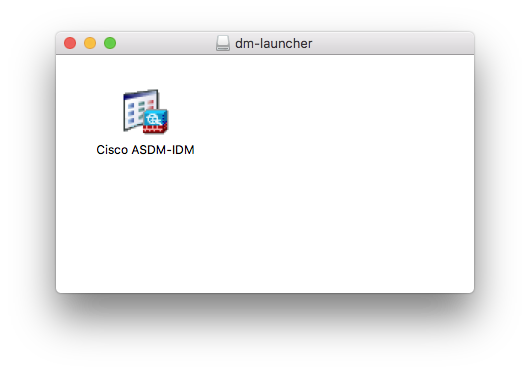
驚いたことに、ASDMはOS X版も提供されています。ダウンロードしたdmgファイルの中にあるCisco ASDM-IDM.appをアプリケーションフォルダにコピーしましょう。
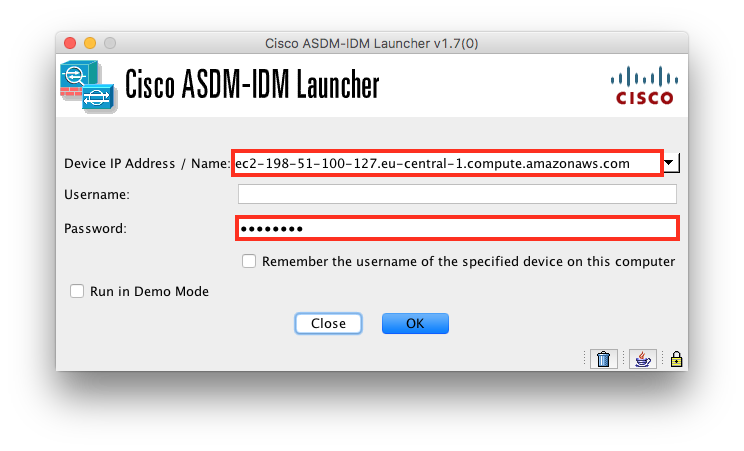
ASDMを開いたら、インスタンスのDNS名とenable_15のパスワードを入力して進みます。
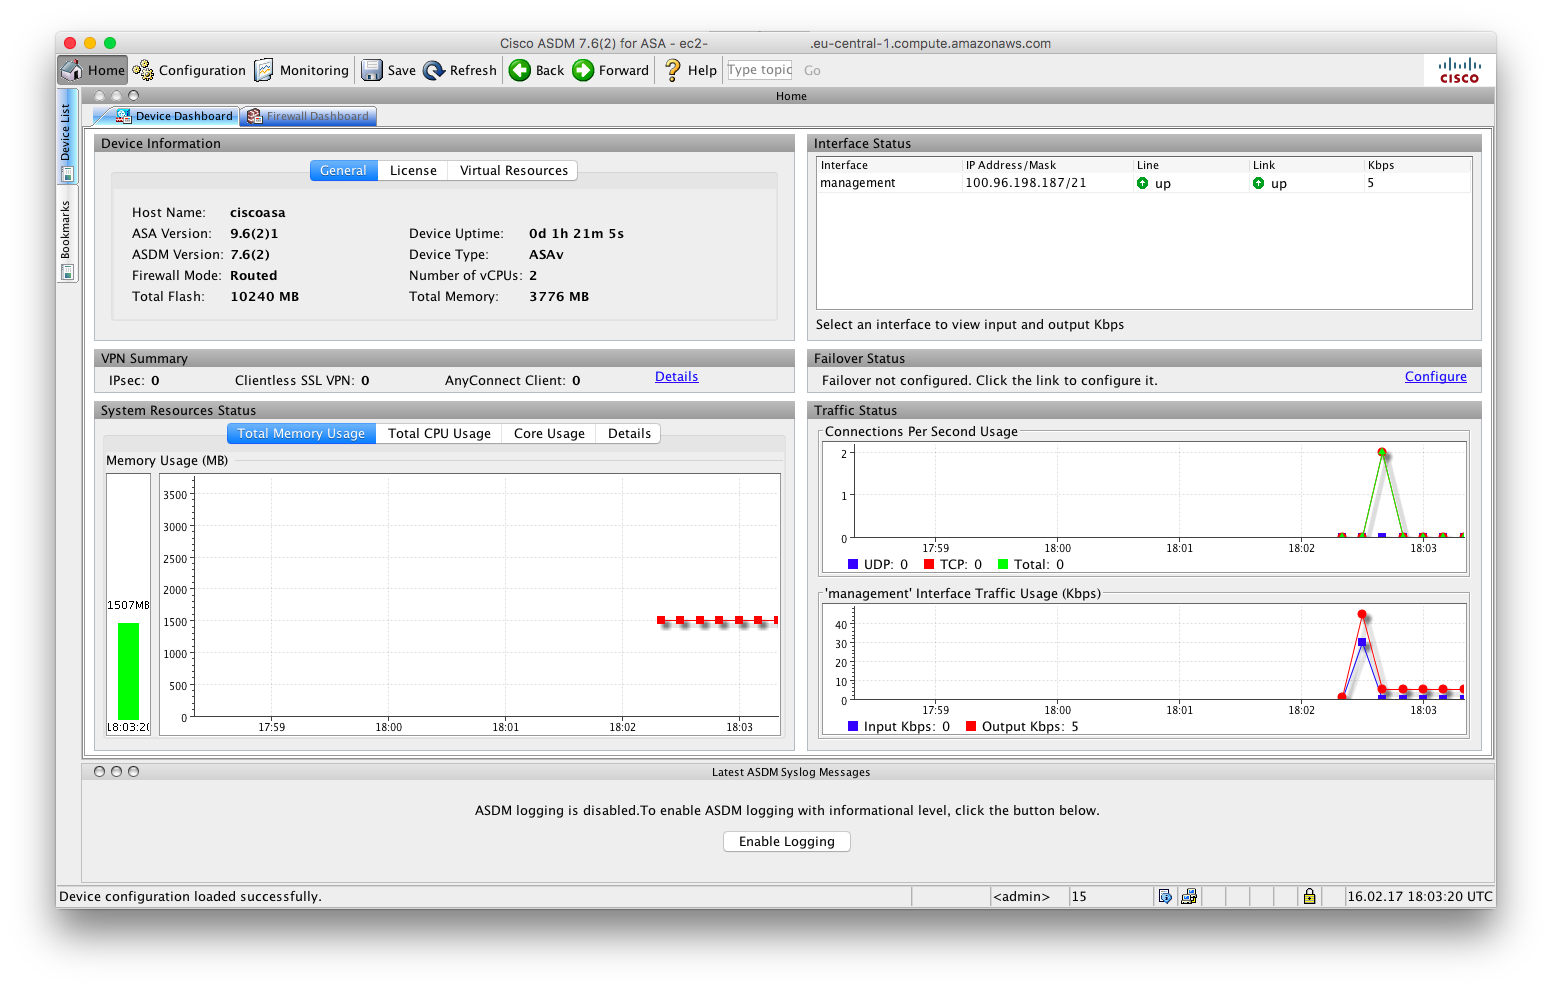
以下のような画面が表示されたら成功です。お疲れ様でした!
おわりに
いかがでしたか? 今回は、EC2にASAvを起動してASDMから操作できるようになるまでの流れをご紹介しました。今後は実際の利用シーンに応じた操作例もご紹介したいと思いますので、どうぞご期待ください。
したっけまた!
参考
CLI Book 1: Cisco ASA Series General Operations CLI Configuration Guide, 9.6 - Cisco
ASDM Book 1: Cisco ASA Series General Operations ASDM Configuration Guide, 7.6 - Cisco


