AWS CLIで、Amazon Q in Connect のコンテンツ検索を日本語ロケールに設定してみた
この記事は公開されてから1年以上経過しています。情報が古い可能性がありますので、ご注意ください。
はじめに
AWS CLI を使用して、Amazon Q in Connect の日本語ロケールを設定してみました。
Q in Connectには主に以下の機能があります。
-
エージェントアシスタンス(オペレーター支援)
エージェント(オペレーター)が顧客対応をスムーズに行えるよう、AI がサポートします。-
会話の内容に基づくナレッジの自動推奨(リアルタイムレコメンデーション)
- 会話の内容を AI が分析し、顧客の意図を自動で検出
- エージェントに適切な回答や推奨アクションをリアルタイムで提示
- 関連するナレッジ記事やドキュメントへのリンクも提供
-
コンテンツ検索
- エージェントは自然言語やキーワードを使って AI に直接質問可能
- AI がナレッジベースを検索し、最適な回答や関連情報を提示
- これにより、エージェントは必要な情報を素早く取得し、顧客対応の時間を短縮
-
-
カスタマーセルフサービス(顧客の自己解決支援)
顧客がオペレーターと話さずに、AI を活用して自分で問題を解決できる機能を提供します。- AI チャットボット
- Amazon Lex ボットを活用し、チャットや IVR(自動音声応答)を通じて顧客の質問に対応
- 例
- 「Wi-Fi の接続方法を教えて」→ AI が手順を案内
- 「予約を変更したい」→ AI が予約システムと連携し、変更を完了
- AI で解決できない場合は、オペレーターにスムーズにエスカレーション
- AI チャットボット
-
AI のカスタマイズと管理
企業のニーズに合わせて、AI の動作を柔軟にカスタマイズすることが可能です。-
AI プロンプトのカスタマイズ
- AI の回答のトーンやフォーマットを調整可能
- 企業独自のナレッジを活用し、より適切な回答を提供
-
AI ガードレールの設定
- 不適切な回答を防ぐための制御機能を提供
- 企業のポリシーに沿った AI の動作を設定可能
-
多言語対応
- 日本語を含む 64 言語をサポート
- 言語ごとのロケール設定が可能(コンテンツ検索のみ)
-
このうち、コンテンツ検索において、日本語ロケール設定が可能になりましたので、コマンドで設定できる方法をご紹介します。
ナレッジベースのコンテンツの言語と、AI エージェントのロケール設定を一致させることで、最適な検索結果を得ることができます。
前提条件
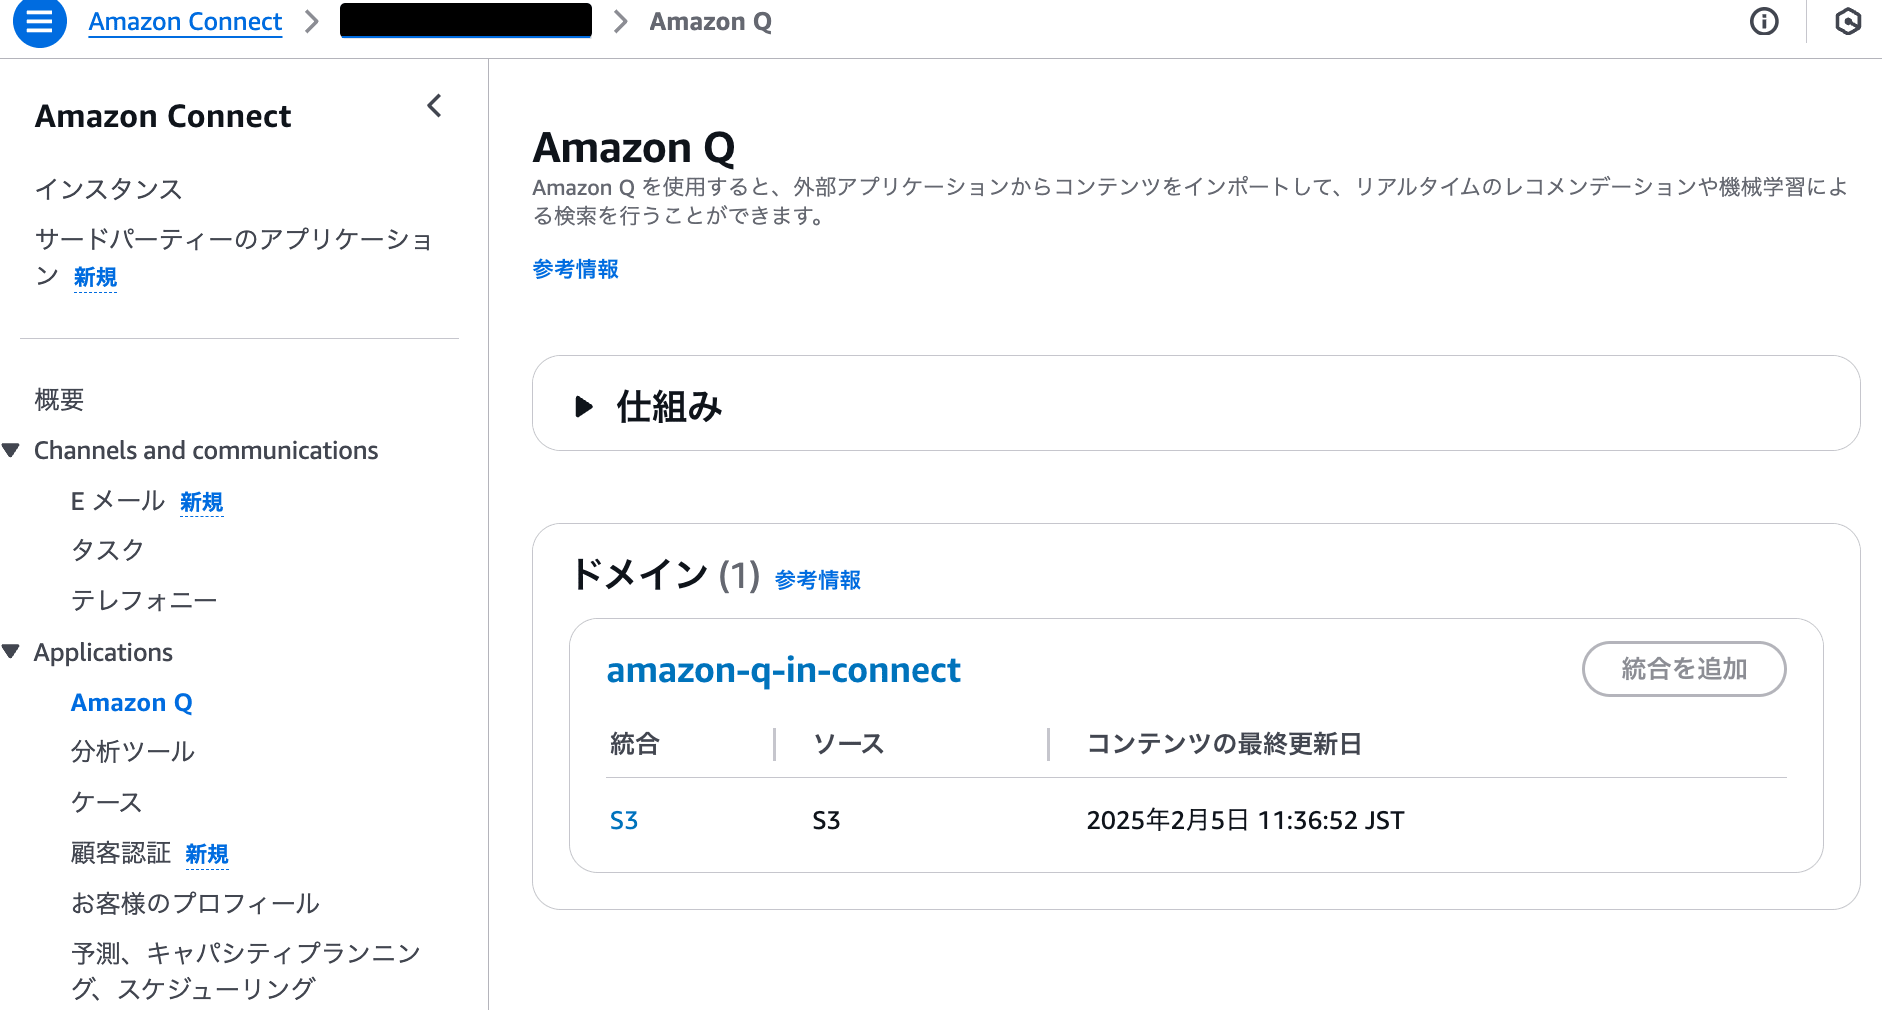
- 以下のブログを参考に、Connect インスタンスで Q in Connect を有効にし、ナレッジベース(統合)を作成します。
日本語ロケールに設定するコマンド
AWS CloudShellを開き、以下のコマンドを実行すると、日本語のロケール設定が完了します。
今回、ナレッジベース(統合)名はamazon-q-in-connectです。
このドメイン名は、AWSマネジメントコンソールで確認することができます。
AIエージェント名は、jp_manual_search_ai_agentにしています。
$ assistant_name="amazon-q-in-connect"
ai_agent_name="jp_manual_search_ai_agent"

assistant_id=$(aws qconnect list-assistants | jq -r --arg name "$assistant_name" '.assistantSummaries[] | select(.name == $name) | .assistantId') && \
ai_agent_id=$(aws qconnect create-ai-agent \
  --assistant-id $assistant_id \
  --name "$ai_agent_name" \
  --visibility-status PUBLISHED \
  --type MANUAL_SEARCH \
  --configuration '{"manualSearchAIAgentConfiguration": {"locale": "ja_JP"}}' | jq -r '.aiAgent.aiAgentId') && \
aws qconnect create-ai-agent-version \
  --assistant-id $assistant_id \
  --ai-agent-id $ai_agent_id && \
aws qconnect update-assistant-ai-agent \
  --assistant-id $assistant_id \
  --ai-agent-type MANUAL_SEARCH \
  --configuration "{\"aiAgentId\": \"$ai_agent_id:1\"}"

## 出力結果
{
    "aiAgent": {
        "aiAgentArn": "arn:aws:wisdom:ap-northeast-1:111111111111:ai-agent/a1793008-f4de-481b-a9ed-3697ef373ff2/a5857927-302f-4d82-a942-0cae2db3a37e:1",
        "aiAgentId": "a5857927-302f-4d82-a942-0cae2db3a37e",
        "assistantArn": "arn:aws:wisdom:ap-northeast-1:111111111111:assistant/a1793008-f4de-481b-a9ed-3697ef373ff2",
        "assistantId": "a1793008-f4de-481b-a9ed-3697ef373ff2",
        "configuration": {
            "manualSearchAIAgentConfiguration": {
                "locale": "ja_JP"
            }
        },
        "modifiedTime": "2025-02-07T08:36:04+00:00",
        "name": "jp_manual_search_ai_agent",
        "origin": "CUSTOMER",
        "status": "ACTIVE",
        "type": "MANUAL_SEARCH",
        "visibilityStatus": "PUBLISHED"
    },
    "versionNumber": 1
}
{
    "assistant": {
        "aiAgentConfiguration": {
            "ANSWER_RECOMMENDATION": {
                "aiAgentId": "3025a3fa-5419-4c9c-a040-877213b93f70:4"
            },
            "MANUAL_SEARCH": {
                "aiAgentId": "a5857927-302f-4d82-a942-0cae2db3a37e:1"
            },
            "SELF_SERVICE": {
                "aiAgentId": "529207fe-80fd-42be-bcf2-facd2141aec7:1"
            }
        },
        "assistantArn": "arn:aws:wisdom:ap-northeast-1:111111111111:assistant/a1793008-f4de-481b-a9ed-3697ef373ff2",
        "assistantId": "a1793008-f4de-481b-a9ed-3697ef373ff2",
        "capabilityConfiguration": {
            "type": "V2"
        },
        "integrationConfiguration": {
            "topicIntegrationArn": "arn:aws:sns:ap-northeast-1:721038445438:wisdom-78d30d9a-ce3a-4f6f-9312-a1545b31b7d7"
        },
        "name": "amazon-q-in-connect",
        "status": "ACTIVE",
        "tags": {
            "AmazonConnectEnabled": "True"
        },
        "type": "AGENT"
    }
}
エラーが発生しなければ、設定は正常に完了しています。
同じコマンドを複数実行すると以下のエラーになります。AIエージェントは同じ名前で作成できないためです。
An error occurred (ConflictException) when calling the CreateAIAgent operation: Name is already in use
次章では、1コマンドずつ実行する方法を紹介します。
1つずつコマンド実行してみる
ロケール設定の変更のみであれば、AI プロンプトの作成は不要で、AI エージェントのみを変更すればよいです。
1. Amazon Q in Connect の assistant-id を取得
まず、assistant-id を取得します。ナレッジベース名は、amazon-q-in-connectです。
$ aws qconnect list-assistants | jq '.assistantSummaries[] |
  select(.name == "amazon-q-in-connect")'

{
  "aiAgentConfiguration": {
    "ANSWER_RECOMMENDATION": {
      "aiAgentId": "3025a3fa-5419-4c9c-a040-877213b93f70:4"
    },
    "MANUAL_SEARCH": {
      "aiAgentId": "652f0287-1610-4fee-bbe3-c687c13f5ec3:4"
    },
    "SELF_SERVICE": {
      "aiAgentId": "529207fe-80fd-42be-bcf2-facd2141aec7:1"
    }
  },
  "assistantArn": "arn:aws:wisdom:ap-northeast-1:111111111111:assistant/a1793008-f4de-481b-a9ed-3697ef373ff2",
  "assistantId": "a1793008-f4de-481b-a9ed-3697ef373ff2",
  "capabilityConfiguration": {
    "type": "V2"
  },
  "integrationConfiguration": {
    "topicIntegrationArn": "arn:aws:sns:ap-northeast-1:721038445438:wisdom-78d30d9a-ce3a-4f6f-9312-a1545b31b7d7"
  },
  "name": "amazon-q-in-connect",
  "status": "ACTIVE",
  "tags": {
    "AmazonConnectEnabled": "True"
  },
  "type": "AGENT"
}

$ aws qconnect list-assistants | jq -r '.assistantSummaries[] |
  select(.name == "amazon-q-in-connect") |
  .assistantId'

a1793008-f4de-481b-a9ed-3697ef373ff2
AI エージェントアシスタンスには、以下の 3 種類が存在することが確認できます。
- 会話の内容に基づくナレッジの自動推奨:ANSWER_RECOMMENDATION
- コンテンツ検索:MANUAL_SEARCH
- カスタマーセルフサービス:SELF_SERVICE
2: AI エージェントを作成
ロケールを指定して、AI エージェントを作成します。
先程出力したassistant-idを利用します。
ロケールを指定して AI エージェントを作成する前は、リストが空の状態です。
$ aws qconnect list-ai-agents --assistant-id a1793008-f4de-481b-a9ed-3697ef373ff2
{
"aiAgentSummaries": []
}
AIエージェント名は、jp_manual_search_ai_agentにして作成します。
$ aws qconnect create-ai-agent \
--assistant-id a1793008-f4de-481b-a9ed-3697ef373ff2 \
--name jp_manual_search_ai_agent \
--visibility-status PUBLISHED \
--type MANUAL_SEARCH \
--configuration '{"manualSearchAIAgentConfiguration": {"locale": "ja_JP"}}'

{
    "aiAgent": {
        "aiAgentArn": "arn:aws:wisdom:ap-northeast-1:111111111111:ai-agent/a1793008-f4de-481b-a9ed-3697ef373ff2/a5857927-302f-4d82-a942-0cae2db3a37e",
        "aiAgentId": "a5857927-302f-4d82-a942-0cae2db3a37e",
        "assistantArn": "arn:aws:wisdom:ap-northeast-1:111111111111:assistant/a1793008-f4de-481b-a9ed-3697ef373ff2",
        "assistantId": "a1793008-f4de-481b-a9ed-3697ef373ff2",
        "configuration": {
            "manualSearchAIAgentConfiguration": {
                "locale": "ja_JP"
            }
        },
        "modifiedTime": "2025-02-07T08:36:04+00:00",
        "name": "jp_manual_search_ai_agent",
        "origin": "CUSTOMER",
        "status": "ACTIVE",
        "tags": {},
        "type": "MANUAL_SEARCH",
        "visibilityStatus": "PUBLISHED"
    }
}

## aiAgentIdのみを出力する
$ aws qconnect create-ai-agent \
--assistant-id a1793008-f4de-481b-a9ed-3697ef373ff2 \
--name jp_manual_search_ai_agent \
--visibility-status PUBLISHED \
--type MANUAL_SEARCH \
--configuration '{"manualSearchAIAgentConfiguration": {"locale": "ja_JP"}}' \
--output json | jq -r '.aiAgent.aiAgentId'

a5857927-302f-4d82-a942-0cae2db3a37e
aiAgentIdは、次のコマンドで利用します。
設定後、AI エージェントのロケールが日本語(ja_JP)に設定されていることを確認できます。
$ aws qconnect list-ai-agents --assistant-id a1793008-f4de-481b-a9ed-3697ef373ff2
{
    "aiAgentSummaries": [
        {
            "aiAgentArn": "arn:aws:wisdom:ap-northeast-1:111111111111:ai-agent/a1793008-f4de-481b-a9ed-3697ef373ff2/a5857927-302f-4d82-a942-0cae2db3a37e",
            "aiAgentId": "a5857927-302f-4d82-a942-0cae2db3a37e",
            "assistantArn": "arn:aws:wisdom:ap-northeast-1:111111111111:assistant/a1793008-f4de-481b-a9ed-3697ef373ff2",
            "assistantId": "a1793008-f4de-481b-a9ed-3697ef373ff2",
            "configuration": {
                "manualSearchAIAgentConfiguration": {
                    "locale": "ja_JP"
                }
            },
            "modifiedTime": "2025-02-07T08:36:04+00:00",
            "name": "jp_manual_search_ai_agent",
            "origin": "CUSTOMER",
            "status": "ACTIVE",
            "tags": {},
            "type": "MANUAL_SEARCH",
            "visibilityStatus": "PUBLISHED"
        }
    ]
}
サポートされているロケールの一覧は、公式ドキュメントに記載されています。
3. AI エージェントのバージョンを作成
aiAgentId を使用して、AI エージェントのバージョンを作成します。
$ aws qconnect create-ai-agent-version \
--assistant-id <assistant-id> \
--ai-agent-id <ai-agent-id>

$ aws qconnect create-ai-agent-version \
--assistant-id a1793008-f4de-481b-a9ed-3697ef373ff2 \
--ai-agent-id a5857927-302f-4d82-a942-0cae2db3a37e
{
    "aiAgent": {
        "aiAgentArn": "arn:aws:wisdom:ap-northeast-1:111111111111:ai-agent/a1793008-f4de-481b-a9ed-3697ef373ff2/a5857927-302f-4d82-a942-0cae2db3a37e:1",
        "aiAgentId": "a5857927-302f-4d82-a942-0cae2db3a37e",
        "assistantArn": "arn:aws:wisdom:ap-northeast-1:111111111111:assistant/a1793008-f4de-481b-a9ed-3697ef373ff2",
        "assistantId": "a1793008-f4de-481b-a9ed-3697ef373ff2",
        "configuration": {
            "manualSearchAIAgentConfiguration": {
                "locale": "ja_JP"
            }
        },
        "modifiedTime": "2025-02-07T08:36:04+00:00",
        "name": "jp_manual_search_ai_agent",
        "origin": "CUSTOMER",
        "status": "ACTIVE",
        "type": "MANUAL_SEARCH",
        "visibilityStatus": "PUBLISHED"
    },
    "versionNumber": 1
}
4. AI エージェントバージョンを適用
作成した AI エージェントのバージョンをQ in Connectに適用します。
$ aws qconnect update-assistant-ai-agent \
--assistant-id <assistant-id> \
--ai-agent-type MANUAL_SEARCH \
--configuration '{
"aiAgentId": "<ai-agent-id>:1"
}'

$ aws qconnect update-assistant-ai-agent \
--assistant-id a1793008-f4de-481b-a9ed-3697ef373ff2 \
--ai-agent-type MANUAL_SEARCH \
--configuration '{
"aiAgentId": "a5857927-302f-4d82-a942-0cae2db3a37e:1"
}'

{
    "assistant": {
        "aiAgentConfiguration": {
            "ANSWER_RECOMMENDATION": {
                "aiAgentId": "3025a3fa-5419-4c9c-a040-877213b93f70:4"
            },
            "MANUAL_SEARCH": {
                "aiAgentId": "a5857927-302f-4d82-a942-0cae2db3a37e:1"
            },
            "SELF_SERVICE": {
                "aiAgentId": "529207fe-80fd-42be-bcf2-facd2141aec7:1"
            }
        },
        "assistantArn": "arn:aws:wisdom:ap-northeast-1:111111111111:assistant/a1793008-f4de-481b-a9ed-3697ef373ff2",
        "assistantId": "a1793008-f4de-481b-a9ed-3697ef373ff2",
        "capabilityConfiguration": {
            "type": "V2"
        },
        "integrationConfiguration": {
            "topicIntegrationArn": "arn:aws:sns:ap-northeast-1:721038445438:wisdom-78d30d9a-ce3a-4f6f-9312-a1545b31b7d7"
        },
        "name": "amazon-q-in-connect",
        "status": "ACTIVE",
        "tags": {
            "AmazonConnectEnabled": "True"
        },
        "type": "AGENT"
    }
}
MANUAL_SEARCHは、先程作成したAIエージェントバージョンa5857927-302f-4d82-a942-0cae2db3a37e:1が適用されていることが確認できます。
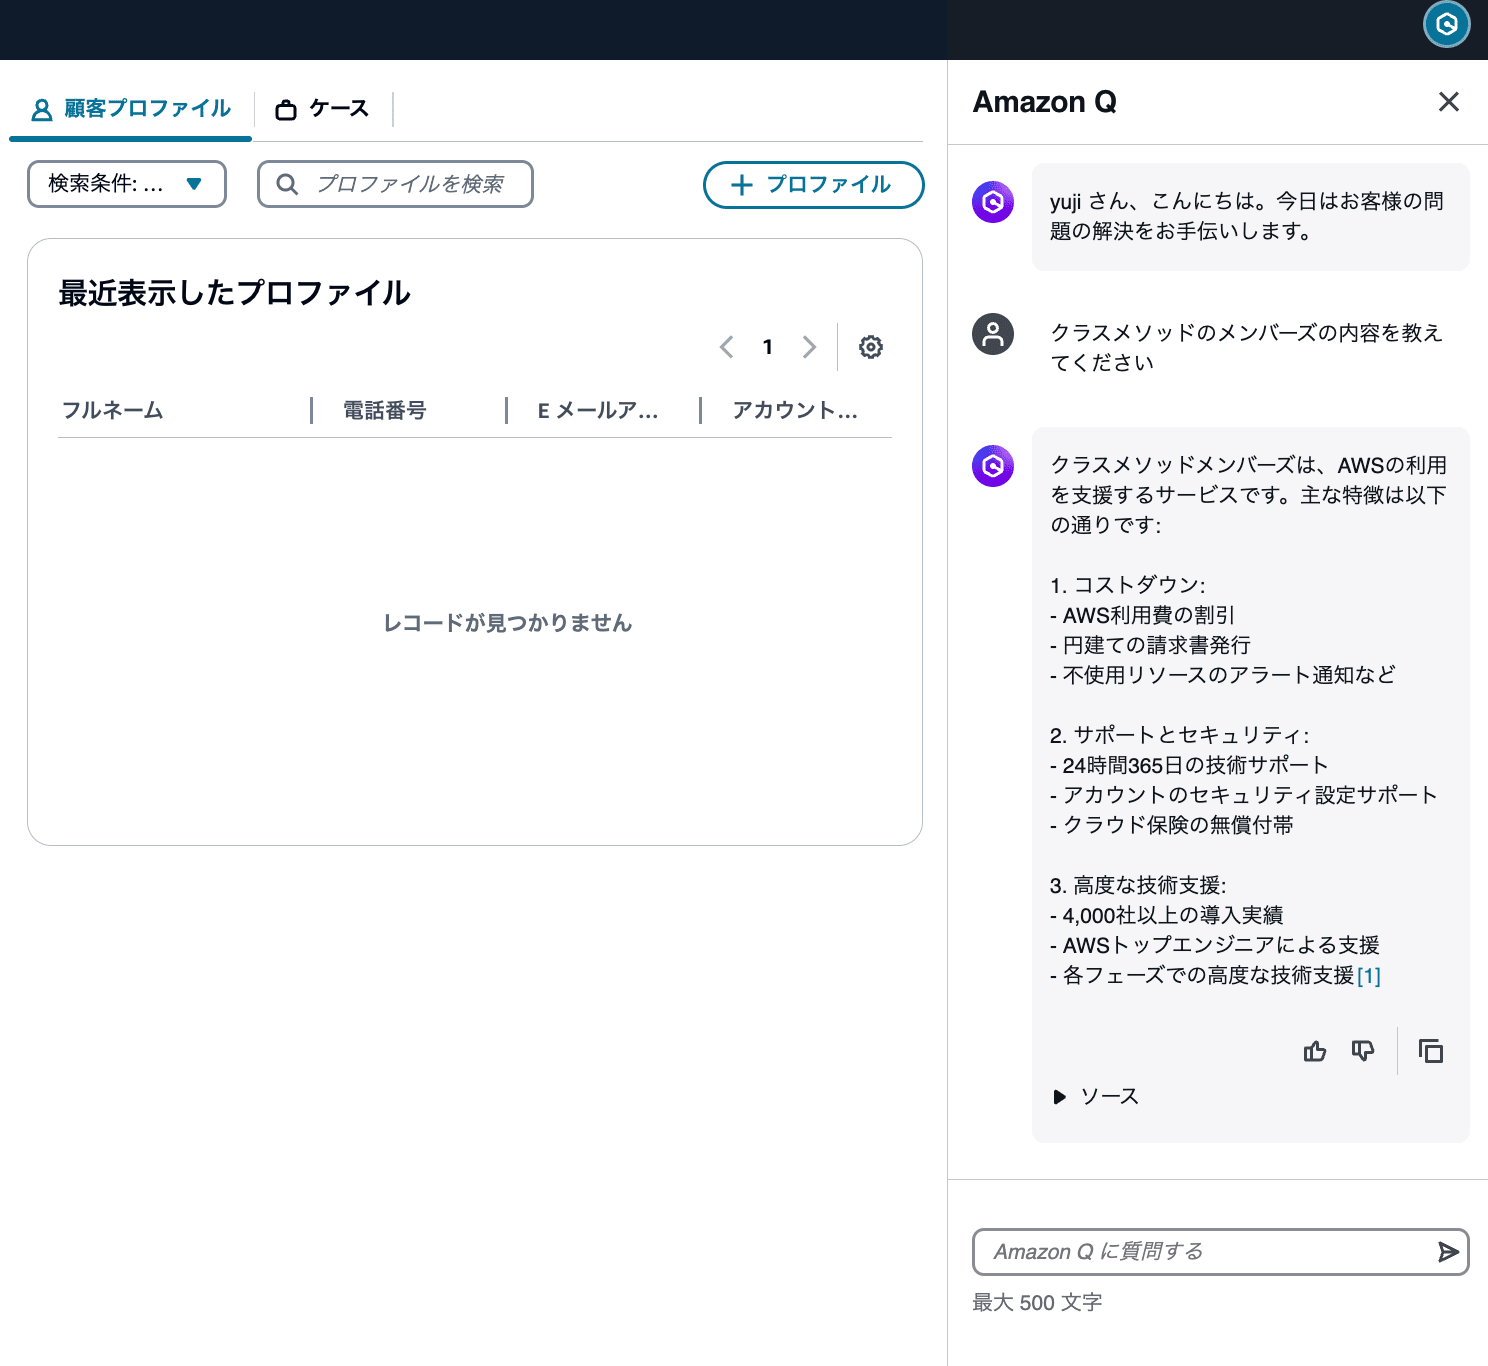
これで、日本語ロケールの設定が完了しました。
コンテンツ検索を実行すると、日本語で回答が返されることを確認できます。
さいごに
今回の手順では、AWS CLI を使用して Amazon Q in Connect の AI エージェントのロケールを日本語(ja_JP)に設定しました。
この設定により、エージェントがコンテンツ検索結果を日本語で得ることができます。
さらに、AI プロンプトのカスタマイズやナレッジベースの検索設定を調整することで、より高度な AI アシスタントも構築できますので、試してみてください。
参考