
【AWS IoT Core】 Fleet Provisioningでデバイスの自動登録を実装してみた
はじめに
こんにちは、コンサルティング部の神野です。
下記記事でFleet Provisioningについて説明したのですが、実際にCloudShellをベースとした手段を本記事で実現してみようと思い、書いてみました!
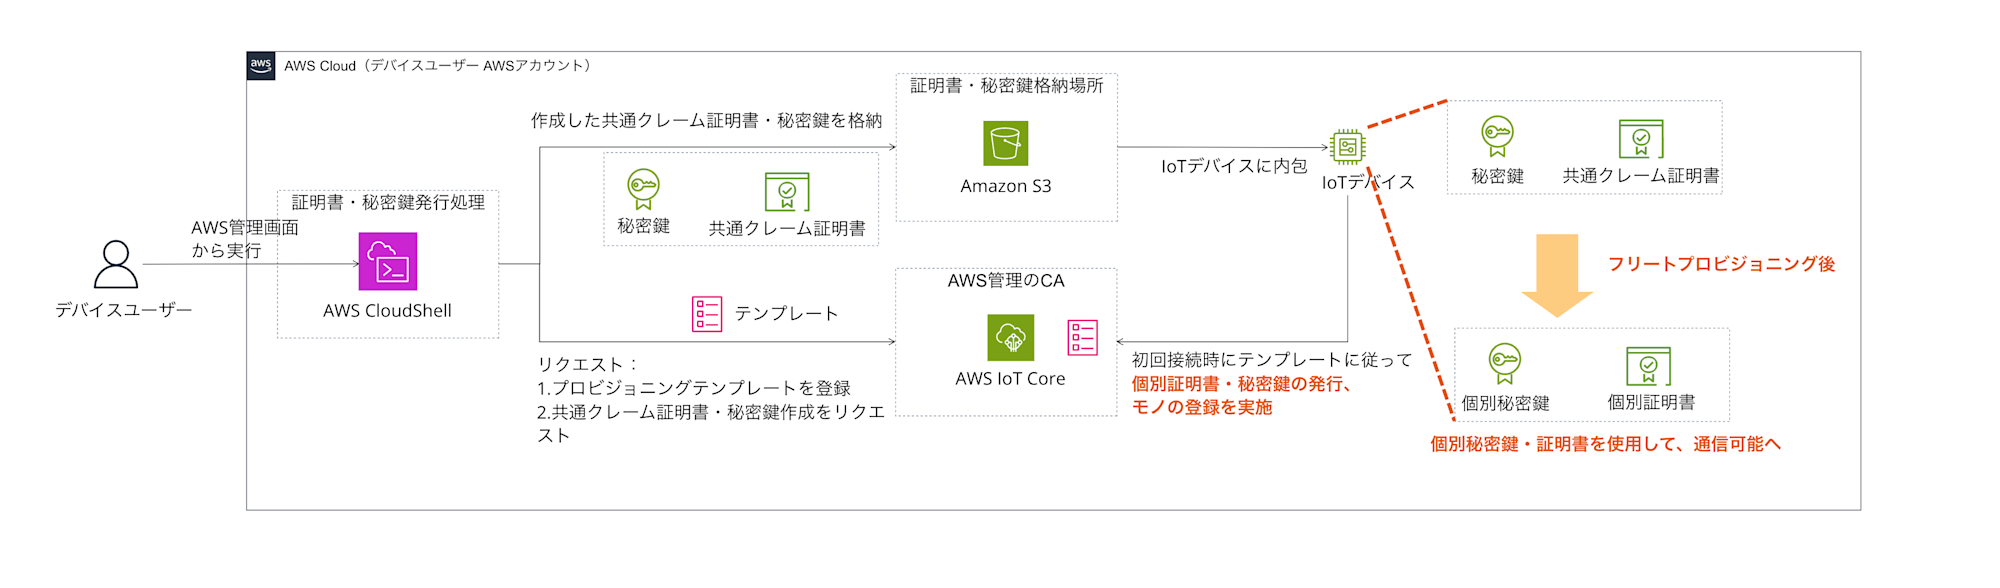
Fleet Provisioningは、IoTデバイスが初めてAWS IoT Coreに接続する際に、自動的にデバイス固有の証明書を発行したり、モノ(Thing)の登録を行ったりできる仕組みです。事前に個別のデバイス証明書を用意する必要がないため、大量のIoTデバイスを扱う場合には非常に便利だと思います。
今回クラウド側の設定はCloudShell、S3を使ってシンプルにして、ローカル環境をデバイスと見立てて、Pythonを使ってFleet Provisioningの一連の流れを実装してみたので、その手順や気づいたポイントを共有したいと思います。
Fleet Provisioningの概要
まず、Fleet Provisioningの仕組みをあらためて確認したいと思います。
- 事前準備
- プロビジョニングテンプレート、IAMロール、クレーム証明書を準備
- 初回接続
- デバイスがクレーム証明書を使ってAWS IoT Coreに接続
- 自動処理
- テンプレートに基づいてデバイス固有証明書の発行、モノの登録、ポリシーのアタッチを実行
- 証明書取得
- デバイスが新しい証明書を受け取り、以降はその証明書で通信
この仕組みにより、製造時には共通のクレーム証明書のみをデバイスに書き込んでおき、初回起動時に自動的にデバイス固有の認証情報を取得する、といったことが可能になります。
使用するサービスや単語などは下記となります。
使用するサービスや単語
- AWS IoT Core
- Fleet Provisioningの機能を提供
- プロビジョニングテンプレート
- デバイス登録時の処理内容を定義
- クレーム証明書
- 初回接続用の共通証明書
- AWS CloudShell
- クレーム証明書やプロビジョニングテンプレートの作成環境
実装手順
それでは、実際の実装手順を順を追って説明していきます。
CloudShell
まずはCloudShellの画面を開きます。
クラウド側の操作は基本的にCloudShellで全て行います。
コンソール上の検索画面からCloudShellと入力して、検索結果のCloudShellを選択します。
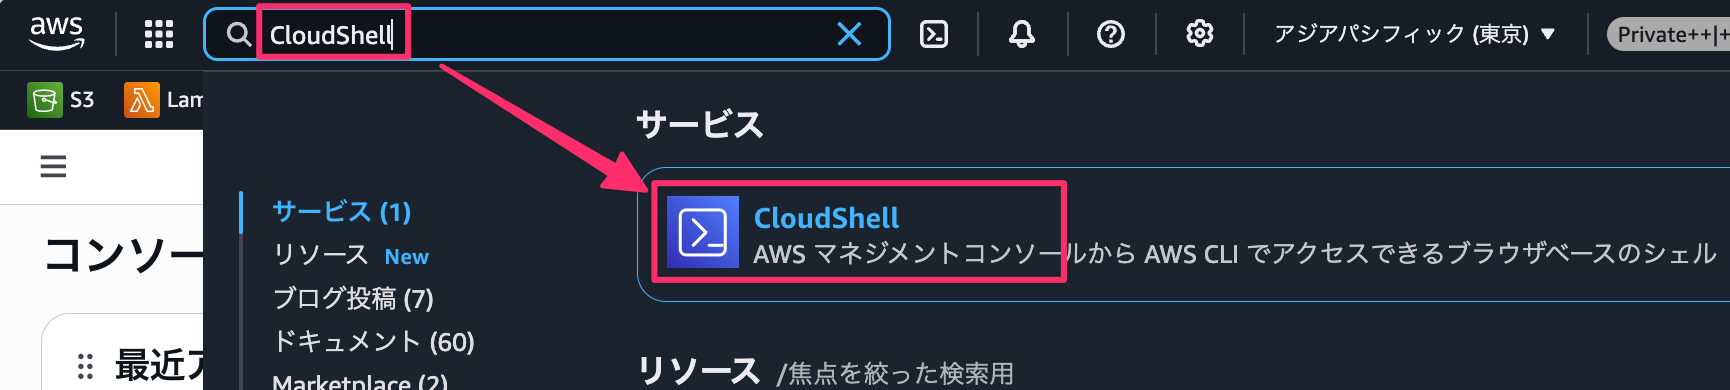
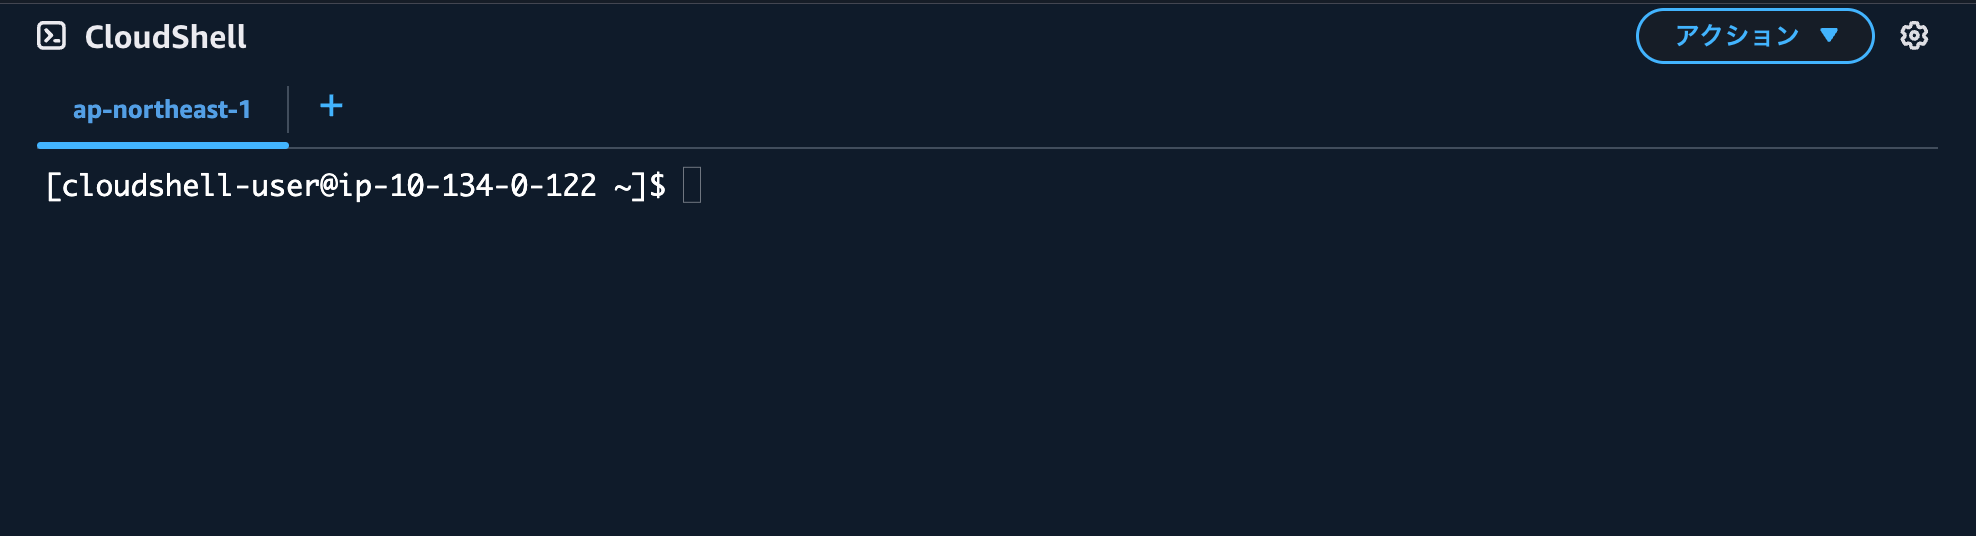
下記のようにCloudShellの画面が表示されていればOKです!
この画面で作業を行なっていきます。
IAMロールの作成
Fleet Provisioningで使用するIAMロールを作成します。このロールは、プロビジョニング処理中にAWS IoT Coreが引き受けて、証明書の発行やモノの作成を行います。
# 信頼ポリシーファイルを作成
cat > fleet-provisioning-trust-policy.json << EOF
{
  "Version": "2012-10-17",
  "Statement": [
    {
      "Effect": "Allow",
      "Principal": {
        "Service": "iot.amazonaws.com"
      },
      "Action": "sts:AssumeRole"
    }
  ]
}
EOF

# IAMロールを作成
aws iam create-role \
  --role-name FleetProvisioningRole \
  --assume-role-policy-document file://fleet-provisioning-trust-policy.json
次に、このロールに必要な権限を付与します。
YOUR_ACCOUNT_IDとなっている箇所はご自身のアカウントIDに変更ください。
# 権限ポリシーファイルを作成
cat > fleet-provisioning-policy.json << EOF
{
  "Version": "2012-10-17",
  "Statement": [
    {
      "Effect": "Allow",
      "Action": [
        "iot:CreateThing",
        "iot:CreateKeysAndCertificate",
        "iot:DescribeCertificate",
        "iot:AttachThingPrincipal",
        "iot:AttachPrincipalPolicy",
        "iot:RegisterThing",
        "iot:DescribeThing",
        "iot:ListThingGroupsForThing",
        "iot:GetPolicy",
        "iot:UpdateCertificate"
      ],
      "Resource": "*"
    }
  ]
}
EOF

# ポリシーを作成
aws iam create-policy \
  --policy-name FleetProvisioningPolicy \
  --policy-document file://fleet-provisioning-policy.json

# ロールにポリシーをアタッチ(YOUR_ACCOUNT_IDは実際のアカウントIDに置き換え)
aws iam attach-role-policy \
  --role-name FleetProvisioningRole \
  --policy-arn arn:aws:iam::YOUR_ACCOUNT_ID:policy/FleetProvisioningPolicy
今回は上記権限を付与しましたが、プロビジョニング時に権限が足りず失敗する場合は下記ブログに書いたようにCloudTrailでエラーが出ているのでログから調査可能です。
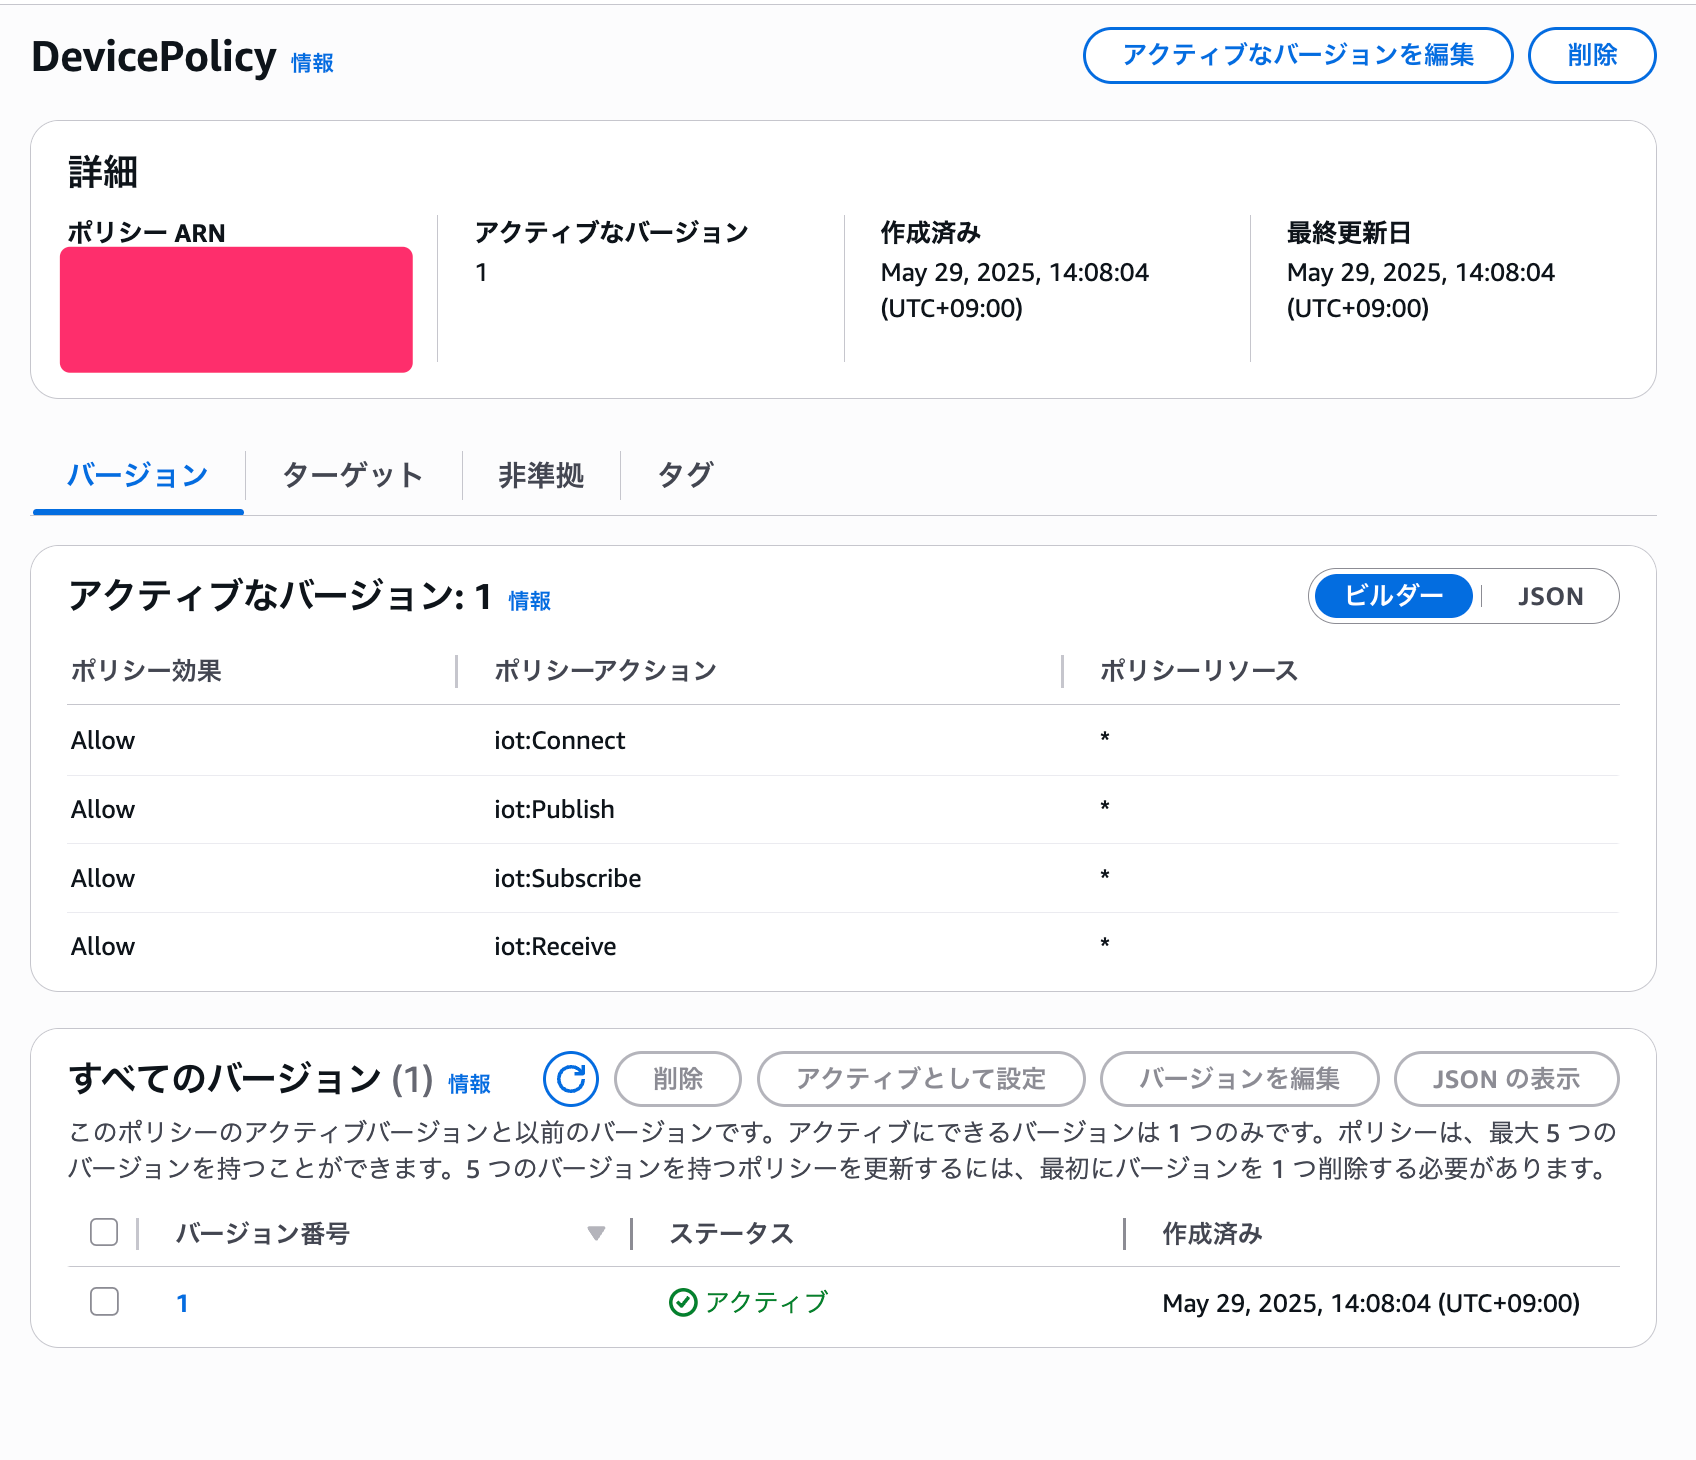
デバイス用のポリシーを作成
プロビジョニング後にデバイスにアタッチされるポリシーを作成します。
今回は検証のためゆるゆるにしていますが、要件や必要に応じてポリシーは調整しましょう。
# デバイス用ポリシーファイルを作成
cat > device-policy.json << EOF
{
  "Version": "2012-10-17",
  "Statement": [
    {
      "Effect": "Allow",
      "Action": [
        "iot:Connect",
        "iot:Publish",
        "iot:Subscribe",
        "iot:Receive"
      ],
      "Resource": "*"
    }
  ]
}
EOF

# ポリシーを作成
aws iot create-policy \
  --policy-name DevicePolicy \
  --policy-document file://device-policy.json
プロビジョニングテンプレートの作成
Fleet Provisioningの動作を定義するテンプレートを作成します。
JITPで書いたテンプレートとほぼ書き方は一緒ですね。
このテンプレート自体にロールを書かないぐらいが違いでしょうか。
一旦はリクエスト時にDeviceIdをパラメータで受け取って、モノの名前であるThingNameに付与する設定にしました。グループや属性を設定したい要件があれば追記しましょう。
ここもYOUR_ACCOUNT_IDと出ている箇所はご自身のアカウントIDに変更ください。
# プロビジョニングテンプレートファイルを作成
cat > provisioning-template.json << 'EOF'
{
  "Parameters": {
    "DeviceId": {
      "Type": "String"
    }
  },
  "Resources": {
    "thing": {
      "Type": "AWS::IoT::Thing",
      "Properties": {
        "ThingName": {
          "Fn::Join": [
            "",
            [
              "MyDevice-",
              {
                "Ref": "DeviceId"
              }
            ]
          ]
        }
      }
    },
    "certificate": {
      "Type": "AWS::IoT::Certificate",
      "Properties": {
        "CertificateId": {
          "Ref": "AWS::IoT::Certificate::Id"
        },
        "Status": "ACTIVE"
      }
    },
    "policy": {
      "Type": "AWS::IoT::Policy",
      "Properties": {
        "PolicyName": "DevicePolicy"
      }
    }
  }
}
EOF

# プロビジョニングテンプレートを作成(YOUR_ACCOUNT_IDは実際のアカウントIDに置き換え)
aws iot create-provisioning-template \
  --template-name MyDeviceTemplate \
  --description "Fleet provisioning template for my devices" \
  --template-body file://provisioning-template.json \
  --provisioning-role-arn arn:aws:iam::YOUR_ACCOUNT_ID:role/FleetProvisioningRole \
  --enabled
クレーム証明書の作成とS3への保存
初回接続で使用するクレーム証明書を作成します。
OpenSSLなどで自前の証明書は作成する必要がなく、iot create-keys-and-certificateコマンドで作成可能です。便利でいいですね。
# クレーム証明書を作成してJSON結果をファイルに保存
aws iot create-keys-and-certificate \
  --set-as-active \
  --certificate-pem-outfile claim-cert.pem \
  --public-key-outfile claim-public.key \
  --private-key-outfile claim-private.key > claim-certificate-result.json
実行すると、以下のような結果がファイルに保存されます。
{
    "certificateArn": "arn:aws:iot:ap-northeast-1:***:cert/***",
    "certificateId": "***",
    "certificatePem": "-----BEGIN CERTIFICATE-----\n***\n...",
    "keyPair": {
        "PublicKey": "-----BEGIN PUBLIC KEY-----\n***\n...",
        "PrivateKey": "-----BEGIN RSA PRIVATE KEY-----\n***\n..."
    }
}
結果をS3に保存します。
バケット名は一意である任意の名前に変更ください。
# S3バケットを作成(バケット名は一意である必要があります)
aws s3 mb s3://your-iot-fleet-provisioning-bucket
# 証明書結果JSONをS3にアップロード
aws s3 cp claim-certificate-result.json s3://your-iot-fleet-provisioning-bucket/certificates/
# 生成されたファイルもS3にアップロード(バックアップ用)
aws s3 cp claim-cert.pem s3://your-iot-fleet-provisioning-bucket/certificates/
aws s3 cp claim-private.key s3://your-iot-fleet-provisioning-bucket/certificates/
aws s3 cp claim-public.key s3://your-iot-fleet-provisioning-bucket/certificates/
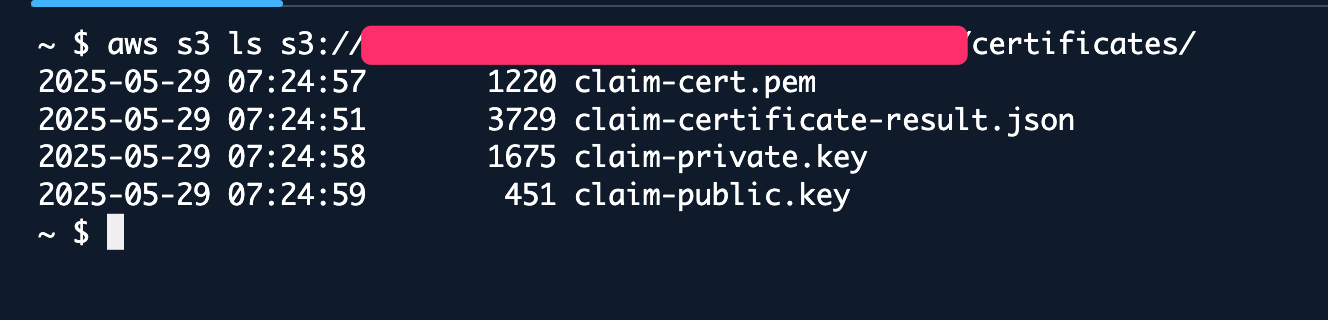
# アップロード確認
aws s3 ls s3://your-iot-fleet-provisioning-bucket/certificates/
確認して下記結果のようにアップロードされていればOKです!
クレーム証明書用のポリシーを作成・アタッチ
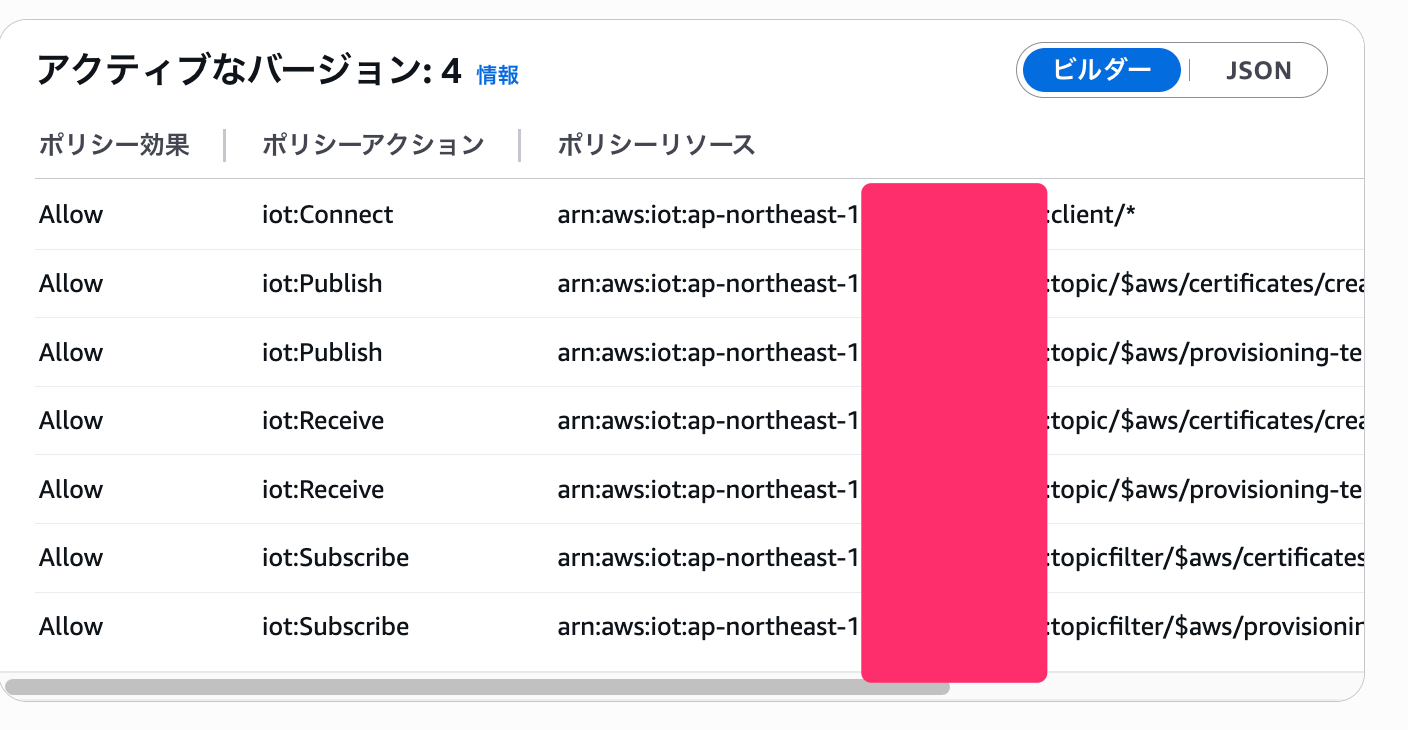
全デバイス共通のクレーム証明書を作成します。プロビジョニングに必要な権限のみに絞っています。このクレーム証明書を使用することで、デバイスからのリクエストでFleet Provisioningが可能になります。
また前提として、東京リージョンを使用、YOUR_ACCOUNT_IDはご自身のアカウントIDに変更ください。
# クレーム証明書用ポリシーファイルを作成
cat > claim-policy.json << EOF
{
  "Version": "2012-10-17",
  "Statement": [
    {
      "Effect": "Allow",
      "Action": "iot:Connect",
      "Resource": "arn:aws:iot:ap-northeast-1:YOUR_ACCOUNT_ID:client/*"
    },
    {
      "Effect": "Allow",
      "Action": [
        "iot:Publish",
        "iot:Receive"
      ],
      "Resource": [
        "arn:aws:iot:ap-northeast-1:YOUR_ACCOUNT_ID:topic/$aws/certificates/create/*",
        "arn:aws:iot:ap-northeast-1:YOUR_ACCOUNT_ID:topic/$aws/provisioning-templates/MyDeviceTemplate/provision/*"
      ]
    },
    {
      "Effect": "Allow",
      "Action": "iot:Subscribe",
      "Resource": [
        "arn:aws:iot:ap-northeast-1:YOUR_ACCOUNT_ID:topicfilter/$aws/certificates/create/*",
        "arn:aws:iot:ap-northeast-1:YOUR_ACCOUNT_ID:topicfilter/$aws/provisioning-templates/MyDeviceTemplate/provision/*"
      ]
    }
  ]
}
EOF

# ポリシーを作成
aws iot create-policy \
  --policy-name ClaimPolicy \
  --policy-document file://claim-policy.json

# クレーム証明書にポリシーをアタッチ(certificateArnはJSONファイルから確認)
aws iot attach-principal-policy \
  --policy-name ClaimPolicy \
  --principal $(cat claim-certificate-result.json | jq -r '.certificateArn')
ここまででクレーム証明書がコンソール上で作成されているか確認してみます。
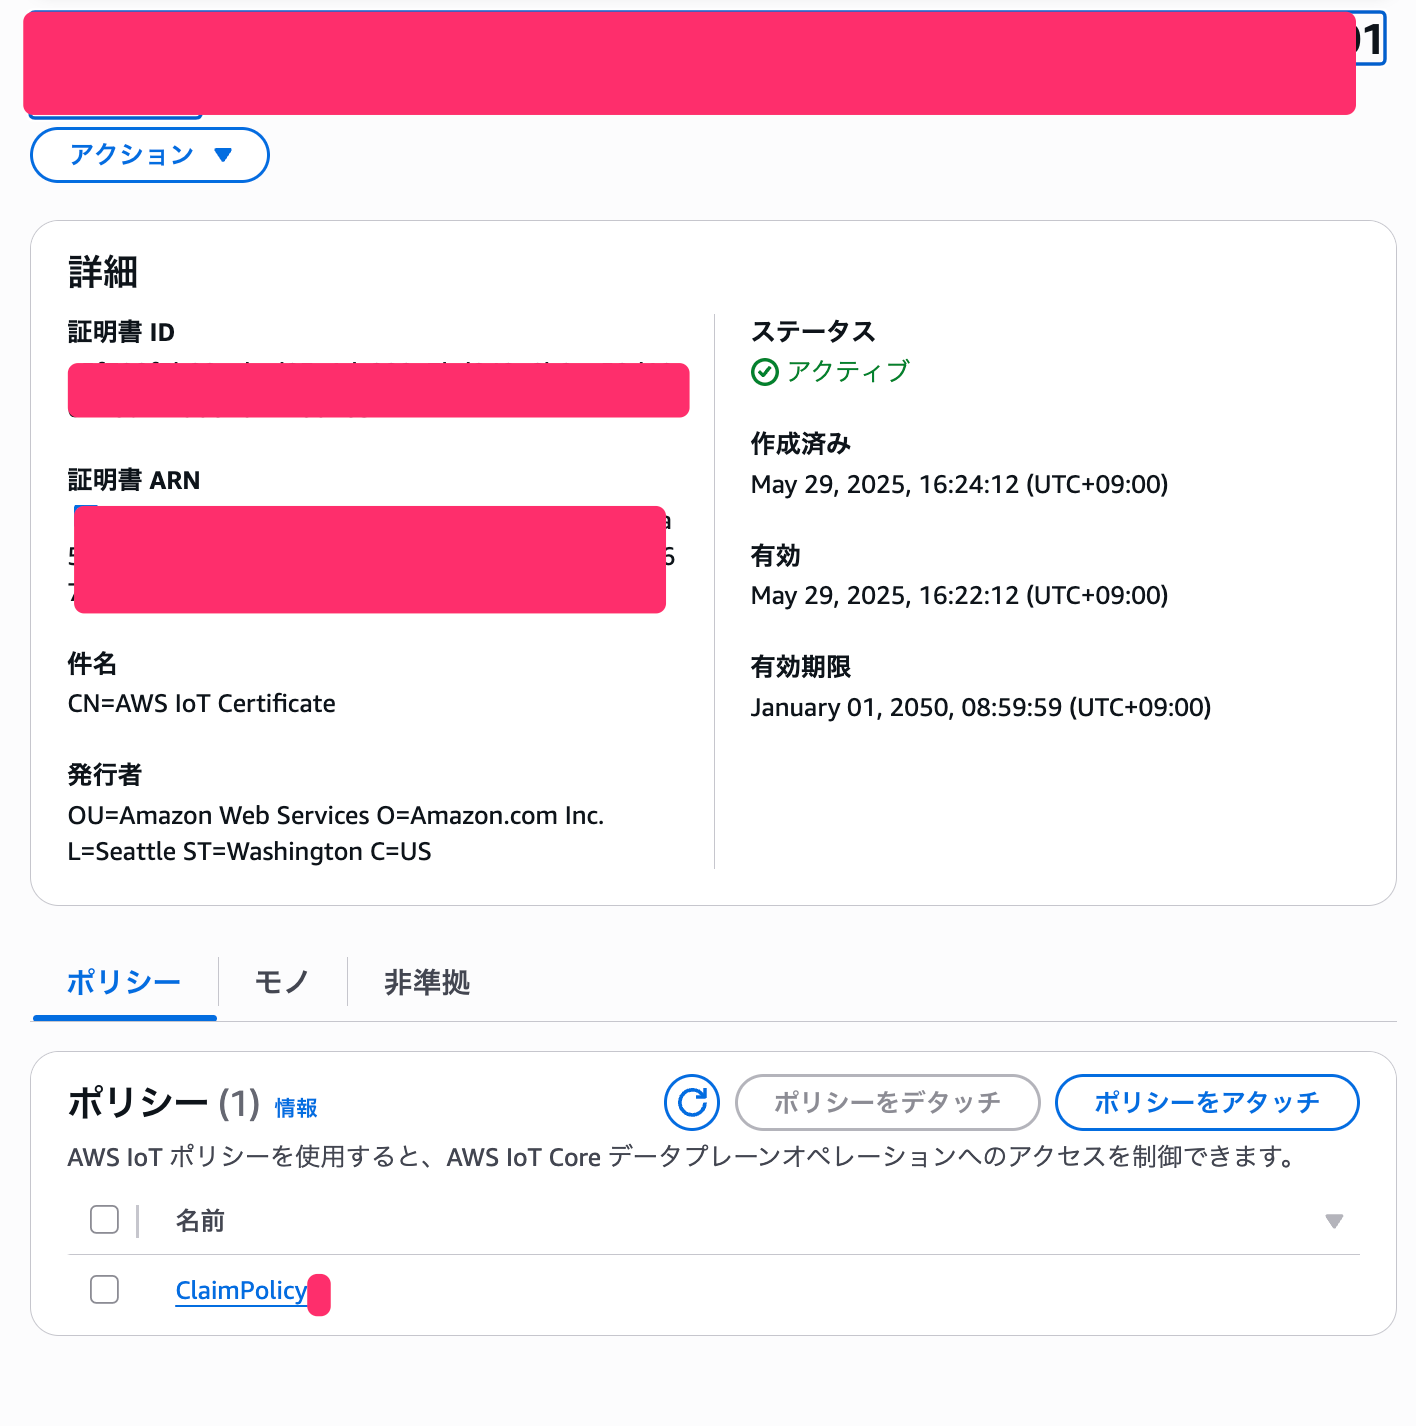
作成されていますね!ポリシーも意図したポリシーが反映されていますね!
デバイスはこのクレーム証明書を使ってプロビジョニングを実施します。
AWS IoT Coreエンドポイントの取得
デバイス側で接続するために、AWS IoT Coreのエンドポイントを取得しておく必要があります。
CloudShellで以下のコマンドを実行します。
# AWS IoT Coreエンドポイントを取得
aws iot describe-endpoint --endpoint-type iot:Data-ATS
実行結果
{
    "endpointAddress": "xxxxxxxxxx-ats.iot.ap-northeast-1.amazonaws.com"
}
このendpointAddressの値をメモしておいてください。デバイス側のスクリプトで使用します。
ここからデバイスの実装に移っていきますが、今までCloudShellとS3だけで諸々と設定することができました!
お手軽で便利ですね。
もしCloudShell上に証明書の情報など残しておきたくなければ、削除しておきましょう!
rm -f claim-certificate-result.json
デバイスへの証明書配置
実際のデバイスで使用するため、S3に保存した証明書情報をダウンロードして配置します。
-
AWSコンソールからS3のクレーム証明書と秘密鍵をダウンロード
- AWSコンソールにログイン
- S3サービスを開く
- 作成したバケットを開く
- クレーム証明書
claim-cert.pem、秘密鍵claim-private.keyをダウンロード
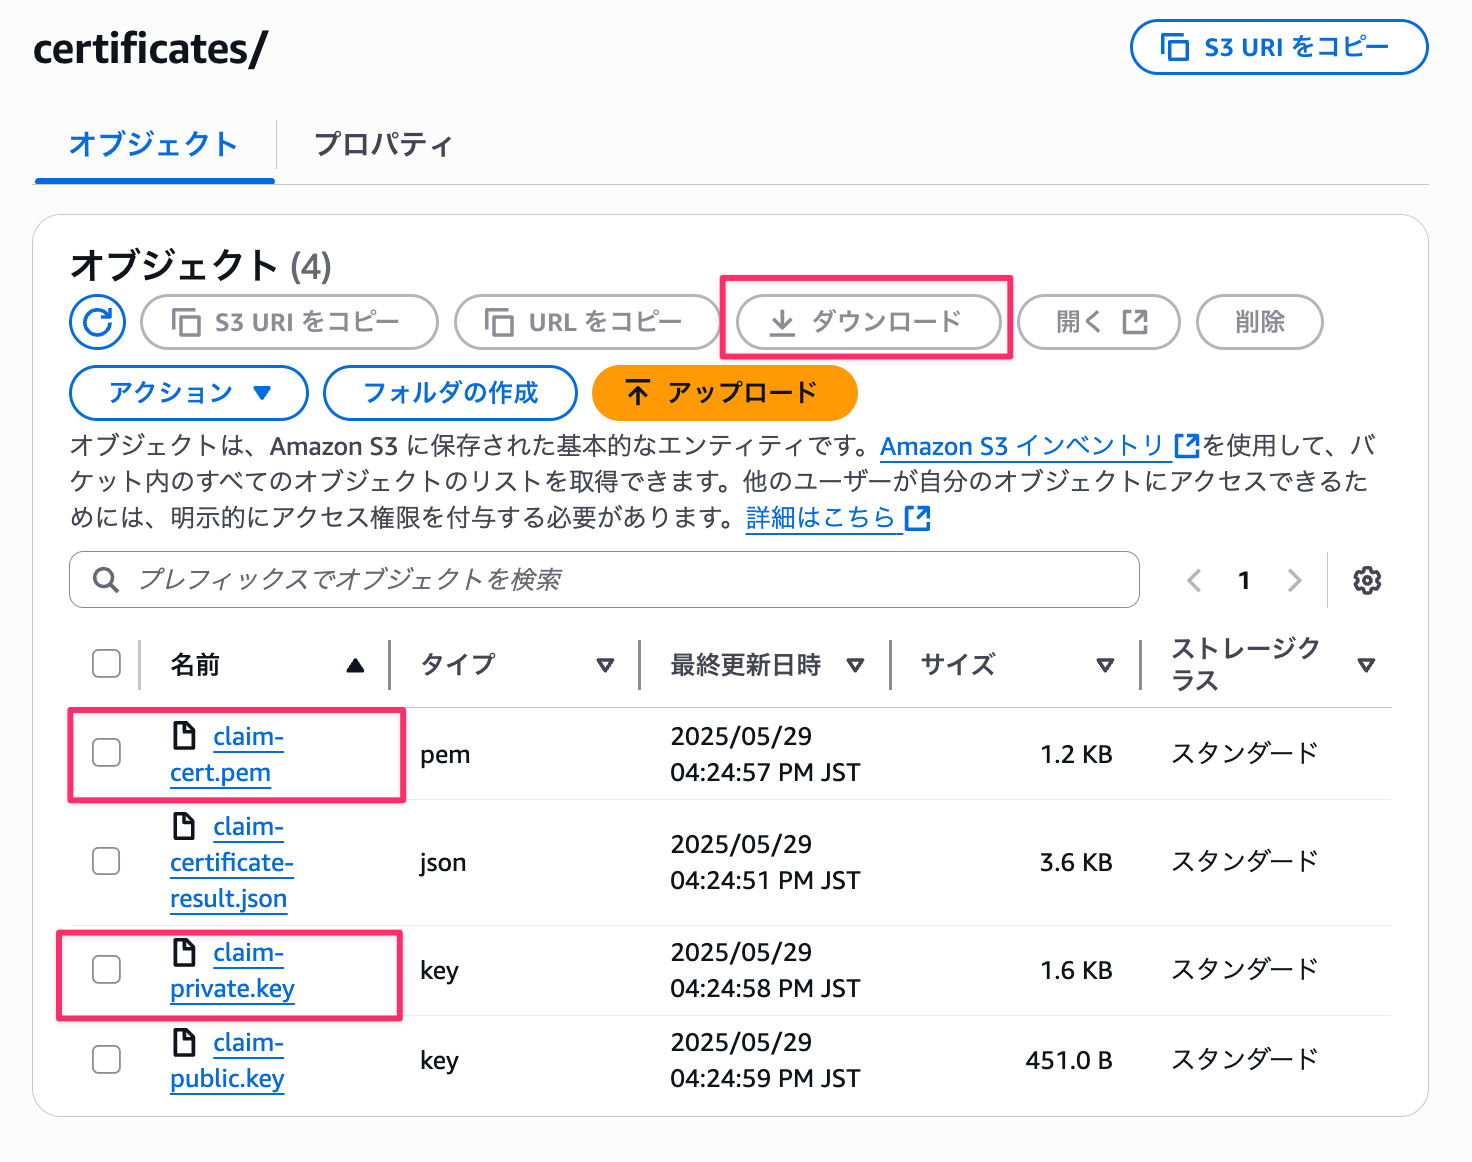
これで、デバイス側でFleet Provisioningに必要な証明書ファイルが準備できました。
ダウンロードしたクレーム証明書と秘密鍵はPythonスクリプト実行するパスと同階層に配置します。
Pythonスクリプトの実装
事前に使用するライブラリをインストールします。
pip install awsiotsdk
処理を記載していきます。
処理全体
import uuid
import time
import threading
from awscrt import mqtt
from awsiot import iotidentity, mqtt_connection_builder
from concurrent.futures import Future

class FleetProvisioningClient:
    def __init__(self, endpoint, cert_path, key_path, ca_path,
                 template_name="MyDeviceTemplate", region='ap-northeast-1'):
        self.endpoint = endpoint
        self.region = region
        self.cert_path = cert_path
        self.key_path = key_path
        self.ca_path = ca_path
        self.template_name = template_name
        self.device_id = str(uuid.uuid4())
        self.client_id = f"claiming-device-{self.device_id}"

        # レスポンス格納用
        self.create_keys_response = None
        self.register_thing_response = None
        self.is_sample_done = threading.Event()
        self.mqtt_connection = None
        self.identity_client = None

        # AWS IoT Core のルートCAをダウンロード(初回のみ)
        if ca_path == 'root-ca.pem':
            self._download_root_ca()

    def _download_root_ca(self):
        """AWS IoT CoreのルートCA証明書をダウンロード"""
        import urllib.request
        try:
            urllib.request.urlretrieve(
                'https://www.amazontrust.com/repository/AmazonRootCA1.pem',
                self.ca_path
            )
            print(f"ルートCA証明書をダウンロードしました: {self.ca_path}")
        except Exception as e:
            print(f"ルートCA証明書のダウンロードに失敗しました: {e}")

    def _on_connection_interrupted(self, connection, error, **kwargs):
        print(f"接続が中断されました。エラー: {error}")

    def _on_connection_resumed(self, connection, return_code, session_present, **kwargs):
        print(f"接続が復旧しました。return_code: {return_code} session_present: {session_present}")

    def _on_disconnected(self, disconnect_future):
        print("切断されました。")
        self.is_sample_done.set()

    def _create_keys_accepted(self, response):
        """CreateKeysAndCertificate成功時のコールバック"""
        try:
            self.create_keys_response = response
            print("新しい証明書とキーが正常に作成されました!")
            print(f"証明書ID: {response.certificate_id}")
        except Exception as e:
            print(f"CreateKeysAndCertificate応答処理エラー: {e}")

    def _create_keys_rejected(self, rejected):
        """CreateKeysAndCertificate拒否時のコールバック"""
        print(f"CreateKeysAndCertificate要求が拒否されました。")
        print(f"エラーコード: {rejected.error_code}")
        print(f"エラーメッセージ: {rejected.error_message}")
        print(f"ステータスコード: {rejected.status_code}")

    def _register_thing_accepted(self, response):
        """RegisterThing成功時のコールバック"""
        try:
            self.register_thing_response = response
            print("デバイス登録が正常に完了しました!")
            print(f"Thing名: {response.thing_name}")
        except Exception as e:
            print(f"RegisterThing応答処理エラー: {e}")

    def _register_thing_rejected(self, rejected):
        """RegisterThing拒否時のコールバック"""
        print(f"RegisterThing要求が拒否されました。")
        print(f"エラーコード: {rejected.error_code}")
        print(f"エラーメッセージ: {rejected.error_message}")
        print(f"ステータスコード: {rejected.status_code}")

    def provision_device(self):
        """デバイスのプロビジョニングを実行"""
        print(f"デバイス ID: {self.device_id} でプロビジョニングを開始します")

        try:
            # MQTT接続を作成
            print("MQTT接続を作成中...")
            self.mqtt_connection = mqtt_connection_builder.mtls_from_path(
                endpoint=self.endpoint,
                port=8883,
                cert_filepath=self.cert_path,
                pri_key_filepath=self.key_path,
                ca_filepath=self.ca_path,
                on_connection_interrupted=self._on_connection_interrupted,
                on_connection_resumed=self._on_connection_resumed,
                client_id=self.client_id,
                clean_session=False,
                keep_alive_secs=30
            )

            print(f"エンドポイント {self.endpoint} にクライアントID '{self.client_id}' で接続中...")
            connected_future = self.mqtt_connection.connect()

            # アイデンティティクライアントを作成
            self.identity_client = iotidentity.IotIdentityClient(self.mqtt_connection)

            # 接続完了を待機
            connected_future.result()
            print("接続成功!")

            # 第1段階: CreateKeysAndCertificate のサブスクリプション
            print("CreateKeysAndCertificate トピックにサブスクライブ中...")

            create_keys_subscription_request = iotidentity.CreateKeysAndCertificateSubscriptionRequest()

            # Accepted サブスクリプション
            create_keys_accepted_future, _ = self.identity_client.subscribe_to_create_keys_and_certificate_accepted(
                request=create_keys_subscription_request,
                qos=mqtt.QoS.AT_LEAST_ONCE,
                callback=self._create_keys_accepted
            )
            create_keys_accepted_future.result()

            # Rejected サブスクリプション
            create_keys_rejected_future, _ = self.identity_client.subscribe_to_create_keys_and_certificate_rejected(
                request=create_keys_subscription_request,
                qos=mqtt.QoS.AT_LEAST_ONCE,
                callback=self._create_keys_rejected
            )
            create_keys_rejected_future.result()

            # CreateKeysAndCertificate 要求を発行
            print("CreateKeysAndCertificate 要求を送信中...")
            publish_future = self.identity_client.publish_create_keys_and_certificate(
                request=iotidentity.CreateKeysAndCertificateRequest(),
                qos=mqtt.QoS.AT_LEAST_ONCE
            )
            publish_future.result()
            print("CreateKeysAndCertificate 要求を送信しました")

            # 応答を待機
            self._wait_for_create_keys_response()

            if self.create_keys_response is None:
                raise Exception('CreateKeysAndCertificate APIが成功しませんでした')

            # 第2段階: RegisterThing のサブスクリプション
            print("RegisterThing トピックにサブスクライブ中...")

            register_thing_subscription_request = iotidentity.RegisterThingSubscriptionRequest(
                template_name=self.template_name
            )

            # Accepted サブスクリプション
            register_thing_accepted_future, _ = self.identity_client.subscribe_to_register_thing_accepted(
                request=register_thing_subscription_request,
                qos=mqtt.QoS.AT_LEAST_ONCE,
                callback=self._register_thing_accepted
            )
            register_thing_accepted_future.result()

            # Rejected サブスクリプション
            register_thing_rejected_future, _ = self.identity_client.subscribe_to_register_thing_rejected(
                request=register_thing_subscription_request,
                qos=mqtt.QoS.AT_LEAST_ONCE,
                callback=self._register_thing_rejected
            )
            register_thing_rejected_future.result()

            # RegisterThing 要求を作成・送信
            print("RegisterThing 要求を送信中...")
            register_thing_request = iotidentity.RegisterThingRequest(
                template_name=self.template_name,
                certificate_ownership_token=self.create_keys_response.certificate_ownership_token,
                parameters={
                    "DeviceId": self.device_id
                }
            )

            register_thing_future = self.identity_client.publish_register_thing(
                register_thing_request,
                mqtt.QoS.AT_LEAST_ONCE
            )
            register_thing_future.result()
            print("RegisterThing 要求を送信しました")

            # 応答を待機
            self._wait_for_register_thing_response()

            if self.register_thing_response is None:
                raise Exception('RegisterThing APIが成功しませんでした')

            return {
                'certificate': self.create_keys_response,
                'thing': self.register_thing_response
            }

        finally:
            if self.mqtt_connection:
                print("接続を切断中...")
                disconnect_future = self.mqtt_connection.disconnect()
                disconnect_future.add_done_callback(self._on_disconnected)
                self.is_sample_done.wait()

    def _wait_for_create_keys_response(self):
        """CreateKeysAndCertificate応答を待機"""
        loop_count = 0
        while loop_count < 10 and self.create_keys_response is None:
            if self.create_keys_response is not None:
                break
            print('CreateKeysAndCertificate応答を待機中...')
            loop_count += 1
            time.sleep(1)

    def _wait_for_register_thing_response(self):
        """RegisterThing応答を待機"""
        loop_count = 0
        while loop_count < 20 and self.register_thing_response is None:
            if self.register_thing_response is not None:
                break
            print('RegisterThing応答を待機中...')
            loop_count += 1
            time.sleep(1)

def main():
    # エンドポイントを指定
    endpoint = "xxx.iot.ap-northeast-1.amazonaws.com"

    print(f"AWS IoT Core エンドポイント: {endpoint}")

    # クレーム証明書を使用してFleet Provisioningクライアントを作成
    provisioning_client = FleetProvisioningClient(
        endpoint=endpoint,
        cert_path='claim-cert.pem',
        key_path='claim-private.key',
        ca_path='root-ca.pem',
        template_name='MyDeviceTemplate'
    )

    try:
        # デバイスプロビジョニングを実行
        response = provisioning_client.provision_device()
        print("\nFleet Provisioning が正常に完了しました!")
        print(f"新しい証明書ID: {response['certificate'].certificate_id}")
        print(f"Thing名: {response['thing'].thing_name}")

        # 新しい証明書とキーを保存
        if response['certificate'].certificate_pem:
            with open('device-cert.pem', 'w') as f:
                f.write(response['certificate'].certificate_pem)
            print("新しいデバイス証明書を device-cert.pem に保存しました")

        if response['certificate'].private_key:
            with open('device-private.key', 'w') as f:
                f.write(response['certificate'].private_key)
            print("新しいプライベートキーを device-private.key に保存しました")

    except Exception as e:
        print(f"エラーが発生しました: {e}")

if __name__ == "__main__":
    main()
処理は長いので折りたたんでおりますが、流れとしては下記となります。
- クレーム証明書でMQTT接続
- 共通のクレーム証明書を使ってAWS IoT Coreに接続
- デバイスIDをUUIDで生成
- CreateKeysAndCertificate API実行
- デバイス固有の新しい証明書とプライベートキーを作成
- 証明書オーナーシップトークンを取得
- RegisterThing API実行
- オーナーシップトークンとDeviceIDをパラメータに設定
- プロビジョニングテンプレートに基づいてモノ(Thing)を登録
- Thing名が「MyDevice-{DeviceID}」で自動作成される
- 新しい証明書を保存
device-cert.pemとdevice-private.keyにファイル保存- 以降はこの新しい証明書でデバイスが通信
これで1台のデバイスが自動的にAWS IoT Coreに登録され、固有の認証情報を取得できる仕組みが完成します!
動作確認
スクリプトを実行して、Fleet Provisioningが正常に動作するか確認してみます。
まず、エンドポイントを実際の値に置き換えてからスクリプトを実行します。
# main関数のendpoint変数を実際の値に変更
endpoint = "a1b2c3d4e5f6g7-ats.iot.ap-northeast-1.amazonaws.com"
スクリプトを実行
python fleet_provisioning_client.py
正常に動作すると、以下のような出力が表示されます。
ルートCA証明書をダウンロードしました: root-ca.pem
デバイス ID: xxx でプロビジョニングを開始します
MQTT接続を作成中...
エンドポイント xxx-ats.iot.ap-northeast-1.amazonaws.com にクライアントID 'claiming-device-476bad26-b974-41d3-b03a-a16d845bc58f' で接続中...
接続成功!
CreateKeysAndCertificate トピックにサブスクライブ中...
CreateKeysAndCertificate 要求を送信中...
CreateKeysAndCertificate 要求を送信しました
CreateKeysAndCertificate応答を待機中...
新しい証明書とキーが正常に作成されました!
証明書ID: xxx
RegisterThing トピックにサブスクライブ中...
RegisterThing 要求を送信中...
RegisterThing 要求を送信しました
RegisterThing応答を待機中...
デバイス登録が正常に完了しました!
Thing名: MyDevice-476bad26-b974-41d3-b03a-a16d845bc58f
接続を切断中...
切断されました。

Fleet Provisioning が正常に完了しました!
新しい証明書ID: xxx
Thing名: MyDevice-476bad26-b974-41d3-b03a-a16d845bc58f
新しいデバイス証明書を device-cert.pem に保存しました
新しいプライベートキーを device-private.key に保存しました
実行に成功するとローカルの同階層にdevice-cert.pemとdevice-private.key が作成されています。
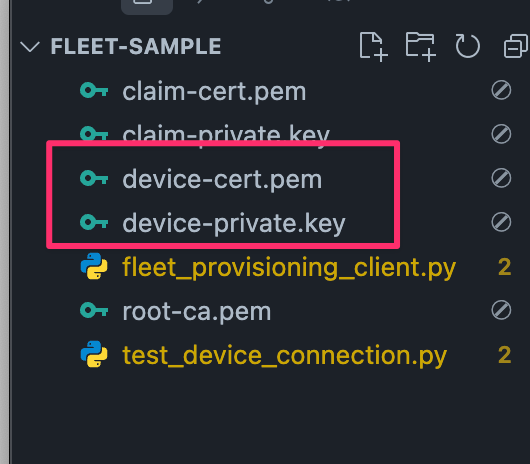
また、AWSマネジメントコンソールのAWS IoT Coreで、新しいモノ(Thing)と証明書が作成されていることも確認できます。
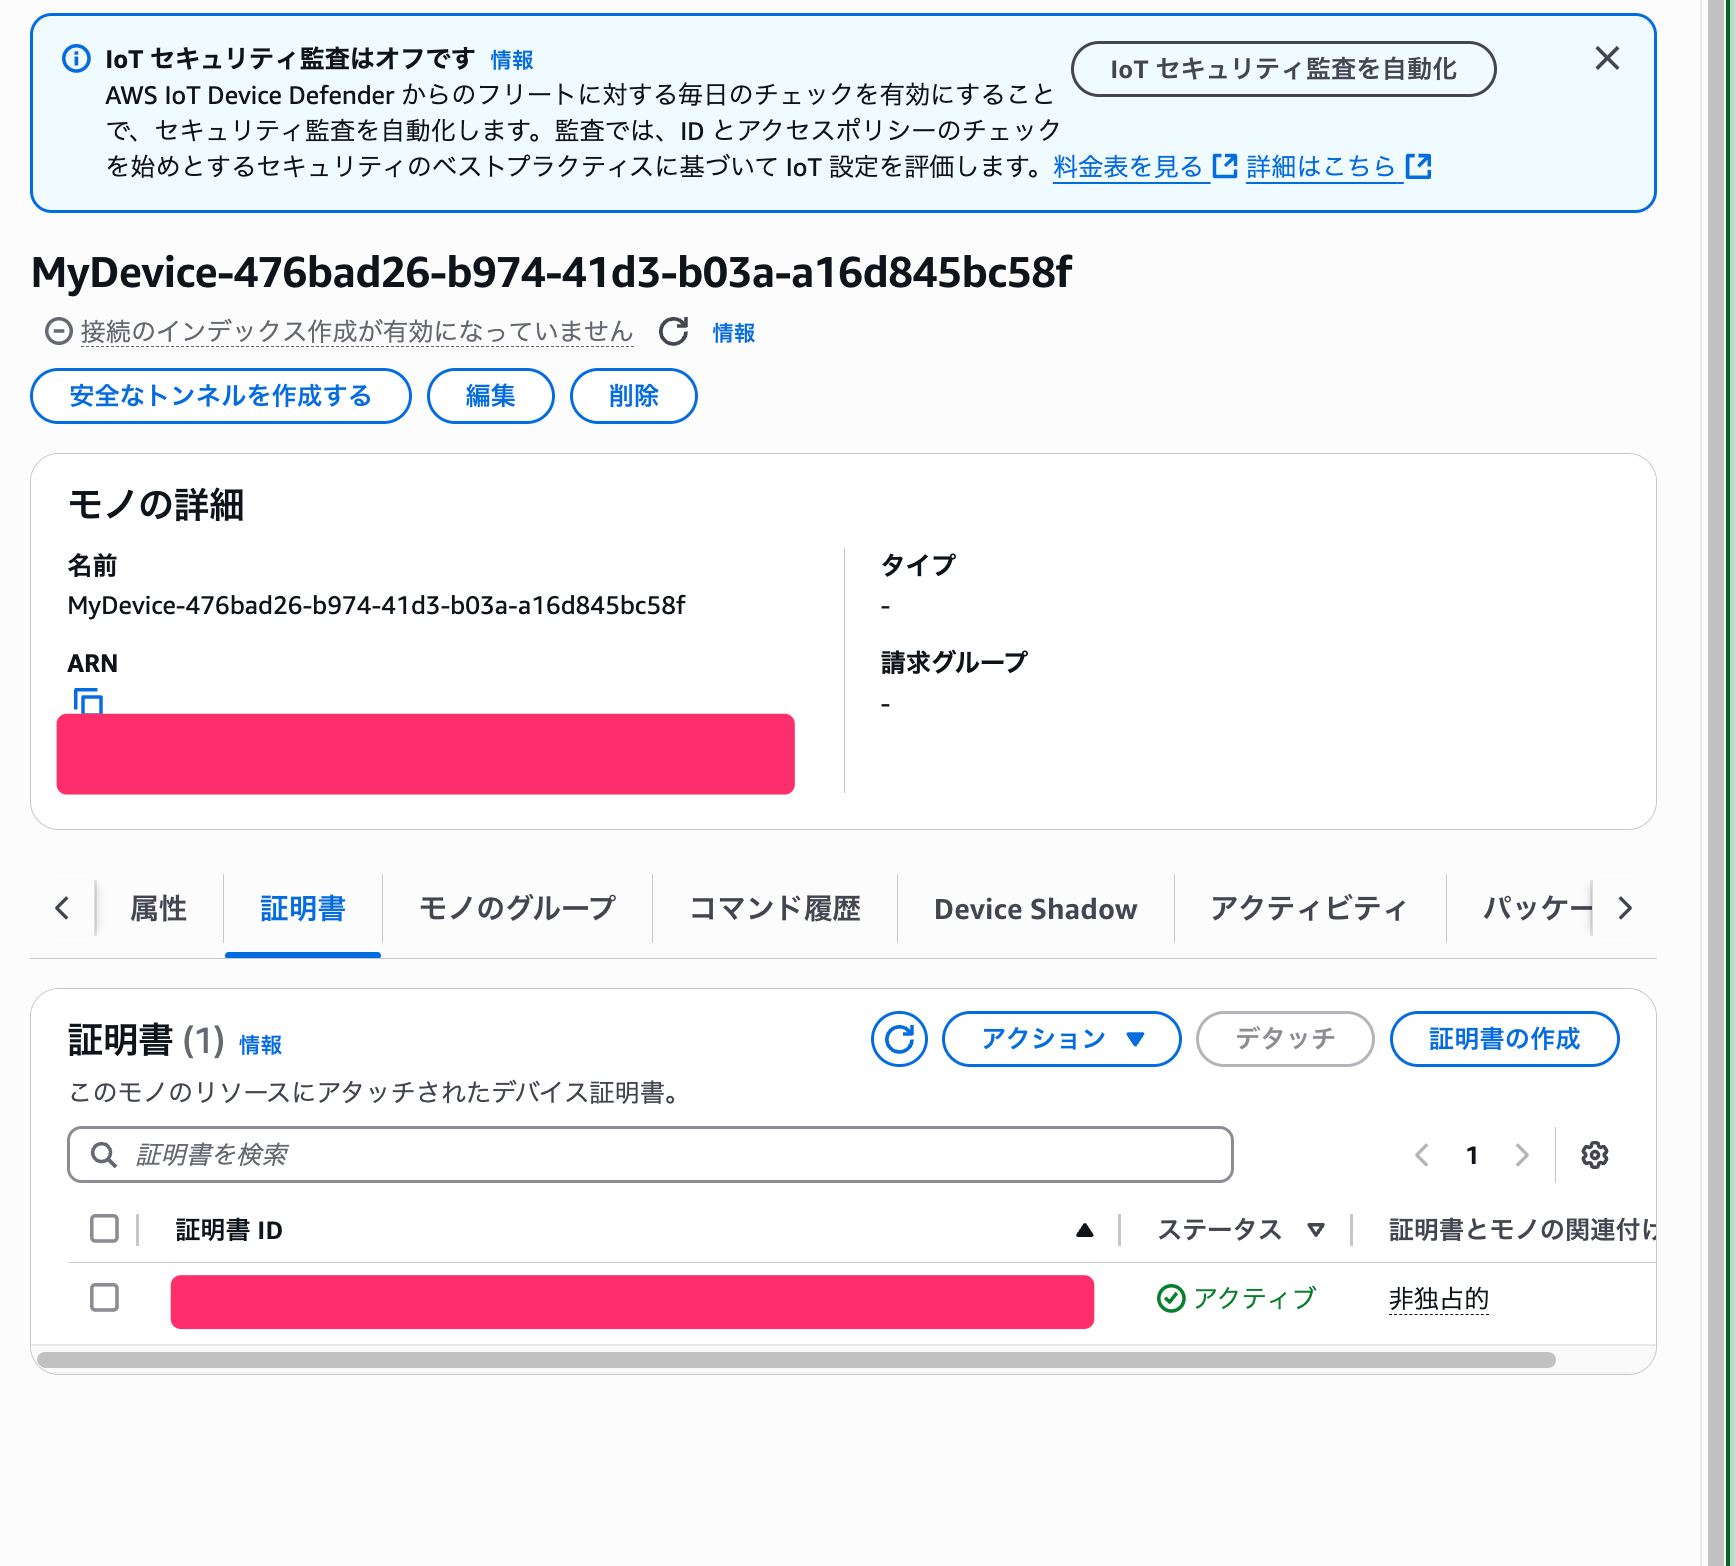
モノの自動登録までできてすごく便利ですね・・・!!!
試しにテスト接続してメッセージをパブリッシュして、テストクライアントで受信できるか確認してみます。
下記Pythonスクリプトを実行してみます。
スクリプトでは個別のクライアント証明書・秘密鍵を使用して通信を実施します。
endpointは実際の値に修正ください。
長いので全体は折りたたんでおります。
処理全体
import time
import json
import uuid
from awscrt import mqtt
from awsiot import mqtt_connection_builder

class DeviceTestClient:
    def __init__(self, endpoint, cert_path, key_path, ca_path='root-ca.pem'):
        self.endpoint = endpoint
        self.cert_path = cert_path
        self.key_path = key_path
        self.ca_path = ca_path
        self.client_id = f"test-device-{str(uuid.uuid4())[:8]}"
        self.mqtt_connection = None

    def connect(self):
        """デバイスをAWS IoT Coreに接続"""
        print(f"新しいデバイス証明書で接続テスト開始...")
        print(f"クライアントID: {self.client_id}")

        # MQTT接続を作成
        self.mqtt_connection = mqtt_connection_builder.mtls_from_path(
            endpoint=self.endpoint,
            port=8883,
            cert_filepath=self.cert_path,
            pri_key_filepath=self.key_path,
            ca_filepath=self.ca_path,
            client_id=self.client_id,
            clean_session=False,
            keep_alive_secs=30
        )

        print(f"エンドポイント {self.endpoint} に接続中...")
        connected_future = self.mqtt_connection.connect()
        connected_future.result()
        print("✅ 接続成功!新しいデバイス証明書で正常に認証されました!")

    def publish_test_message(self, topic="test/topic", message_count=3):
        """テストメッセージを送信"""
        print(f"\n📤 トピック '{topic}' にテストメッセージを送信します...")

        for i in range(message_count):
            # テストメッセージの作成
            test_message = {
                "timestamp": int(time.time()),
                "device_id": self.client_id,
                "message_number": i + 1,
                "status": "Fleet Provisioning Test",
                "data": {
                    "temperature": 25.5 + i,
                    "humidity": 60.0 + i * 2,
                    "battery": 85 - i
                }
            }

            # JSON形式でメッセージを送信
            message_json = json.dumps(test_message, indent=2)
            print(f"\n送信メッセージ {i + 1}:")
            print(message_json)

            # メッセージをパブリッシュ
            publish_future, packet_id = self.mqtt_connection.publish(
                topic=topic,
                payload=message_json,
                qos=mqtt.QoS.AT_LEAST_ONCE
            )

            # パブリッシュ完了を待機
            publish_future.result()
            print(f"✅ メッセージ {i + 1} 送信完了 (Packet ID: {packet_id})")

            # 次のメッセージまで少し待機
            if i < message_count - 1:
                time.sleep(2)

    def disconnect(self):
        """接続を切断"""
        if self.mqtt_connection:
            print("\n🔌 接続を切断中...")
            disconnect_future = self.mqtt_connection.disconnect()
            disconnect_future.result()
            print("✅ 切断完了")

def main():
    # エンドポイントを指定(Fleet Provisioningスクリプトと同じもの)
    endpoint = "xxx-ats.iot.ap-northeast-1.amazonaws.com"  # 実際の値に変更してください

    print("=== AWS IoT Core デバイス接続テスト ===")
    print("Fleet Provisioningで生成された証明書を使用してテストします\n")

    # 新しく生成されたデバイス証明書を使用
    test_client = DeviceTestClient(
        endpoint=endpoint,
        cert_path='device-cert.pem',      # Fleet Provisioningで生成
        key_path='device-private.key',    # Fleet Provisioningで生成
        ca_path='root-ca.pem'             # ルートCA
    )

    try:
        # 接続テスト
        test_client.connect()

        # テストメッセージ送信
        test_client.publish_test_message(
            topic="fleet-provisioning/test",
            message_count=3
        )

        print("\n🎉 すべてのテストが正常に完了しました!")
        print("AWSコンソールのIoT Core > テスト > MQTTテストクライアントで")
        print("トピック 'fleet-provisioning/test' をサブスクライブして")
        print("メッセージが受信されていることを確認してください。")

    except Exception as e:
        print(f"❌ エラーが発生しました: {e}")

    finally:
        test_client.disconnect()

if __name__ == "__main__":
    main()
下記は実行とその結果です。
python test_device_connection.py
=== AWS IoT Core デバイス接続テスト ===
Fleet Provisioningで生成された証明書を使用してテストします

新しいデバイス証明書で接続テスト開始...
クライアントID: test-device-97b9097c
エンドポイント xxx-ats.iot.ap-northeast-1.amazonaws.com に接続中...
✅ 接続成功!新しいデバイス証明書で正常に認証されました!

📤 トピック 'fleet-provisioning/test' にテストメッセージを送信します...

送信メッセージ 1:
{
  "timestamp": 1748505279,
  "device_id": "test-device-97b9097c",
  "message_number": 1,
  "status": "Fleet Provisioning Test",
  "data": {
    "temperature": 25.5,
    "humidity": 60.0,
    "battery": 85
  }
}
✅ メッセージ 1 送信完了 (Packet ID: 1)

送信メッセージ 2:
{
  "timestamp": 1748505281,
  "device_id": "test-device-97b9097c",
  "message_number": 2,
  "status": "Fleet Provisioning Test",
  "data": {
    "temperature": 26.5,
    "humidity": 62.0,
    "battery": 84
  }
}
✅ メッセージ 2 送信完了 (Packet ID: 2)

送信メッセージ 3:
{
  "timestamp": 1748505283,
  "device_id": "test-device-97b9097c",
  "message_number": 3,
  "status": "Fleet Provisioning Test",
  "data": {
    "temperature": 27.5,
    "humidity": 64.0,
    "battery": 83
  }
}
✅ メッセージ 3 送信完了 (Packet ID: 3)

🎉 すべてのテストが正常に完了しました!
AWSコンソールのMQTTテストクライアントで
トピック 'fleet-provisioning/test' をサブスクライブして
メッセージが受信されていることを確認してください。

🔌 接続を切断中...
✅ 切断完了
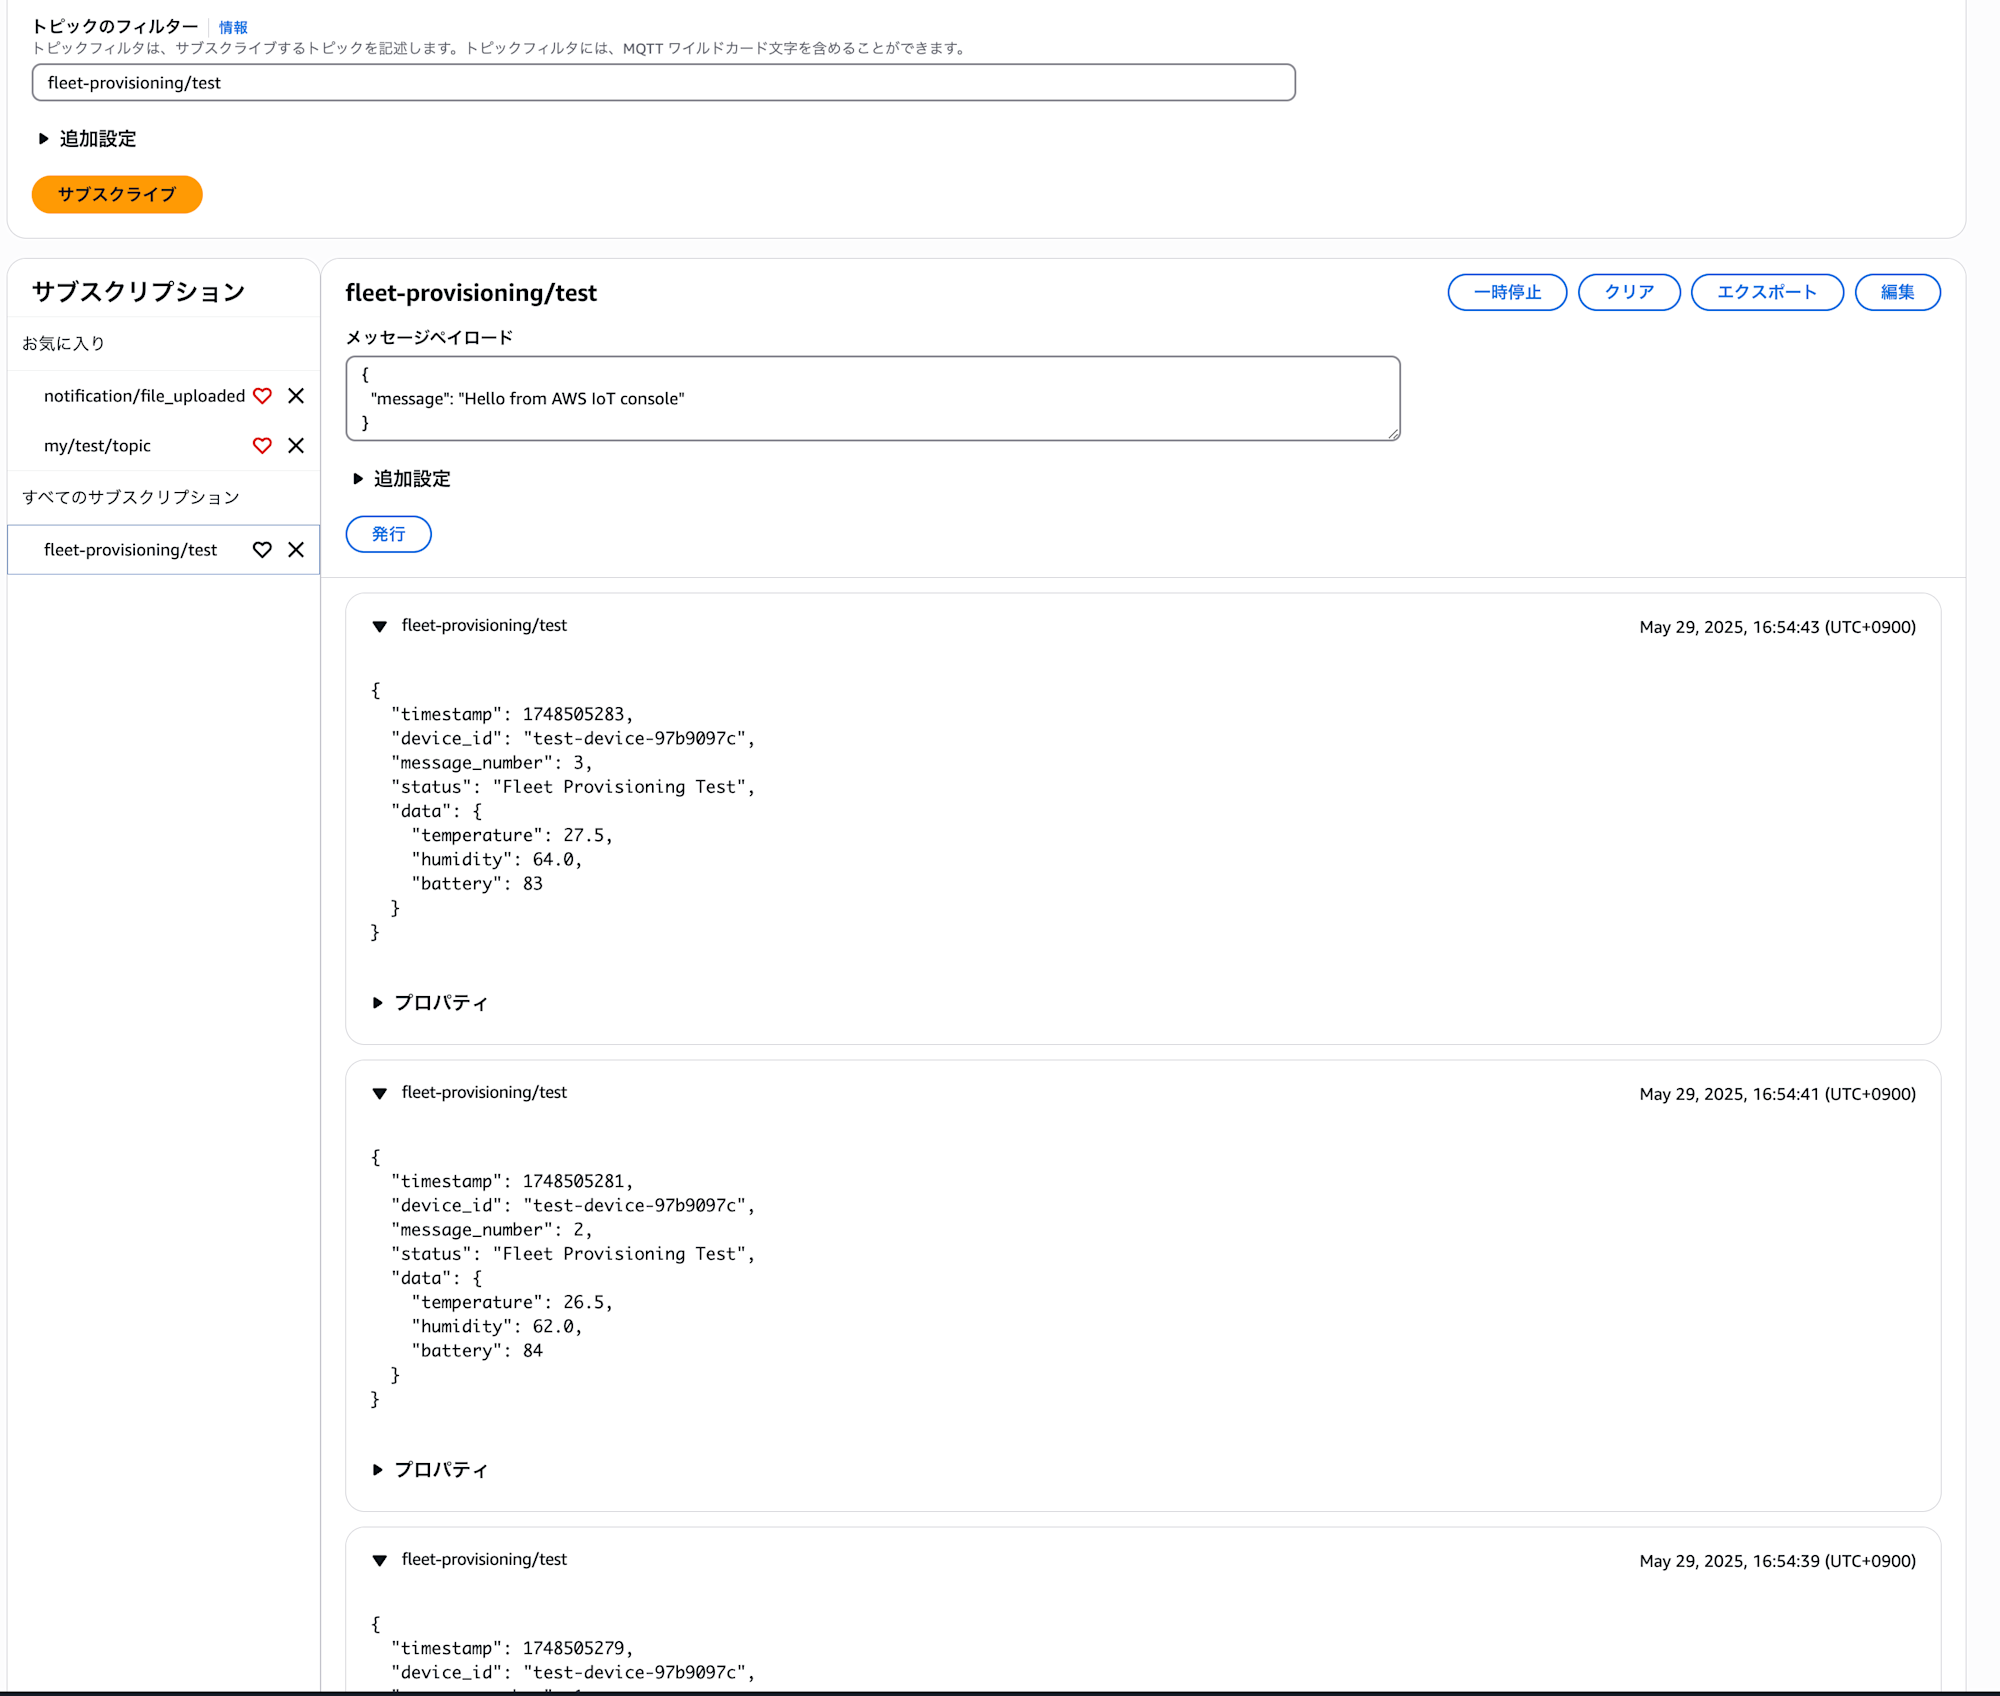
問題なく送信できていることを確認できました!!
おわりに
今回はAWS IoT CoreのFleet Provisioningを使って、IoTデバイスの自動登録を実装してみました。
設定項目が個別で登録する際よりも少し複雑で、エラーメッセージも抽象的な場合がありますが、一度セットアップしてしまえば、大量のデバイスを効率的に管理できる非常に強力な仕組みだと思います。特に、製造ラインでの証明書管理やデバイスのオンボーディングプロセスを自動化したい場合には、とても有効な選択肢になると思いました!
今回はCloudShellとS3を活用して、シンプルに実装して検証してみましたが、実際の運用を考えてどこまでシンプルに寄せるのか工夫する余地は色々とあるかと思います。
本記事が少しでも参考になれば幸いです!最後までお読みいただき、ありがとうございましたー!


