![[AWS IoT Core]容量が大きいファイルを取り扱う際にS3の署名付きURLを活用してファイルアップロードする](https://images.ctfassets.net/ct0aopd36mqt/wp-thumbnail-06e039aecab973a68134b7db69ff9ffd/bd37c8691e5a1f5e3b239f6e8a3888af/aws-iot-core?w=3840&fm=webp)
[AWS IoT Core]容量が大きいファイルを取り扱う際にS3の署名付きURLを活用してファイルアップロードする
この記事は公開されてから1年以上経過しています。情報が古い可能性がありますので、ご注意ください。
はじめに
コンサルティング部の神野です。
デバイスからファイルなどの画像を送信する際、MQTTのペイロード上限は128KBのため、大きいファイルの取り扱いが難しいことがあります。
前回は認証情報プロバイダーを活用してファイルアップロードを実現しましたが、今回はS3の署名付きURLを活用してファイルアップロードを実装します。
署名付きURLについて
署名付きURLは、AWS S3で一時的なアクセス権を付与するための仕組みです。この仕組みを使用することで、通常はアクセス権のないユーザーやアプリケーション、そして本記事のケースではIoTデバイスに対して、特定のオブジェクトへの一時的なアクセスを許可することでS3へのアップロードを実現します。
実装イメージ
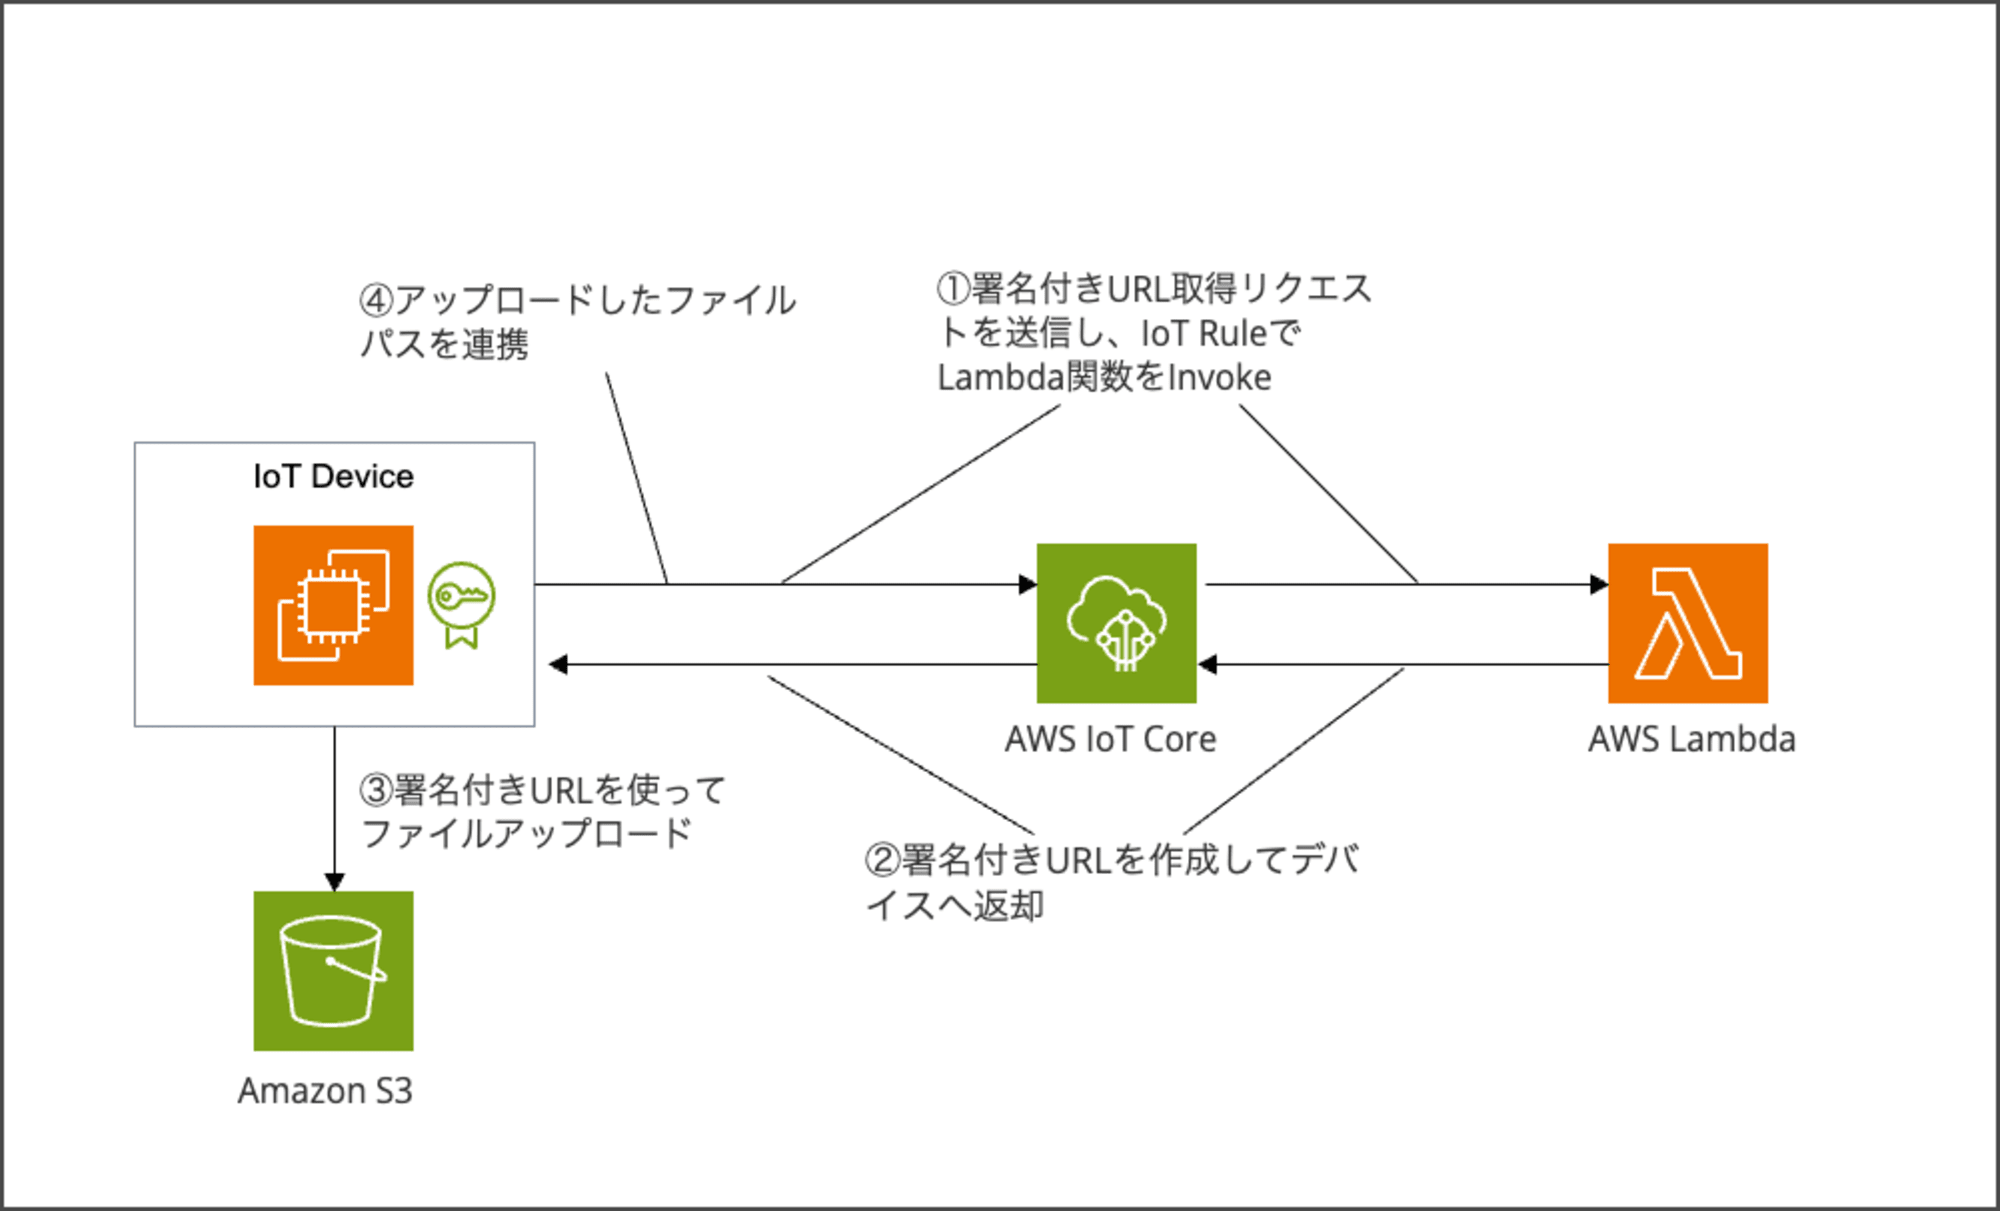
実装のイメージは下記となります。処理の流れとしては以下のように実装します。
- デバイス側からMQTT通信で署名付きURL取得のリクエストをAWS IoT Coreに送信し、RuleでLambda関数を起動
- Lambda関数は署名付きURLを作成し、AWS IoT Coreを経由してデバイスへURLを返却
- デバイスは受け取った署名付きURLを使って、ファイルをアップロード
- アップロードに成功したらファイルパスをAWS IoT Coreに送信
構築
前回の記事に従ってTerraformを使ってデバイスと見立てたEC2を作成します。
この構築用のコードをベースに今回は差分でコードを追記していきます。
下記に、前回の記事で紹介したレポジトリと今回の記事で使用したコードのレポジトリを貼っていますので、参考にしていただければ幸いです。
前回紹介記事のコード
今回実施のコード
作成
今回は署名付きURLを使ってS3にファイルをアップロードするよう実装を進めていきます。
iot.tf
下記リソースを追加で実装します。
- IoTポリシーの追加
- Publish/Recive
request/upload_urlnotification/file_uploadedresponse/file_url
- Subscribe
response/file_url
- Publish/Recive
- アップロードファイル用のS3バケット
- 署名付きURLを発行するLambda関数
- Lambda関数はzip化してアップロード
- IAMポリシーの設定
- S3バケットへの権限設定
response/file_urlトピックへのPublish権限
- IoT Ruleで、
request/upload_urlトピックを受信したらLambda関数を起動するように設定
# IoTポリシーを作成
# このポリシーは特定のトピックに対する操作を許可
resource "aws_iot_policy" "pubsub" {
  name = "PubSubToSpecificTopic"
  policy = jsonencode({
    Version = "2012-10-17"
    Statement = [
      {
        # 特定のクライアントの接続を許可
        Effect   = "Allow"
        Action   = ["iot:Connect"]
        Resource = ["arn:aws:iot:${data.aws_region.current.name}:${data.aws_caller_identity.current.account_id}:client/${aws_iot_thing.example.name}"]
      },
      {
        # 特定のトピックへの発行と受信を許可
        Effect   = "Allow"
        Action   = ["iot:Publish", "iot:Receive"]
+       Resource = ["arn:aws:iot:${data.aws_region.current.name}:${data.aws_caller_identity.current.account_id}:topic/my/test/topic", "arn:aws:iot:${data.aws_region.current.name}:${data.aws_caller_identity.current.account_id}:topic/request/upload_url", "arn:aws:iot:${data.aws_region.current.name}:${data.aws_caller_identity.current.account_id}:topic/notification/file_uploaded", "arn:aws:iot:${data.aws_region.current.name}:${data.aws_caller_identity.current.account_id}:topic/response/file_url"]
      },
      {
        # 特定のトピックフィルターへのサブスクリプションを許可
        Effect   = "Allow"
        Action   = ["iot:Subscribe"]
+       Resource = ["arn:aws:iot:${data.aws_region.current.name}:${data.aws_caller_identity.current.account_id}:topicfilter/my/test/topic", "arn:aws:iot:${data.aws_region.current.name}:${data.aws_caller_identity.current.account_id}:topicfilter/response/file_url"]
      }
    ]
  })
}

+ # S3バケットの作成
+ resource "aws_s3_bucket" "iot_bucket" {
+   # 任意のバケット名を入れてください
+   bucket = "<your-bucket-name>"
+ }

+ # Lambda関数用のIAMロールの作成
+ resource "aws_iam_role" "lambda_role" {
+   name = "iot_lambda_role"
+
+   assume_role_policy = jsonencode({
+     Version = "2012-10-17"
+     Statement = [
+       {
+         Action = "sts:AssumeRole"
+         Effect = "Allow"
+         Principal = {
+           Service = "lambda.amazonaws.com"
+         }
+       }
+     ]
+   })
+ }

+ # Lambda関数用のIAMポリシーの作成
+ resource "aws_iam_role_policy" "lambda_policy" {
+   name = "iot_lambda_policy"
+   role = aws_iam_role.lambda_role.id
+
+   policy = jsonencode({
+     Version = "2012-10-17"
+     Statement = [
+       {
+         Effect = "Allow"
+         Action = [
+           "s3:PutObject",
+           "s3:GetBucketLocation"
+         ]
+         Resource = [
+           aws_s3_bucket.iot_bucket.arn,
+           "${aws_s3_bucket.iot_bucket.arn}/*"
+         ]
+       },
+       {
+         Effect = "Allow"
+         Action = [
+           "iot:Publish"
+         ]
+         Resource = "arn:aws:iot:${data.aws_region.current.name}:${data.aws_caller_identity.current.account_id}:topic/response/file_url"
+       },
+       {
+         Effect = "Allow"
+         Action = [
+           "logs:CreateLogGroup",
+           "logs:CreateLogStream",
+           "logs:PutLogEvents"
+         ]
+         Resource = "arn:aws:logs:*:*:*"
+       }
+     ]
+   })
+ }

+ # lambdaフォルダのソースをzip化
+ data "archive_file" "lambda_zip" {
+   type        = "zip"
+   source_file = "${path.module}/lambda/index.py"
+   output_path = "${path.module}/lambda/index.zip"
+ }

+ # Lambda関数の作成
+ resource "aws_lambda_function" "iot_lambda" {
+   filename      = data.archive_file.lambda_zip.output_path
+   function_name = "iot_s3_url_generator"
+   role          = aws_iam_role.lambda_role.arn
+   handler       = "index.lambda_handler"
+   runtime       = "python3.10"
+
+   environment {
+     variables = {
+       S3_BUCKET = aws_s3_bucket.iot_bucket.id
+     }
+   }
+
+ }

+ # IoT Ruleの作成
+ resource "aws_iot_topic_rule" "iot_rule" {
+   name        = "iot_s3_url_rule"
+   description = "IoT Rule to invoke Lambda for S3 URL generation"
+   enabled     = true
+   sql         = "SELECT * FROM 'request/upload_url'"
+   sql_version = "2016-03-23"
+
+   lambda {
+     function_arn = aws_lambda_function.iot_lambda.arn
+   }
+ }

+ # IoT RuleがLambda関数を呼び出すための権限を付与
+ resource "aws_lambda_permission" "iot_lambda_permission" {
+   statement_id  = "AllowIoTInvoke"
+   action        = "lambda:InvokeFunction"
+   function_name = aws_lambda_function.iot_lambda.function_name
+   principal     = "iot.amazonaws.com"
+   source_arn    = aws_iot_topic_rule.iot_rule.arn
+ }
ec2.tf
ファイルアップロードを実行するPythonファイルupload_file.pyを後で追加するので、下記項目の置換処理を追記します。
- IoT エンドポイント(
iot_endpoint)
# テンプレートファイルの読み込みとローカル変数の設定
locals {
  iot_pubsub_script = templatefile("${path.module}/scripts/iot_pubsub.py", {
    iot_endpoint = data.aws_iot_endpoint.data.endpoint_address
  })

+   upload_file_script = templatefile("${path.module}/scripts/upload_file.py", {
+     iot_endpoint = data.aws_iot_endpoint.data.endpoint_address
+   })

  setup_script = templatefile("${path.module}/scripts/setup.sh", {
    iot_pubsub_script  = local.iot_pubsub_script
+   upload_file_script = local.upload_file_script
    aws_region         = data.aws_region.current.name
  })
}
setup.sh
ファイルアップロード用のスクリプトupload_file.py作成処理を追記します。
#!/bin/bash
yum update -y
yum install -y python3 python3-pip jq
pip3 install AWSIoTPythonSDK boto3 requests

# Retrieve secrets from Secrets Manager
SECRET=$(aws secretsmanager get-secret-value --secret-id iot_certificate_test --region ${aws_region} --query SecretString --output text)

# Extract certificate and private key
echo $SECRET | jq -r '.certificate_pem' > /home/ec2-user/certificate.pem
echo $SECRET | jq -r '.private_key' > /home/ec2-user/private.key

# Download root CA
curl https://www.amazontrust.com/repository/AmazonRootCA1.pem -o /home/ec2-user/root-ca.pem

# Copy the Python script to the EC2 instance
cat <<EOT > /home/ec2-user/iot_pubsub.py
${iot_pubsub_script}
EOT

+ # Copy the Python script to the EC2 instance
+ cat <<EOT > /home/ec2-user/upload_file.py
+ ${upload_file_script}
+ EOT

# Set appropriate permissions
chown ec2-user:ec2-user /home/ec2-user/*.pem /home/ec2-user/*.key /home/ec2-user/*.py
chmod 600 /home/ec2-user/*.pem /home/ec2-user/*.key
chmod 644 /home/ec2-user/*.py
upload_file.py
処理の内容は下記の通りです。
- 初期設定とMQTTクライアントの準備
- AWS IoT Core用のMQTTクライアントを設定して接続
- MQTTメッセージを非同期で実行する用の
publish_workerスレッドを開始 - トピック
response/file_urlをサブスクライブし、署名付きURLの受信
- ファイルアップロードのリクエスト
- コマンドライン引数からアップロードするファイル名を取得
- 署名付きURLのリクエストを作成し、
request/upload_urlトピックにMQTTメッセージとして発行request/upload_urlトピックの受信を起点に、Lambda関数が起動し署名付きURLを発行
- S3へのアップロード
response/file_urlトピックで署名付きURLを受信したら、指定されたファイルをS3にアップロード- アップロードが完了したら、
notification/file_uploadeトピックに成功通知をMQTTメッセージとしてS3のファイルパスを連携
import time
import json
from AWSIoTPythonSDK.MQTTLib import AWSIoTMQTTClient
import sys
import os
import requests
import uuid
from queue import Queue
import threading

# グローバル変数
iot_endpoint = "${iot_endpoint}"
myMQTTClient = None
upload_queue = Queue()
publish_queue = Queue()

def publish_worker():
    """
    MQTTメッセージを非同期で公開するワーカー関数
    """
    while True:
        topic, payload, qos = publish_queue.get()
        if topic is None:
            break
        myMQTTClient.publish(topic, payload, qos)

def on_response_message(client, userdata, message):
    """
    署名付きURLのレスポンスを処理するコールバック関数
    """
    payload = json.loads(message.payload.decode())
    file_path = upload_queue.get()
    signed_url = payload.get("url")
    bucket = payload.get("bucket")
    key = payload.get("key")

    if not signed_url:
        print("Error: No signed URL received")
        return

    try:
        upload_file_to_s3(file_path, signed_url)
        notify_file_uploaded(bucket, key)
        print(f"File uploaded successfully: {os.path.basename(file_path)}")
    except Exception as e:
        print(f"Error during upload: {str(e)}")

def setup_mqtt_client():
    """
    AWS IoT Core用のMQTTクライアントを設定する
    """
    global myMQTTClient
    myMQTTClient = AWSIoTMQTTClient("example-thing")
    myMQTTClient.configureEndpoint(iot_endpoint, 8883)
    myMQTTClient.configureCredentials(
        "/home/ec2-user/root-ca.pem",
        "/home/ec2-user/private.key",
        "/home/ec2-user/certificate.pem"
    )
    myMQTTClient.connect()
    # レスポンストピックをサブスクライブ
    myMQTTClient.subscribe("response/file_url", 1, on_response_message)

def request_signed_url(file_name):
    """
    署名付きURLをリクエストする
    """
    request_id = str(uuid.uuid4())
    request_payload = {
        "request_id": request_id,
        "file_name": file_name,
        "device_id": "example-thing"
    }
    publish_queue.put(("request/upload_url", json.dumps(request_payload), 1))

def upload_file_to_s3(file_path, signed_url):
    """
    署名付きURLを使用してファイルをS3にアップロードする
    """
    with open(file_path, 'rb') as file:
        response = requests.put(signed_url, data=file)

    if response.status_code != 200:
        raise Exception(f"Error uploading file: {response.status_code}")

def notify_file_uploaded(bucket, key):
    """
    ファイルのアップロードが完了したことを通知する
    """
    s3_file_path = f"s3://{bucket}/{key}"
    notification_payload = {
        "s3_file_path": s3_file_path
    }
    publish_queue.put(("notification/file_uploaded", json.dumps(notification_payload), 1))

def upload_file(file_path):
    """
    指定されたファイルのアップロードプロセスを開始する
    """
    file_name = os.path.basename(file_path)
    upload_queue.put(file_path)
    request_signed_url(file_name)

def main():
    """
    メイン関数:コマンドライン引数を処理し、アップロードプロセスを開始する
    """
    if len(sys.argv) != 2:
        print("Usage: python script.py <file_path>")
        sys.exit(1)

    file_path = sys.argv[1]

    if not os.path.exists(file_path):
        print(f"Error: File '{file_path}' does not exist.")
        sys.exit(1)

    setup_mqtt_client()

    # Publish workerスレッドの開始
    publish_thread = threading.Thread(target=publish_worker)
    publish_thread.start()

    upload_file(file_path)

    try:
        while True:
            time.sleep(5)
    except KeyboardInterrupt:
        print("Interrupted by user, shutting down.")
    finally:
        # Publish workerスレッドの終了
        publish_queue.put((None, None, None))
        publish_thread.join()
        myMQTTClient.disconnect()

if __name__ == "__main__":
    main()
index.py
Lambda関数で実行する処理で下記要約です。
- デバイスIDとタイムスタンプを使用して、S3バケット内の一意のファイル名を生成
- 生成したファイル名に対応する署名付きURLをS3から取得
- 署名付きURLを含むメッセージを
response/file_urlトピックにMQTT経由でPublishし、デバイスへ返却 - ファイルは
lambdaフォルダ配下に作成
import json
import os
import datetime
import boto3
from botocore.exceptions import ClientError

def lambda_handler(event, context):
    # S3クライアントの初期化
    s3_client = boto3.client('s3')
    # IoT クライアントの初期化
    iot_client = boto3.client('iot-data')
    # 環境変数からS3バケット名を取得
    bucket_name = os.environ['S3_BUCKET']

    # デバイスIDの取得(イベントから)
    device_id = event.get('device_id', 'unknown')

    # オブジェクトキーの設定(デバイスIDをプレフィックスとして使用)
    timestamp = datetime.datetime.now().strftime('%Y%m%d%H%M%S')
    object_key = f"{device_id}/upload_{timestamp}.txt"

    try:
        # 署名付きURLの生成
        url = s3_client.generate_presigned_url(
            'put_object',
            Params={'Bucket': bucket_name, 'Key': object_key},
            ExpiresIn=3600  # URLの有効期限(秒)
        )

        # MQTTメッセージの作成
        message = {
            'url': url,
            'bucket': bucket_name,
            'key': object_key
        }

        # MQTTトピックの設定
        topic = 'response/file_url'

        # MQTTメッセージの発行
        iot_client.publish(
            topic=topic,
            qos=1,
            payload=json.dumps(message)
        )

        return {
            'statusCode': 200,
            'body': json.dumps('URL generated and sent successfully')
        }

    except ClientError as e:
        print(e)
        return {
            'statusCode': 500,
            'body': json.dumps('Error generating URL')
        }
動作確認
Session Manager
Session Managerから該当のEC2インスタンスへログインして操作します。
ec2-userでログイン- アップロード用のダミーファイルを作成
upload_file.pyファイルを実行
# ec2-userでログイン
sudo su --login ec2-user

# 5KBのファイルを作成
fallocate -l 5K upload_file.txt

# 5KBのファイルを引数にして、Pythonのスクリプトを実行
python3 upload_file.py upload_file.txt
# 実行ログ
File uploaded successfully: upload_file.txt
S3
ファイルが指定のプレフィックス(example-thing)で適切にアップロードされているか確認します。
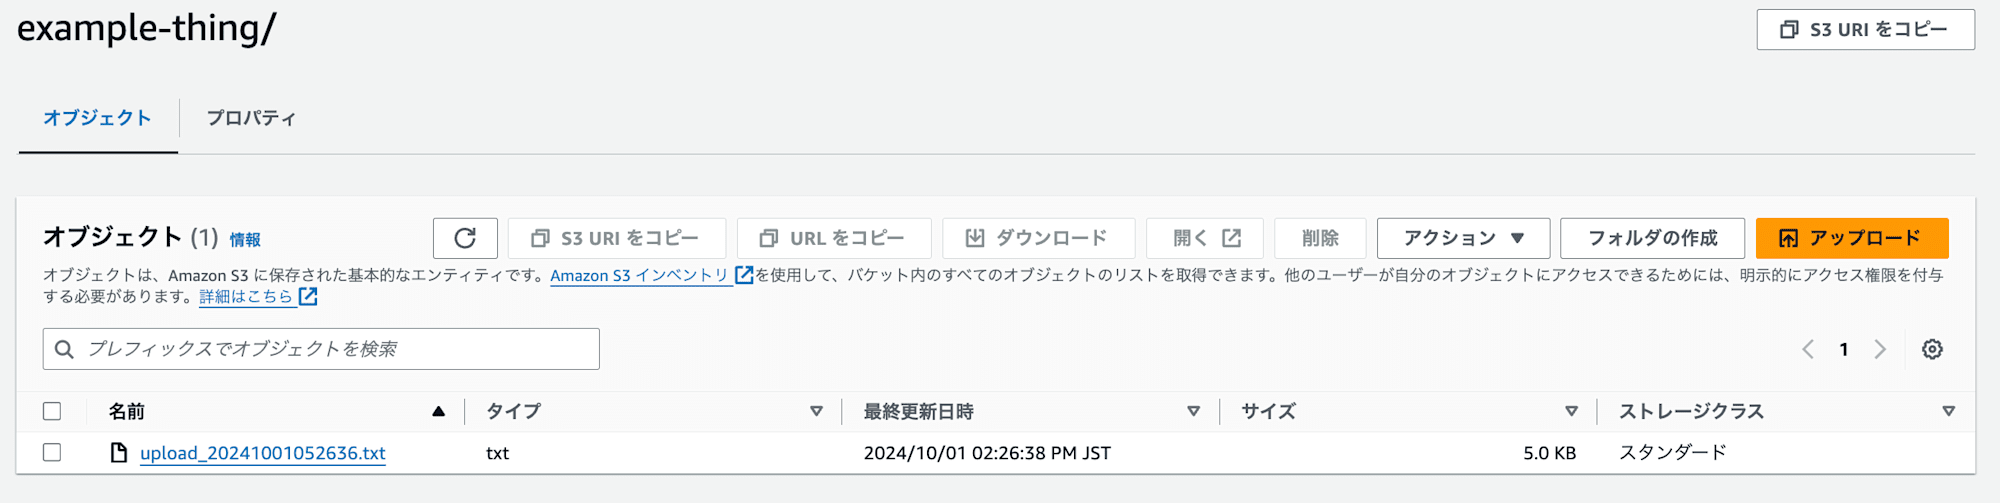
適切にファイルがアップロードされていますね!!
AWS IoT Core
AWS IoT Coreの機能で備わっている「MQTTテストクライアント」で、トピックnotification/file_uploadedにファイルパスが適切に送信されているか確認します。
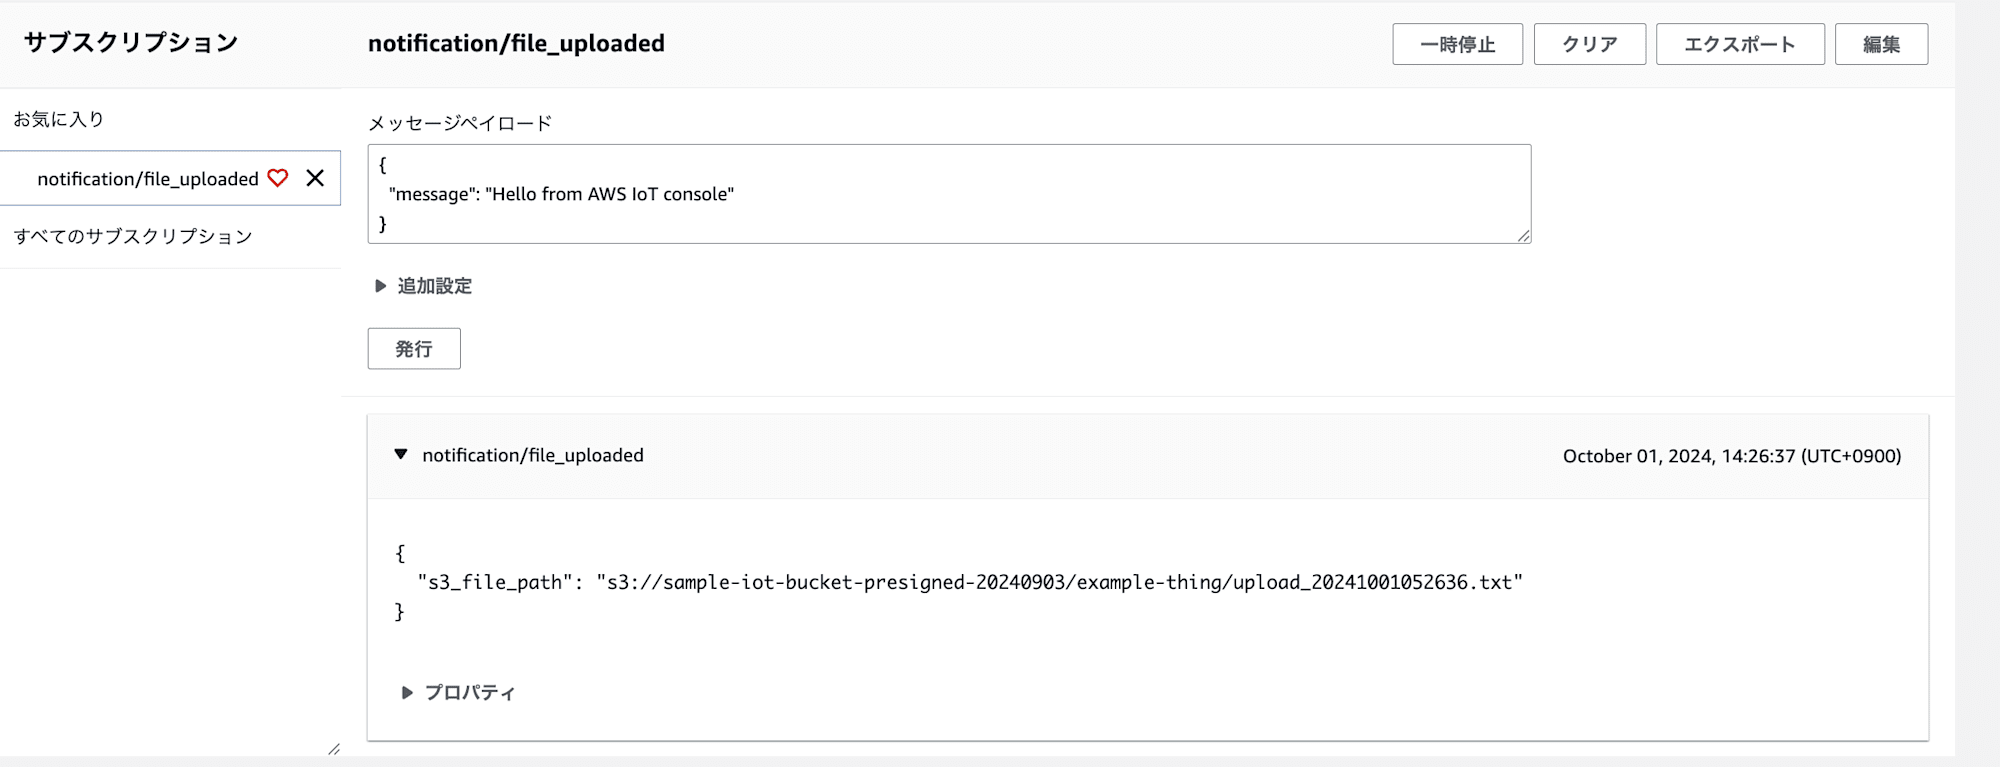
こちらも問題なくファイルパスが連携されていますね!
おわりに
MQTTのペイロード上限を超過するようなファイルをアップロードする際に、S3の署名付きURLを使用する方法はいかがだったでしょうか。
本記事が少しでも参考になりましたら幸いです!