Androidコンポーネント初級編#3 : ExpandableListViewの使いかた
この記事は公開されてから1年以上経過しています。情報が古い可能性がありますので、ご注意ください。
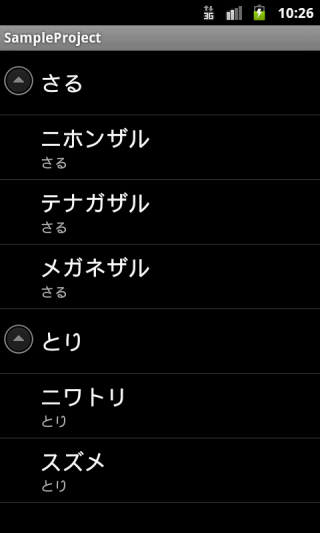
今回はExpandableListViewの使いかたをご紹介したいと思います。 ExpandableListViewは、折りたたむことができるListViewです。 親子関係を持ったデータを扱うのでこれまでより少し複雑ですが、出来る限りわかりやすく解説したいと思います。 今回は下図のようなサンプルを作成します。
ExpandableListViewの作りかた
1.親のArrayListと子のArrayListを作る
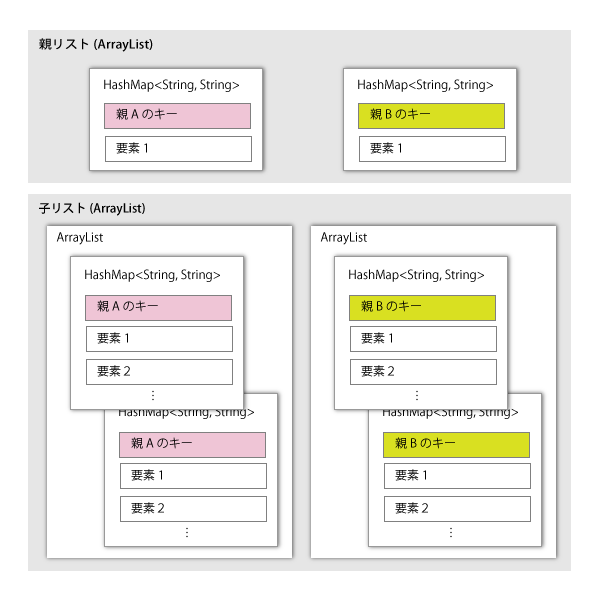
まずはじめに、これまで同様リストに表示するデータを作ります。 前述の通り、ExpandableListViewは親子関係を持ったリストです。 そのため、今回は親のArrayList、子のArrayListをそれぞれ作ります。 親リストはHashMapのArrayList、子リストはHashMapのArrayListのArrayListを作ります。 少しわかりづらいですか、下図のようなイメージを持つとよいと思います。
親リストと子リストの関連付けはHashMapに含まれたキーと値のセットで判別します。 子は、親と同じキーと値を入れることで、その親の子になります。 要素1、2と書いてあるものは任意に入れることのできる値です。 子には表示する名前などが入ってくるかと思います。
2.SimpleExpandableListAdapterを作る
次に、ExpandableListView専用のAdapterである、SimpleExpandableListAdapterを作ります(長い名前ですね)。 このAdapterのコンストラクタ引数は第9引数まであります。少し多いですがそれぞれ入れていきます。 なお、SimpleExpandableListAdapterの引数に入れる値は以下のとおりです。
| 第一引数 | Context | Activityのコンテキストです。getApplicationContext()で取得できます。 |
| 第二引数 | List<? extends Map<String, ?>> | 親のリストです。 |
| 第三引数 | int | 親アイテムの表示に使うレイアウトのリソースIDです。 |
| 第四引数 | String[] | 親のレイアウトに表示するデータです。 |
| 第五引数 | int[] | 上記データをセットするTextViewのIDです。 |
| 第六引数 | List<? extends List<? extends Map<String, ?>>> | 子のリストです。 |
| 第七引数 | int | 子アイテムの表示に使うレイアウトのリソースIDです。 |
| 第八引数 | String[] | 子のレイアウトに表示するデータです。 |
| 第九引数 | int[] | 上記データをセットするTextViewのIDです。 |
3.ExpandableListViewにSimpleExpandableListAdapterをセットする
最後に、ExpandablListViewに2で作成したAdapterをセットします。 ここは前回までと特に変わっているところはありません。
ソース
SampleActivity.java
package cm.blog.sample;

import java.util.ArrayList;
import java.util.HashMap;

import android.app.Activity;
import android.os.Bundle;
import android.widget.ExpandableListView;
import android.widget.SimpleExpandableListAdapter;

public class SampleActivity extends Activity {
	@Override
	public void onCreate(Bundle savedInstanceState) {
		super.onCreate(savedInstanceState);
		setContentView(R.layout.main);

		// 親リスト
		ArrayList<HashMap<String, String>> groupData
			 = new ArrayList<HashMap<String,String>>();
		// 子リスト
		ArrayList<ArrayList<HashMap<String, String>>> childData
			 = new ArrayList<ArrayList<HashMap<String,String>>>();

		// 親リストに要素を追加
		HashMap<String, String> groupA = new HashMap<String, String>();
		groupA.put("group", "さる");
		HashMap<String, String> groupB = new HashMap<String, String>();
		groupB.put("group", "とり");

		groupData.add(groupA);
		groupData.add(groupB);

		// 子リストに要素を追加(1)
		ArrayList<HashMap<String, String>> childListA = new ArrayList<HashMap<String,String>>();
		HashMap<String, String> childAA = new HashMap<String, String>();
		childAA.put("group", "さる");
		childAA.put("name", "ニホンザル");
		HashMap<String, String> childAB = new HashMap<String, String>();
		childAB.put("group", "さる");
		childAB.put("name", "テナガザル");
		HashMap<String, String> childAC = new HashMap<String, String>();
		childAC.put("group", "さる");
		childAC.put("name", "メガネザル");

		childListA.add(childAA);
		childListA.add(childAB);
		childListA.add(childAC);

		childData.add(childListA);

		// 子リストに要素を追加(2)
		ArrayList<HashMap<String, String>> childListB = new ArrayList<HashMap<String,String>>();
		HashMap<String, String> childBA = new HashMap<String, String>();
		childBA.put("group", "とり");
		childBA.put("name", "ニワトリ");
		HashMap<String, String> childBB = new HashMap<String, String>();
		childBB.put("group", "とり");
		childBB.put("name", "スズメ");

		childListB.add(childBA);
		childListB.add(childBB);

		childData.add(childListB);

		// 親リスト、子リストを含んだAdapterを生成
		SimpleExpandableListAdapter adapter = new SimpleExpandableListAdapter(
				getApplicationContext(),
				groupData,
				android.R.layout.simple_expandable_list_item_1,
				new String[] {"group"},
				new int[] { android.R.id.text1 },
				childData,
				android.R.layout.simple_expandable_list_item_2,
				new String[] {"name", "group"},
				new int[] { android.R.id.text1, android.R.id.text2 });

		// ExpandableListViewにAdapterをセット
		ExpandableListView listView = (ExpandableListView) findViewById(R.id.listView1);
		listView.setAdapter(adapter);
	}
}
main.xml
<?xml version="1.0" encoding="utf-8"?>
<LinearLayout xmlns:android="http://schemas.android.com/apk/res/android"
	android:orientation="vertical"
	android:layout_width="match_parent"
	android:layout_height="match_parent">
	<ExpandableListView android:id="@+id/listView1"
		android:layout_width="match_parent"
		android:layout_height="match_parent">
	</ExpandableListView>
</LinearLayout>
実行結果
今回はExpandableListViewの使いかたのご紹介でした。 ArrayListの作成など少し難しいところはありますが、まずは試してみてください!


