![[HTML5] CreateJS を利用した線表アプリの部品づくり ( 部品編 2/2 )](https://devio2023-media.developers.io/wp-content/uploads/2013/11/createjs.png)
[HTML5] CreateJS を利用した線表アプリの部品づくり ( 部品編 2/2 )
この記事は公開されてから1年以上経過しています。情報が古い可能性がありますので、ご注意ください。
連載 URL
- CreateJS を利用した線表アプリの部品づくり ( 部品編 1/2 )
- CreateJS を利用した線表アプリの部品づくり ( 部品編 2/2 )
- CreateJS を利用した線表アプリの部品づくり ( 実装編 )
再描画を考慮した MovieClip 拡張 JS の拡張
MovieClip 拡張 JS オブジェクトのサイズを変更するとき、外部から setTransform() メソッドを呼び出して変形させることは可能ですが、この場合、変形前の描画の状態が単純に変形されてしまいます。
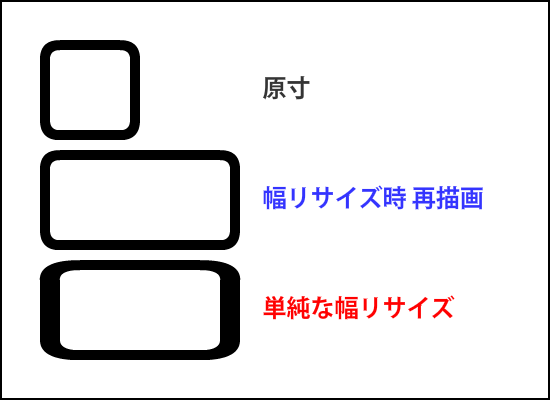
上記画像を見て分るとおり、単純に変形するだけでは不格好な結果になってしまうので、ボタンの変形と同時に描画更新を行う setActualSize() を実装した例が以下のソースです。
SimpleButton.js
(function (lib, img, cjs) {

    var p;

    var outBorderColor  = "#000000";
    var outFillColor    = "#ffffff";
    var overBorderColor = "#333333";
    var overFillColor   = "#cccccc";
    var hitBorderColor  = "#000000";
    var hitFillColor    = "#000000";
    var downBorderColor = "#330000";
    var downFillColor   = "#cc0000";

    var defaultX = 0;
    var defaultY = 0;
    var defaultWidth = 100;
    var defaultHeight = 100;

    var borderSize = 5;

    var cornerRadius = 20;

    var updateDisplayList = function(target, x, y, w, h, fillColor, borderColor) {
        var wb = borderSize * 2;
        var g = target.graphics;
        var fr = (cornerRadius - borderSize);
        fr = ( fr > 0 ) ? fr : 0;
        g.clear()
         .beginFill(borderColor)
         .drawRoundRect(0, 0, w, h, cornerRadius)
         .endFill()
         .beginFill(fillColor)
         .drawRoundRect(borderSize, borderSize, w - wb, h - wb, fr)
         .endFill();
        return target;
    };

    (lib.out = function(mode,startPosition,loop) {
        this.initialize(mode,startPosition,loop,{});
        this.shape = this.addChild(
            updateDisplayList( new cjs.Shape(), defaultX, defaultY, defaultWidth, defaultHeight, outFillColor, outBorderColor )
        );
    }).prototype = p = new cjs.Container();
    p.nominalBounds = new cjs.Rectangle(defaultX, defaultY, defaultWidth, defaultHeight);

    (lib.over = function(mode,startPosition,loop) {
        this.initialize(mode,startPosition,loop,{});
        this.shape = this.addChild(
            updateDisplayList( new cjs.Shape(), defaultX, defaultY, defaultWidth, defaultHeight, overFillColor, overBorderColor )
        );
    }).prototype = p = new cjs.Container();
    p.nominalBounds = new cjs.Rectangle(defaultX, defaultY, defaultWidth, defaultHeight);

    (lib.down = function(mode,startPosition,loop) {
        this.initialize(mode,startPosition,loop,{});
        this.shape = this.addChild(
            updateDisplayList( new cjs.Shape(), defaultX, defaultY, defaultWidth, defaultHeight, downFillColor, downBorderColor )
        );
    }).prototype = p = new cjs.Container();
    p.nominalBounds = new cjs.Rectangle(defaultX, defaultY, defaultWidth, defaultHeight);

    (lib.hit = function(mode,startPosition,loop) {
        this.initialize(mode,startPosition,loop,{});
        this.shape = this.addChild(
            updateDisplayList( new cjs.Shape(), defaultX, defaultY, defaultWidth, defaultHeight, hitFillColor, hitBorderColor )
        );
    }).prototype = p = new cjs.Container();
    p.nominalBounds = new cjs.Rectangle(defaultX, defaultY, defaultWidth, defaultHeight);

    (lib.SimpleButton = function(mode,startPosition,loop) {
        if (loop == null) { loop = false; }
        this.initialize(mode,startPosition,loop,{out:0,over:1,down:2,hit:3});
        this.instance = new lib.out();
        this.instance_1 = new lib.over();
        this.instance_2 = new lib.down();
        this.instance_3 = new lib.hit();
        this.timeline.addTween(
            cjs.Tween
            .get({})
            .to({state:[{t:this.instance}]})
            .to({state:[{t:this.instance_1}]},1)
            .to({state:[{t:this.instance_2}]},1)
            .to({state:[{t:this.instance_3}]},1)
            .wait(1)
        );
    }).prototype = p = new cjs.MovieClip();
    p.nominalBounds = new cjs.Rectangle(defaultX, defaultY, defaultWidth, defaultHeight);

    p.setActualSize = function(w, h) {
        updateDisplayList(this.instance.shape,   defaultX, defaultY, w, h, outFillColor,  outBorderColor);
        updateDisplayList(this.instance_1.shape, defaultX, defaultY, w, h, overFillColor, overBorderColor);
        updateDisplayList(this.instance_2.shape, defaultX, defaultY, w, h, downFillColor, downBorderColor);
        updateDisplayList(this.instance_3.shape, defaultX, defaultY, w, h, hitFillColor,  hitBorderColor);
    };

})(lib = lib||{}, images = images||{}, createjs = createjs||{});

var lib, images, createjs;
Haxe の extern
package ;
import createjs.easeljs.MovieClip;
@:native("lib.SimpleButton")
extern class SimpleButton extends MovieClip {
    public function new(?mode:String = INDEPENDENT, ?startPosition:Float = 0, ?loop:Bool = true, ?labels:Dynamic = null):Void;
    public function setActualSize(w:Float, h:Float):Void;
}
各ボタンの役割を分析する
線表アプリの「タスク」は、以下のような複数の機能を持つボタンの集合体であることが分ります。
- タスク開始日を変更する左側ボタン
- タスク終了日を変更する右側ボタン
- タスク開始日、タスク終了日、タスクの並び順を変更するトラックボタン
- タスクの進捗を操作するスライダーボタン ( 今回は割愛 )
これらの構造を保ったオブジェクト ( タスクボタン ) を作ります。
複数のボタンを保持したオブジェクト ( タスクボタン ) をつくる
複数のボタンを保持する場合には CreateJS の Container を拡張した JS を作成します。筆者の都合により、以下のように Haxe で実装しました。
TaskButton.hx
package jp.taiga;

import createjs.easeljs.ButtonHelper;
import createjs.easeljs.Container;

class TaskButton extends Container {

    private var bodyButton:SimpleButton;
    private var bodyButtonHeler:ButtonHelper;

    private var leftButton:SimpleButton;
    private var leftButtonHeler:ButtonHelper;

    private var rightButton:SimpleButton;
    private var rightButtonHeler:ButtonHelper;

    public var maxWidth:Float;
    public var maxHeight:Float;

    public var minWidth:Float;
    public var minHeight:Float;

    public override function setBounds(x:Float, y:Float, width:Float, height:Float):Void {

        if( width < minWidth ) {
            width = minWidth;
        }
        else if(width > maxWidth) {
            width = maxWidth;
        }
        if( height < minHeight ) {
            height = minHeight;
        }
        else if(height > maxHeight) {
            height = maxHeight;
        }

        super.setBounds(x, y, width, height);

        //↓ボタン変形時、マウスのヒット領域は ButtonHelper が保持する hitArea のスケールを弄るのが無難っぽいです

        bodyButton.setActualSize(width, height);
        bodyButtonHeler.target.hitArea.scaleX = width * 0.01;
        bodyButtonHeler.target.hitArea.scaleY = height * 0.01;

        leftButton.setActualSize(edgeButtonWidth, height);
        leftButtonHeler.target.hitArea.scaleX = edgeButtonWidth * 0.01;
        leftButtonHeler.target.hitArea.scaleY = height * 0.01;

        rightButton.setActualSize(edgeButtonWidth, height);
        rightButtonHeler.target.hitArea.scaleX = edgeButtonWidth * 0.01;
        rightButtonHeler.target.hitArea.scaleY = height * 0.01;
        rightButton.x = width - edgeButtonWidth;

    }

    public static function main():Void {
        new CustomButton();
    }
    public function new() {
        super();

        bodyButton = new SimpleButton();

        leftButton = new SimpleButton();
        leftButton.setCornerRadius(0);

        rightButton = new SimpleButton();
        rightButton.setCornerRadius(0);

        bodyButtonHeler  = new ButtonHelper(bodyButton, "out", "over", "down", false, new SimpleButton(), "hit");
        leftButtonHeler  = new ButtonHelper(leftButton, "out", "over", "down", false, new SimpleButton(), "hit");
        rightButtonHeler = new ButtonHelper(rightButton, "out", "over", "down", false, new SimpleButton(), "hit");

        this.addChild(bodyButton);
        this.addChild(leftButton);
        this.addChild(rightButton);

        setBounds(0, 0, 300, 50);

    }
}
各 ButtonHelper ですが、単純にインスタンス化するだけでは実行中に参照が無くなり機能しなくなることがあるので、変数に代入して常に保持しています。( 公式サイトでも推奨されています ) また、第 6 引数の hitArea は、ボタン化対象のオブジェクトと共有させることも可能ですが、ボタンのリサイズを考慮する場合、別インスタンスにしておかないと hitArea が適切に更新できないことがあるので、敢えて "new SimpleButton()" という形で別インスタンスを渡しています。
dispatchEvent() で各ボタンの操作状況を送出する
今回、タスクボタンが使用する CreateJS の マウスイベントは下記のとおりです。
- 左側ボタンの "pressmove"
- 左側ボタンの "pressup"
- 右側ボタンの "pressmove"
- 右側ボタンの "pressup"
- トラックボタンの "pressmove"
- トラックボタンの "pressup"
これらのイベント種別を、タスクボタン利用する側に適切に伝えるため、dispatchEvent() メソッドでカスタムイベントを送出します。
TaskButton.hx 内部にてカスタムイベントを送出
public function new() {
    super();
    …
    bodyButton.addEventListener("pressmove", buttonPressMoveHandler);
    bodyButton.addEventListener("pressup",   buttonPressUpHandler);

    leftButton.addEventListener("pressmove", buttonPressMoveHandler);
    leftButton.addEventListener("pressup",   buttonPressUpHandler);

    rightButton.addEventListener("pressmove", buttonPressMoveHandler);
    rightButton.addEventListener("pressup",   buttonPressUpHandler);
}

…

private function buttonPressMoveHandler(e:MouseEvent):Void {
    var tmpButton:SimpleButton = cast(e.target, SimpleButton);
    var eventType:String = "PressMove";
    if(tmpButton == bodyButton) {
        eventType = "bodyButton" + eventType;
    }
    else if(tmpButton == leftButton) {
        eventType = "leftButton" + eventType;
    }
    else if(tmpButton == rightButton) {
        eventType = "rightButton" + eventType;
    }
    else {
        return;
    }
    dispatchEvent( { type:eventType, target:this } );
}

private function buttonPressUpHandler(e:MouseEvent):Void {
    var tmpButton:SimpleButton = e.currentTarget;
    var eventType:String = "PressUp";
    if(tmpButton == bodyButton) {
        eventType = "bodyButton" + eventType;
    }
    else if(tmpButton == leftButton) {
        eventType = "leftButton" + eventType;
    }
    else if(tmpButton == rightButton) {
        eventType = "rightButton" + eventType;
    }
    else {
        return;
    }
    dispatchEvent( { type:eventType, target:this } );
}
TaskButton を使用する側では、次のようにイベントをハンドリングします。
taskButton = new TaskButton();
taskButton.addEventListener("bodyButtonPressMove", bodyButtonPressMoveHandler);
taskButton.addEventListener("bodyButtonPressUp", bodyButtonPressUpHandler);
taskButton.addEventListener("leftButtonPressMove", leftButtonPressMoveHandler);
taskButton.addEventListener("leftButtonPressUp", leftButtonPressUpHandler);
taskButton.addEventListener("rightButtonPressMove", rightButtonPressMoveHandler);
taskButton.addEventListener("rightButtonPressUp", rightButtonPressUpHandler);最後は、これらのイベントハンドリングについての実装について解説します。