Contentful Content Preview 機能チュートリアル実践 - Next.js での実装例
はじめに
本記事では、Contentful の Content Preview 機能を使用し、下書き記事をプレビューできる環境を構築します。
Contentful とは
Contentful は、API ファーストのヘッドレス CMS です。コンテンツの作成・管理と表示を分離することで、様々なプラットフォームやデバイスに対して柔軟にコンテンツを配信できます。
Contentful の Content Preview 機能とは
Content Preview 機能は、Contentful で作成したコンテンツを公開前にプレビューできる機能です。この機能により、編集者は下書き状態のコンテンツを実際のウェブサイトやアプリの見た目で確認できます。
対象読者
- Content Preview 機能の導入を検討している方
- Contentful を使用したヘッドレス CMS の実装経験がある方
- Next.js の基本的な知識を持つ開発者
参考
背景と課題
既存のブログサイト実装
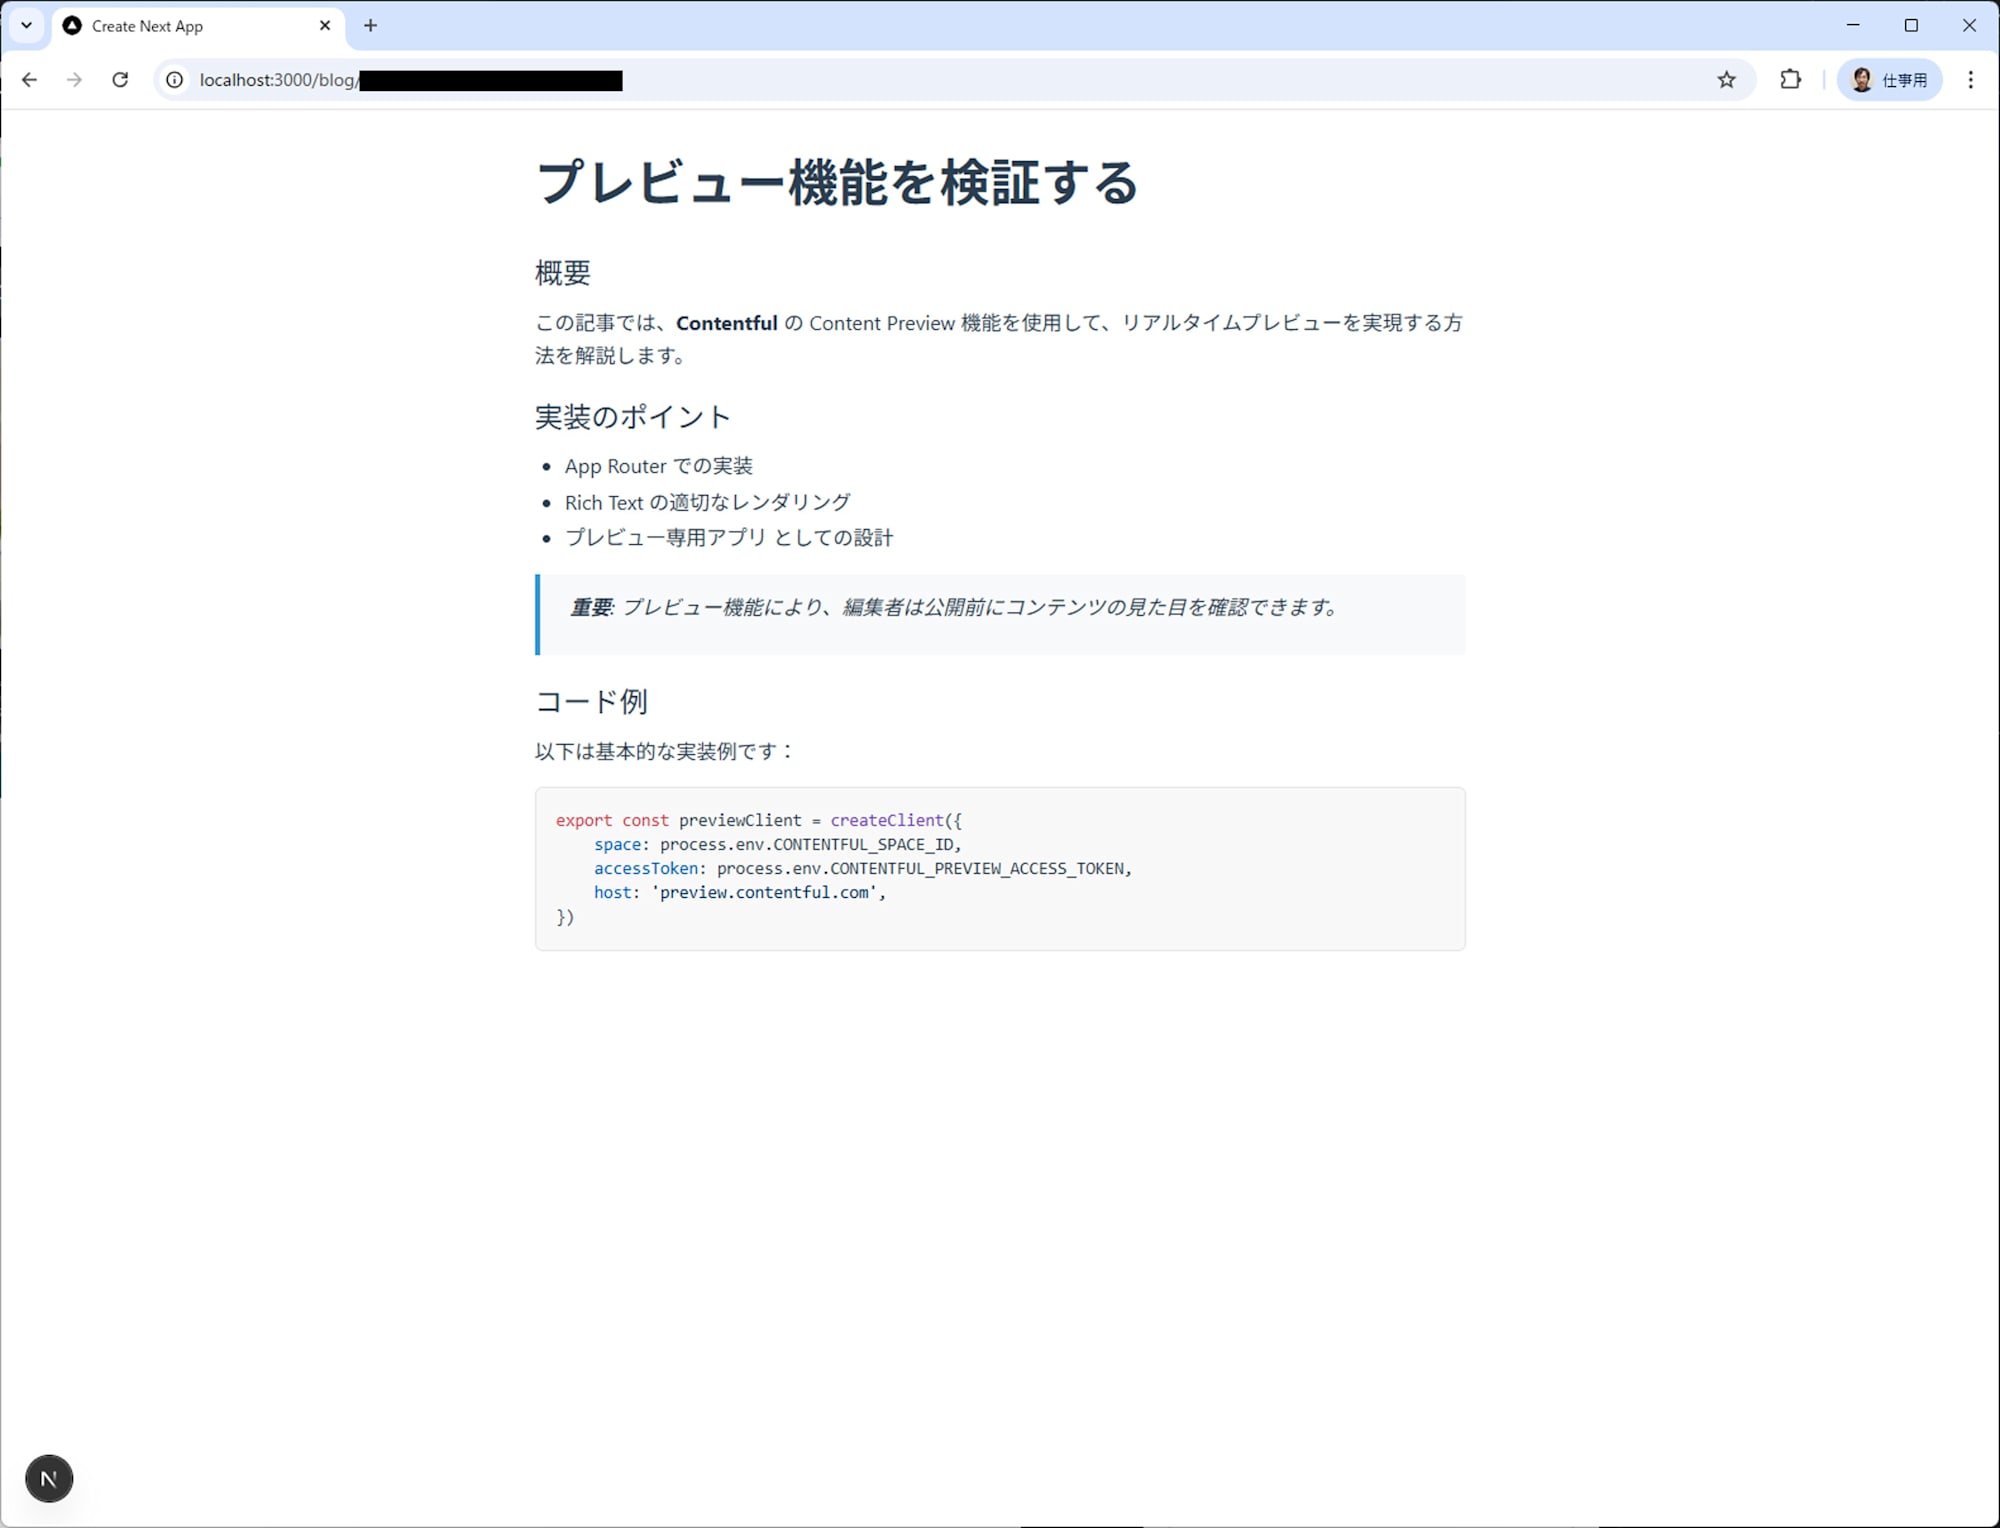
まず、すでに運用中の Next.js ブログサイトがあると仮定します。公開されている Contentful の BlogPost エントリーが、下のスクリーンショットのように表示される仕組みがあるとします。
環境変数設定 (.env.local)
CONTENTFUL_SPACE_ID=your_space_id
CONTENTFUL_ACCESS_TOKEN=your_delivery_api_token
必要なライブラリのインストール
npm install contentful @contentful/rich-text-react-renderer @contentful/rich-text-types react-markdown remark-gfm rehype-highlight highlight.js
Contentful クライアント設定 (lib/contentful.js)
import { createClient } from 'contentful'

export const client = createClient({
    space: process.env.CONTENTFUL_SPACE_ID,
    accessToken: process.env.CONTENTFUL_ACCESS_TOKEN,
})
ブログ記事表示ページ (app/blog/[id]/page.js)
import { client } from '../../../lib/contentful'
import { documentToReactComponents } from '@contentful/rich-text-react-renderer'
import { BLOCKS, MARKS, INLINES } from '@contentful/rich-text-types'
import ReactMarkdown from 'react-markdown'
import remarkGfm from 'remark-gfm'
import rehypeHighlight from 'rehype-highlight'
import 'highlight.js/styles/github.css'

// Markdown コンポーネントのスタイル設定
const markdownComponents = {
    h1: ({children}) => (
        <h1 style={{
            fontSize: '1.8rem',
            marginTop: '1.5rem',
            marginBottom: '0.8rem',
            borderBottom: '2px solid #e1e5e9',
            paddingBottom: '0.3rem',
            color: '#2c3e50'
        }}>
            {children}
        </h1>
    ),
    h2: ({children}) => (
        <h2 style={{
            fontSize: '1.4rem',
            marginTop: '1.2rem',
            marginBottom: '0.6rem',
            color: '#2c3e50'
        }}>
            {children}
        </h2>
    ),
    h3: ({children}) => (
        <h3 style={{
            fontSize: '1.2rem',
            marginTop: '1rem',
            marginBottom: '0.5rem',
            color: '#34495e'
        }}>
            {children}
        </h3>
    ),
    p: ({children}) => (
        <p style={{
            marginBottom: '0.8rem',
            lineHeight: '1.6',
            color: '#2c3e50'
        }}>
            {children}
        </p>
    ),
    ul: ({children}) => (
        <ul style={{
            marginBottom: '0.8rem',
            paddingLeft: '1.5rem',
            listStyleType: 'disc'
        }}>
            {children}
        </ul>
    ),
    ol: ({children}) => (
        <ol style={{
            marginBottom: '0.8rem',
            paddingLeft: '1.5rem'
        }}>
            {children}
        </ol>
    ),
    li: ({children}) => (
        <li style={{
            marginBottom: '0.3rem',
            lineHeight: '1.5'
        }}>
            {children}
        </li>
    ),
    blockquote: ({children}) => (
        <blockquote style={{
            borderLeft: '4px solid #3498db',
            paddingLeft: '1rem',
            margin: '1rem 0',
            fontStyle: 'italic',
            color: '#7f8c8d',
            backgroundColor: '#f8f9fa',
            padding: '0.8rem 0.8rem 0.8rem 1.5rem',
            borderRadius: '0 4px 4px 0'
        }}>
            {children}
        </blockquote>
    ),
    code: ({inline, children}) => {
        if (inline) {
            return (
                <code style={{
                    backgroundColor: '#f1f3f4',
                    padding: '0.15rem 0.3rem',
                    borderRadius: '3px',
                    fontSize: '0.9em',
                    fontFamily: 'Monaco, Consolas, "Liberation Mono", "Courier New", monospace'
                }}>
                    {children}
                </code>
            )
        }
        return (
            <code style={{
                fontFamily: 'Monaco, Consolas, "Liberation Mono", "Courier New", monospace'
            }}>
                {children}
            </code>
        )
    },
    pre: ({children}) => (
        <pre style={{
            backgroundColor: '#f8f8f8',
            border: '1px solid #e1e5e9',
            borderRadius: '6px',
            padding: '1rem',
            margin: '1rem 0',
            overflow: 'auto',
            fontSize: '0.85rem',
            lineHeight: '1.4'
        }}>
            {children}
        </pre>
    ),
}

// Rich Text のレンダリングオプション
const richTextOptions = {
    renderNode: {
        [BLOCKS.HEADING_1]: (node, children) => (
            <h1 style={{
                fontSize: '2rem',
                marginTop: '2rem',
                marginBottom: '1rem',
                borderBottom: '2px solid #e1e5e9',
                paddingBottom: '0.5rem',
                color: '#2c3e50'
            }}>
                {children}
            </h1>
        ),
        [BLOCKS.HEADING_2]: (node, children) => (
            <h2 style={{
                fontSize: '1.5rem',
                marginTop: '1.5rem',
                marginBottom: '0.75rem',
                color: '#2c3e50'
            }}>
                {children}
            </h2>
        ),
        [BLOCKS.HEADING_3]: (node, children) => (
            <h3 style={{
                fontSize: '1.25rem',
                marginTop: '1.25rem',
                marginBottom: '0.5rem',
                color: '#34495e'
            }}>
                {children}
            </h3>
        ),
        [BLOCKS.PARAGRAPH]: (node, children) => {
            // 段落内のテキストを取得して Markdown かどうか判定
            const textContent = node.content
                .filter(item => item.nodeType === 'text')
                .map(item => item.value)
                .join('')

            // Markdown 記法が含まれているかチェック
            const hasMarkdown = /^#{1,6}\s|^\*\s|^\d+\.\s|^>\s|```|`[^`]+`|\*\*[^*]+\*\*|\*[^*]+\*/m.test(textContent)

            if (hasMarkdown && textContent.trim()) {
                return (
                    <div style={{ marginBottom: '1rem' }}>
                        <ReactMarkdown
                            remarkPlugins={[remarkGfm]}
                            rehypePlugins={[rehypeHighlight]}
                            components={markdownComponents}
                        >
                            {textContent}
                        </ReactMarkdown>
                    </div>
                )
            }

            // 通常の段落として処理
            return (
                <p style={{
                    marginBottom: '1rem',
                    lineHeight: '1.7',
                    color: '#2c3e50'
                }}>
                    {children}
                </p>
            )
        },
        [BLOCKS.UL_LIST]: (node, children) => (
            <ul style={{
                marginBottom: '1rem',
                paddingLeft: '2rem',
                listStyleType: 'disc'
            }}>
                {children}
            </ul>
        ),
        [BLOCKS.OL_LIST]: (node, children) => (
            <ol style={{
                marginBottom: '1rem',
                paddingLeft: '2rem'
            }}>
                {children}
            </ol>
        ),
        [BLOCKS.LIST_ITEM]: (node, children) => (
            <li style={{
                marginBottom: '0.5rem',
                lineHeight: '1.6'
            }}>
                {children}
            </li>
        ),
        [BLOCKS.QUOTE]: (node, children) => (
            <blockquote style={{
                borderLeft: '4px solid #3498db',
                paddingLeft: '1rem',
                margin: '1.5rem 0',
                fontStyle: 'italic',
                color: '#7f8c8d',
                backgroundColor: '#f8f9fa',
                padding: '1rem 1rem 1rem 2rem',
                borderRadius: '0 4px 4px 0'
            }}>
                {children}
            </blockquote>
        ),
        [BLOCKS.CODE]: (node) => (
            <pre style={{
                backgroundColor: '#f8f8f8',
                border: '1px solid #e1e5e9',
                borderRadius: '6px',
                padding: '1rem',
                margin: '1rem 0',
                overflow: 'auto',
                fontSize: '0.9rem',
                lineHeight: '1.4'
            }}>
                <code>{node.content[0].value}</code>
            </pre>
        ),
    },
    renderMark: {
        [MARKS.BOLD]: (text) => <strong style={{ fontWeight: '600' }}>{text}</strong>,
        [MARKS.ITALIC]: (text) => <em style={{ fontStyle: 'italic' }}>{text}</em>,
        [MARKS.CODE]: (text) => (
            <code style={{
                backgroundColor: '#f1f3f4',
                padding: '0.2rem 0.4rem',
                borderRadius: '3px',
                fontSize: '0.9em',
                fontFamily: 'Monaco, Consolas, "Liberation Mono", "Courier New", monospace'
            }}>
                {text}
            </code>
        ),
    },
}

export default async function BlogPost({ params }) {
    const resolvedParams = await params

    try {
        const entry = await client.getEntry(resolvedParams.id)

        return (
            <div style={{
                padding: '2rem',
                maxWidth: '800px',
                margin: '0 auto',
                fontFamily: '-apple-system, BlinkMacSystemFont, "Segoe UI", Roboto, "Helvetica Neue", Arial, sans-serif'
            }}>
                <h1 style={{
                    fontSize: '2.5rem',
                    marginBottom: '2rem',
                    color: '#2c3e50',
                    fontWeight: '700',
                    lineHeight: '1.2'
                }}>
                    {entry.fields.title || 'No Title'}
                </h1>

                {entry.fields.body && (
                    <div style={{ color: '#2c3e50' }}>
                        {documentToReactComponents(entry.fields.body, richTextOptions)}
                    </div>
                )}

                {!entry.fields.body && (
                    <p style={{
                        color: '#95a5a6',
                        fontStyle: 'italic',
                        textAlign: 'center',
                        padding: '2rem',
                        backgroundColor: '#f8f9fa',
                        borderRadius: '8px'
                    }}>
                        本文が設定されていません
                    </p>
                )}
            </div>
        )
    } catch (error) {
        return (
            <div style={{ padding: '2rem' }}>
                <h1>記事が見つかりません</h1>
                <p>Entry ID: {resolvedParams.id}</p>
                <p>Error: {error.message}</p>
            </div>
        )
    }
}
公開する前に確認できないという課題
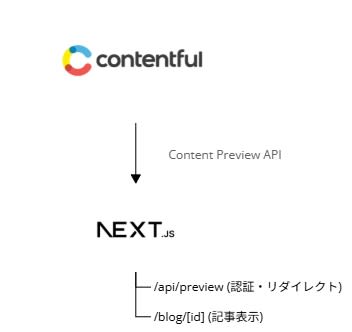
上記の実装では Delivery API を使用しているため、公開済みの記事のみが表示されます。したがって、編集者が記事を作成・編集する際、下書き状態の記事を実際のサイトデザインで確認できないという課題が発生します。この課題を解決するために、Contentful の Content Preview 機能 を導入します。
Contentful 側の準備
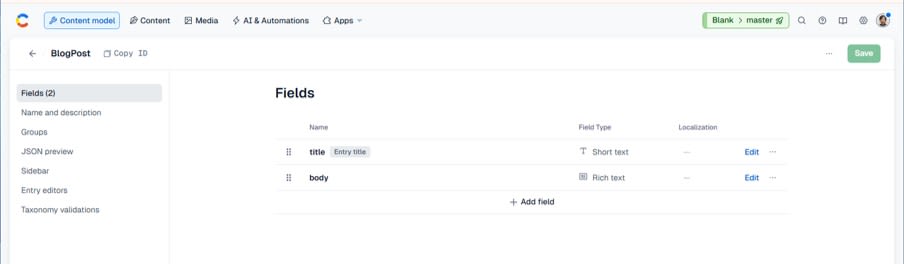
本記事では、 Preview 機能を適用する Content model として BlogPost を作成済みであるとします。
Contentful コンソール で API Key の取得と、 Preview 機能の設定を行います。
-
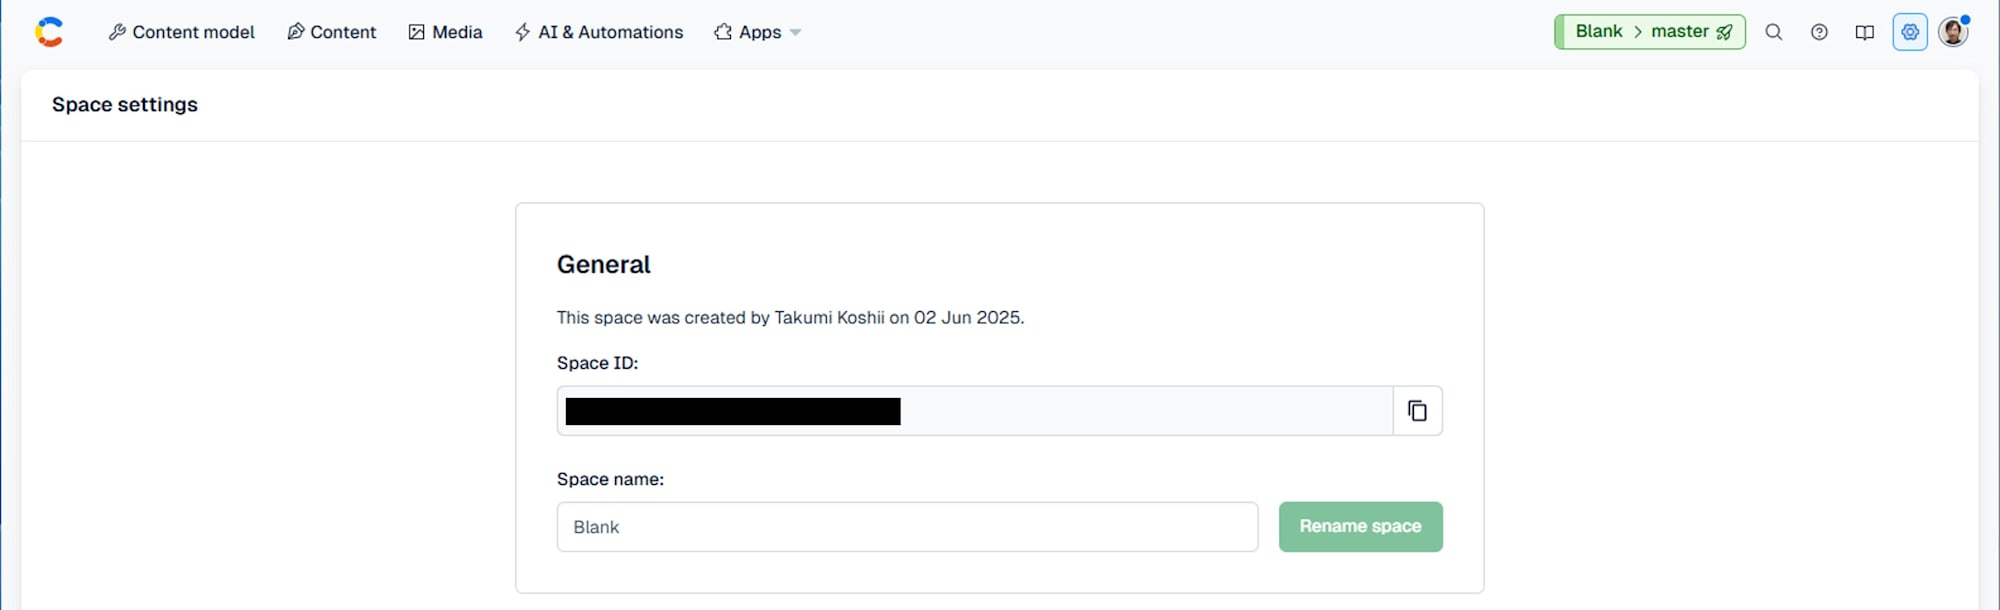
Settings menu (画面上部の歯車マーク) > General settings > Space ID を控える
-
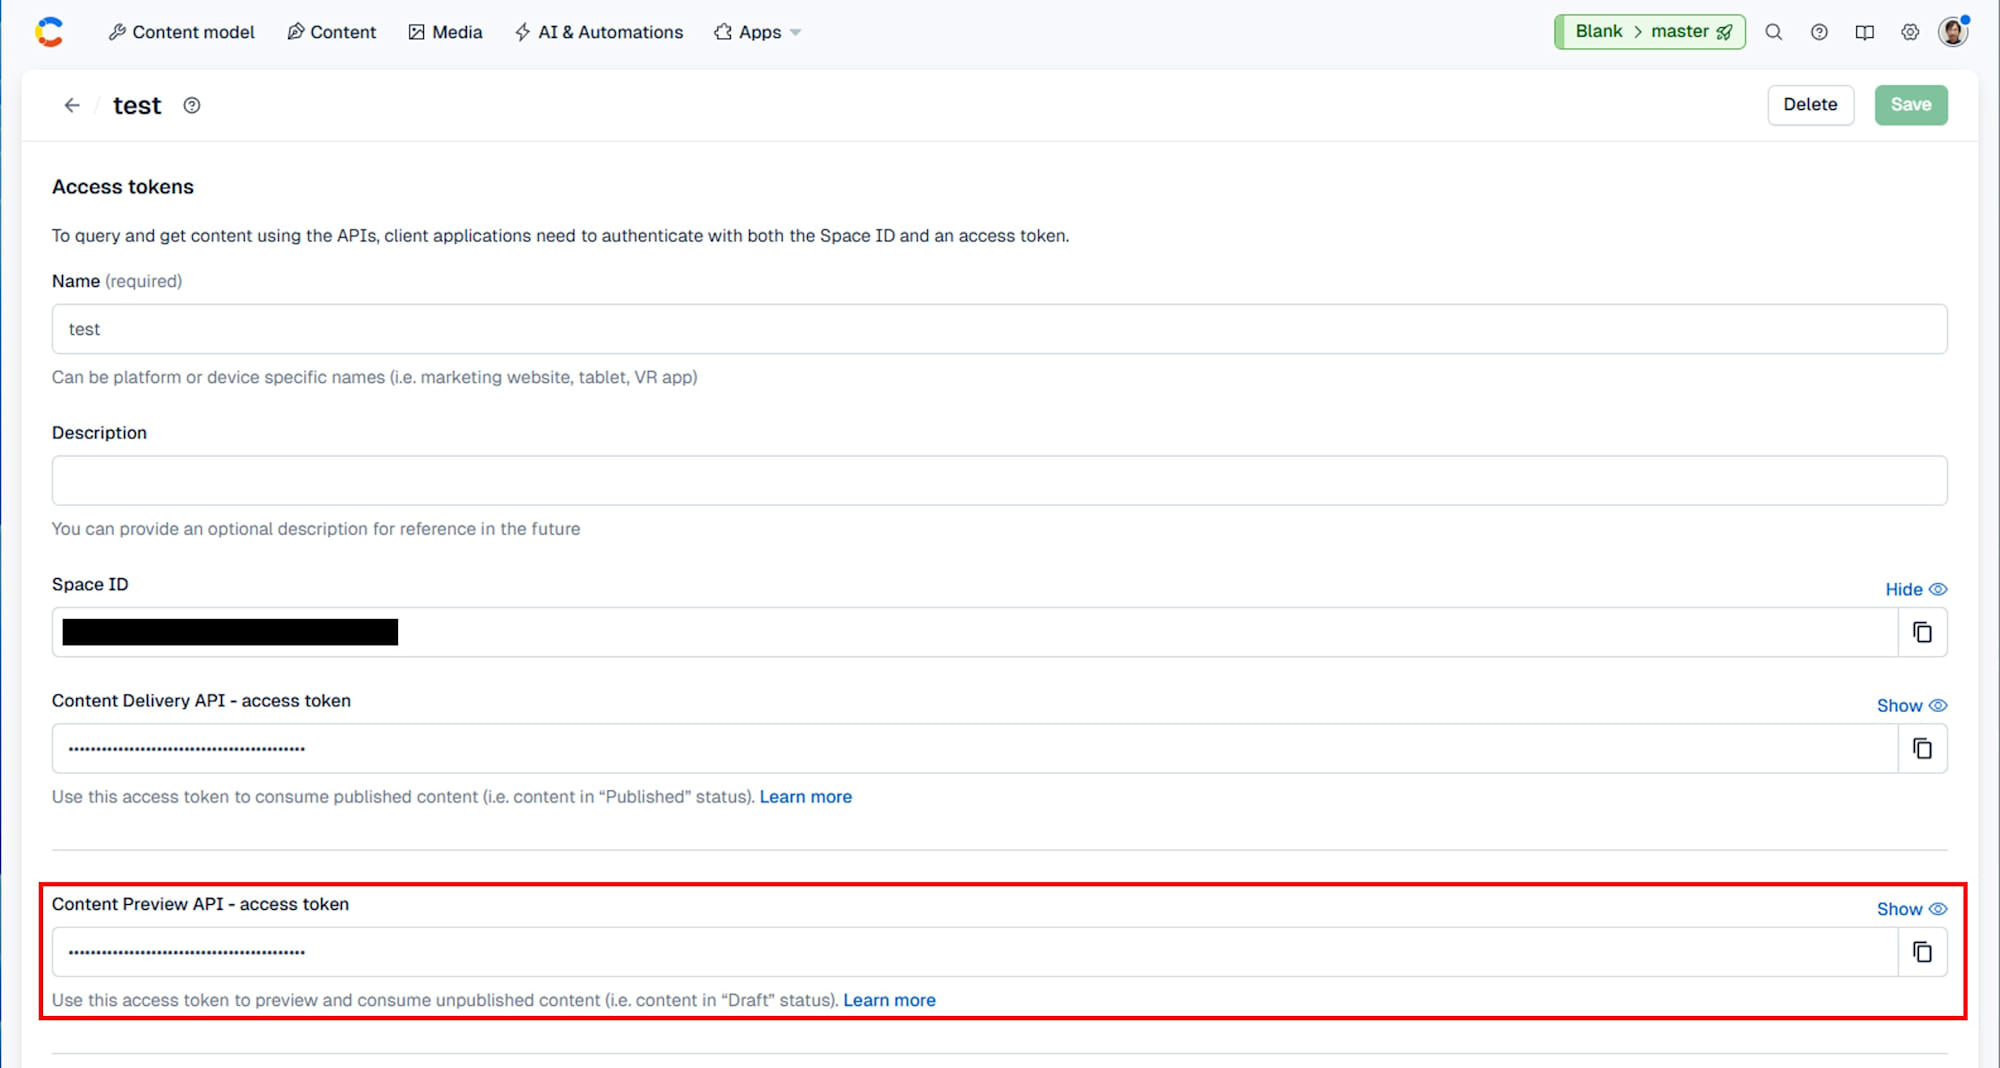
Settings menu > API keys から Content Preview API - access token を控える
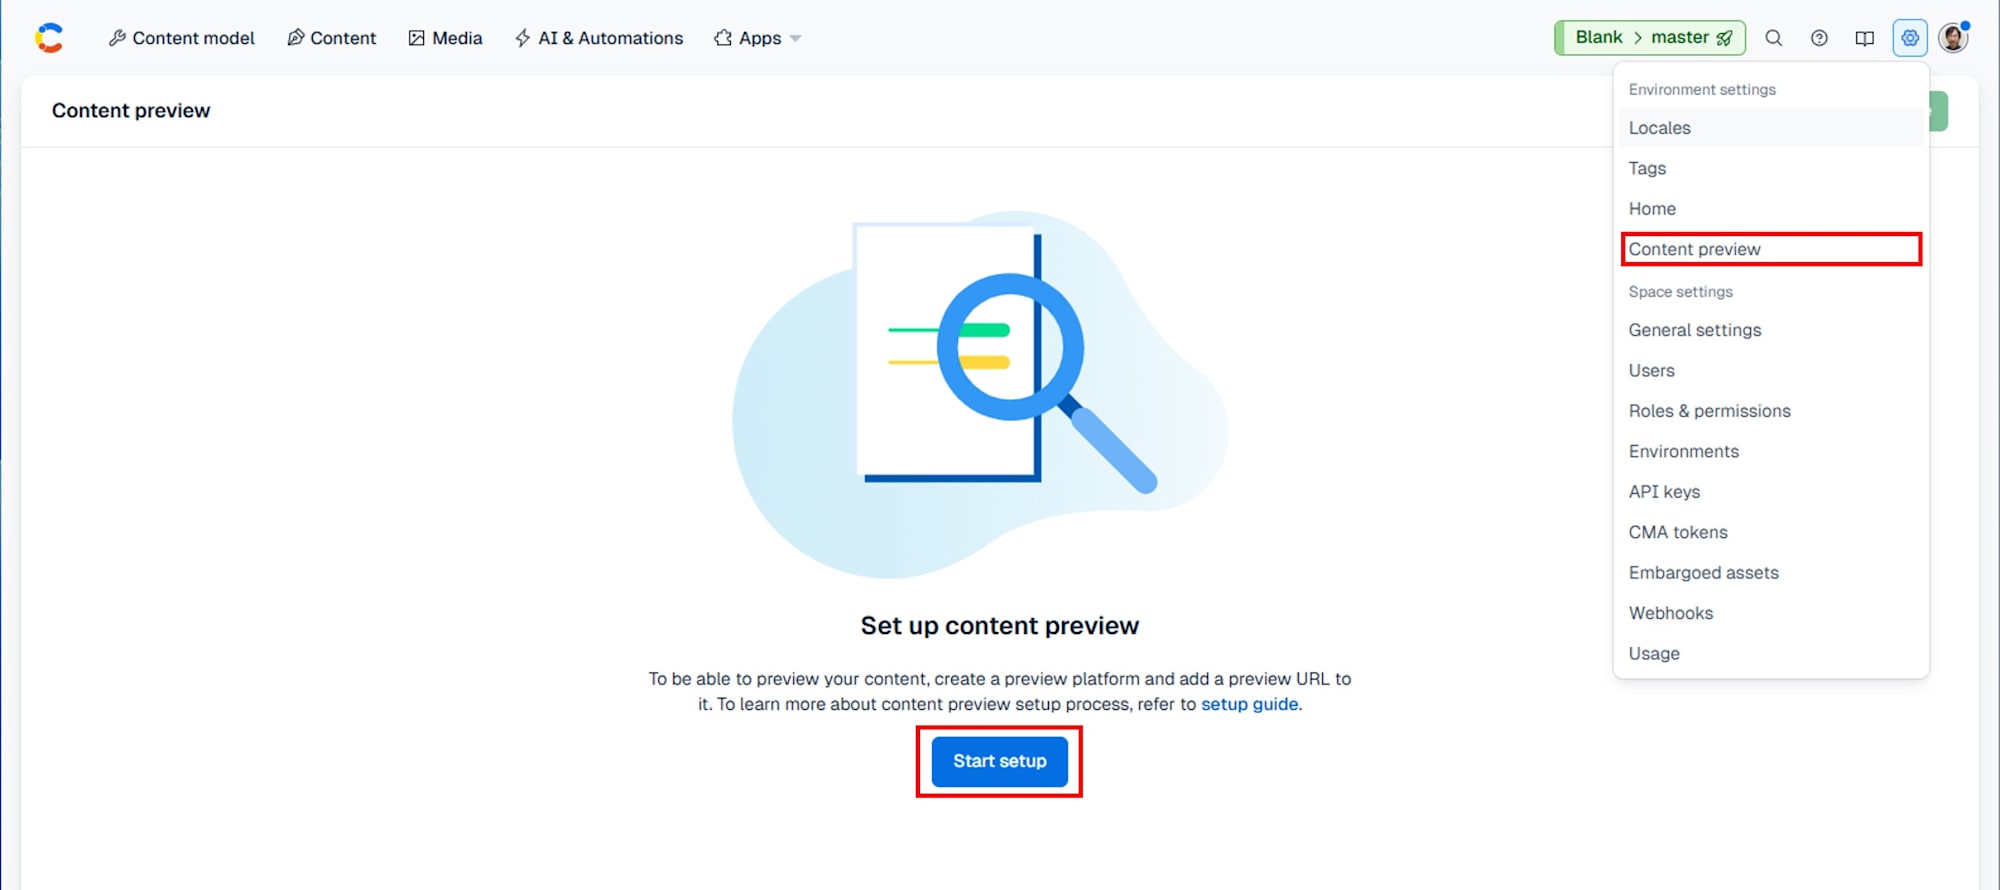
-
Settings menu > Content preview で Start setup をクリック
-
以下の設定を入力
- Name: 任意 (例:
Local Development) - Description: 任意 (例:
ローカル開発環境) - Content types: BlogPost
- Preview URL for BlogPost:
http://localhost:3000/api/preview?secret=YOUR_PREVIEW_SECRET&id={entry.sys.id}

- Name: 任意 (例:
Preview 機能の追加実装
既存の実装に Preview 機能を追加するため、以下の変更を行います。
環境変数の追加
既存の .env.local ファイルに Preview 用の環境変数を追加します。
CONTENTFUL_SPACE_ID=your_space_id
CONTENTFUL_ACCESS_TOKEN=your_delivery_api_token
# 以下を追加
CONTENTFUL_PREVIEW_ACCESS_TOKEN=your_preview_api_token
CONTENTFUL_PREVIEW_SECRET=YOUR_PREVIEW_SECRET
Contentful クライアントの拡張
既存の lib/contentful.js に Preview API 用のクライアントを追加します。
import { createClient } from 'contentful'

// 既存の Delivery API クライアント
export const client = createClient({
    space: process.env.CONTENTFUL_SPACE_ID,
    accessToken: process.env.CONTENTFUL_ACCESS_TOKEN,
})

// 追加: Preview API 専用クライアント
export const previewClient = createClient({
    space: process.env.CONTENTFUL_SPACE_ID,
    accessToken: process.env.CONTENTFUL_PREVIEW_ACCESS_TOKEN,
    host: 'preview.contentful.com',
})
Preview API エンドポイントの追加
Contentful からのプレビューリクエストを処理するため、新しく app/api/preview/route.js を作成します。
import { redirect } from 'next/navigation'

/**
 * Contentful からのプレビューリクエストを処理する API エンドポイント
 *
 * Contentful の管理画面でプレビューボタンをクリックした際に呼び出される
 * 認証後、該当するブログ記事ページにリダイレクトする
 */
export async function GET(request) {
    // URL パラメータから secret と entry ID を取得
    const { searchParams } = new URL(request.url)
    const secret = searchParams.get('secret')  // 認証用のシークレットキー
    const id = searchParams.get('id')          // プレビュー対象のエントリ ID

    // 認証チェック: シークレットキーの検証とエントリ ID の存在確認
    if (secret !== process.env.CONTENTFUL_PREVIEW_SECRET || !id) {
        return new Response('Invalid token', { status: 401 })
    }

    // 認証成功時、該当するブログ記事ページにリダイレクト
    redirect(`/blog/${id}`)
}
ブログ記事表示ページの修正
既存の app/blog/[id]/page.js を Preview API に対応するよう修正します。
変更点
clientからpreviewClientへの変更- Preview Mode であることを示すバナーの追加
// import 文の変更
import { previewClient } from '../../../lib/contentful'  // client → previewClient に変更
import { documentToReactComponents } from '@contentful/rich-text-react-renderer'
import { BLOCKS, MARKS, INLINES } from '@contentful/rich-text-types'
import ReactMarkdown from 'react-markdown'
import remarkGfm from 'remark-gfm'
import rehypeHighlight from 'rehype-highlight'
import 'highlight.js/styles/github.css'

// markdownComponents と richTextOptions は既存のものをそのまま使用
// (省略 - 既存実装と同じ)

export default async function BlogPost({ params }) {
    const resolvedParams = await params

    try {
        // client.getEntry → previewClient.getEntry に変更
        const entry = await previewClient.getEntry(resolvedParams.id)

        return (
            <div style={{
                padding: '2rem',
                maxWidth: '800px',
                margin: '0 auto',
                fontFamily: '-apple-system, BlinkMacSystemFont, "Segoe UI", Roboto, "Helvetica Neue", Arial, sans-serif'
            }}>
                {/* 追加: プレビューモードであることを示すバナー */}
                <div style={{
                    background: 'linear-gradient(135deg, #667eea 0%, #764ba2 100%)',
                    color: 'white',
                    padding: '1rem 1.5rem',
                    marginBottom: '2rem',
                    borderRadius: '8px',
                    boxShadow: '0 4px 6px rgba(0, 0, 0, 0.1)'
                }}>
                    🔍 <strong>Preview Mode</strong> - Entry ID: {resolvedParams.id}
                </div>

                <h1 style={{
                    fontSize: '2.5rem',
                    marginBottom: '2rem',
                    color: '#2c3e50',
                    fontWeight: '700',
                    lineHeight: '1.2'
                }}>
                    {entry.fields.title || 'No Title'}
                </h1>

                {entry.fields.body && (
                    <div style={{ color: '#2c3e50' }}>
                        {documentToReactComponents(entry.fields.body, richTextOptions)}
                    </div>
                )}

                {!entry.fields.body && (
                    <p style={{
                        color: '#95a5a6',
                        fontStyle: 'italic',
                        textAlign: 'center',
                        padding: '2rem',
                        backgroundColor: '#f8f9fa',
                        borderRadius: '8px'
                    }}>
                        本文が設定されていません
                    </p>
                )}
            </div>
        )
    } catch (error) {
        return (
            <div style={{ padding: '2rem' }}>
                <h1>記事が見つかりません</h1>
                <p>Entry ID: {resolvedParams.id}</p>
                <p>Error: {error.message}</p>
            </div>
        )
    }
}
動作確認
開発サーバーの起動
下記のコマンドでローカルにサーバーを起動し、動作を確認します。
npm run dev
プレビューの確認手順
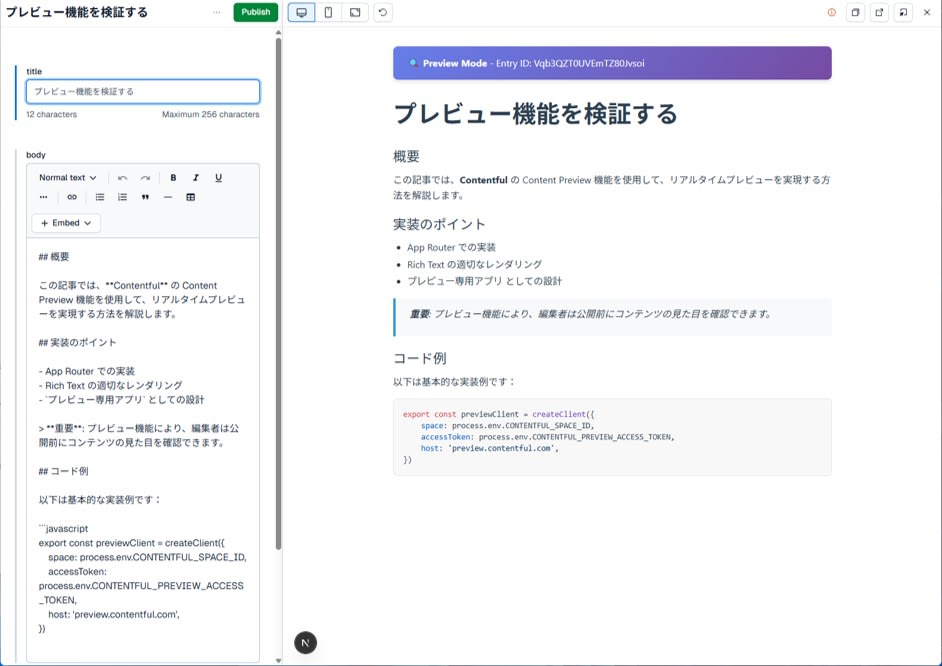
Contentful コンソールの Content > Add entry から BlogPost を選択し、記事の内容を入力してから Open Live Preview を選択します。
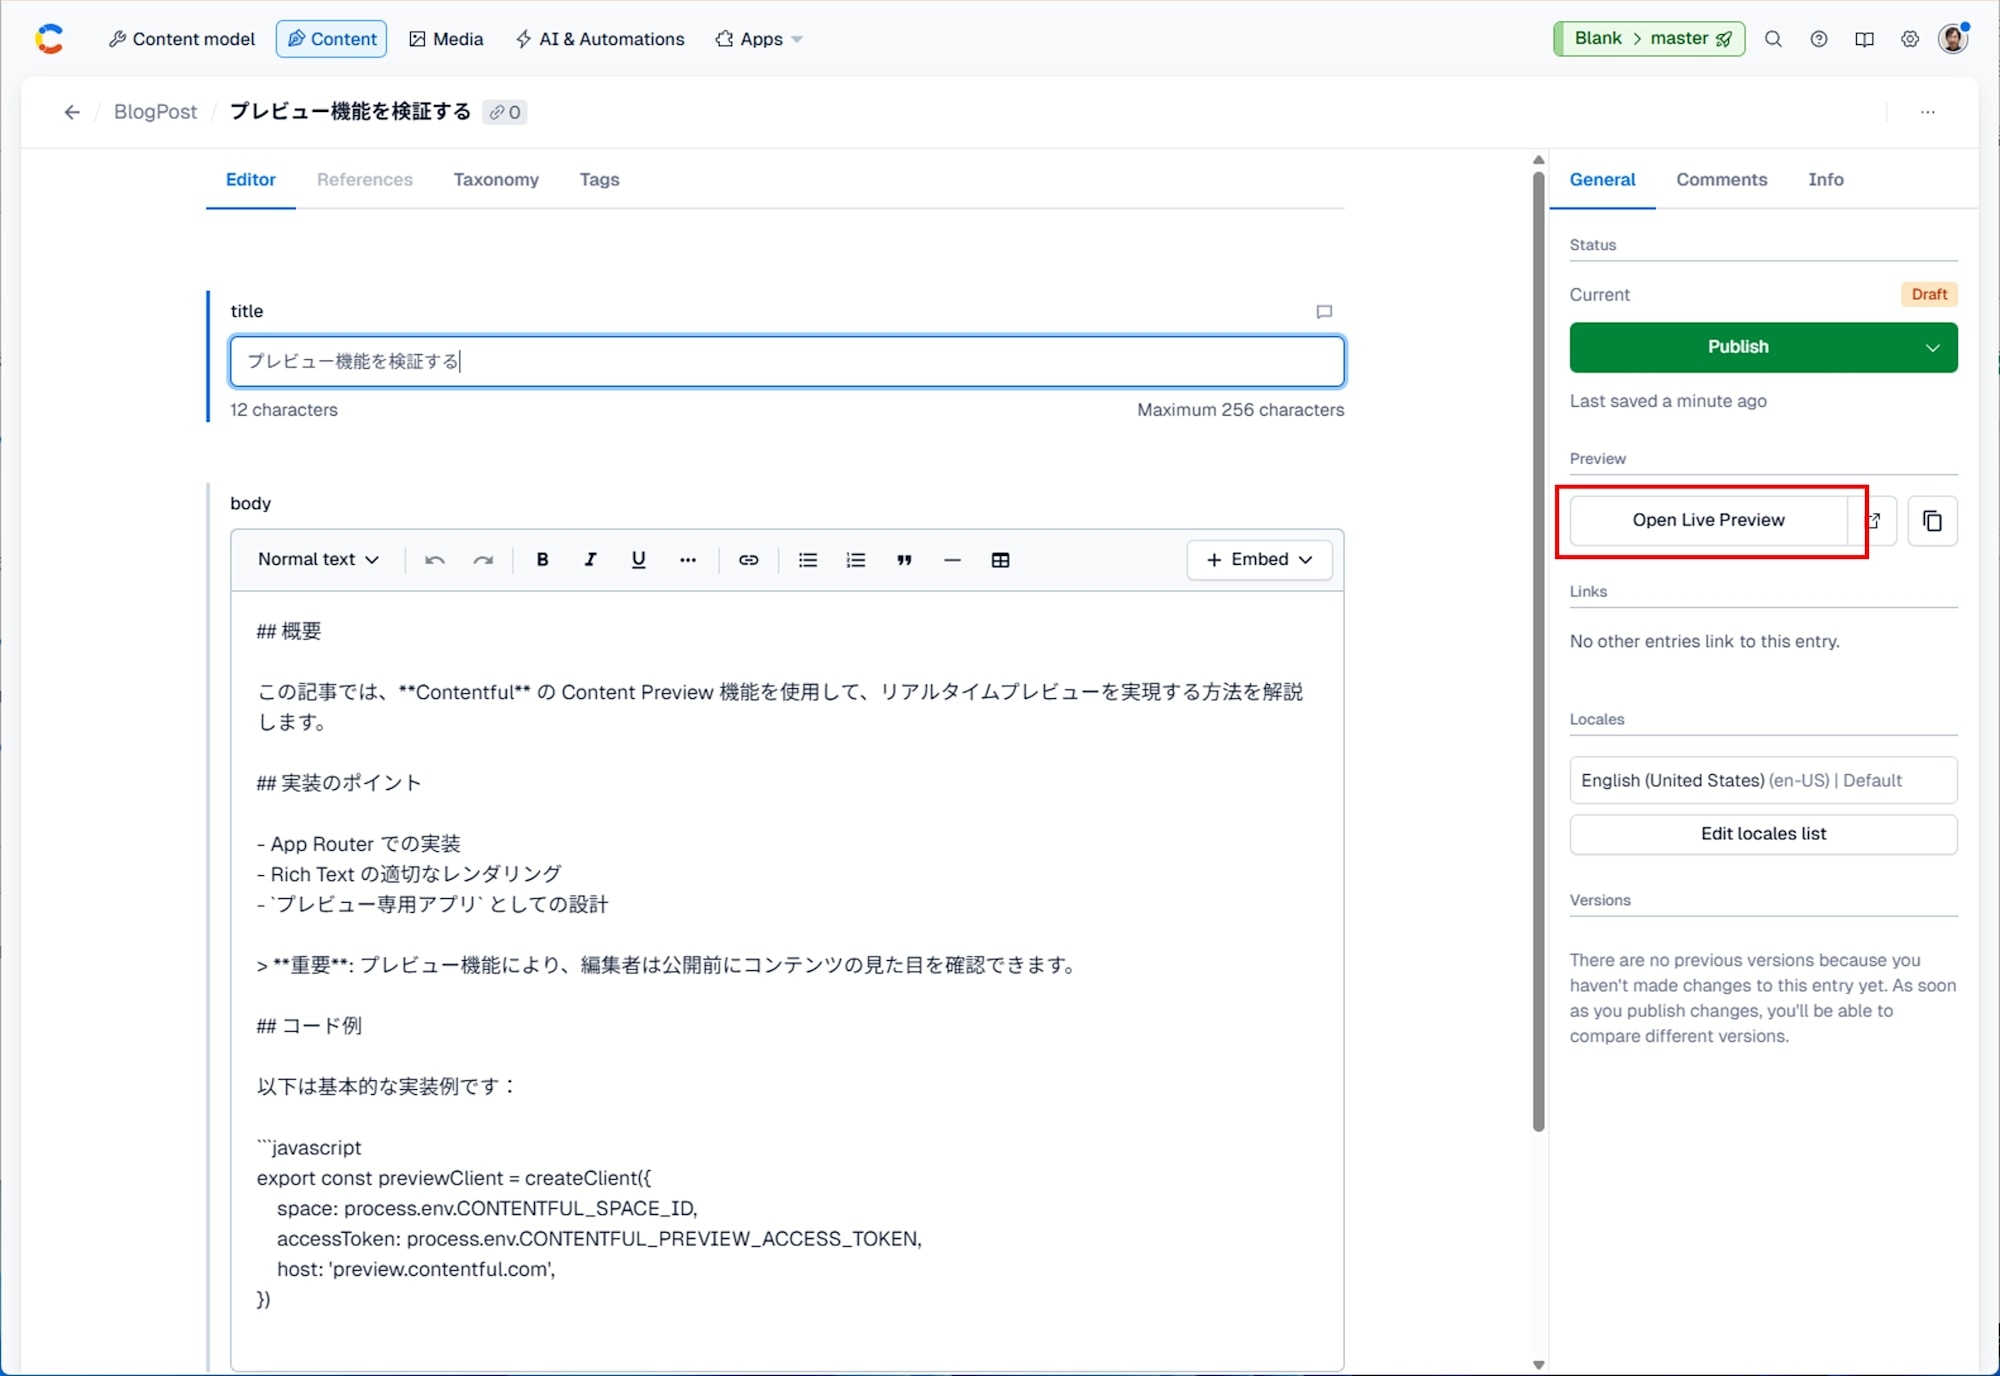
プレビューが表示されることを確認します。
まとめ
本記事では、既存の Next.js ブログサイトに Contentful Content Preview 機能を追加する実装方法を紹介しました。Preview API クライアントの追加と専用エンドポイントの作成により、最小限の変更で下書きコンテンツのプレビューが可能になります。本番環境では Preview 用と公開用でエンドポイントを分離し、適切なアクセス制御を設けることで、セキュアなプレビュー環境を構築することを推奨します。