dbt FusionのQuickstartに則って、PowerShellでVS Code拡張機能を試してみた
かわばたです。
5月末に発表されたdbt Fusionについて、プレビュー版となったため、dbtが提供しているQuickstartガイドに基づいて設定を行っていきたいと思います。
【公式ドキュメント】
対象読者
- dbt Fusionの設定方法について興味のある方
検証環境と事前準備
検証環境
dbt Fusionを試すことが出来る環境は下記のとおりです。今回はVSCodeの拡張機能を使って試していきます。
- dbt Studio
- dbt CLI
- VS Code 拡張機能(Visual Studio CodeまたはCursor IDE)
事前準備
- VSCodeのインストール
- macOS (ターミナル)、Linux、または Windows (Powershell)
- 今回はPowershellを利用します。
- 接続するDWH
- 今回はSnowflakeのトライアルアカウントのEnterprise版を利用します。
インストール
dbt Fusion エンジンをインストールし、dbt CLI を使用してスタンドアロンで使用できます。
Fusion をインストールせずに dbt 拡張機能をインストールして使用することはできません。
とドキュメントにあります。今回はPowershellにdbt Fusionをインストールします。
PowerShell で次のコマンドを実行します。
irm https://public.cdn.getdbt.com/fs/install/install.ps1 | iex
インストールが開始されました。
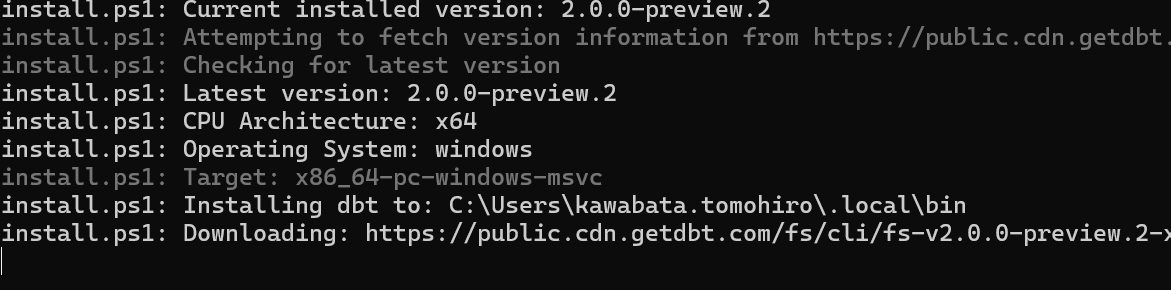
完了すると自動的にPowerShellが閉じたので、再度開いてdbt Fusionのバージョンを確認します。
dbtf --version

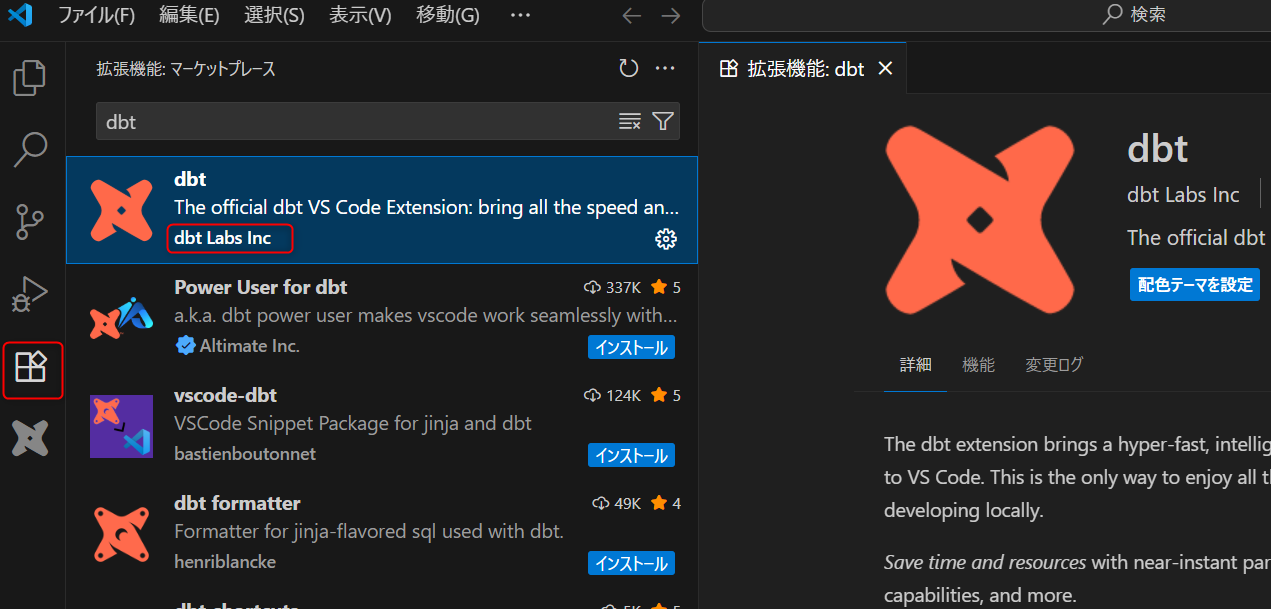
続いて、VSCodeの拡張機能をVisual Studio拡張機能マーケットプレイスから入手していきます。
- VSCodeの拡張機能タブに移動し
dbtと検索します。発行元がdbt Labs Incのものを選択しインストールします。
-
エディターのステータスバー(左下側)に以下のように表示されていれば正常にインストールされています。

-
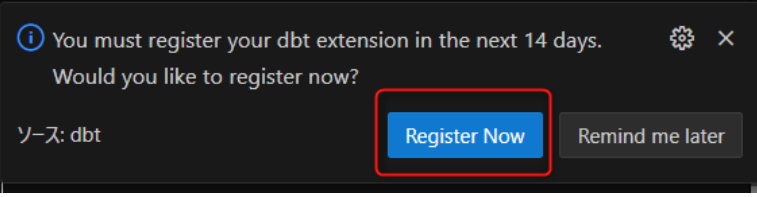
以下のポップアップのとおりdbt拡張機能をインストールしてから14日以内に登録を完了する必要があります。dbtアカウントがない方はそのまま
Register Nowをクリックしてアカウントを発行します。
既存のユーザーはVSCodeで登録を更新するには、dbt_cloud.ymlを/.dbt/配下に配置し、コマンドパレットでdbt: Register dbt extensionを実行してください。
【参考ドキュメント】
JaffleShopプロジェクト
ここからはサンプルプロジェクトをセットアップしていきます。
※VS Codeに移動するまで、PowerShellで実行していましたが、VS Code上でコマンドを実行しても良かったかもしれません。
dbtf init -- dbt CloudのInitialize dbt projectにあたる
ここで各種認証情報を聞かれるので、回答します。
------------------------------------------------------
接続先の選択(snowflake,databricks,bigquery,redshift)
-- かわばたはSnowflakeを選択したので、以下Snowflake設定時の必要な認証情報となります。
Snowflake account:
Username:
認証方法を選択:password,externalbrowser (open browser SSO),keypair,oauth
-- かわばたはpasswordを選択
Do you use MFA for username/password? [y/N]
-- かわばたはMFAを利用していないのでNを選択
Role
Database
Warehouse
Schema
------------------------------------------------------
【躓きポイント】
No profiles.yml found at `C:\Users\ユーザー名\.dbt\profiles.yml` or `C:\Users\ユーザー名\jaffle_shop\profiles.yml`
のようにprofiles.ymlの配置が重要になりますので参考にしてください。
.dbt配下にdbt_cloud.ymlがある場合は、dbt Cloudの認証情報を利用できます。
【参考ドキュメント】
問題なく認証されれば、jaffle_shopのディレクトリが生成されるので、作成したディレクトリに移動します。
cd jaffle_shop
VS Codeに移動し、ターミナルを確認します。

下記のように表示されているので順番に実行していきます。
※何を伝えているかを簡単に記載しますが、トグルを開くと表示されていた内容を記載しておりますのでご確認ください。
既存のdbtプラットフォームアカウント(旧dbt Cloud)をお持ちですか?
Do you have an existing dbt platform account (fka dbt Cloud)? [Y/n]
かわばたは持っているので、Yを選択。
dbt_cloud.yml 認証情報ファイルを.dbt配下に配置して完了したら[ENTER]を押してください。
Great! You’ll need to connect your dbt platform account using a dbt_cloud.yml credentials file from
your account.
‣ Log in to your account and navigate to Settings -> VS Code Extension
(<YOUR_ACCOUNT_DOMAIN>>/settings/profile/vscode) to download your credentials file, placing it at C:\Users\ユーザー名.dbt\dbt_cloud.yml
‣ You may need to create a C:\Users\ユーザー名.dbt/ directory if this is your first time developing
locally with dbt.
Once you're done, press [ENTER] to continue.
profiles.ymlが設定されているので、dbtf debugを使用してデータプラットフォームに接続を確認します。[ENTER]を押してください。
Next, you’ll need to set up a profiles.yml containing the connection details for your data platform. We found a
valid profiles.yml file that we can use.
Let’s use dbtf debug to check that your dbt project is configured correctly and able to connect to your
data platform.
Ready to run a dbtf debug? Press [ENTER] to continue.
dbtプロジェクトを解析し、コードがFusionと互換性があるか確認します。[ENTER]を押してください。
Let’s first parse your dbt project and make sure your code is Fusion compatible. This will check for any
deprecated functionality.
Fusion only accepts strictly validated inputs for your project. To learn why this is an important change from dbt
Core, check out:
‣ https://github.com/dbt-labs/dbt-core/discussions/11493
‣ https://docs.getdbt.com/docs/dbt-versions/core-upgrade/upgrading-to-fusion#a-clean-slate
Ready to run a dbtf parse? Press [ENTER] to continue.
dbt-autofixを使用して非推奨の構成を検出し、最新のベストプラクティスに合わせて更新します。[ENTER]を押してください。
Oh no! Looks like we hit some issues when parsing your project.
We recommend using dbt-autofix to try resolving these issues. dbt-autofix automatically scans your dbt project
for deprecated configurations and updates them to align with the latest best practices.
We detected that we can run autofix.
Press [ENTER] to kick off an autofix run.
上記dbt-autofixですが、事前にインストールしていたためこのような形となりました。未インストールの方は下記ドキュメントをご参考にしてください。
従来の方法(静的解析なし)でプロジェクトをコンパイルします。[ENTER]を押してください。
Nice! Your project is parsing successfully.
Next, let’s try compiling your project the old-fashioned way used by dbt Core (without any static analysis). dbt
Core's compile command only renders Jinja into SQL, so we will temporarily disable Fusion's advanced
SQL comprehension.
To learn more, check out https://docs.getdbt.com/docs/fusion/new-concepts#principles-of-static-analysis
Ready to run a ‘dbtf compile -static-analysis off’? Press [ENTER] to continue.
Fusion の完全な静的解析機能を有効にしてプロジェクトをコンパイルします。[ENTER]を押してください。
Nice! Finally, let's try compiling your project with Fusion's full static analysis capabilities turned on.
This checks that your SQL code is valid in the context of your warehouse's tables and columns — so will
successfully execute in your warehouse — without actually needing to execute those queries. To learn more about
static analysis, check out https://docs.getdbt.com/docs/fusion/new-concepts
Fusion's SQL comprehension capabilities are at the heart of its new features.
Ready to run a ‘dbtf compile’? Press [ENTER] to continue.
プロジェクトのコンパイルに成功しました。
Nice! Your project is compiling successfully.
A successful compile with Fusion means your code will run when deployed in your warehouse!
~** Compilation completed successfully! **~
╭────────────────────────────────────────────────────────────────────────────────────────────╮
│ Next steps (if using the dbt VS Code extension): │
│ │
│ 👁︎ Preview model results and compiled code quickly: │
│ https://docs.getdbt.com/guides/fusion?step=5#preview-data-and-code │
│ │
│ 🧭 Navigate your project with lineage tools: │
│ https://docs.getdbt.com/guides/fusion?step=5#navigate-your-project-with-lineage-tools │
│ │
│ 🧠 Use the power of SQL understanding to catch issues early: │
│ https://docs.getdbt.com/guides/fusion?step=5#use-the-power-of-sql-understanding │
│ │
│ 🚀 Speed up common dbt commands with the command bar: │
│ https://docs.getdbt.com/guides/fusion?step=5#speeding-up-common-dbt-commands │
╰────────────────────────────────────────────────────────────────────────────────────────────╯
Learn more about Fusion here: https://docs.getdbt.com/docs/fusion/about-fusion
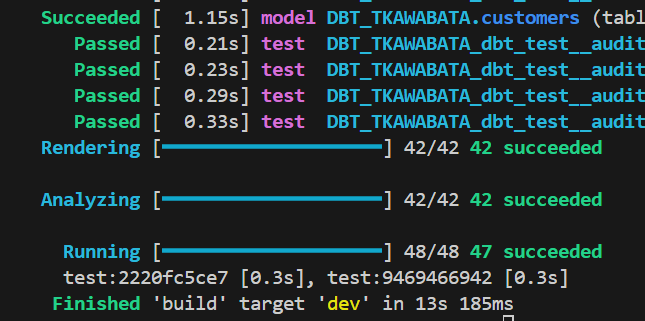
ここまでで一連の設定が完了しました。最後にdbtf buildをします。
正常に実行することが出来ました。
dbtVSCode拡張機能を使って探索
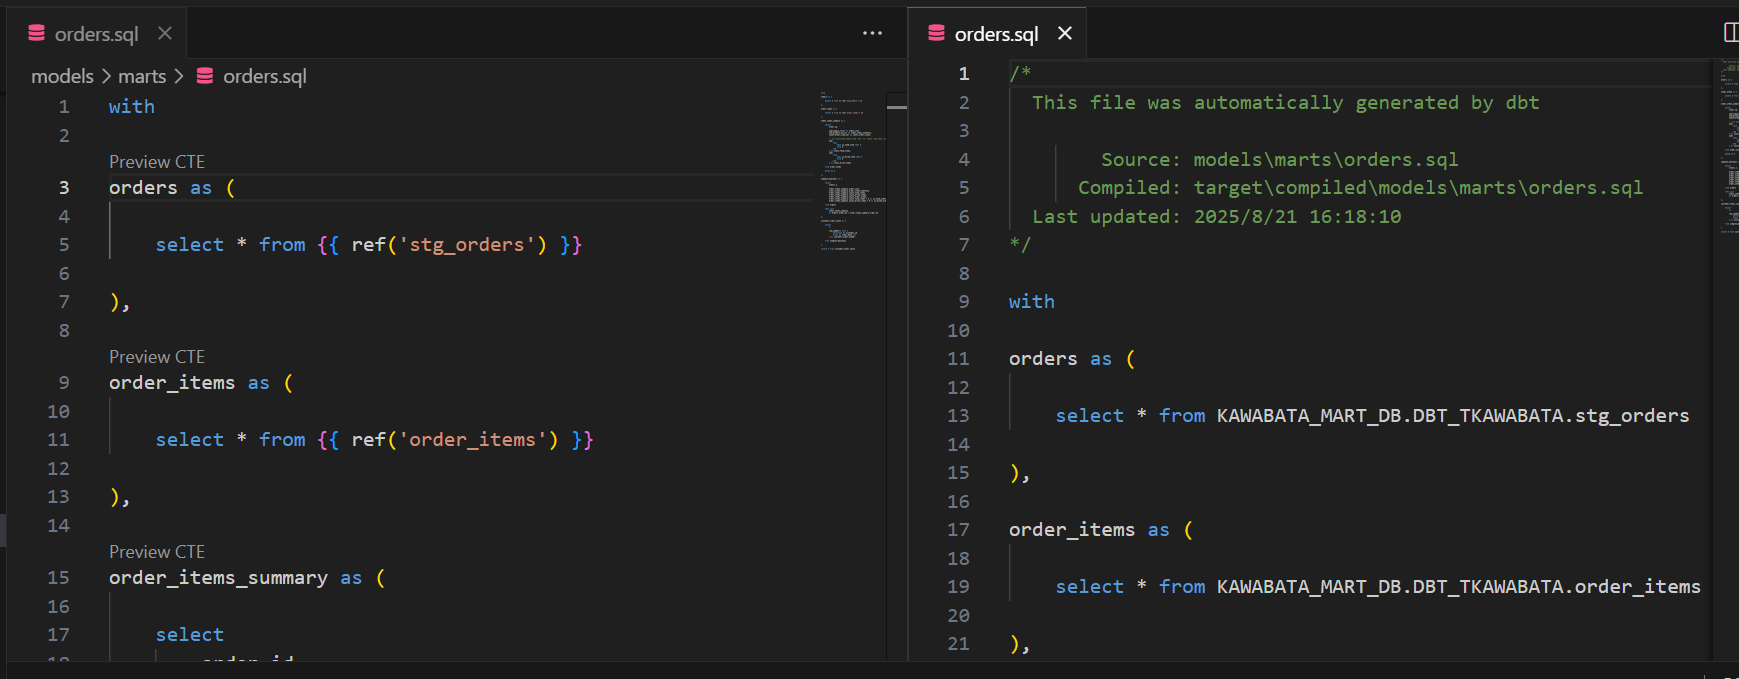
先ほど作成したjaffle_shopフォルダを選択し、models/marts/orders.sqlを開きLineageを確認します。
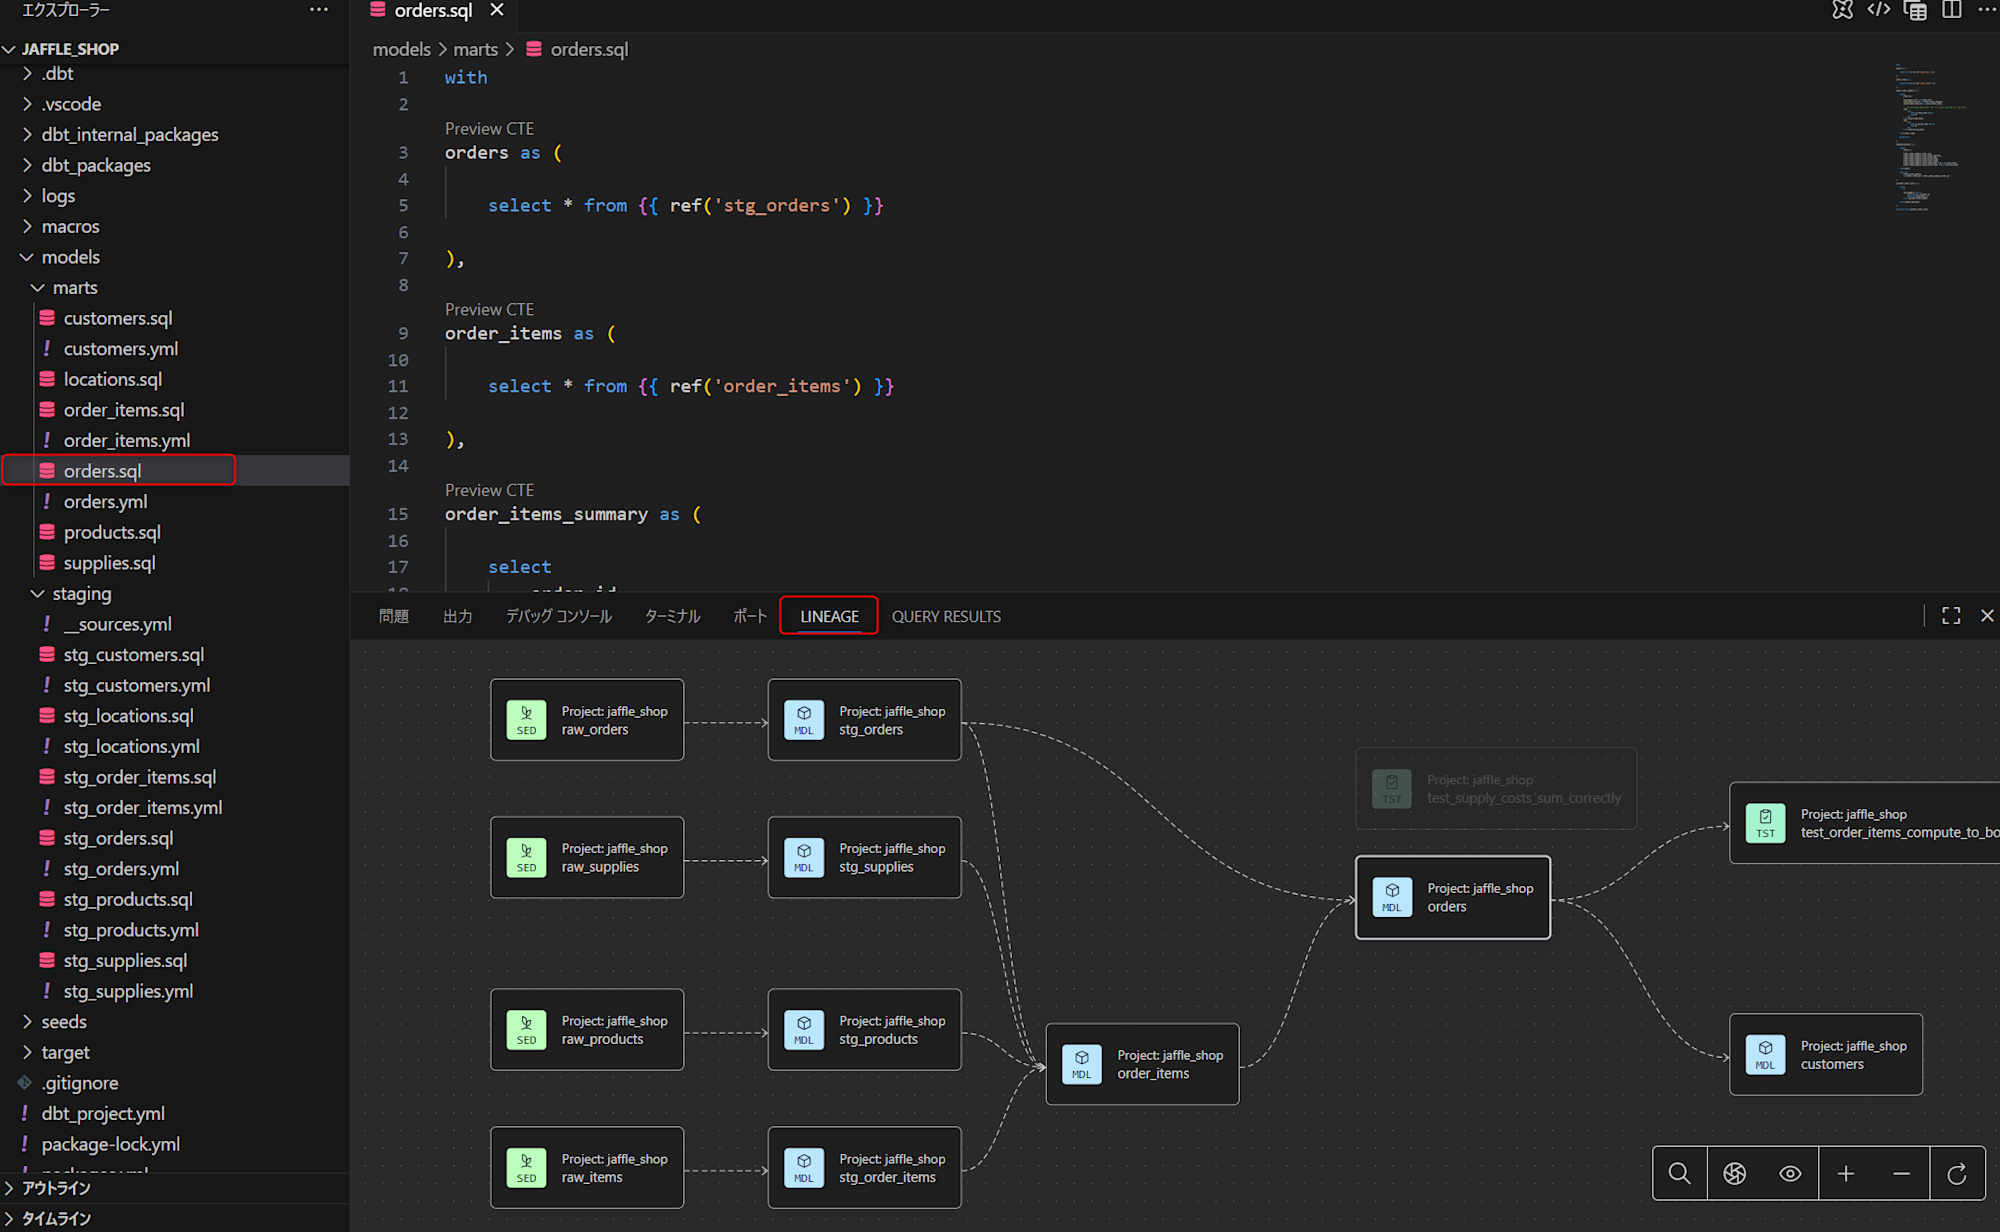
これらがすべて表示されていれば拡張機能は正しくインストールされています。
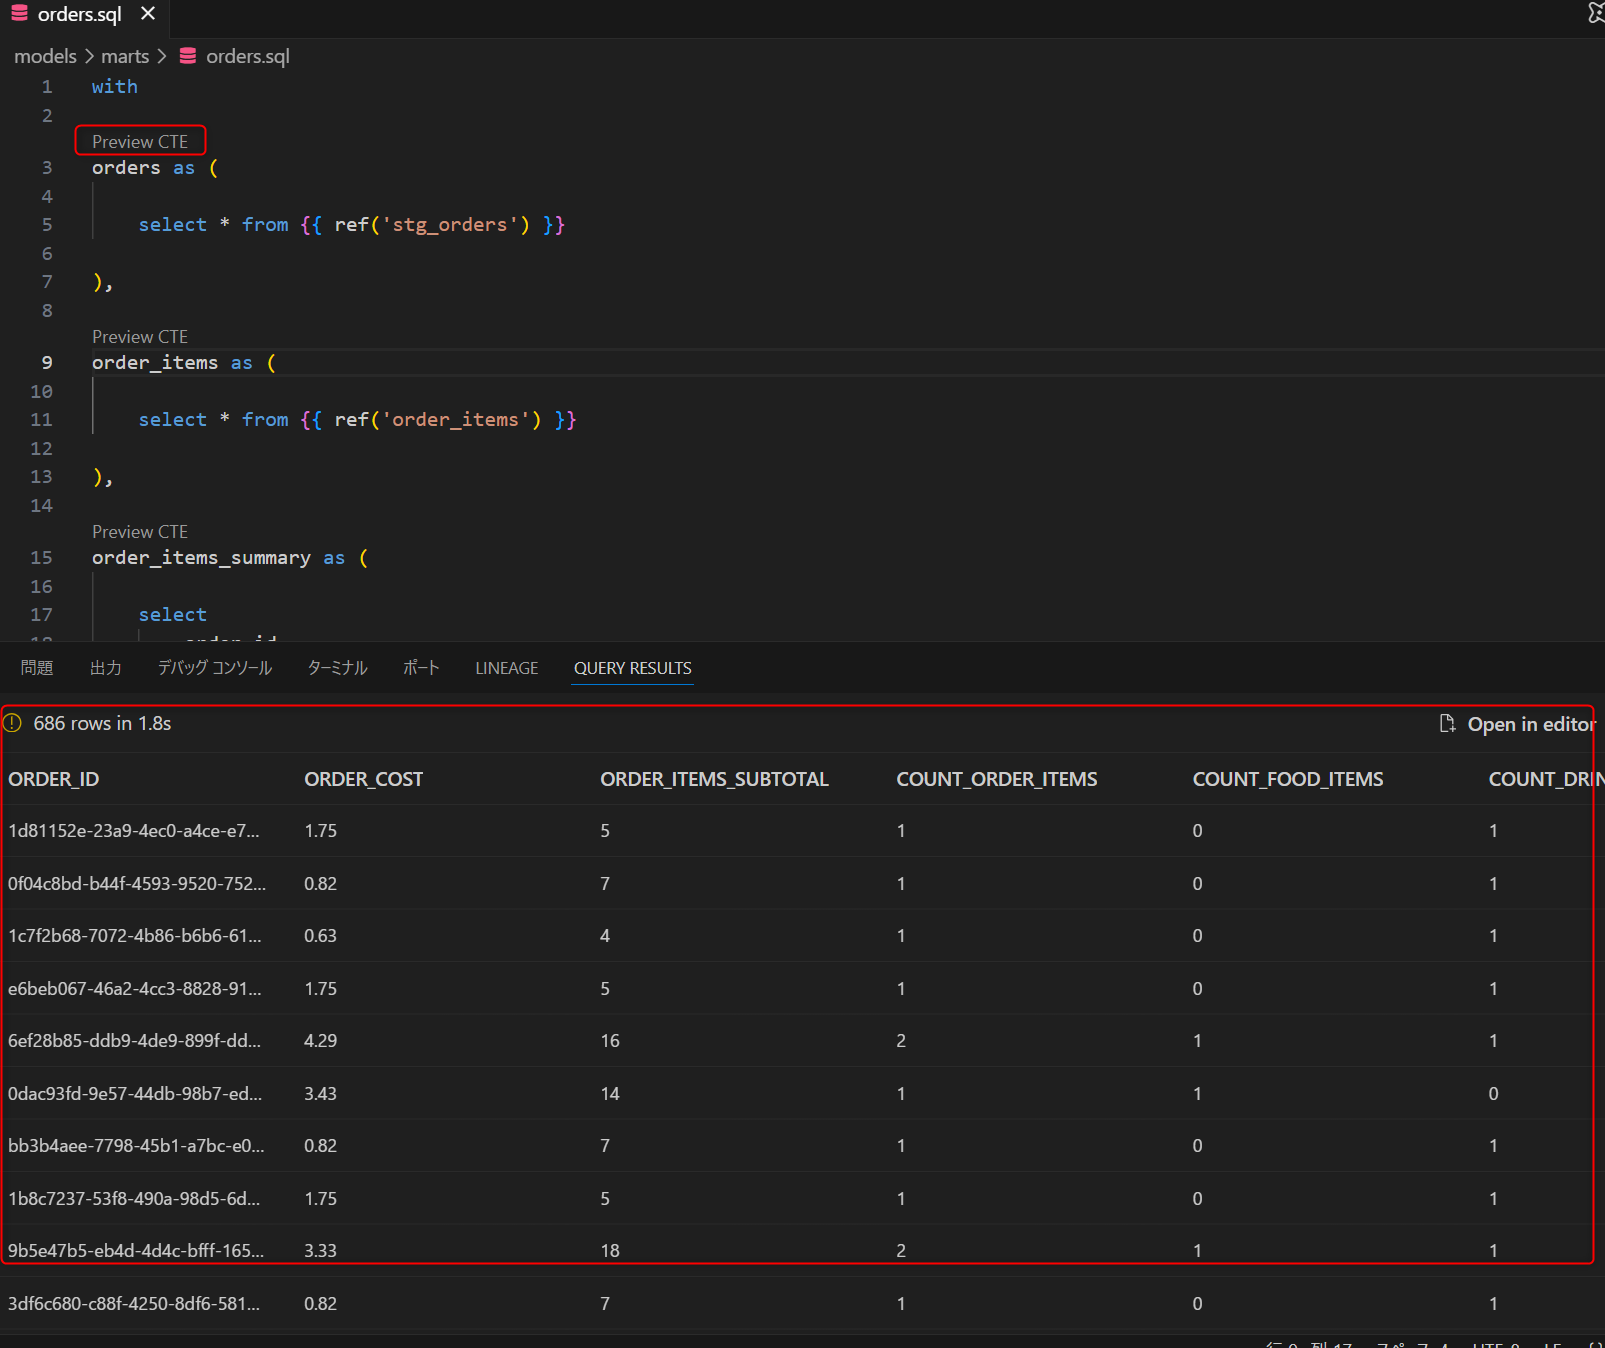
Preview
- 右上隅にある「ファイルのプレビュー」のアイコンをクリックすると、「クエリ結果」タブで結果をプレビューできます。
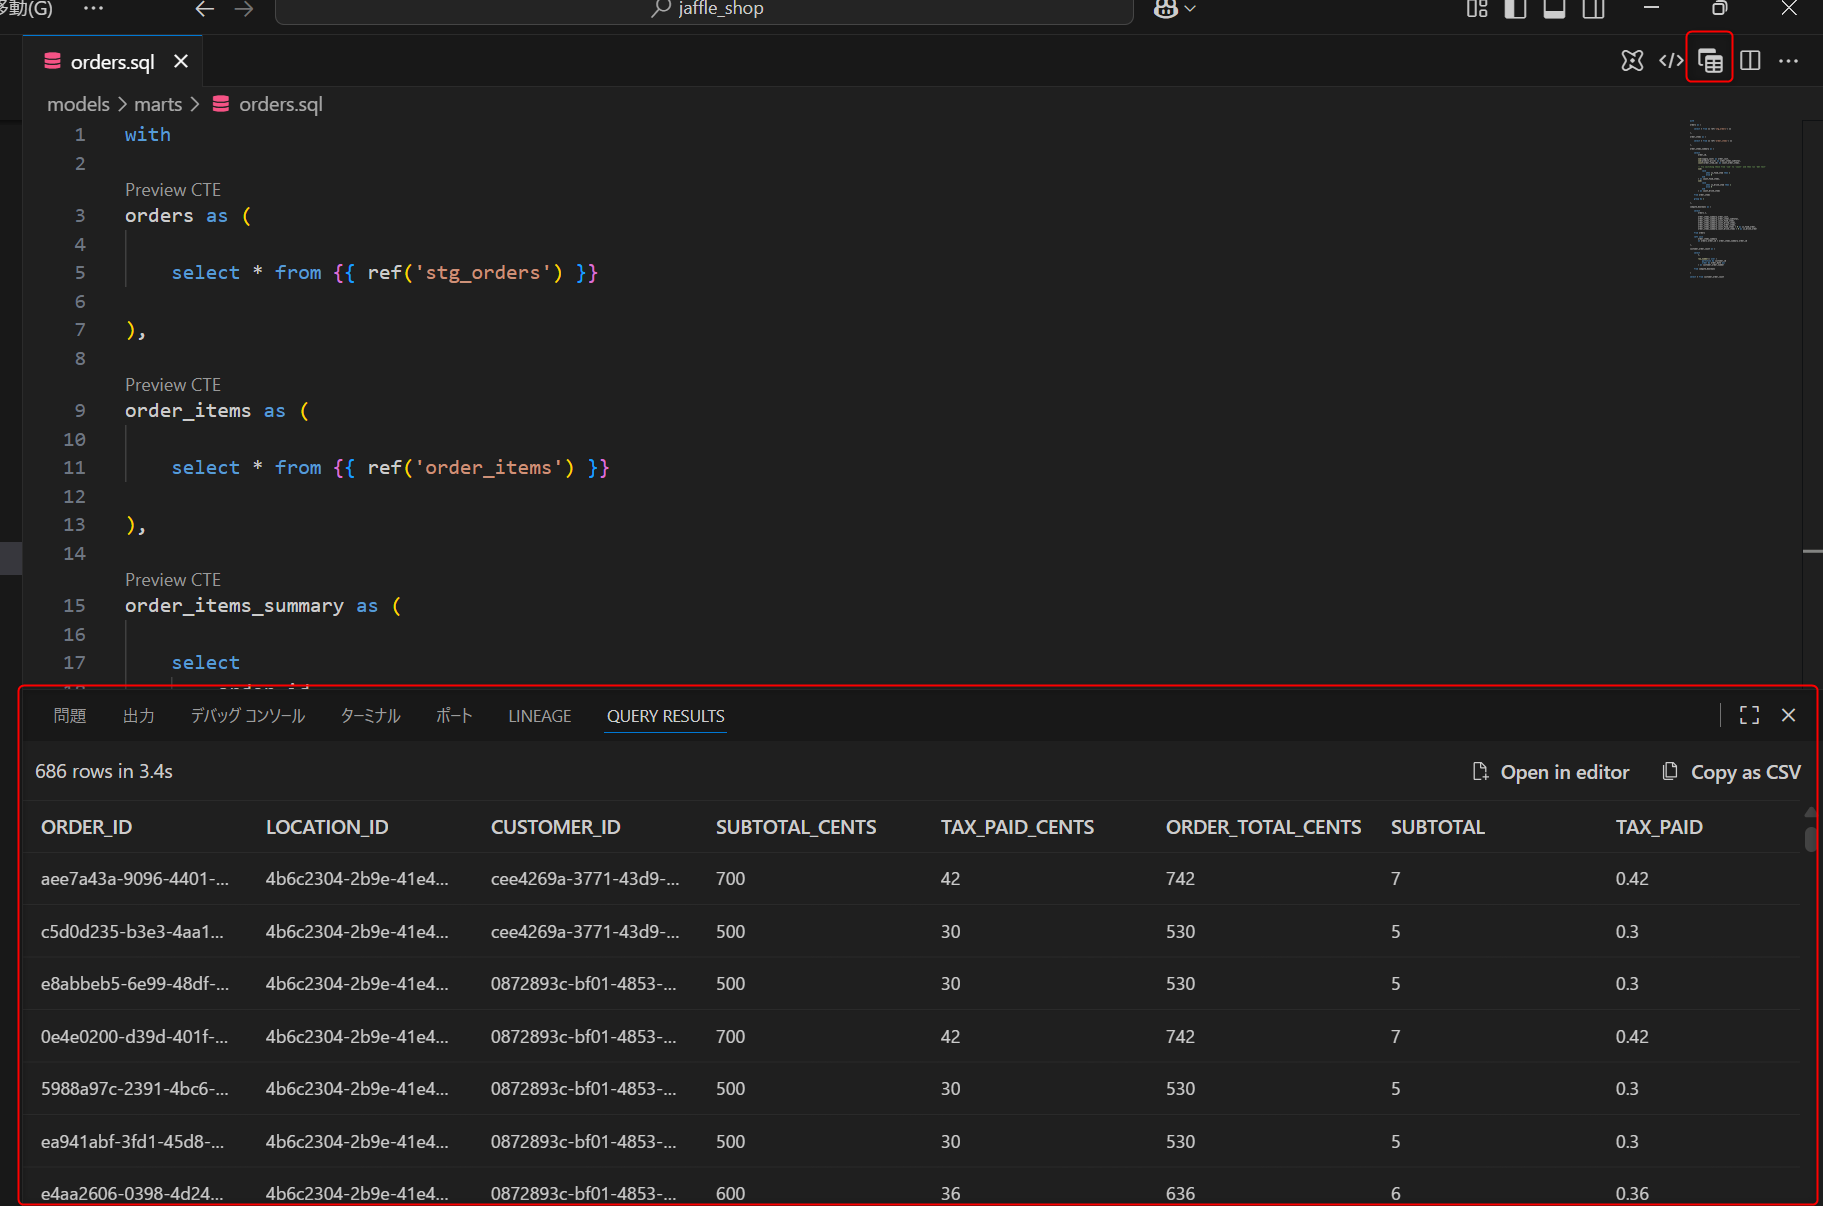
- CTEのプレビューも行うことができ、
Preview CTEをクリックすると対象の結果を確認することが出来ます。
CTEとは
CTEは、SQLクエリ内で一時的に使用される名前付きのクエリ結果セットです。WITH句を使って定義され、同じクエリ内で複数回参照できます。
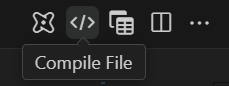
- 右上隅にある「Compile File」をクリックすると、コンパイル済みのモデルが表示されたウィンドウを確認できます。
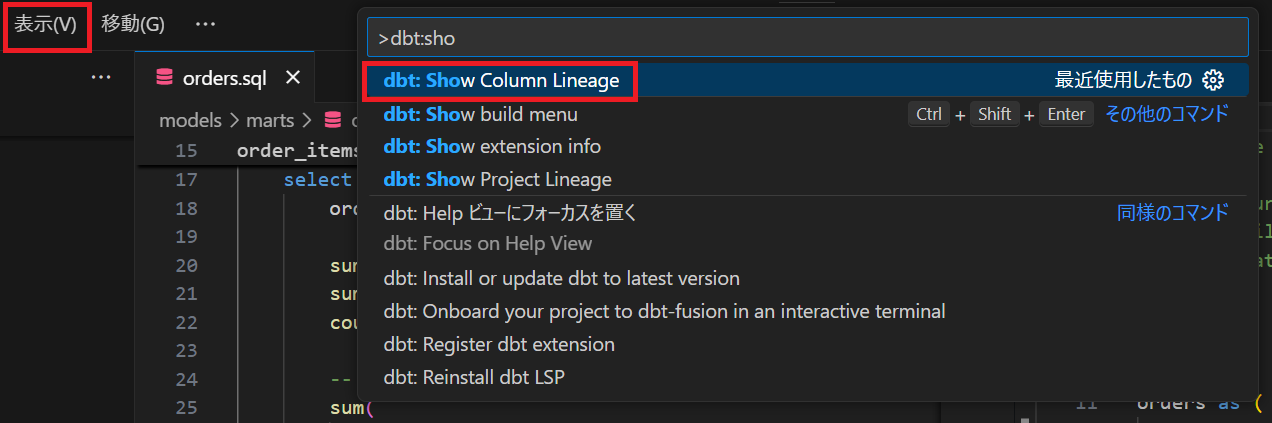
Lineage
先ほどモデルレベルのLineageを確認しましたが、カラムレベルのLineageを確認します。
表示タブからコマンドパレットを選択し、以下のようにdbt: Show Column Lineageを入力します。
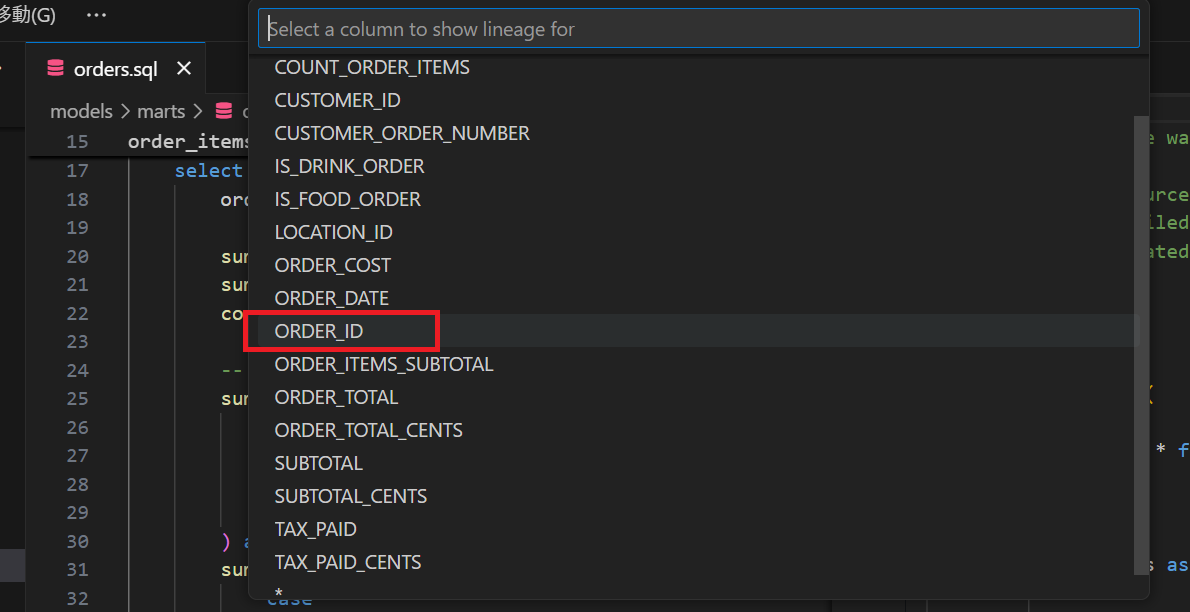
カラムを選択できるので、今回はORDER_IDを選択しました。
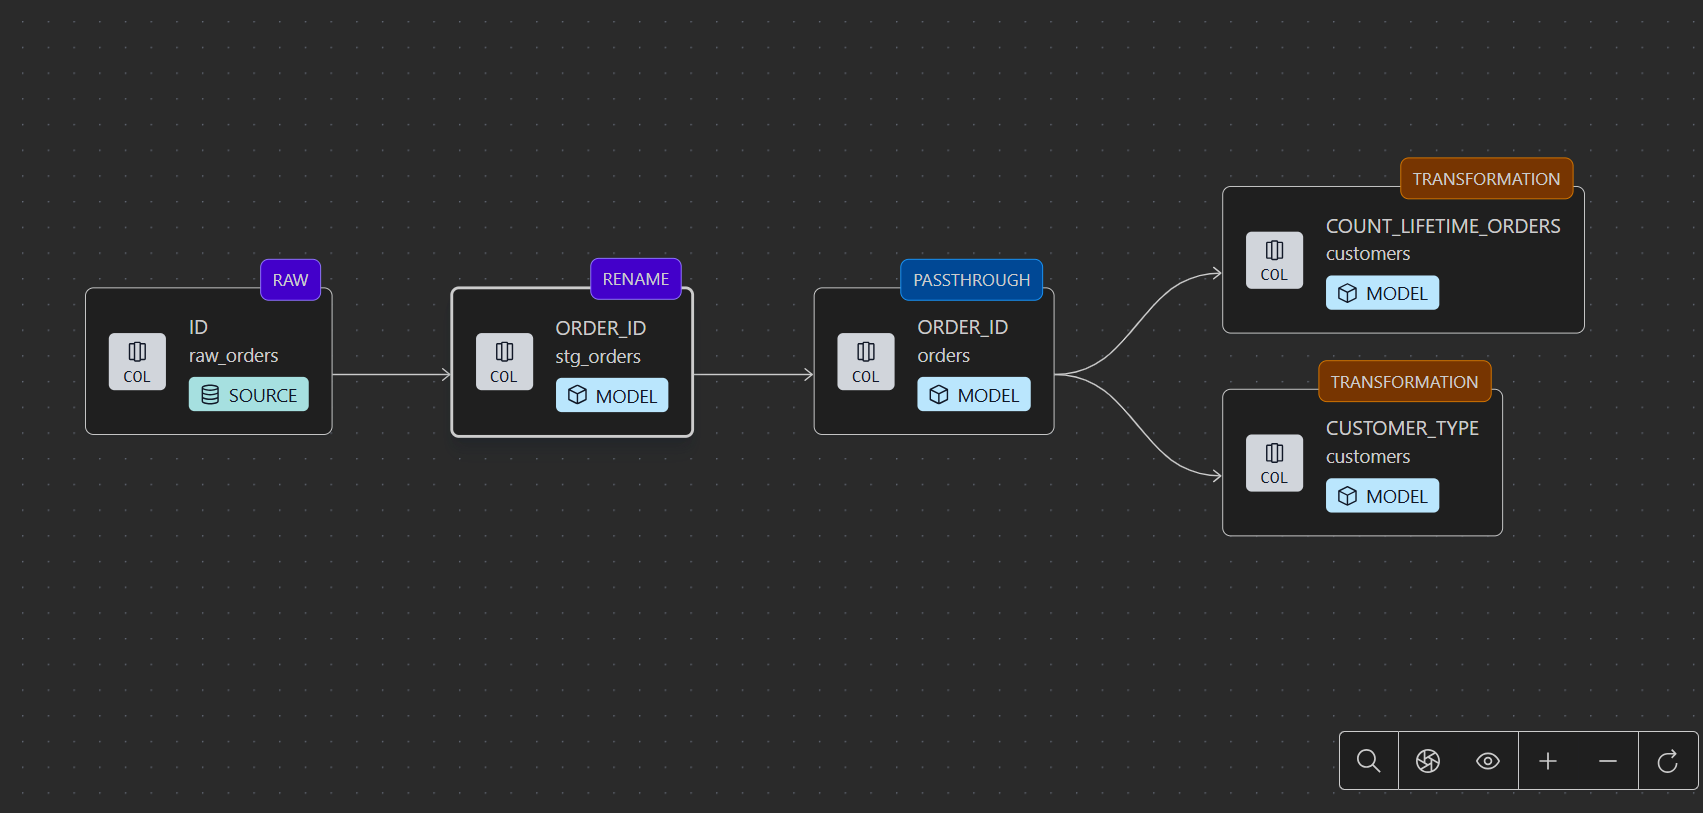
すると以下のように、カラムレベルのLineageを表示することが出来ました。
SQLについて
コーディングを難しくするのではなく、スマートに。オートコンプリートとコンテキストヒントがミスを防ぎ、迅速かつ正確なSQLを記述するのに役立ちます。コミットする前に問題をキャッチしましょう!
実際に試します。
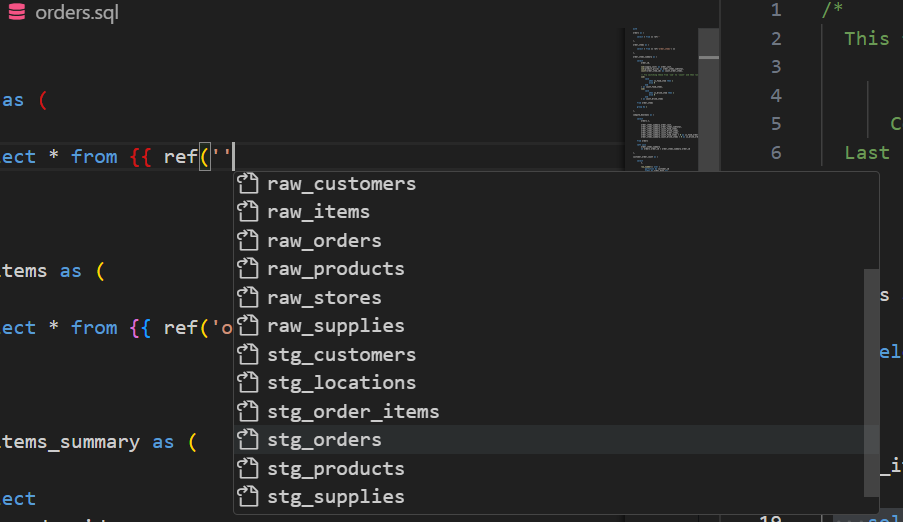
- from句に記載するときに、
ref(''まで記載すると、以下のように候補が表示されます。
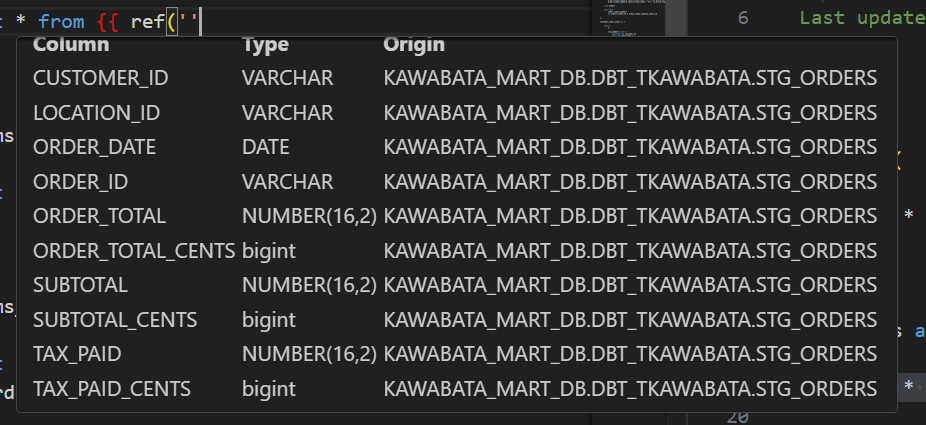
- 該当のモデルを選択したまま、select句の
*にマウスのカーソルを合わせるとカラムとデータ型が確認できます。
一般的なdbtコマンド
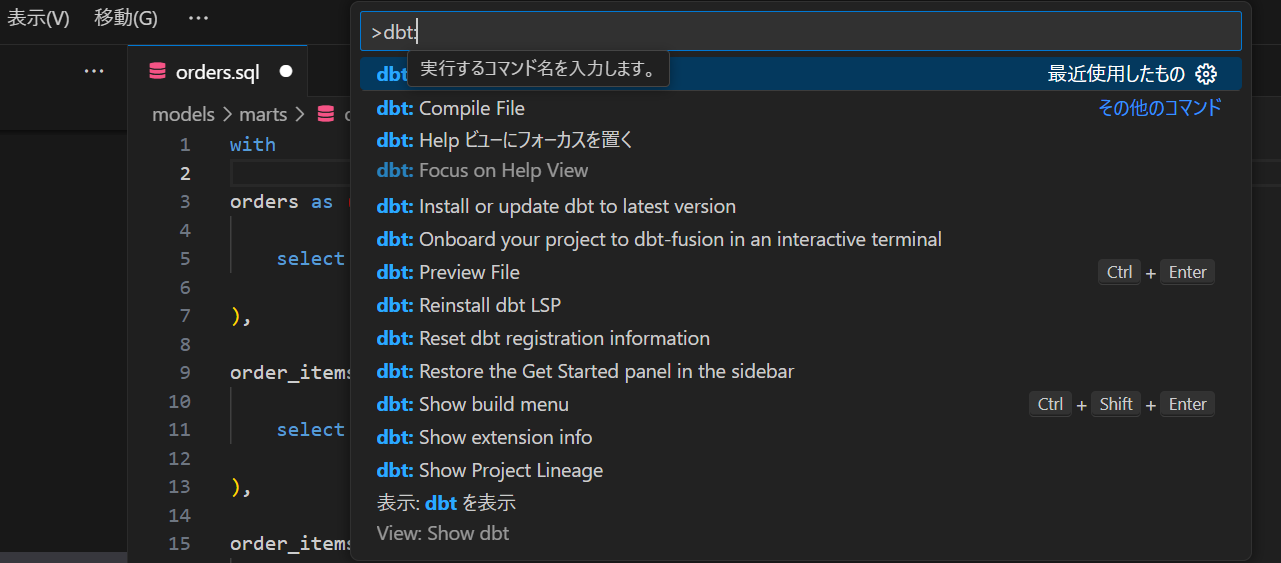
- 右上の dbtアイコンをクリックすると、拡張機能固有のコマンドのリストが開きます。
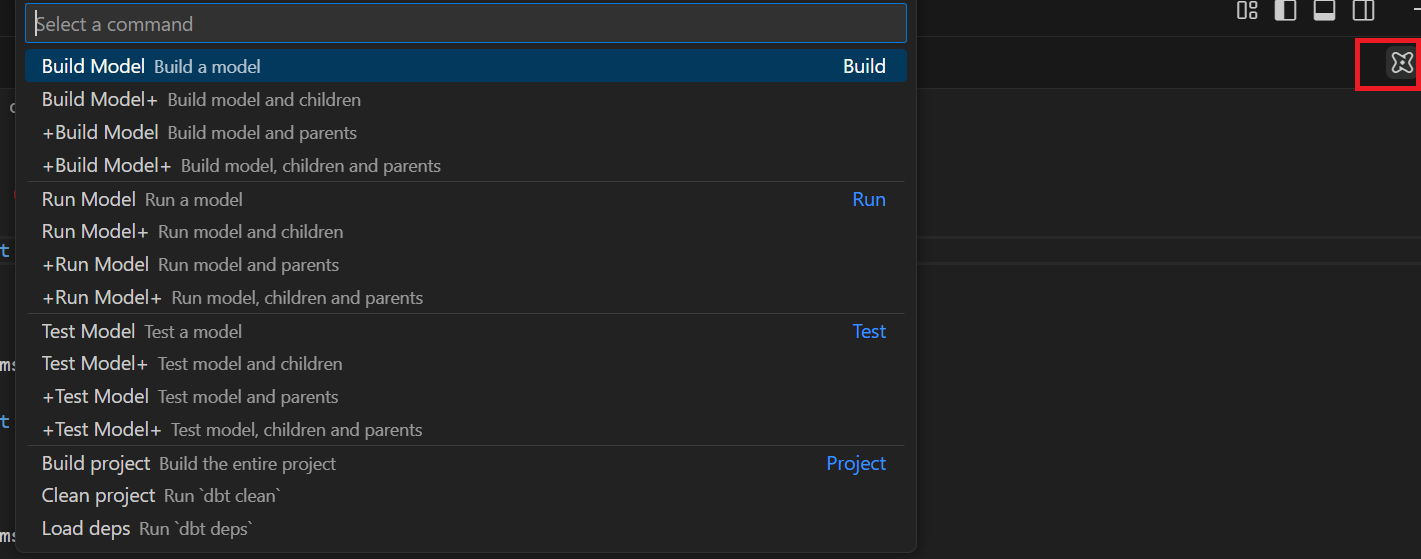
- 表示タブからコマンドパレットを選択し、以下のように
dbt:と入れると使用可能なすべてのコマンドが表示されます。
Fusionに関する詳細情報
ここまでで参考として添付した内容と重複する可能性がありますが、ドキュメントがまとめてありましたのでこちらにも記載します。
【dbtFusionエンジンについて】
【dbt拡張機能について】
【Fusionの新しいコンセプト】
【サポートされている機能マトリックス】
【Fusion CLIのインストール】
【VS Code拡張機能のインストール】
【Fusion リリーストラック】
【Fusion のクイックスタート】
【アップグレードガイド】
【Fusionライセンス】
最後に
いかがでしたでしょうか。
かわばたは、認証情報の部分とdbt-autofixで躓いたので是非参考にしていただければと思います。
Quickstart for the dbt Fusion engineで試せたカラムレベルのリネージ、CTEのプレビューは使うタイミングが多そうで一般公開が楽しみです。
まだ試せていない機能もあるので引き続き検証していきます!
この記事が参考になれば幸いです。