Getting Started with Celery: A Beginner’s Guide.
2024.04.04
この記事は公開されてから1年以上経過しています。情報が古い可能性がありますので、ご注意ください。
Introduction.
In modern web applications, it's often necessary to offload time-consuming or resource-intensive tasks to a separate process or worker. This approach ensures that the main application remains responsive and efficient, providing a better user experience. Celery is a powerful asynchronous task queue system for Python that allows you to distribute tasks across multiple worker processes or machines. In this blog post, we'll explore how to get started with Celery and walk through the steps to set up a basic Celery project.
What is Celery?
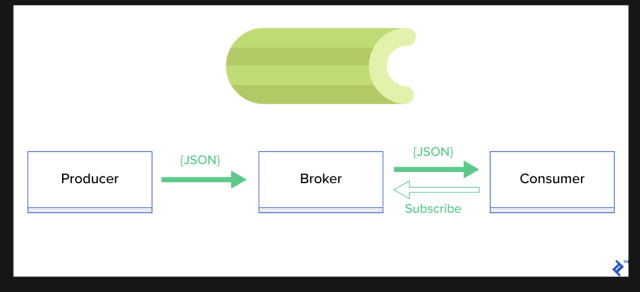
Celery is an open-source distributed task queue system that allows you to create, schedule, and monitor background tasks. It is designed to operate asynchronously, meaning that tasks are executed independently from the main application flow. Celery is particularly useful for handling long-running tasks, such as file processing, email sending, data analysis, and more.
Setting up a Celery Project.
Install Celery:
- Start by installing Celery and a message broker (e.g., RabbitMQ or Redis) using pip:
pip install celery
Create a Celery Instance:
- In your Python project, create a new file (e.g.,
tasks.py) and initialize a Celery instance:
from celery import Celery app = Celery('tasks', broker='amqp://guest:guest@localhost:5672//')- In this example, we're using RabbitMQ as the message broker, but you can replace the broker URL with the appropriate connection string for your chosen broker.
Define Tasks:
- In the same
tasks.pyfile, define your tasks using the@app.taskdecorator: - This defines a task named
addthat takes two arguments,xandy, and returns their sum.
@app.task
def add(x, y):
    return x + y
Start the Celery Worker:
-
- Open a terminal or command prompt and navigate to your project directory. Start the Celery worker by running:
celery -A tasks worker --beat --scheduler django --loglevel=info
- This command starts the Celery worker, enabling it to listen for and process tasks from the task queue.
Execute Tasks:
-
- In your main application code (e.g., a Django view or Flask route), import the task and execute it asynchronously:
from tasks import add

result = add.delay(4, 4)
- The
delaymethod sends the task to the task queue, and Celery will process it as soon as a worker is available.
Retrieve Results:
-
- You can retrieve the result of a task using the
AsyncResultobject:
- You can retrieve the result of a task using the
result.get(timeout=1) # Wait for up to 1 second for the result
- If the task completes within the specified timeout, the result will be returned. Otherwise, an exception will be raised.
Monitoring and Management:
Celery provides several tools for monitoring and managing tasks, including:
- Flower: A web-based monitoring tool that allows you to view task progress, revoke tasks, and monitor worker status.Refer to the documentation:https://flower.readthedocs.io/

- Celery Beat: A scheduler that enables you to run tasks periodically or at specific times. Refer to the documentation:https://docs.celeryq.dev/en/stable/userguide/periodic-tasks.html

- Celery Events: A real-time monitoring system that sends event notifications about task progress and worker status.Refer to the documentation:https://docs.celeryq.dev/en/stable/reference/celery.events.html

Conclusion.
Celery is a powerful tool for offloading time-consuming tasks from your main application, improving performance and responsiveness. By following the steps outlined in this blog post, you've learned how to set up a basic Celery project, define tasks, start workers, execute tasks asynchronously, and retrieve results. With this foundation, you can explore Celery's advanced features, such as task routing, periodic tasks, and more, to enhance your application's functionality and scalability.