Gitリポジトリ全体をテキスト化できるツール:「Gitingest」の紹介
この記事は公開されてから1年以上経過しています。情報が古い可能性がありますので、ご注意ください。
あしざわです。
「このGitHubリポジトリのコードについて質問したいけど、ファイルが多すぎてAIサービスに全部アップロードできない...」
「生成AIにこのリポジトリ全体の構造を理解してもらった上で質問したいのに...」
こんな悩みを抱えたことはありませんか?
今回はそんな悩みを解決する、Gitingestというツールをご紹介します。
忙しい人向けのまとめ
- Gitingestは任意のGitリポジトリをLLMが読み取りやすいコードベースのテキストダイジェストに変換するツール
- Webブラウザ、セルフホスティング、CLI、ブラウザ拡張機能、Python拡張機能など複数の利用方法がある
- 一番簡単な利用方法:GitHubリポジトリのURLの "hub" を "ingest" に変換する(例:https://gitingest.com/awslabs/mcp)
- サマリー、ディレクトリ構造、ファイルのコンテンツの3つに変換できるため、各ファイルをそのまま任意の生成AIツールのソースとして利用すればOK
生成AIとGitHubリポジトリの壁
ChatGPTやNotebookLMなどのブラウザベースで利用できる生成AIサービスは非常に便利ですが、GitHubリポジトリのような複雑なフォルダ構造を持つプロジェクトを一度に取り込むのは簡単ではありません。
例えば以下のような問題があります:
- フォルダ階層が深いと、一つ一つファイルをアップロードする手間がかかる
- ファイルを個別にアップロードすると、フォルダ構造というファイル間の関連性が失われてしまう
- 大量のファイルを手動でアップロードするのは時間がかかる
特にNotebookLMでは、複数のフォルダにネストされたファイル群をそのままソースとして追加することができないという制限があります。
そこで役立つのがGitingestです。
Gitingest の紹介
Gitingestは、任意のGitリポジトリをLLMが読み取りやすいコードベースのテキストダイジェストに変換するツールです。
GitHubのREADMEに記載されている特徴は以下です:
- 簡単なコードコンテキスト: Git リポジトリの URL またはディレクトリからテキストダイジェストを取得
- スマートフォーマット: LLM プロンプト用に最適化された出力形式
- 統計情報:
- ファイルとディレクトリ構造
- 抽出サイズ
- トークン数
- CLI ツール: シェルコマンドとして実行可能
- Python パッケージ: コード内にインポート可能
Gitingestは「Webブラウザベースのアクセス」「Dockerを使ったセルフホスティング」「コマンドラインツール(CLI)」「ブラウザ拡張機能」「Pythonパッケージ」の5つの形式から利用できます。
Gitingestを使ってみた
それでは実際にGitingestを使って、GitHubリポジトリをテキストに変換してみましょう。
以下の4つの形式で試してみました。
- Webブラウザベースのアクセス
- Dockerを使ったセルフホスティング
- コマンドラインツール(CLI)
- ブラウザ拡張機能
Webブラウザベースのアクセス:基本機能
Gitingestは、以下URLからWebブラウザベースでアクセス可能です。

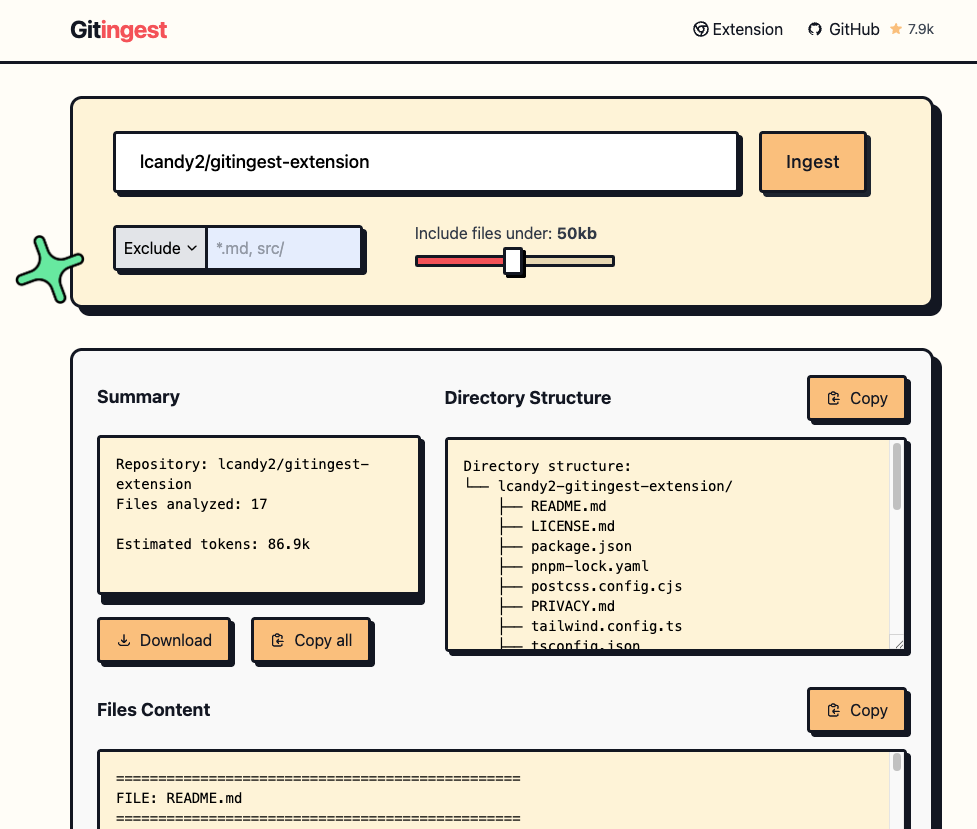
https://github.com/...と記載されている入力枠に任意のGitHubパブリックリポジトリのURLを入力し、Ingestをクリックすると変換できます。
Try these example repositories: の「Gitingest」をクリックするとGitingestのGitHubリポジトリURLが自動入力されました。
そのまま変換したものがこちらです。

「Summary」「Directory Structure」「Files Content」の3つの要素に分かれていますね。
それぞれ出力結果を以下トグルの中に格納したので気になる方は覗いてみてください。
Summary
Repository: cyclotruc/gitingest
Files analyzed: 65

Estimated tokens: 56.3k
Directory Structure
Directory structure:
└── cyclotruc-gitingest/
    ├── README.md
    ├── CODE_OF_CONDUCT.md
    ├── CONTRIBUTING.md
    ├── Dockerfile
    ├── LICENSE
    ├── pyproject.toml
    ├── requirements-dev.txt
    ├── requirements.txt
    ├── SECURITY.md
    ├── .dockerignore
    ├── .pre-commit-config.yaml
    ├── docs/
    ├── src/
    │   ├── gitingest/
    │   │   ├── __init__.py
    │   │   ├── cli.py
    │   │   ├── cloning.py
    │   │   ├── config.py
    │   │   ├── entrypoint.py
    │   │   ├── ingestion.py
    │   │   ├── output_formatters.py
    │   │   ├── query_parsing.py
    │   │   ├── schemas/
    │   │   │   ├── __init__.py
    │   │   │   ├── filesystem_schema.py
    │   │   │   └── ingestion_schema.py
    │   │   └── utils/
    │   │       ├── __init__.py
    │   │       ├── exceptions.py
    │   │       ├── file_utils.py
    │   │       ├── git_utils.py
    │   │       ├── ignore_patterns.py
    │   │       ├── ingestion_utils.py
    │   │       ├── notebook_utils.py
    │   │       ├── path_utils.py
    │   │       ├── query_parser_utils.py
    │   │       └── timeout_wrapper.py
    │   ├── server/
    │   │   ├── __init__.py
    │   │   ├── main.py
    │   │   ├── query_processor.py
    │   │   ├── server_config.py
    │   │   ├── server_utils.py
    │   │   ├── routers/
    │   │   │   ├── __init__.py
    │   │   │   ├── download.py
    │   │   │   ├── dynamic.py
    │   │   │   └── index.py
    │   │   └── templates/
    │   │       ├── api.jinja
    │   │       ├── base.jinja
    │   │       ├── git.jinja
    │   │       ├── index.jinja
    │   │       └── components/
    │   │           ├── footer.jinja
    │   │           ├── git_form.jinja
    │   │           ├── navbar.jinja
    │   │           └── result.jinja
    │   └── static/
    │       ├── robots.txt
    │       └── js/
    │           └── utils.js
    ├── tests/
    │   ├── __init__.py
    │   ├── conftest.py
    │   ├── test_cli.py
    │   ├── test_flow_integration.py
    │   ├── test_ingestion.py
    │   ├── test_notebook_utils.py
    │   ├── test_repository_clone.py
    │   ├── .pylintrc
    │   └── query_parser/
    │       ├── test_git_host_agnostic.py
    │       └── test_query_parser.py
    └── .github/
        ├── dependabot.yml
        └── workflows/
            ├── ci.yml
            ├── publish.yml
            └── scorecard.yml
Files Content
================================================
FILE: README.md
================================================
# Gitingest
[
[
[
[
[
[
Turn any Git repository into a prompt-friendly text ingest for LLMs.
You can also replace `hub` with `ingest` in any GitHub URL to access the corresponding digest.
[gitingest.com](https://gitingest.com) · [Chrome Extension](https://chromewebstore.google.com/detail/adfjahbijlkjfoicpjkhjicpjpjfaood) · [Firefox Add-on](https://addons.mozilla.org/firefox/addon/gitingest)
(以降は省略)
Webブラウザベースのアクセス:取得データの限定・除外
青枠内のUIから大体想像がつくと思いますが、以下機能も利用できます。
- 正規表現を用いて取得するファイルを除外・限定する
- データサイズに基づいて取得するファイルを限定する

Exclude/Includeの枠内に正規表現やフォルダパスを指定することで、取得対象にするファイルやフォルダパスを限定できました。
以下の例では、*.md の正規表現でincludeを指定していたところ、.md形式のファイルのみに絞られました。

試せていませんが、excludeを使って特定のファイル名・ファイルパスを除外したり、Include files under:を使えば大きいファイルサイズのデータを除外できそうですね。
Webブラウザベースのアクセス:URL変換
「ブラウザアクセス→URL入力の流れがめんどくさいな」と思う方もいるかもしれません。
Gitingestは、GithubリポジトリのURLにある hub をingest に変換することでIngest後の画面に直接アクセス可能です。
例えばhttps://github.com/awslabs/mcpのパブリックリポジトリであれば、https://gitingest.com/awslabs/mcpのように変換します。

Dockerを使ったセルフホスティング
GitingestのGitHubリポジトリではセルフホスティング用のDockerファイルが準備されています。
以下コマンドで、GitHubリポジトリのCloneからDockerビルド、コンテナの起動まで実施しました。
> git clone https://github.com/cyclotruc/gitingest.git
Cloning into 'gitingest'...
remote: Enumerating objects: 2040, done.
remote: Counting objects: 100% (1023/1023), done.
remote: Compressing objects: 100% (409/409), done.
remote: Total 2040 (delta 810), reused 615 (delta 614), pack-reused 1017 (from 2)
Receiving objects: 100% (2040/2040), 639.82 KiB | 2.55 MiB/s, done.
Resolving deltas: 100% (1301/1301), done.

> cd gitingest/

> ls Dockerfile
Dockerfile

> docker build -t gitingest .
[+] Building 51.5s (15/15) FINISHED                                                        docker:rancher-desktop
 => [internal] load build definition from Dockerfile                                                         0.0s
 => => transferring dockerfile: 1.14kB                                                                       0.0s
 => [internal] load metadata for docker.io/library/python:3.12-slim                                          7.7s
 => [internal] load .dockerignore                                                                            0.0s
 => => transferring context: 364B                                                                            0.0s
 => [builder 1/4] FROM docker.io/library/python:3.12-slim@sha256:48a11b7ba705fd53bf15248d1f94d36c39549903c5  6.8s
 => => resolve docker.io/library/python:3.12-slim@sha256:48a11b7ba705fd53bf15248d1f94d36c39549903c5d59edcfa  0.0s
 => => sha256:916619b289581c9a4f2941745a09b2934cee4bd354049355b4d4d53485d67573 5.52kB / 5.52kB               0.0s
 => => sha256:16c9c4a8e9eef856231273efbb42a473740e8d50d74d35e6aedd04ff69fe161f 28.07MB / 28.07MB             3.2s
 => => sha256:a7d9a0ac6293889b2e134861072f9099a06d78ca983d7172d7bb8b236008c7c3 3.33MB / 3.33MB               1.0s
 => => sha256:d5df539669ae60a3cb66149ba68e4e0ab8526d2eabef9e700fa3003a5ea67e2b 13.57MB / 13.57MB             1.9s
 => => sha256:48a11b7ba705fd53bf15248d1f94d36c39549903c5d59edcfa2f3f84126e7b44 9.12kB / 9.12kB               0.0s
 => => sha256:40011d5cf225eb43b650ec158d4a59ca3110e6566ddfd3f506824db6153761cf 1.75kB / 1.75kB               0.0s
 => => sha256:29f5e0fcc12f1188255a1b6c71c97c1760d7cb256e27d6af730db82b2e86164b 251B / 251B                   3.1s
 => => extracting sha256:16c9c4a8e9eef856231273efbb42a473740e8d50d74d35e6aedd04ff69fe161f                    2.2s
 => => extracting sha256:a7d9a0ac6293889b2e134861072f9099a06d78ca983d7172d7bb8b236008c7c3                    0.2s
 => => extracting sha256:d5df539669ae60a3cb66149ba68e4e0ab8526d2eabef9e700fa3003a5ea67e2b                    1.0s
 => => extracting sha256:29f5e0fcc12f1188255a1b6c71c97c1760d7cb256e27d6af730db82b2e86164b                    0.0s
 => [internal] load build context                                                                            0.0s
 => => transferring context: 209.94kB                                                                        0.0s
 => [builder 2/4] WORKDIR /build                                                                             0.2s
 => [stage-1 2/7] RUN apt-get update     && apt-get install -y --no-install-recommends git curl    && rm -  10.8s
 => [builder 3/4] COPY requirements.txt .                                                                    0.0s
 => [builder 4/4] RUN apt-get update     && apt-get install -y --no-install-recommends gcc python3-dev      35.7s
 => [stage-1 3/7] WORKDIR /app                                                                               0.0s
 => [stage-1 4/7] RUN useradd -m -u 1000 appuser                                                             0.2s
 => [stage-1 5/7] COPY --from=builder /usr/local/lib/python3.12/site-packages/ /usr/local/lib/python3.12/si  0.3s
 => [stage-1 6/7] COPY src/ ./                                                                               0.0s
 => [stage-1 7/7] RUN chown -R appuser:appuser /app                                                          0.3s
 => exporting to image                                                                                       0.3s
 => => exporting layers                                                                                      0.3s
 => => writing image sha256:6d18f197a910e6fe19e8710165b7330e22657019717fefcb0419a83bd976adb6                 0.0s
 => => naming to docker.io/library/gitingest                                                                 0.0s

> docker run -d --name gitingest -p 8000:8000 gitingest
b1578ba77669406ba8b4faa76a151d4ecc2c774433b4ac92b372dd2e8523ac1c
ブラウザからhttp://localhost:8000/にアクセスすると、「Webブラウザベースのアクセス」と同じ画面が表示されました。

ローカルデプロイした環境でも変わらず、パブリックリポジトリの情報が取得できました。

セキュリティ上の問題でパブリックなWebサービスの利用が難しい環境では、この方法でローカル環境で動作させるとよさそうですね。
コマンドラインツール(CLI)
GitingestにはCLIツールが提供されています。
これまでのブラウザベースのツールと異なり、パブリックリポジトリのGitHubプロジェクトだけでなくローカルのファイルやディレクトリの分析もサポートしています。
個人的に、この形態のGitingestを最も推しています。
CLIツールはPyPIで公開されており、以下コマンドでインストール可能です。
> pip install gitingest
(pipがローカルにインストールされていない場合)お好みのパッケージマネージャーからインストールしてください。
> brew install pipx
> apt install pipx
> scoop install pipx
...
インストールできているかは、以下ヘルプコマンドから確認しました。
> gitingest --help
Usage: gitingest [OPTIONS] [SOURCE]

   Main entry point for the CLI. This function is called when the CLI is run
   as a script.

  It calls the async main function to run the command.

  Parameters ---------- source : str     The source directory or repository to
  analyze. output : str, optional     The path where the output file will be
  written. If not specified, the output will be written     to a file named
  `<repo_name>.txt` in the current directory. max_size : int     The maximum
  file size to process, in bytes. Files larger than this size will be ignored.
  exclude_pattern : Tuple[str, ...]     A tuple of patterns to exclude during
  the analysis. Files matching these patterns will be ignored. include_pattern
  : Tuple[str, ...]     A tuple of patterns to include during the analysis.
  Only files matching these patterns will be processed. branch : str, optional
  The branch to clone (optional).

Options:
  -o, --output TEXT           Output file path (default: <repo_name>.txt in
                              current directory)
  -s, --max-size INTEGER      Maximum file size to process in bytes
  -e, --exclude-pattern TEXT  Patterns to exclude
  -i, --include-pattern TEXT  Patterns to include
  -b, --branch TEXT           Branch to clone and ingest
  --help                      Show this message and exit.
ブラウザベースでもできていた、最大サイズ指定(-s, --max-size)、除外パターン(-e, --exclude-pattern)、限定パターン(-i, --include-pattern)だけでなく、ブランチ指定(-b, --branch)ってのも使えるようですね。
基本的な使い方は、以下のようにgitingestコマンドと合わせて「ディレクトリパスを指定するか」「URLを指定するか」のどちらかになります。
# Basic usage
gitingest /path/to/directory

# From URL
gitingest https://github.com/cyclotruc/gitingest
URL指定でコマンドを実行したものがこちら。コマンドの実行結果にSummaryが含まれていますね。
> gitingest https://github.com/cyclotruc/gitingest
Analysis complete! Output written to: digest.txt

Summary:
Repository: cyclotruc/gitingest
Files analyzed: 65

Estimated tokens: 56.3k
出力結果はdigest.txtというファイルに格納されていました。ブラウザベースで取得できた「Directory structure」と「Files Content」が連結されています。
> cat digest.txt
Directory structure:
└── cyclotruc-gitingest/
├── README.md
├── CODE_OF_CONDUCT.md
├── CONTRIBUTING.md
├── Dockerfile
├── LICENSE
├── SECURITY.md
├── pyproject.toml
├── requirements-dev.txt
├── requirements.txt
├── .dockerignore
├── .pre-commit-config.yaml
├── docs/
├── src/
│ ├── gitingest/
│ │ ├── __init__.py
│ │ ├── cli.py
│ │ ├── cloning.py
│ │ ├── config.py
│ │ ├── entrypoint.py
│ │ ├── ingestion.py
│ │ ├── output_formatters.py
│ │ ├── query_parsing.py
│ │ ├── schemas/
│ │ │ ├── __init__.py
│ │ │ ├── filesystem_schema.py
│ │ │ └── ingestion_schema.py
│ │ └── utils/
│ │ ├── __init__.py
│ │ ├── exceptions.py
│ │ ├── file_utils.py
│ │ ├── ingestion_utils.py
│ │ ├── query_parser_utils.py
│ │ └── timeout_wrapper.py
│ │ ├── main.py
│ │ ├── query_processor.py
│ │ ├── server_config.py
│ │ ├── server_utils.py
│ │ ├── routers/
│ │ │ ├── dynamic.py
│ │ │ └── index.py
│ │ └── templates/
│ │ ├── api.jinja
│ │ ├── base.jinja
│ │ ├── git.jinja
│ │ ├── index.jinja
│ │ └── components/
│ │ ├── footer.jinja
│ │ ├── git_form.jinja
│ │ ├── navbar.jinja
│ │ └── result.jinja
│ └── static/
│ ├── robots.txt
│ └── js/
│ └── utils.js
├── tests/
│ ├── __init__.py
│ ├── conftest.py
│ ├── test_cli.py
│ ├── test_flow_integration.py
│ ├── test_ingestion.py
│ ├── test_notebook_utils.py
│ ├── test_repository_clone.py
│ ├── .pylintrc
│ └── query_parser/
│ ├── test_git_host_agnostic.py
│ └── test_query_parser.py
└── .github/
├── dependabot.yml
└── workflows/
├── ci.yml
├── publish.yml
└── scorecard.yml
================================================
File: README.md
================================================
# Gitingest
[
[
├── publish.yml
└── scorecard.yml
================================================
File: README.md
================================================
# Gitingest
[
[
[
[
[
[
Turn any Git repository into a prompt-friendly text ingest for LLMs.
You can also replace `hub` with `ingest` in any GitHub URL to access the corresponding digest.
[gitingest.com](https://gitingest.com) · [Chrome Extension](https://chromewebstore.google.com/detail/adfjahbijlkjfoicpjkhjicpjpjfaood) · [Firefox Add-on](https://addons.mozilla.org/firefox/addon/gitingest)
(以降は略)
パス指定のコマンドで実行したものがこちら。そのディレクトリがGitリポジトリなのか関係なく、ディレクトリ配下のファイルを分析・テキスト化してくれます。
> gitingest ../test-path
Analysis complete! Output written to: digest.txt

Summary:
Directory: test-path
Files analyzed: 2

Estimated tokens: 52

> cat digest.txt
Directory structure:
└── test-path/
    ├── test.txt
    └── test2.txt

================================================
File: test.txt
================================================
Hello, World!


================================================
File: test2.txt
================================================
Hello, World! 2
ちなみにgitingestコマンド単体で実行すると、カレントディレクトリが分析対象となります。
> pwd
work/gitingest

> gitingest
Analysis complete! Output written to: digest.txt

Summary:
Directory: gitingest
Files analyzed: 65

Estimated tokens: 56.3k
ブラウザ拡張機能
Gitingestは、Chrome拡張機能、Firefox拡張機能、Microsoft Edge拡張機能のブラウザ拡張からも利用できます。
私はGoogle Chromeをメインのブラウザとして使っているので、Chrome拡張機能から試してみました。
Chrome拡張機能をローカルのGoogle Chromeにインストールします。


その後、任意のパブリックGitHubリポジトリにアクセスすると、Open in Gitingestボタンが追加されています。
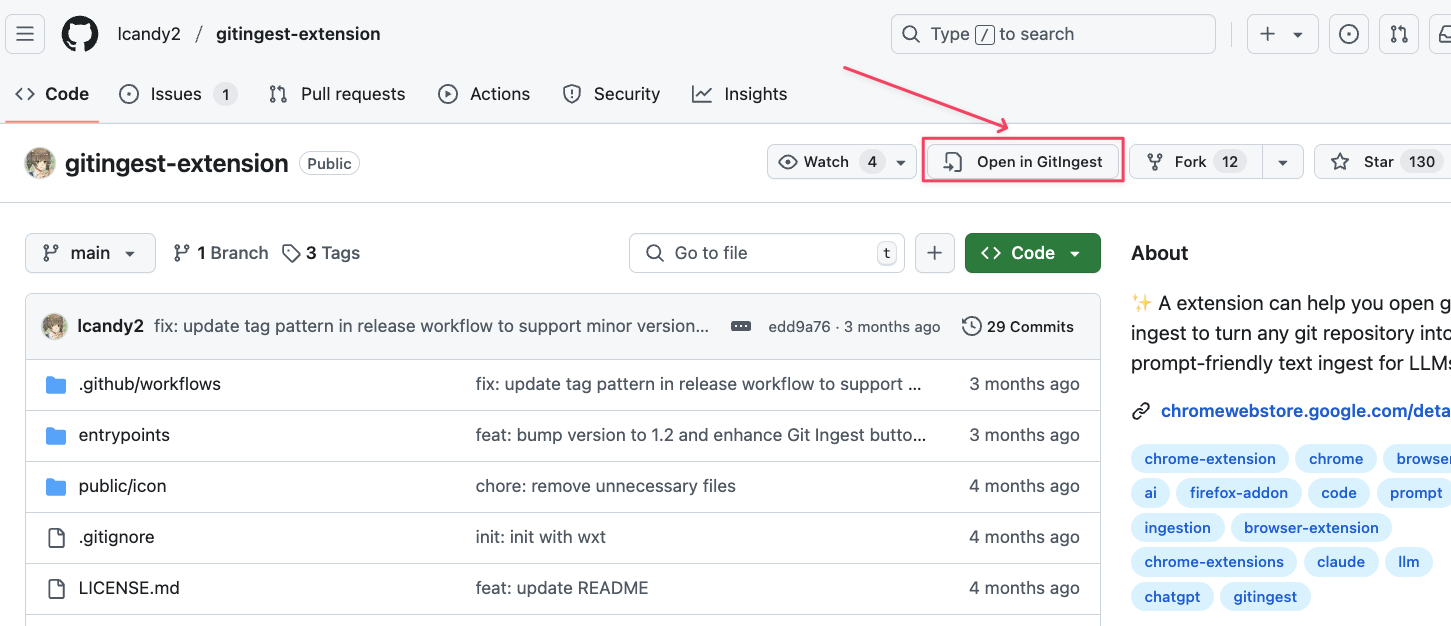
クリックすると、するとGitHubリポジトリのURLを入力した状態のGitingestページが表示されます。
アクセス形式はURLの一部文字列を変換する「Webブラウザベースのアクセス:URL変換」と似て簡単で、GitHubリポジトリ上から直接アクセスできるようになる点が便利ですね。
生成AIツールにインプットしてみる
前述した各手順でGitingestを使ってパブリックリポジトリを分析・抽出して得たテキストファイルをNotebookLMのソースに登録してみます。
GitingestのGitリポジトリを、いずれかの手段で抽出したdigest.txtをNotebookLMのソースに登録します。

NotebookLMにチャットに以下のように質問してみました。

正しくこのリポジトリに関する情報を教えてもらえましたね。
さいごに
今回は、Gitリポジトリ全体をテキスト化できる「Gitingest」というツールを紹介しました。
個人的には、CLIツールを使ってローカルにあるGitリポジトリ以外も含めたフォルダ構造をテキスト化できる点が気に入りました。
最近ホットなのは、ローカルにあるAIツールからMCPサーバーを経由して色々なWebサービスへアクセスすること、だと思っています。
一方で今回紹介したGitingestやbacklog-exporterを使って、生成AIが読み取りやすい形式でローカルにファイルをダウンロードして、ローカルをRAGのように扱いAI活用するユースケースも有効な場合があります。
用途に合わせて有用なAIツールを選んで、運用を楽にしていきましょう。
以上です。