GKE Multi-cluster Gatewayによるマルチリージョン構成を試してみた
GKEを利用している環境でグローバル展開を検討する機会がありました。
GKE Multi-cluster Gatewayを使うことで、複数リージョンをまたぐグローバルルーティングを構築できます。
今回はこの仕組みを実際に構築して確認します。
インフラ構築にはTerraformを、Kubernetesリソースのデプロイにはkubectlをそれぞれ使用します。
構成
| 項目 | 設定 |
|---|---|
| クラスタ | GKE Autopilot × 2 |
| リージョン | us-west1(オレゴン)、asia-northeast1(東京) |
| Config Cluster | gke-us |
| GatewayClass | gke-l7-global-external-managed-mc |
| サンプルアプリ | whereami(応答にクラスタ名・ゾーンを含むGoogle公式サンプル) |
主要コンセプト
構築に必要な概念は以下です。詳細は各リンク先を参照してください。
| 概念 | 説明 | 参照 |
|---|---|---|
| Fleet | 複数GKEクラスタの論理グループ | https://cloud.google.com/kubernetes-engine/docs/fleets-overview |
| Config Cluster | Gateway/HTTPRouteを配置するクラスタ。LB設定の単一制御点 | https://cloud.google.com/kubernetes-engine/docs/concepts/multi-cluster-gateways |
| Multi-cluster Services (MCS) | ServiceExportでサービスをFleetに公開し、LBバックエンドとして登録する仕組み | https://cloud.google.com/kubernetes-engine/docs/concepts/multi-cluster-services |
| Gateway API | Kubernetes Ingress後継。GatewayClass → Gateway → HTTPRoute の階層でLBを定義 | https://cloud.google.com/kubernetes-engine/docs/concepts/gateway-api |
ServiceExportはGlobal LBのバックエンド登録(North-South)に使用します。
事前準備
gke-gcloud-auth-pluginのインストール
kubectlからGKEクラスタへ認証するために必要なプラグインです。
gcloud components install gke-gcloud-auth-plugin
API有効化
Multi-cluster Gatewayには以下の5つのAPIが必要です。Terraform実行前にgcloud CLIで有効化します。
まず、プロジェクトIDをシェル変数に設定します。以降のコマンドで繰り返し使用します。
export PROJECT_ID="YOUR_PROJECT_ID"
gcloud services enable \
  container.googleapis.com \
  gkehub.googleapis.com \
  trafficdirector.googleapis.com \
  multiclusterservicediscovery.googleapis.com \
  multiclusteringress.googleapis.com \
  --project=$PROJECT_ID
container.googleapis.com— GKEgkehub.googleapis.com— Fleet (GKE Hub)trafficdirector.googleapis.com— Cloud Service Mesh(MCGコントローラーが内部で使用)multiclusterservicediscovery.googleapis.com— Multi-cluster Servicesmulticlusteringress.googleapis.com— Multi-cluster Ingress(MCGコントローラー)
Terraformでインフラ構築
ディレクトリ構成
terraform/
├── main.tf          # provider設定
├── variables.tf     # プロジェクトID
├── terraform.tfvars # 変数値の定義
├── gke.tf           # GKE Autopilotクラスタ × 2
├── fleet.tf         # Fleet登録、MCS・MCG有効化、Config Cluster指定
├── iam.tf           # MCS/MCG用IAMバインディング
└── outputs.tf       # kubectlコンテキスト設定コマンド
provider設定
terraform {
  required_version = ">= 1.14"

  required_providers {
    google = {
      source  = "hashicorp/google"
      version = "~> 7.24"
    }
    google-beta = {
      source  = "hashicorp/google-beta"
      version = "~> 7.24"
    }
  }
}

provider "google" {
  project = var.project_id
}

provider "google-beta" {
  project = var.project_id
}

data "google_project" "current" {
  project_id = var.project_id
}
variable "project_id" {
  description = "GCP project ID"
  type        = string
}
GKE Autopilotクラスタ
resource "google_container_cluster" "gke_us" {
  provider = google-beta

  name     = "gke-us"
  location = "us-west1"
  project  = var.project_id

  enable_autopilot = true

  gateway_api_config {
    channel = "CHANNEL_STANDARD"
  }

  release_channel {
    channel = "REGULAR"
  }
  deletion_protection = false

}

resource "google_container_cluster" "gke_asia" {
  provider = google-beta

  name     = "gke-asia"
  location = "asia-northeast1"
  project  = var.project_id

  enable_autopilot = true

  gateway_api_config {
    channel = "CHANNEL_STANDARD"
  }

  release_channel {
    channel = "REGULAR"
  }
  deletion_protection = false

}
gateway_api_configでGateway APIを有効化しています。
Fleet登録・機能の有効化
クラスタ作成後、google_gke_hub_membershipでFleetに登録し、MCS・MCG機能を有効化します。
# Fleet membership registration
resource "google_gke_hub_membership" "gke_us" {
  provider = google-beta

  membership_id = "gke-us"
  project       = var.project_id

  endpoint {
    gke_cluster {
      resource_link = "//container.googleapis.com/${google_container_cluster.gke_us.id}"
    }
  }
}

resource "google_gke_hub_membership" "gke_asia" {
  provider = google-beta

  membership_id = "gke-asia"
  project       = var.project_id

  endpoint {
    gke_cluster {
      resource_link = "//container.googleapis.com/${google_container_cluster.gke_asia.id}"
    }
  }
}

# Multi-cluster Service Discovery (MCS)
resource "google_gke_hub_feature" "mcs" {
  provider = google-beta

  name     = "multiclusterservicediscovery"
  location = "global"
  project  = var.project_id

  depends_on = [
    google_gke_hub_membership.gke_us,
    google_gke_hub_membership.gke_asia,
  ]
}

# Multi-cluster Ingress (MCG) with gke-us as config cluster
resource "google_gke_hub_feature" "mcg" {
  provider = google-beta

  name     = "multiclusteringress"
  location = "global"
  project  = var.project_id

  spec {
    multiclusteringress {
      config_membership = google_gke_hub_membership.gke_us.id
    }
  }

  depends_on = [
    google_gke_hub_membership.gke_us,
    google_gke_hub_membership.gke_asia,
  ]
}
google_gke_hub_membershipでクラスタをFleetに登録した後、MCS・MCG機能を有効化しています。config_membershipでgke-usをConfig Clusterに指定します。Gateway/HTTPRouteリソースはこのConfig Clusterにデプロイします。
IAMバインディング
resource "google_project_iam_member" "mcs_admin" {
  project = var.project_id
  role    = "roles/container.admin"
  member  = "serviceAccount:service-${data.google_project.current.number}@gcp-sa-mcsd.iam.gserviceaccount.com"

  depends_on = [google_gke_hub_feature.mcs]
}

resource "google_project_iam_member" "mcg_admin" {
  project = var.project_id
  role    = "roles/container.admin"
  member  = "serviceAccount:service-${data.google_project.current.number}@gcp-sa-multiclusteringress.iam.gserviceaccount.com"

  depends_on = [google_gke_hub_feature.mcg]
}
MCSとMCGのサービスアカウントにGKEクラスタの操作権限を付与します。これらのサービスアカウントはFeature有効化時にGoogle側で自動作成されるため、depends_onで順序を制御しています。
Outputs
output "get_credentials_gke_us" {
  description = "gcloud command to get kubectl credentials for gke-us"
  value       = "gcloud container clusters get-credentials gke-us --region us-west1 --project ${var.project_id}"
}

output "get_credentials_gke_asia" {
  description = "gcloud command to get kubectl credentials for gke-asia"
  value       = "gcloud container clusters get-credentials gke-asia --region asia-northeast1 --project ${var.project_id}"
}
Terraform実行
terraform.tfvarsにプロジェクトIDを設定します。
project_id = "<YOUR_PROJECT_ID>"
cd terraform
terraform init
terraform plan
terraform apply
Autopilotクラスタの作成に10分程度かかります。
完了後、outputsに表示されるコマンドでkubectlのコンテキストを設定します。
gcloud container clusters get-credentials gke-us --region us-west1 --project $PROJECT_ID
gcloud container clusters get-credentials gke-asia --region asia-northeast1 --project $PROJECT_ID
コンテキストをわかりやすい名前に変更しておきます。
kubectl config rename-context gke_${PROJECT_ID}_us-west1_gke-us gke-us
kubectl config rename-context gke_${PROJECT_ID}_asia-northeast1_gke-asia gke-asia
GatewayClassが利用可能になっていることを確認します。
kubectl get gatewayclasses --context=gke-us
実行結果:
NAME                                        CONTROLLER                    ACCEPTED   AGE
gke-l7-global-external-managed-mc           networking.gke.io/gateway     True       5m
gke-l7-regional-external-managed-mc         networking.gke.io/gateway     True       5m
gke-l7-rilb-mc                              networking.gke.io/gateway     True       5m
...
gke-l7-global-external-managed-mcが表示されれば、Multi-cluster Gatewayの準備は完了です。
アプリケーションデプロイ
whereamiのデプロイ
whereamiはリクエストを処理したクラスタの名前やゾーンをJSONで返すGoogle公式サンプルアプリです。
apiVersion: v1
kind: Namespace
metadata:
  name: whereami
---
apiVersion: apps/v1
kind: Deployment
metadata:
  name: whereami
  namespace: whereami
  labels:
    app: whereami
spec:
  replicas: 1
  selector:
    matchLabels:
      app: whereami
  template:
    metadata:
      labels:
        app: whereami
    spec:
      containers:
        - name: whereami
          image: us-docker.pkg.dev/google-samples/containers/gke/whereami:v1
          ports:
            - containerPort: 8080
          resources:
            requests:
              cpu: 250m
              memory: 512Mi
---
apiVersion: v1
kind: Service
metadata:
  name: whereami
  namespace: whereami
spec:
  selector:
    app: whereami
  ports:
    - port: 8080
      targetPort: 8080
両クラスタにデプロイします。
kubectl apply -f k8s/whereami.yaml --context=gke-us
kubectl apply -f k8s/whereami.yaml --context=gke-asia
ServiceExportの作成
ServiceExportを作成して、各クラスタのwhereami ServiceをFleetに公開します。
apiVersion: net.gke.io/v1
kind: ServiceExport
metadata:
  name: whereami
  namespace: whereami
kubectl apply -f k8s/service-export.yaml --context=gke-us
kubectl apply -f k8s/service-export.yaml --context=gke-asia
ServiceImportが自動生成されることを確認します。
kubectl get serviceimport --namespace=whereami --context=gke-us
実行結果:
NAME        TYPE           IP                 AGE
whereami    ClusterSetIP   ["10.x.x.x"]       30s
ServiceImportが表示されれば、Multi-cluster GatewayからこのServiceのPodをバックエンドとして参照可能になります。
Gateway & HTTPRouteのデプロイ
Config Cluster(gke-us)にGatewayとHTTPRouteをデプロイします。
apiVersion: gateway.networking.k8s.io/v1
kind: Gateway
metadata:
  name: external-http
  namespace: whereami
spec:
  gatewayClassName: gke-l7-global-external-managed-mc
  listeners:
    - name: http
      protocol: HTTP
      port: 80
      allowedRoutes:
        kinds:
          - kind: HTTPRoute
---
apiVersion: gateway.networking.k8s.io/v1
kind: HTTPRoute
metadata:
  name: whereami-route
  namespace: whereami
spec:
  parentRefs:
    - kind: Gateway
      name: external-http
      namespace: whereami
  rules:
    - backendRefs:
        - group: net.gke.io
          kind: ServiceImport
          name: whereami
          port: 8080
Config Clusterにのみデプロイします。
kubectl apply -f k8s/gateway.yaml --context=gke-us
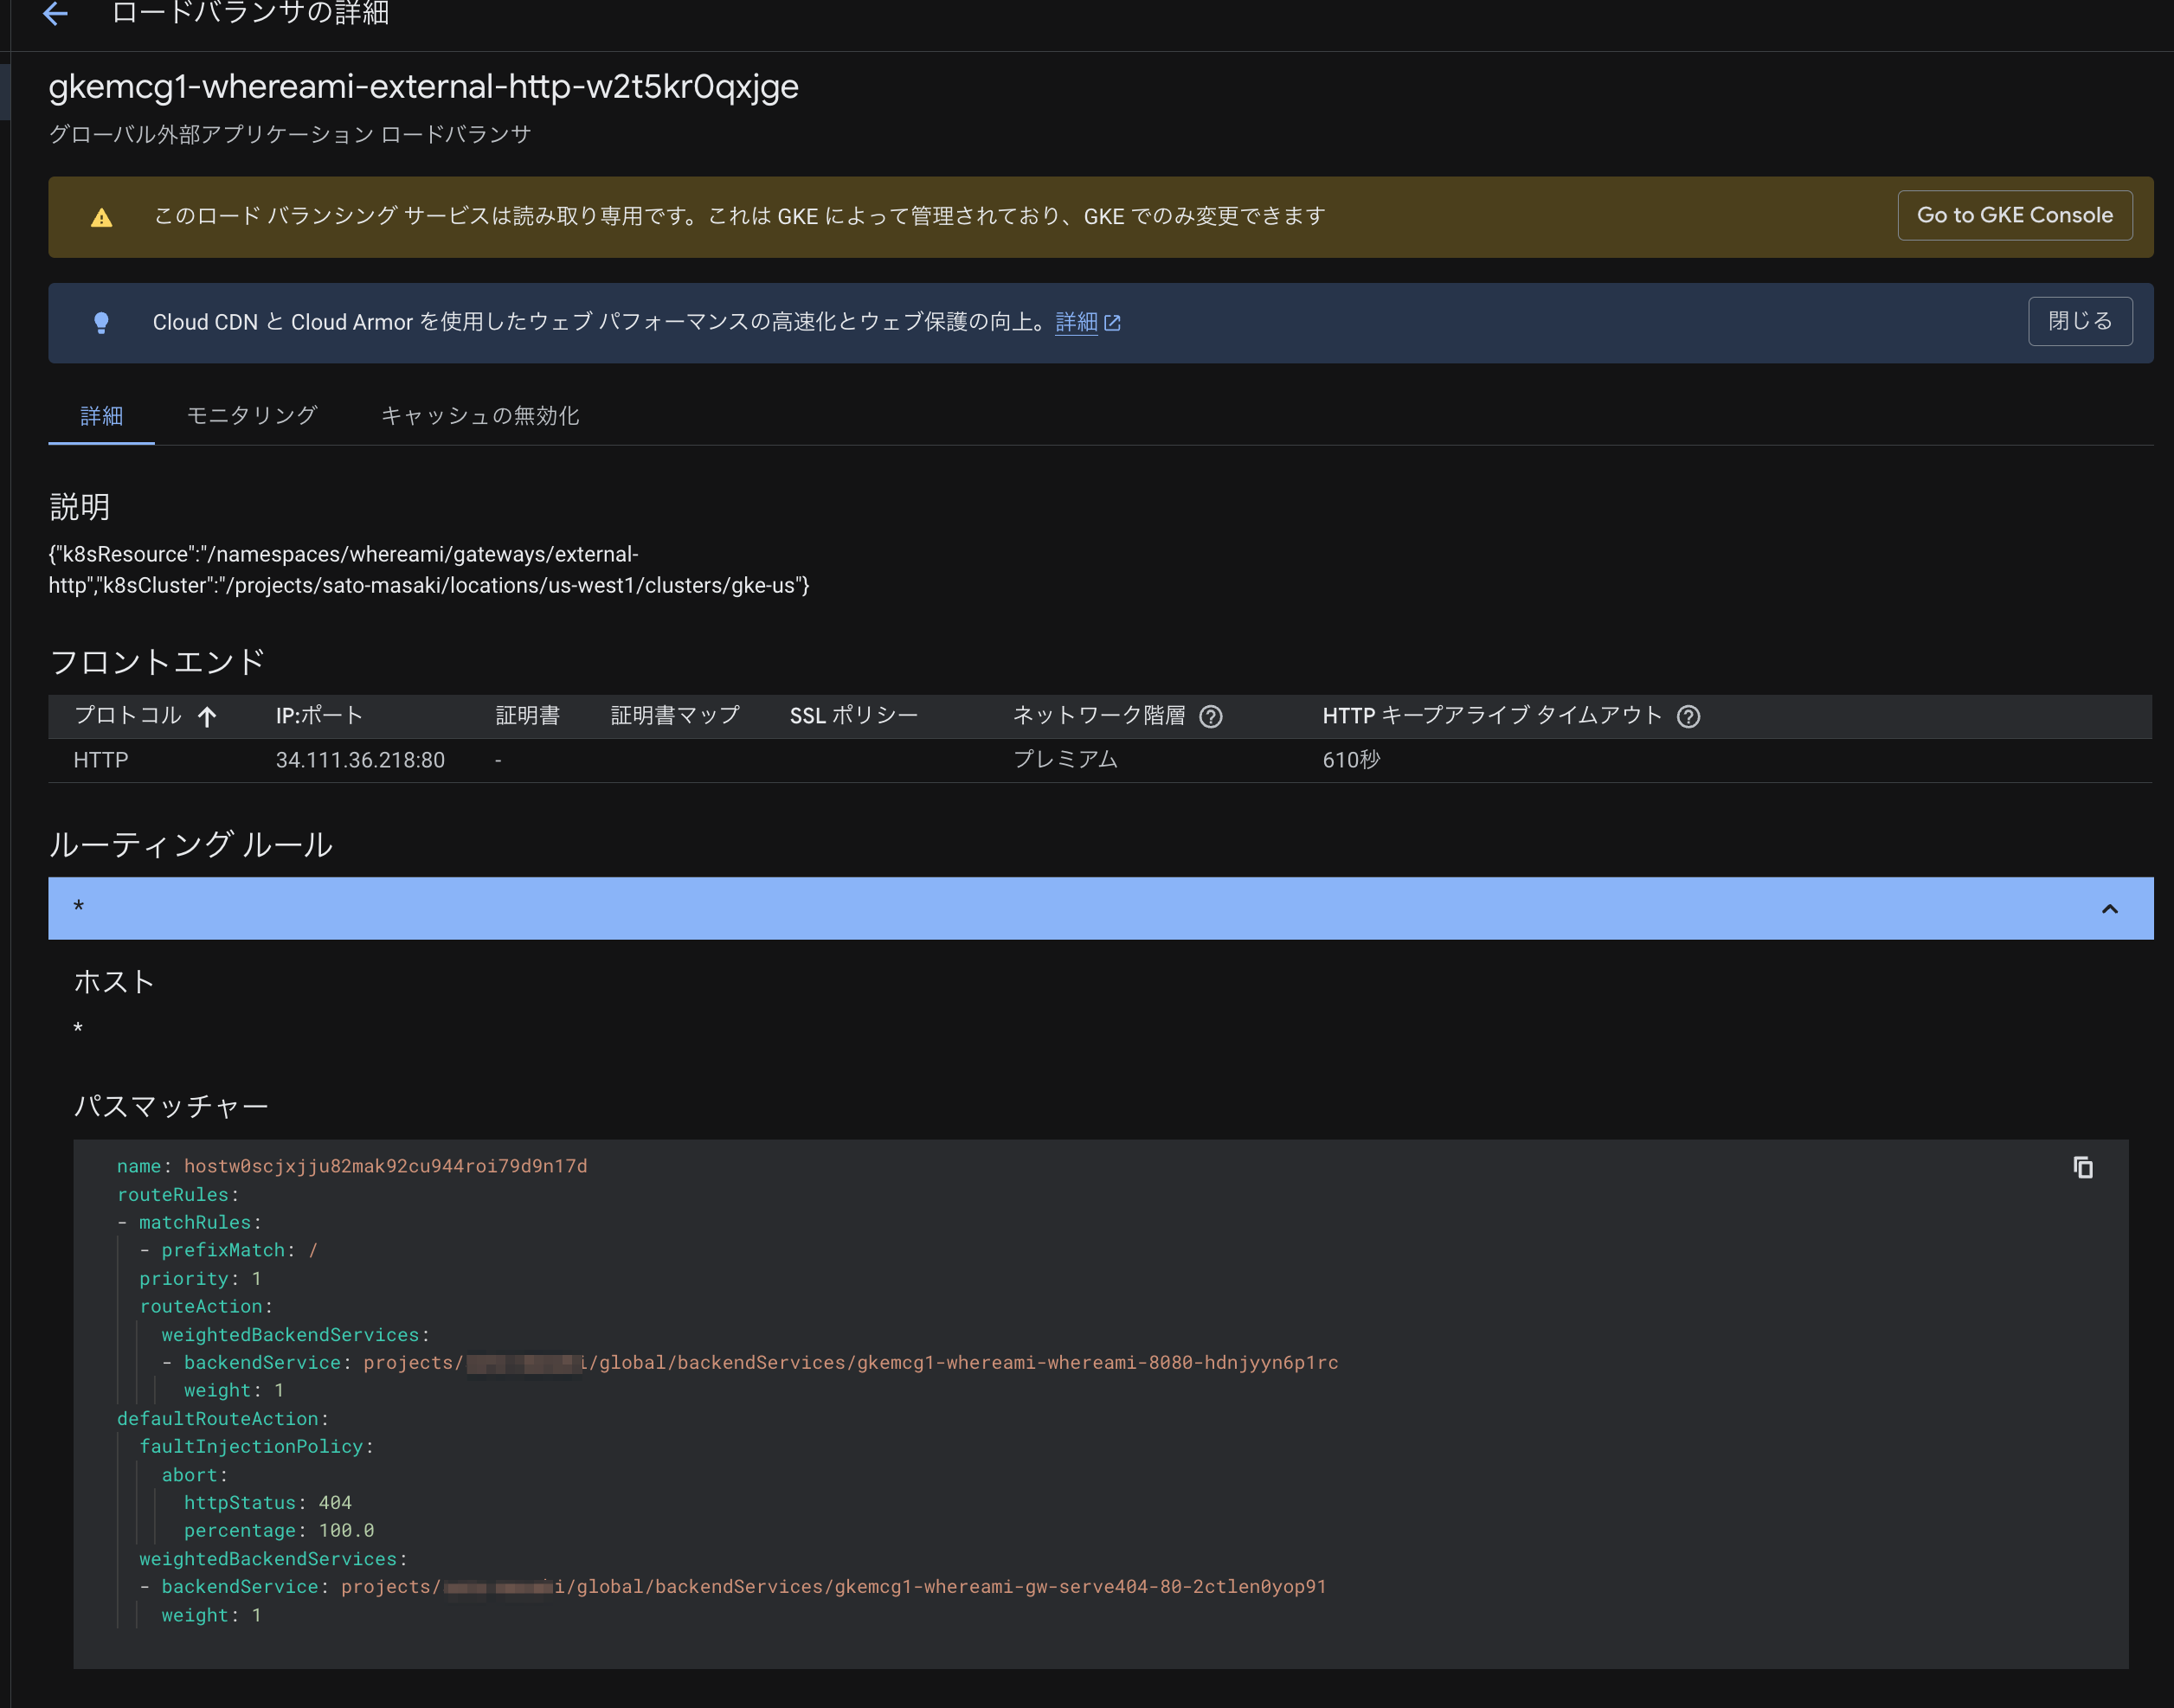
gatewayClassName: gke-l7-global-external-managed-mcを指定することで、Global External Application Load Balancerがプロビジョニングされます。HTTPRouteのbackendRefsではkind: ServiceImportを指定し、Fleet内の全クラスタのwhereami PodをLBバックエンドとして参照しています。GKE Gateway controllerが転送ルール、URLマップ、バックエンドサービス、ヘルスチェックを自動作成します。
GatewayにIPアドレスが割り当てられるまで待ちます。
kubectl get gateway external-http --namespace=whereami --context=gke-us -w
実行結果:
NAME            CLASS                                 ADDRESS         PROGRAMMED   AGE
external-http   gke-l7-global-external-managed-mc     34.xxx.xxx.xx   True         3m
ADDRESSにIPが表示され、PROGRAMMEDがTrueになれば準備完了です。このIPはAnycast IPで、Googleの100以上のPoPから広告されています。
動作検証
基本確認
Gateway IPにリクエストを送信します。
GATEWAY_IP=$(kubectl get gateway external-http --namespace=whereami --context=gke-us -o jsonpath='{.status.addresses[0].value}')
curl http://${GATEWAY_IP}/
実行結果(日本から実行した場合):
{
  "cluster_name": "gke-asia",
  "gce_region": "asia-northeast1",
  "gce_zone": "asia-northeast1-a",
  "host_header": "34.xxx.xxx.xx",
  "pod_name": "whereami-xxxxxxxxxx-xxxxx",
  "pod_name_emoji": "🔮",
  "project_id": "my-project",
  "timestamp": "2026-03-22T12:00:00",
  "zone": "asia-northeast1-a"
}
cluster_nameがgke-asia、gce_regionがasia-northeast1となっており、日本から最も近いクラスタにルーティングされていることが確認できます。
フェイルオーバー検証
asia-northeast1のDeploymentを0レプリカにスケールダウンして、フェイルオーバーを確認します。
kubectl scale deployment whereami --replicas=0 --namespace=whereami --context=gke-asia
しばらく待ってからリクエストを送信します。
curl http://${GATEWAY_IP}/
実行結果:
{
  "cluster_name": "gke-us",
  "gce_region": "us-west1",
  ...
}
asia-northeast1のPodが存在しないため、us-west1にフォールバックしています。DNS切り替え不要で、ヘルスチェックベースの自動フェイルオーバーが秒単位で行われます。
レプリカを戻します。
kubectl scale deployment whereami --replicas=1 --namespace=whereami --context=gke-asia
Podが起動しヘルスチェックに合格すると、日本からのリクエストは再びasia-northeast1に戻ります。
GCPコンソールでの確認
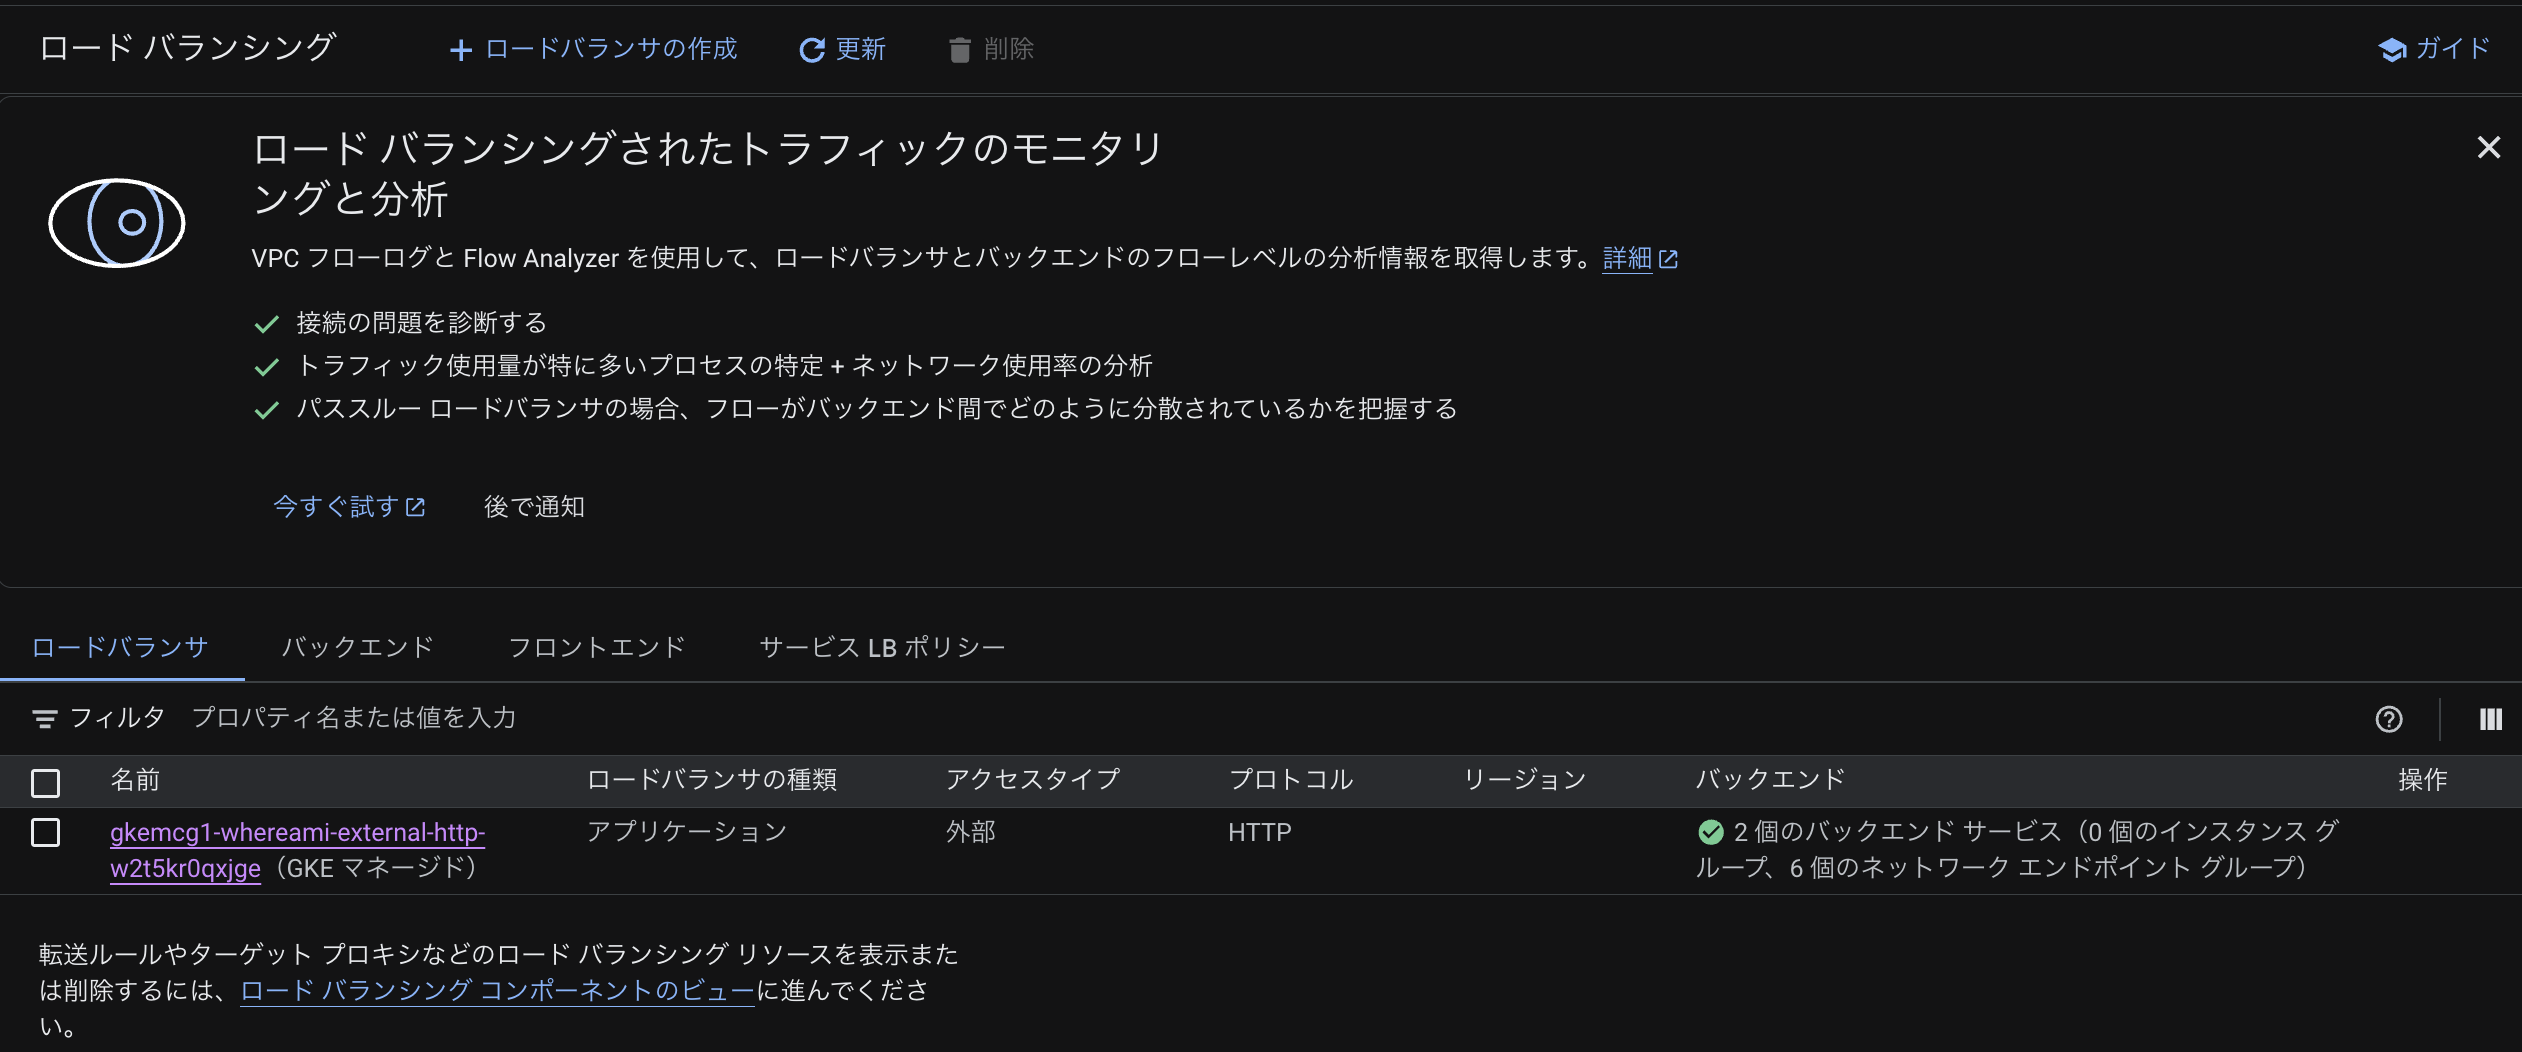
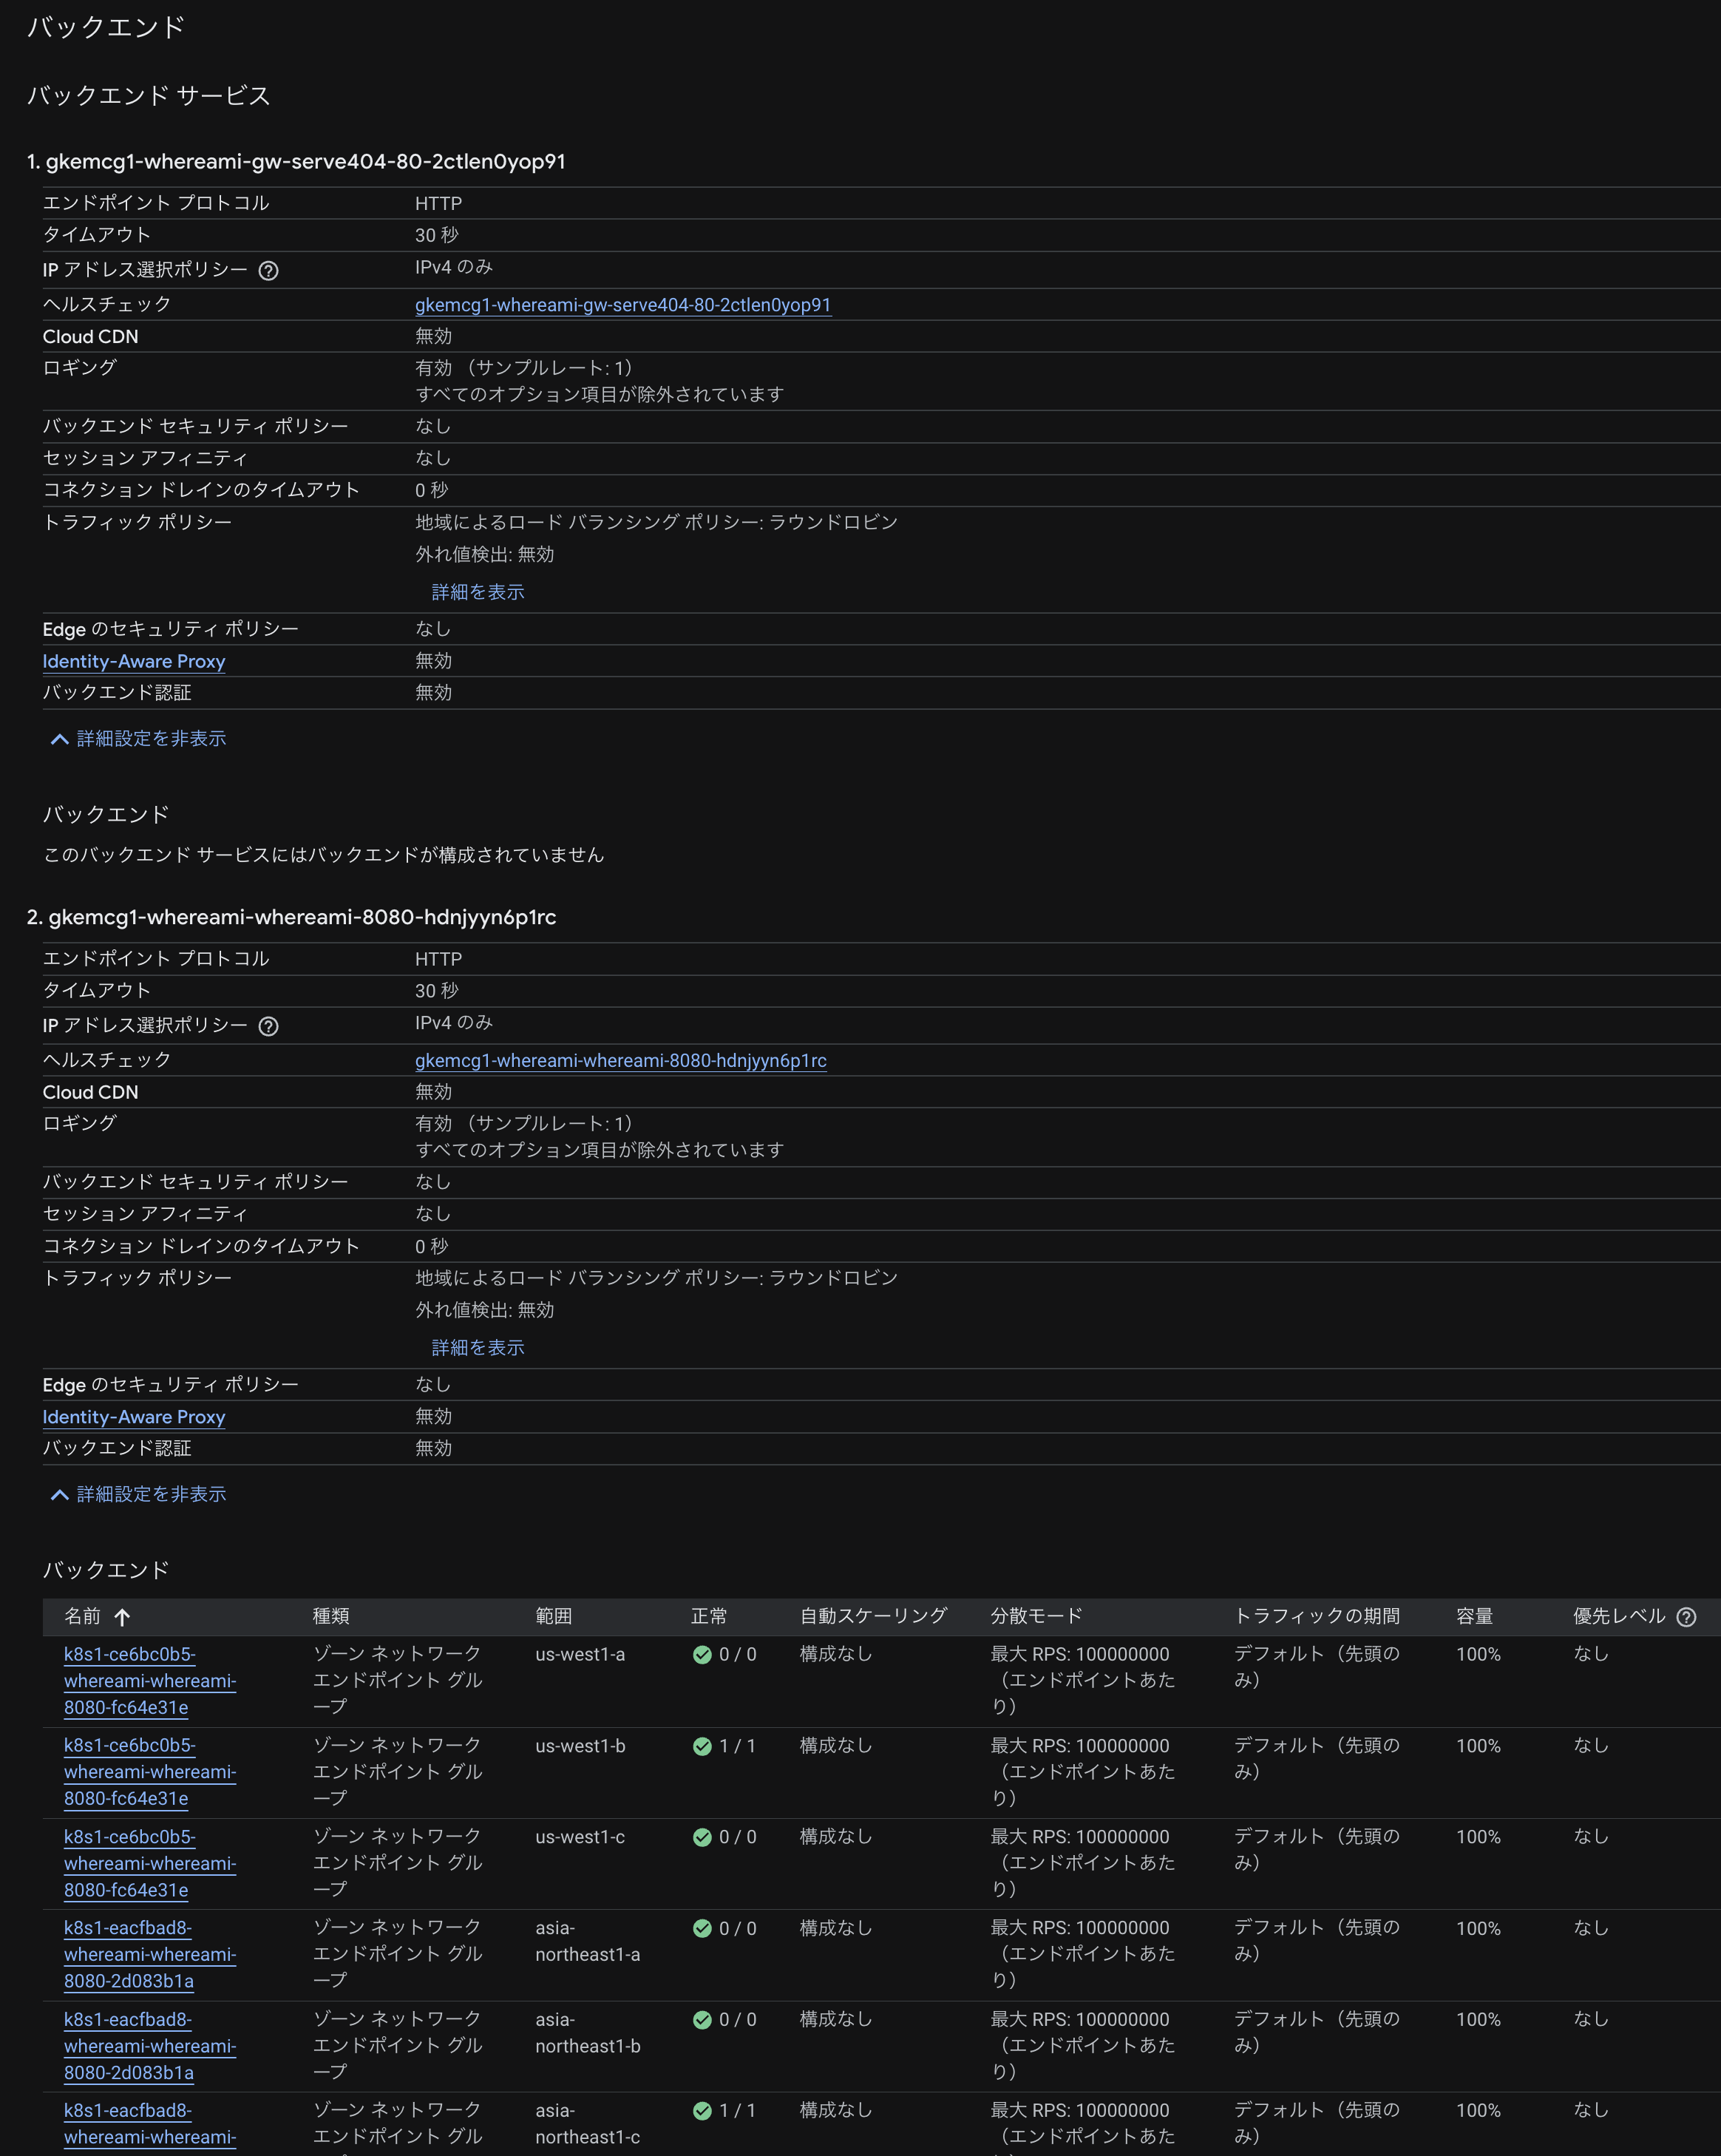
GCPコンソールの「ネットワークサービス」→「ロード バランシング」を開くと、GKE Gateway controllerが自動作成したGlobal External Application Load Balancerが表示されます。バックエンドサービスに両リージョンのNEGが登録されており、ヘルスステータスを確認できます。
クリーンアップ
Kubernetesリソースを先に削除し、その後Terraformでインフラを一括削除します。
# K8sリソース削除
kubectl delete -f k8s/gateway.yaml --context=gke-us
kubectl delete -f k8s/service-export.yaml --context=gke-us
kubectl delete -f k8s/service-export.yaml --context=gke-asia
kubectl delete -f k8s/whereami.yaml --context=gke-us
kubectl delete -f k8s/whereami.yaml --context=gke-asia
Gateway削除後、LBリソースが完全に削除されるまで数分待ちます。GCPコンソールのロードバランシング画面でLBが消えたことを確認してから、Fleet機能を無効化します。
# MCS Feature の強制無効化
gcloud container fleet multi-cluster-services disable --project=$PROJECT_ID --force
Terraform providerのgoogle_gke_hub_featureは強制削除に対応していないため、gcloud CLIで先に無効化します。
# インフラ削除
cd terraform
terraform destroy
terraform destroyでGKEクラスタ、Fleet登録、IAMバインディングの残りのリソースが削除されます。
クラスタを削除し忘れると、AutopilotのPod課金やLBの転送ルール課金が継続するため、注意してください。
おわりに
GKE Multi-cluster Gatewayを2リージョン構成で構築し、Anycast IPによる最寄りクラスタへのルーティングとヘルスチェックベースの自動フェイルオーバーを確認しました。
Config Cluster上の1つのGateway YAMLから、Google CloudのGlobal External Application Load Balancerが自動的にプロビジョニングされ、複数クラスタのPodがバックエンドとして登録されます。LBの転送ルールやURLマップを手動で管理する必要はありません。
参考