Hello World with Git
この記事は公開されてから1年以上経過しています。情報が古い可能性がありますので、ご注意ください。
This is the second article for Introduction to Git and GitHub for Beginners. In this article, we shall work with the famous version control tool "Git cli" and learn its various command. We shall also see Git's general workflow in terms of local repository and online repository respectively.
Prerequisites and Working Environment
Prerequisites for this article:-
- A basic understanding of what is Git and Github and why we use them.
- Git tool should be installed (we will see the installation in a moment).
- Any code editor or IDE and access to the terminal(bash).
- Familiarity with basic BASH commands.
My Working Environment:-
- OS -> Ubuntu 20.04.2 LTS.
- Code Editor -> Visual Studio Code [ For Download ]
- Git version -> 2.25.1
How to install Git [Ubuntu]
On a Mac/Linux Git is already installed, we can verify by running the following command:-
git --version
if git isn't installed then for Ubuntu or Debian based:-
sudo apt update
sudo apt install git
For installing on Windows and Mac refer to this.
Before working with Git CLI, its various command, and GitHub, it's important to set up SSH keys so that we can connect and authenticate to remote servers and services. With SSH keys, you can connect to GitHub without supplying your username and personal access token at each visit.
Generating a new SSH key [Mac/Linux/Windows]
ssh-keygen -t ed25519 -C "your_email@example.com" #subsitute with your GitHub email address
You will be asked for the file name and passphrase details just hit Enter to accept defaults.
Adding your SSH key to the ssh-agent
eval "$(ssh-agent -s)"
ssh-add ~/.ssh/id_ed25519
Adding the Generated key to our GitHub Account
- Copy the generated key to your clipboard.
sudo apt install -y xclip ; cd ~/.ssh; xclip -selection clipboard ~/.ssh/id_ed25519.pub
- Go to your GitHub account settings -> ssh and gpg keys -> add new ssh key -> add a meaningful title like "Home laptop" and hit ctrl-v under the key section.
- Whenever we work in collaboration it is important to know who saved that and for that, git associates our identity to every commit using the configuration. Now this configuration can be global (for all repositories of the current user),system-wide (for all the users), or project-wise (for the current directory).
git config --global user.name " your name" ; git config --global user.email "your email"
Before jumping into anything there are a few concepts and terminologies related to git!
Git concepts and terminologies
I will be using the analogy of a soccer playground in order to explain.
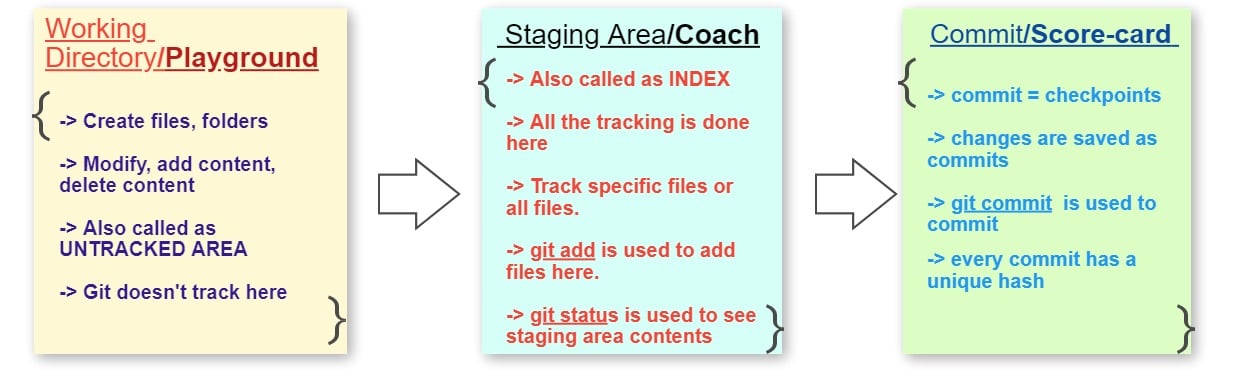
- Working Tree -> Working tree is like a playground where you can make changes to your team, play, do mistakes and correct them, In the Git world whatever we do; like create files, add and delete files, make modifications to code are all done in working tree. If we make mistakes we can definitely see and undo them. It is also called "untracked area", whatever we do here is not tracked until we tell git explicitly to track and save. To check what we have done in the working tree we use
git statuscommand.
- Staging Area/Index -> Staging area is like the coach of the team which tracks our performance only when we ask the coach to track in other words when we want then only git will track our files which are done by sending files from the working tree to the staging area ( working tree -> staging area) using
git add filenameorgit add .Here.means all files.If we feel Certain changes should not be saved we can unstage them. The staging area is the reflection of the commit. For the first time since there is no commit, it will be empty but for the next time, it will be a reflection of the previous commit that is how git track changes between the working directory and present staging area.
- Commits -> Think of commit as a permanent score-card or performance report of all the players, matches, which are being maintained all the time. All the changes in the repository are the reflection of commits. Commit is a complete, permanent snapshot of ours project. Git identifies changes by comparing the current changes with the last commit. Commits are stored in the local repository, to commit we use
git commit -m " message", collects all changes in the Staging Area, wraps them together, and puts them in your Local Repository. Staging area never becomes empty once you commit (a common misconception)."Using the staging area before a final commit allows us to carefully select what changes should be committed and whatnot. In other words, review our work before saving a commit.

- origin -> alias (Url or address) stored in our local system for the remote repository( hosted on GitHub)
- main/master repository -> It's the default area (branch) in the repository where we make changes modify code.
- push -> upload local repository to remote repository.
- pull -> Download changes from a remote repository into the current branch.
Now we are all set to work with git commands but before that let's discuss two workflows that will be applicable throughout our Git and GitHub journey.
Git General workflows
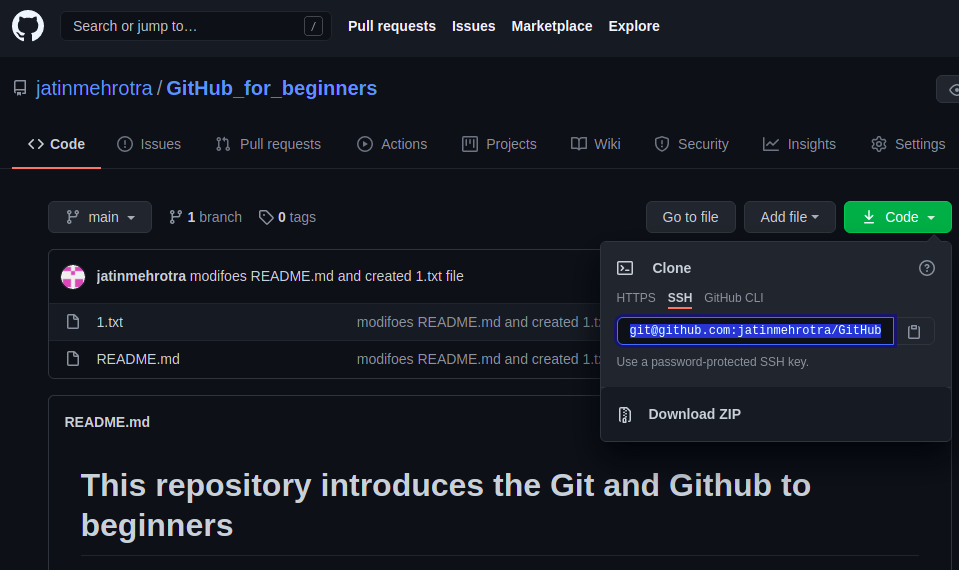
1) Repository which is hosted on GitHub
In the previous article, we hosted a repository GitHub_for_beginners on GitHub.In order to work with the Git tool we need to:-
- Create a clone or copy of that repository in our local machine. To clone the repository we will need to find the ssh address of the repository. ( in your case the ssh address will be different)
- Now the following commands can be run on the terminal or vs code. I will choose vscode since it allows me to edit files and at the same time run terminal inside vs code.
- Open a folder( in my case Hello world to Git) in vscode of your choice and then open the terminal in vscode using
ctrl +`key.git clone git@github.com:jatinmehrotra/GitHub_for_beginners.git
- The entire repository will be available locally to work, edit on it and use git commands.
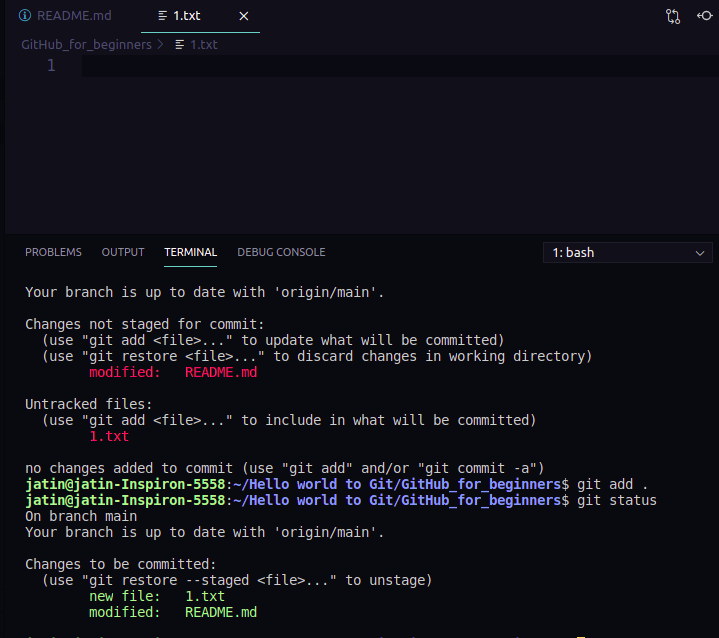
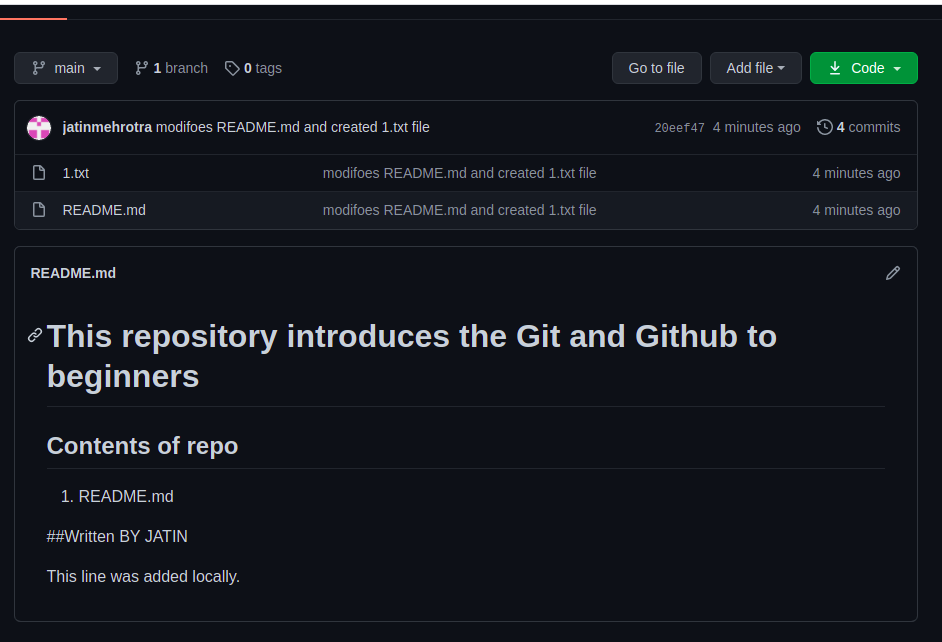
- Let's make some modifications, create a new file 1.txt and update README.md in our repository( using vs code).

- Change the directory to the repository using the cd command and run git status.
git status
- git status -> tells which files are modified, which files are not being tracked, which files are staged.
- untracked files -> git doesn't know about it yet, there is no tracking for this file we need to tell git to track it.
- modified files -> Those files which are being tracked by git.`
- In order to add these changes ( modified files and untracked files) in the register ( commit history ) we need to stage them ( store them in the staging area) using the git add command. git command allows us to stage all files using the `.` option or individual files.
git add . # to add all file to staging area when there are lots of files
git add 1.txt # to add the only 1.txt to staging area
git add README.md # to add only README.md to the staging area
- We can verify again by `git status`.To commit the changes.
git commit -m "modifoed ReadME.md and created 1.txt file"
- To sync this commit with Github we need to push this to our repository (remote) hosted on our GitHub account.
git push origin main # this command means to push the local main branch to the origin( remote repository)
- Check the Github repository for the committed changes.
2) Repository which is created locally
In the previous workflow the repository was created on GitHub but what if we want to start a project locally or we want to track files locally and then push to some hosting service like GitHub.
- Create a directory either using GUI or command on terminal.
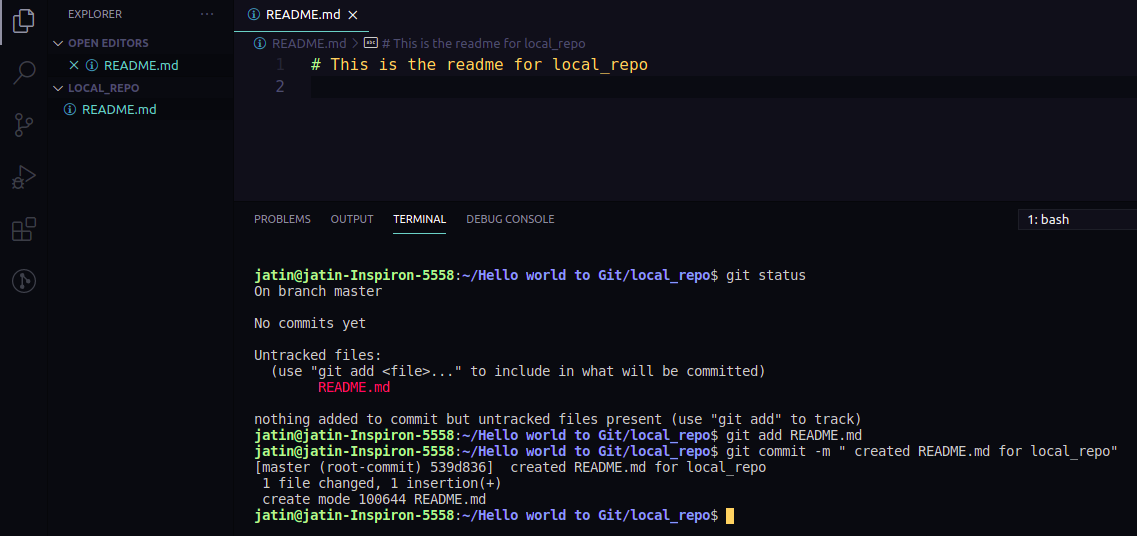
mkdir local_repo
- Here we need to explicitly tell git that I want the folder to act as a repository and kindly track the changes, in other words, we need to initialize the directory with git, otherwise git never tracks directories by default unless told to do so.
cd local_repo ; git init
- Behind the scenes, git init creates a
.gitfolder in the directory that has all configuration for tracking changes but when we clone the repository from Github it.gitis already created that is why we don't need to initialize the cloned repository. - Let's create a README.md and add to staging are + commit it.
- In order to push this local repository to GitHub, we need to use
git push origin mainthis was possible in the cloned repository where the origin was already set for us, but in the case of this workflow, we need to set the origin, by creating a repository on GitHub and copy its ssh address.
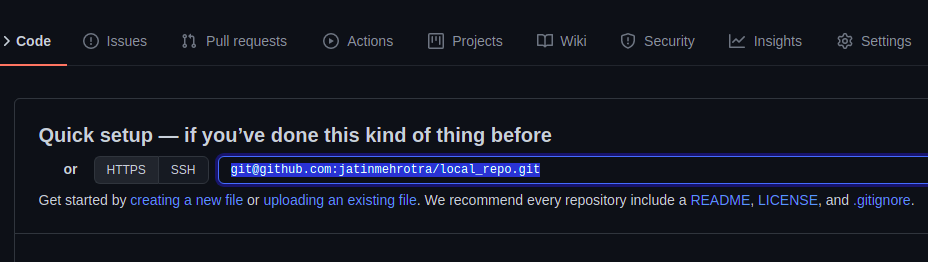
git remote add origin git@github.com:jatinmehrotra/local_repo.git
- In order to push the local repo's master branch to the remote repository on GitHub.
git push origin master
- Every time we want to push our changes writing `git push origin master` is troublesome, for that we can set an upstream.
git push -u origin master
- Now, whenever we need to push we can just use,
git pushto push the local master branch to remote that is the origin.git push

Summary
Here in this article, we closely observed the core concepts, general workflows of git, and its various commands, with this new knowledge we can definitely incorporate version control system ( git) for our projects. In the future, we will look at advanced features of git such as undoing things, branching, etc.
Till then Happy learning :)