
Hugging FaceのLearning Rateを調整するためのSchedulerについて深堀する
この記事は公開されてから1年以上経過しています。情報が古い可能性がありますので、ご注意ください。
こんちには。
データアナリティクス事業本部 機械学習チームの中村です。
Hugging Faceのライブラリの使い方紹介記事第3弾です。
今回は、Learning Rateを調整するためのSchedulerについて深堀し、理解を深めていきます。
Schedulerの種類
Hugging FaceのTransformersでは、Learning Rateを調整するためのいくつかのSchedulerが準備されています。
| Schedulerの種類 | 内容 |
|---|---|
| "constant" | 設定したLearning Rateで一定値 |
| "linear" | 設定したLearning Rateをピークとして線形にepochの終わりで0となるよう減衰 |
| "cosine" | 設定したLearning Rateをピークとしてcosineカーブでepochの終わりで0となるよう減衰 |
| "cosine_with_restarts" | 設定したLearning Rateをピークとしてcosineカーブで0となるよう減衰を周期的に |
| "polynomial" | 設定したLearning Rateをピークとして多項式曲線でepochの終わりで指定値となるよう減衰 |
上記にそれぞれ、warmup用の期間を追加で設定することが可能です。
これらは特に意識して設定しない場合、デフォルトでは"linear"が使用されます。
設定方法としては以下の2パターンがあります。
- lr_scheduler_typeを指定する方法
- get関数を使用してSchedulerを作成する方法
前者は、warmupなしの"constant"、"linear"、"cosine"を使用したい場合に簡易な設定として使用可能です。
より詳細に設定したい場合は後者の方法で使用します。
以降でそれぞれの方法について確認していきます。
実行環境
今回はGoogle Colaboratory環境で実行しました。
ハードウェアなどの情報は以下の通りです。
- GPU: Tesla P100 (GPUメモリ16GB搭載)
- CUDA: 11.1
- メモリ: 13GB
主なライブラリのバージョンは以下となります。
- transformers: 4.22.1
- datasets: 2.4.0
インストール
transformersとdatasetsをインストールします。
!pip install transformers datasets
また事前学習モデルの依存モジュールをインストールします。
!pip install fugashi
!pip install ipadic
!pip install sentencepiece
ベースとするコード
今回のベースとするコードは以下のとおりです。
from datasets import load_dataset
from transformers import AutoTokenizer
from transformers import AutoModelForSequenceClassification
from transformers import TrainingArguments
from transformers import Trainer
from sklearn.metrics import accuracy_score, f1_score
import torch

# データセットのロード
dataset = load_dataset("tyqiangz/multilingual-sentiments", "japanese")

# # 実験のためデータセットを縮小したい場合はコチラを有効化
# dataset = DatasetDict({
#     "train": dataset['train'].select(range(100)),
#     "validation": dataset['validation'].select(range(100)),
#     "test": dataset['test'].select(range(100)),
# })

# トークナイザのロード
model_ckpt = "cl-tohoku/bert-base-japanese-whole-word-masking"
tokenizer = AutoTokenizer.from_pretrained(model_ckpt)

# トークナイズ処理
def tokenize(batch):
    return tokenizer(batch["text"], padding=True, truncation=True)
dataset_encoded = dataset.map(tokenize, batched=True, batch_size=None)

# 事前学習モデルのロード
device = torch.device("cuda" if torch.cuda.is_available() else "cpu")
num_labels = 3
model = (AutoModelForSequenceClassification
    .from_pretrained(model_ckpt, num_labels=num_labels)
    .to(device))

# メトリクスの定義
def compute_metrics(pred):
    labels = pred.label_ids
    preds = pred.predictions.argmax(-1)
    f1 = f1_score(labels, preds, average="weighted")
    acc = accuracy_score(labels, preds)
    return {"accuracy": acc, "f1": f1}

# 学習パラメータの設定
batch_size = 16
model_name = "sample-text-classification-bert"

training_args = TrainingArguments(
    output_dir=model_name,
    num_train_epochs=10,
    learning_rate=2e-5,
    per_device_train_batch_size=batch_size,
    per_device_eval_batch_size=batch_size,
    weight_decay=0.01,
    evaluation_strategy="epoch",
    logging_strategy="steps",
    disable_tqdm=False,
    logging_steps=1,
    push_to_hub=False,
    log_level="error",
)

# Trainerの定義
trainer = Trainer(
    model=model,
    args=training_args,
    compute_metrics=compute_metrics,
    train_dataset=dataset_encoded["train"],
    eval_dataset=dataset_encoded["validation"],
    tokenizer=tokenizer
)

# トレーニング実行
trainer.train()
この内容についての解説は以下の記事を参照ください。
上記の記事と違う点として以下の変更を加えています。
- Learning Rateのstep毎の変化を見るため、TrainingArgumentsに
logging_strategy="steps"を指定- ここでstepとは、ミニバッチ単位のこと
logging_strategy="steps"としてもlogging_steps以下の粒度にならないため、logging_steps=1と最小で指定- 変化を分かりやすくするために
num_train_epochs=10とエポックを増加
また、デフォルトのSchedulerはwarmupなしのlinearですので、このコードの場合はそちらが適用されます。
lr_scheduler_typeを指定する方法
設定方法
TrainingArgumentにlr_scheduler_typeという引数があり、ここでSchedulerを文字列で設定することができます。
以下はconstantに指定する例です。
training_args = TrainingArguments(
    output_dir=model_name,
    num_train_epochs=10,
    learning_rate=2e-5,
    per_device_train_batch_size=batch_size,
    per_device_eval_batch_size=batch_size,
    weight_decay=0.01,
    evaluation_strategy="epoch",
    logging_strategy="steps",
    disable_tqdm=False,
    logging_steps=1,
    push_to_hub=False,
    log_level="error",
    lr_scheduler_type="constant",
)
lr_scheduler_typeには、以下に定義されているSchedulerTypeを指定可能です。
種類は6つありますが、lr_scheduler_typeで使い分けができるのは、"constant", "linear", "cosine"です。
それ以外の"constant_with_warmup", "cosine_with_restarts", "polynomial"はそれぞれ以下のような動作となりますので注意が必要です。
- "constant_with_warmup"は、"constant"と同じ動作
- "cosine_with_restarts"は、"cosine"と同じ動作
- "polynomial"は、"linear"と同じ動作
これらをきちんと区別して使用したい場合は、後述の「get関数を使用してSchedulerを作成する方法」で実施が必要です。 また、それぞれwarmupの設定をしたい場合も、後述の方法で実施が必要です。
逆に簡易な設定で良い場合は、lr_scheduler_typeの指定で対応できます。
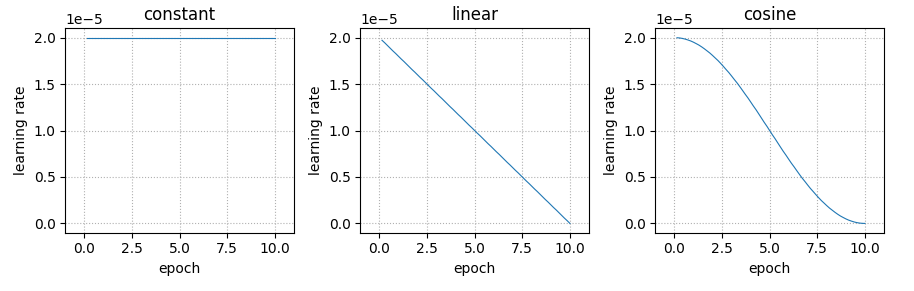
それぞれの結果を比較
一旦、lr_scheduler_typeで使い分けが可能な3種類をそれぞれ確認ます。
import pandas as pd

learning_rate_history = {}

for lr_scheduler_type in ["constant", "linear", "cosine"]:

    model = (AutoModelForSequenceClassification
        .from_pretrained(model_ckpt, num_labels=num_labels)
        .to(device))

    training_args = TrainingArguments(
        output_dir=model_name,
        num_train_epochs=10,
        learning_rate=2e-5,
        per_device_train_batch_size=batch_size,
        per_device_eval_batch_size=batch_size,
        weight_decay=0.01,
        evaluation_strategy="epoch",
        logging_strategy="steps",
        disable_tqdm=False,
        logging_steps=1,
        push_to_hub=False,
        log_level="error",
        lr_scheduler_type=lr_scheduler_type,
    )

    # Trainerの定義
    trainer = Trainer(
        model=model,
        args=training_args,
        compute_metrics=compute_metrics,
        train_dataset=dataset_encoded["train"],
        eval_dataset=dataset_encoded["validation"],
        tokenizer=tokenizer
    )

    # トレーニング実行
    trainer.train()

    # Learning Rateの変化を抽出
    train_log = [i for i in trainer.state.log_history if "loss" in i]
    learning_rate_history[lr_scheduler_type] = pd.DataFrame(train_log)["learning_rate"]
学習時のログがtrainer.state.log_historyに格納されているため、ここからLearning Rateの変化を抽出します。
結果は以下のコードで可視化します。
learning_rate_history["epoch"] = pd.DataFrame(train_log)["epoch"]
df = pd.DataFrame(learning_rate_history)

import matplotlib.pyplot as plt

fig, axes = plt.subplots(1, 3, figsize=(11, 5), dpi=100)
axes = axes.reshape(-1)

scheduler_types = ["constant", "linear", "cosine"]
for i, c in enumerate(scheduler_types):
    ax = axes[i]
    ax.plot(df["epoch"], df, linewidth=0.8)
    ax.grid(visible=True, linestyle=":")
    ax.set_xlim([-1, 11])
    ax.set_ylim([-0.1e-5, 2.1e-5])
    ax.set_title(c)
    ax.set_xlabel("epoch")
    ax.set_ylabel("learning rate")

plt.tight_layout()
Learning Rateの変化はそれぞれ以下のようになりました。
get関数を使用してSchedulerを作成する方法
get関数の種類
より詳細なLearning Rateのschedulerを使用するためには、get関数を使用してSchedulerを作成する必要があります。
関数はそれぞれ以下のように準備されています。
| Schedulerの種類 | getするための関数 |
|---|---|
| "constant" | transformers.get_constant_schedule |
| "constant_with_warmup" | transformers.get_constant_schedule_with_warmup |
| "linear" | transformers.get_linear_schedule_with_warmup |
| "cosine" | transformers.get_cosine_schedule_with_warmup |
| "cosine_with_restarts" | transformers.get_cosine_with_hard_restarts_schedule_with_warmup |
| "polynomial" | transformers.get_polynomial_decay_schedule_with_warmup |
transformers.get_schedulerというものもありますが、すべての設定ができるわけではないため、カスタマイズのためにはこれらのget関数を使用します。
公式ドキュメント上は以下を確認してください。
それぞれのget関数について使用方法を確認していきます。
get_constant_schedule
まずはconstantを例にget関数を使う場合の手順を確認していきます。
get関数を使う場合はoptimizerを定義します。
今回はoptimizerにAdamWを使用しました。これはtransformersのTrainerで学習する際のデフォルトです。
from transformers import AdamW, get_constant_schedule

# modelから学習すべきパラメータを抽出
params = filter(lambda x: x.requires_grad, model.parameters())

# 今回はoptimizerにAdamWを使用
optimizer = AdamW(params, lr=2e-5)

scheduler = get_constant_schedule(optimizer)
これらをTrainerのoptimizers引数に以下のように与えて学習すればOKです。
この際、TrainingArgumentsのlearning_rateとlr_scheduler_typeは削除しておきます。
model = (AutoModelForSequenceClassification
    .from_pretrained(model_ckpt, num_labels=num_labels)
    .to(device))

training_args = TrainingArguments(
    output_dir=model_name,
    num_train_epochs=10,
    per_device_train_batch_size=batch_size,
    per_device_eval_batch_size=batch_size,
    weight_decay=0.01,
    evaluation_strategy="epoch",
    logging_strategy="steps",
    disable_tqdm=False,
    logging_steps=1,
    push_to_hub=False,
    log_level="error",
)

# Trainerの定義
trainer = Trainer(
    model=model,
    args=training_args,
    compute_metrics=compute_metrics,
    train_dataset=dataset_encoded["train"],
    eval_dataset=dataset_encoded["validation"],
    tokenizer=tokenizer,
    optimizers=[optimizer, scheduler]
)

# トレーニング実行
trainer.train()
以降のget関数では、trainingの部分は同様ですので省略します。
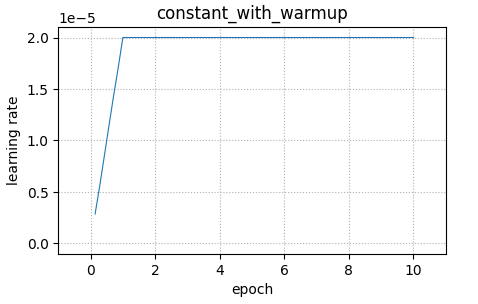
get_constant_schedule_with_warmup
こちらは、constantにwarmup期間を設けることができるSchedulerを作成できます。
引数としてnum_warmup_stepsを使用してstep単位(ミニバッチ単位)で指定が可能です。
今回は1エポック相当で指定しました。
import math
from transformers import get_constant_schedule_with_warmup

params = filter(lambda x: x.requires_grad, model.parameters())
optimizer = AdamW(params, lr=2e-5)

# 1epoch分をwarmupとするための記述
num_warmup_steps = math.ceil(dataset["train"].num_rows / batch_size) * 1

scheduler = get_constant_schedule_with_warmup(optimizer, num_warmup_steps=num_warmup_steps)
結果は以下のように1エポックをかけて2e-5まで上昇し、そこから一定となるような形となっています。
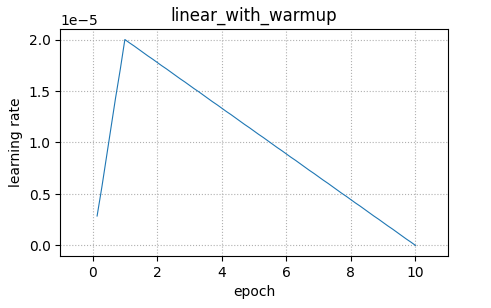
get_linear_schedule_with_warmup
こちらは、先ほどのlr_scheduler_typeでも指定できた、線形に減衰するSchedulerを作成できます。
引数としてnum_warmup_stepsが使用できるので、warmupの設定が可能です。
またnum_training_stepsが引数として存在し、ここは通常エポックの最後相当となるようなstepsを指定します。
from transformers import get_linear_schedule_with_warmup

params = filter(lambda x: x.requires_grad, model.parameters())
optimizer = AdamW(params, lr=2e-5)

num_warmup_steps = math.ceil(dataset["train"].num_rows / batch_size) * 1

# Learning Rateを0にする点を指定する、今回はepoch=10なので10
num_training_steps = math.ceil(dataset["train"].num_rows / batch_size) * 10

scheduler = get_linear_schedule_with_warmup(optimizer,
    num_warmup_steps=num_warmup_steps, num_training_steps=num_training_steps)
結果は、warmup後に線形に減衰する形となっています。
num_training_stepsについての補足です。
num_training_stepsは、最後のepoch相当より小さい値をに指定することも可能です。
学習を途中のエポックで止めたい場合などに使用します。
何の意味があるのか一見分からないかもしれませんが、途中の層は一定エポックで学習を止めるなど、層に応じて動作を変える際に使用するケースがあるためと考えられます。
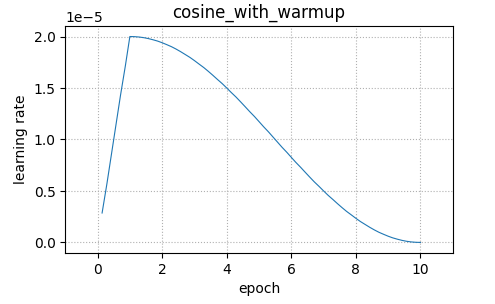
get_cosine_schedule_with_warmup
こちらも、先ほどのlr_scheduler_typeでも指定できた、cosine波形で減衰するSchedulerを作成できます。
同様にnum_warmup_stepsが使用できるので、warmupの設定が可能です。
またnum_training_stepsも同様に指定が必要です。
from transformers import get_cosine_schedule_with_warmup

params = filter(lambda x: x.requires_grad, model.parameters())
optimizer = AdamW(params, lr=2e-5)

num_warmup_steps = math.ceil(dataset["train"].num_rows / batch_size) * 1

num_training_steps = math.ceil(dataset["train"].num_rows / batch_size) * 10

scheduler = get_cosine_schedule_with_warmup(optimizer,
    num_warmup_steps=num_warmup_steps, num_training_steps=num_training_steps)
結果は、warmup後にcosine波形で減衰する形となっています。
get_cosine_with_hard_restarts_schedule_with_warmup
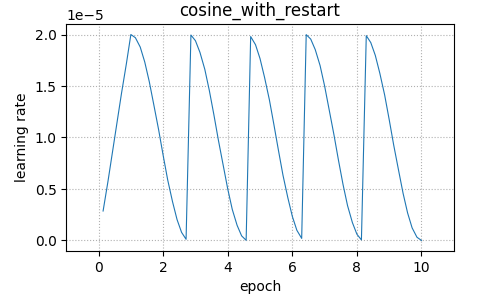
こちらはcosine減衰の更に応用編で、cosine減衰を周期的に減衰させることが可能です。
今回は周期数をnum_cycles=5と指定しています。
from transformers import get_cosine_with_hard_restarts_schedule_with_warmup

params = filter(lambda x: x.requires_grad, model.parameters())
optimizer = AdamW(params, lr=2e-5)

num_warmup_steps = math.ceil(dataset["train"].num_rows / batch_size) * 1
num_training_steps = math.ceil(dataset["train"].num_rows / batch_size) * 10

# cosineの周期を指定
num_cycles = 5

scheduler = get_cosine_with_hard_restarts_schedule_with_warmup(optimizer,
    num_warmup_steps=num_warmup_steps, num_training_steps=num_training_steps,
    num_cycles=num_cycles)
結果は、warmup後にcosine波形の減衰が周期的に繰り返される形となっています。
get_polynomial_decay_schedule_with_warmup
こちらはlinear減衰の応用といえるのですが、多項式で減衰させることが可能です。
lr_endで最終的なLearning Rateを指定し、powerで多項式の次数を指定します。
powerが増加するほど、減衰が急峻となります。
from transformers import get_polynomial_decay_schedule_with_warmup

params = filter(lambda x: x.requires_grad, model.parameters())
optimizer = AdamW(params, lr=2e-5)

num_warmup_steps = math.ceil(dataset["train"].num_rows / batch_size) * 1
num_training_steps = math.ceil(dataset["train"].num_rows / batch_size) * 10

# 最終的なLearning Rateを指定
lr_end = 2e-6

# 次数を指定
power = 2

scheduler = get_polynomial_decay_schedule_with_warmup(optimizer,
    num_warmup_steps=num_warmup_steps, num_training_steps=num_training_steps,
    lr_end=lr_end, power=power)
比較のため、powerをいくつかのパターンで試してプロットしました。
warmup後に多項式の次数に応じて急峻となる減衰になっています。
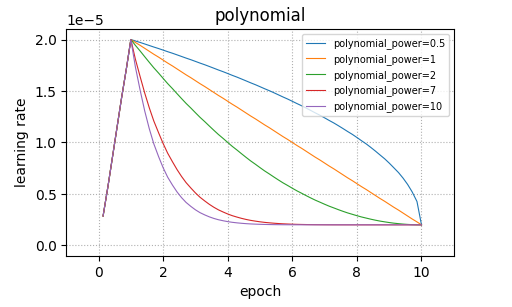
powerには負の数は指定できませんが、このように1.0以下を指定することも可能です。
まとめ
いかがでしたでしょうか?
最初は、デフォルトでSchedulerがlinearとなっていることに気が付き、設定方法を調べていくと Schedulerの指定方法にいくつかのパターンがあることが分かったため、詳細を理解するために深堀して記事にしてみました。
本記事がHugging Faceを使われる方の参考になれば幸いです。