Integrating Apache Kafka with Informatica Intelligent Cloud Services (IDMC)
この記事は公開されてから1年以上経過しています。情報が古い可能性がありますので、ご注意ください。
Introduction
I'm Shiwani from the Data Analytics Division.
This time, i tried integrating Apache Kafka with Informatica(IDMC).
Apache Kafka is a powerful distributed event streaming platform used for building real-time data pipelines and streaming applications.
In this blog, i have created the Kafka connection and Kafka Topic to integrate the Apache Kafka with Informatica(IDMC). Additionally, I have also describe the essential steps to install and configure Kafka on Informatica Secure Agent.
Objective
- Install and configure Kafka
- Start Apache ZooKeeper and Kafka server
- Create Kafka Topic
- Create Kafka connection
Prerequisite
- It is assumed that the IICS Secure Agent and VPC has been configured.
- Install Java on your Secure Agent instance as Kafka requires Java to run.
Install and Configure Apache Kafka
Installing Kafka on a Secure Agent allows you to use the Kafka for real-time data streaming directly within the IICS environment.
Download Apache Kafka
Let's download and install along with its dependency and Apache ZooKeeper.
- Execute the following command to download the Apache Kafka to your Secure Agent machine.
wget https://downloads.apache.org/kafka/3.0.0/kafka_2.13-3.0.0.tgz

- Once the download is complete, extract the tar file on your Secure Agent machine:
- tar -xzf kafka_2.12-2.2.1.tgz

Configure Apache Kafka on Secure Agent
Next, Let's Configure the Apache Kafka to work with the Secure Agent environment.
- First, Specify the directories where Kafka will store its logs.
- Create a directory for logs using following commands:
mkdir -p ~/kafka-logs/zookeeper
mkdir -p ~/kafka-logs/kafka
-
Configure Kafka to use the new log directory.
- Edit ZooKeeper configuration.
nano config/zookeeper.properties- Add or modify the following line:
dataDir=<your-path>/kafka-logs/zookeeper-
Replace <your-path> with the directory where you want ZooKeeper to store its logs.
-
Edit Kafka configuration.
nano config/server.properties- Add or modify the following lines:
log.dirs=<your-path>/kafka-logs/kafka
Start Apache ZooKeeper and Kafka Server on Secure Agent
Once the installation and configuration are complete, you can start the ZooKeeper service and Kafka server on your Secure Agent.
- Start ZooKeeper and redirect its output to the new directory:
nohup bin/zookeeper-server-start.sh config/zookeeper.properties > ~/kafka-logs/zookeeper.out 2>&1 &

- Start Kafka Server and redirect its output to the new directory:
nohup bin/kafka-server-start.sh config/server.properties > ~/kafka-logs/kafka.out 2>&1 &

Verify Logs
After starting the ZooKeeper and Kafka services, it’s important to verify that both are running correctly by checking their logs.
- Verify Zookeeper Logs.
cat kafka-logs/zookeeper.out

- Verify Kafka Logs.
cat kafka-logs/kafka.out

- Zookeeper and Kafka has been started successfully. Kafka should now be running on your Secure Agent, listening on port 9092.
Create the Kafka Topic
Kafka uses topics to organize, store, and process messages in a scalable and fault-tolerant manner. Kafka topics are used to stream real-time data from various sources, such as website activity, IoT sensors, or transaction logs.
- Let's create the Kafka topic with the name S-XX-KafkaDemo using following command.
bin/kafka-topics.sh-create--topic S-XX-KafkaDemo --bootstrap-server localhost:9092 --partitions 1 --replication-factor 1
- Verify the topic has been created successfully using following command.
bin/kafka-topics.sh --list--bootstrap-server localhost:9092

Create Kafka Connection
Next, create a Kafka connection in Informatica (IDMC).
-
From the My Services window, select Administrator.
-
Go to Connections and click on New Connection.
-
Configure the Connection by specifying the following details.
- Connection Name : Kafka_connection_test
- Type : Kafka
- Runtime Environment : Select your runtime environment.
- Kafka Broker List : Enter the Kafka broker’s address running on the Secure Agent (e.g., localhost:9092).
- Kafka Broker Version: Apache 0.10.1.1 & above
-
Click on Test Connection to ensure the connection has been established successfully. If successful, save the connection.
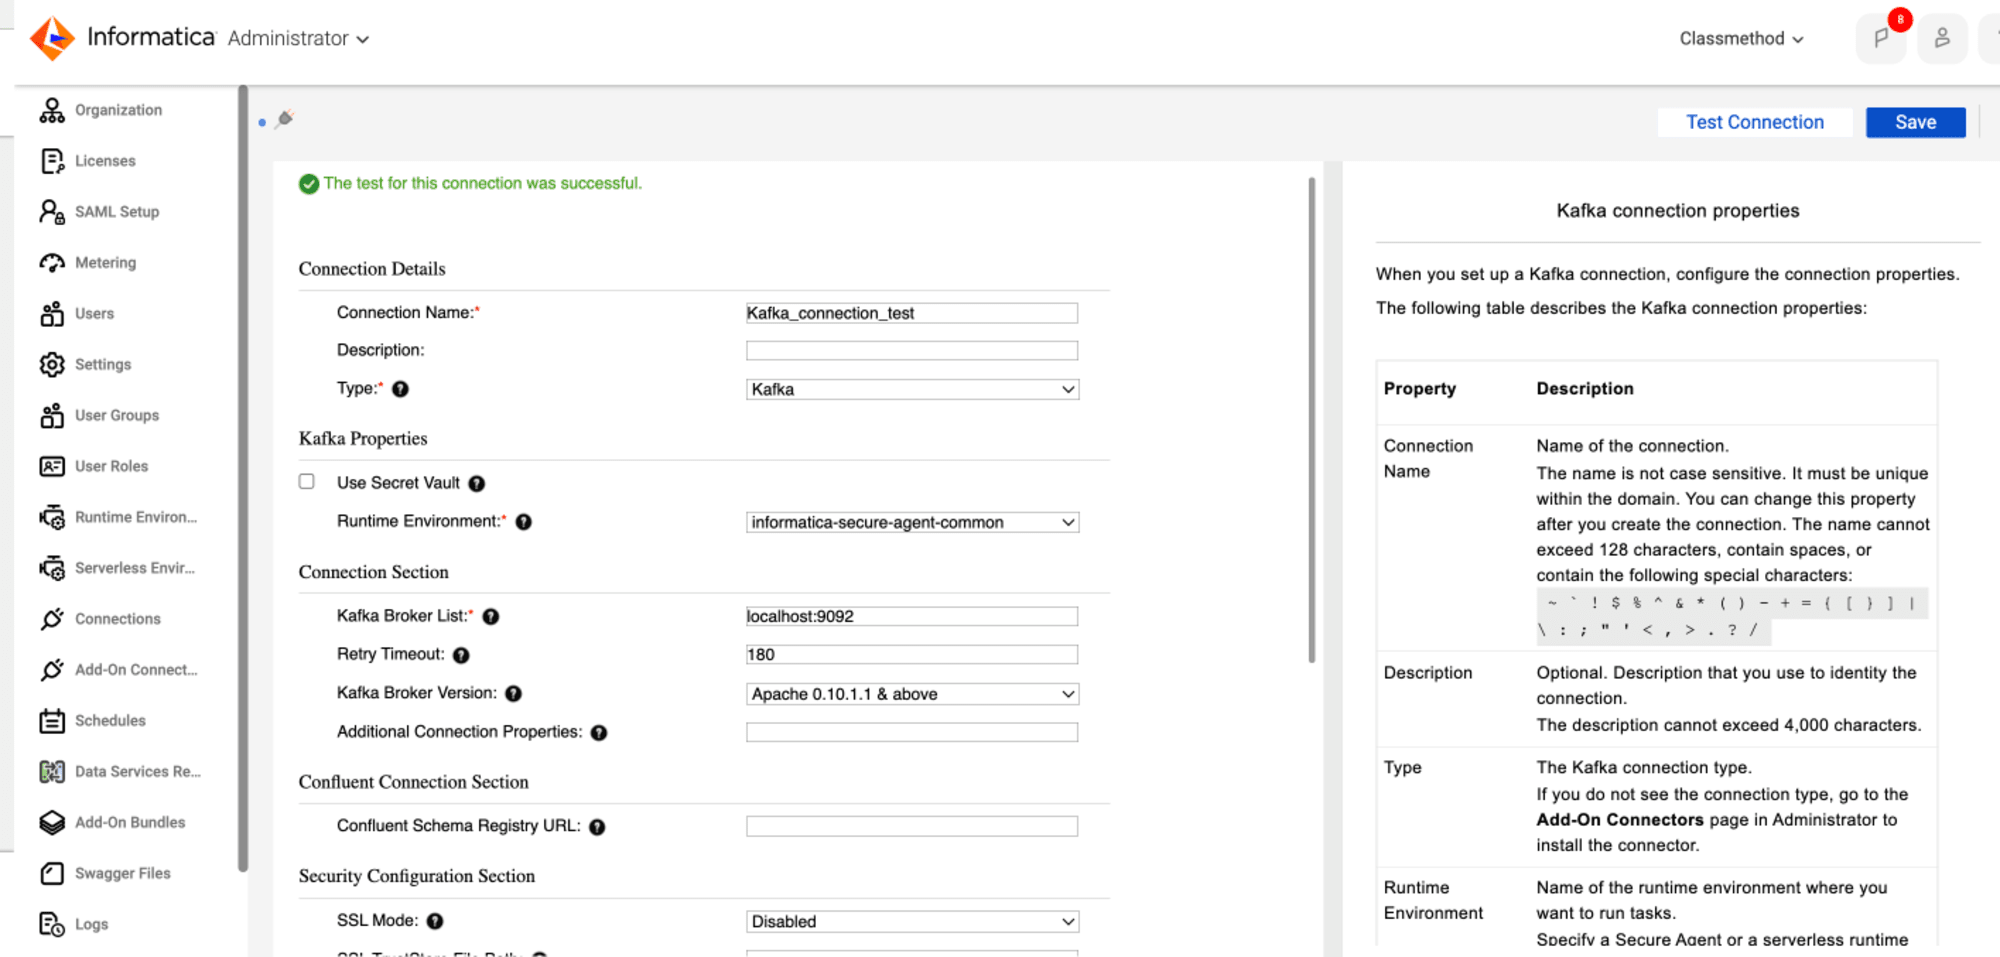
- Kafka connection test is successful which means Kafka connection has been created successfully.
Conclusion
I have successfully installed and configured Apache Kafka on an Informatica Secure Agent. I have also created a Kafka Topic and Kafka connection in IICS, and confirmed that connection has been established and working as expected. This setup enables you to use Kafka for real-time data streaming, processing and integration within your IDMC environment.