負荷テストツールk6をAWS CodeBuildから実行してみた
負荷テストツールk6の実行環境としてAWS CodeBuildを使用する機会があったので記録として残します。
k6とは
k6はGrafana Labsによって開発されている負荷テストツールです。
テストシナリオをJavaScriptで作成することができ、作成したスクリプトをCLIから実行することでテストを行えます。
AWSのドキュメントでも紹介されている負荷テストツールの1つになります。
環境構築
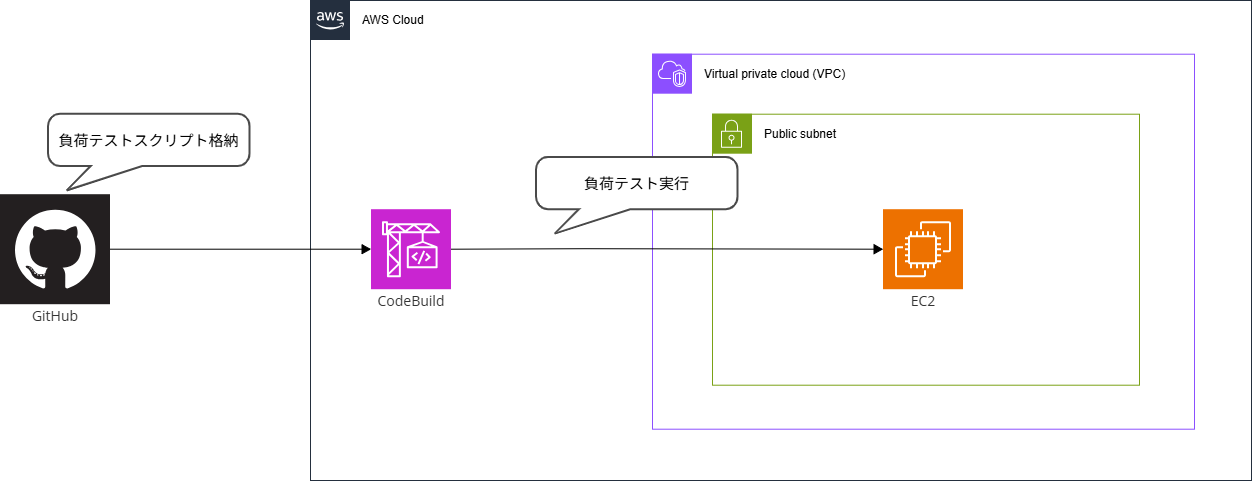
今回は負荷をかける環境とk6を実行する環境の2つを作成します。
k6を実行するAWS CodeBuild側の設定は以下のGrafana Labsの公式ブログを参考に行います。
AWSの構成としては以下のような形となります。
今回はシンプルにEC2にApacheをインストールして負荷をかけていきます。
EC2作成
EC2は以下のCloudFormationテンプレートで作成を行います。
AWSTemplateFormatVersion: "2010-09-09"

Description: test Stack

Metadata:
# ------------------------------------------------------------#
# Metadata
# ------------------------------------------------------------#
  AWS::CloudFormation::Interface:
    ParameterGroups:
      - Label:
          default: Parameters for VPC
        Parameters:
          - VPCCIDR
      - Label:
          default: Parameters for Subnet
        Parameters:
          - PublicSubnet01CIDR
      - Label:
          default: Parameters for ec2
        Parameters:
          - EC2VolumeSize
          - EC2VolumeIOPS
          - EC2AMI
          - EC2InstanceType

Parameters:
# ------------------------------------------------------------#
# Parameters
# ------------------------------------------------------------#
  VPCCIDR:
    Default: 172.30.0.0/16
    Type: String

  PublicSubnet01CIDR:
    Default: 172.30.3.0/24
    Type: String

  EC2VolumeSize:
    Default: 32
    Type: Number

  EC2VolumeIOPS:
    Default: 3000
    Type: Number

  EC2AMI:
    Default: '/aws/service/ami-amazon-linux-latest/al2023-ami-kernel-6.1-x86_64'
    Type: 'AWS::SSM::Parameter::Value<AWS::EC2::Image::Id>'

  EC2InstanceType:
    Default: t3.micro
    Type: String

Resources:
# ------------------------------------------------------------#
# IAM
# ------------------------------------------------------------#
  EC2IAMRole:
    Type: AWS::IAM::Role
    Properties:
      AssumeRolePolicyDocument:
        Version: "2012-10-17"
        Statement:
          - Effect: Allow
            Principal:
              Service:
                - ec2.amazonaws.com
            Action:
              - 'sts:AssumeRole'
      ManagedPolicyArns:
        - arn:aws:iam::aws:policy/AmazonSSMManagedInstanceCore
      RoleName: iam-role-ec2
      Tags:
        - Key: Name
          Value: iam-role-ec2

  EC2IAMInstanceProfile:
    Type: AWS::IAM::InstanceProfile
    Properties:
      InstanceProfileName: iam-instanceprofile-ec2
      Roles:
        - !Ref EC2IAMRole

# ------------------------------------------------------------#
# VPC
# ------------------------------------------------------------#
  VPC:
    Type: AWS::EC2::VPC
    Properties:
      CidrBlock: !Ref VPCCIDR
      EnableDnsSupport: true
      EnableDnsHostnames: true
      Tags:
        - Key: Name
          Value: test-vpc

# ------------------------------------------------------------#
# InternetGateway
# ------------------------------------------------------------#
  InternetGateway:
    Type: AWS::EC2::InternetGateway
    Properties:
      Tags:
        - Key: Name
          Value: !Sub test-igw

  InternetGatewayAttachment:
    Type: AWS::EC2::VPCGatewayAttachment
    Properties:
      InternetGatewayId: !Ref InternetGateway
      VpcId: !Ref VPC

# ------------------------------------------------------------#
# Subnet
# ------------------------------------------------------------#
  PublicSubnet01:
    Type: AWS::EC2::Subnet
    Properties:
      AvailabilityZone: ap-northeast-1a
      CidrBlock: !Ref PublicSubnet01CIDR
      MapPublicIpOnLaunch: true
      Tags:
        - Key: Name
          Value: !Sub test-public-subnet-01
      VpcId: !Ref VPC

# ------------------------------------------------------------#
# RouteTable
# ------------------------------------------------------------#
  PublicRouteTable:
    Type: AWS::EC2::RouteTable
    Properties:
      VpcId: !Ref VPC
      Tags:
        - Key: Name
          Value: test-public-rtb

  PublicRouteTableRoute:
    Type: AWS::EC2::Route
    Properties:
      DestinationCidrBlock: 0.0.0.0/0
      GatewayId: !Ref InternetGateway
      RouteTableId: !Ref PublicRouteTable

  PublicRtAssociation1:
    Type: AWS::EC2::SubnetRouteTableAssociation
    Properties:
      RouteTableId: !Ref PublicRouteTable
      SubnetId: !Ref PublicSubnet01

# ------------------------------------------------------------#
# Security Group
# ------------------------------------------------------------#
  EC2SG:
    Type: AWS::EC2::SecurityGroup
    Properties:
      GroupDescription: for ec2
      GroupName: test-sg-ec2
      SecurityGroupIngress:
        - FromPort: 80
          IpProtocol: tcp
          CidrIp: 0.0.0.0/0
          ToPort: 80
      Tags:
        - Key: Name
          Value: test-sg-ec2
      VpcId: !Ref VPC

# ------------------------------------------------------------#
# EC2
# ------------------------------------------------------------#
  EC2:
    Type: AWS::EC2::Instance
    Properties:
      BlockDeviceMappings:
        - DeviceName: /dev/xvda
          Ebs:
            DeleteOnTermination: true
            Encrypted: true
            Iops: !Ref EC2VolumeIOPS
            VolumeSize: !Ref EC2VolumeSize
            VolumeType: gp3
      DisableApiTermination: false
      IamInstanceProfile: !Ref EC2IAMInstanceProfile
      ImageId: !Ref EC2AMI
      InstanceType: !Ref EC2InstanceType
      SecurityGroupIds:
        - !Ref EC2SG
      SubnetId: !Ref PublicSubnet01
      Tags:
        - Key: Name
          Value: test-ec2
      UserData: !Base64 |
        #!/bin/bash
        dnf install httpd -y
        systemctl start httpd
        systemctl enable httpd
        echo "test kobayashi" > /var/www/html/index.html
EC2起動時にユーザーデータでApacheをインストールするようにしています。
CloudFormationのデプロイは以下のAWS CLIコマンドで行います。
aws cloudformation create-stack --stack-name CloudFormationスタック名 --template-body file://CloudFormationテンプレートファイル名 --capabilities CAPABILITY_NAMED_IAM
CodeBuildの作成
今回はGitHubリポジトリにk8の使用するスクリプトとbuildspec.yamlを配置するのでCodeBuildプロジェクトを作成する前にGitHubと連携を行っておく必要があります。
以下のドキュメントの手順でGitHubへ接続を行ってください。
接続が完了したらCodeBuildプロジェクトの作成を行います。
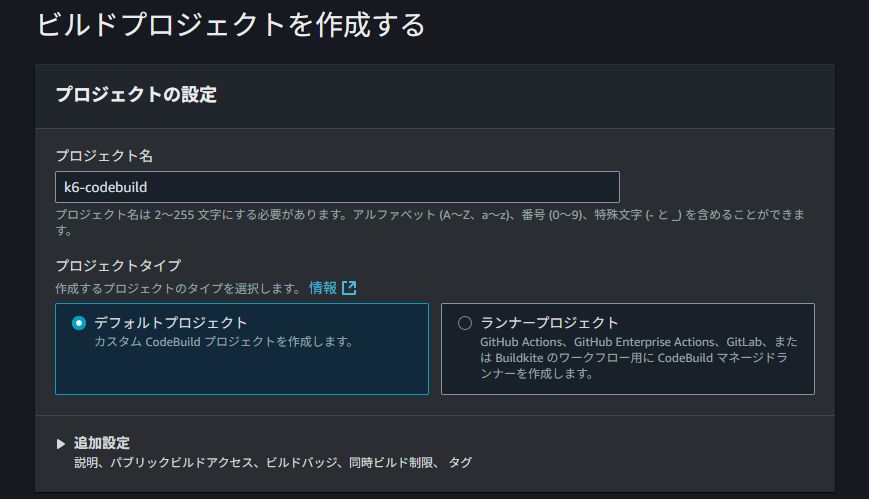
CodeBuildのビルドプロジェクトから「プロジェクトを作成する」をクリックしてください。

ビルドプロジェクトの作成画面が開いたら「プロジェクトの設定」欄で任意の「プロジェクト名」を入力してください。
次に「ソース」欄で「ソースプロバイダ」と「リポジトリ」を設定します。
ソースプロバイダはGitHubを選択してリポジトリは負荷テストスクリプトとCodeBuildの使用するbuildspec.yamlを配置するリポジトリを選択してください。
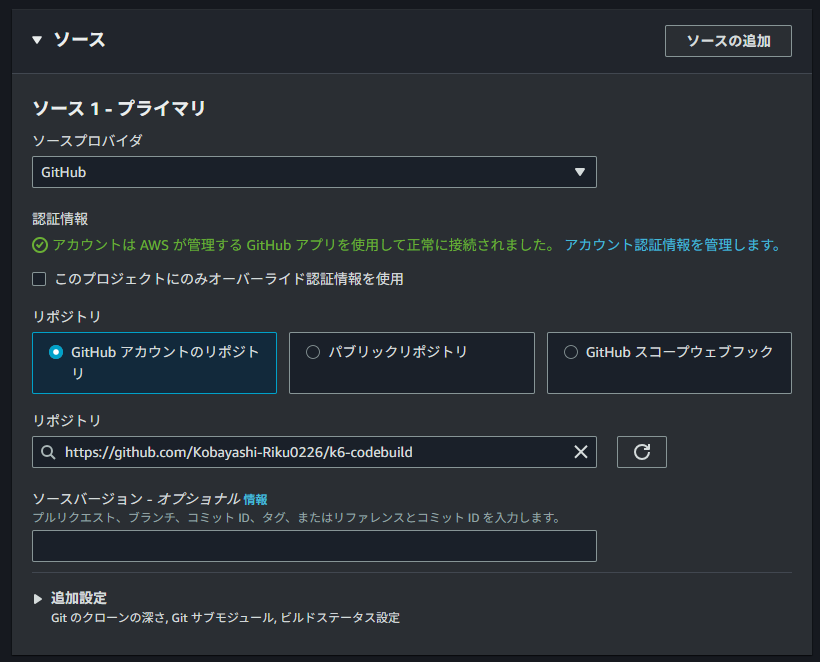
ウェブフックは使用しないのでウェブフックのチェックは外しておきます。

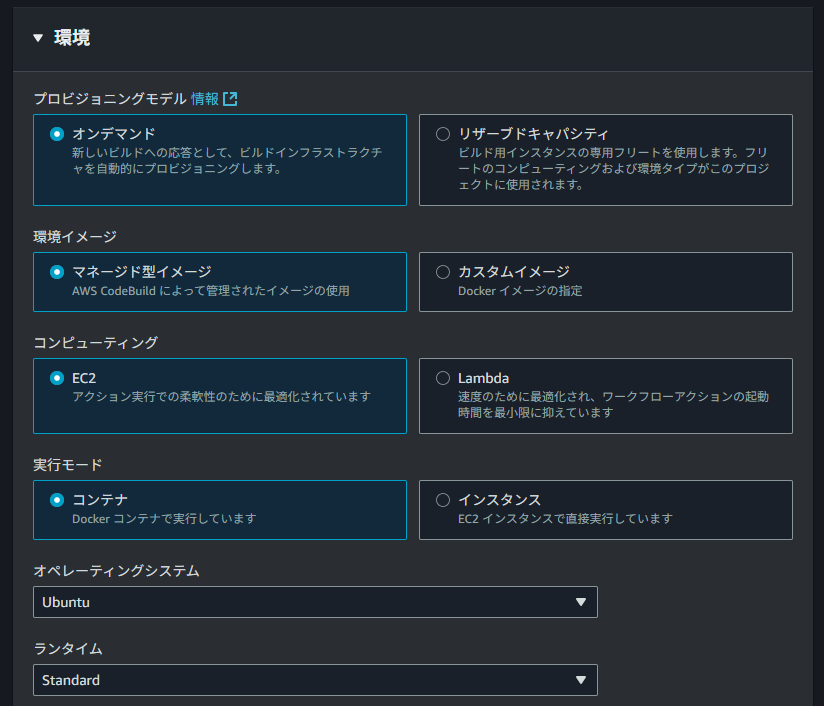
「環境」欄はオペレーティングシステムをUbuntuに変更してそれ以外はデフォルトの設定とします。
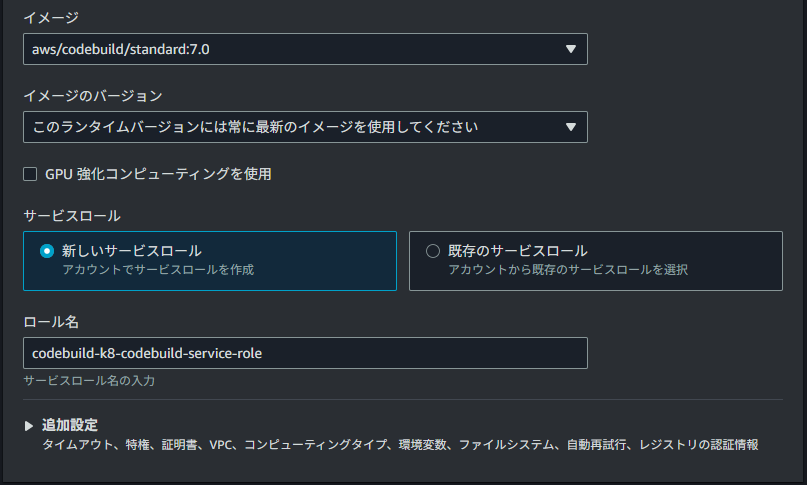
「Buildspec」欄では「buildspec ファイルを使用する」を選択して「Buildspec 名」をbuildspec.yamlにします。
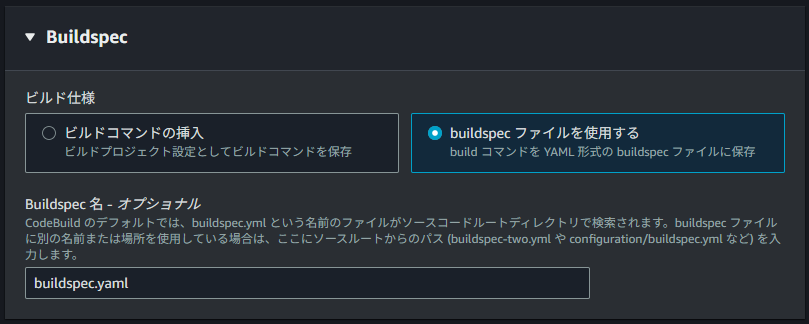
その他の設定はデフォルトのままにして画面下の「ビルドプロジェクトの作成」をクリックします。
CodBuildが作成できたらGitHubリポジトリにbuildspec.yamlとサンプルの負荷テストスクリプトをプッシュします。
version: 0.2

phases:
  pre_build:
    commands:
      - echo Pull grafana/k6 image..
      - docker pull grafana/k6
  build:
    commands:
      - echo Run performance test
      - docker run -i grafana/k6 run - <scripts/test.js
  post_build:
    commands:
      - echo Performance test complete
// ./test.js
import http from 'k6/http';
import { sleep } from 'k6';

export default function () {
  const res = http.get('http://EC2のパブリックIPアドレス');
  sleep(1);
}
サンプルの負荷テストスクリプト実行
GitHubへプッシュしたらCodeBuildプロジェクト画面の「ビルドを開始」から「今すぐ始める」をクリックすると実行されます。

実行が完了するとログに結果が表示されます。
[Container] 2025/09/05 04:16:27.676786 Running command docker run -i grafana/k6 run - <scripts/test.js

         /\      Grafana   /‾‾/
    /\  /  \     |\  __   /  /
   /  \/    \    | |/ /  /   ‾‾\
  /          \   |   (  |  (‾)  |
 / __________ \  |_|\_\  \_____/

     execution: local
        script: -
        output: -

     scenarios: (100.00%) 1 scenario, 1 max VUs, 10m30s max duration (incl. graceful stop):
              * default: 1 iterations for each of 1 VUs (maxDuration: 10m0s, gracefulStop: 30s)

running (00m01.0s), 1/1 VUs, 0 complete and 0 interrupted iterations
default   [   0% ] 1 VUs  00m01.0s/10m0s  0/1 iters, 1 per VU

  █ TOTAL RESULTS

    HTTP
    http_req_duration..............: avg=2.42ms min=2.42ms med=2.42ms max=2.42ms p(90)=2.42ms p(95)=2.42ms
      { expected_response:true }...: avg=2.42ms min=2.42ms med=2.42ms max=2.42ms p(90)=2.42ms p(95)=2.42ms
    http_req_failed................: 0.00% 0 out of 1
    http_reqs......................: 1     0.993465/s

    EXECUTION
    iteration_duration.............: avg=1s     min=1s     med=1s     max=1s     p(90)=1s     p(95)=1s
    iterations.....................: 1     0.993465/s
    vus............................: 1     min=1      max=1
    vus_max........................: 1     min=1      max=1

    NETWORK
    data_received..................: 262 B 260 B/s
    data_sent......................: 68 B  68 B/s

running (00m01.0s), 0/1 VUs, 1 complete and 0 interrupted iterations
default ✓ [ 100% ] 1 VUs  00m01.0s/10m0s  1/1 iters, 1 per VU
負荷テストスクリプトをカスタマイズしてみる
サンプルの実行ができたので、同時接続数などを調整してみたいと思います。
コードを以下のように変更してGitHubへプッシュしてください。
// ./test.js
import http from 'k6/http';
import { sleep } from 'k6';

export const options = {
  vus: 10,
  duration: '30s',
};

export default function () {
  const res = http.get('http://EC2のパブリックIPアドレス');
  sleep(1);
}
k6ではユーザー数をVUs (仮想ユーザー) というもので表現しているらしいです。
コード内ではoptionsで指定することが可能です。
また、テストの実行時間をdurationで設定できます。
上記のコードであれば10ユーザーがアクセスして30秒間テストが実行されます。
GitHubへコードをプッシュしたら同じ手順でCodeBuildを実行します。
実行後、以下のようにログが確認できます。(重要度の高い部分だけ抜粋しています)
2025/09/05 04:36:04.323974 Running command docker run -i grafana/k6 run - <scripts/test.js

         /\      Grafana   /‾‾/
    /\  /  \     |\  __   /  /
   /  \/    \    | |/ /  /   ‾‾\
  /          \   |   (  |  (‾)  |
 / __________ \  |_|\_\  \_____/

     execution: local
        script: -
        output: -

     scenarios: (100.00%) 1 scenario, 10 max VUs, 1m0s max duration (incl. graceful stop):
              * default: 10 looping VUs for 30s (gracefulStop: 30s)

  █ TOTAL RESULTS

    HTTP
    http_req_duration..............: avg=2.64ms min=2.11ms med=2.62ms max=4.1ms p(90)=2.92ms p(95)=3.02ms
      { expected_response:true }...: avg=2.64ms min=2.11ms med=2.62ms max=4.1ms p(90)=2.92ms p(95)=3.02ms
    http_req_failed................: 0.00% 0 out of 300
    http_reqs......................: 300   9.966328/s

    EXECUTION
    iteration_duration.............: avg=1s     min=1s     med=1s     max=1s    p(90)=1s     p(95)=1s
    iterations.....................: 300   9.966328/s
    vus............................: 10    min=10       max=10
    vus_max........................: 10    min=10       max=10

    NETWORK
    data_received..................: 79 kB 2.6 kB/s
    data_sent......................: 20 kB 678 B/s

running (0m30.1s), 00/10 VUs, 300 complete and 0 interrupted iterations
default ✓ [ 100% ] 10 VUs  30s
結果の見方は以下のドキュメントに記載されています。
iterationsが仮想ユーザーがスクリプトを実行した回数なので今回使用したスクリプトの場合は300回リクエストが送られていることになります。
実際、Apacheのアクセスログを確認すると300回アクセスが発生していることが確認できました。
grep "Grafana" access_log | grep "05/Sep/2025:04:36" | wc
    300    3900   28500
また、上記のようなGETリクエストだけでなくPOSTリクエストも行えるため、ID/PWが必要なエンドポイントへのリクエストも行えます。
さいごに
今回はCodeBuildで負荷テストツールk6を実行してみました。
普段EC2を負荷テストツールの実行環境に使うことが多いのですが、CodeBuildは実行が完了したタイミングで停止するので使い方によってはEC2よりもコストを抑えられそうです。
また、k6のように環境構築が簡単なツールであればCodeBuildの設定を行うだけで実行できるようになるのも魅力的だと思いました。