
Kong GatewayのJWTプラグインを使ってAuth0のJWTオーソライザーをローカル環境で構築してみた
この記事は公開されてから1年以上経過しています。情報が古い可能性がありますので、ご注意ください。
こんにちは、ゲームソリューション部/業務効率化ソリューション部の新屋です。
本ブログはClassmethod ゲーソル・ギョーソル Advent Calendar 2024の25日目のブログとなります。
今日はクリスマスです。みなさんサンタクロースからのプレゼントは枕元にあったでしょうか?
プレゼントをもらえた人はおめでとうございます、でもちょっと待ってください。
そのプレゼント、本当にサンタクロースからのものですか?
もし、プレゼントが運ばれる途中で何者かに改ざんされているとしたら…
この改ざんに気づくための仕組みとして、認証の世界では、JWTと呼ばれるトークンを検証する方法があります。
このJWTには、認証情報(例えばログイン済みであること)といった任意の情報(クレームと呼びます)を含めることが出来るのですが、改ざんが無ければ、その情報(例えばログイン済みであること)を信頼することができます。
さて、今回はJWT形式のアクセストークン発行をAuth0に、その検証をKongのJWTプラグインを使って、API保護を試してみようと思います。
全体構成はこちら
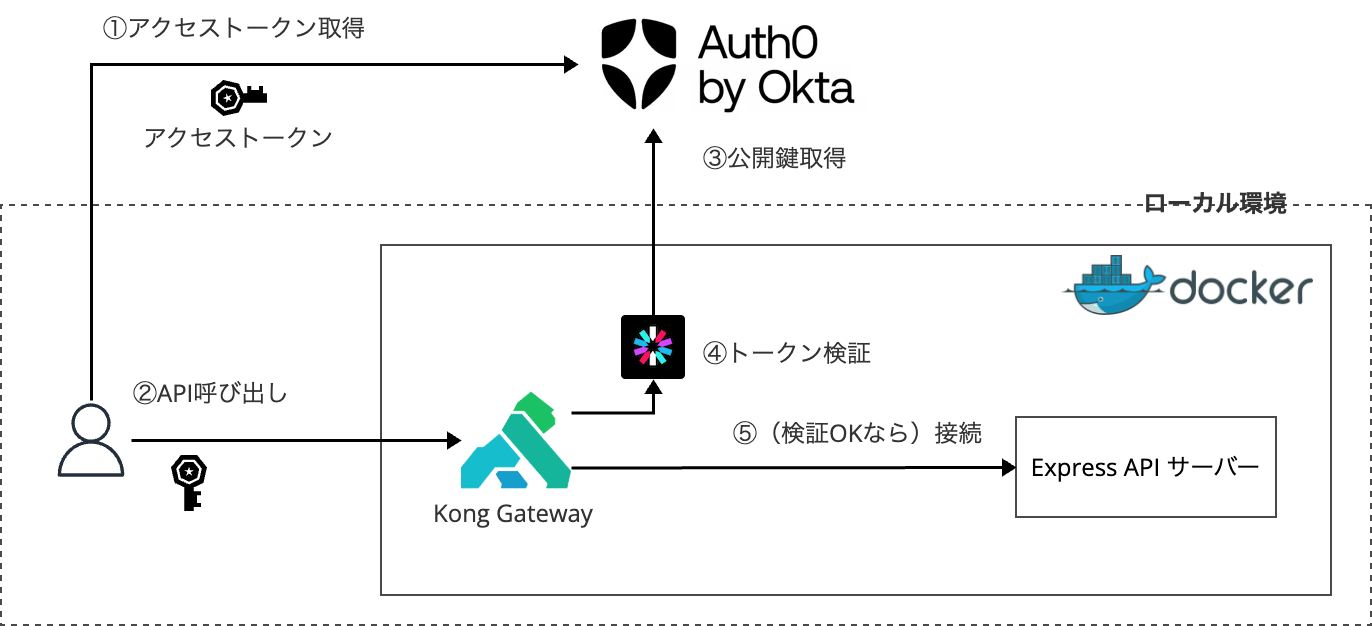
ちなみに、以下の過去記事の「API Gateway + JWTオーソライザー」の部分を「Kong Gateway + JWT Plugin」に置き換えるのが今回の試みです。
前提
- Auth0のアカウントがあり、APIとM2Mアプリケーションを作成できる
- 私の実行環境
- Docker version 27.3.1
- docker compose が実行可能
- Node v20.5.0
- npm が実行可能
- Docker version 27.3.1
モチベーション
- Kong Gatewayをローカルで構築・設定したい
- JWTによるAPI保護の方法を学びたい
- 他にもKong GatewayにOIDCプラグインを実装して保護する方法がある
実装
保護対象のAPIを実装①(Node.js + Express)
const express = require('express');
const app = express();
const port = 3000;

app.get('/', (req, res) => {
  res.send('Hello world DESUWA!');
});

app.listen(port, () => {
  console.log(`Example app listening at http://localhost:${port}`);
});
{
  "name": "my-kong-jwt-plugin",
  "version": "1.0.0",
  "description": "",
  "main": "index.js",
  "scripts": {
    "test": "echo \"Error: no test specified\" && exit 1"
  },
  "keywords": [],
  "author": "",
  "license": "ISC",
  "dependencies": {
    "express": "^4.21.2"
  }
}
npm install をして package-lock.json を生成しておきましょう。
保護対象のAPIを実装②(Dockerfile)
FROM node:18-alpine

WORKDIR /app

COPY package*.json ./

RUN npm install

COPY . .

EXPOSE 3000

CMD ["node", "index.js"]
コンテナオーケストレーション(compose.yml)
version: "3.8"

services:
  my-api-server:
    build:
      context: .
      dockerfile: Dockerfile
    ports:
      - "3000:3000"
    networks:
      - my-kong-jwt-plugin

  kong:
    image: kong/kong-gateway:latest
    environment:
      KONG_DATABASE: "off"
      KONG_DECLARATIVE_CONFIG: "/kong/declarative/kong.yml"
      KONG_ADMIN_LISTEN: "0.0.0.0:8001"
    ports:
      - "8000:8000"
      - "8001:8001"
    volumes:
      - "./kong.yml:/kong/declarative/kong.yml"
    depends_on:
      - my-api-server
    networks:
      - my-kong-jwt-plugin

networks:
  my-kong-jwt-plugin:
今回、Kong GatewayサーバーはDB-lessモードで起動しています。
そのため、Kongの設定はkong.ymlに直接入力します。
DB-lessじゃない場合は、Kong Admin APIをつかって動的に設定を追加していきます。
Kong Gatewayの設定(kong.yml)
_format_version: "3.0"
_transform: true

services:
  - name: my-api-service
    url: http://my-api-server:3000

routes:
  - name: api-requests
    service: my-api-service
    paths:
      - /api

plugins:
  - name: jwt
    service: my-api-service
    config:
      key_claim_name: iss
      claims_to_verify:
        - exp
      header_names:
        - Authorization

consumers:
  - username: "auth0-user"
    jwt_secrets:
      - key: https://{your_auth0_tenant}.auth0.com/
        algorithm: RS256
        secret: {ランダム文字列} # head /dev/urandom | hexdump | sha256sum で出力されてるランダムな文字列
        rsa_public_key: |
          -----BEGIN PUBLIC KEY-----
          ...
          -----END PUBLIC KEY-----
rsa_public_keyは以下のようにして取得してください。
- https://{your_auth0_tenant}.auth0.com/pem にアクセスして証明書ファイルを取得
- cert.pem
- 以下のコマンドで公開鍵に変換してください。
$ openssl x509 -pubkey -noout -in cert.pem > pubkey.pem
- pubkey.pemにrsa_public_keyの文字列が記載されていますので、コピペします。
ディレクトリ構成
$ tree -L 1
.
├── Dockerfile
├── compose.yml
├── index.js
├── kong.yml
├── package.json
└── package-lock.json
動作確認
Kong Gateway と API サーバーを起動
$ docker compose up
Auth0からアクセストークンを取得
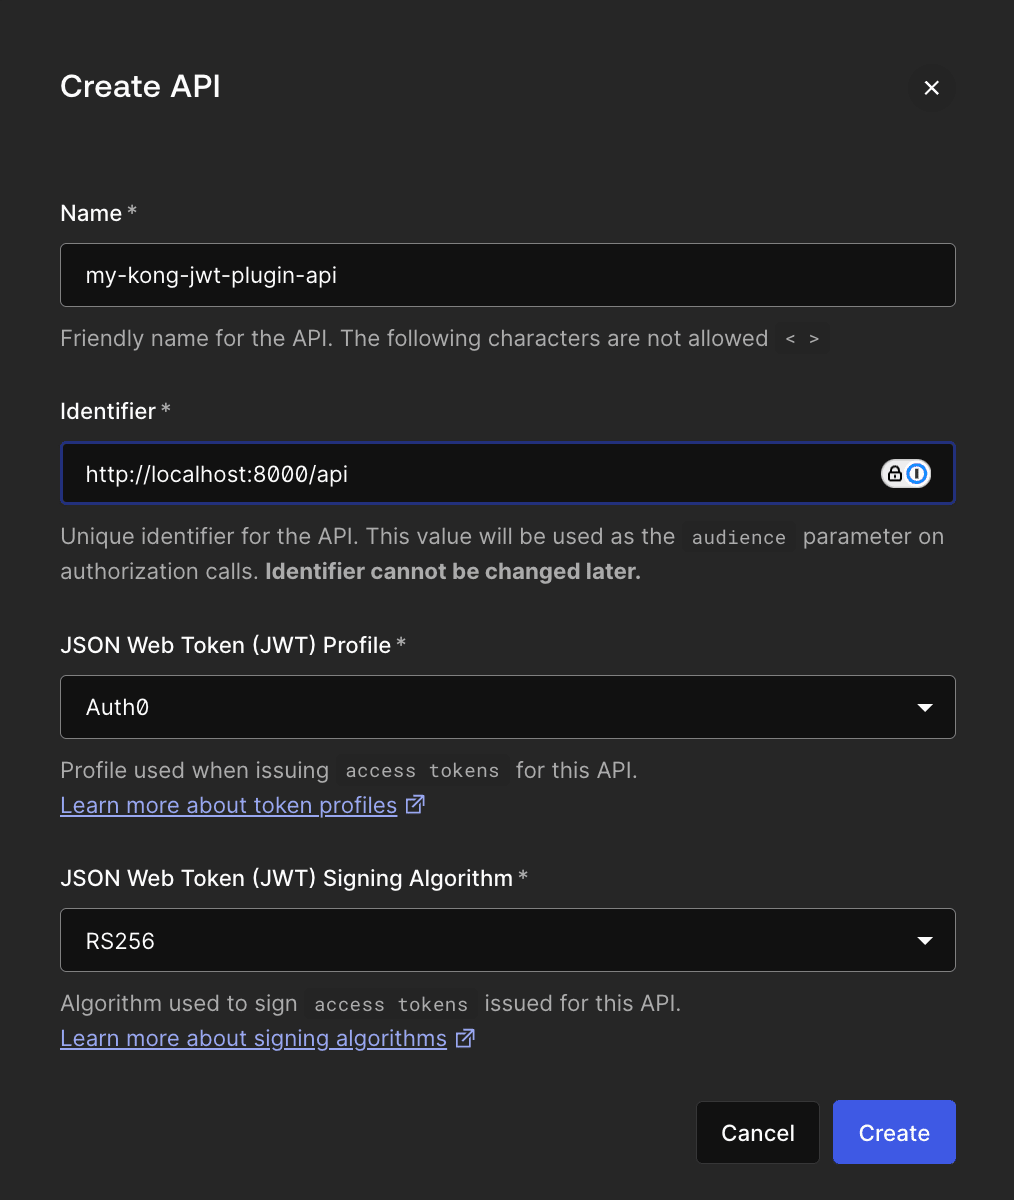
API作成
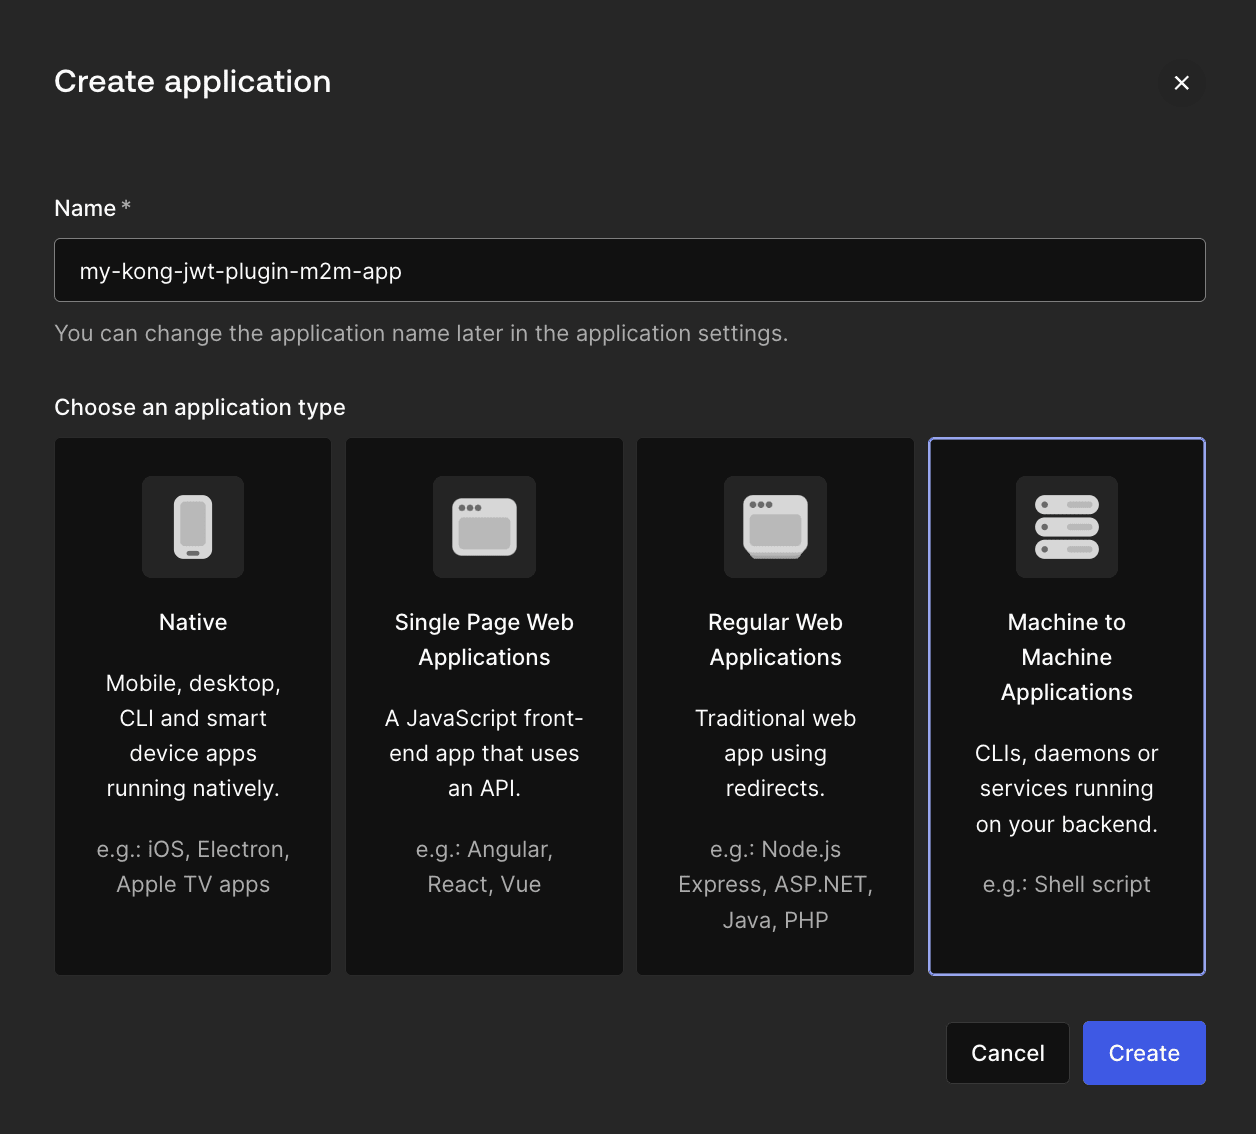
M2Mアプリケーション作成
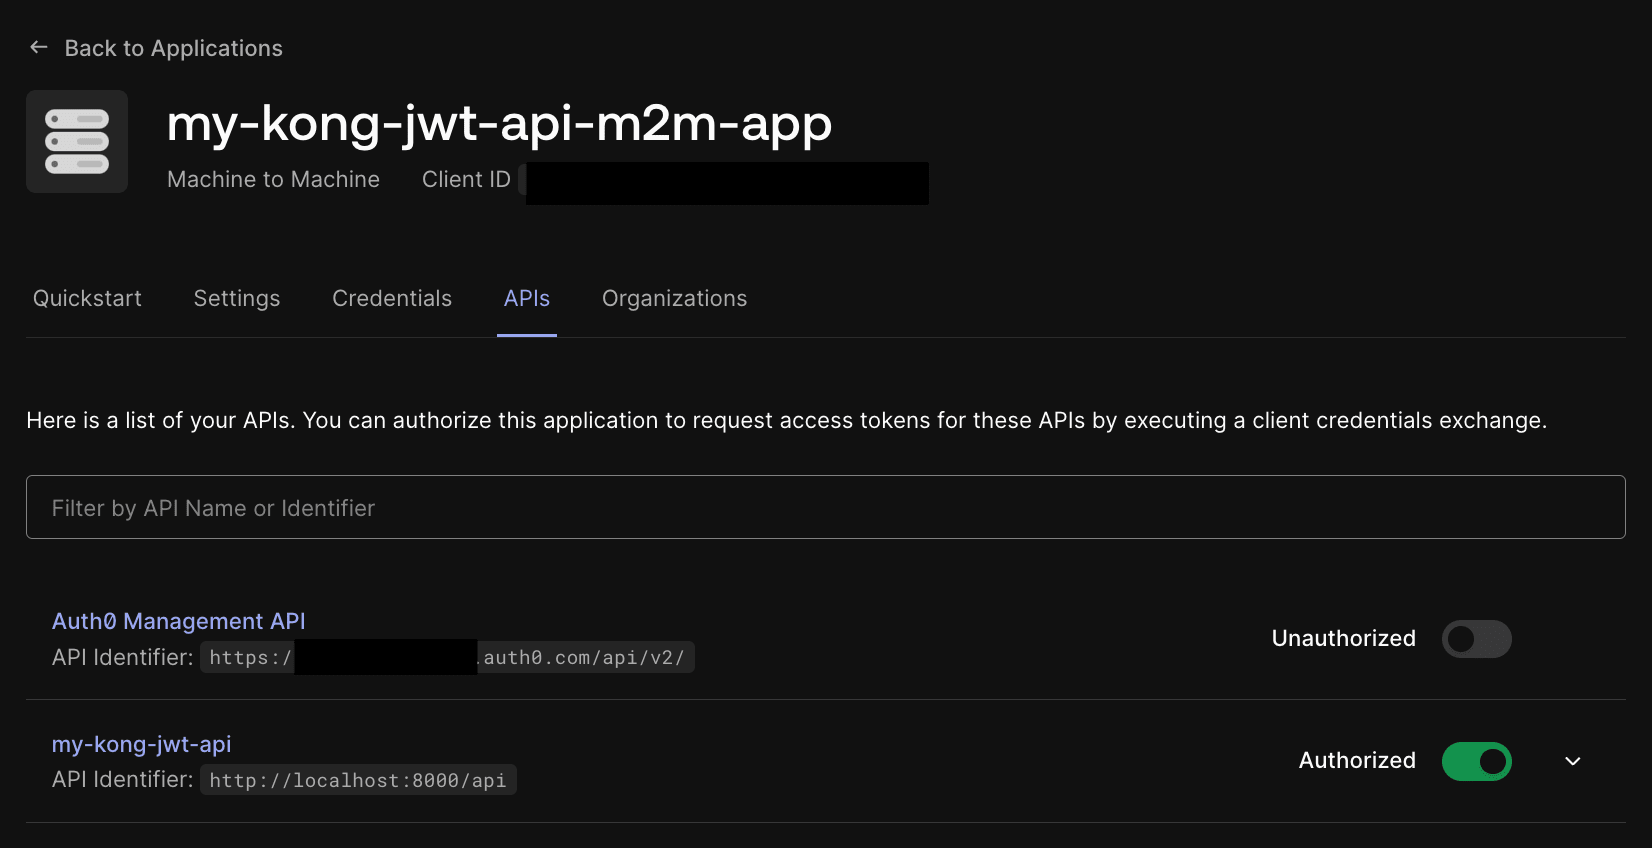
M2MアプリケーションとAPIを紐づける
M2Mアプリケーションからアクセストークンを取得(Quickstartに手順が書いてます)
$ curl --request POST \
  --url https://{your_auth0_tenant}.auth0.com/oauth/token \
  --header 'content-type: application/json' \
  --data '{"client_id":"...","client_secret":"...","audience":"http://localhost:8000/api","grant_type":"client_credentials"}'
{"access_token":"...","expires_in":86400,"token_type":"Bearer"}
Kong Gateway経由でExpress APIサーバーにアクセス
トークンなし
$ curl localhost:8000/api
{"message":"Unauthorized"}
トークンあり
$ curl localhost:8000/api -H 'Authorization: Bearer ...'
Hello world DESUWA!
トークン改ざん
$ curl localhost:8000/api -H 'Authorization: Bearer xxx'
{"message":"Invalid signature"}
参考URL
Kong GatewayとJWTプラグインを実装する方法
Kong GatewayのConsumerにAuth0を設定する方法
さいごに
API保護の方法として、API GatewayでOIDC認証を行うパターンも有効だと思います。
ALBの場合
Kongの場合
今回のJWTオーソライザーの実装は、モバイルアプリやSPAのように、フロントエンドが直接認証を実装している場合に特に便利です。
API GatewayでのOIDC認証では、IDプロバイダーへのトークン検証が必要となりオーバーヘッドが発生しますが、JWTオーソライザーはAPIサーバー側でJWTを検証するだけで済むため、よりシンプルかつ効率的なAPI保護を実現できます。
以上で、本アドベントカレンダーは終了です。
みなさん、良いお年を!メリークリスマス!

