Cloudflare WorkersでSlack Appのバックエンドを動かす

こんにちは、情報システム室の夏目です。
最近個人的にCloudflare Workersで色々遊んでいます。
今回はSlack AppでEvent Subscriptionを行い、バックエンドをCloudflare Workersで動かしてみようと思います。
Bolt for JavaScriptを使うことはできない
Cloudflare WorkersではJSを動かすことができるのですが、Bolt for JavaScriptは使えないようでした。
https://zenn.dev/seratch/articles/c370cf8de7f9f5#cloudflare-workers-では-bolt-を使えないの?
ただ、残念ながら Bolt for JS は axios やその他 Node.js の API に依存する部分が多くあり、そのままでは Cloudflare Workers で使うことはできません。名前は for JavaScript ですが、どちらかというと for Node.js といった趣のフレームワークなのです。
また、Bolt for JS は Receiver というインターフェースで拡張する仕様になっているのですが、この点が Cloudflware Workers の fetch 関数としてリクエストを処理する仕様との相性が良くないという問題も存在しています。この点は Next.js や Nest.js のようなモダンなフレームワークを使った Web アプリの一部として動かしたいという場合にも制約となります。
Cloudflare WorkersでBolt for JavaScriptを使用することができません。
リクエスト署名の検証やリクエストペイロードの形式チェックなどを自前で実装すれば、Cloudflare Workersで動かすことはできなくはないですが、非常に面倒です。
そのため、今回は引用したブログにある slack-edge ライブラリを利用してCloudflare Workersで動かしてみます。
slack-edge と slack-cloudflare-workers
Cloudflare Workersと Vercel Edge Functions 向けのSlackアプリ開発フレームワークです。
slack-edge ライブラリに基本的な機能が入っています。
また、Bolt for PythonのLazyListenersに相当する機能が追加されているので使い勝手も良さそうです (Bolt for JavaScriptには相当する機能がない)。
slack-cloudflare-workers にはCloudflare KVを使って (インストール情報の管理など) OAuthフロー関連の実装が追加で入っています。
なので使い分けとしては、
- 基本的には
slack-edge - OAuthフロー関連をCloudflare KVで管理するなら
slack-cloudflare-workers
ということになります。
またCloudflare WorkersやVercel Edge Functions向けとは書きましたが、コンテナサービスで動くアプリにも使用できます (DenoやBunにも対応)。
作って、動かしてみる
今回はSlack AppのEvent Subscriptionsでチャンネルにメッセージが投稿されたのを、 slack-edge を使って受け取るCloudflare Workersに作ってみます。
1. Workerを作成して、ほぼそのままデプロイする
Event Subscriptions用のURLを取得するためにWorkerの雛型に最小限の変更を加えて、Cloudflareにデプロイします。
1-1. npm create cloudflare@latest でWorkerの雛型を作る
$ npm create cloudflare@latest
npm notice run npx
npm notice run 'create-cloudflare'

──────────────────────────────────────────────────────────────────────────────────────────────────────────
👋 Welcome to create-cloudflare v2.71.1!
🧡 Let's get started.
📊 Cloudflare collects telemetry about your usage of Create-Cloudflare.

Learn more at: https://github.com/cloudflare/workers-sdk/blob/main/packages/create-cloudflare/telemetry.md
──────────────────────────────────────────────────────────────────────────────────────────────────────────

╭ Create an application with Cloudflare Step 1 of 3
│
├ In which directory do you want to create your application?
│ dir ./worker-subscribe-channel-messages
│
├ What would you like to start with?
│ category Hello World example
│
├ Which template would you like to use?
│ type Worker only
│
├ Which language do you want to use?
│ lang TypeScript
│
├ Copying template files
│ files copied to project directory
│
├ Updating name in `package.json`
│ updated `package.json`
│
├ Installing dependencies
│ installed via `npm install`
│
├ Do you want to add an AGENTS.md file to help AI coding tools understand Cloudflare APIs?
│ no agents
│
╰ Application created

╭ Configuring your application for Cloudflare Step 2 of 3
│
├ Installing wrangler A command line tool for building Cloudflare Workers
│ installed via `npm install wrangler --save-dev`
│
├ Retrieving current workerd compatibility date
│ compatibility date 2026-08-13
│
├ Generating types for your application
│ generated to `./worker-configuration.d.ts` via `npm run cf-typegen`
│
├ Installing @types/node
│ installed via npm
│
├ Do you want to use git for version control?
│ no git
│
╰ Application configured

╭ Deploy with Cloudflare Step 3 of 3
│
├ Do you want to deploy your application?
│ no deploy via `npm run deploy`
│
╰ Done

────────────────────────────────────────────────────────────
🎉  SUCCESS  Application created successfully!

💻 Continue Developing
Change directories: cd worker-subscribe-channel-messages
Deploy: npm run deploy

📖 Explore Documentation
https://developers.cloudflare.com/workers

🐛 Report an Issue
https://github.com/cloudflare/workers-sdk/issues/new/choose

💬 Join our Community
https://discord.cloudflare.com
────────────────────────────────────────────────────────────
今回は worker-subscribe-channel-messages という名前のWorkerを作成します。
1-2. デプロイスクリプトを修正する
{
  "scripts": {
    "cf-typegen": "wrangler types",
    "deploy": "npm run cf-typegen && wrangler deploy"
  }
}
cf-typegen を deploy の上に移動し、 deploy の仲で cf-typegen を実行するようにしました。
cf-typegen というのは wrangler.jsonc からCloudflare Workers用の型定義ファイル worker-configuration.d.ts を生成するコマンドです。
そのためデプロイを行う際には、生成を行ってからデプロイを行うようにします。
1-3. wrangler.jsoncを修正する
{
  "$schema": "node_modules/wrangler/config-schema.json",
  "name": "worker-subscribe-channel-messages",
  "main": "src/index.ts",
  "compatibility_date": "2026-08-13",
  "observability": {
    "enabled": true
  },
  "upload_source_maps": true,
  "workers_dev": true,
  "preview_urls": false
 }
workers_dev と preview_urls を追記します。
"workers_dev": true としてプロダクション用のURLが発行されるようにします (devと付いていますがプロダクション用のURLになります)。
"previews_urls": false としてプレビュー用のURLは生成されないようにします。
1-4. デプロイする
$ npx wrangler login
$ npm run deploy
npm notice run worker-subscribe-channel-messages@0.0.0 deploy
npm notice run npm run cf-typegen && wrangler deploy
npm notice run worker-subscribe-channel-messages@0.0.0 cf-typegen
npm notice run wrangler types

 ⛅ wrangler 4.122.0
────────────────────
Generating project types...

interface __BaseEnv_Env {
}
declare namespace Cloudflare {
        interface GlobalProps {
                mainModule: typeof import("./src/index");
        }
        interface Env extends __BaseEnv_Env {}
}
interface Env extends __BaseEnv_Env {}

Generating runtime types...

Runtime types generated.

────────────────────────────────────────────────────────────
✨ Types written to worker-configuration.d.ts

📖 Read about runtime types
https://developers.cloudflare.com/workers/languages/typescript/#generate-types
📣 Remember to rerun 'wrangler types' after you change your wrangler.jsonc file.

 ⛅ wrangler 4.122.0
────────────────────
Total Upload: 0.19 KiB / gzip: 0.16 KiB
Worker Startup Time: 4 ms
Uploaded worker-subscribe-channel-messages (1.29 sec)
Deployed worker-subscribe-channel-messages triggers (0.78 sec)
  https://worker-subscribe-channel-messages.luciferous.workers.dev
Current Version ID: b043f9e8-800f-4f5f-ab41-4a6fb7d3b8c8
npx wrangler login でwranglerコマンドでデプロイするために認証を通します。
ブラウザで認証を行ってください。
npm run deploy でデプロイを行います。
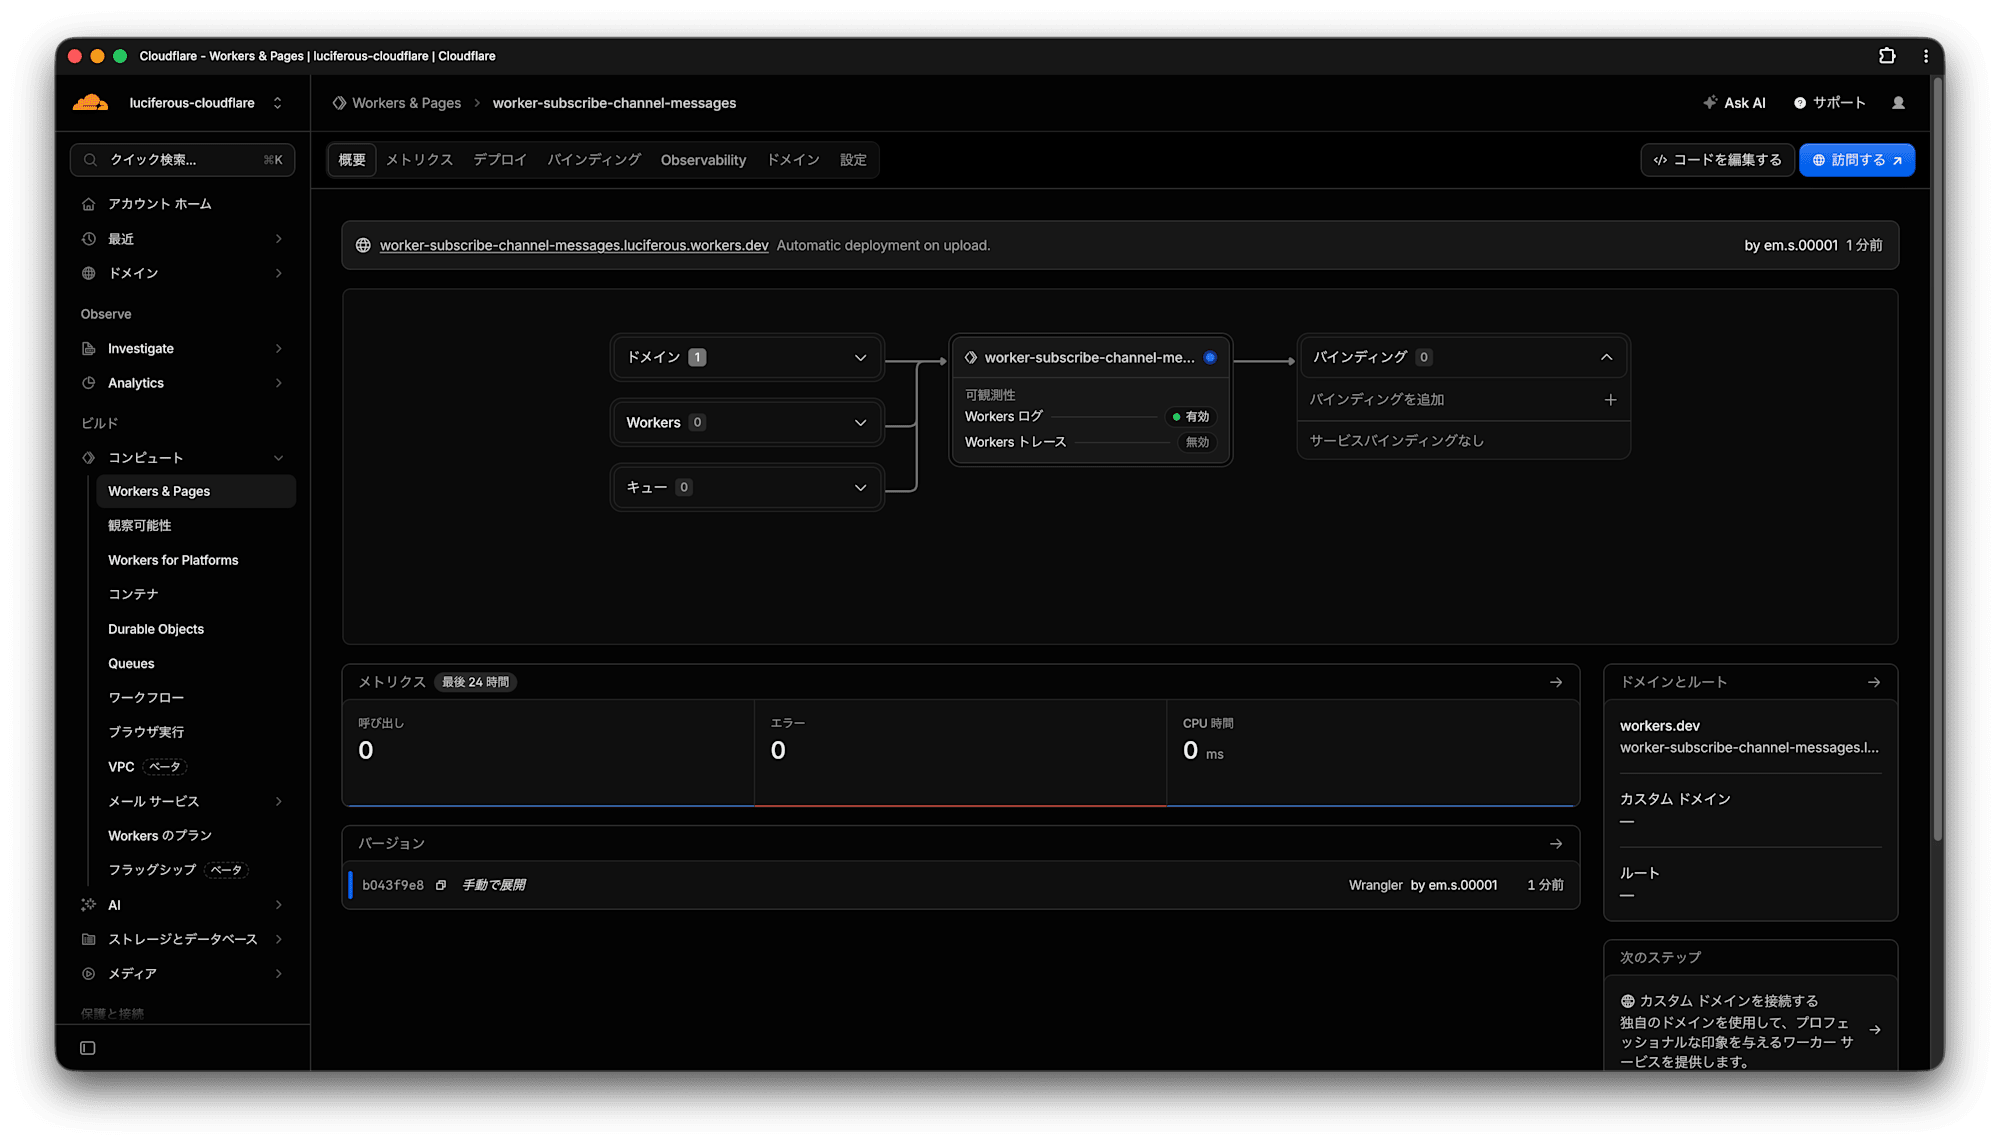
Cloudflareのダッシュボードを見ると、デプロイされていることがわかります。
今回のURLは https://worker-subscribe-channel-messages.luciferous.workers.dev/ です。
2. Slack Appの初期設定を行う
Event Subscriptionに使うSlack Appを作成し、OAuthのパーミッションスコープなど初期設定を行います。
Event Subscriptionの設定は後で行います。
(Workerのコードなどを修正する必要があるので)
2-1. Slack Appを作成する
https://api.slack.com/apps にアクセスします。
(Slack AppをインストールするSlack Workspaceへの認証を通す必要がある場合があります)
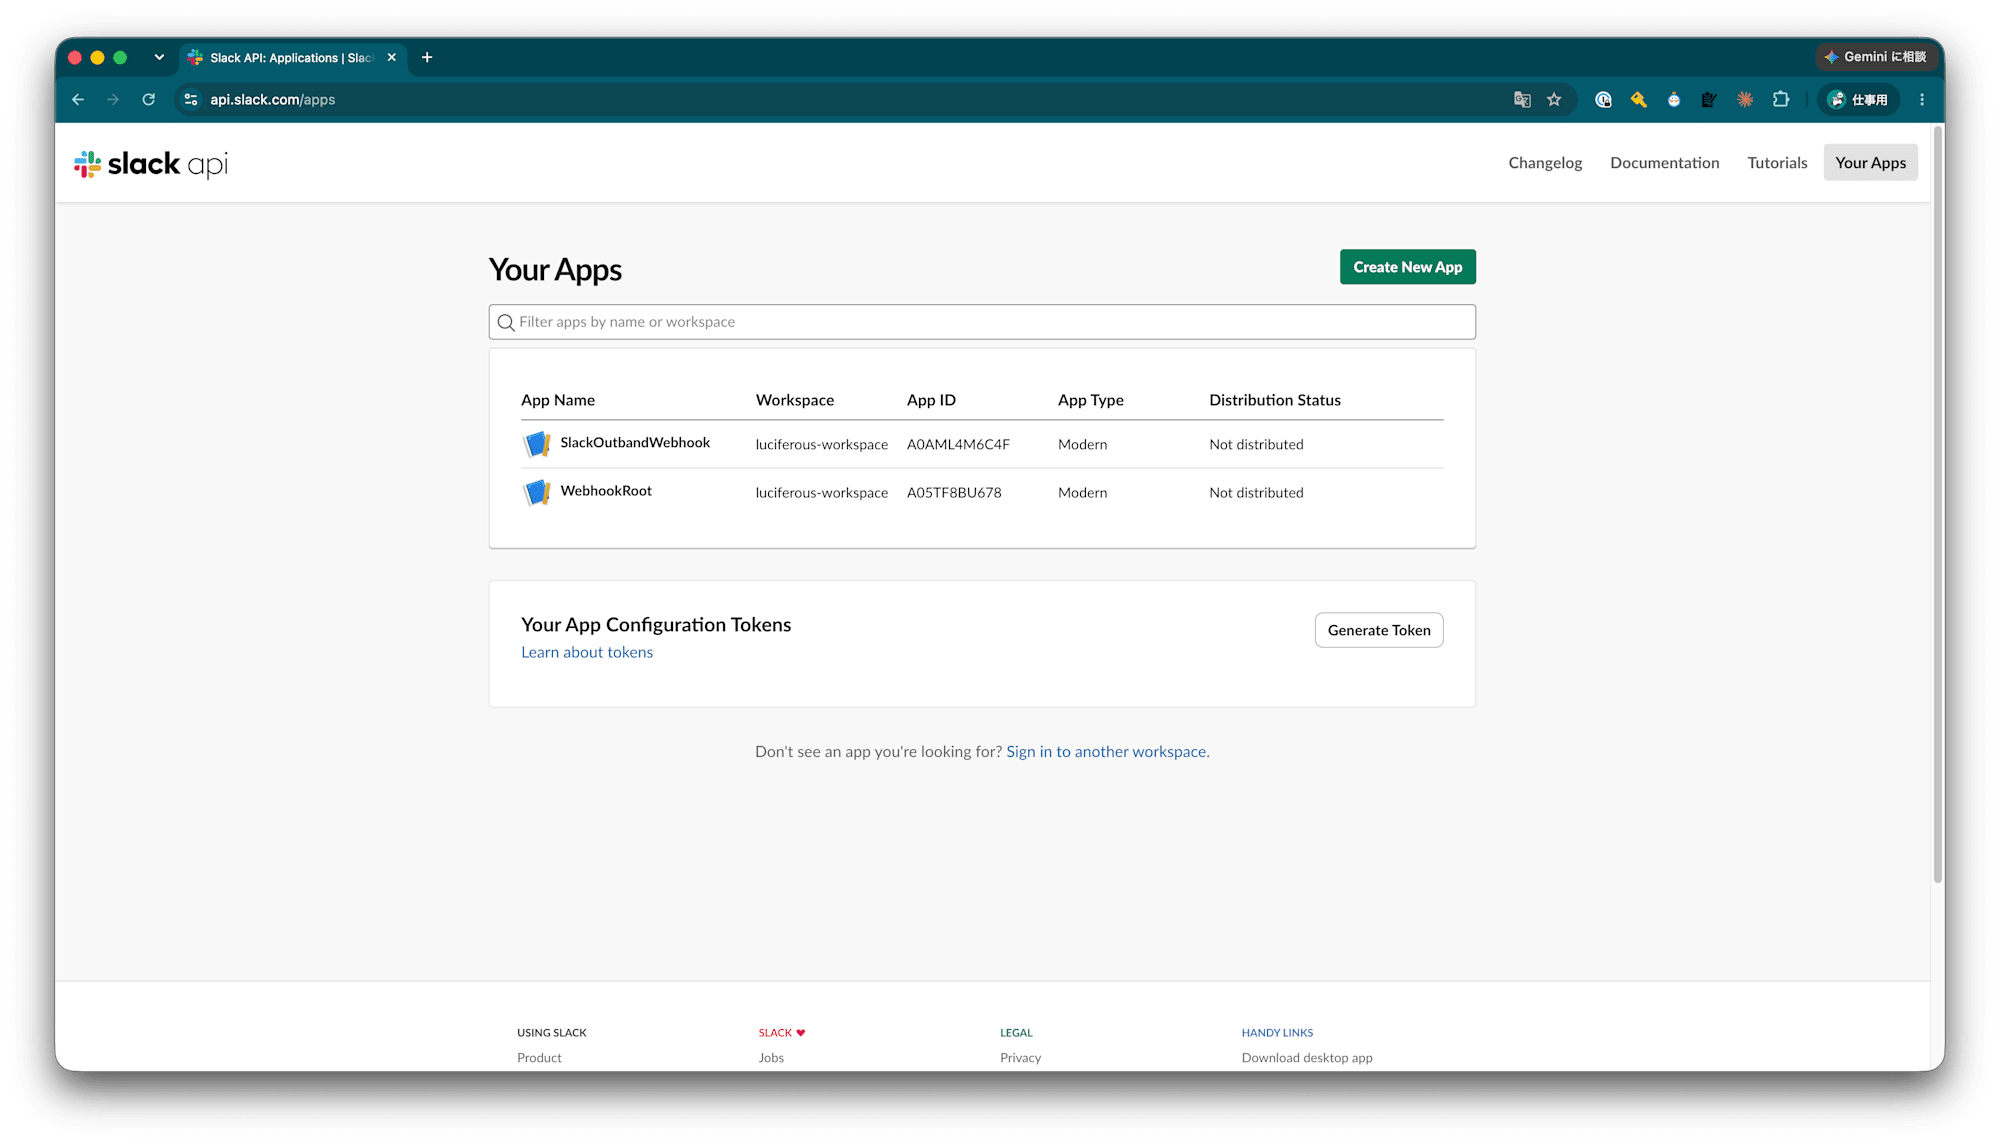
Create New App をクリックします。
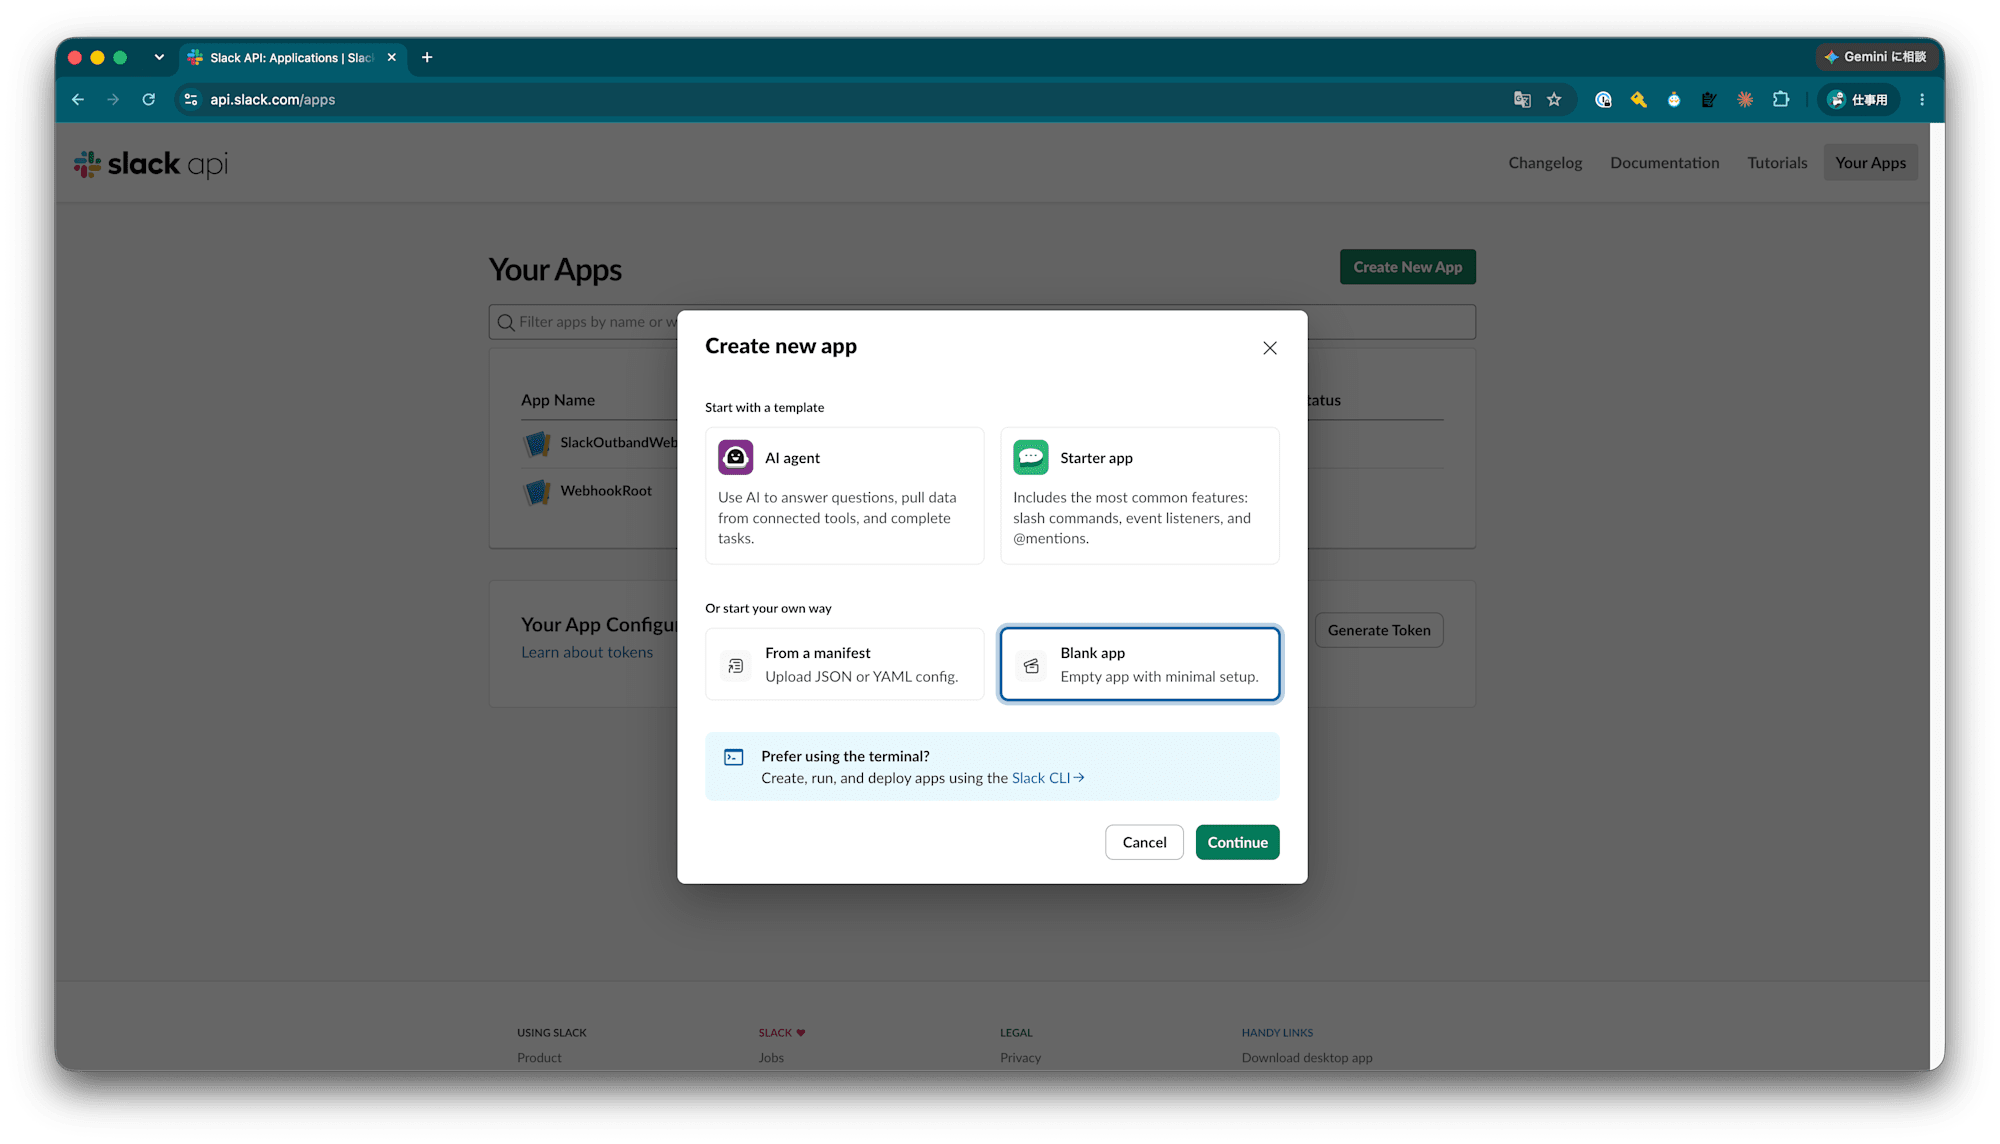
Blank app を選択し、 Continue をクリックします。
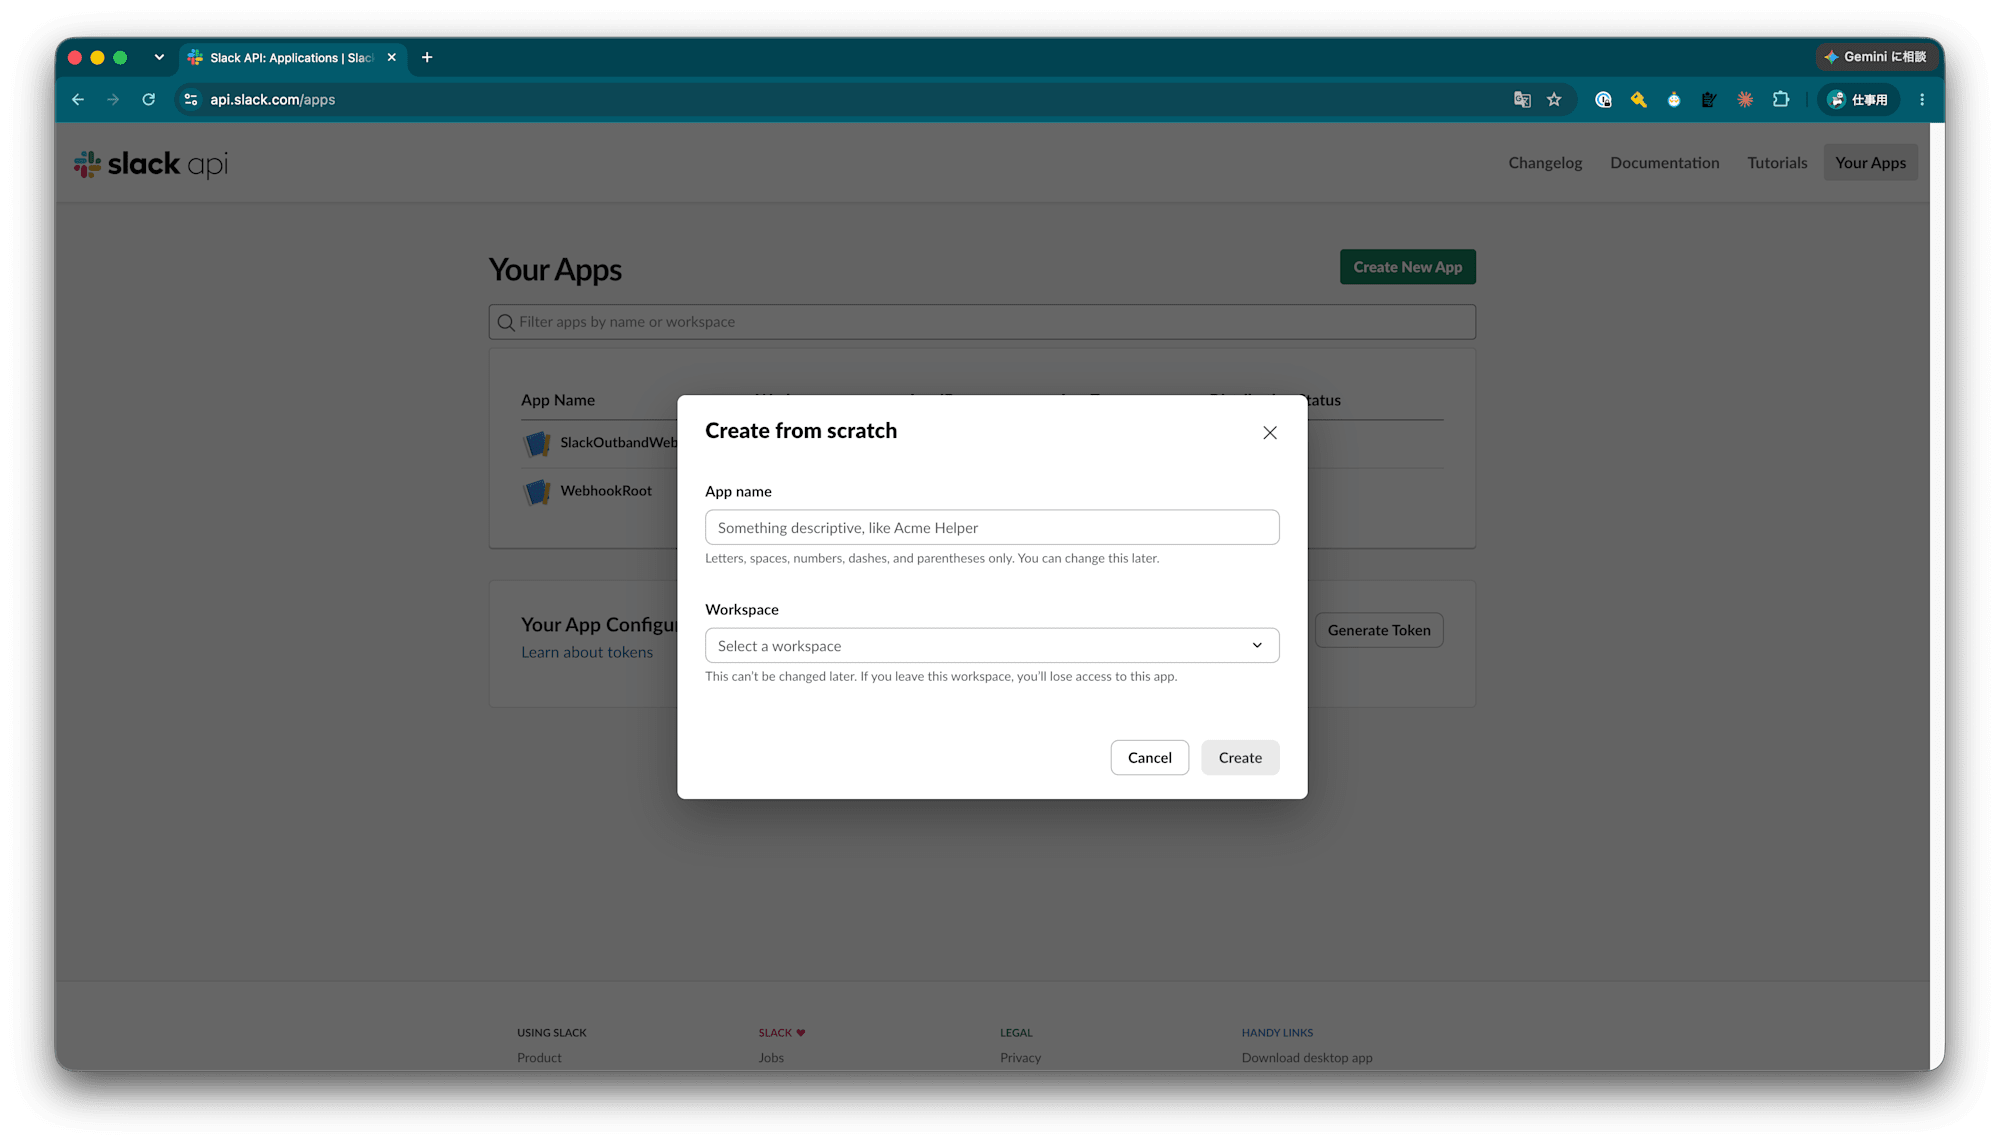
App name に任意の名前を入力し、インストールするワークスペースを Workspace で選択します。
ここでは worker-subscribe-channel-messages という名前にします。
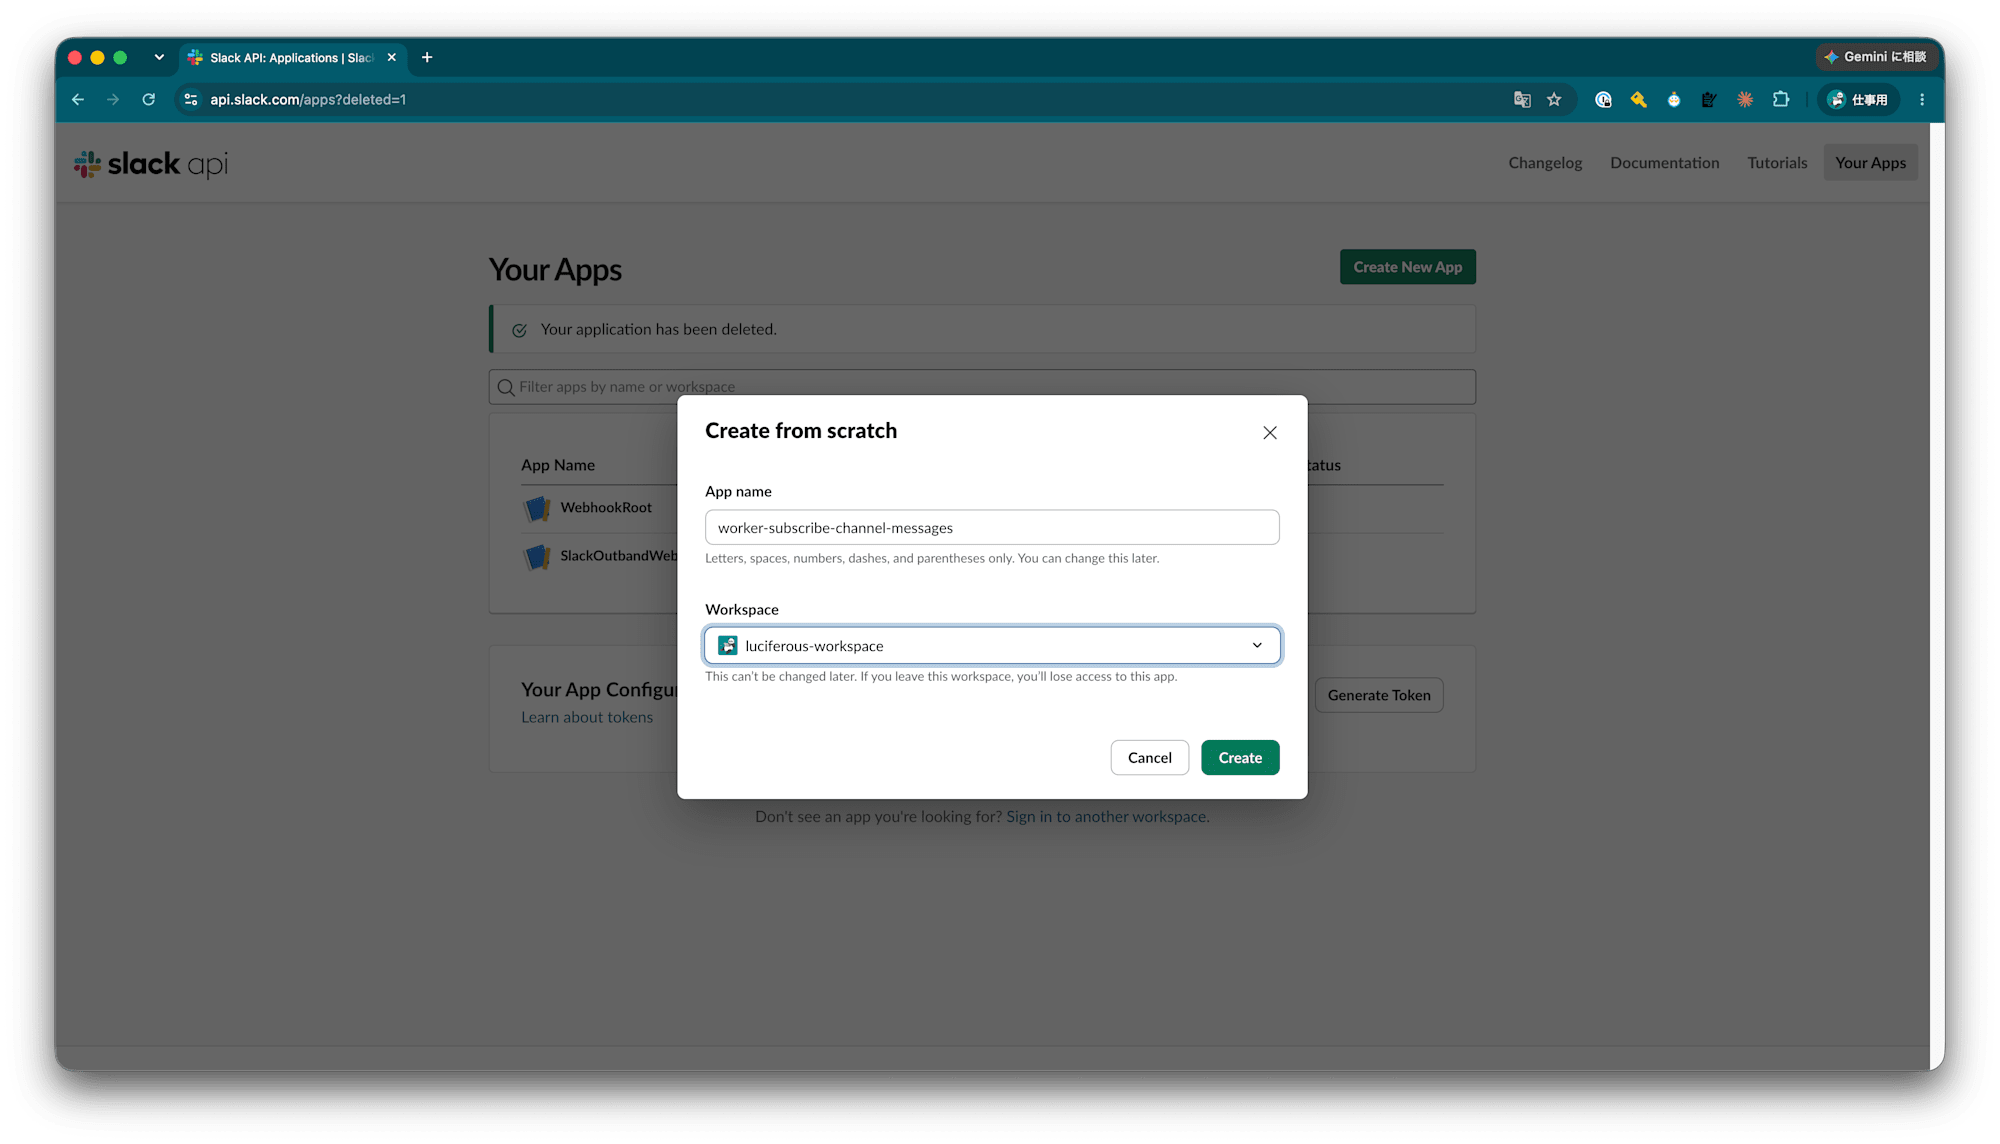
入力と選択をしたら Create をクリックします。
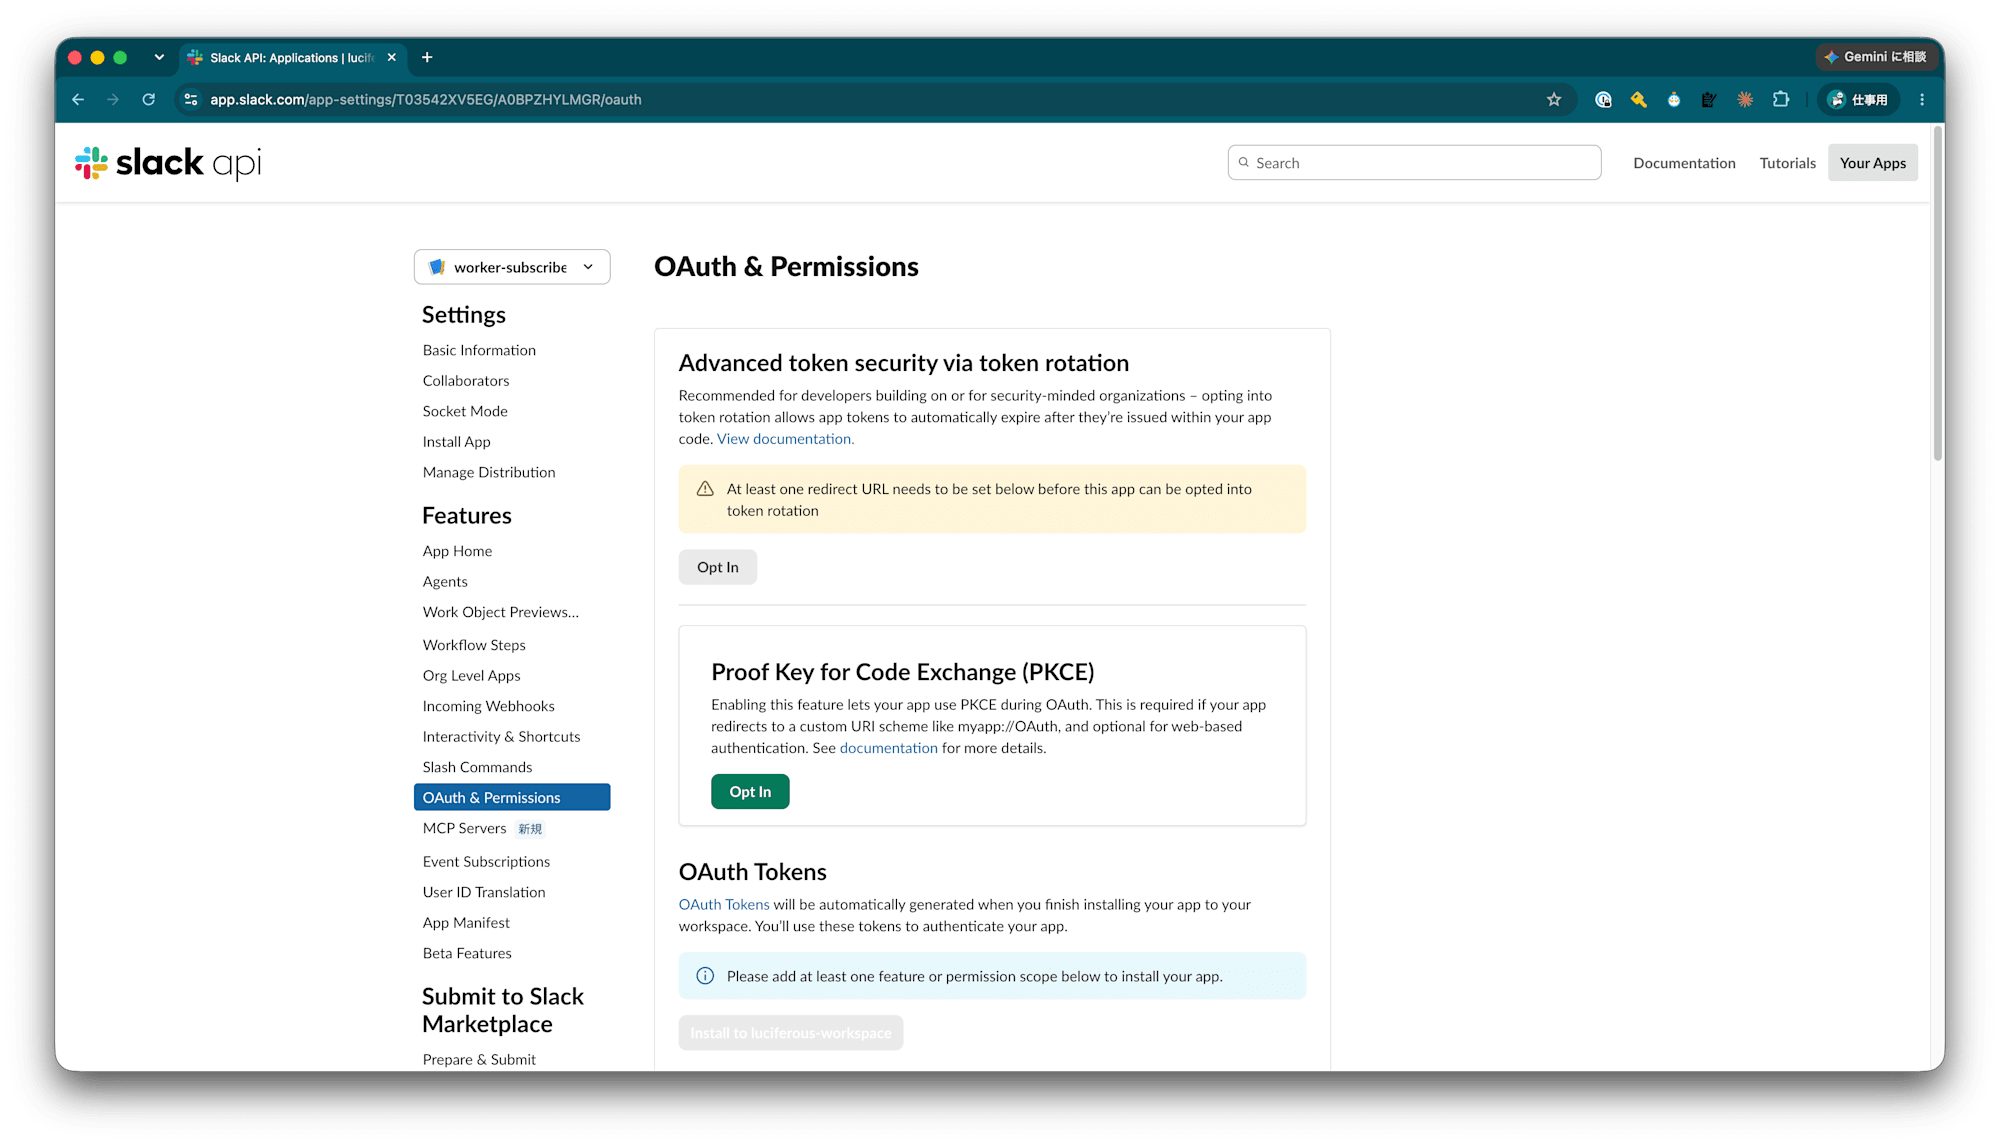
Slack Appが作成されました。
2-2. ボット トークンのスコープを設定する
Features -> OAuth & Permissions を開き、 スコープ までスクロールします。
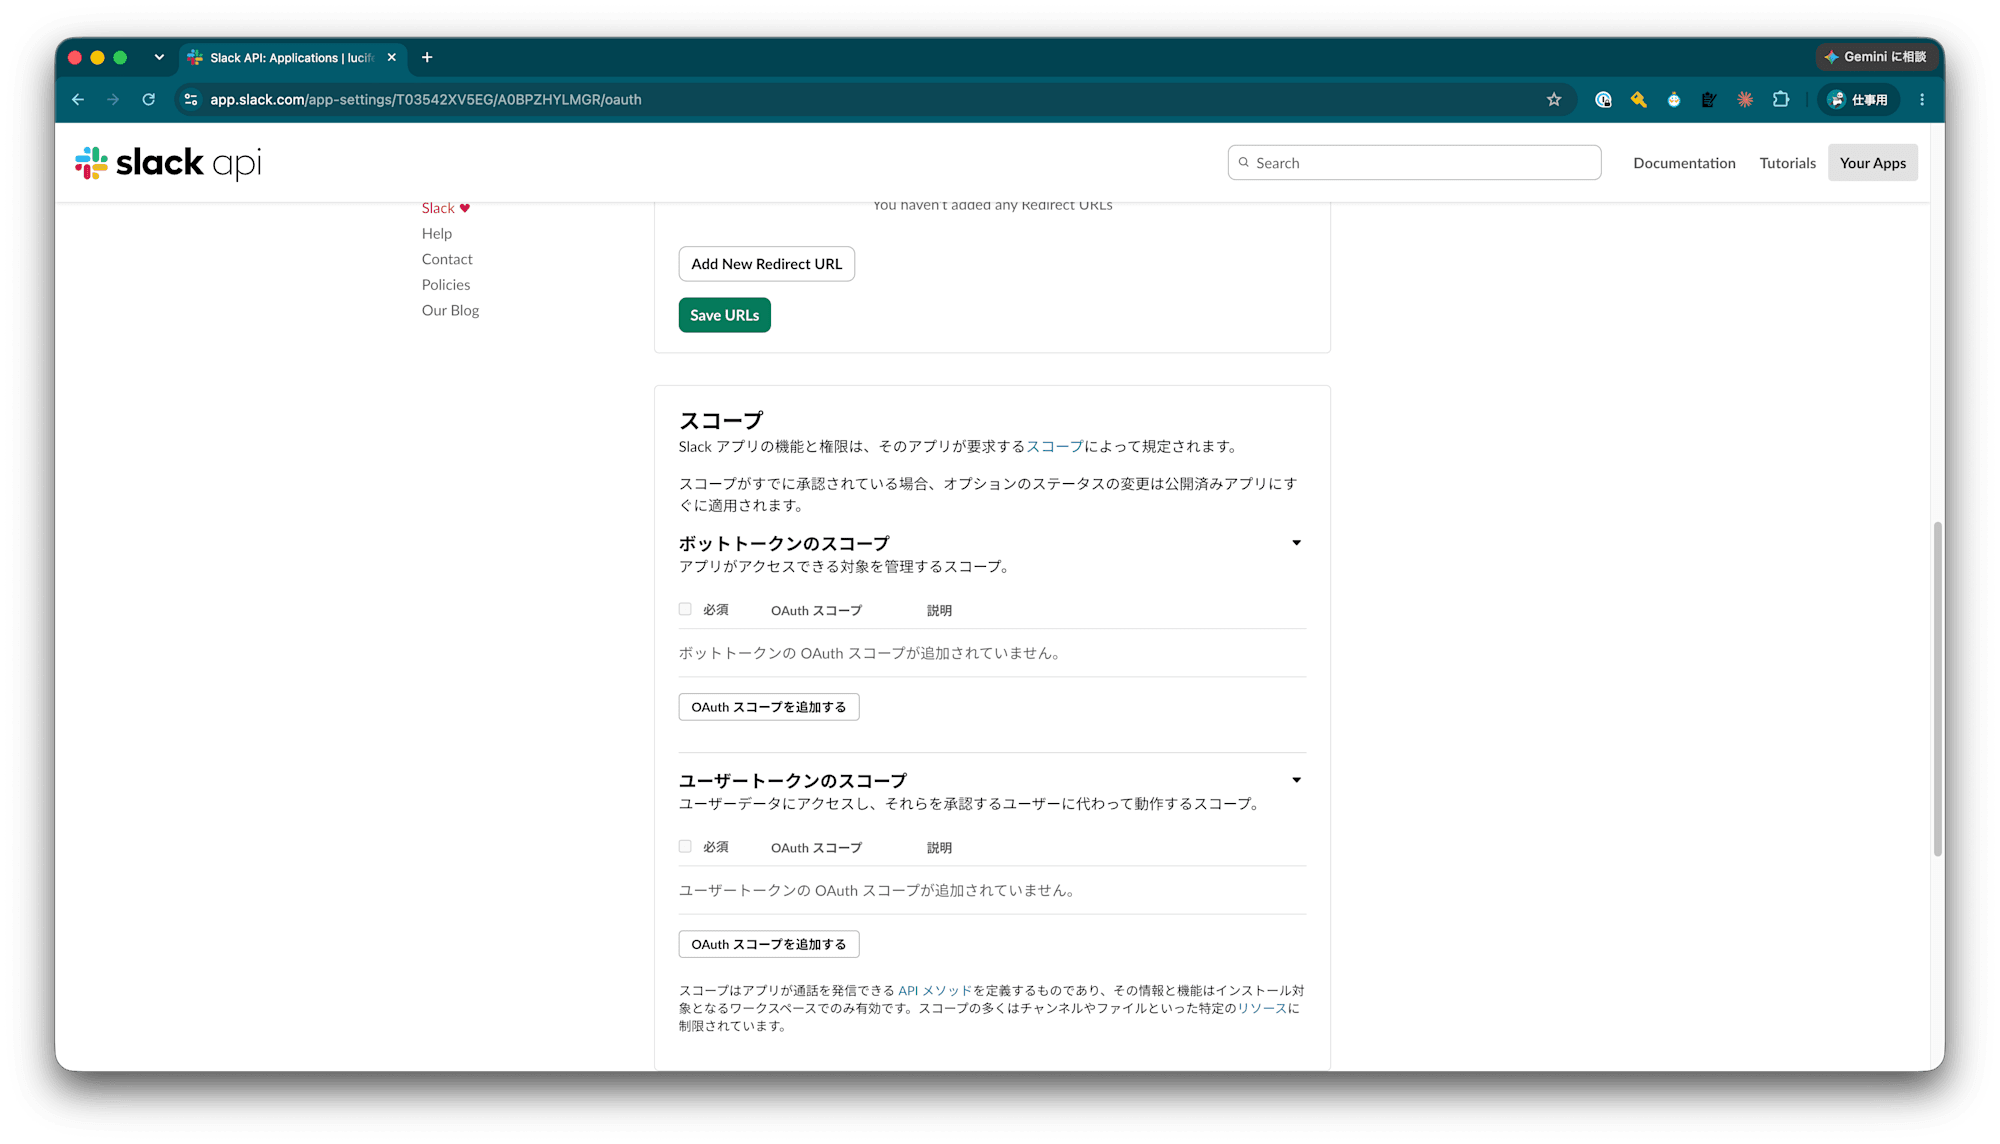
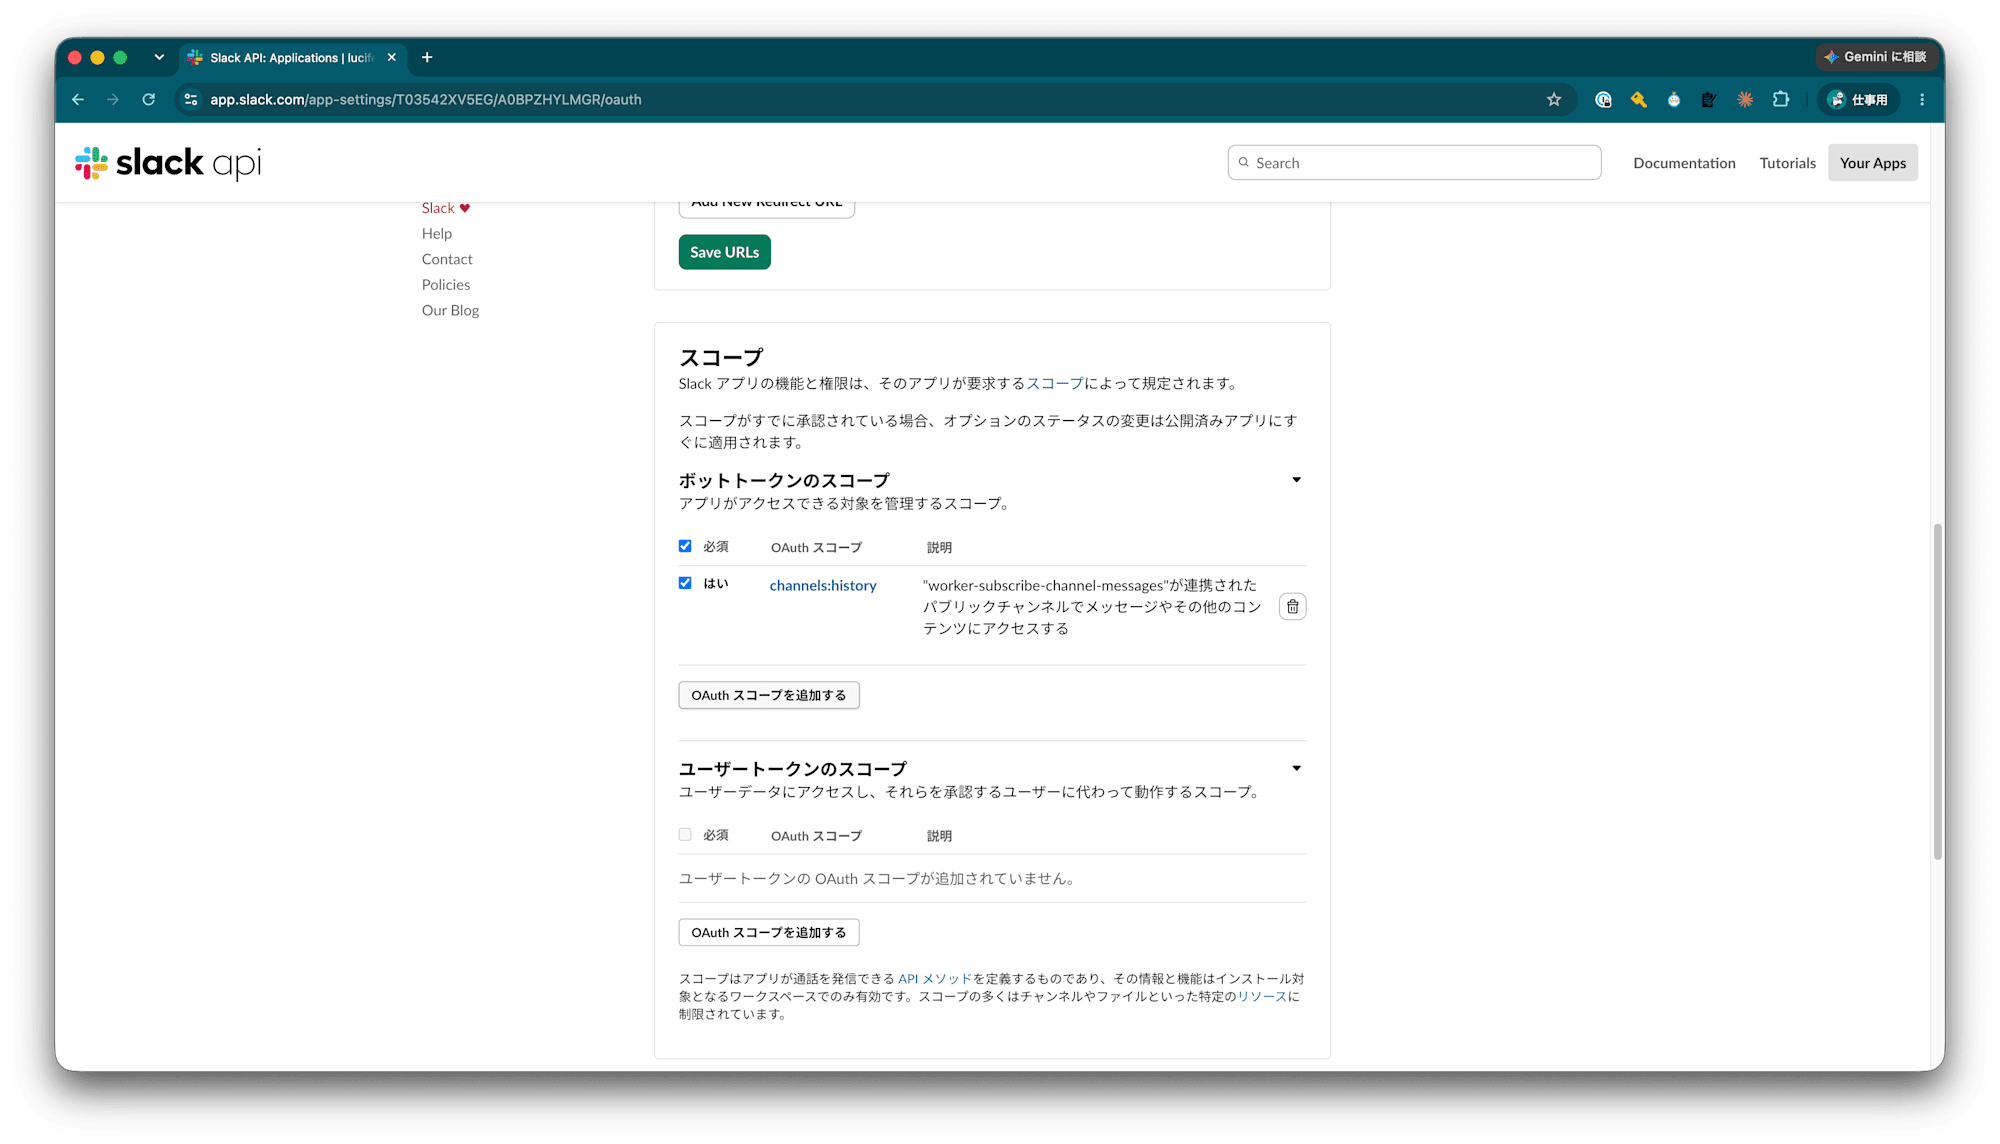
今回はチャンネルにメッセージが投稿されたことをサブスクライブしたいので channels:history をボット トークンのスコープに追加します。
上にスクロールすると、 OAuth Tokens に Install to xxxx (xxxx はSlack Workspaceの名前)というボタンが有効になっています。
(ここでは Install to luciferous-workspace という名前になっています)
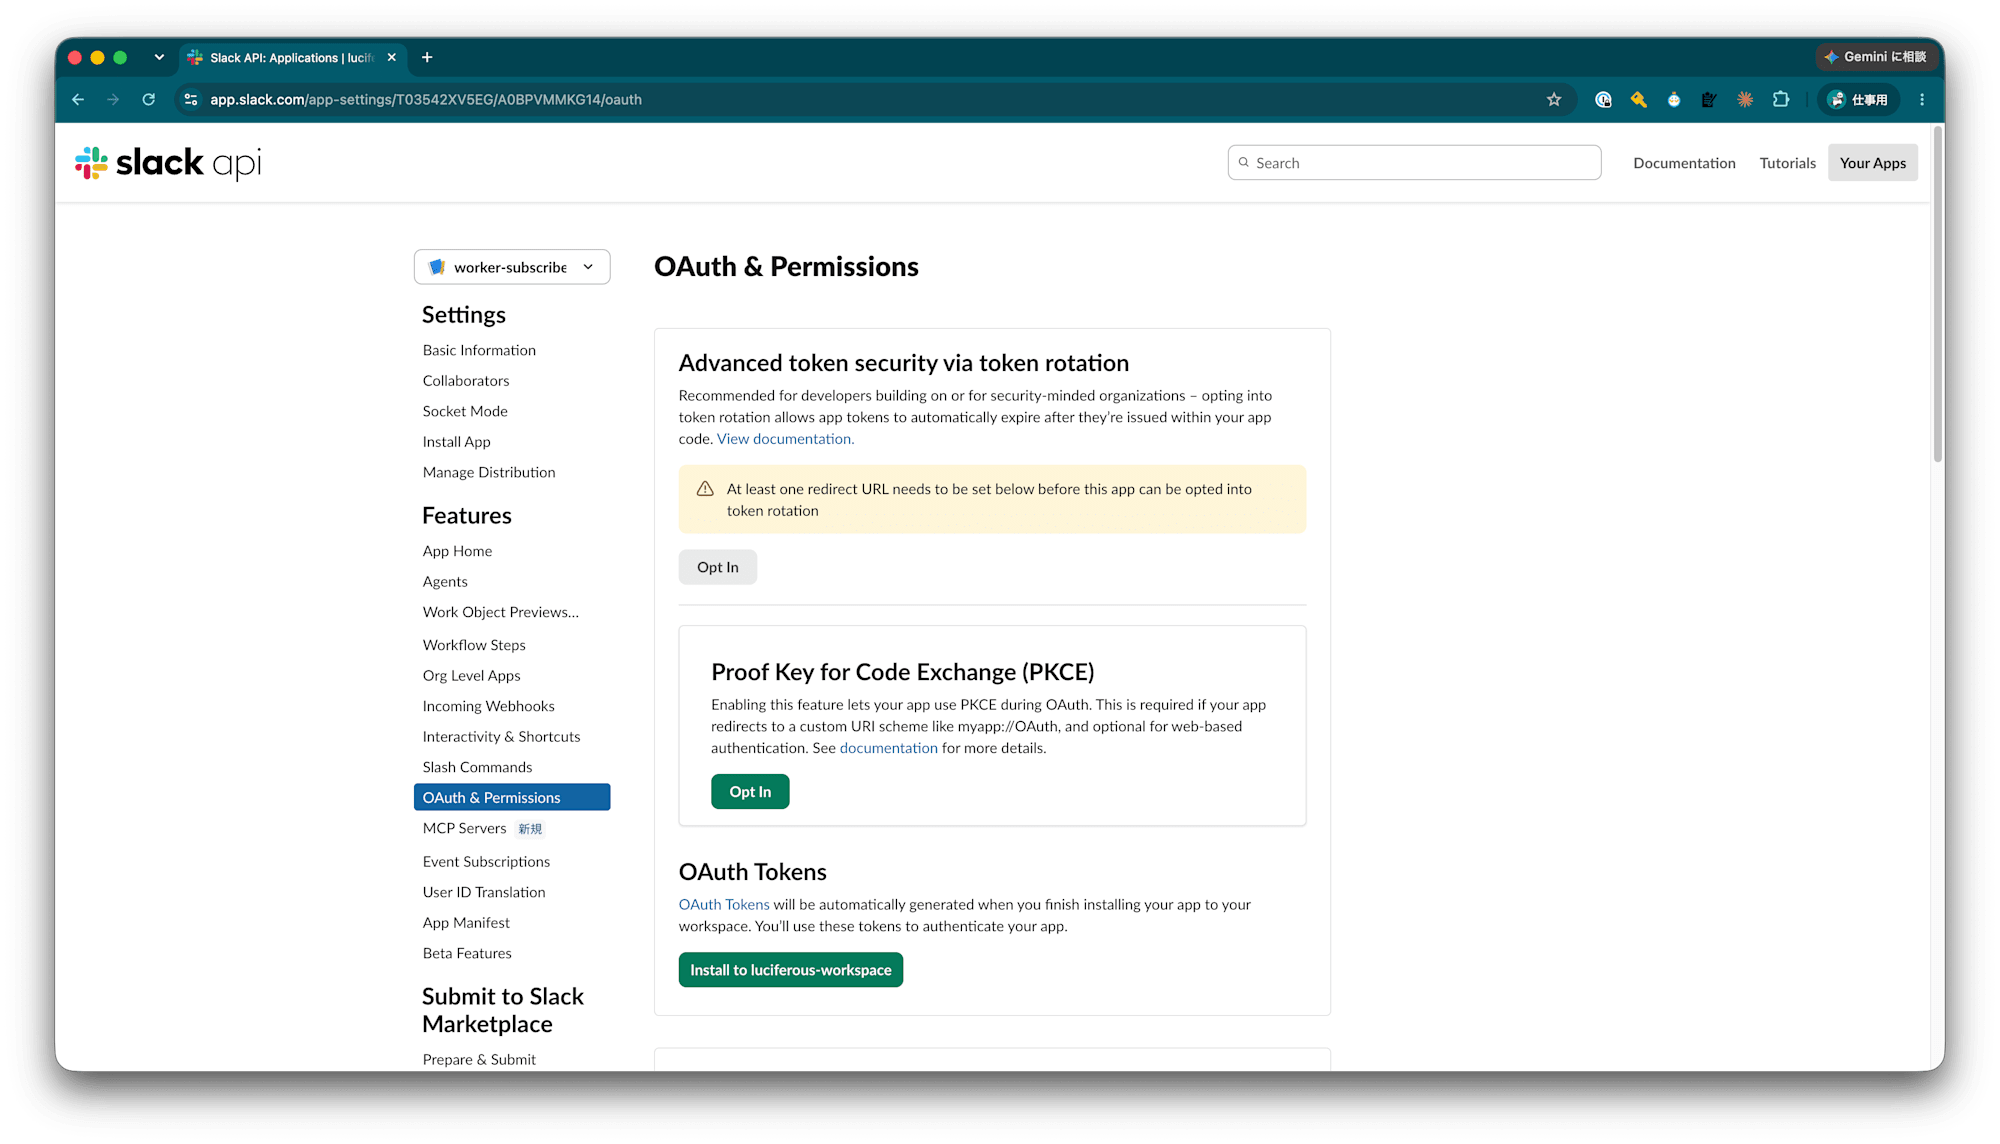
Install to luciferous-workspace をクリックします。
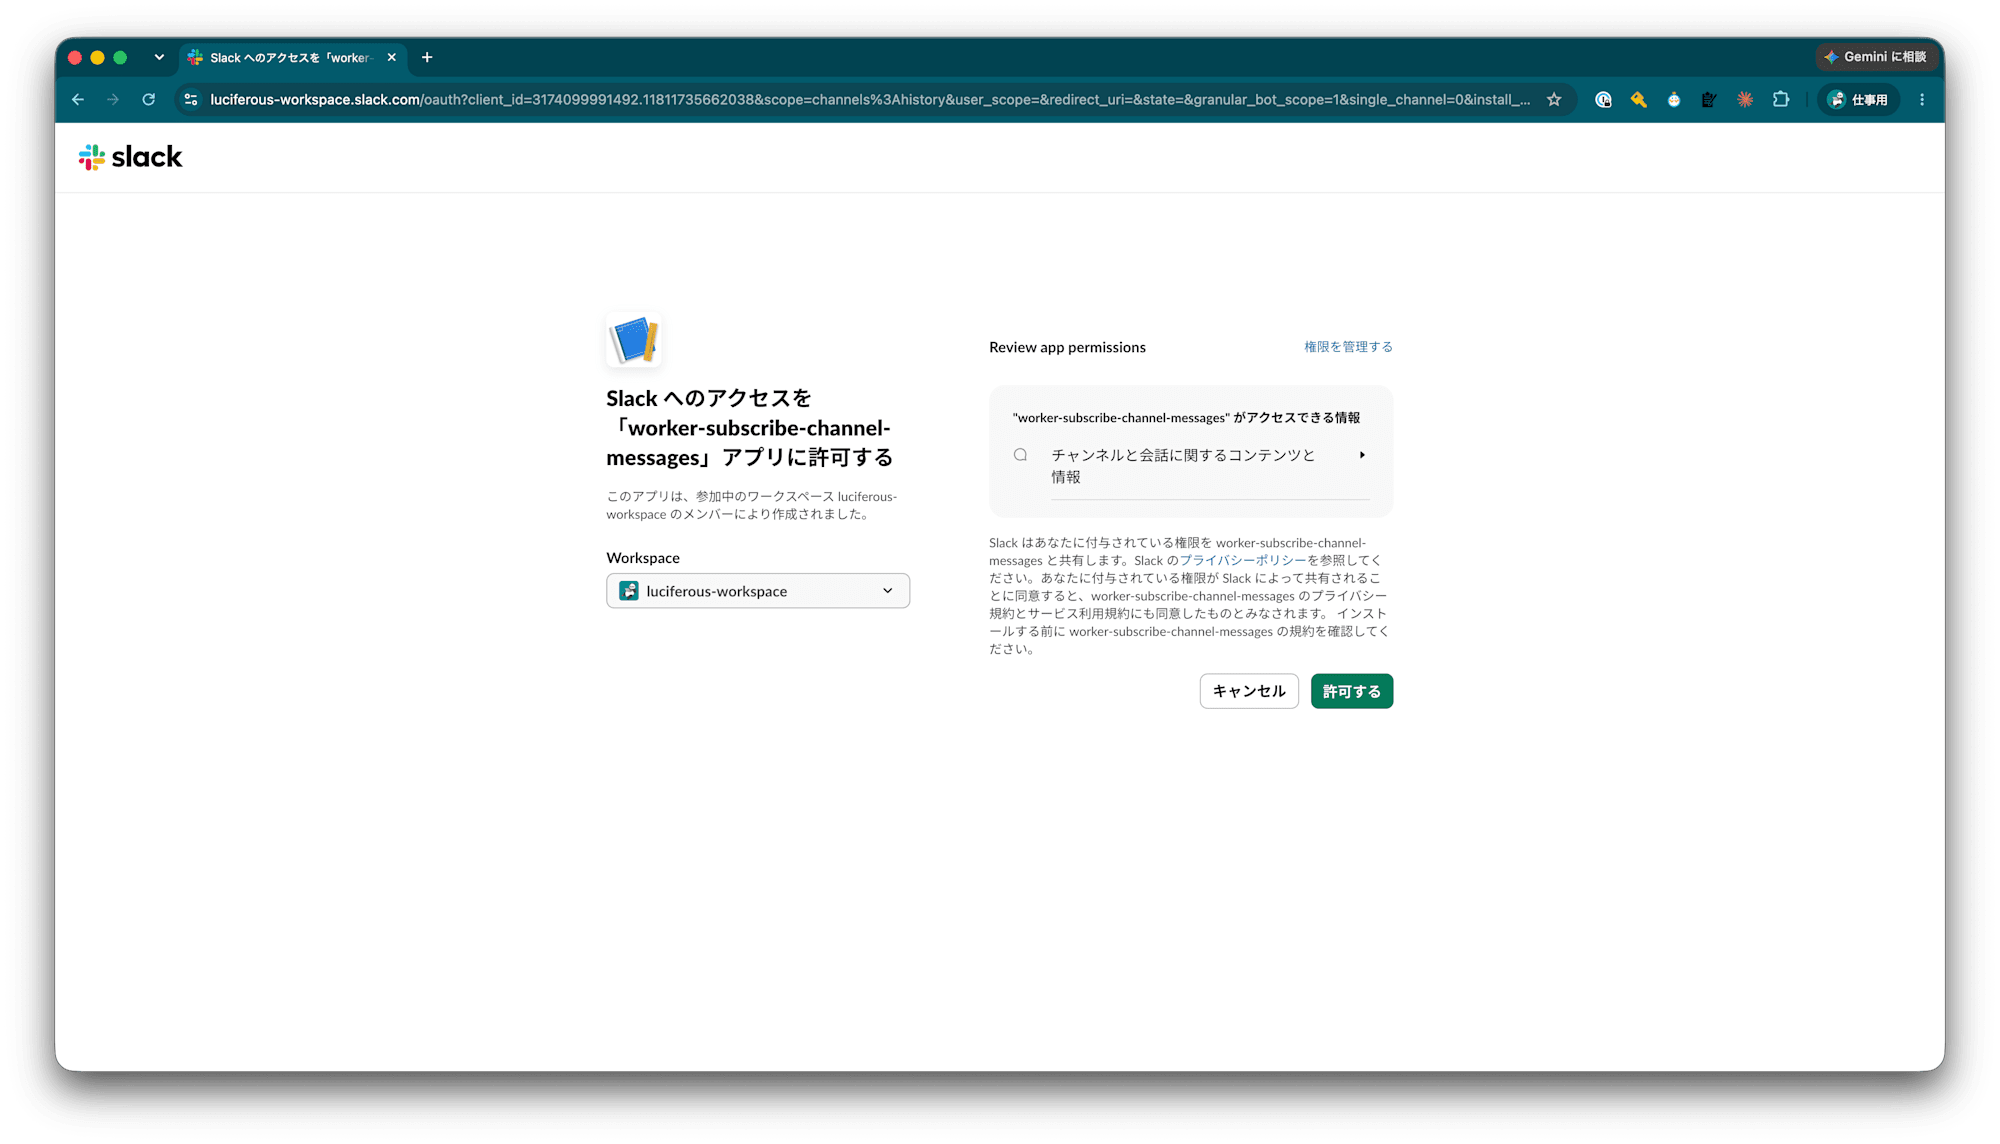
確認画面が表示されるので 許可する をクリックします。
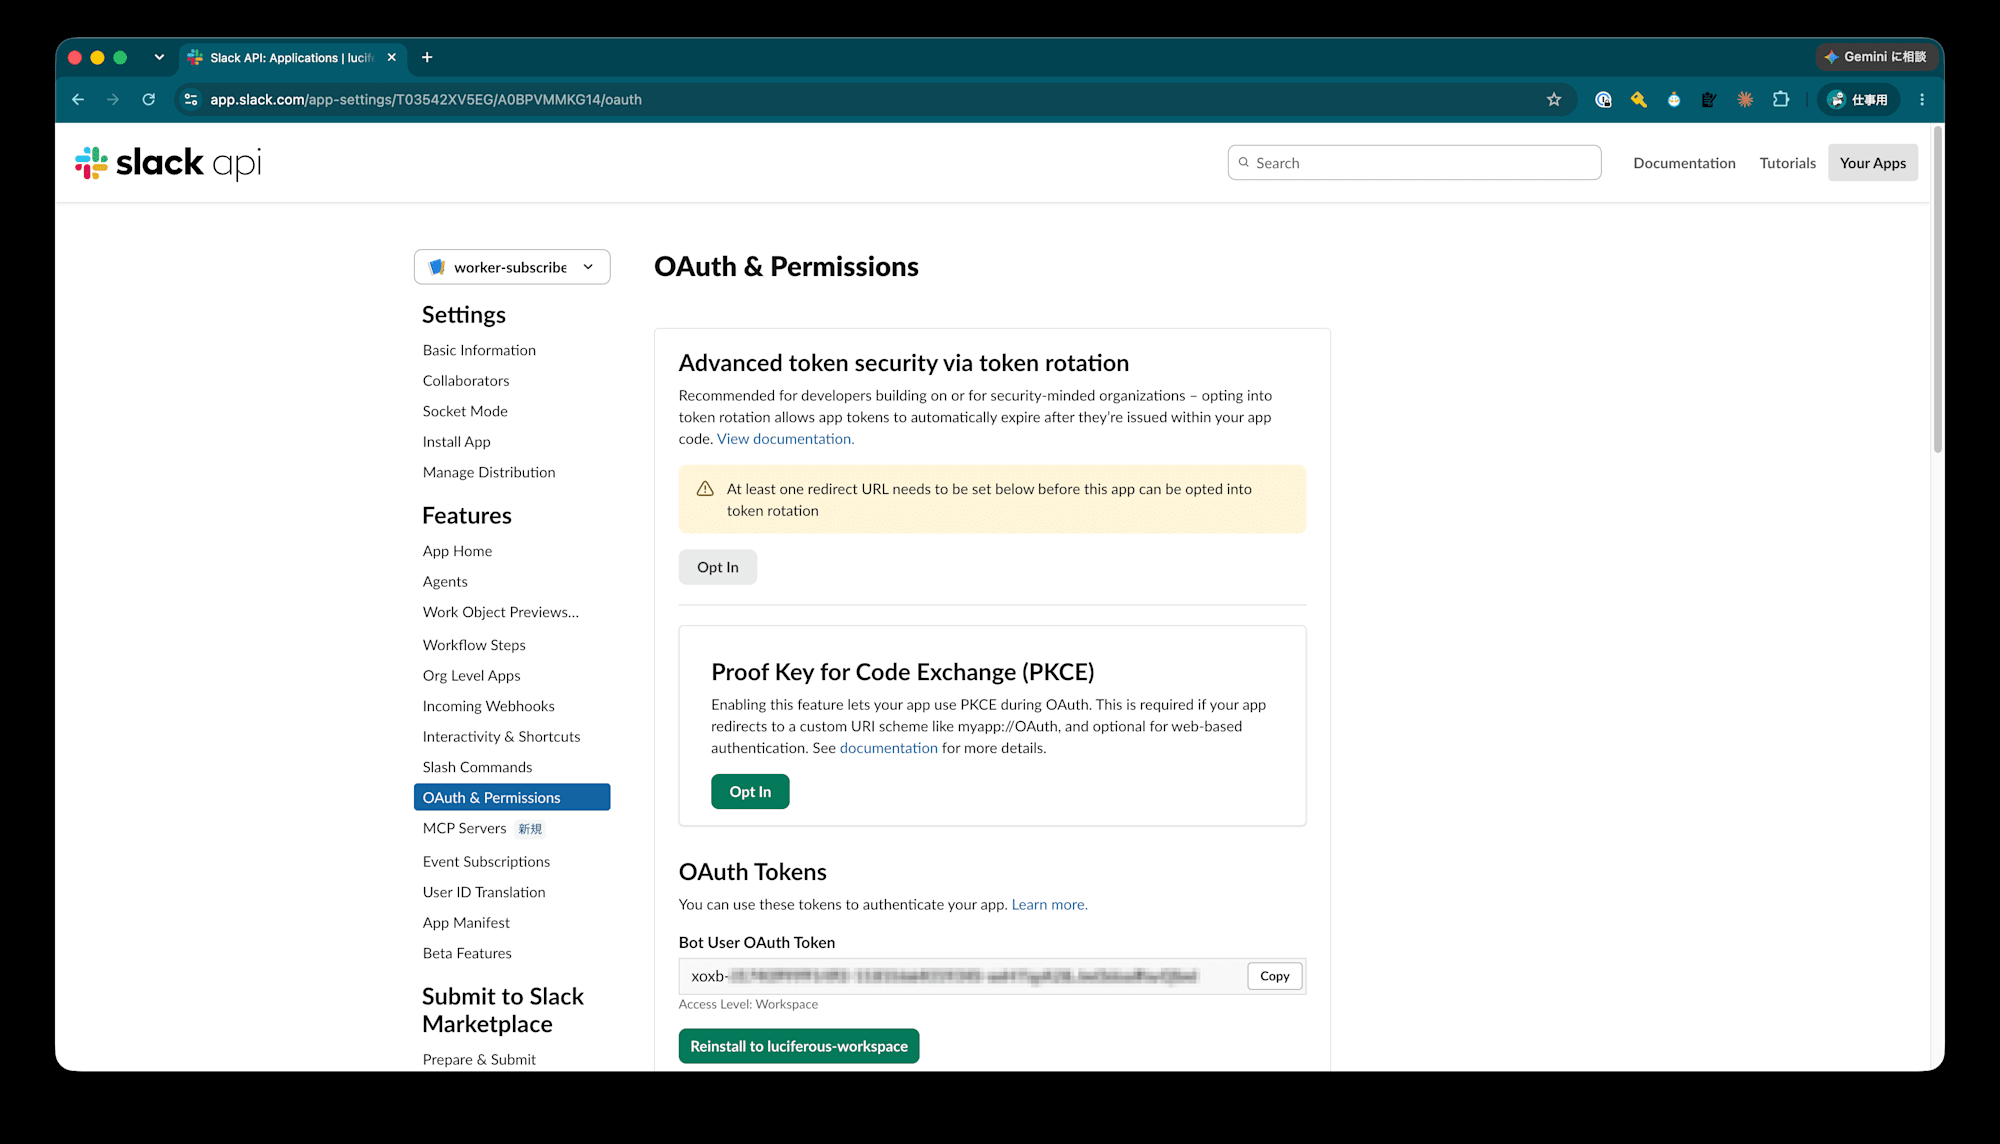
Slack Workspaceへのインストールが完了し、 Bot User OAuth Token が発行されています。
このトークンはまた後で使います。
2-3. Socket Modeをオフにする
今回はCloudflare WorkersのURLにリクエストを投げさせたいので Socket Modeはオフにする必要があります。
Settings -> Socket Mode を開きます。
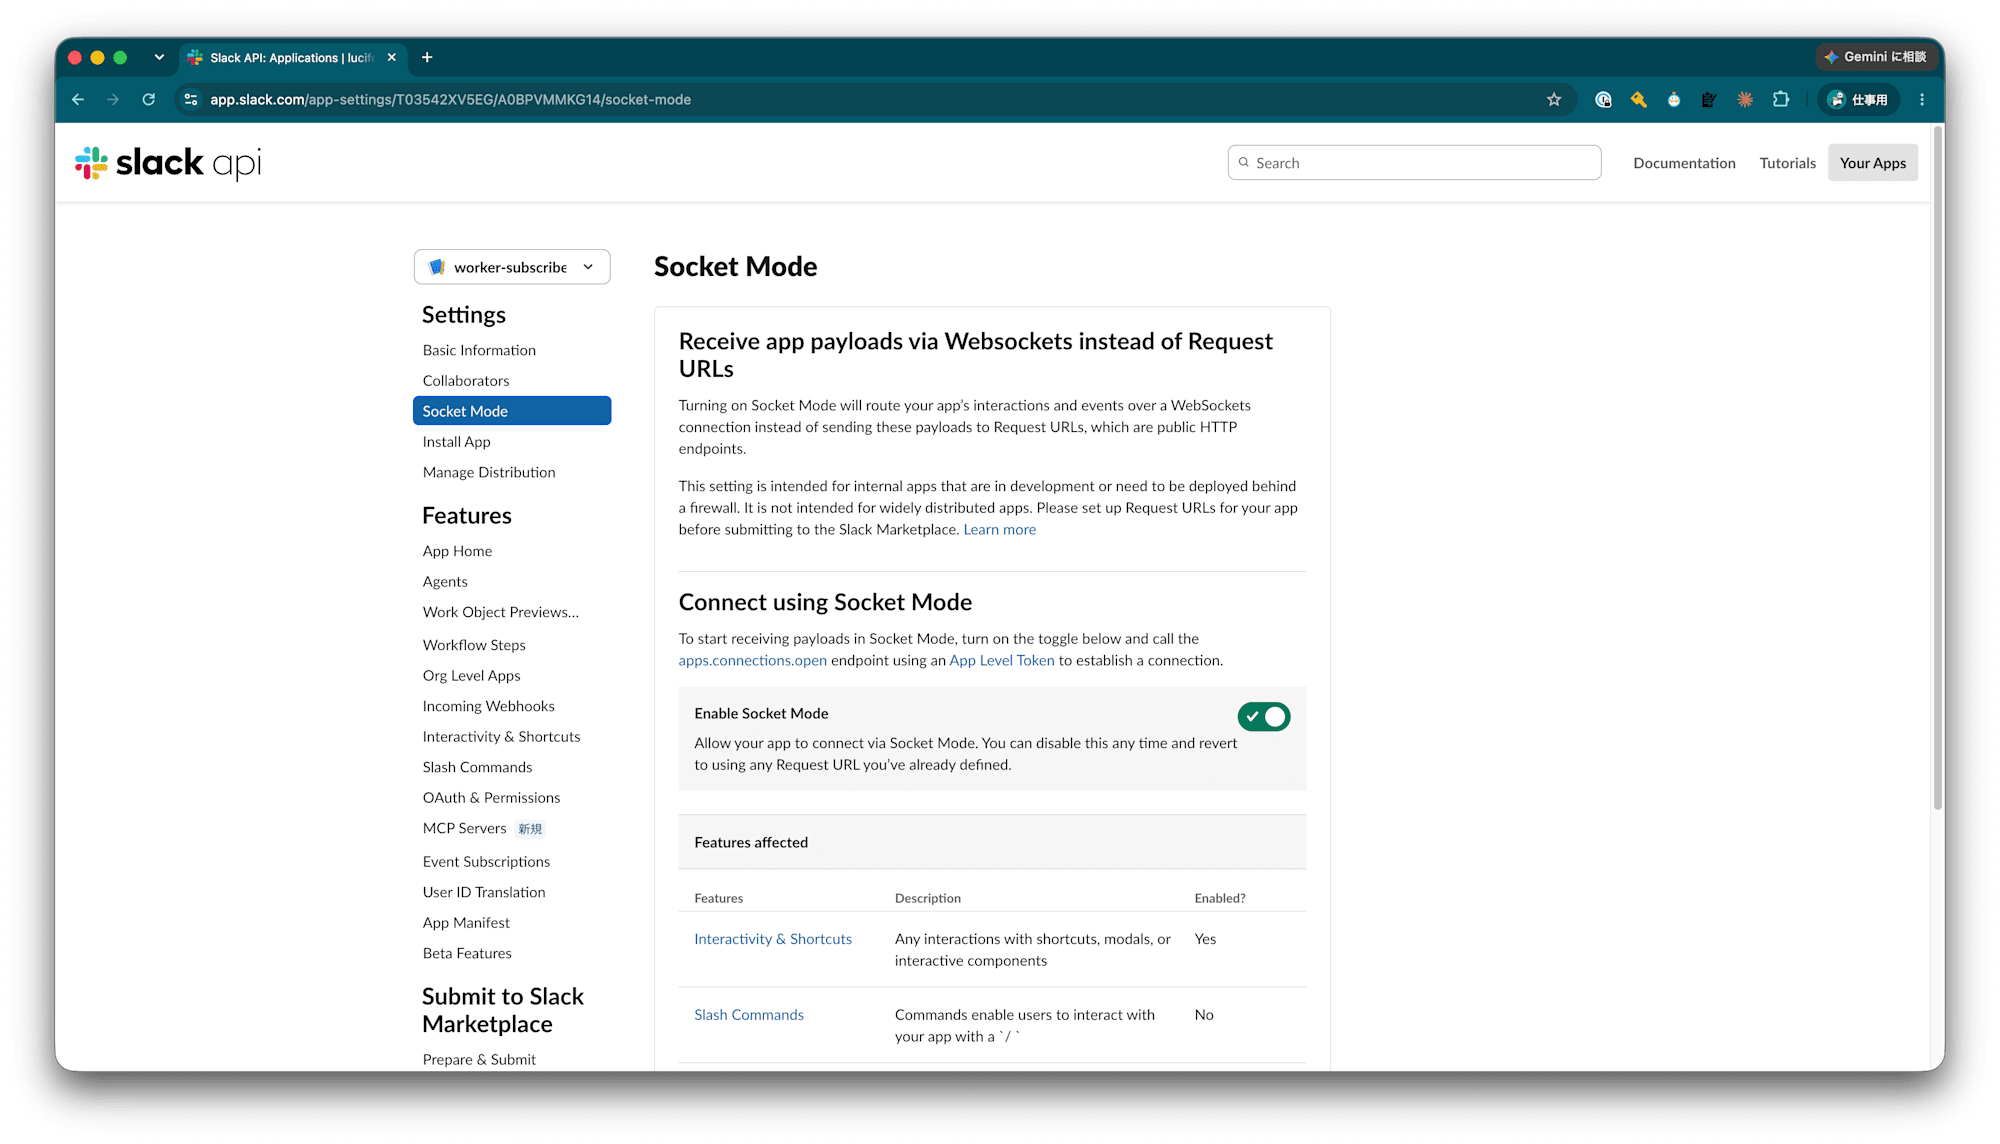
Enable Socket Mode のトグルがオン (緑) になっていたら、クリックしてオフにします。
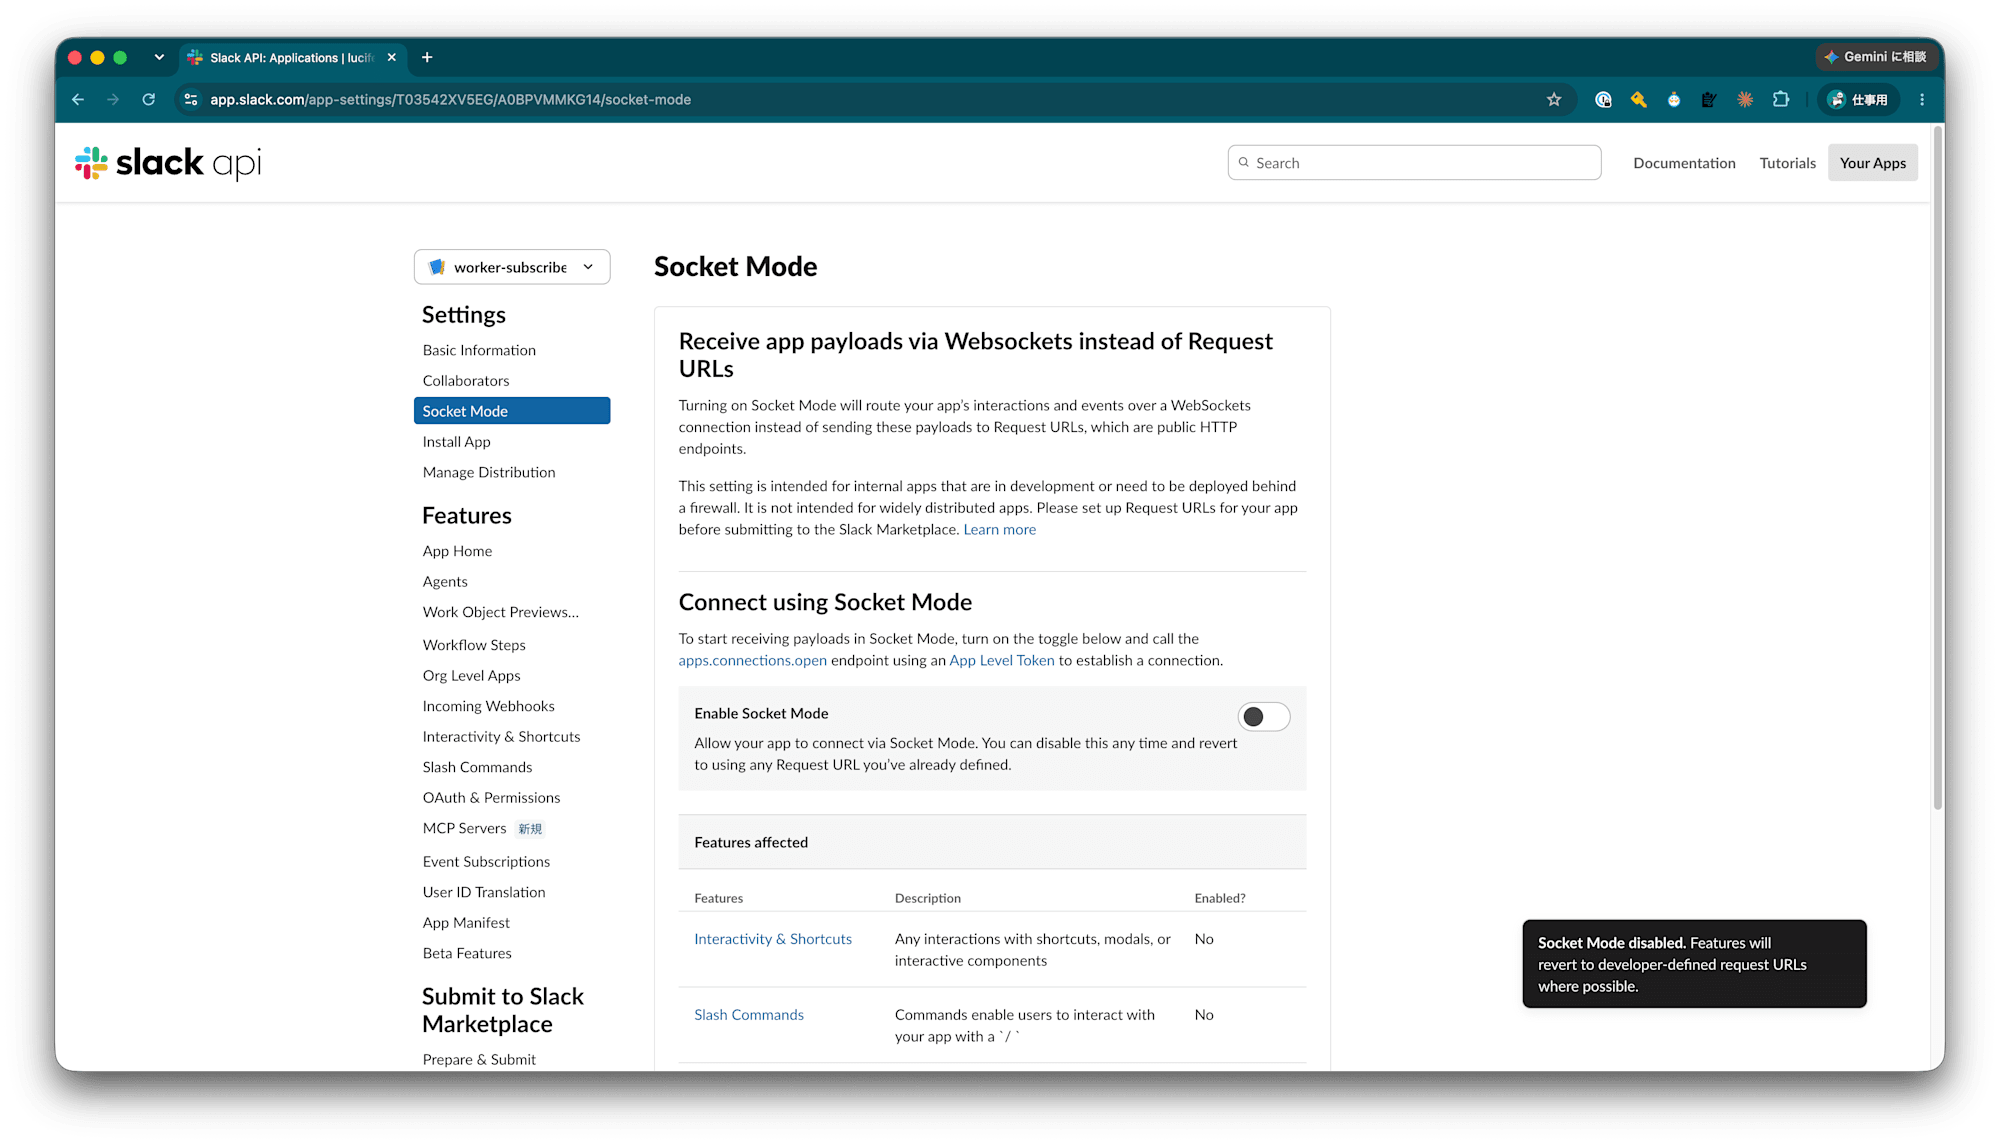
Socket Modeがオフになりました。
3. WorkerのSecretを設定し、コードを更新する
Slack Appの準備ができたので、Secretを設定し、コードを実装します。
3-1. SLACK_BOT_USER_OAUTH_TOKEN をSecretに設定する
先ほどスコープを設定したときに生成されたトークンをSecretに設定します。
$ npx wrangler secret put SLACK_BOT_USER_OAUTH_TOKEN
npm notice run worker-subscribe-channel-messages@0.0.0 npx
npm notice run 'wrangler' secret put SLACK_BOT_USER_OAUTH_TOKEN

 ⛅ wrangler 4.122.0
────────────────────
✔ Enter a secret value: … **********************************************************
🌀 Creating the secret for the Worker "worker-subscribe-channel-messages"
✨ Success! Uploaded secret SLACK_BOT_USER_OAUTH_TOKEN
3-2. SLACK_SIGNING_SECRET をSecretに設定する
Slackからのリクエストか署名検証するのに使用するSigning Secretを Secretに設定します。
Settings -> Basic Information を開きます。
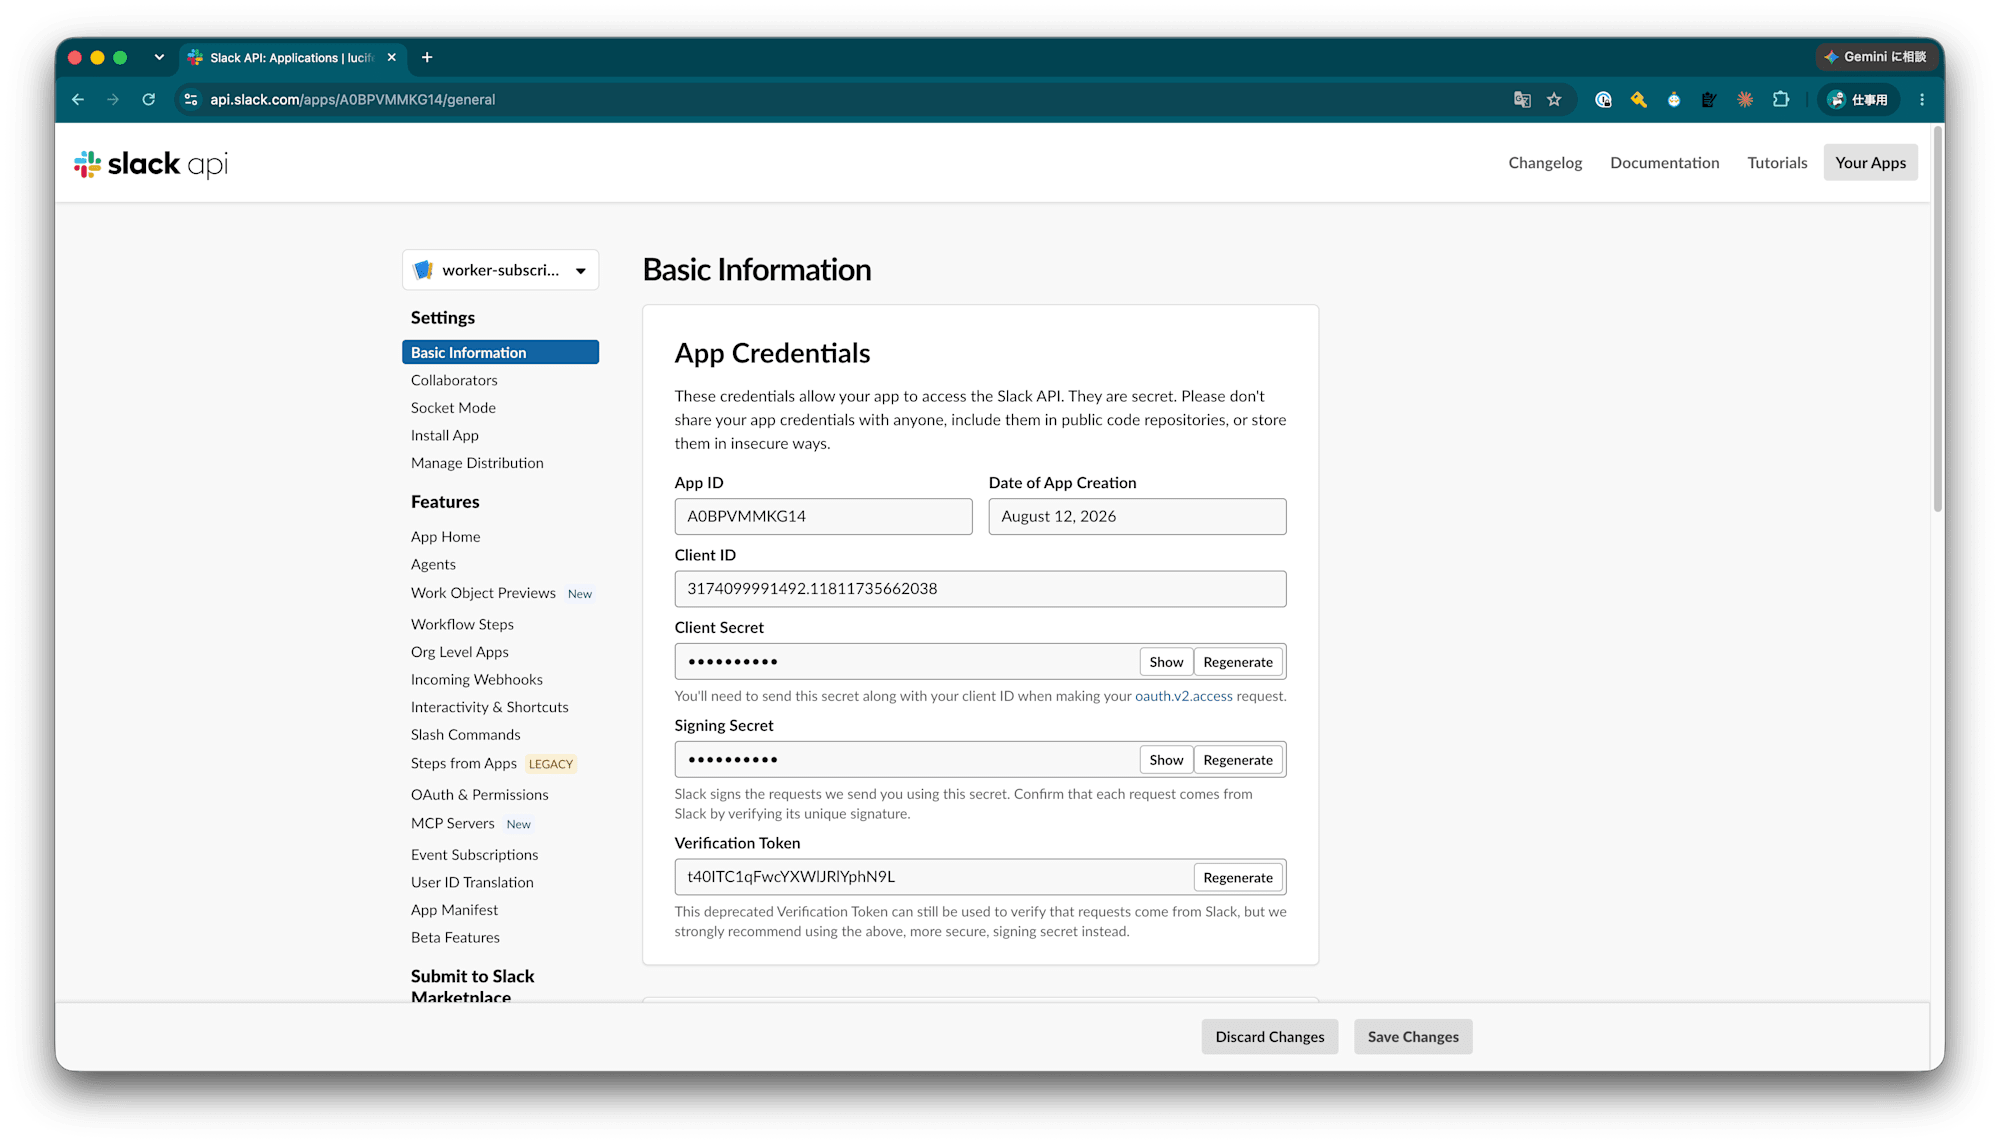
Signing Secret の Show ボタンをクリックすると値が表示されます。
この値を先ほどと同様にSecretに保存します。
$ npx wrangler secret put SLACK_SIGNING_SECRET
npm notice run worker-subscribe-channel-messages@0.0.0 npx
npm notice run 'wrangler' secret put SLACK_SIGNING_SECRET

 ⛅ wrangler 4.122.0
────────────────────
✔ Enter a secret value: … ********************************
🌀 Creating the secret for the Worker "worker-subscribe-channel-messages"
✨ Success! Uploaded secret SLACK_SIGNING_SECRET
3-3. wrangler.jsoncに必要なSecretを列挙し、型定義ファイルを再生成する
{
  "$schema": "node_modules/wrangler/config-schema.json",
  "name": "worker-subscribe-channel-messages",
  "main": "src/index.ts",
  "compatibility_date": "2026-08-13",
  "observability": {
    "enabled": true
  },
  "upload_source_maps": true,
  "workers_dev": true,
  "preview_urls": false,
  "secrets": {
    "required": ["SLACK_BOT_USER_OAUTH_TOKEN", "SLACK_SIGNING_SECRET"]
  }
}
末尾に secrets を追加します。
wrangler.jsoncに secrets.required があるとき、ここに列挙されたSecretがないとデプロイが失敗するようになります。
また、npm run cf-typegen をすると、 Env という型に列挙したSecretにアクセスするための型定義が追加されます。
$ npm run cf-typegen
interface __BaseEnv_Env {
  SLACK_BOT_USER_OAUTH_TOKEN: string;
  SLACK_SIGNING_SECRET: string;
}
declare namespace Cloudflare {
  interface GlobalProps {
    mainModule: typeof import("./src/index");
  }
  interface Env extends __BaseEnv_Env {}
}
interface Env extends __BaseEnv_Env {}
これで設定したSecretの型定義もできました。
3-4. index.tsを実装する
最初に slack-edge をインストールします。
$ npm install slack-edge
次にWorker用のコードを修正します。
import { SlackApp, SlackEdgeAppEnv } from "slack-edge";

export default {
  async fetch(request, env: Env, ctx): Promise<Response> {
    const slackEnv: SlackEdgeAppEnv = {
      SLACK_SIGNING_SECRET: env.SLACK_SIGNING_SECRET,
      SLACK_BOT_TOKEN: env.SLACK_BOT_USER_OAUTH_TOKEN,
      SLACK_LOGGING_LEVEL: "DEBUG",
    };

    const app = new SlackApp({
      env: slackEnv,
    }).event("message", async ({ payload }) => {
      console.debug({ message: "message event payload", payload });
    });

    return await app.run(request, ctx);
  },
} satisfies ExportedHandler<Env>;
コードを修正したらデプロイします。
$ npm run deploy
npm notice run worker-subscribe-channel-messages@0.0.0 deploy
npm notice run npm run cf-typegen && wrangler deploy
npm notice run worker-subscribe-channel-messages@0.0.0 cf-typegen
npm notice run wrangler types

 ⛅ wrangler 4.122.0
────────────────────
Generating project types...

interface __BaseEnv_Env {
        SLACK_BOT_USER_OAUTH_TOKEN: string;
        SLACK_SIGNING_SECRET: string;
}
declare namespace Cloudflare {
        interface GlobalProps {
                mainModule: typeof import("./src/index");
        }
        interface Env extends __BaseEnv_Env {}
}
interface Env extends __BaseEnv_Env {}
type StringifyValues<EnvType extends Record<string, unknown>> = {
        [Binding in keyof EnvType]: EnvType[Binding] extends string ? EnvType[Binding] : string;
};
declare namespace NodeJS {
        interface ProcessEnv extends StringifyValues<Pick<Cloudflare.Env, "SLACK_BOT_USER_OAUTH_TOKEN" | "SLACK_SIGNING_SECRET">> {}
}

Generating runtime types...

Runtime types generated.

────────────────────────────────────────────────────────────
✨ Types written to worker-configuration.d.ts

📖 Read about runtime types
https://developers.cloudflare.com/workers/languages/typescript/#generate-types
📣 Remember to rerun 'wrangler types' after you change your wrangler.jsonc file.

 ⛅ wrangler 4.122.0
────────────────────
Total Upload: 178.51 KiB / gzip: 27.67 KiB
Worker Startup Time: 7 ms
Uploaded worker-subscribe-channel-messages (2.57 sec)
Deployed worker-subscribe-channel-messages triggers (0.95 sec)
  https://worker-subscribe-channel-messages.luciferous.workers.dev
Current Version ID: e8dea3cf-38d8-408a-8569-a3fe426fb955
3-5. 備考: コードについて
slack-edge のREADMEに記載されているサンプルコードは次のようになっています。
import { SlackApp, SlackEdgeAppEnv } from "slack-cloudflare-workers";

export default {
  async fetch(
    request: Request,
    env: SlackEdgeAppEnv,
    ctx: ExecutionContext
  ): Promise<Response> {
    const app = new SlackApp({ env })
      .command("/hello-cf-workers",
        async (req) => {
          // sync handler, which is resposible to ack the request
          return ":wave: This app runs on Cloudflare Workers!";
          // If you don't have anything to do here, the function doesn't need to return anything
          // This means in that case, simply having `async () => {}` works for you
        },
        async ({ context: { respond } }) => {
          // Lazy listener, which can be executed asynchronously
          // You can do whatever may take longer than 3 seconds here
          await respond({ text: "This is an async reply. How are you doing?" });
        }
      );
    return await app.run(request, ctx);
  },
};
サンプルコードでは slack-edge で定義された SlackEdgeAppEnv をenvの型として使用しています。
SlackEdgeAppEnvで定義されている型に従ってSecretを設定しているときにはこちらのコードで構いません。
しかし、この書き方では npm run cf-typegen によるEnvの自動生成の恩恵を受けることができません。
そのため、自分の作成したコードでは自動生成したEnvをenvの型として扱い、 SlackAppクラスのPropsのenv に渡すようにしています。
4. Slack AppにEvent Subscriptionsの設定を行う
Workerの準備ができたのでSlack AppにEvent Subscriptionの設定を行います。
4-1. Event SubscriptionsにURLを設定し、サブスクライブするイベントを指定する
Features -> Event Subscriptions を開きます。
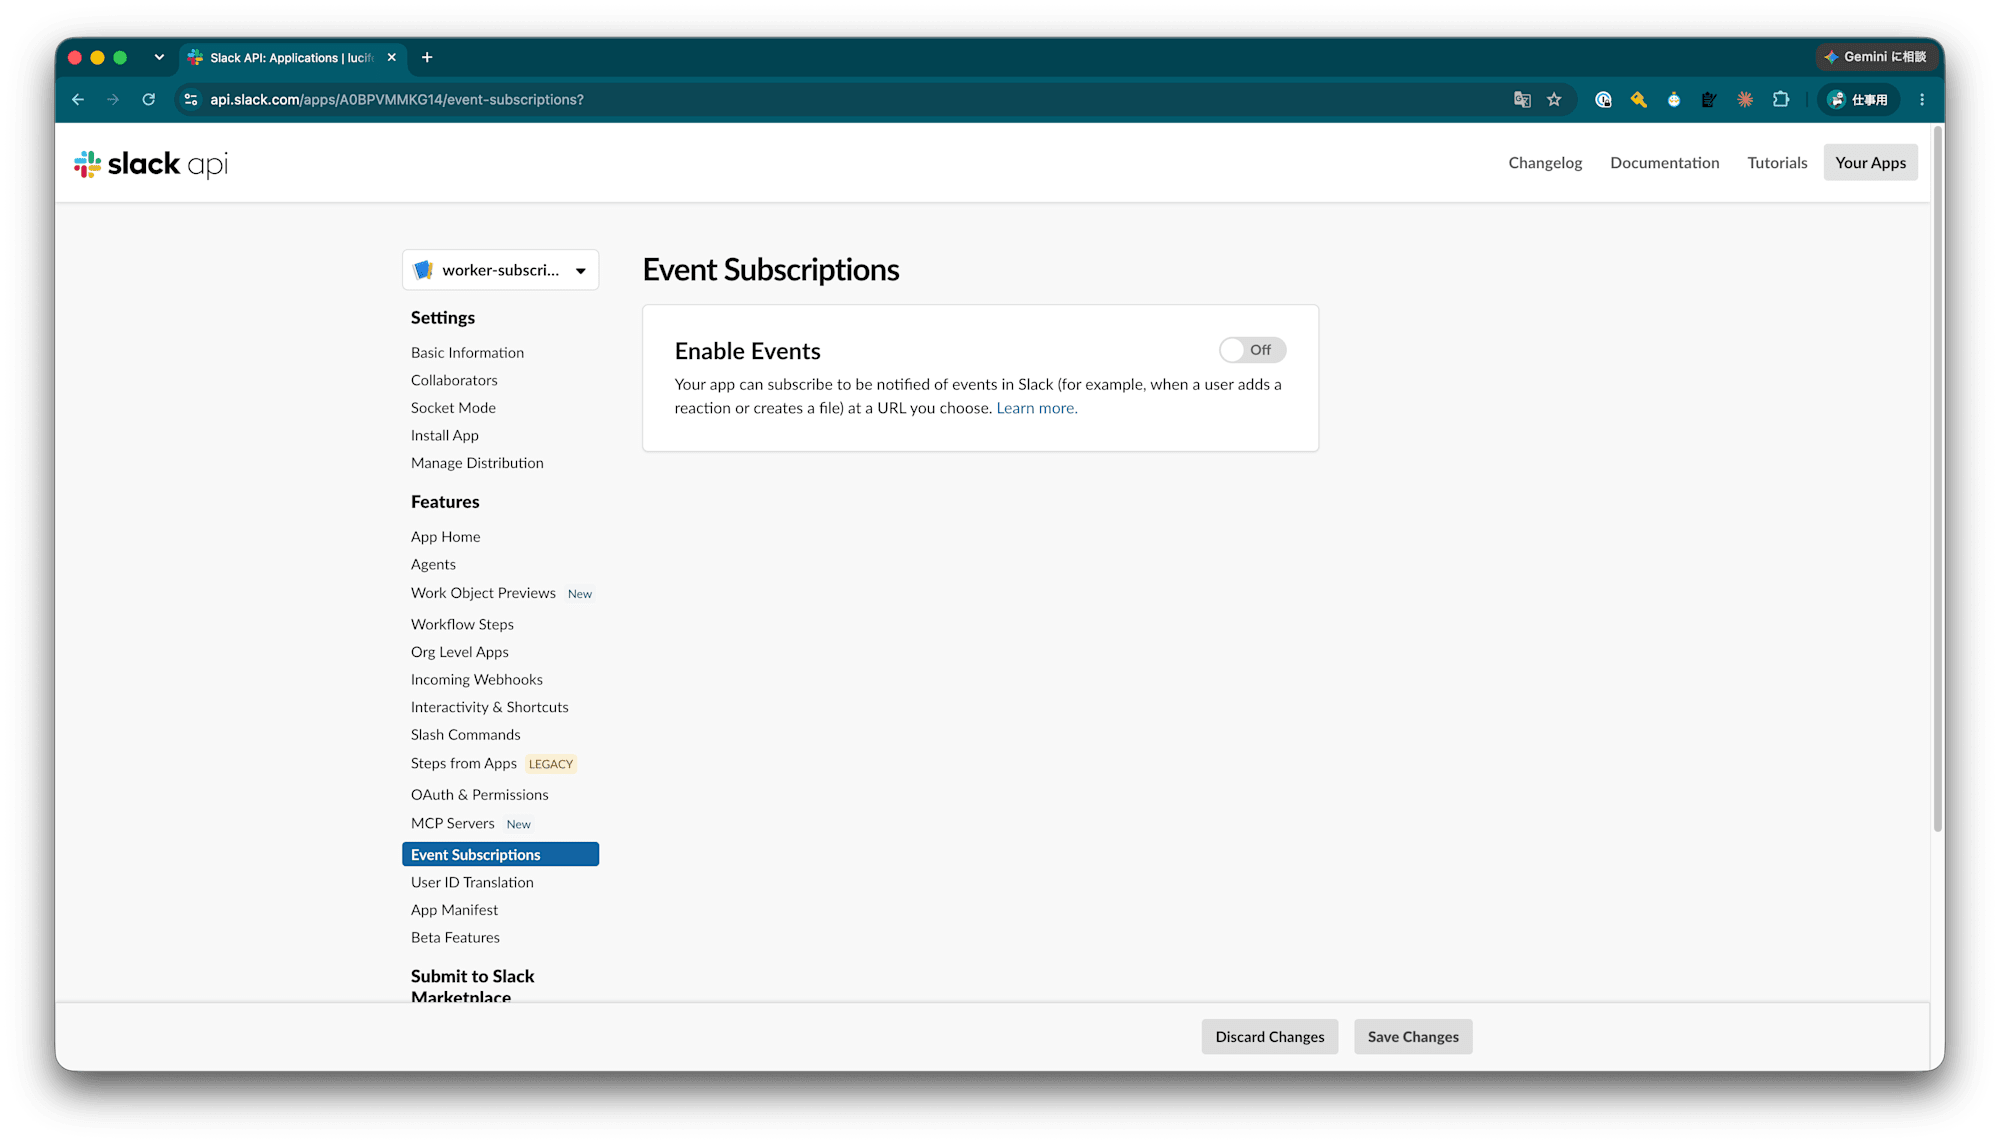
Enable Events のトグルボタンをクリックし、Onにします。
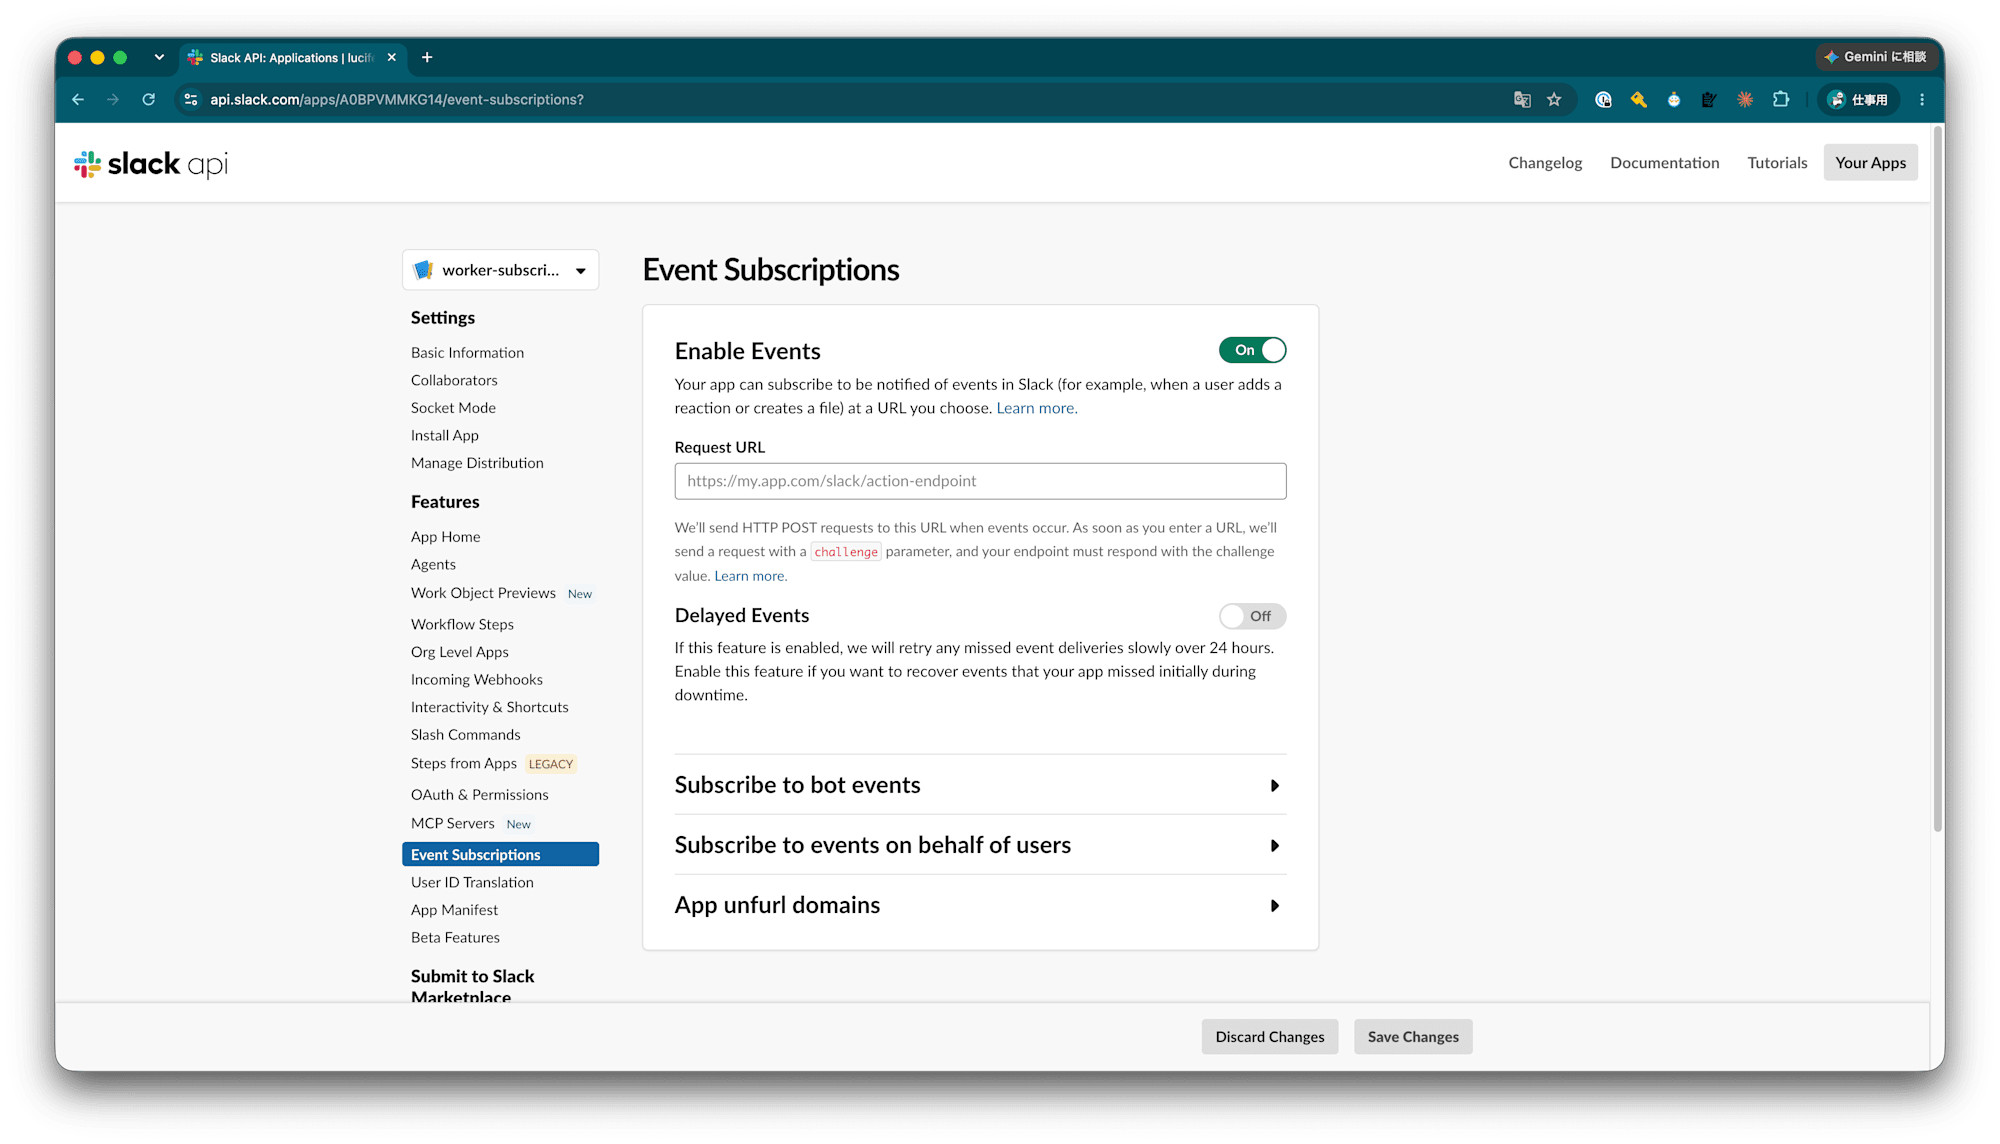
Request URL にWorkerのURLを入力します。
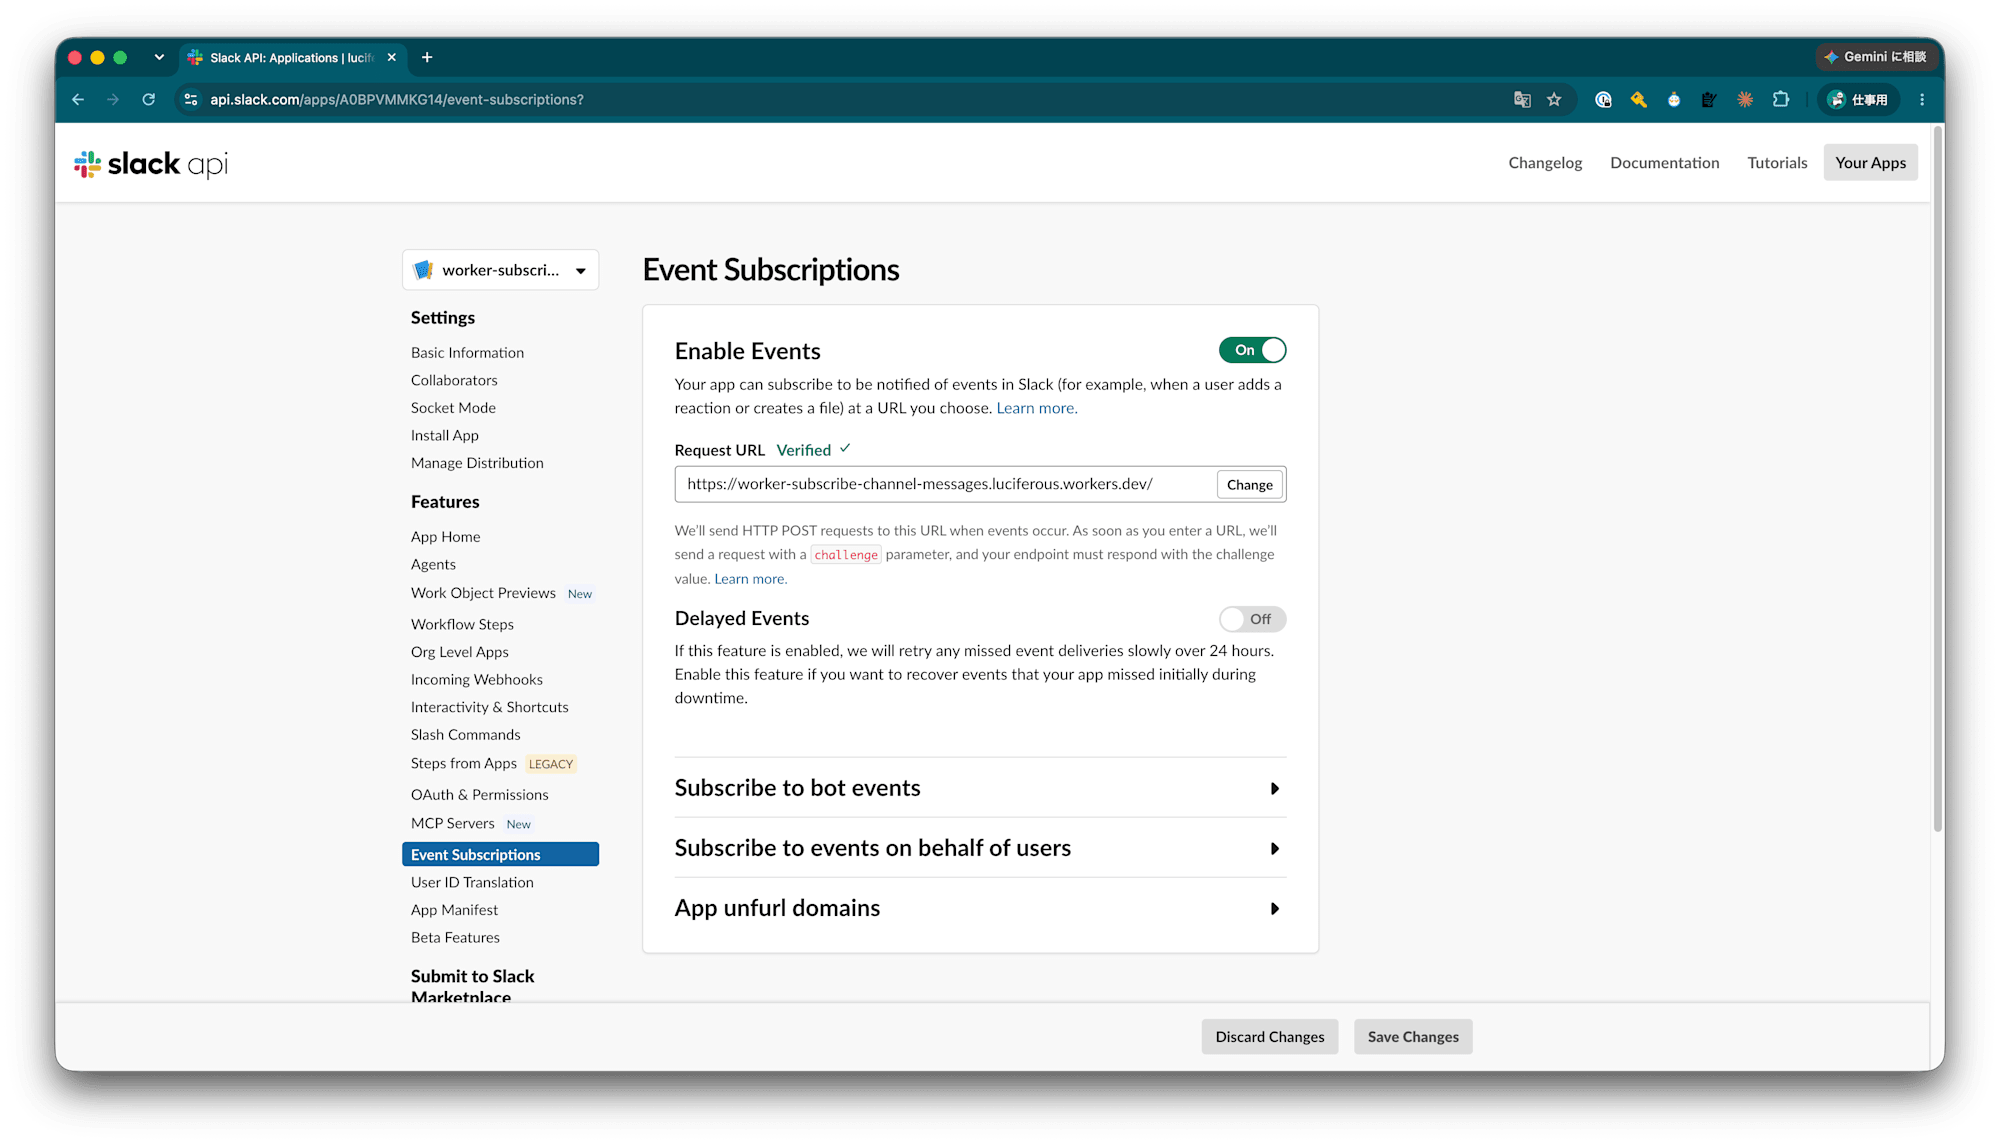
WorkerのコードとSecretを設定しているので Verified となります。
Subscribe to bot events をクリックします。
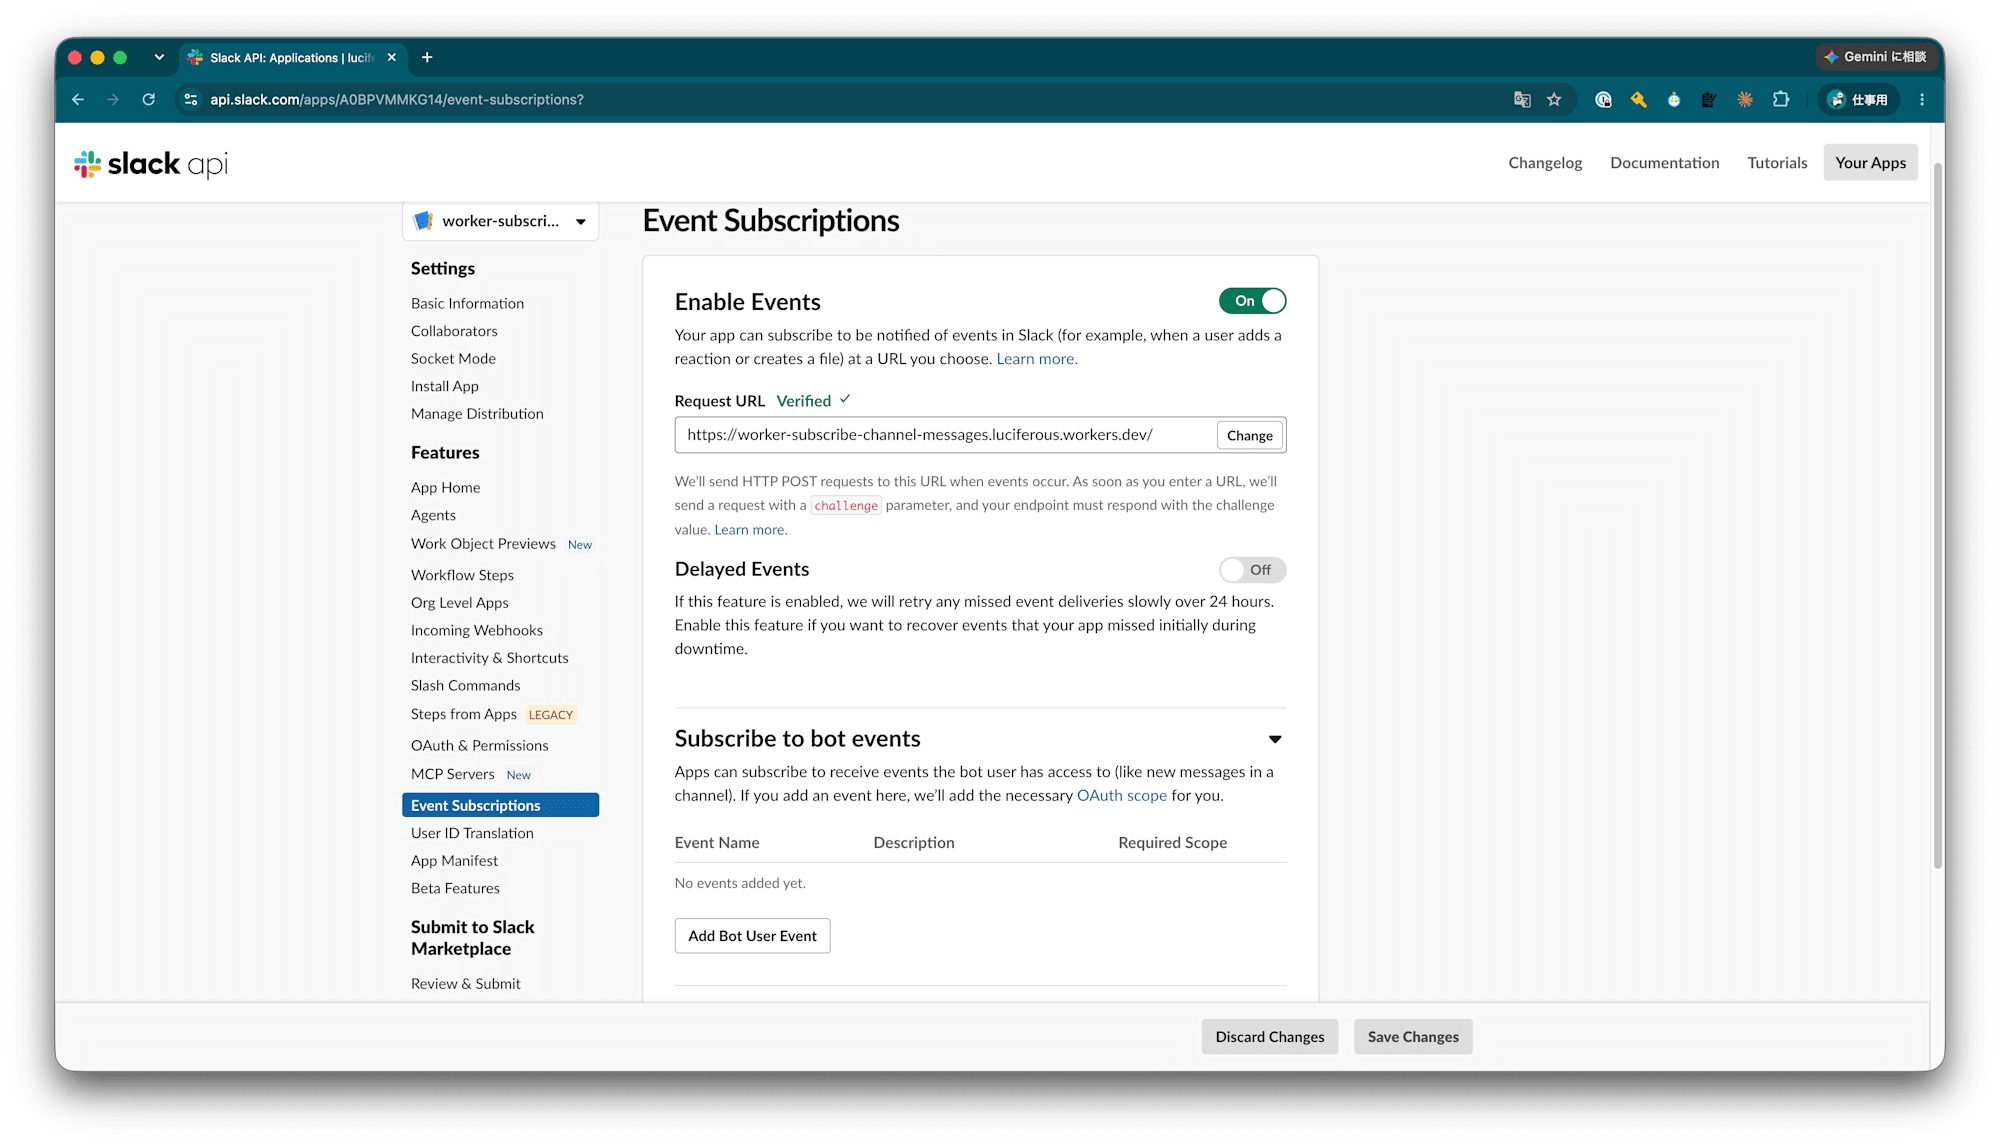
Add Bot User Event をクリックし、 message.channels を追加します。
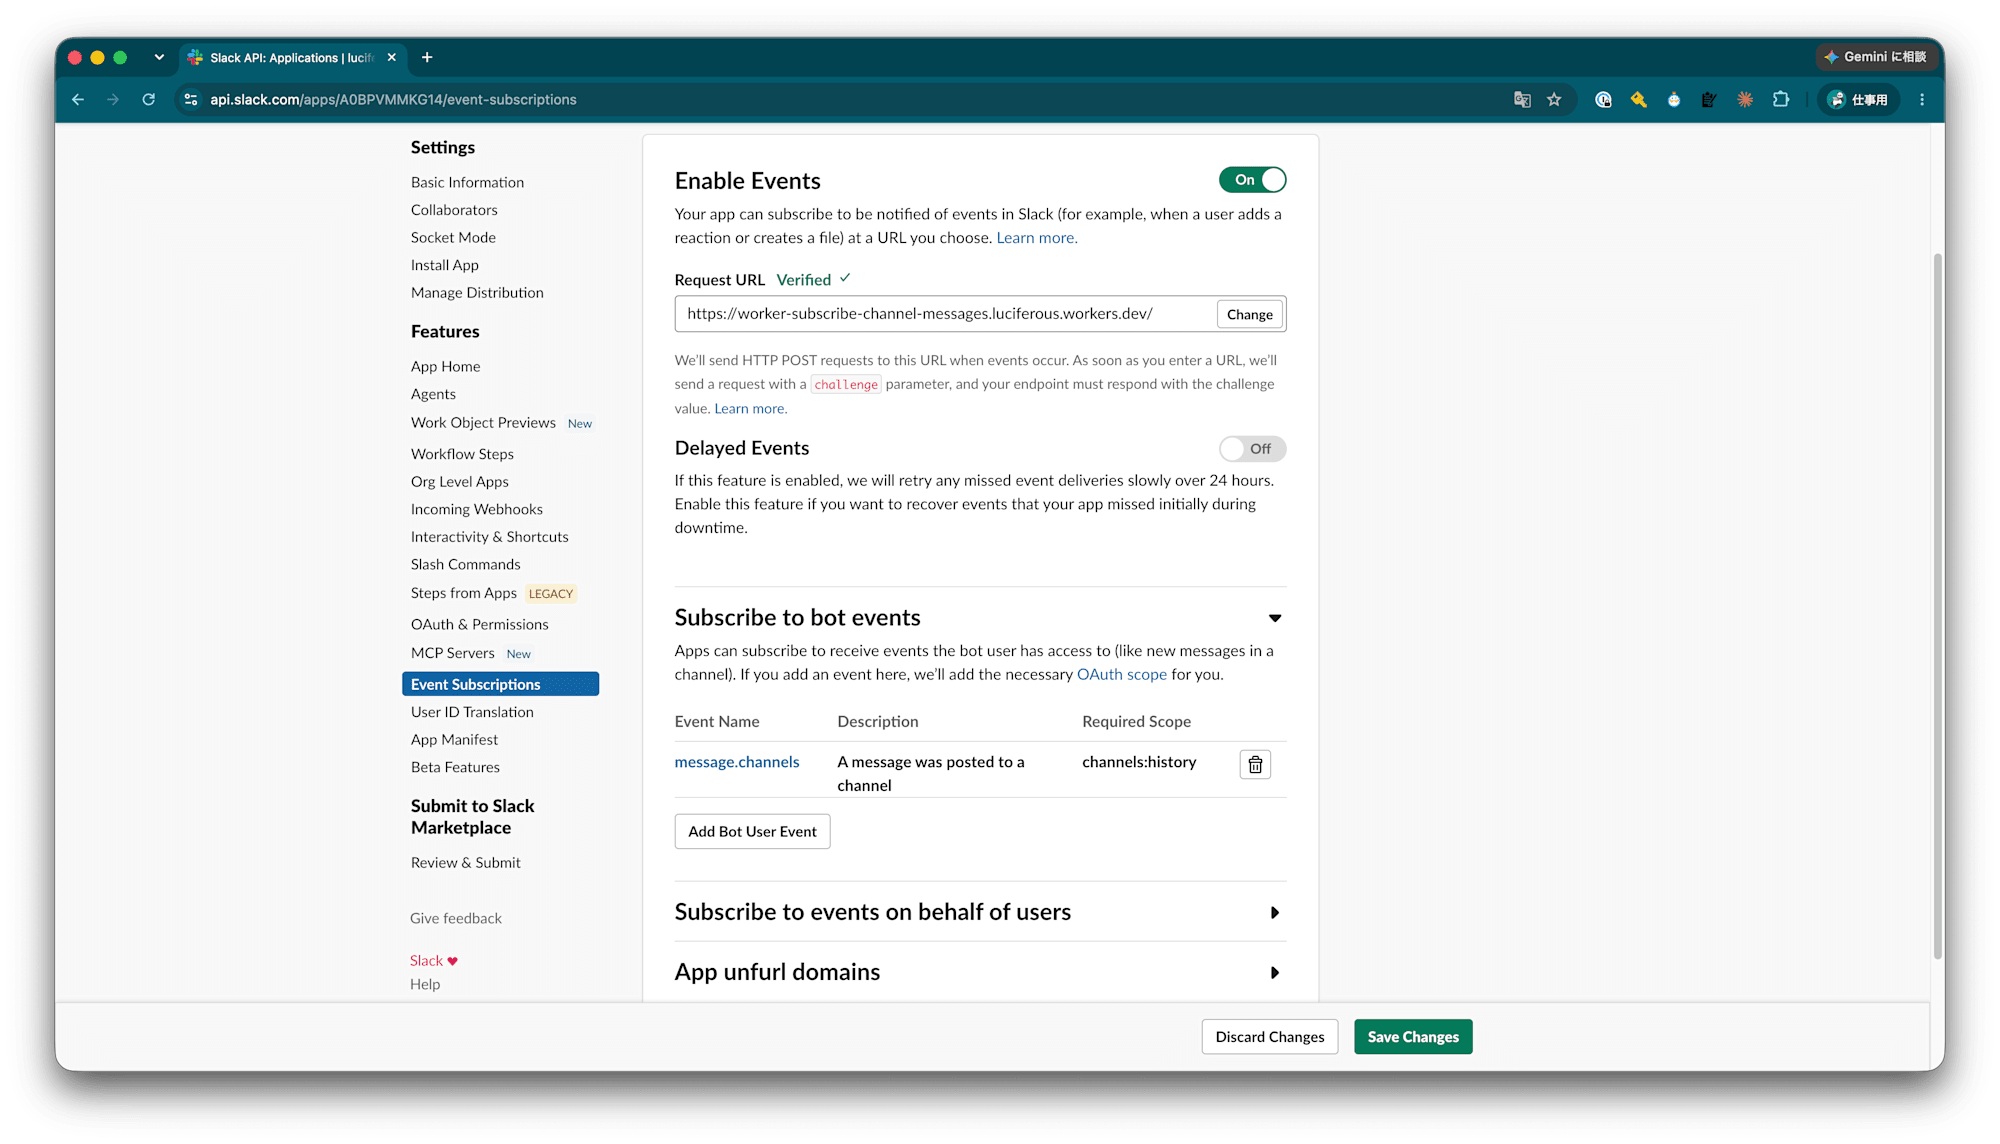
Save Changes をクリックして反映します。
これでEvent Subscriptionsの準備ができました。
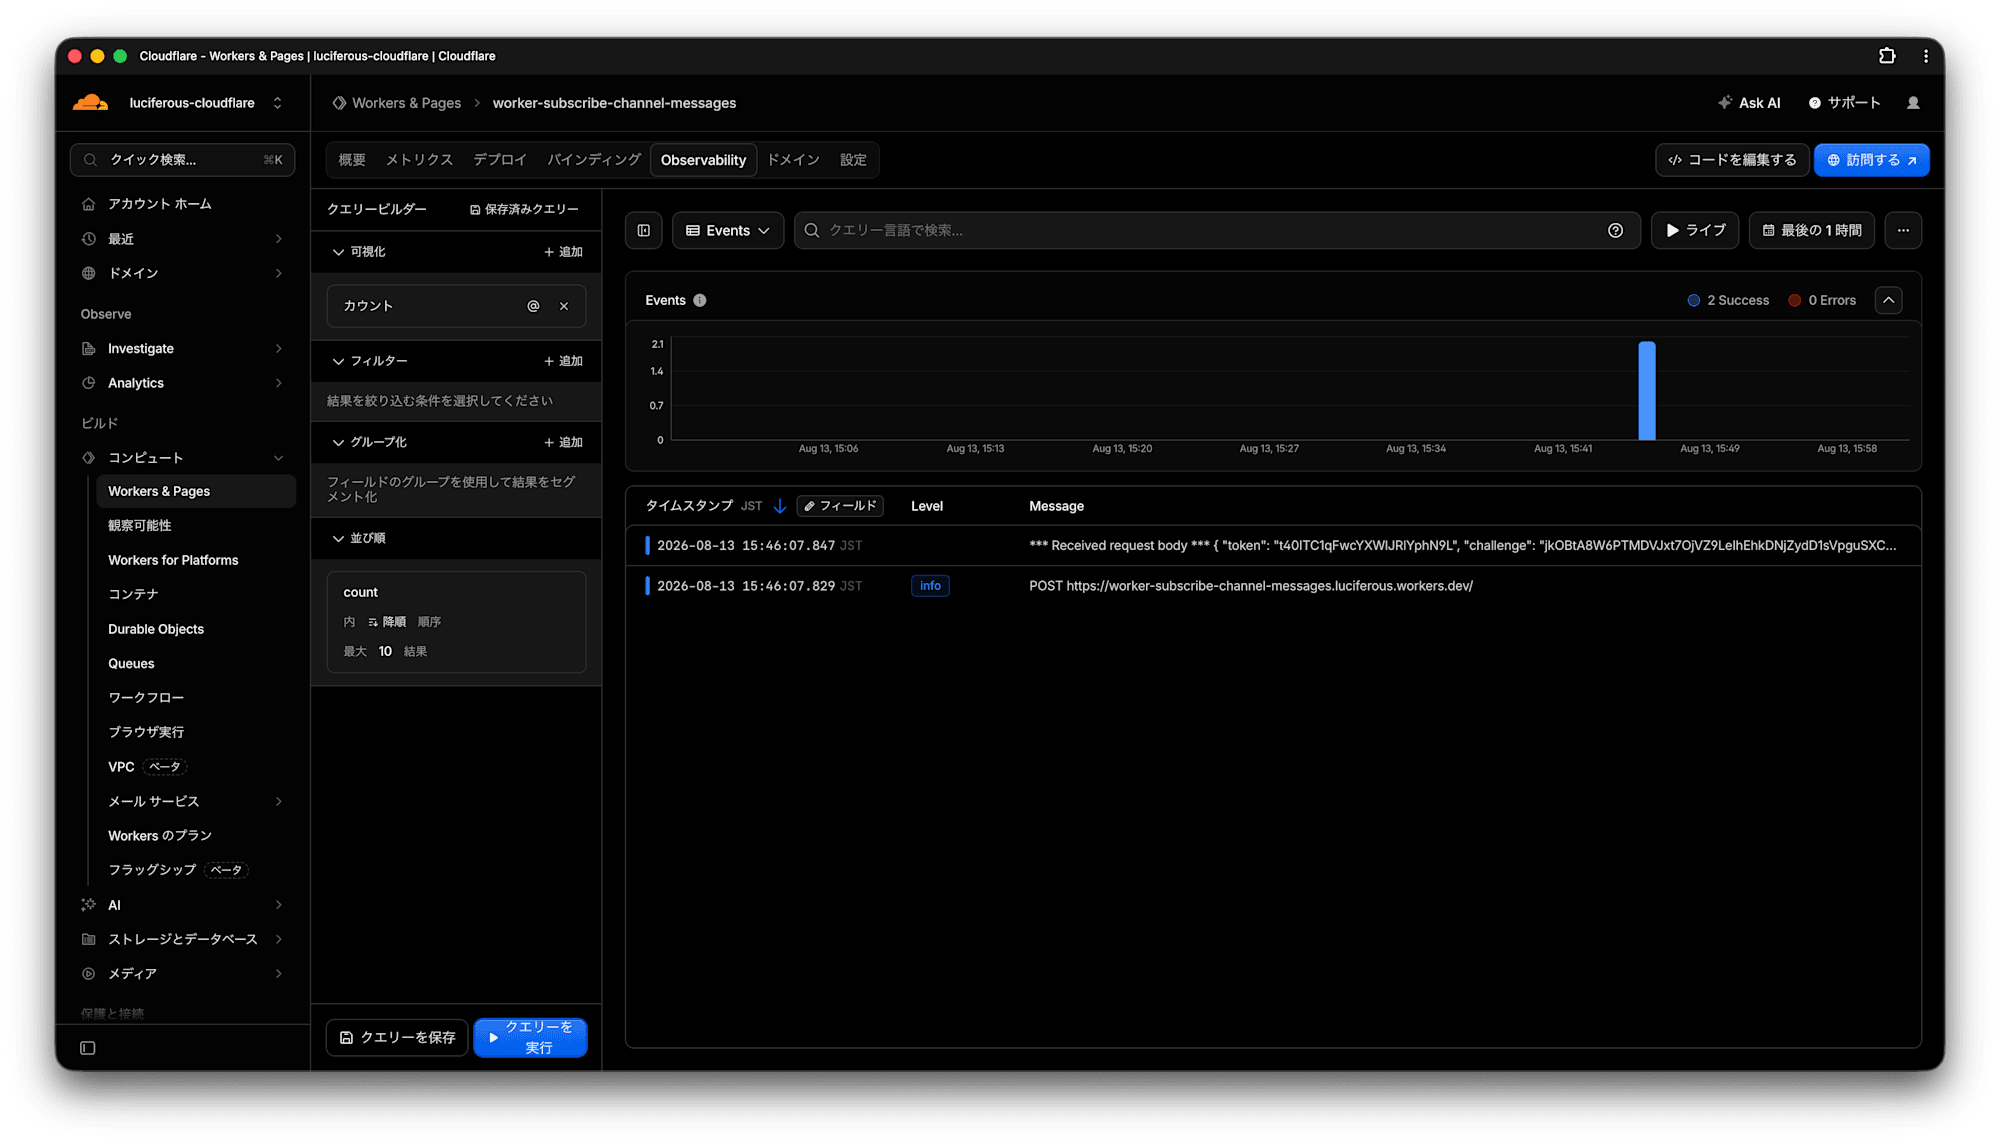
Workerのログを確認すると、Verifyのリクエストが来たこともわかります。
5. 動かしてみる
Slack Workspaceのチャンネルに追加して、投稿されたメッセージがサブスクライブできるか試します。
5-1. チャンネルにSlack Appを追加する
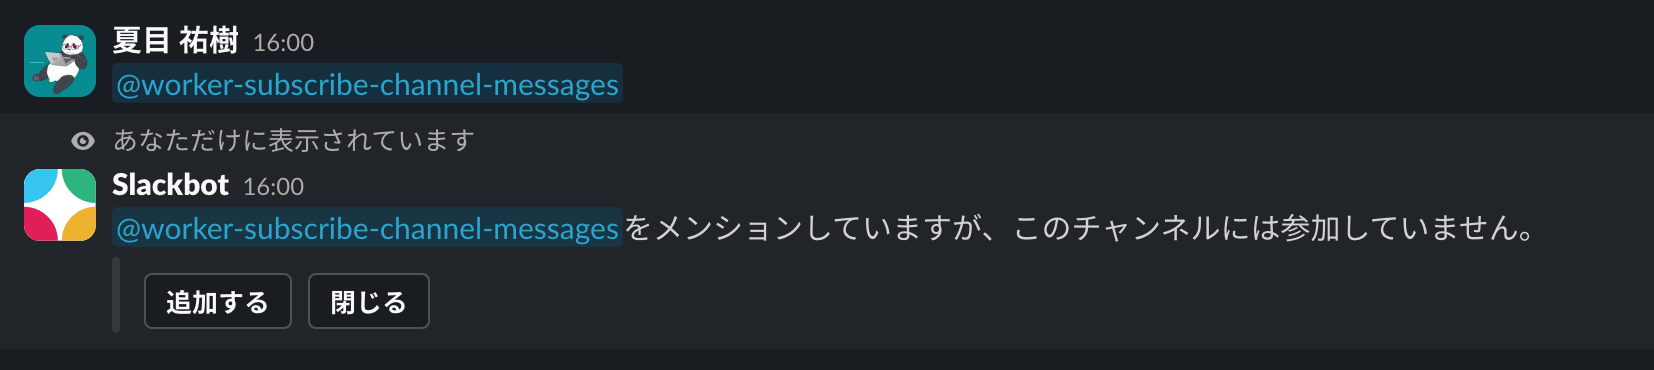
チャンネルにSlack App追加する方法はいくつかありますが、今回はメンションを飛ばす方法を使います。
追加する をクリックし、追加します。
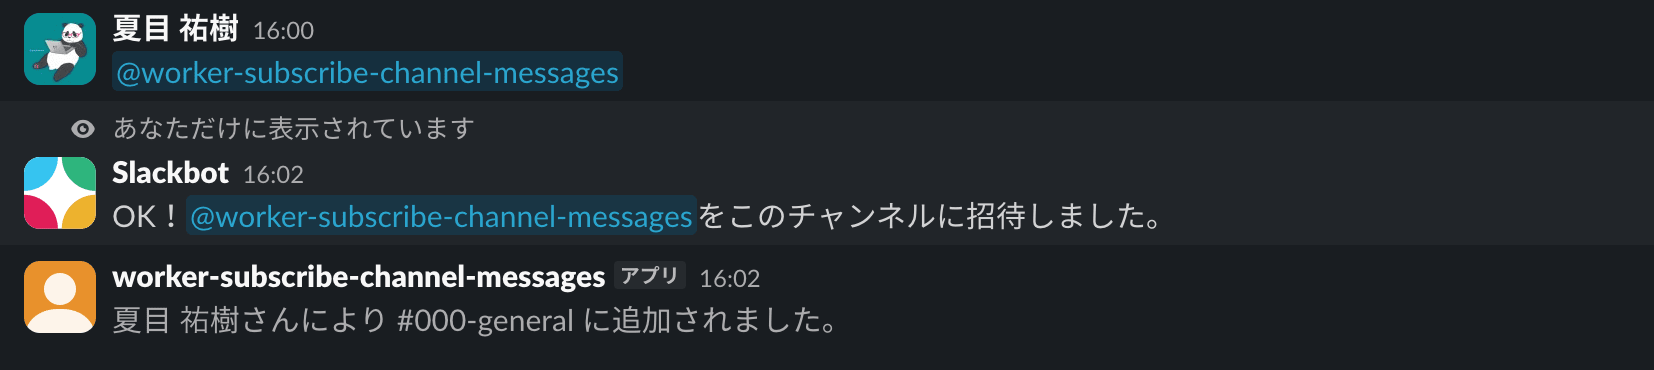
5-2. チャンネルにメッセージを投稿して、Workerでサブスクライブできているか確認する
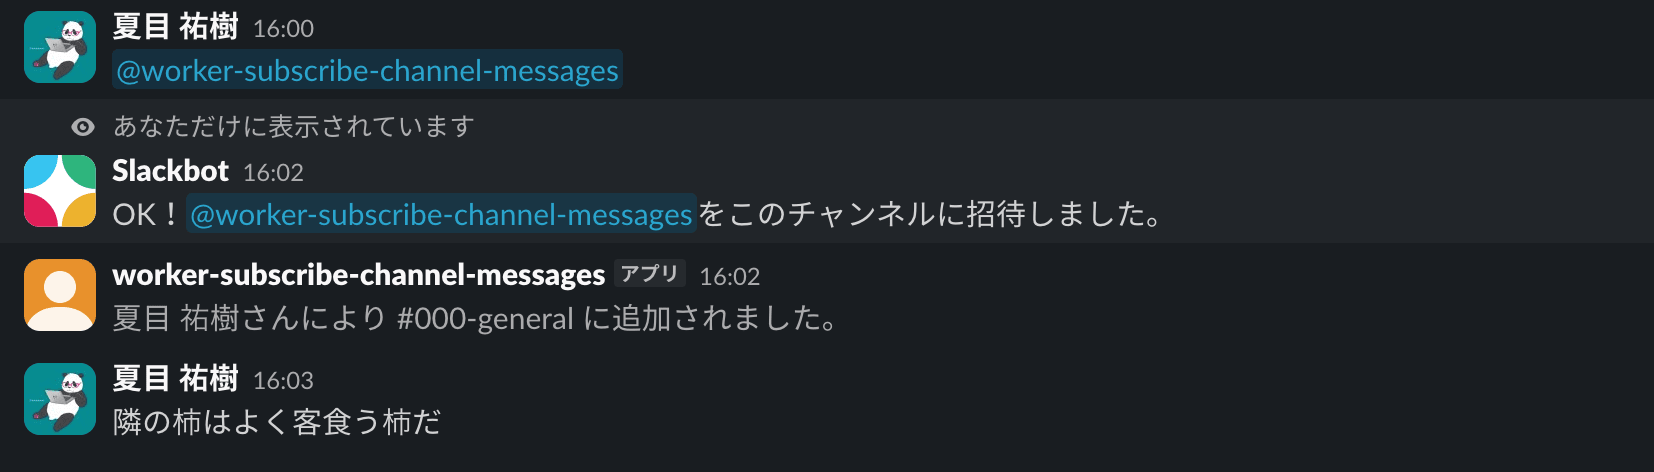
メッセージを投稿したので、Workerのログを確認します。
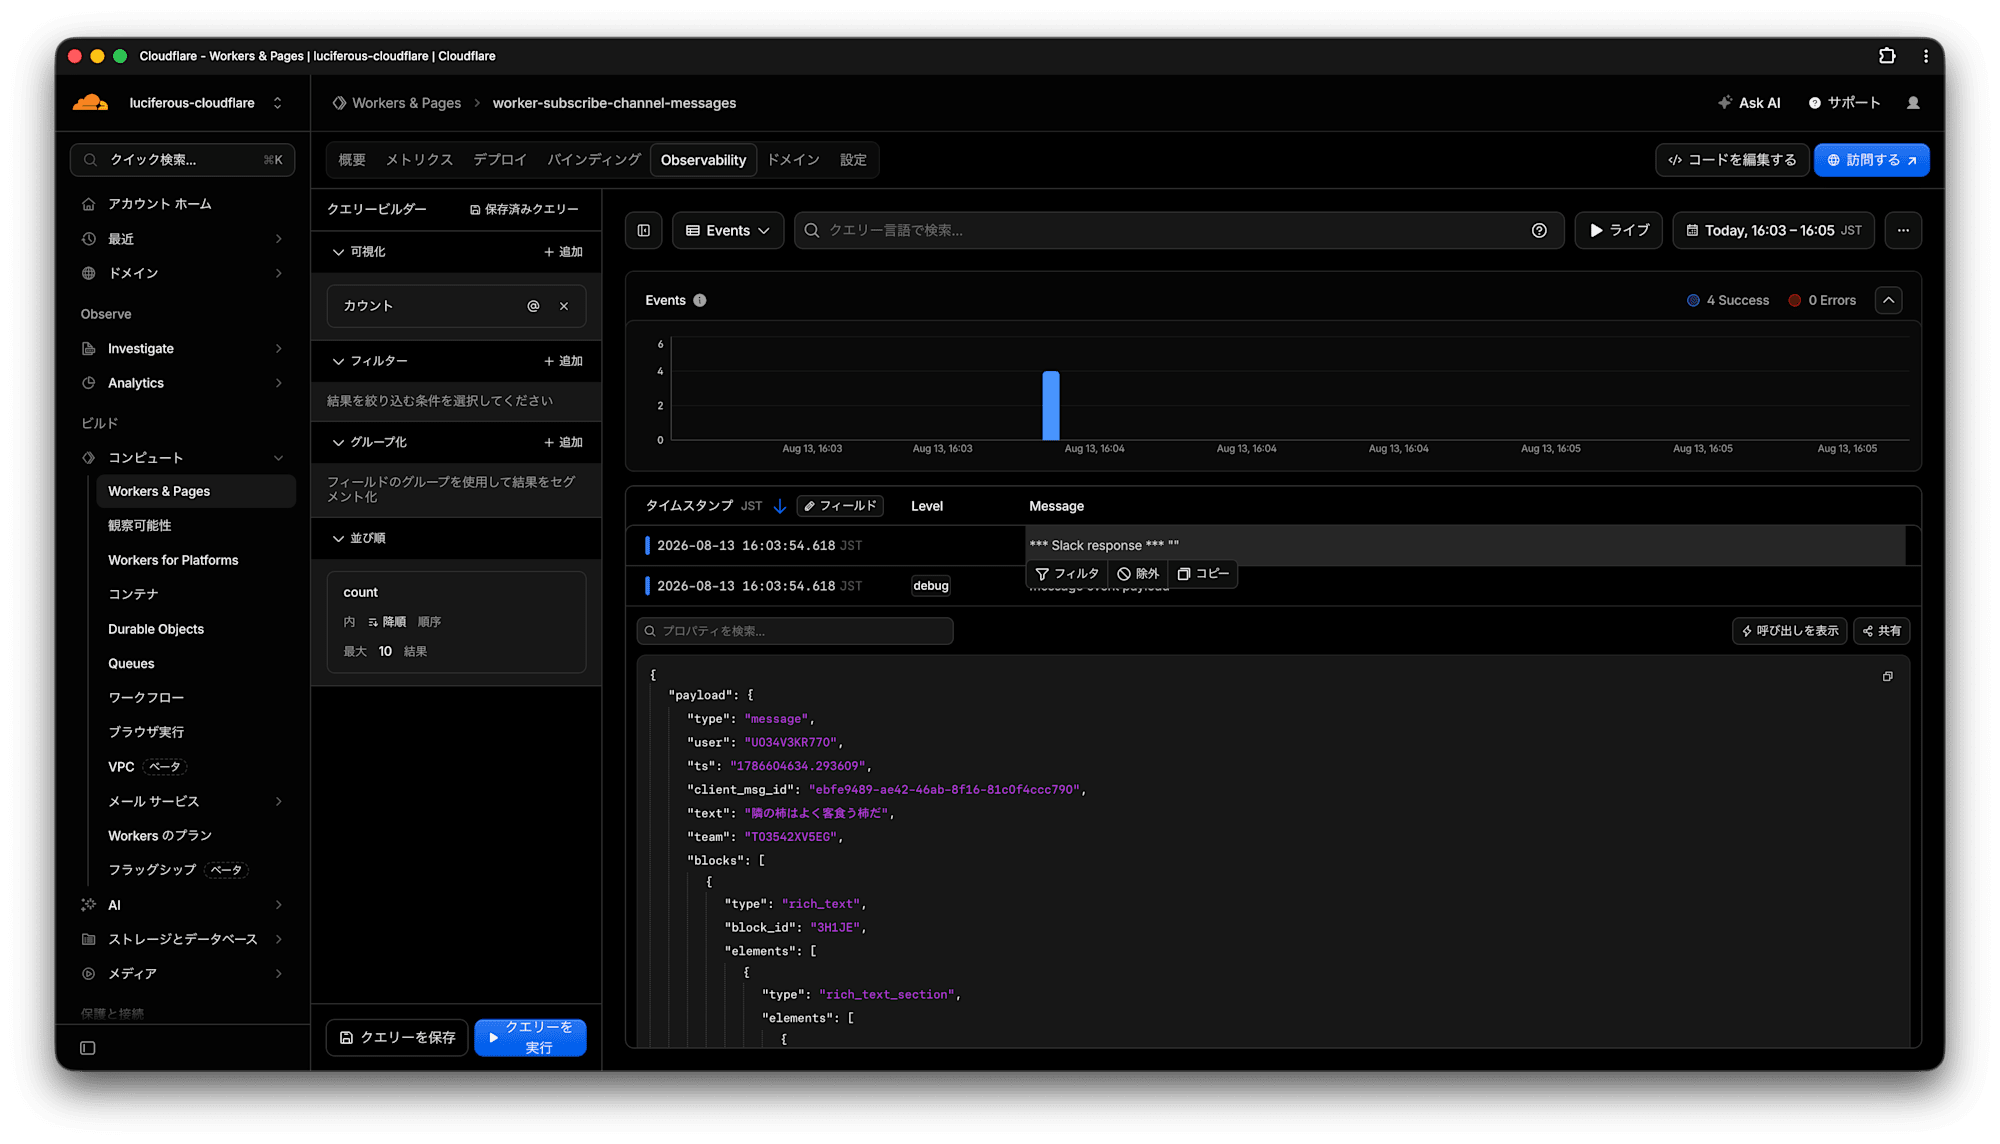
きちんとサブスクライブできていることがわかりました。
まとめ
以上、Cloudflare WorkersでSlack Appのバックエンドを動かす方法でした。
何かのお役に立てたら幸いです。
引用
- Cloudflare Workers で Slack アプリを動かす方法
- SlackアプリのScopeとEvent Subscriptionsについてgpt-o1にまとめてもらった!|テツタミヤザワ/danielvo