
Twilio Voice SDK - フロントエンドから番号を秘匿して外部電話番号へ発信する仕組みを実装する
はじめに
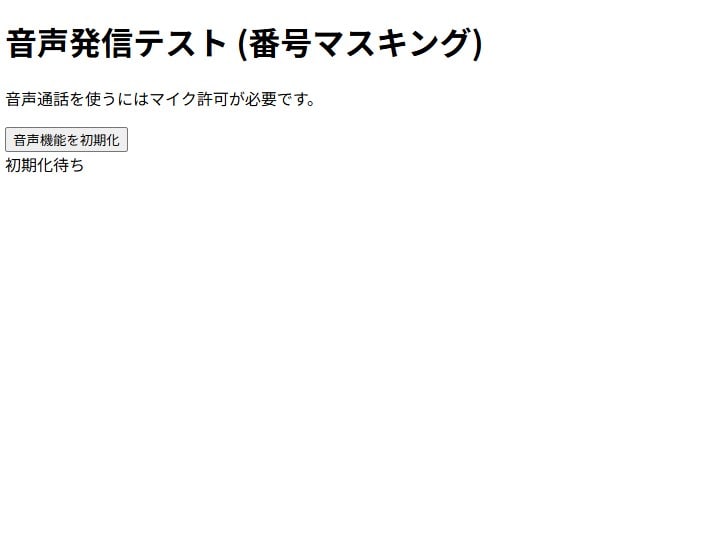
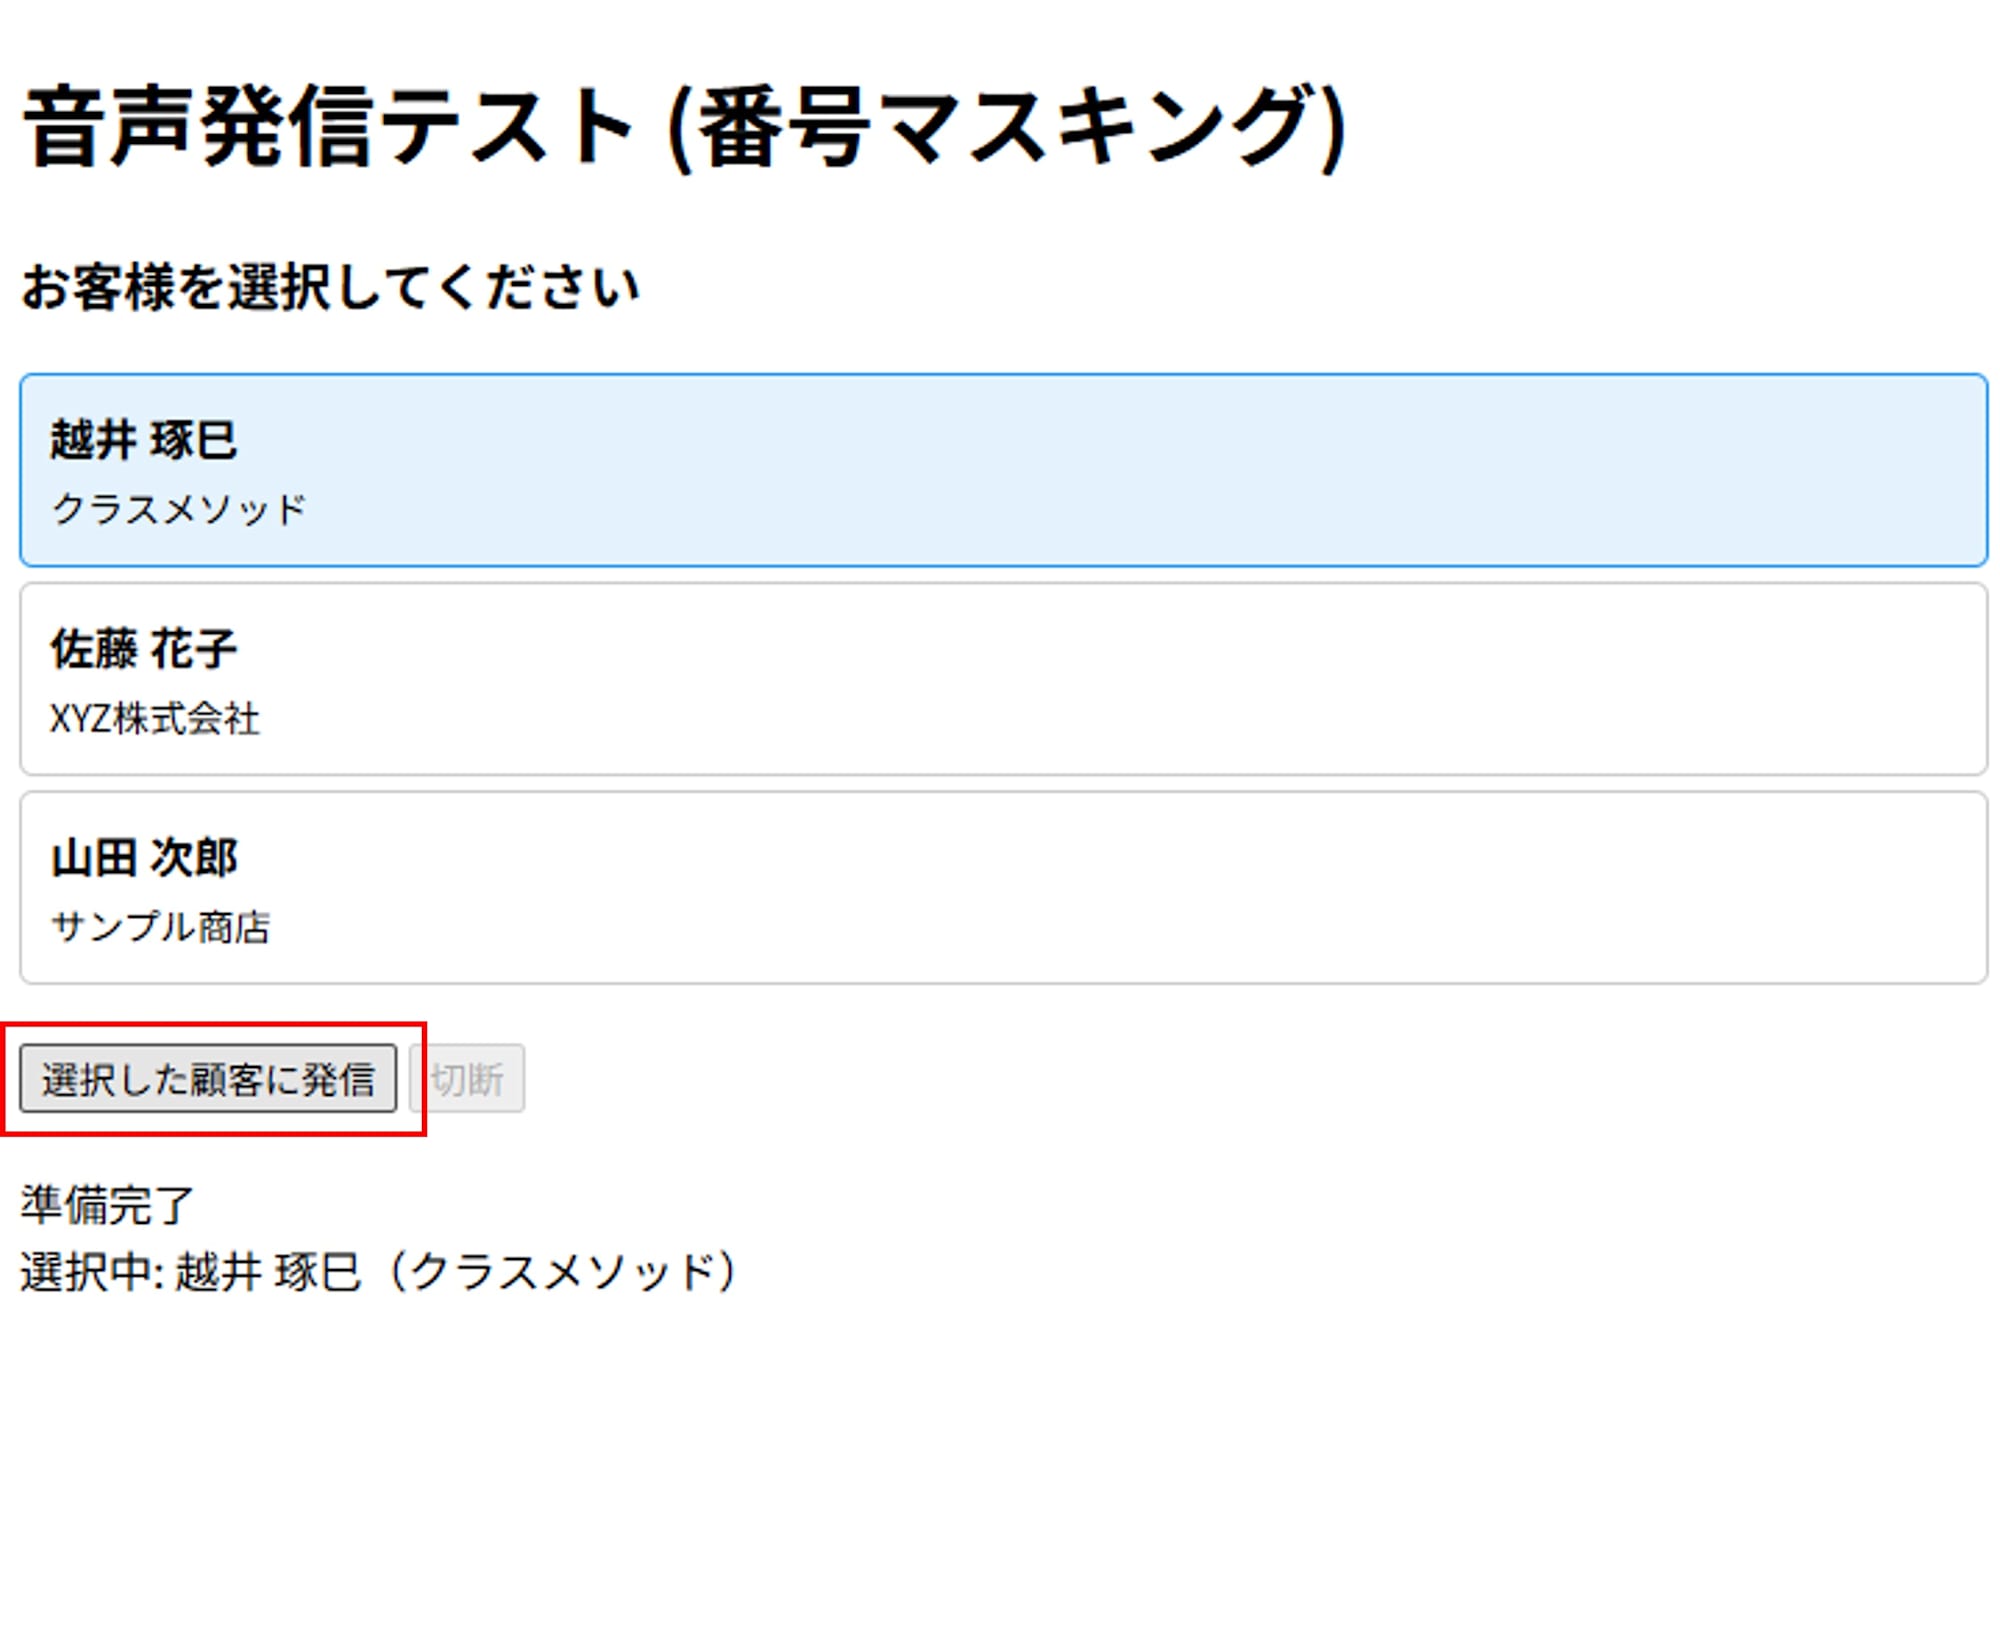
本記事では、Twilio Voice サービスを使用した音声通話機能の実装方法について解説します。今回は例として JavaScript で実装したフロントエンドアプリケーションから外部電話番号へ発信する機能を実装します。次の画像が今回実装したアプリの UI イメージです。
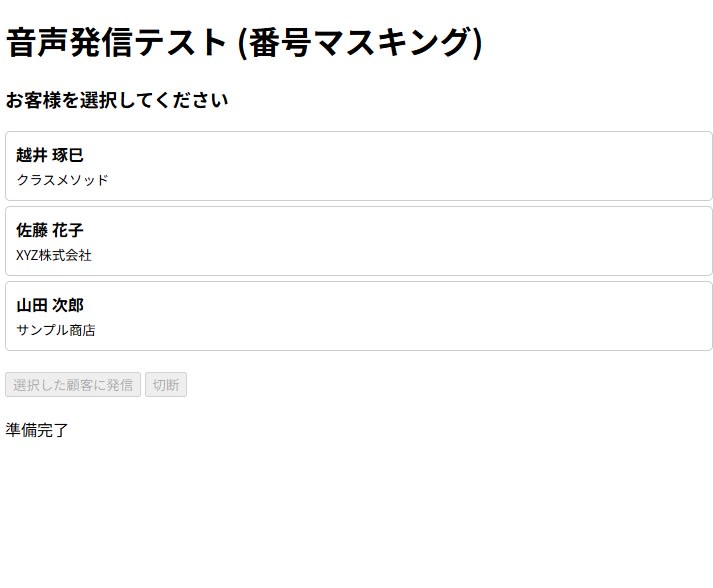
番号が秘匿された状態で顧客名を選択し発信することができます。配車アプリやデリバリーサービスなど、顧客とサービス提供者の間で直接的な通話が必要でありながら、お互いの電話番号を秘匿したいシステムの構築において、Twilio Voice は有力な選択肢となります。
Twilio とは
Twilio は、音声通話、SMS、ビデオ通話などの通信機能を API として提供するクラウドサービスです。開発者は複雑な通信インフラを構築することなく、REST API や SDK を通じてアプリケーションに通信機能を組み込めます。
対象読者
- 音声通話機能の実装に興味があるアプリケーション開発者
- Twilio サービスを初めて使用される方
- JavaScript および Node.js の基本的な知識をお持ちの方
- WebRTC の実用シーンについて知りたい方
参考
- Twilio Voice JavaScript SDK Documentation
- Twilio Voice Quickstart for JavaScript
- TwiML Voice Reference
概要と構成図
音声発信機能では、フロントエンドから Twilio Voice JavaScript SDK を使用して、一般の電話番号に通話を発信します。フロントエンドの実装で電話番号をマスキングし、UI では顧客名のみが表示されるようにします。
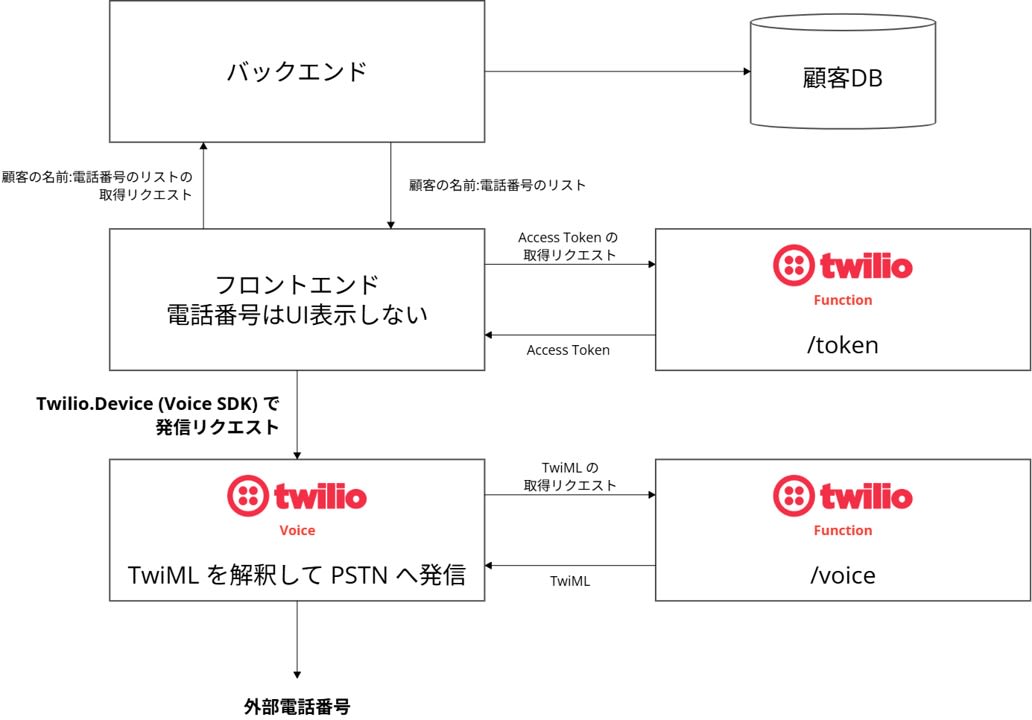
- フロントエンドがバックエンドから顧客の名前:電話番号リストを取得 (電話番号は UI 表示しない)
- フロントエンドが Twilio Function /token から Access Token を取得
- ユーザーが顧客を選択して発信ボタンをクリック
- フロントエンドが選択された顧客の電話番号を使用し Twilio Voice SDK で発信リクエストを実行
- Twilio が TwiML を Twilio Function /voice から取得し内容を解釈
- Twilio が PSTN 経由で外部電話番号に通話を転送
実装
TwiML App の作成
- Develop > Phone Numbers > Manage > TwiML Apps
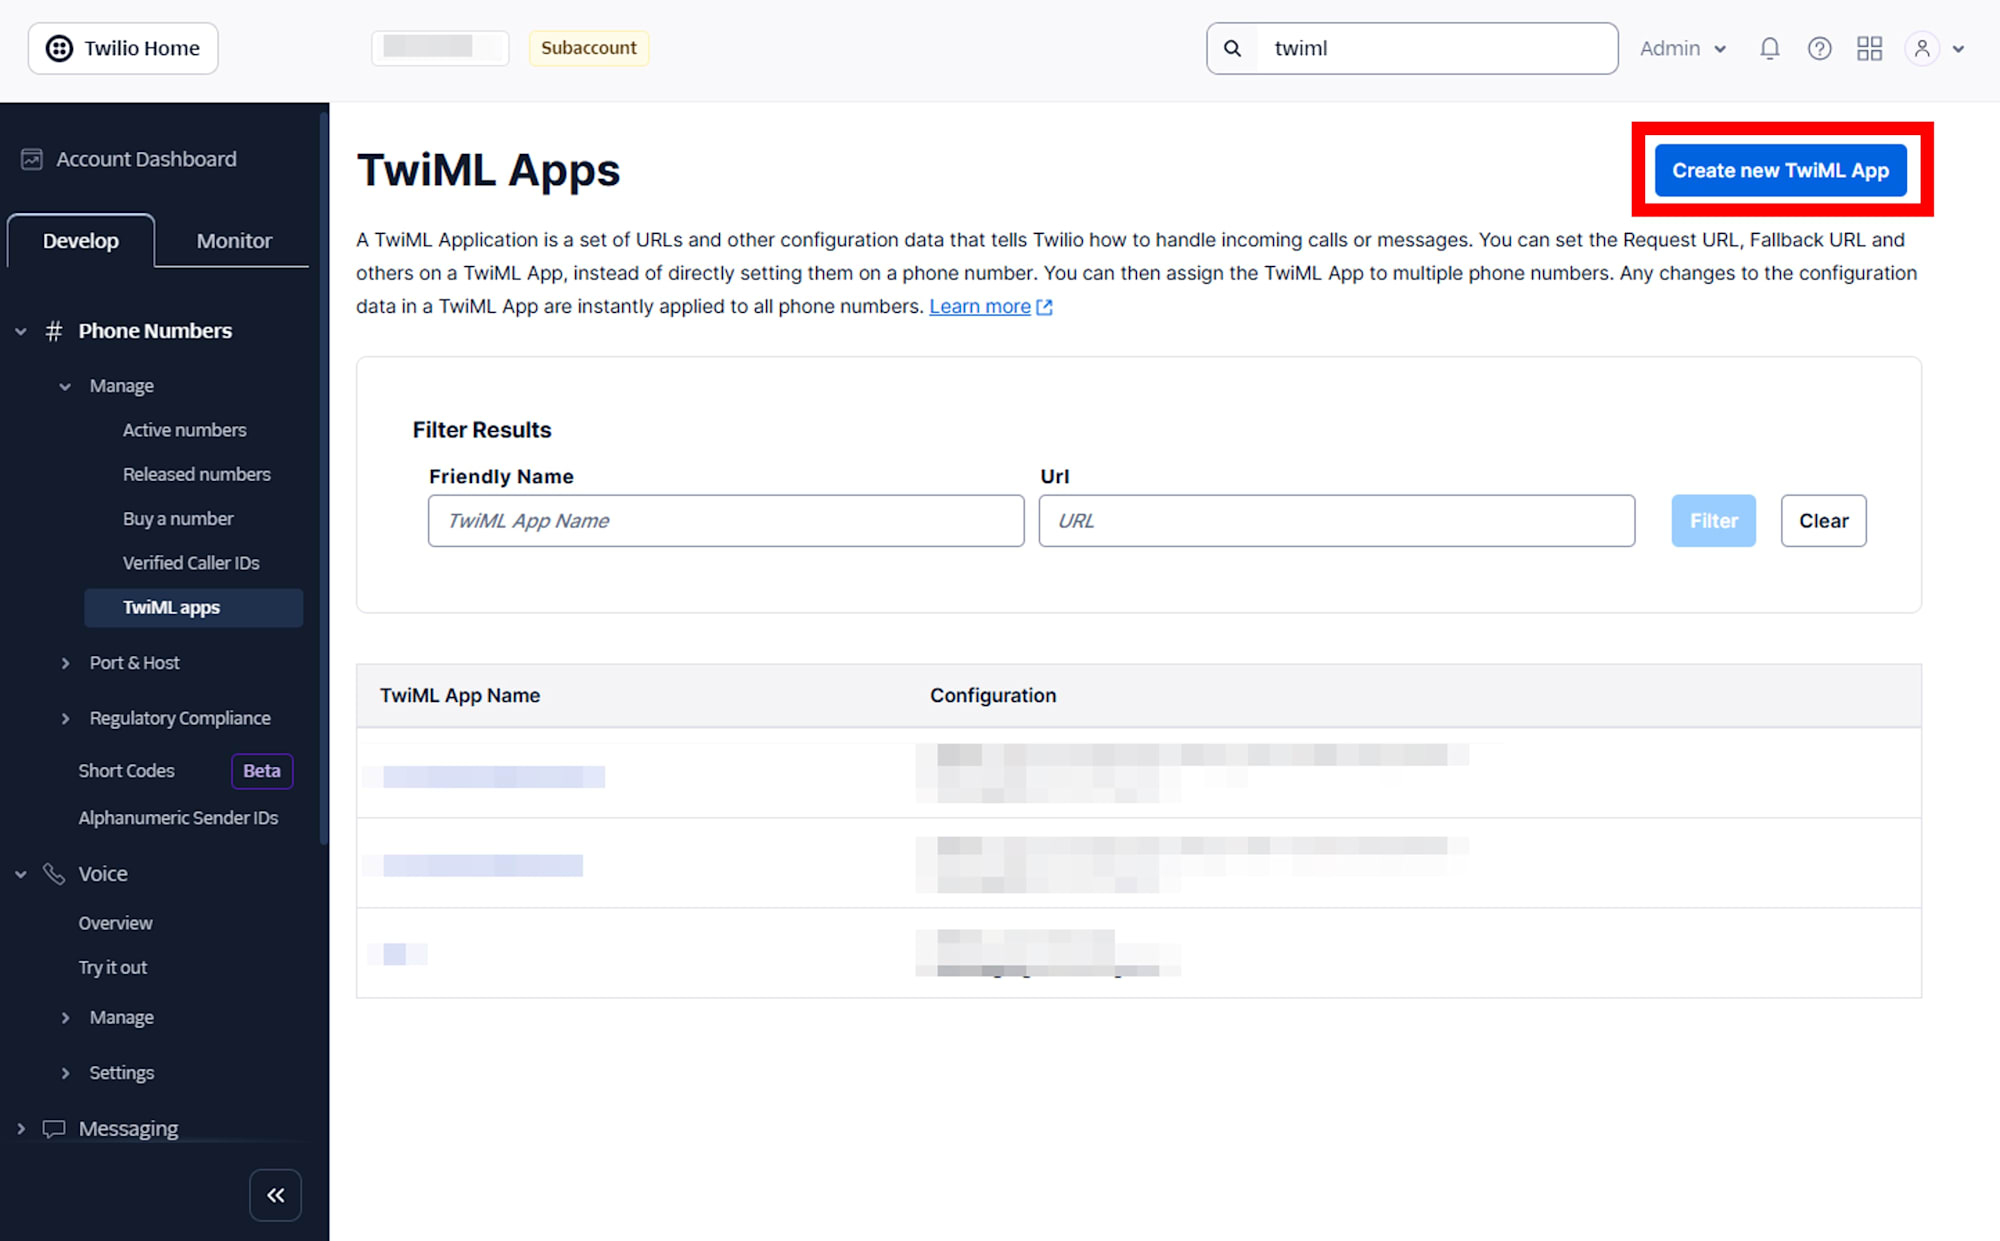
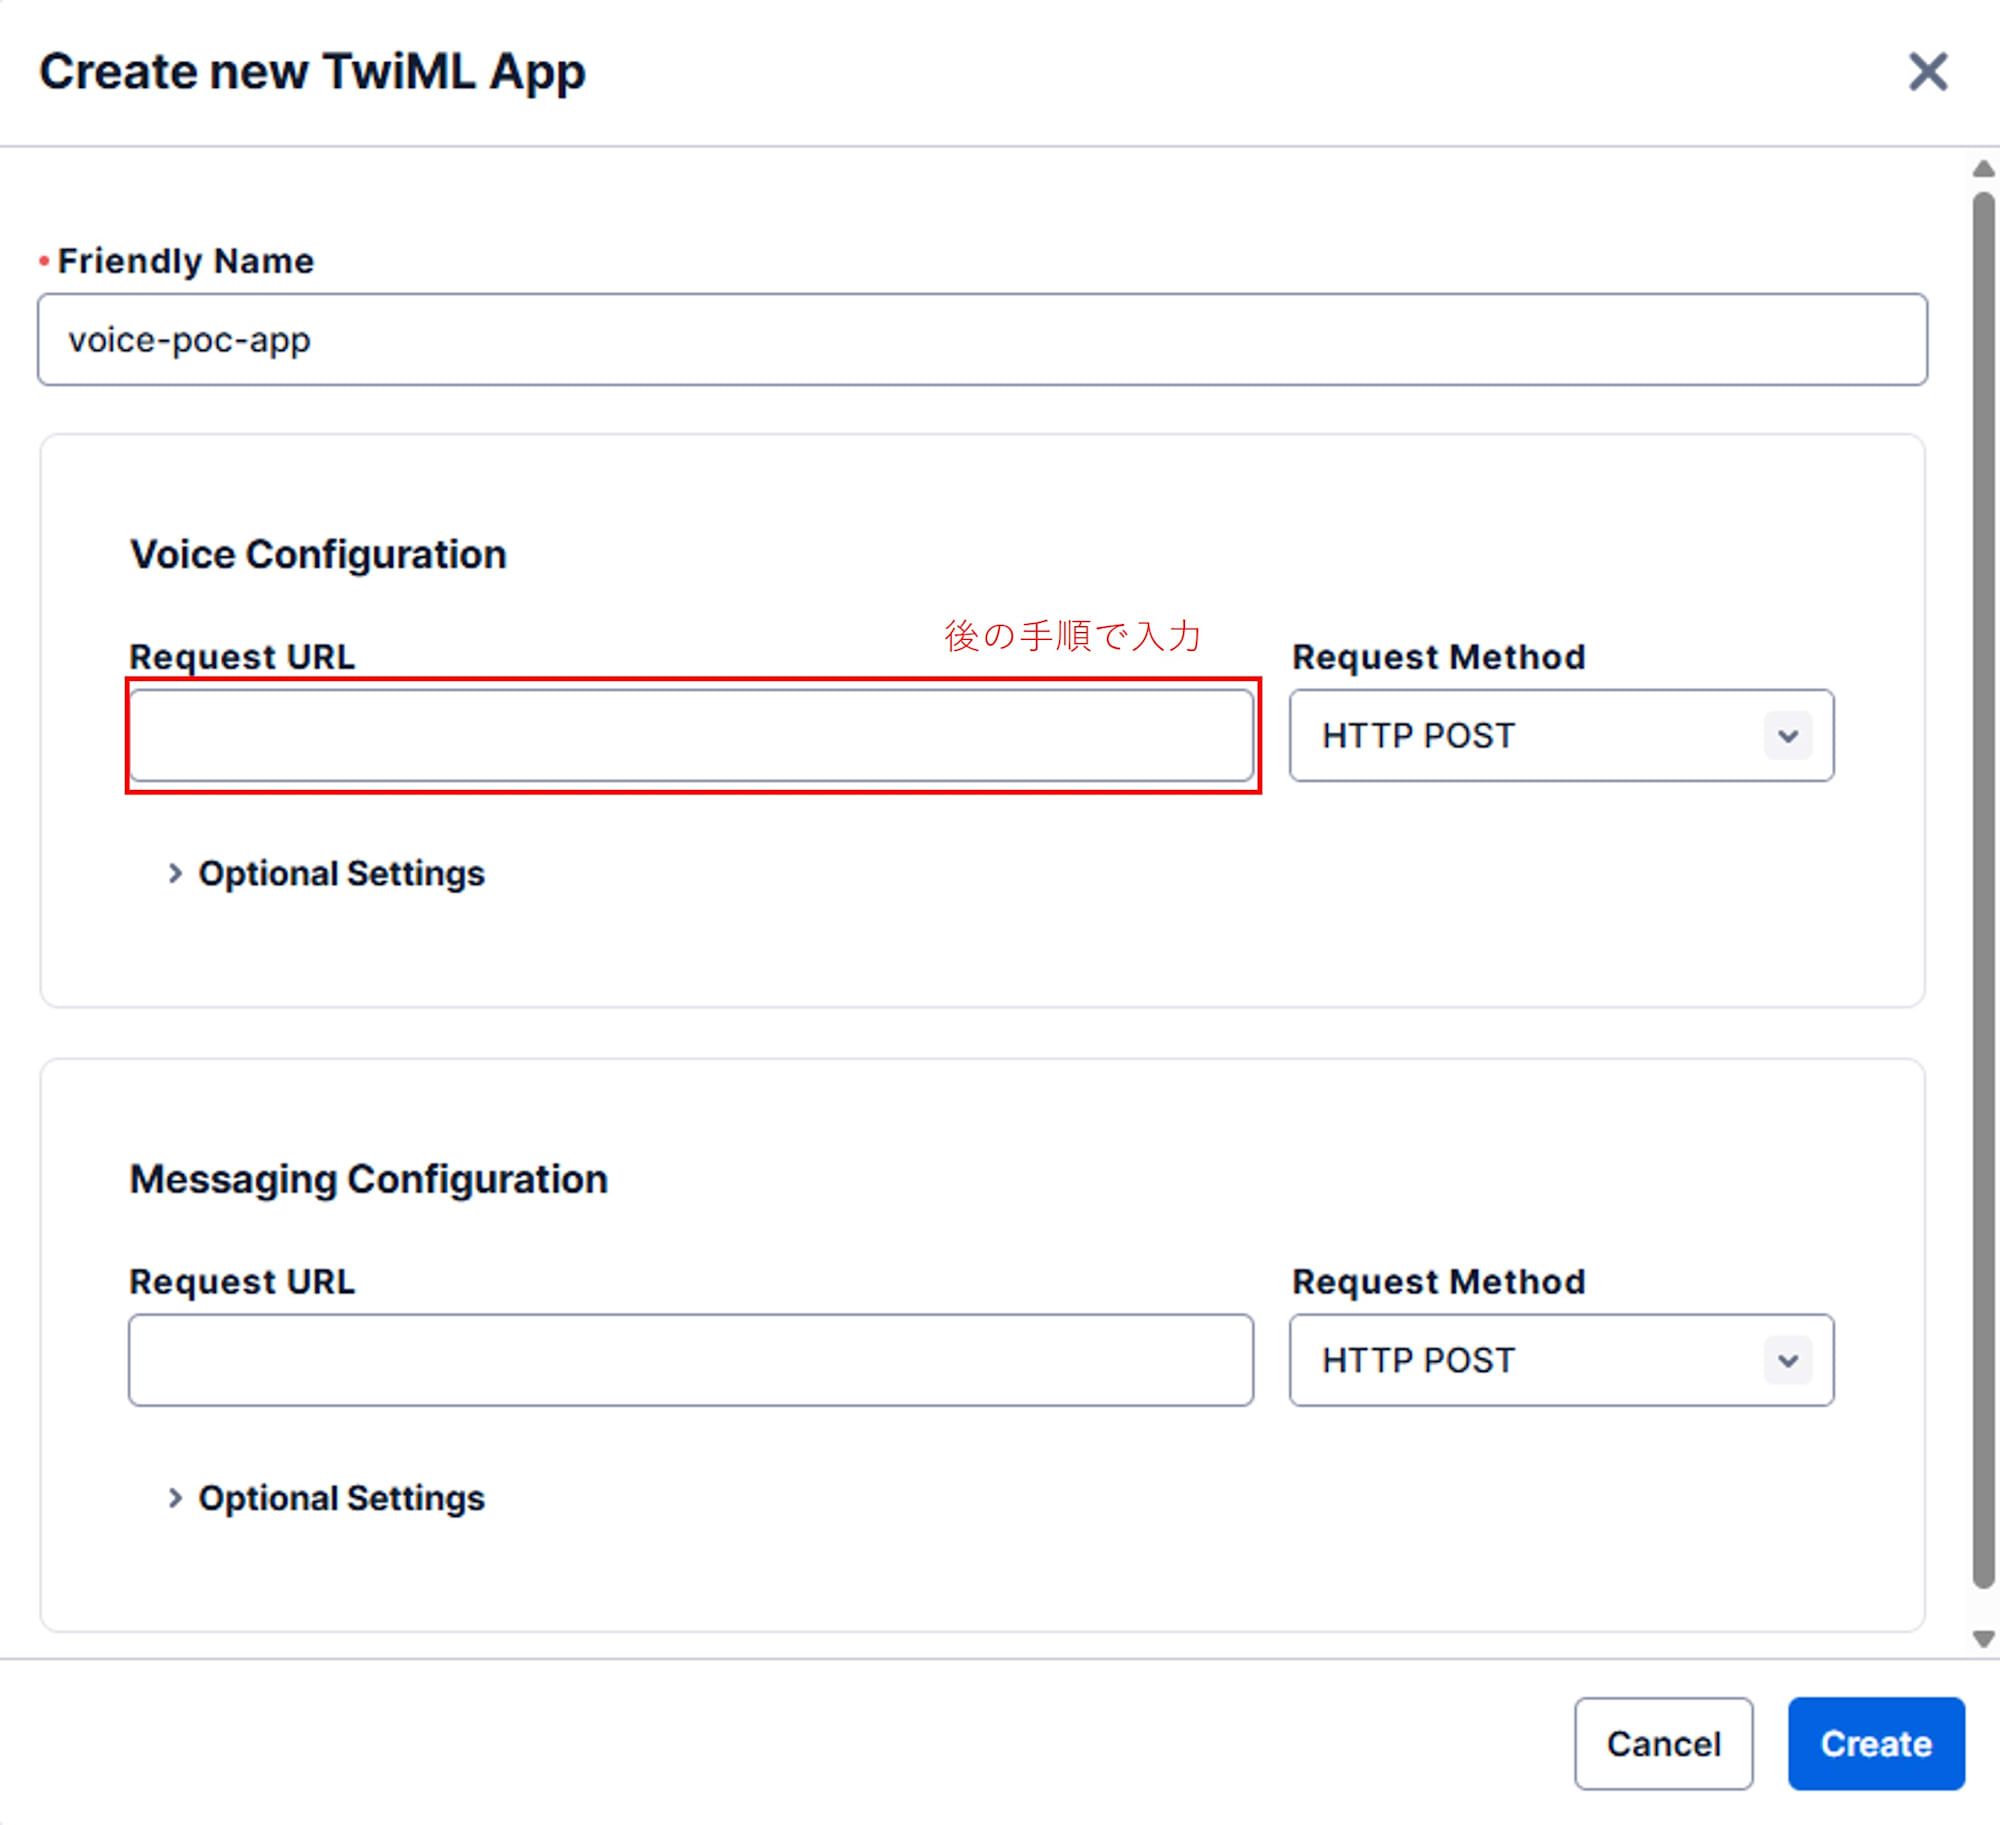
- Friendly name: 任意 (例:
voice-poc-app) - Voice Configuration の Request URL は後ほど Twilio Functions の URL を設定
- TwiML App の SID を控えておきます
API Key の取得
- Account Dashboard > Account Info > API Keys & Tokens
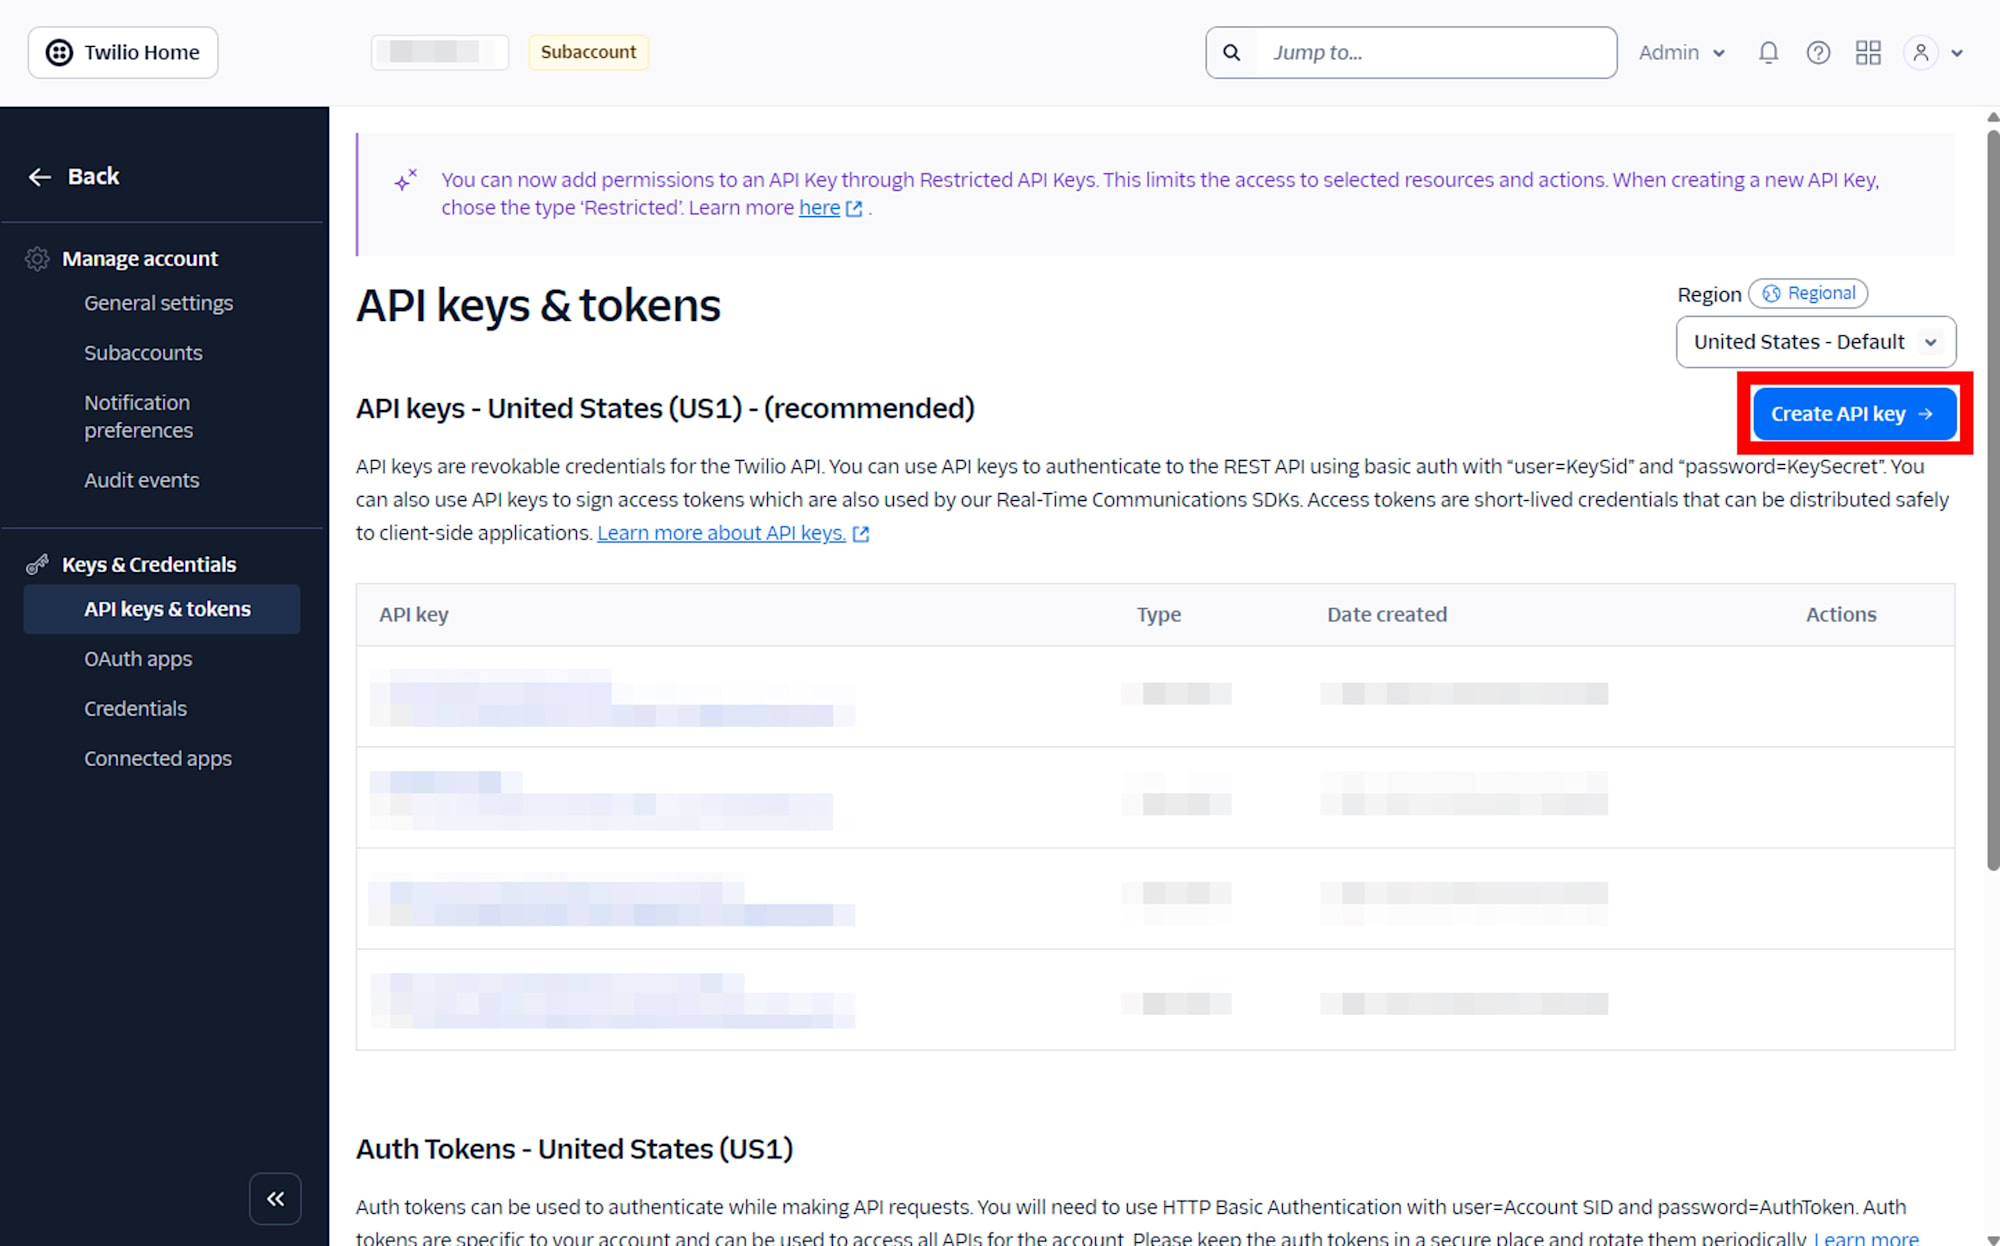
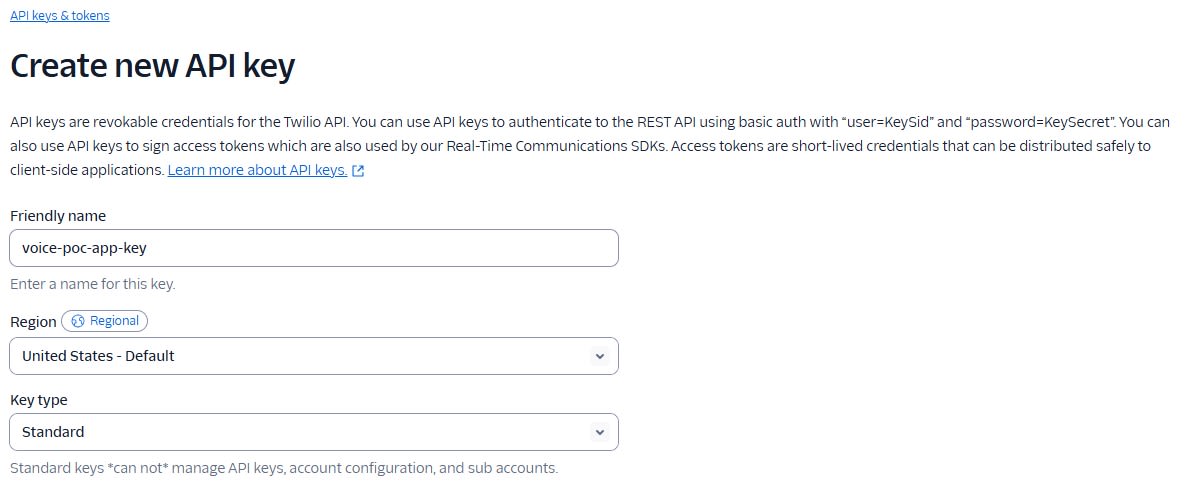
- Friendly name: 任意 (例:
voice-poc-app-key) - Key type: Standard
- Key SID と Secret を控えておきます
Twilio Function: Access Token 生成 (/token)
- Develop > Functions and Assets > Services でサービスを作成
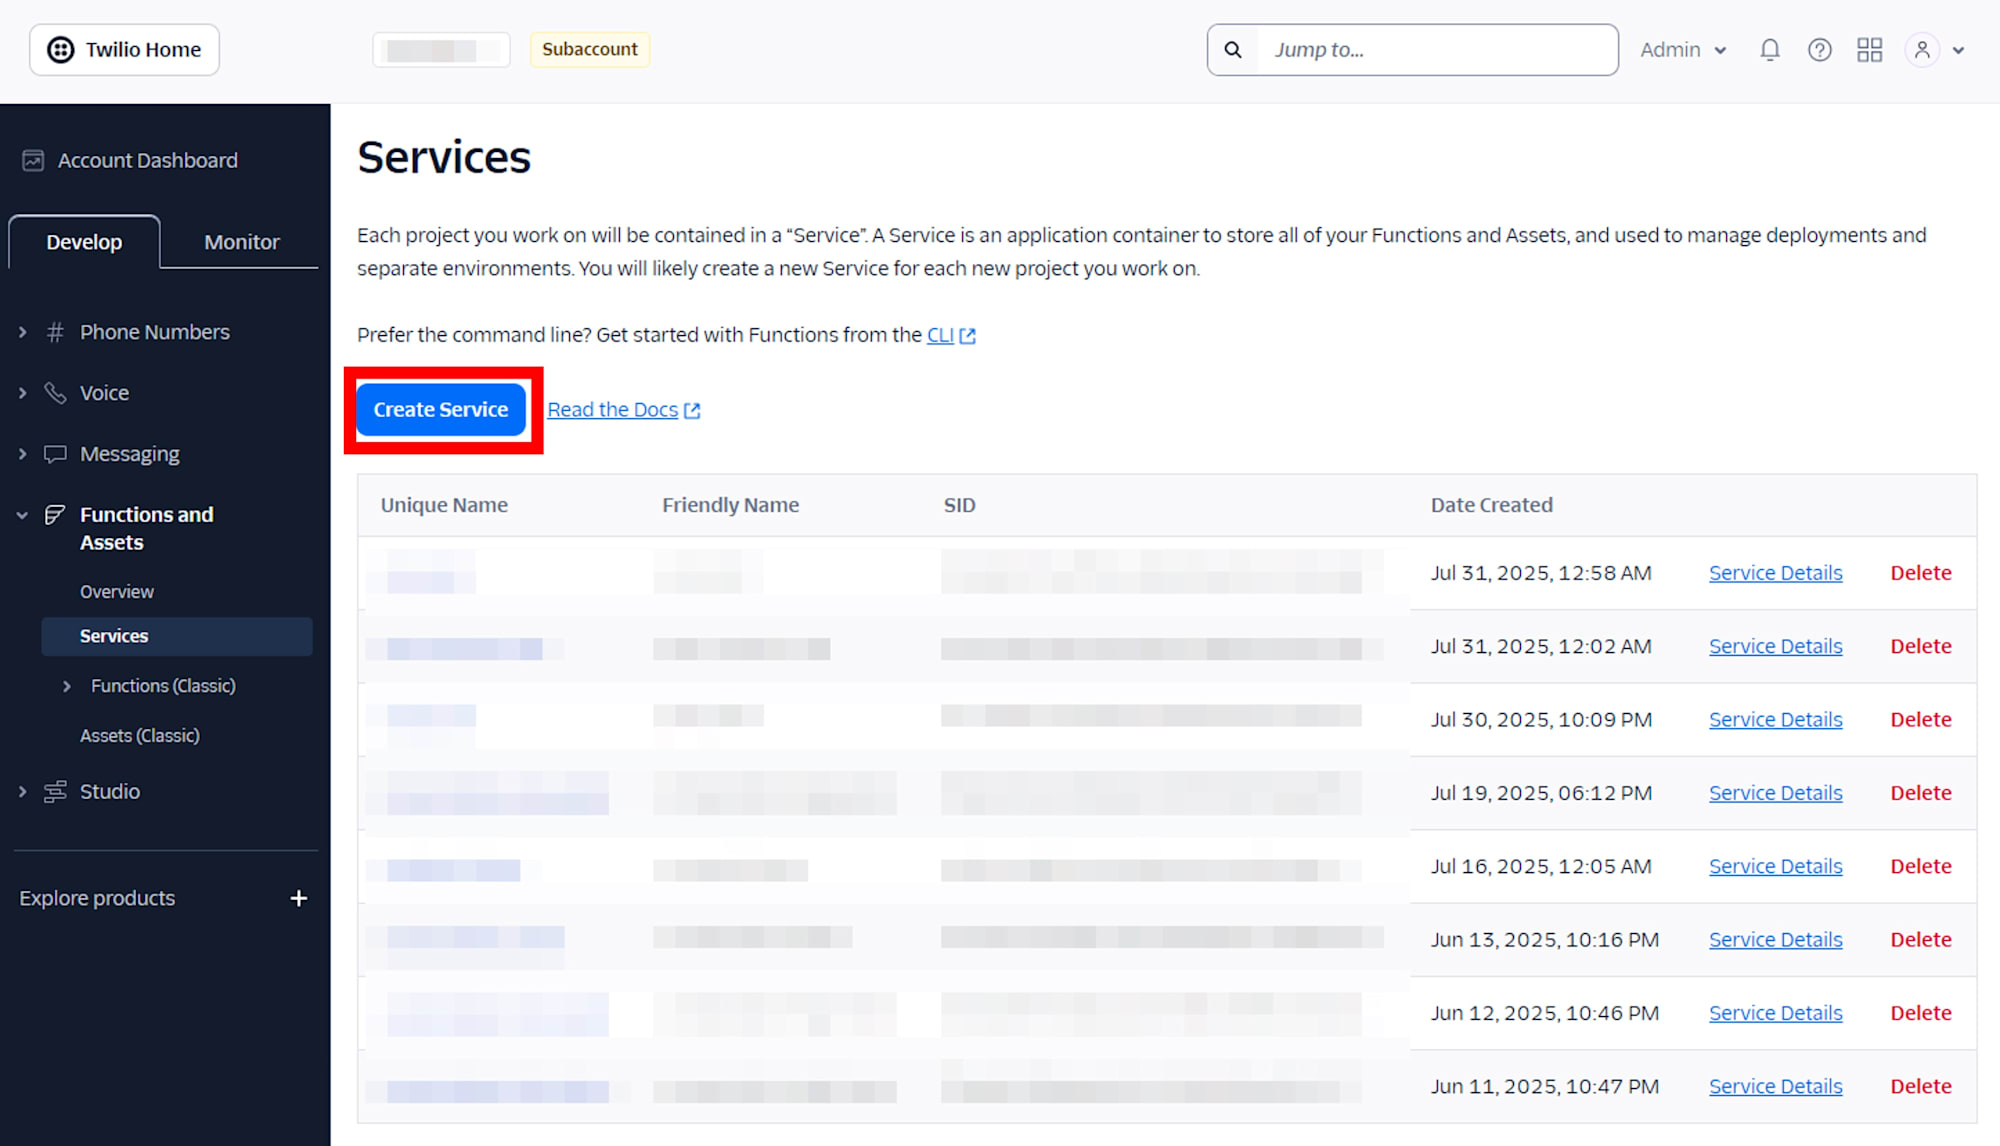
- Service Name: 任意 (例:
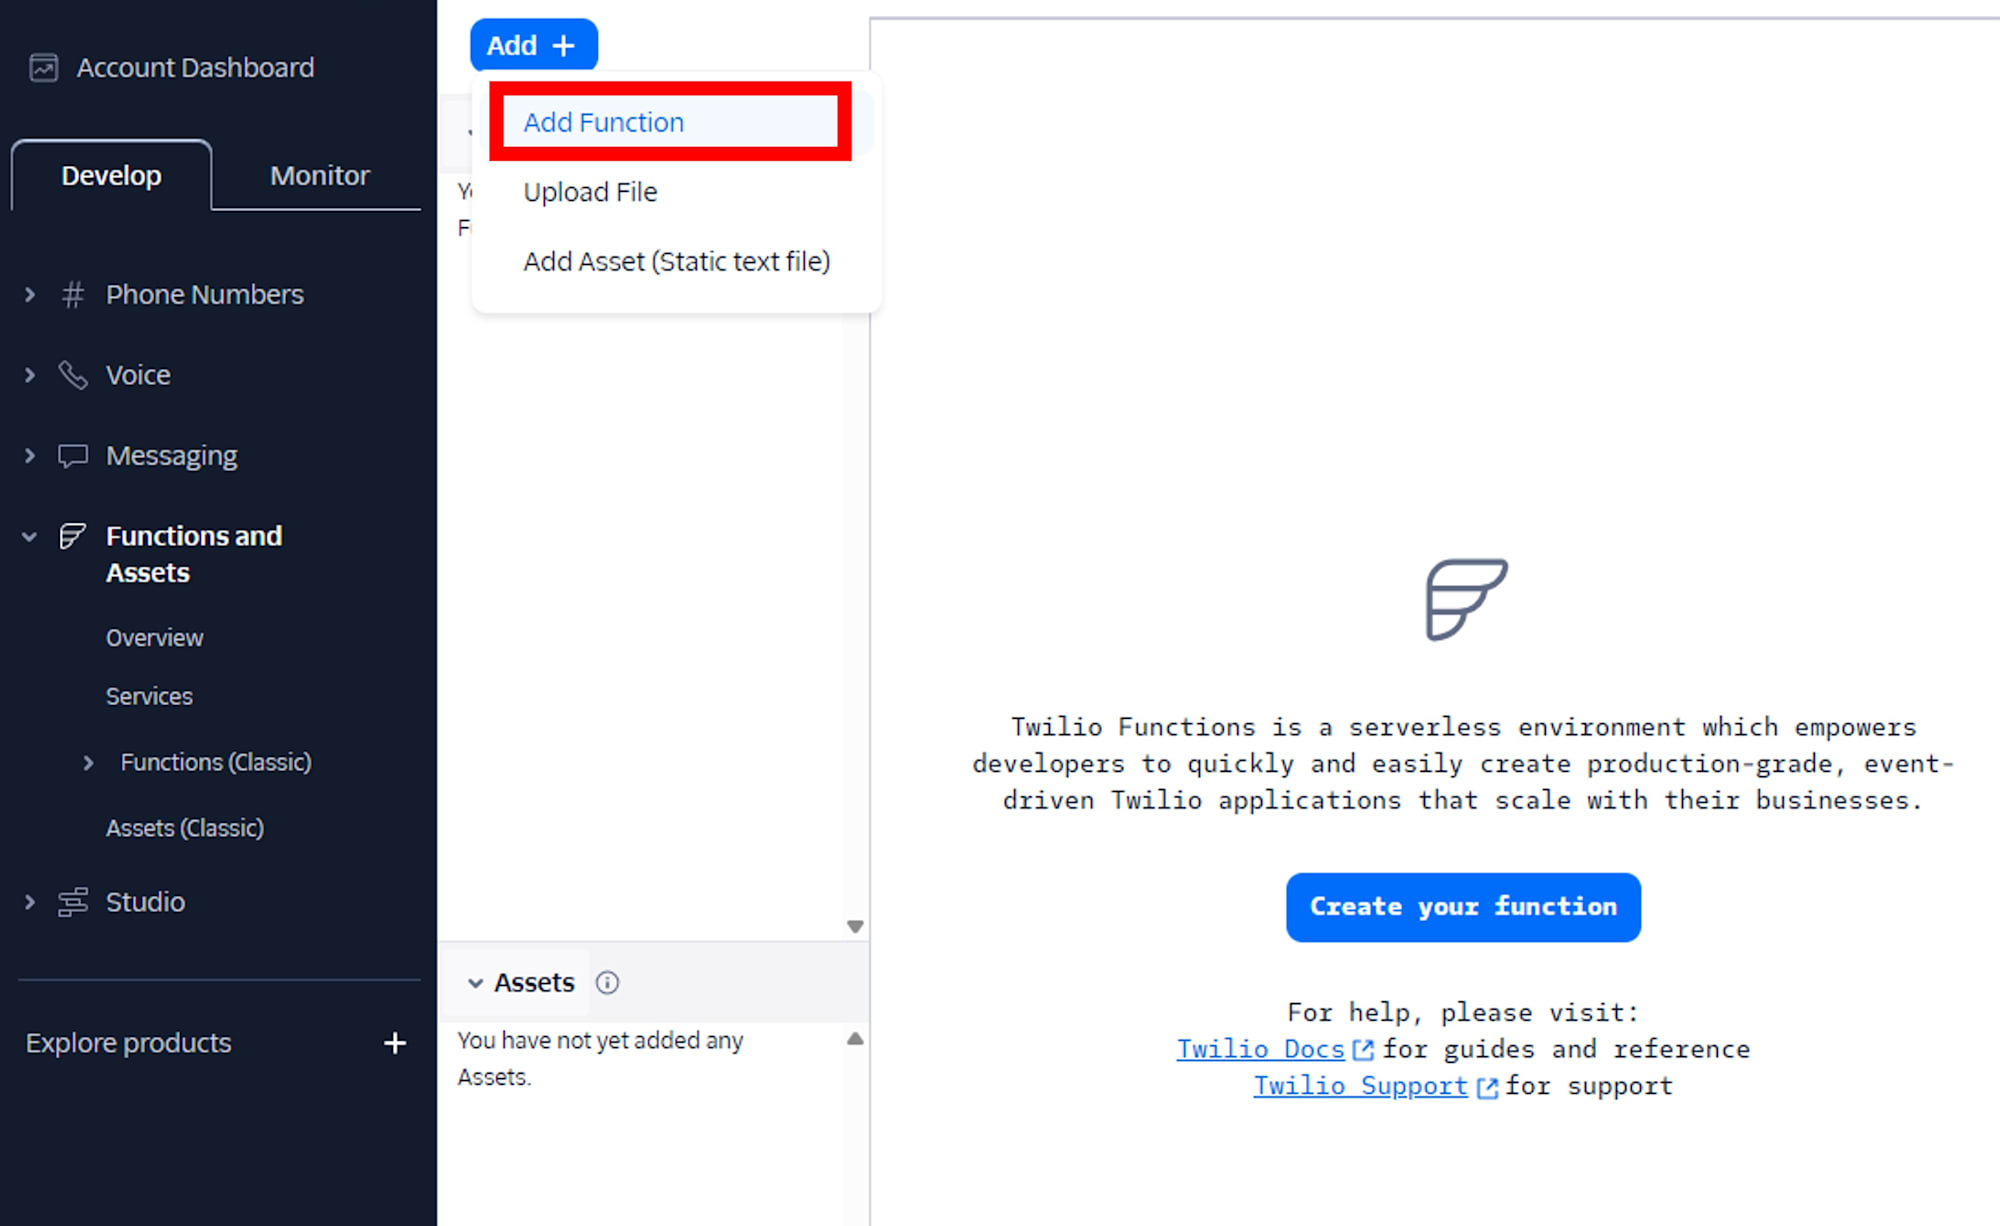
voice-poc-service) - Add Function で
/tokenという名前の Function を作成
/token の実装
exports.handler = function(context, event, callback) {
  const res = new Twilio.Response();
  res.appendHeader('Content-Type', 'application/json');
  res.appendHeader('Access-Control-Allow-Origin', '*');
  res.appendHeader('Access-Control-Allow-Methods', 'GET, POST, OPTIONS');
  res.appendHeader('Access-Control-Allow-Headers', 'Content-Type');

  if (event.httpMethod === 'OPTIONS') {
    res.setStatusCode(200); res.setBody(''); return callback(null, res);
  }

  const AccessToken = Twilio.jwt.AccessToken;
  const VoiceGrant = AccessToken.VoiceGrant;

  const identity = 'user001';
  const token = new AccessToken(context.ACCOUNT_SID, context.API_KEY_SID, context.API_KEY_SECRET, { identity });
  token.addGrant(new VoiceGrant({ outgoingApplicationSid: context.TWIML_APP_SID, incomingAllow: true }));

  res.setBody({ identity, token: token.toJwt() });
  callback(null, res);
};
- Visibility を Public に変更
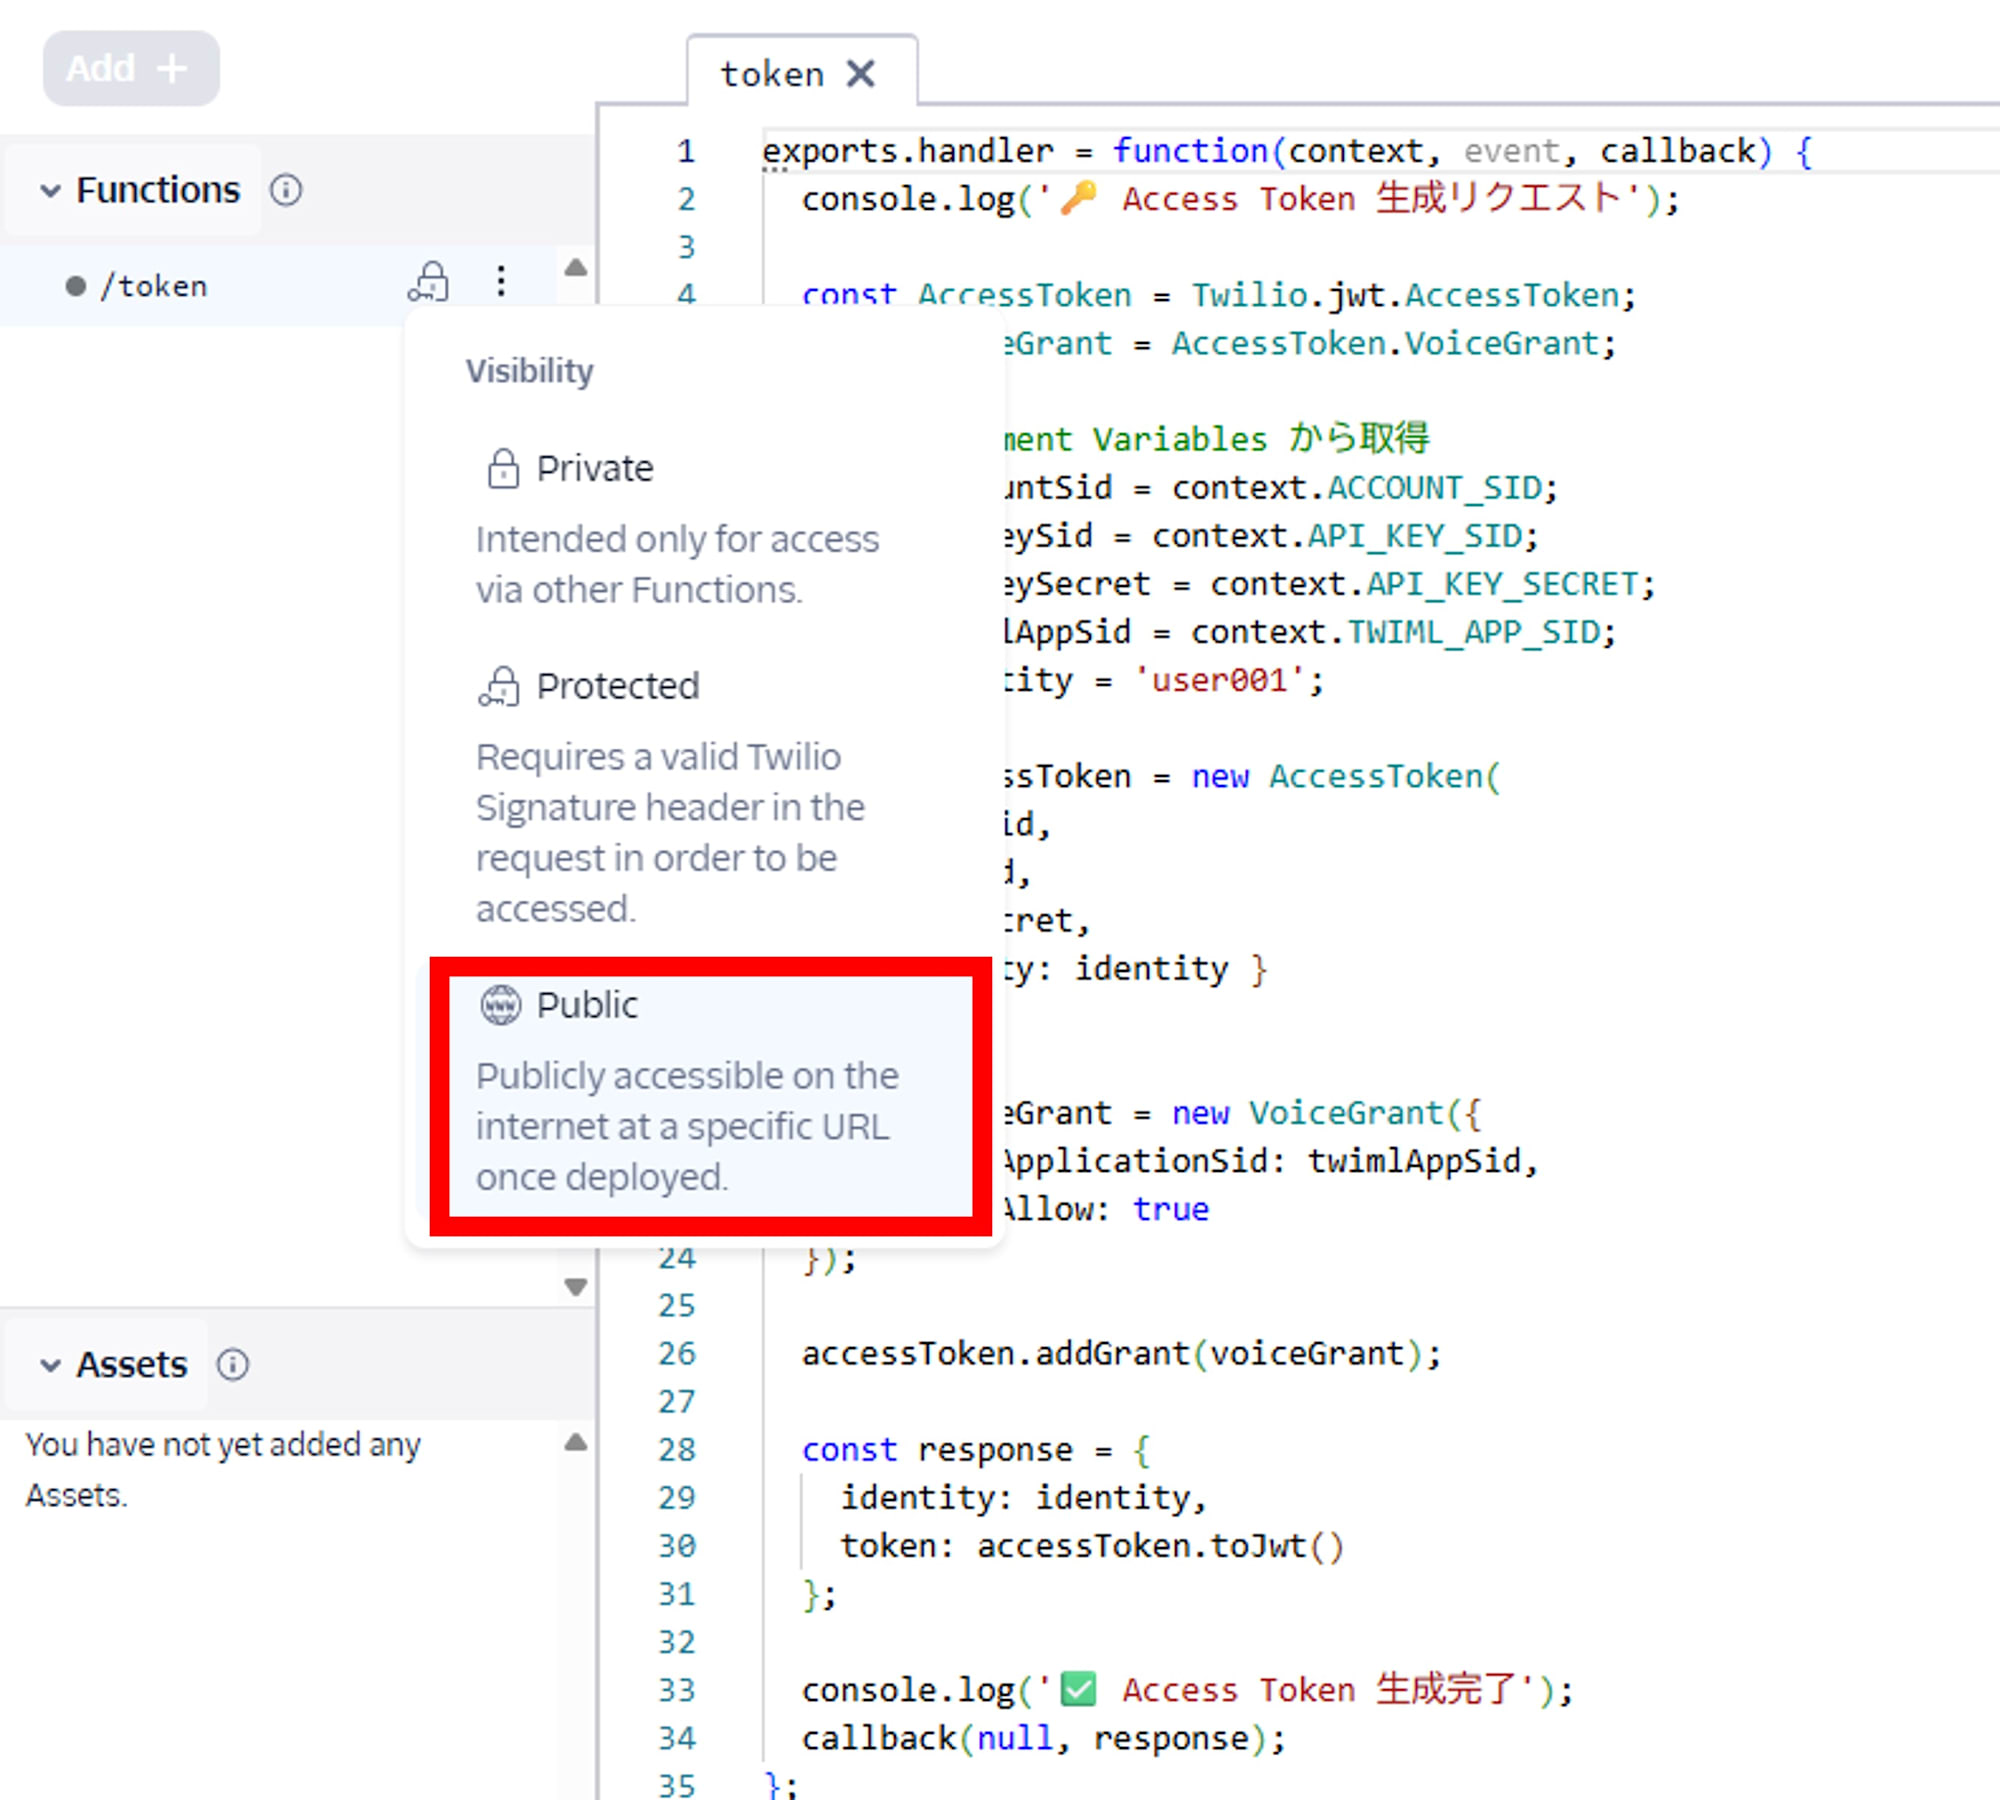
- 変更後 Save と Deploy All を忘れずに押下します
Twilio Function: TwiML 生成 (/voice)
- Add Function で
/voiceという名前の Function を作成
/voice の実装
exports.handler = function (context, event, callback) {
  const twiml = new Twilio.twiml.VoiceResponse();
  const to = event.To;
  const from = context.CALLER_ID; // 例: +81XXXXXXXXXX(発信元として認証済み番号 or 購入番号)

  if (!to) {
    twiml.say({ voice: 'Polly.Joanna', language: 'en-US' }, 'No phone number provided');
    return callback(null, twiml);
  }
  if (!from) {
    twiml.say({ voice: 'Polly.Joanna', language: 'en-US' }, 'Caller ID is not configured');
    return callback(null, twiml);
  }

  const dial = twiml.dial({ callerId: from, answerOnBridge: true, timeLimit: 3600 });
  dial.number(to);
  callback(null, twiml);
};
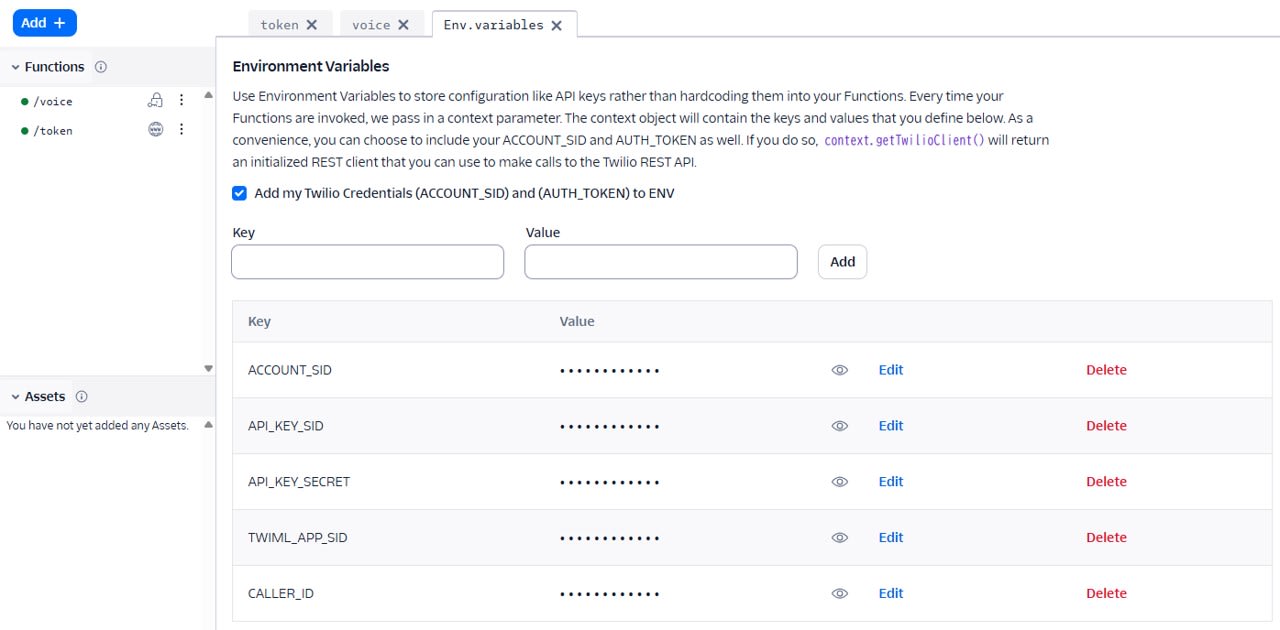
環境変数の設定
- Environment Variables で下記の値を設定します。ACCOUNT_SID は Twilio コンソールアカウントダッシュボードから取得できます。また、 CALLER_ID には Twilio で購入済みの番号を指定してください。
ACCOUNT_SID=ACxxxxxxxxxxxxxxxxxxxxxxxxxxxxxxxxx
API_KEY_SID=SKxxxxxxxxxxxxxxxxxxxxxxxxxxxxxxxxx
API_KEY_SECRET=your_api_key_secret
TWIML_APP_SID=APxxxxxxxxxxxxxxxxxxxxxxxxxxxxxxxxx
CALLER_ID=+81xxxxxxxxxx
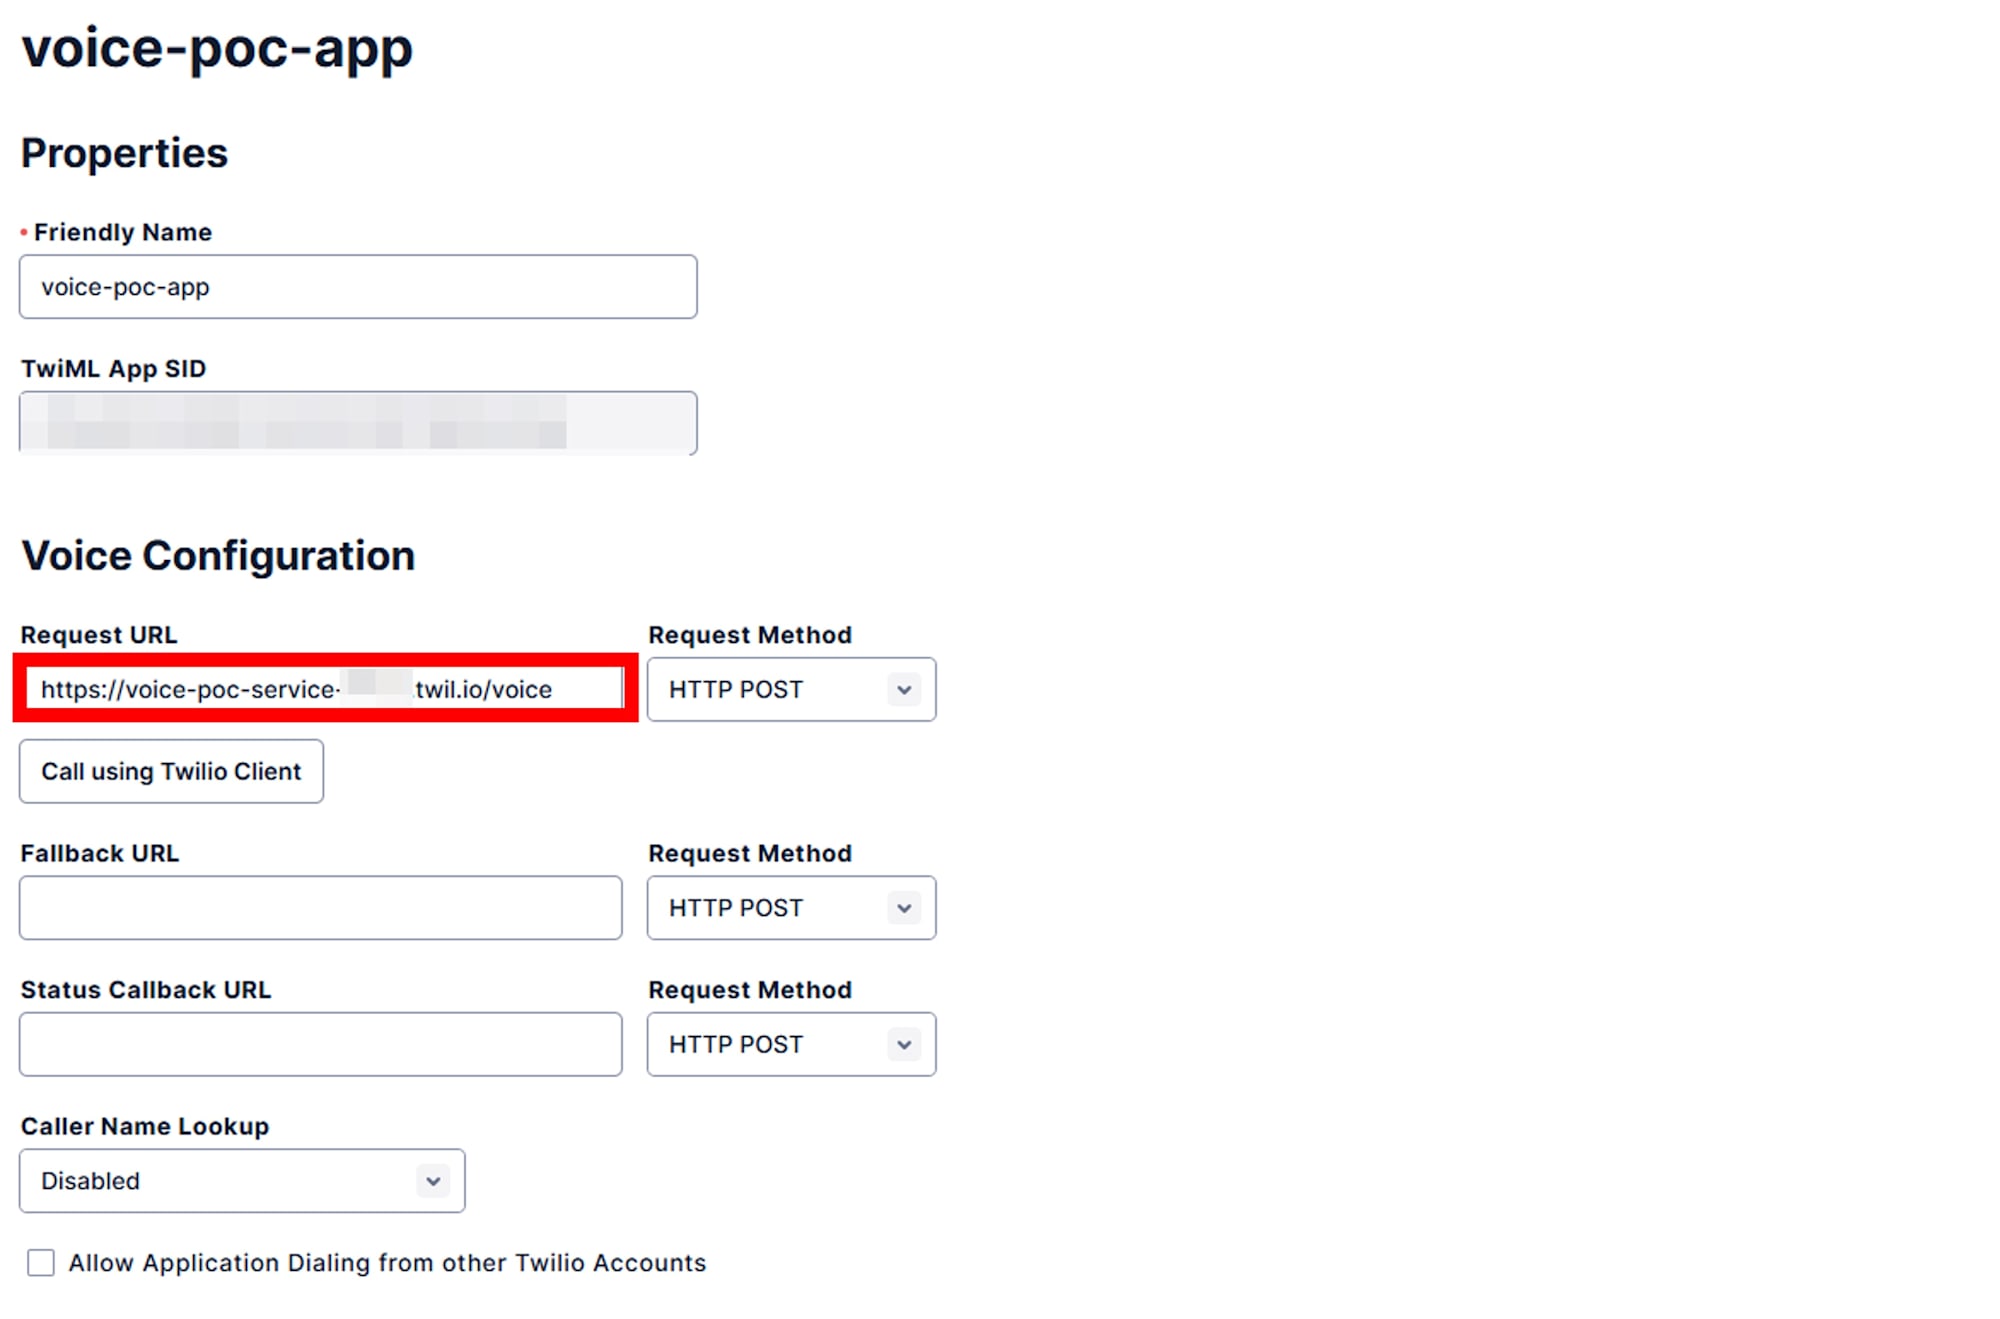
TwiML App への Functions URL 設定
Function を Deploy 完了後、TwiML App の Voice Request URL に /voice Function の URL を設定します。発信時はその TwiML App 経由で実際の PSTN 発信が行われます。
- Console > TwiML Apps > 作成したアプリを選択
- Voice Request URL:
https://voice-poc-service-xxxx-dev.twil.io/voice
バックエンド実装
顧客情報管理 (電話番号含む) を担当する部分を、今回は仮で作成します。本実装では、DB 接続やフロントエンドのセッション管理などがここで実装される想定です。
mkdir twilio-voice-poc
cd twilio-voice-poc
npm init
npm install express
server.js の実装
const express = require('express');
const app = express();
app.use(express.static('public'));

app.get('/customers', (_req, res) => {
  const customers = [
    { id: 'c1', name: '越井 琢巳', company: 'クラスメソッド', phoneNumber: '+819012345678' },
    { id: 'c2', name: '佐藤 花子', company: 'XYZ株式会社',     phoneNumber: '+819087654321' },
    { id: 'c3', name: '山田 次郎', company: 'サンプル商店',     phoneNumber: '+819011111111' },
  ];
  res.json({ customers, count: customers.length });
});

app.listen(3000, () => {
  console.log('http://localhost:3000');
});
フロントエンド実装
エンドユーザーが顧客と通話を行うために必要な機能や、番号秘匿 UI を提供します。今回の記事の核となる部分です。
Twilio Voice JavaScript SDK Releases から twilio.min.js をダウンロードして public フォルダに配置します。
twilio-voice-poc/
├── server.js
├── public/
│   ├── index.html
│   ├── app.js
│   └── twilio.min.js  ← GitHub からダウンロードしたファイル
public/index.html の実装
<!DOCTYPE html>
<html>
<head>
  <meta charset="UTF-8" />
  <title>Twilio Voice PoC</title>
  <style>
    .customer-item{border:1px solid #ccc;margin:5px 0;padding:10px;border-radius:5px;cursor:pointer}
    .customer-item:hover{background:#f0f0f0}
    .customer-item.selected{background:#e3f2fd;border-color:#2196f3}
  </style>
</head>
<body>
  <h1>音声発信テスト (番号マスキング)</h1>
  <div id="initSection">
    <p>音声通話を使うにはマイク許可が必要です。</p>
    <button id="initButton">音声機能を初期化</button>
    <div id="initStatus">初期化待ち</div>
  </div>
  <div id="callSection" style="display:none">
    <h3>お客様を選択してください</h3>
    <div id="customerList">読み込み中...</div>
    <div style="margin:20px 0">
      <button id="callButton" disabled>選択した顧客に発信</button>
      <button id="hangupButton" disabled>切断</button>
    </div>
    <div id="callStatus">準備完了</div>
    <div id="selectedCustomer"></div>
  </div>
  <script src="twilio.min.js"></script>
  <script src="app.js"></script>
</body>
</html>
public/app.js の実装
const Device = Twilio.Device;
const FUNCTIONS_BASE_URL = 'https://voice-poc-service-xxxx.twil.io';  // Twilio Function の URL を指定

let device;
let activeCall = null;
let selectedCustomer = null;

async function initializeTwilio() {
  // マイク許可
  await navigator.mediaDevices.getUserMedia({ audio: true, video: false });

  // トークン取得
  const { token } = await (await fetch(`${FUNCTIONS_BASE_URL}/token`)).json();

  // Device 作成 → register
  device = new Device(token);
  await device.register();

  // UI 切り替え
  document.getElementById('initSection').style.display = 'none';
  document.getElementById('callSection').style.display = 'block';

  // 以後の通話イベントは device で一元管理
  device.on('connect', (call) => {
    activeCall = call;
    document.getElementById('callStatus').textContent = '通話中...';
    document.getElementById('callButton').disabled = true;
    document.getElementById('hangupButton').disabled = false;

    call.on('disconnect', () => {
      activeCall = null;
      document.getElementById('callStatus').textContent = '通話終了';
      document.getElementById('callButton').disabled = false;
      document.getElementById('hangupButton').disabled = true;
    });
  });

  device.on('tokenWillExpire', async () => {
    const { token } = await (await fetch(`${FUNCTIONS_BASE_URL}/token`)).json();
    await device.updateToken(token);
  });
}

// 顧客一覧のロード&表示(電話番号はUI表示しない)
async function loadCustomers() {
  const { customers } = await (await fetch('/customers')).json();
  const list = document.getElementById('customerList');
  list.innerHTML = customers.map(c => `
    <div class="customer-item" data-customer='${JSON.stringify(c)}'>
      <strong>${c.name}</strong><br><small>${c.company}</small>
    </div>`).join('');
  [...document.querySelectorAll('.customer-item')].forEach(el => {
    el.addEventListener('click', () => {
      [...document.querySelectorAll('.customer-item')].forEach(i => i.classList.remove('selected'));
      el.classList.add('selected');
      selectedCustomer = JSON.parse(el.dataset.customer);
      document.getElementById('callButton').disabled = false;
      document.getElementById('selectedCustomer').textContent =
        `選択中: ${selectedCustomer.name}(${selectedCustomer.company})`;
    });
  });
}

// 初期化ボタン
document.getElementById('initButton').addEventListener('click', async () => {
  await initializeTwilio();
  await loadCustomers();
});

// 発信
document.getElementById('callButton').addEventListener('click', () => {
  if (!selectedCustomer) return;
  document.getElementById('callStatus').textContent = '発信中...';
  device.connect({ params: { To: selectedCustomer.phoneNumber } }); // ✅
});

// 切断
document.getElementById('hangupButton').addEventListener('click', () => {
  activeCall?.disconnect();
});
動作検証
Twilio Functions の Deploy 確認
Functions Console で両方の Function が正常に Deploy されていることを確認します。

ローカルサーバー起動
node server.js
動作テスト
http://localhost:3000をブラウザで開く
- 「音声機能を初期化」ボタンをクリックしマイク使用を承認
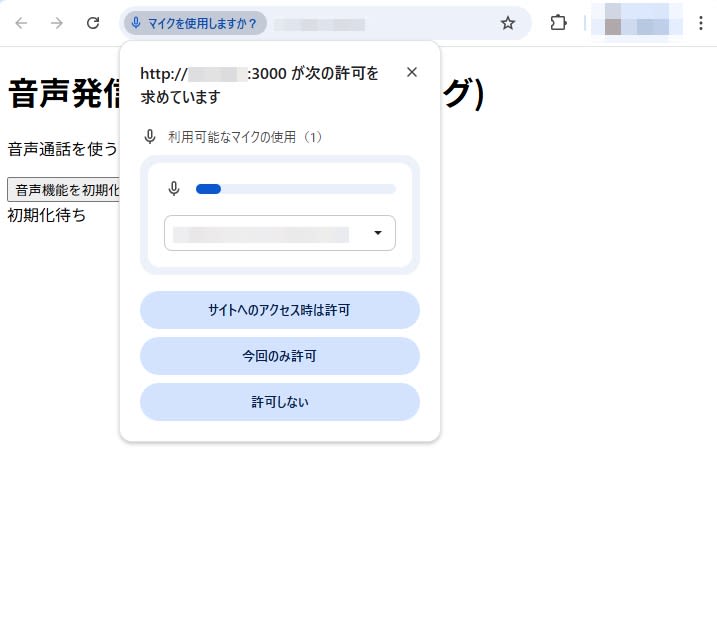
- 顧客リストが表示されることを確認
- 顧客を選択して「選択した顧客に発信」ボタンをクリック (電話番号はフロントエンドのUIに表示されない)
- アプリ⇔外部電話番号間で問題なく通話が行えることを確認
まとめ
本記事では、Twilio Voice JavaScript SDK と Twilio Functions を組み合わせて、ブラウザから外部電話番号へ発信する仕組みを構築しました。顧客情報はサーバー側で管理しつつ、フロントエンドでは名前と会社名だけを表示することで、利用者同士の電話番号を秘匿したまま通話を成立させることができます。配車アプリやデリバリーサービスのようなユースケースに限らず、電話番号を共有せずにユーザー間で通話を実現したいあらゆる場面で活用できます。
次回の記事では、発信処理の次のステップとして着信処理の実装を紹介する予定です。双方向での通信を可能とすることで、より実運用に近い番号秘匿通話システムを構築できることが期待されます。


