
Twilio Voice SDK - フロントエンドで番号を秘匿しつつ外部電話番号からの着信を受ける
はじめに
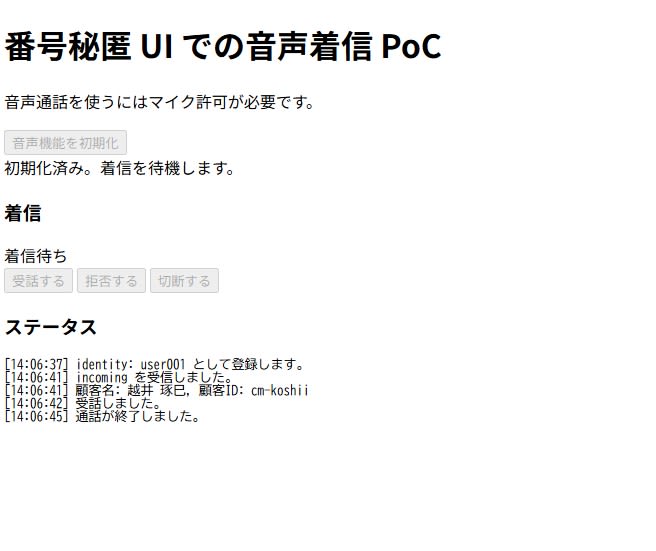
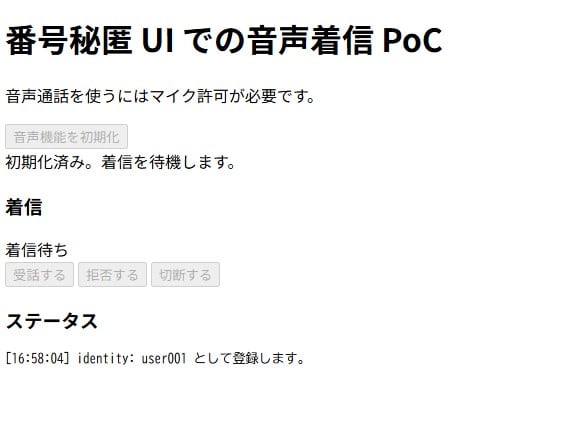
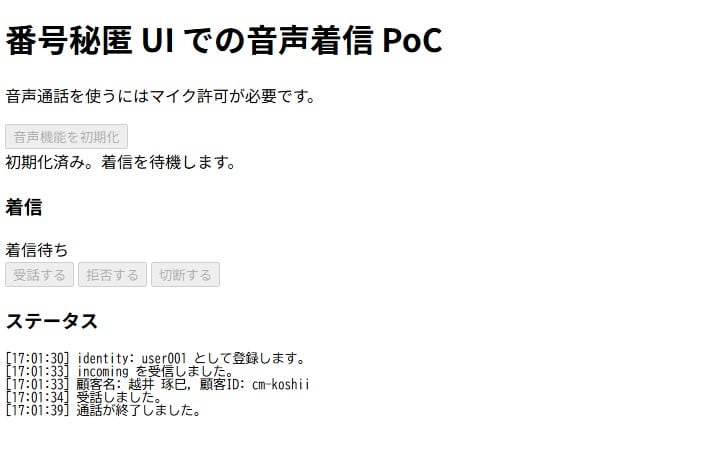
本記事では、Twilio Voice サービスを使用した番号秘匿 UI での音声着信機能の実装方法を解説します。以前の記事 にて、ブラウザから外部電話番号へ発信する仕組みを構築しました。今回は、顧客が Twilio 購入番号に電話をかけた際に、オペレーター側の Web アプリで番号を秘匿したまま着信を受けられる仕組みを実装します。以下のスクリーンショットに示すように、UI に電話番号は表示されず、顧客名などの識別情報のみが提示されます。
番号秘匿着信は、配車アプリやデリバリーサービスのように顧客とサービス提供者の双方が直接通話する必要がありながら、個人の電話番号を共有したくないケースで有効です。
Twilio とは
Twilio は、音声通話、SMS、ビデオ通話などの通信機能を API として提供するクラウドサービスです。開発者は複雑な通信インフラを構築することなく、REST API や SDK を通じてアプリケーションに通信機能を組み込めます。特に Voice サービスは、WebRTC を基盤としたブラウザ通話から、電話網 (PSTN) を経由した外部通話まで、幅広いユースケースに対応しています。
対象読者
- 音声着信機能を実装したいアプリケーション開発者
- Twilio Voice サービスを初めて利用する方
- JavaScript および Node.js の基本的な知識をお持ちの方
- 番号秘匿通話システムの PoC を検討されている方
参考
- Twilio Voice JavaScript SDK Documentation
- Twilio Voice Quickstart for JavaScript
- TwiML Voice Reference
概要と構成図
今回の実装では、顧客が Twilio の購入番号へ発信 → オペレーターのブラウザに着信 → UI 上で番号を秘匿しつつ顧客名のみ表示して受話、という流れを実現します。今回は PoC のため一部を簡易化しますが、将来の本番構成を前提に説明します。
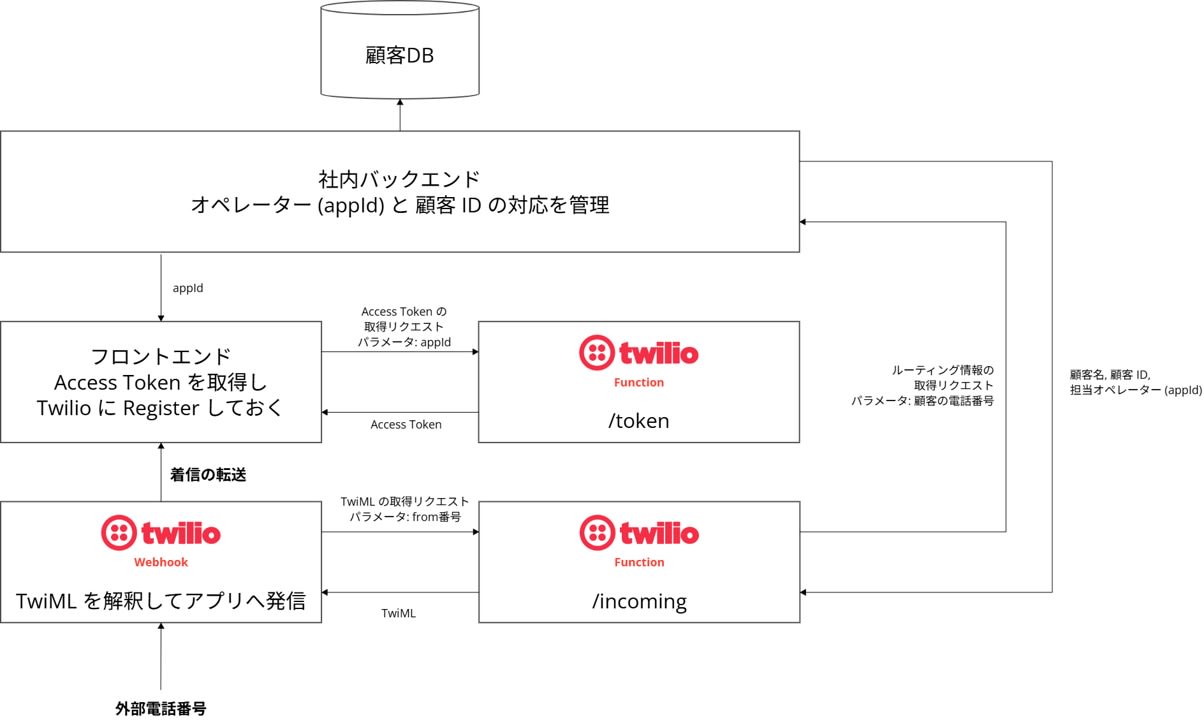
- フロントエンドが、Web アプリを Twilio Voice JS SDK で受話可能な端末として登録するため、 Twilio Function
/tokenに identity=appId を指定して Access Token を要求 - フロントエンドが取得した Token で Twilio Voice JS SDK を初期化しデバイス登録
- 顧客が Twilio 購入番号 に発信
- Twilio が Incoming Webhook で Twilio Function
/incomingを呼び出す /incomingが電話番号から顧客と担当者 (appId) を特定するため社内バックエンド API を呼び出し、顧客 DB を参照/incomingが TwiML を生成して返却- Twilio が appId を基にフロントエンドへ着信イベントを転送
- フロントエンド が incoming イベントで顧客名などのパラメータを取得し、番号秘匿 UI に表示
- オペレーター が受話ボタンを押すと通話が成立 (双方向音声は WebRTC 経由、PSTN 側は Twilio がブリッジ)
実装
API Key の取得
- Account Dashboard > Account Info > API Keys & Tokens
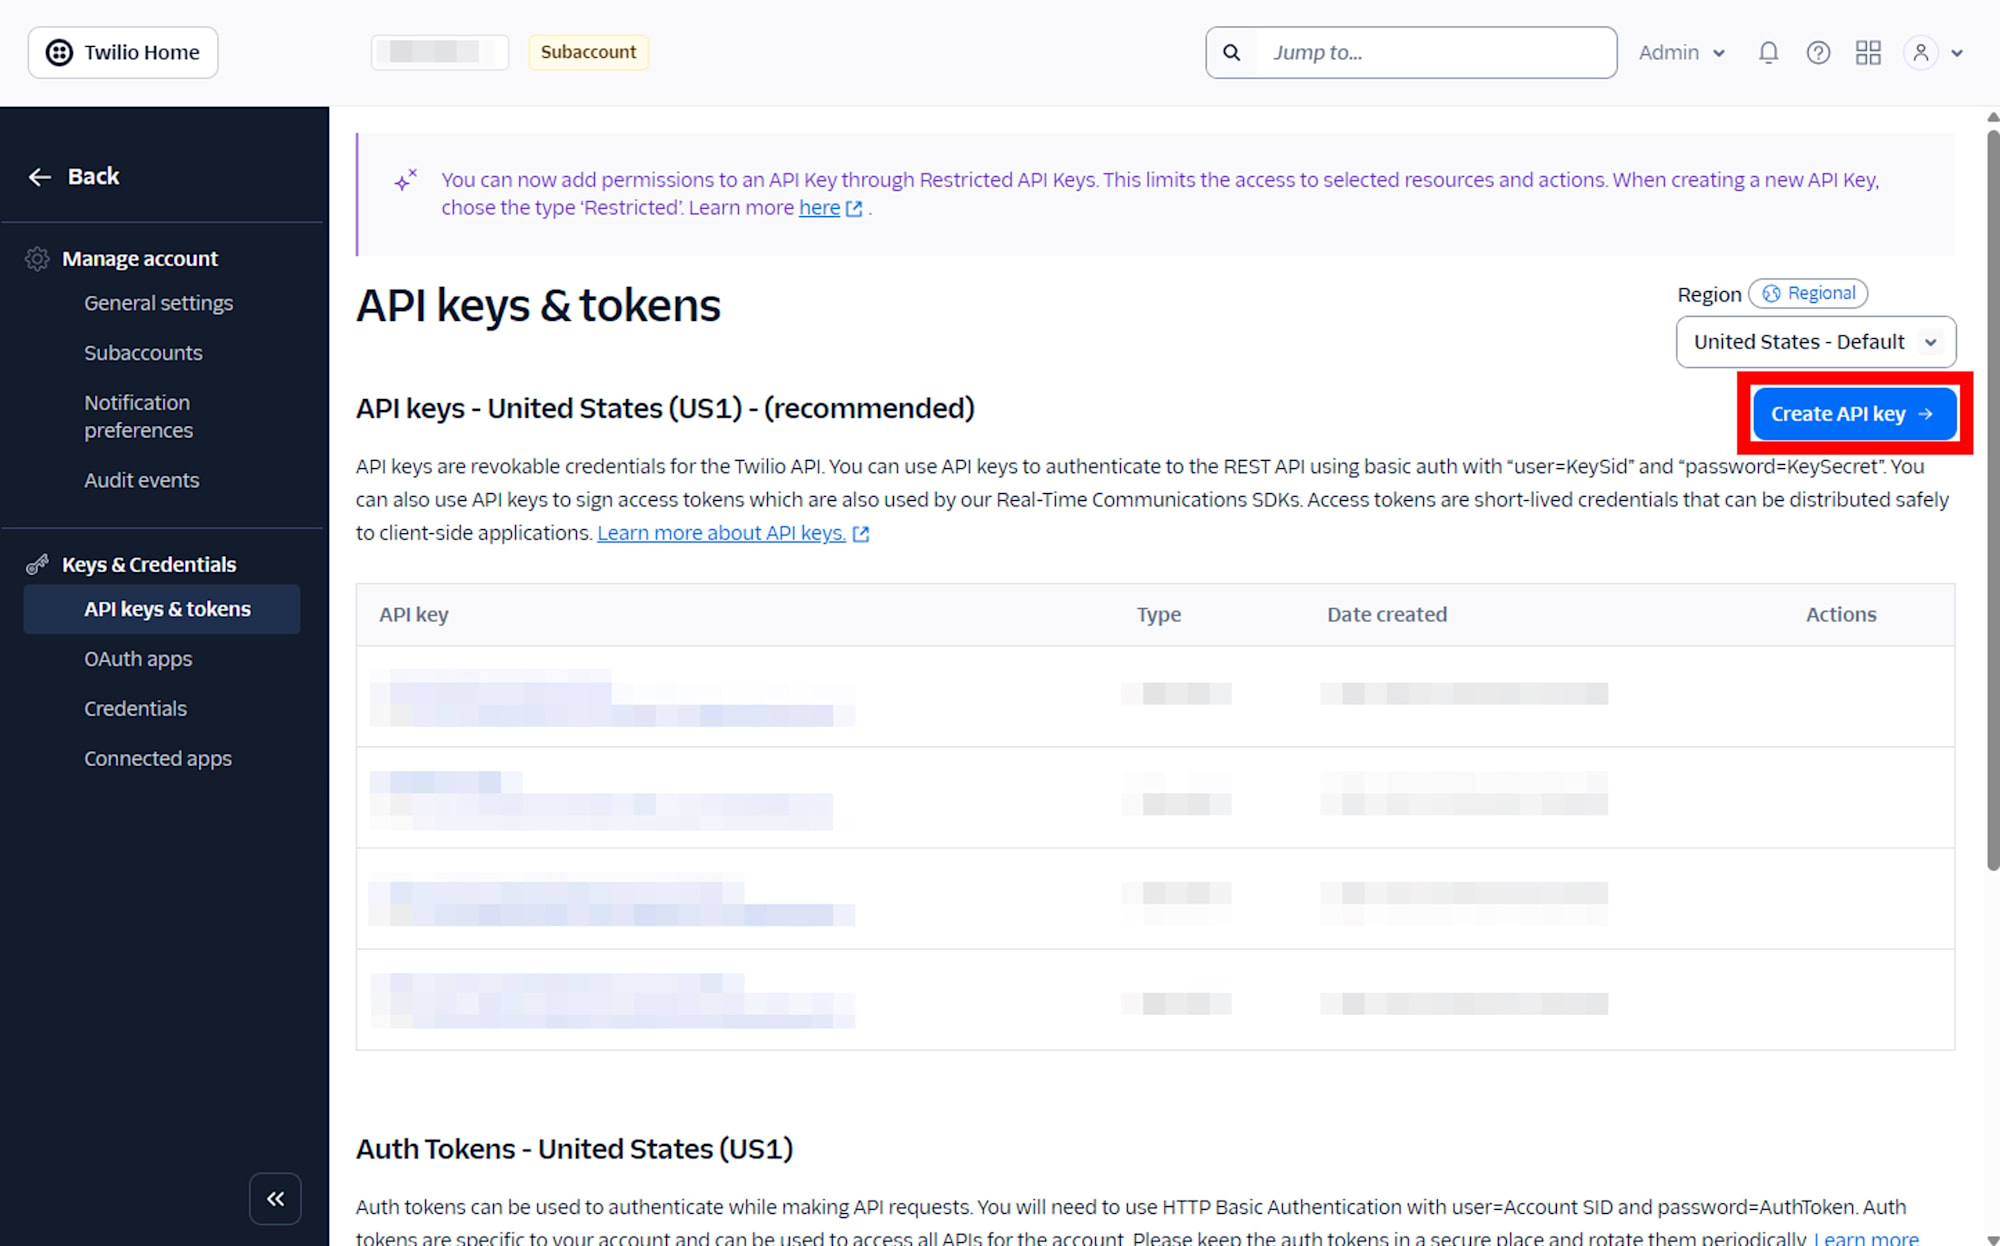
- Friendly name: 任意 (例:
incoming-poc-key) - Key type: Standard
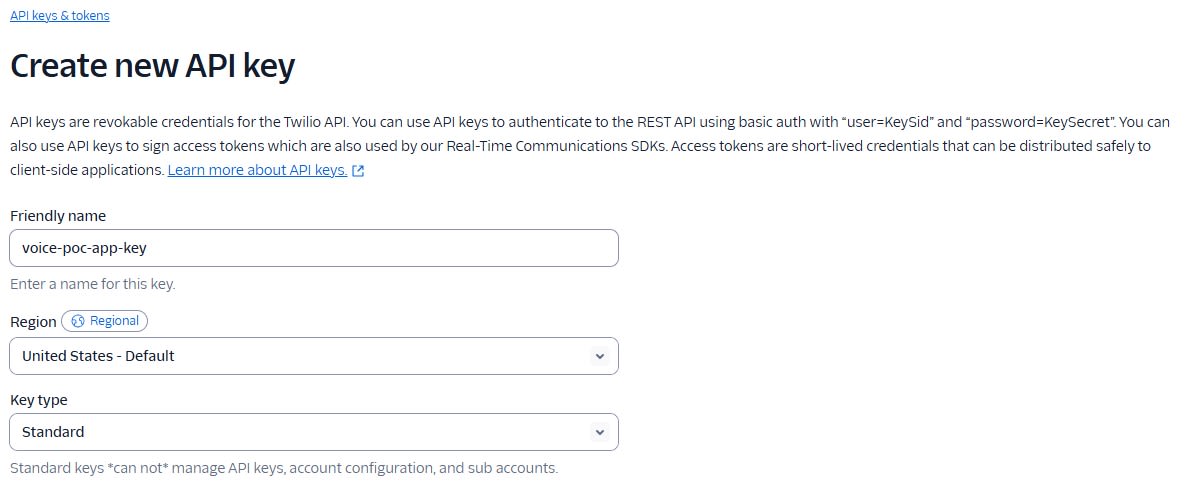
- Key SID と Secret を控えておきます
Twilio Function: Access Token 生成 (/token)
- Develop > Functions and Assets > Services で新しいサービスを作成
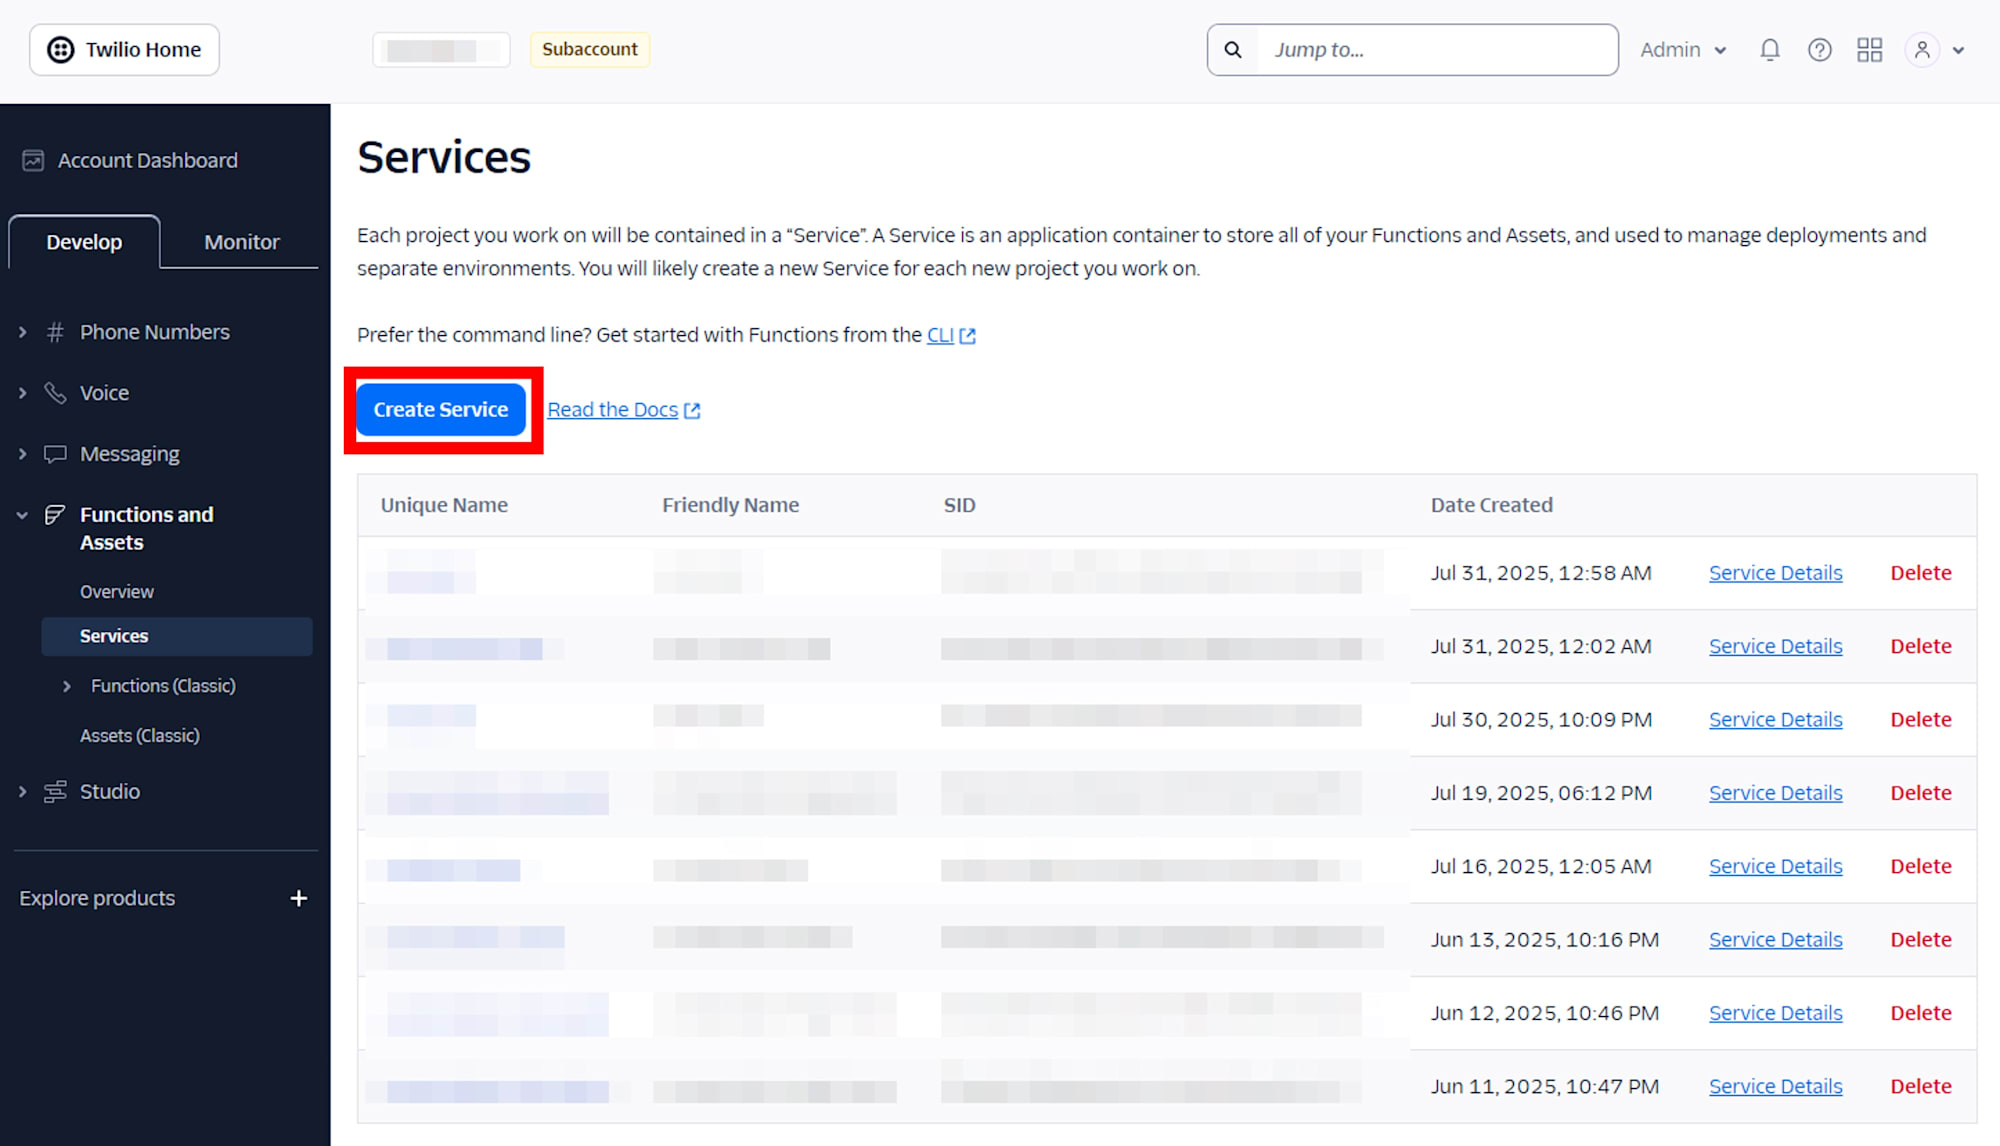
- Service Name: 任意 (例:
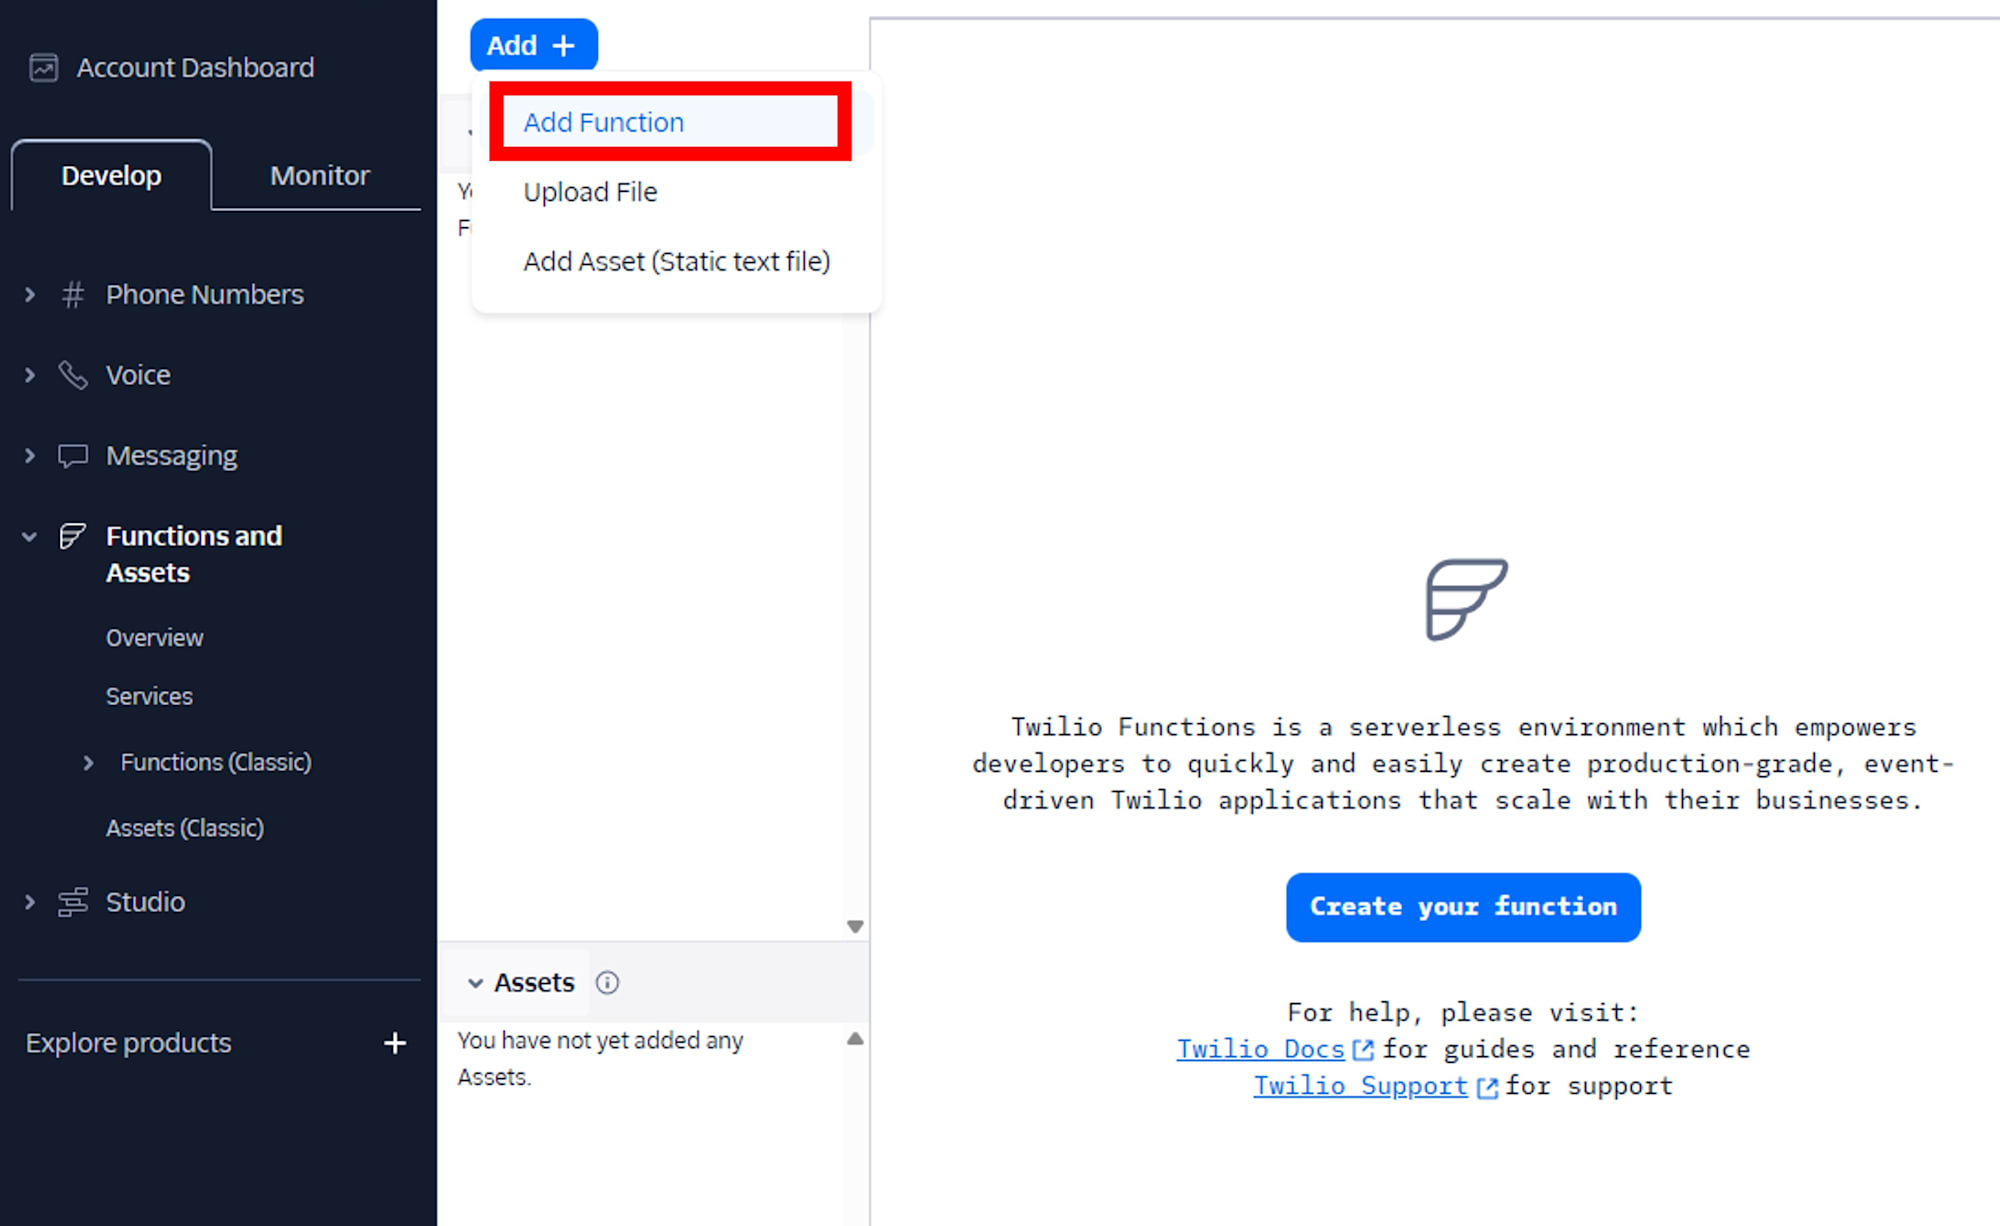
incoming-poc-service) - Add Function で
/tokenを作成
/token の実装
// /token
exports.handler = function (context, event, callback) {
  // CORS とレスポンス初期化
  const res = new Twilio.Response();
  // 本番ではワイルドカードではなく、許可オリジンを環境変数で固定してください
  // 例: CORS_ALLOW_ORIGIN=https://example.com
  const allowOrigin = context.CORS_ALLOW_ORIGIN || 'https://example.com';

  res.appendHeader('Content-Type', 'application/json');
  res.appendHeader('Access-Control-Allow-Origin', allowOrigin);
  res.appendHeader('Access-Control-Allow-Methods', 'GET, POST, OPTIONS');
  res.appendHeader('Access-Control-Allow-Headers', 'Content-Type');

  if (event.httpMethod === 'OPTIONS') {
    res.setStatusCode(200);
    res.setBody('');
    return callback(null, res);
  }

  // 受け付けるメソッドを限定
  if (event.httpMethod !== 'GET' && event.httpMethod !== 'POST') {
    res.setStatusCode(405);
    res.setBody(JSON.stringify({ error: 'method_not_allowed' }));
    return callback(null, res);
  }

  // identity の取得と検証
  // 今回はクエリやフォームの identity を使用します
  // 本来は社内バックエンドで認証済みユーザーから解決します
  const identityRaw = (event.identity || '').trim();
  const ID_REGEX = /^[A-Za-z0-9_\-\.@]{1,64}$/; // 許可文字を限定

  if (!identityRaw || !ID_REGEX.test(identityRaw)) {
    res.setStatusCode(400);
    res.setBody(JSON.stringify({
      error: 'invalid_identity',
      message: 'identity を指定してください [ 英数、アンダースコア、ハイフン、ドット、アットマーク、1〜64 文字 ]'
    }));
    return callback(null, res);
  }

  const identity = identityRaw;

  // Token 生成
  const AccessToken = Twilio.jwt.AccessToken;
  const VoiceGrant = AccessToken.VoiceGrant;

  // TTL は環境変数で制御可能にします。未設定時は 3600 秒
  const ttlSec = Number(context.TOKEN_TTL_SEC) > 0 ? Number(context.TOKEN_TTL_SEC) : 3600;

  const token = new AccessToken(
    context.ACCOUNT_SID,
    context.API_KEY_SID,
    context.API_KEY_SECRET,
    { identity, ttl: ttlSec }
  );

  // 受話のみ許可します。発信は不要のため付与しません。
  token.addGrant(new VoiceGrant({ incomingAllow: true }));

  res.setStatusCode(200);
  res.setBody({ identity, token: token.toJwt() });
  return callback(null, res);
};
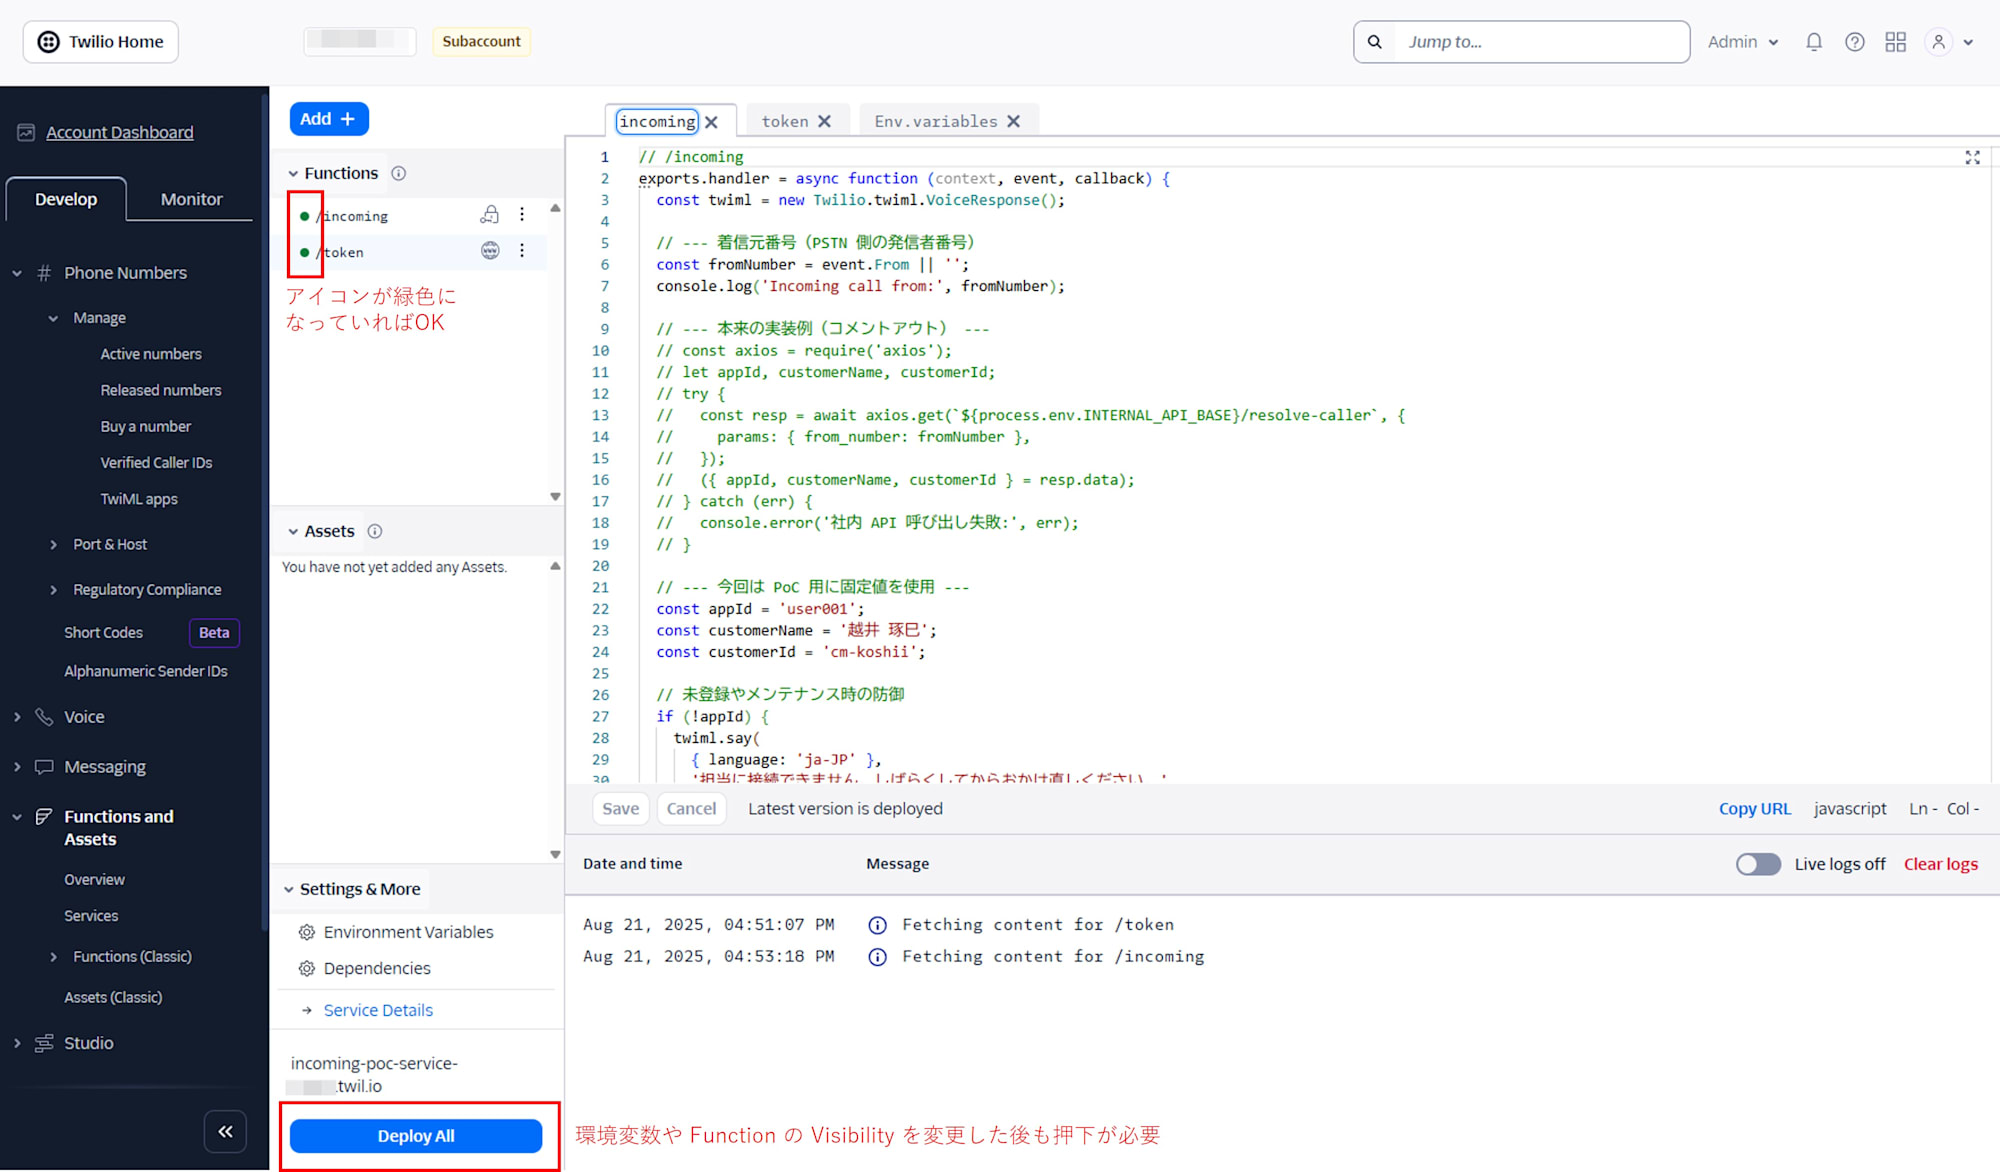
- Visibility を Public に変更
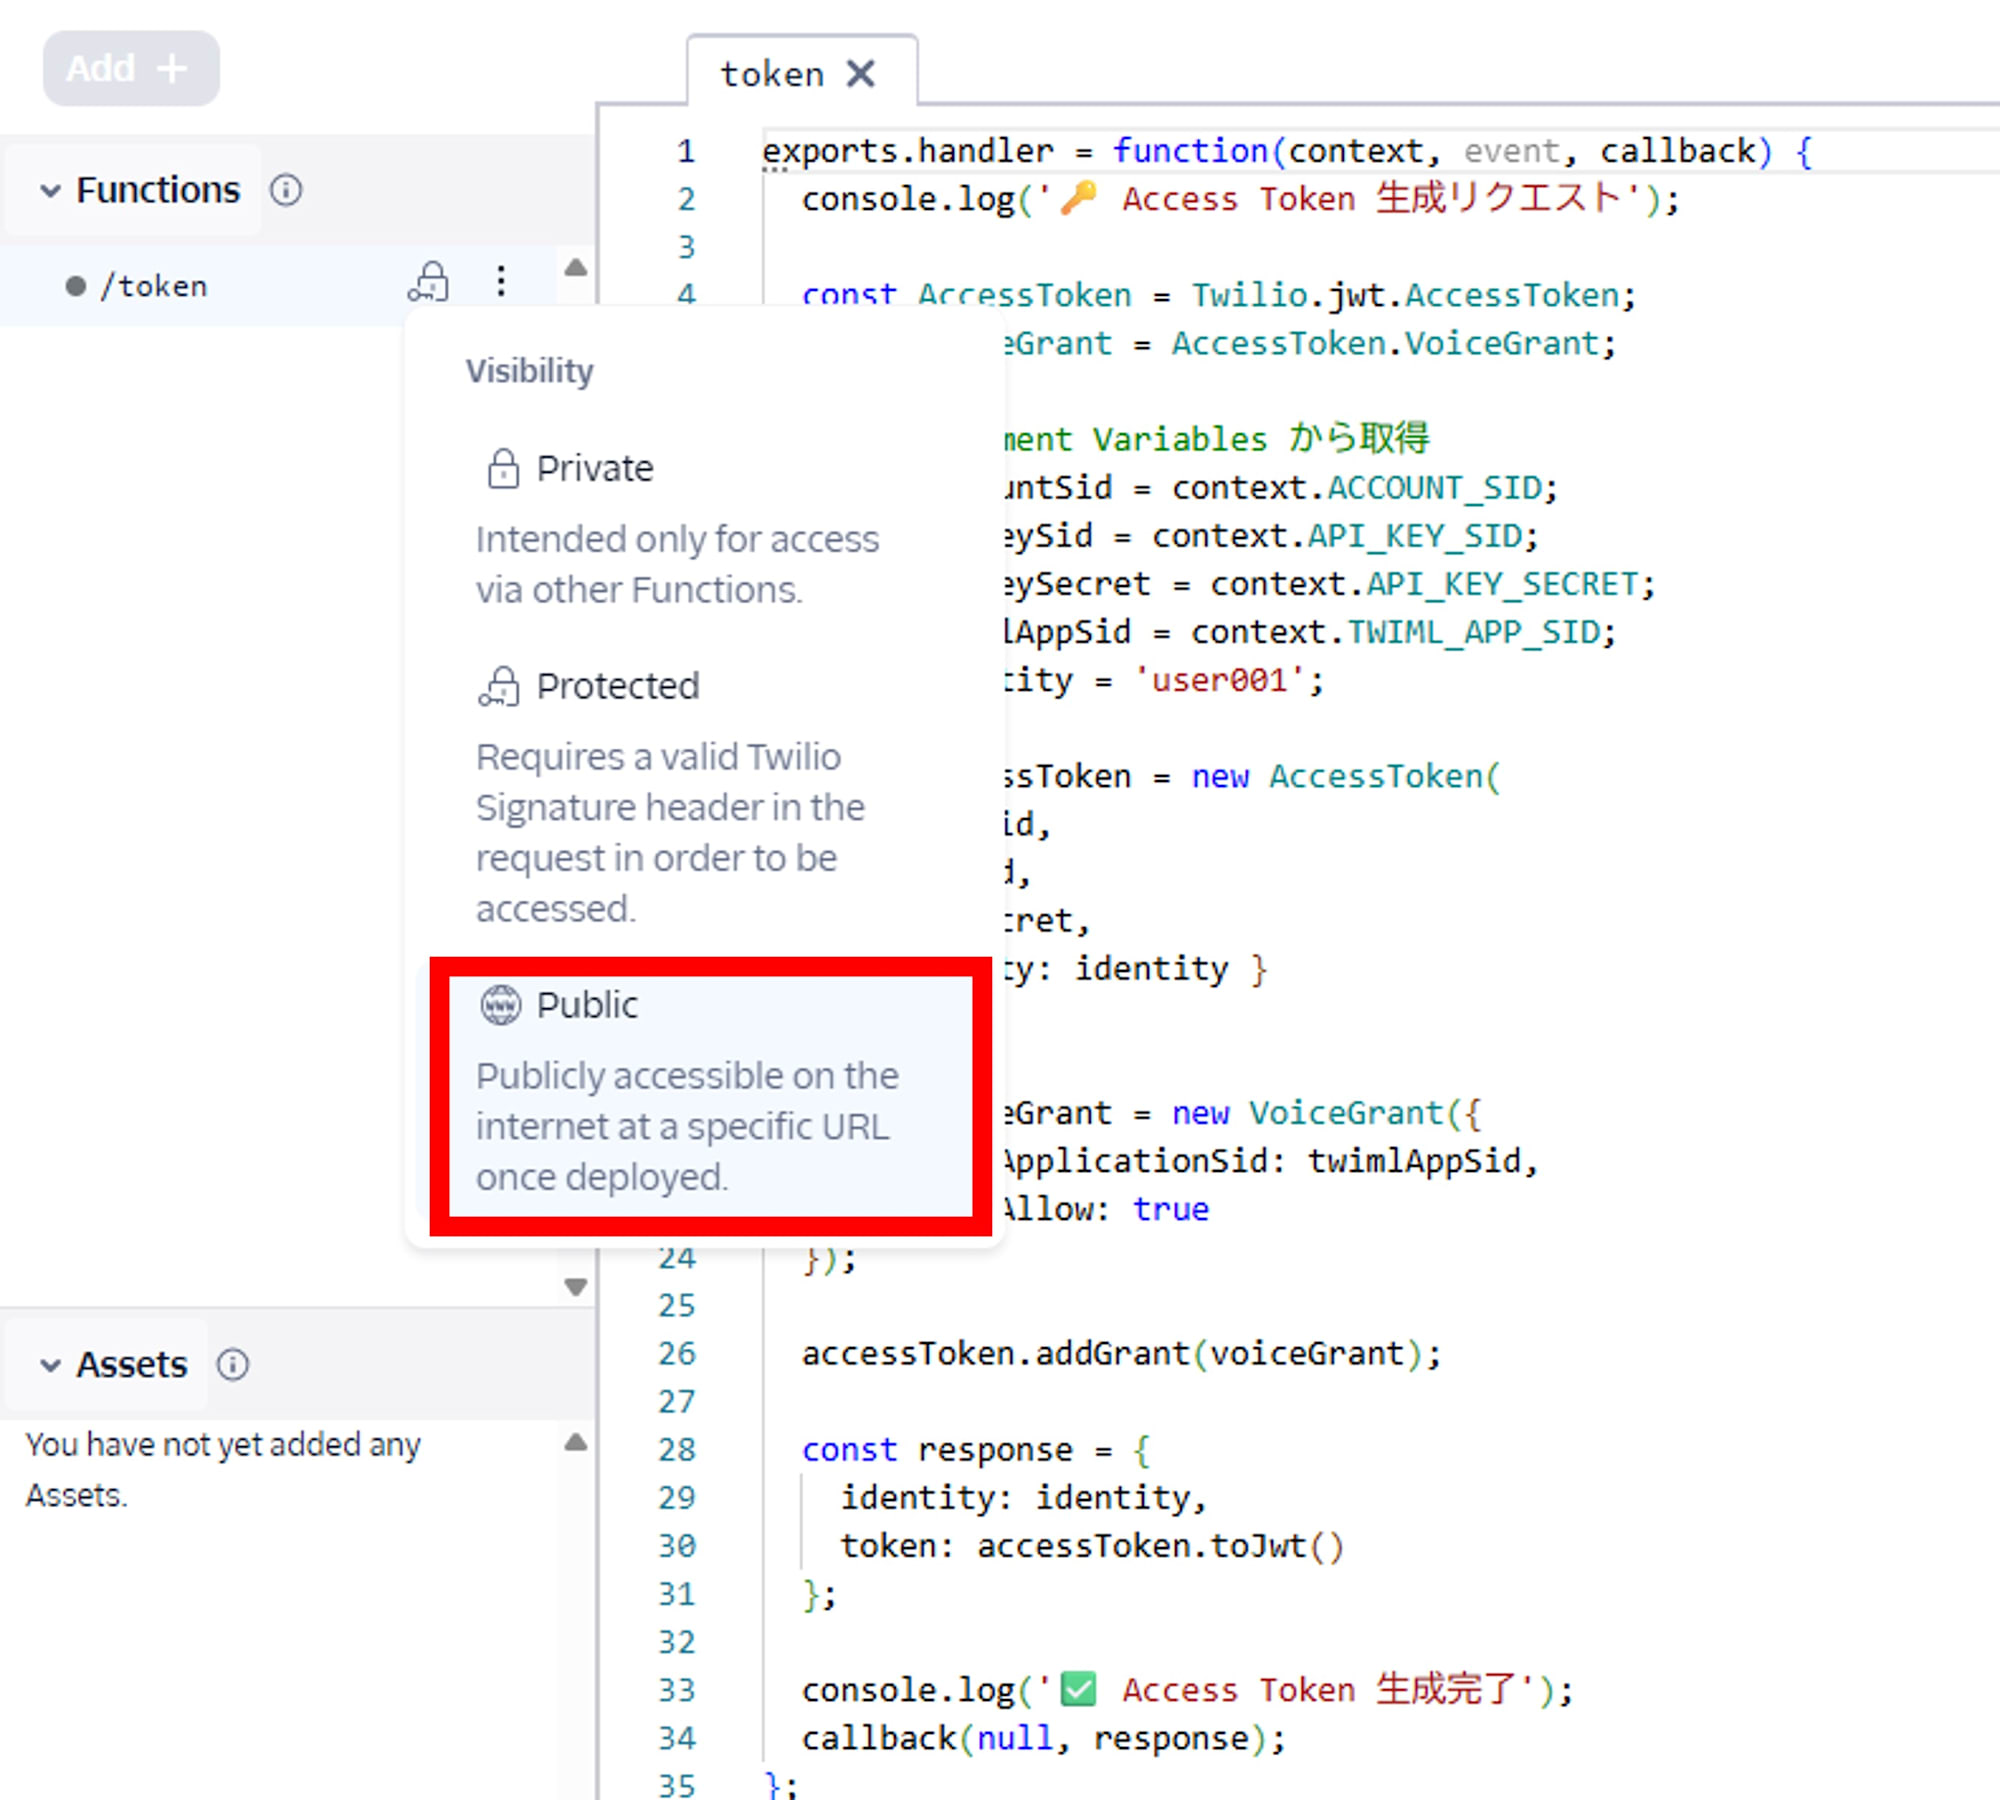
- 変更後 Save と Deploy All を忘れずに押下します
Twilio Function: TwiML 生成 (/incoming)
- Add Function で
/incomingを作成 - Twilio 購入番号に着信があったとき、この Function を呼び出すようにします
/incoming の実装
// /incoming
exports.handler = async function (context, event, callback) {
  const twiml = new Twilio.twiml.VoiceResponse();

  // 着信元番号は取得しますが、外部公開やログ出力はしません。
  // 理由: 個人情報最小化のため。UI や Parameter にも含めません。
  const fromNumber = event.From || '';

  // 本来の実装では、社内 API で fromNumber をキーに
  // { appId, customerName, customerId } を解決します。
  // 例:
  // const axios = require('axios');
  // let appId, customerName, customerId;
  // try {
  //   const resp = await axios.get(`${context.INTERNAL_API_BASE}/resolve-caller`, {
  //     params: { from_number: fromNumber },
  //     timeout: 2000,
  //   });
  //   ({ appId, customerName, customerId } = resp.data);
  // } catch (e) {
  //   // 本番では監査ログへ CallSid とステータスのみを記録し、
  //   // fromNumber はハッシュ化などで直接保存しない設計を推奨します。
  //   // 必要に応じて、代表窓口やガイダンスへフォールバックします。
  // }

  // 今回の PoC では固定値を使用します。
  const appId = 'user001';
  const customerName = '越井 琢巳';
  const customerId = 'cm-koshii';

  // ルーティング不能時のフォールバック
  if (!appId) {
    twiml.say({ language: 'ja-JP' }, '担当に接続できません。しばらくしてからおかけ直しください。');
    return callback(null, twiml);
  }

  // オペレーターの Web アプリ ( identity = appId ) にブリッジします。
  const dial = twiml.dial({ answerOnBridge: true, timeLimit: 3600 });
  const client = dial.client(appId);

  // UI 表示用の最小メタ情報のみを渡します。
  // 電話番号や内部 ID、機微情報は含めないでください。
  client.parameter({ name: 'customerName', value: customerName });
  client.parameter({ name: 'customerId', value: customerId });

  return callback(null, twiml);
};
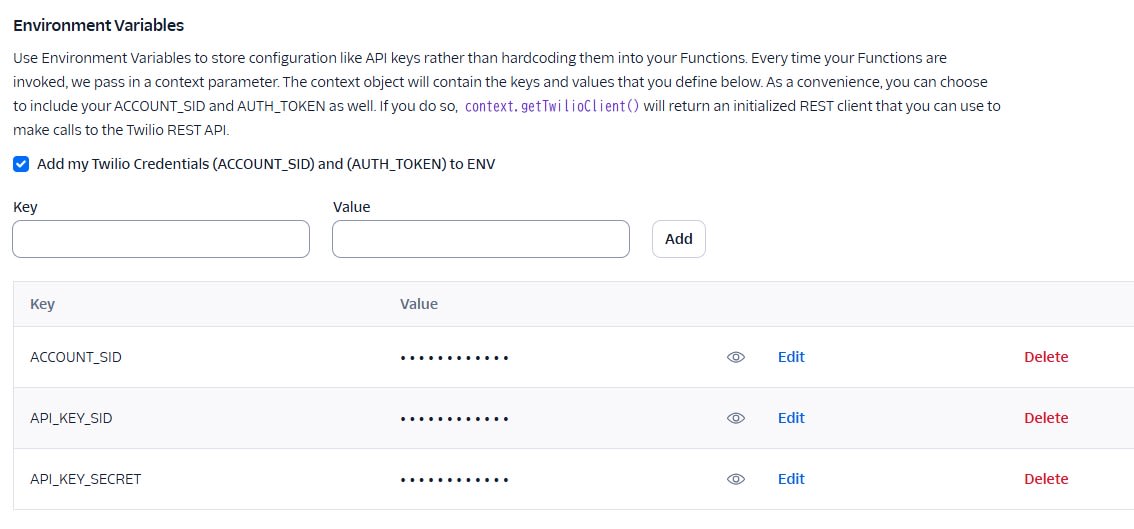
環境変数の設定
- Service の Environment Variables に以下を設定します。 ACCOUNT_SID は Twilio console の Account dashboard から取得します。
ACCOUNT_SID=ACxxxxxxxxxxxxxxxxxxxxxxxxxxxx
API_KEY_SID=SKxxxxxxxxxxxxxxxxxxxxxxxxxxxx
API_KEY_SECRET=your_api_key_secret
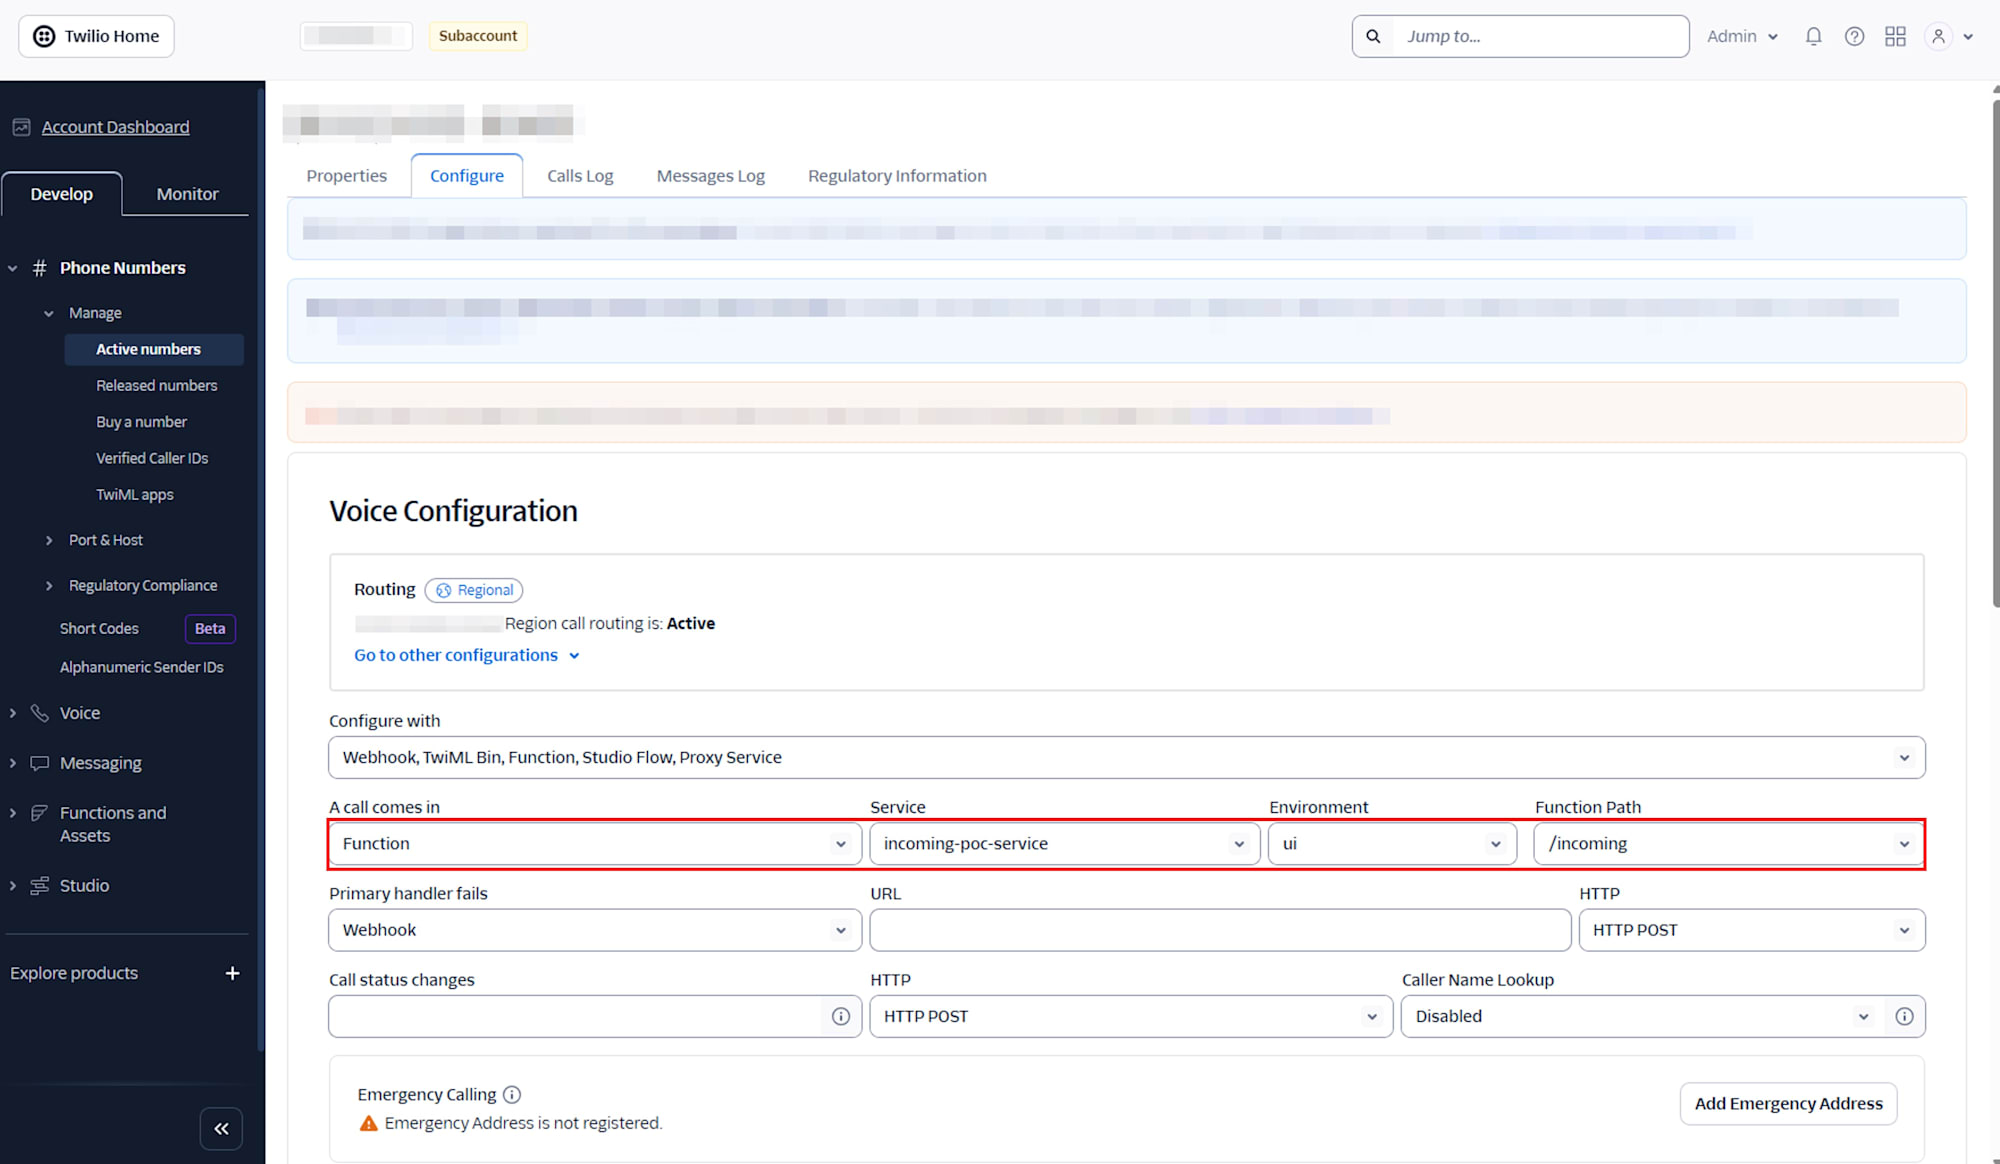
Incoming Webhook への Functions URL 設定
- Develop > Phone Numbers > Manage > Active numbers より、今回使用する Twilio 購入番号を選択し、 Voice Configuration の A call comes in に
/incomingFunction を設定します。
フロントエンド実装
ブラウザが着信を受けられるようにするため、Voice JS SDK を利用して UI を構築します。
mkdir twilio-incoming-poc
cd twilio-incoming-poc
npm init
Twilio Voice JavaScript SDK Releases から twilio.min.js をダウンロードして public フォルダに配置します。
フォルダー構成
twilio-incoming-poc/
├── public/
│   ├── index.html
│   ├── app.js
│   └── twilio.min.js  ← SDK を配置
public/index.html の実装
<!DOCTYPE html>
<html lang="ja">
<head>
<meta charset="UTF-8" />
<title>Twilio Incoming PoC</title>
</head>
<body>
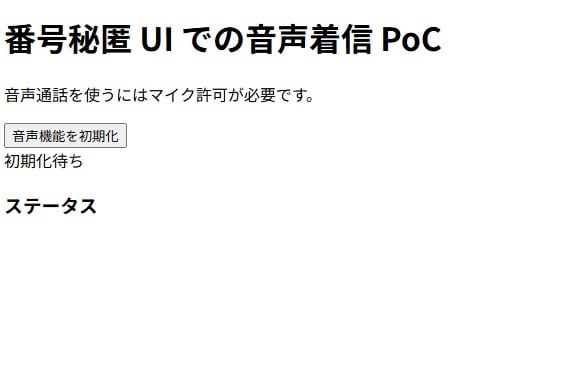
<h1>番号秘匿 UI での音声着信 PoC</h1>
<div id="initSection">
<p>音声通話を使うにはマイク許可が必要です。</p>
<button id="initButton">音声機能を初期化</button>
<div id="initStatus">初期化待ち</div>
</div>
<div id="incomingSection" style="display:none;">
<h3>着信</h3>
<div id="incomingInfo">着信待ち</div>
<button id="answerBtn" disabled>受話する</button>
<button id="rejectBtn" disabled>拒否する</button>
<button id="hangupBtn" disabled>切断する</button>
</div>
<div>
<h3>ステータス</h3>
<pre id="status"></pre>
</div>
<script src="twilio.min.js"></script>
<script src="app.js"></script>
</body>
</html>
public/app.js の実装
// ===== 設定値 =====
// 実環境の Functions ドメインに置き換えてください
const FUNCTIONS_BASE_URL = 'https://YOUR-FUNCTIONS-DOMAIN.twil.io';
// オペレーターの identity は URL クエリ ?identity=user001 を優先し、なければ既定値を使用します
const DEFAULT_OPERATOR_ID = 'user001';
const urlParams = new URLSearchParams(location.search);
const OPERATOR_ID = urlParams.get('identity') || DEFAULT_OPERATOR_ID;
const TOKEN_URL = (id) => `${FUNCTIONS_BASE_URL}/token?identity=${encodeURIComponent(id)}`;
// ===== 状態 =====
let device = null;
let pendingCall = null;
let activeCall = null;
// ===== 補助関数 =====
function $(id) { return document.getElementById(id); }
function safeText(id, text) {
const el = $(id);
if (el) el.textContent = text;
}
function log(line) {
// 掲載用の簡易ログ。個人情報は記録しません。
const box = $('status');
if (!box) return;
const t = new Date().toLocaleTimeString();
box.textContent += `[${t}] ${line}\n`;
}
async function fetchToken(id) {
const res = await fetch(TOKEN_URL(id), { method: 'GET', cache: 'no-store' });
if (!res.ok) {
const text = await res.text().catch(() => '');
throw new Error(`token fetch failed: ${res.status} ${text}`);
}
return res.json();
}
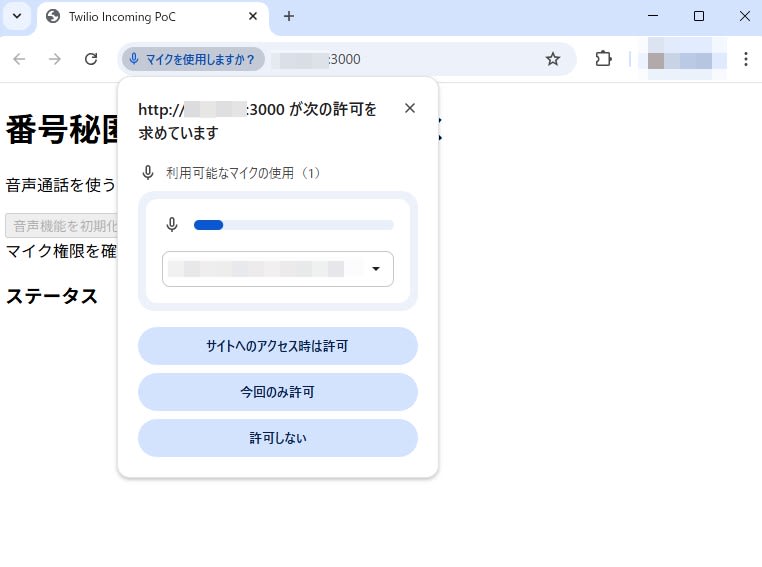
async function ensureMicPermission() {
// ブラウザ権限の取得。拒否時は例外になります。
await navigator.mediaDevices.getUserMedia({ audio: true });
}
// ===== 初期化フロー =====
async function initialize() {
const initButton = $('initButton');
try {
if (initButton) initButton.disabled = true;
safeText('initStatus', 'マイク権限を確認します…');
await ensureMicPermission();
safeText('initStatus', 'トークンを取得します…');
const { token, identity } = await fetchToken(OPERATOR_ID);
// Twilio Voice SDK v2
device = new Twilio.Device(token);
await device.register();
wireDeviceEvents(device);
safeText('initStatus', `初期化済み。受話待機中 ( identity: ${identity} )`);
const incomingSection = $('incomingSection');
if (incomingSection) incomingSection.style.display = 'block';
} catch (e) {
safeText('initStatus', '初期化に失敗しました。リトライしてください。');
log(`init error`);
if (initButton) initButton.disabled = false;
}
}
function wireDeviceEvents(dev) {
dev.on('registered', () => log('Device.registered'));
dev.on('unregistered', () => log('Device.unregistered'));
dev.on('error', () => log('Device.error'));
// トークン更新
dev.on('tokenWillExpire', async () => {
try {
log('tokenWillExpire → 更新します');
const { token } = await fetchToken(OPERATOR_ID);
await dev.updateToken(token);
log('トークンを更新しました');
} catch {
log('トークン更新失敗');
}
});
// 着信処理
dev.on('incoming', (call) => {
pendingCall = call;
// /incoming で付与した UI 表示用メタ情報を取得します
const customerName = call.customParameters?.get('customerName') || '不明';
const customerId = call.customParameters?.get('customerId') || 'unknown';
// 顧客名は UI のみに表示し、ログには記録しません
safeText('incomingInfo', `着信: ${customerName} (ID: ${customerId})`);
log('incoming を受信しました');
const answerBtn = $('answerBtn');
const rejectBtn = $('rejectBtn');
const hangupBtn = $('hangupBtn');
if (answerBtn) answerBtn.disabled = false;
if (rejectBtn) rejectBtn.disabled = false;
if (hangupBtn) hangupBtn.disabled = true;
call.on('disconnect', () => {
log('通話が終了しました');
activeCall = null;
pendingCall = null;
if (answerBtn) answerBtn.disabled = true;
if (rejectBtn) rejectBtn.disabled = true;
if (hangupBtn) hangupBtn.disabled = true;
safeText('incomingInfo', '着信待ち');
});
call.on('error', () => log('Call.error'));
});
dev.on('connect', (call) => {
log('connect しました');
activeCall = call;
const hangupBtn = $('hangupBtn');
if (hangupBtn) hangupBtn.disabled = false;
});
}
// ===== DOM 構築後にイベントを束ねる =====
document.addEventListener('DOMContentLoaded', () => {
const initButton = $('initButton');
const answerBtn = $('answerBtn');
const rejectBtn = $('rejectBtn');
const hangupBtn = $('hangupBtn');
if (initButton) initButton.addEventListener('click', initialize);
if (answerBtn) {
answerBtn.addEventListener('click', async () => {
if (!pendingCall) return;
try {
answerBtn.disabled = true;
if (rejectBtn) rejectBtn.disabled = true;
await pendingCall.accept();
log('受話しました');
if (hangupBtn) hangupBtn.disabled = false;
} catch {
log('受話失敗');
answerBtn.disabled = false;
if (rejectBtn) rejectBtn.disabled = false;
}
});
}
if (rejectBtn) {
rejectBtn.addEventListener('click', async () => {
try {
rejectBtn.disabled = true;
if (answerBtn) answerBtn.disabled = true;
await pendingCall?.reject();
log('着信を拒否しました');
} catch {
log('拒否失敗');
} finally {
pendingCall = null;
const hangupBtn2 = $('hangupBtn');
if (hangupBtn2) hangupBtn2.disabled = true;
safeText('incomingInfo', '着信待ち');
}
});
}
if (hangupBtn) {
hangupBtn.addEventListener('click', async () => {
try {
hangupBtn.disabled = true;
await activeCall?.disconnect();
log('切断しました');
} catch {
log('切断失敗');
} finally {
activeCall = null;
pendingCall = null;
safeText('incomingInfo', '着信待ち');
if (answerBtn) answerBtn.disabled = true;
if (rejectBtn) rejectBtn.disabled = true;
}
});
}
});
動作検証
Twilio Functions の Deploy 確認
Functions Console 上で /token と /incoming が Deploy 済みであることを確認します。
ローカルサーバー起動
npx http-server ./public -p 3000
動作テスト
http://localhost:3000をブラウザで開く
- 「音声機能を初期化」ボタンをクリックし、マイク利用を承認
- identity: user001 の登録ログが表示され、「着信待ち」となることを確認
- 携帯電話などから Twilio 購入番号に発信。ブラウザ側に着信が表示され、顧客名と顧客 ID のみが表示される (電話番号は表示されない)

- 「受話する」をクリックすると通話が成立し、双方で音声を確認。終了後は「通話が終了しました。」というログが表示され、再び「着信待ち」の状態に戻る
まとめ
本記事では、Twilio Voice JavaScript SDK と Twilio Functions を利用して、外部電話番号からの着信をフロントエンドアプリに転送する仕組みを構築しました。社内 API で from_number をキーに顧客情報を解決する流れを想定しつつ、PoC では固定値を利用する形で実装しています。フロントエンドには顧客名や ID のみを渡し、電話番号そのものは表示しないことで、番号を秘匿したまま通話を成立させることが可能です。このアプローチは、コールセンター業務やユーザーサポートなど、顧客情報を安全に取り扱う必要がある場面で活用が期待されます。


