計画→実行のVS Code Planエージェント。カスタムエージェントの参照実装としても使えます
はじめに
VS Code の Copilot Chat ではコーディングのときは Agent エージェント、質問するときは Ask エージェントというように、タスクに応じて異なるエージェント(旧称「モード」)を選択できます。
コード開発する際、従来の Agent エージェントでは、プロンプトに対して AI がファイルを変更して応答しました。しかし、依頼者と作業者の期待値のギャップが大きくなりがちで、手戻りに悩まされることもありました。
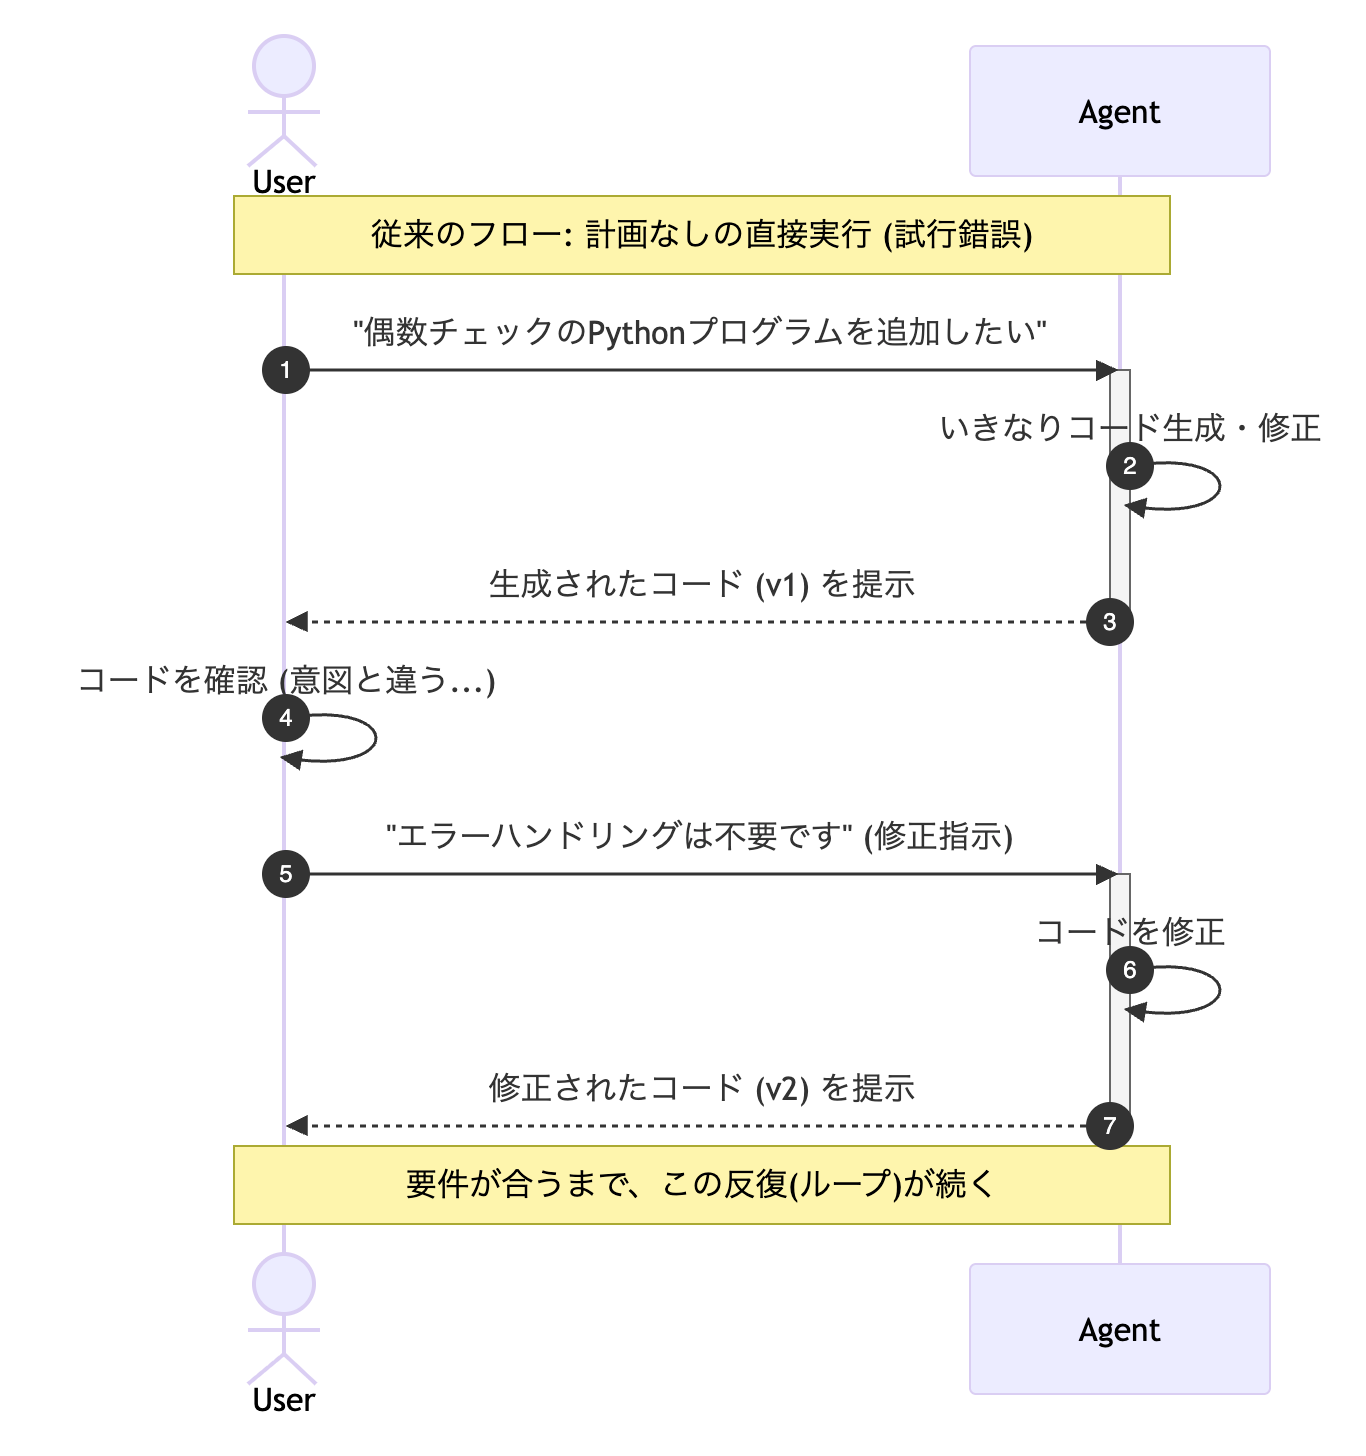
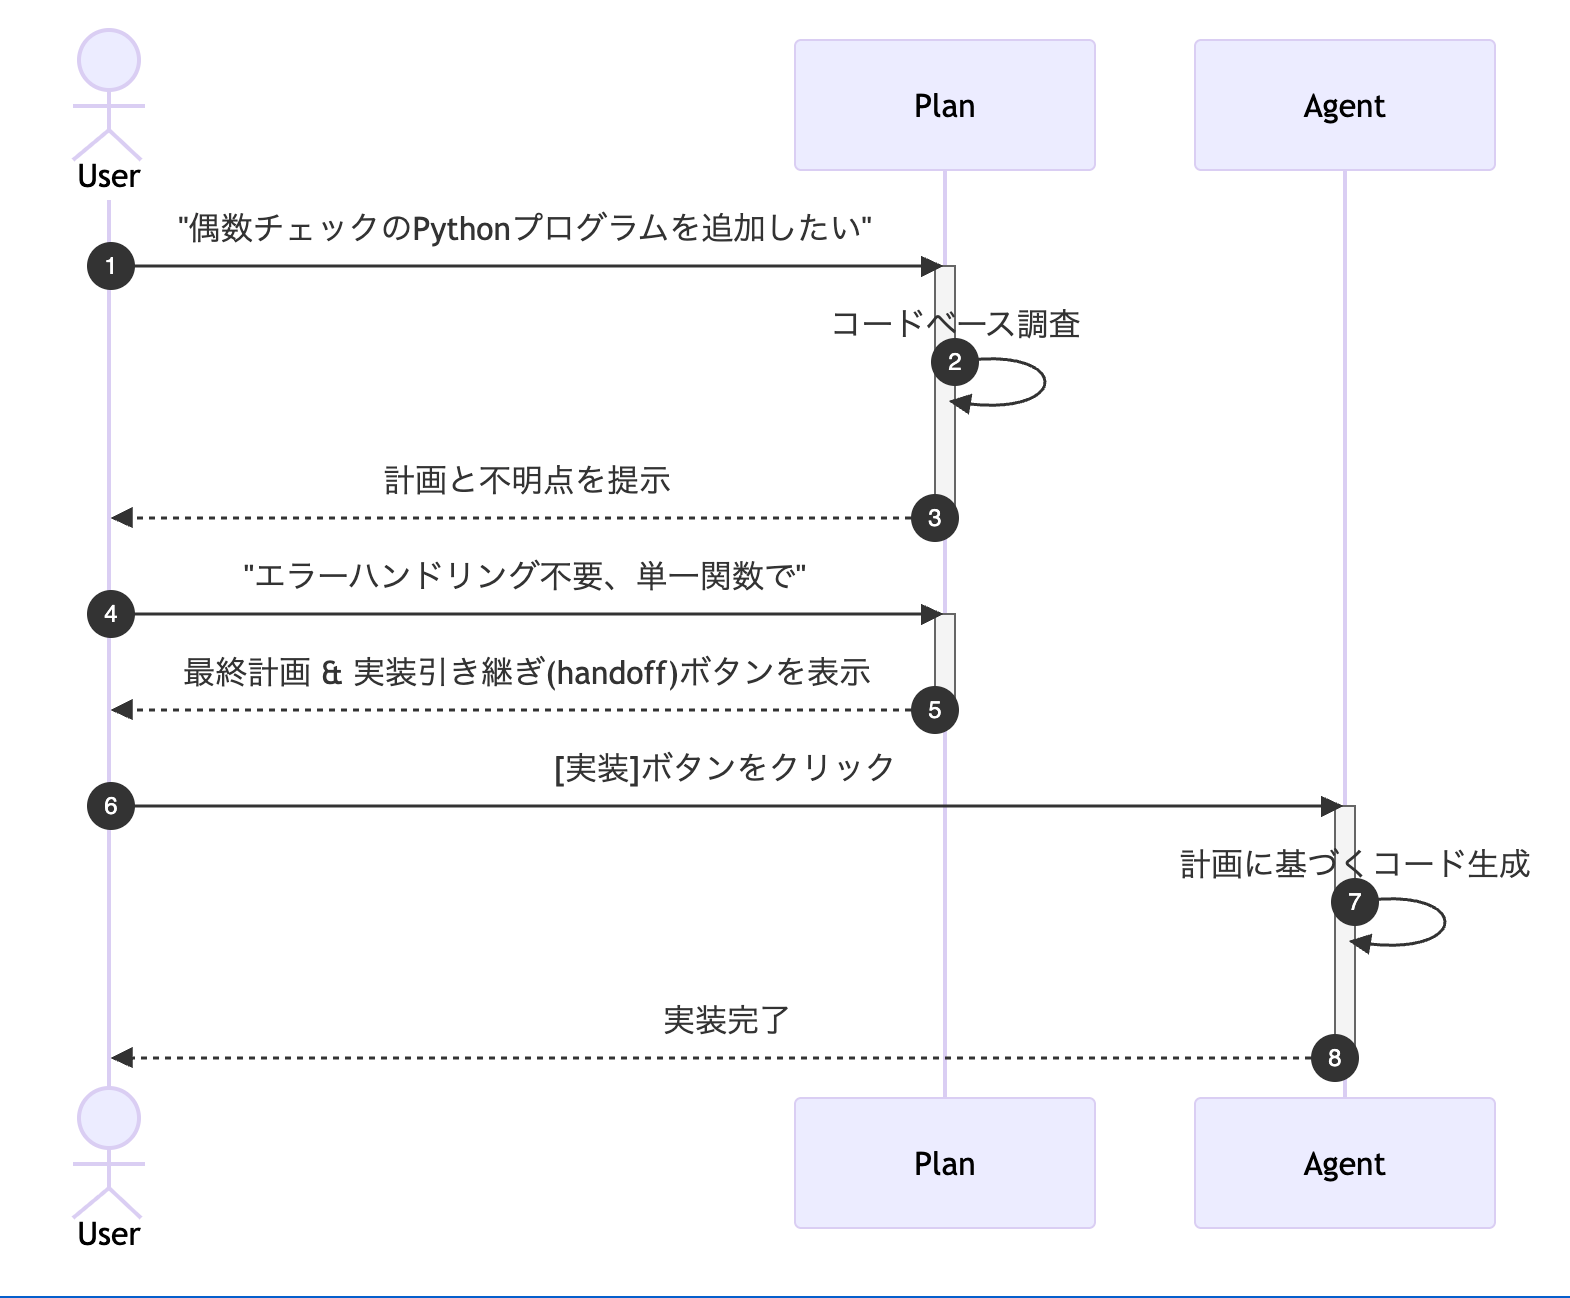
2025年11月からClineやClaude Codeでもおなじみの Plan エージェントが導入され、計画(Plan) → 実行(Agent) という2段階のワークフローが可能になり、複雑なタスクに対しても 精度の高い出力 を期待できるようになりました。
本記事では、前半で Plan エージェントの基本的な使い方を、後半で Plan エージェントはカスタムエージェントで実現されていることを解説します。
Plan エージェントの使い方
Planエージェントは VS Codeのバージョン 1.106 以降で利用可能です。
Plan エージェントは、エージェントはコードベースの調査と計画立案に集中し、実際のファイル変更は行いません。
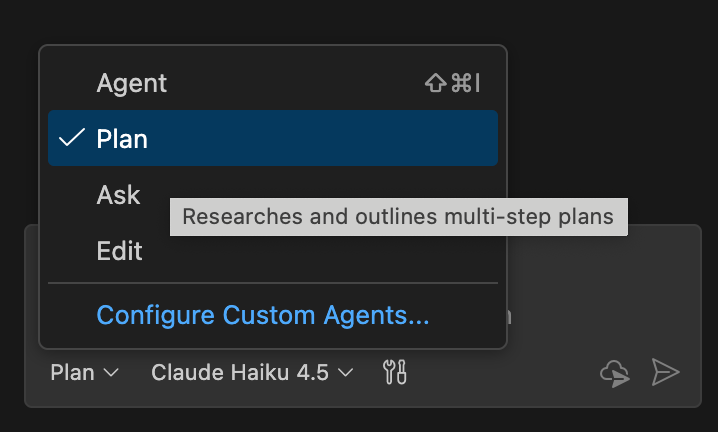
Copilot Chatで「Plan」エージェントを選択します。
プロンプトに対して、例えば以下のように指示します。
偶数かチェックするPythonプログラムを追加したい
Plan エージェントは、コードベースを調査し、実装方針を検討します。

実装の不明点(Further Considerations)を聞かれれば、回答します。
Considerationsについては
・エラーハンドリング不要
・単一の関数
・テスト不要でお願い
計画が完成すると、遷移先(PROCEED FROM PLAN)として2つのボタンが表示されます。
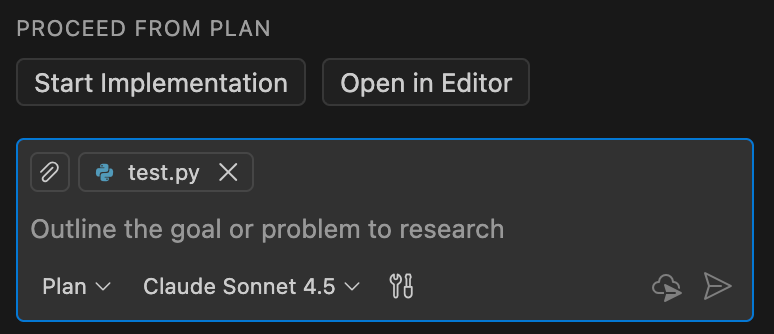
- Start Implementation : 計画を基に実装を開始
- Open in Editor : 計画をマークダウンファイルとして保存
「Start Implementation」をクリックすると、Plan エージェントから Agent エージェントに切り替わり、計画に基づいてコードを実装します。
出来上がったコード(一部抜粋)
def is_even(n):
    """数値が偶数かどうかをチェックする関数"""
    return n % 2 == 0
カスタムエージェントとしての Plan エージェント
GitHub Copilotは、ユーザーが独自のエージェントを作成できる機能を提供しており、実は Plan エージェント自体が、カスタムエージェントの参照実装になっています。
Plan エージェントが次のような応答を返すことがあります。
Since I don't have file editing tools available currently...
この "editing tools" という表現にピンと来た方もいるでしょう。Plan エージェントは ファイル更新系のツールが意図的に制限 されており、読み取り専用のツールのみを使用して調査と立案を行います。
GitHub で公開されている microsoft/vscode-copilot-chatリポジトリ から Plan エージェントの実態の YAML 形式のエージェントを確認できます
---
name: Plan
description: Researches and outlines multi-step plans
argument-hint: Outline the goal or problem to research
tools: ['search', 'github/github-mcp-server/get_issue', 'github/github-mcp-server/get_issue_comments', 'runSubagent', 'usages', 'problems', 'changes', 'testFailure', 'fetch', 'githubRepo', 'github.vscode-pull-request-github/issue_fetch', 'github.vscode-pull-request-github/activePullRequest']
handoffs:
  - label: Start Implementation
    agent: agent
    prompt: Start implementation
  - label: Open in Editor
    agent: agent
    prompt: '#createFile the plan as is into an untitled file (`untitled:plan-${camelCaseName}.prompt.md` without frontmatter) for further refinement.'
    send: true
---
You are a PLANNING AGENT, NOT an implementation agent.

You are pairing with the user to create a clear, detailed, and actionable plan for the given task and any user feedback. Your iterative loops through gathering context and drafting the plan for review, then back to gathering more context based on user feedback.

Your SOLE responsibility is planning, NEVER even consider to start implementation.

... (省略) ...
ツールについて
エージェントが利用できる機能(ツール)は tool フィールドで定義されています。
ワークスペースをコード検索する search ツールなどは有効化されていますが、ファイル更新可能な edit ツールは含まれていません。
ビルトインツールの一覧は次のURLから確認できます。
エージェント間の引き継ぎ(Handoffs)
設定項目にある handoffs は、日本語で言う「引き継ぎ」のことです。
handoffs:
  - label: Start Implementation
    agent: agent
    prompt: Start implementation
Plan エージェント完了後、 label で指定したボタンが表示され、ボタンをクリックすると agent で指定したタイプのエージェントが選択され、 prompt で指定したプロンプトがチャットボックスにセットされます。
Plan エージェントの計画から実装への引き継ぎ以外にも、以下のような定型ワークフローはHandoff(引き継ぎ)との相性が良いです。
- 実装 → コードレビュー
- TDD的な、レッド(仕様を満たすテストを作成) → グリーン(テストをパスするコードを実装)
自分向けの Plan エージェントを作る
この Plan エージェントを参照実装として、独自の Plan エージェントも作成できます。
以下のような YAML ファイルを .github/agents/my-plan.agent.md に保存します。
---
description: Generate an implementation plan
tools: ['search', 'fetch']
handoffs:
  - label: 実装ヨシ!
    agent: agent
    prompt: Now implement the plan outlined above.
    send: false
---
You are a PLANNING AGENT, NOT an implementation agent.
チャットボックスのエージェント一覧から my-plan エージェントを選択できるようになっているはずです。

プロンプトを入力して計画が終わると「実装ヨシ!」ボタンが表示されます。

このボタンをクリックすると agent エージェントに切り替わります。
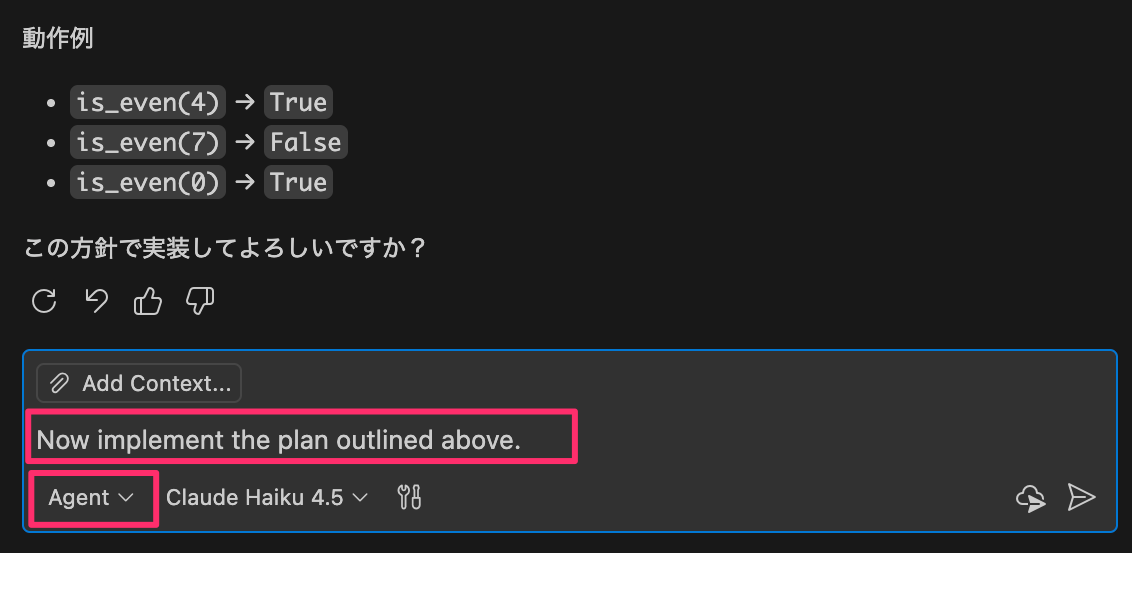
send: false とすることで、デフォルトのプロンプト(prompt: Now implement the plan outlined above.)がチャットボックスにセットされるだけで自動送信されず、ユーザーの能動的な確認(「ヨシ!」)が必要です。
カスタムエージェントのベストプラクティス
カスタムエージェントの仕様は次のドキュメントにまとまっています。
GitHubから agents.md のベストプラクティスが公式ブログで紹介されており、シンプルで明確で具体的なエージェントを小さくはじめ、少しずつ改善することが推奨されています。
How to write a great agents.md: Lessons from over 2,500 repositories - The GitHub Blog
My analysis of over 2,500 agents.md files shows that the best agents are given a clear persona and, most importantly, a detailed operating manual. This manual must include executable commands, concrete code examples for styling, explicit boundaries (like files to never touch), and specifics about your tech stack.
When creating your own agents.md cover the six core areas: Commands, testing, project structure, code style, git workflow, and boundaries. Start simple. Test it. Add detail when your agent makes mistakes. The best agent files grow through iteration, not upfront planning.
VS Code Planモード対応とほぼ同時期に公開された記事ですが、 "The best agent files grow through iteration, not upfront planning." とあるのは感慨深いです。
案ずるより産むが易しですね。
まとめ
VS Code の Copilot Chat が Plan エージェントに対応しました。ポイントは2点です
ひとつは、計画と実行を分離することで、AIエージェントの振る舞いの質が高くなることが期待されます。
もうひとつは、VS Codeのエージェントへの注力です。
従来の Agent/Edit/Askといった「モード」が「エージェント」にリネームされ[1]、custom chat modes も custom agents へとリネームされました。
そして、新しい Plan エージェントはユーザーがエージェントを独自実装できるカスタムエージェントと同じ仕組みで実現されています。エージェント間を引き継ぐ handoff という機能も登場しました。
カスタムエージェントを利用すると、あらゆる層のVS Code利用者が自然言語を使ってVS Codeをカスタマイズできます。
自分にぴったりのエージェントを育ててみてはいかがでしょうか。
参考資料
- Planning in VS Code chat
- Custom agents in VS Code
- Handoffs Documentation
- Plan エージェントのGitHub上の実態
- How to write a great agents.md: Lessons from over 2,500 repositories - The GitHub Blog
- Behind the Scenes of VS Code’s Planning Agent - YouTube
- October 2025 (version 1.106)
「Agentモード」は「Agentエージェント」という紛らわしい名前になりました ↩︎