Kubernetes cluster on AWS (構築編)
この記事は公開されてから1年以上経過しています。情報が古い可能性がありますので、ご注意ください。
Kubernetes とは?
k8s と略されることも多い、コンテナーアプリケーションを自動配備したり 管理してくれるオープンソースのソフトウェアです。 元々は、Google 社が開発していましたが、Cloud Native Computing Foundation に寄贈されました。 詳細については、以下をご参照ください。
はじめに
Kubernetes Operations(kops) という OSS を利用し、AWS 上に Kubernetes cluster を構築してみました。
Kubernetes Operations (kops) は、Production Grade で提供されている Kubernetes 環境を構築したり管理をするためのツールであり、以下に示す機能が 提供されているようです。
- Automate the provisioning of Kubernetes clusters in (AWS)
- Deploy Highly Available (HA) Kubernetes Masters
- Supports upgrading from kube-up
- Built on a state-sync model for dry-runs and automatic idempotency
- Ability to generate Terraform configuration
- Supports custom add-ons for kubectl
- Command line autocompletion
- Community supported!
requirement
- kubectl
詳細については、以下をご参照ください。
ツールのインストール方法
macOS の場合は、Homebrew でインストール出来ます。
$ brew update
$ brew install kubectl kops

# インストールされた kops のバージョンは、1.5.3 でした。
$ kops version
Version 1.5.3
ツールのインストール自体は、簡単ですね。
環境設定
AWS 上に Kubernetes Cluster を構築するには予め諸々の設定などが必要です。
- まずは、kops を利用する IAM ユーザを AWS CLI を利用して作成します。
$ aws iam create-group --group-name kops
$ export arns="
arn:aws:iam::aws:policy/AmazonEC2FullAccess
arn:aws:iam::aws:policy/AmazonRoute53FullAccess
arn:aws:iam::aws:policy/AmazonS3FullAccess
arn:aws:iam::aws:policy/IAMFullAccess
arn:aws:iam::aws:policy/AmazonVPCFullAccess"
$ for arn in $arns
do
aws iam attach-group-policy --policy-arn "$arn" --group-name kops
done
$ aws iam create-user --user-name kops
$ aws iam add-user-to-group --user-name kops --group-name kops

# 表示された SecretAccessKey および AccessKeyID を記録しておきます。
$ aws iam create-access-key --user-name kops

# 記録していたシークレットキーおよびキーID を、AWS Access Key ID および
# AWS Secret Access Key に対して入力します。
$ aws configure

# また、以下の環境変数も設定しておきましょう。
$ export AWS_ACCESS_KEY_ID=
$ export AWS_SECRET_ACCESS_KEY=
DNS の構成
本記事では、kops のガイドに記載されている Scenario 1b: A subdomain under a domain purchased/hosted via AWS を想定し、作業を実施しております。
# Route53 に Kubernetes cluster で利用するゾーンを作成します。ドメイン名は、ご自身のドメインに置き換えてください。
$ aws route53 create-hosted-zone --name subdomain.example.com --caller-reference 1
$ ID=$(uuidgen) && aws route53 create-hosted-zone --name subdomain.example.com --caller-reference $ID | \
> jq .DelegationSet.NameServers
[
"ns-1.awsdns-1.co.uk",
"ns-2.awsdns-2.org",
"ns-3.awsdns-3.com",
"ns-4.awsdns-4.net"
]
NS Value をメモし、以下のような json ファイルを作成します。 (ResourceRecordSet の Name や、ResourceRecords の Value は、適宜修正してください)
# subdomain.json
{
  "Comment": "Create a subdomain NS record in the parent domain",
  "Changes": [
    {
      "Action": "CREATE",
      "ResourceRecordSet": {
        "Name": "subdomain.example.com",
        "Type": "NS",
        "TTL": 300,
        "ResourceRecords": [
          {
            "Value": "ns-1.awsdns-1.co.uk"
          },
          {
            "Value": "ns-2.awsdns-2.org"
          },
          {
            "Value": "ns-3.awsdns-3.com"
          },
          {
            "Value": "ns-4.awsdns-4.net"
          }
        ]
      }
    }
  ]
}
サブドメインの NS レコードを PARENT ホストゾーンに適用します。
$ export PARENT_ZONE_ID=`aws route53 list-hosted-zones | jq '.HostedZones[] | select(.Name=="example.com.") | .Id'`
$ aws route53 change-resource-record-sets --hosted-zone-id ${PARENT_ZONE_ID} \
> --change-batch file:///path/to/subdomain.json
念のため、DNS の設定を確認しておきます。
$ dig ns subdomain.example.com
次に、Cluster State storage(クラスター状態ストレージ)を作成します。
$ aws s3api create-bucket --bucket prefix-example-com-state-store
$ aws s3api put-bucket-versioning --bucket prefix-example-com-state-store --versioning-configuration Status=Enabled
Kubernetes Cluster の作成
# ローカル変数を設定しておきます。
export NAME=subdomain.example.com
export KOPS_STATE_STORE=s3://prefix-example-com-state-store

# 以下の例は、東京リージョンで Kubernetes Cluster を構成する例となります。
$ kops create cluster --zones ap-northeast-1a ${NAME}
I0421 10:32:38.334806 7392 create_cluster.go:493] Inferred --cloud=aws from zone "ap-northeast-1a"
I0421 10:32:38.337288 7392 create_cluster.go:630] Using SSH public key: /Users/shimoda.yuji/.ssh/id_rsa.pub
I0421 10:32:42.299635 7392 subnets.go:183] Assigned CIDR 172.20.32.0/19 to subnet ap-northeast-1a
Previewing changes that will be made:

I0421 10:32:49.801152 7392 executor.go:91] Tasks: 0 done / 56 total; 27 can run
I0421 10:32:50.795005 7392 executor.go:91] Tasks: 27 done / 56 total; 12 can run
I0421 10:32:51.165709 7392 executor.go:91] Tasks: 39 done / 56 total; 15 can run
I0421 10:32:51.326047 7392 executor.go:91] Tasks: 54 done / 56 total; 2 can run
I0421 10:32:51.364934 7392 executor.go:91] Tasks: 56 done / 56 total; 0 can run
Will create resources:
AutoscalingGroup/master-ap-northeast-1a.masters.subdomain.example.com
MinSize 1
MaxSize 1
:
略
:
Cluster configuration has been created.

Suggestions:
* list clusters with: kops get cluster
* edit this cluster with: kops edit cluster subdomain.example.com
* edit your node instance group: kops edit ig --name=subdomain.example.com nodes
* edit your master instance group: kops edit ig --name=subdomain.example.com master-ap-northeast-1a

Finally configure your cluster with: kops update cluster subdomain.example.com --yes

$
標準出力にログがたくさん出力されますが、この時点ではインスタンスなど起動されておらず クラスターの構成のみが行われています。
なお、クラスター構成を変更する場合は以下を実施ください。(お好みで)
$ kops edit cluster ${NAME}
クラスターの構築
$ kops update cluster ${NAME} --yes
:
略
:
I0421 13:08:41.346863 7594 update_cluster.go:208] Exporting kubecfg for cluster
Kops has set your kubectl context to subdomain.example.com

Cluster is starting. It should be ready in a few minutes.

Suggestions:
* validate cluster: kops validate cluster
* list nodes: kubectl get nodes --show-labels
* ssh to the master: ssh -i ~/.ssh/id_rsa admin@api.subdomain.example.com
* read about installing addons: https://github.com/kubernetes/kops/blob/master/docs/addons.md

$
EC2 インスタンスが起動し、セットアップが完了するまで暫く時間がかかりました。
ノードの状態を確認します。
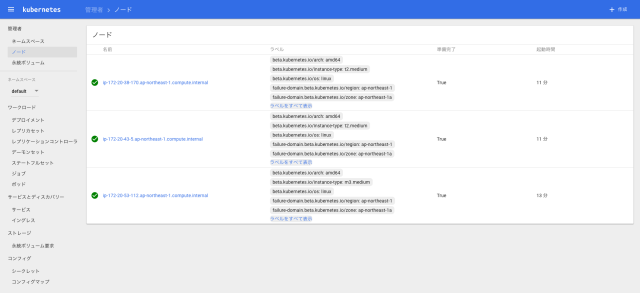
$ kubectl get nodes --show-labels
NAME STATUS AGE VERSION LABELS
ip-172-20-38-170.ap-northeast-1.compute.internal Ready 1m v1.5.2 beta.kubernetes.io/arch=amd64,beta.kubernetes.io/instance-type=t2.medium,beta.kubernetes.io/os=linux,failure-domain.beta.kubernetes.io/region=ap-northeast-1,failure-domain.beta.kubernetes.io/zone=ap-northeast-1a,kubernetes.io/hostname=ip-172-20-38-170.ap-northeast-1.compute.internal
ip-172-20-43-5.ap-northeast-1.compute.internal Ready 1m v1.5.2 beta.kubernetes.io/arch=amd64,beta.kubernetes.io/instance-type=t2.medium,beta.kubernetes.io/os=linux,failure-domain.beta.kubernetes.io/region=ap-northeast-1,failure-domain.beta.kubernetes.io/zone=ap-northeast-1a,kubernetes.io/hostname=ip-172-20-43-5.ap-northeast-1.compute.internal
ip-172-20-53-112.ap-northeast-1.compute.internal Ready,master 3m v1.5.2 beta.kubernetes.io/arch=amd64,beta.kubernetes.io/instance-type=m3.medium,beta.kubernetes.io/os=linux,failure-domain.beta.kubernetes.io/region=ap-northeast-1,failure-domain.beta.kubernetes.io/zone=ap-northeast-1a,kubernetes.io/hostname=ip-172-20-53-112.ap-northeast-1.compute.internal,kubernetes.io/role=master
Master ノードに SSH 接続
$ ssh -i ~/.ssh/id_rsa admin@api.subdomain.example.com
:
略
:
admin@ip-172-20-53-112:~$
デフォルト設定では、debian の AMI が利用されているようです。
クラスターの検証
$ kops validate cluster
Using cluster from kubectl context: subdomain.example.com

Validating cluster subdomain.example.com

INSTANCE GROUPS
NAME ROLE MACHINETYPE MIN MAX SUBNETS
master-ap-northeast-1a Master m3.medium 1 1 ap-northeast-1a
nodes Node t2.medium 2 2 ap-northeast-1a

NODE STATUS
NAME ROLE READY
ip-172-20-38-170.ap-northeast-1.compute.internal node True
ip-172-20-43-5.ap-northeast-1.compute.internal node True
ip-172-20-53-112.ap-northeast-1.compute.internal master True

Your cluster subdomain.example.com is ready
$
標準構成だと、Master ノードとして m3.medium が1台。 worker machine としてのノードが、t2.medium 2台構成のようです。
全てのシステムコンポーネントの確認
$ kubectl -n kube-system get po
NAME READY STATUS RESTARTS AGE
dns-controller-661228401-wn166 1/1 Running 0 7m
etcd-server-events-ip-172-20-53-112.ap-northeast-1.compute.internal 1/1 Running 0 5m
etcd-server-ip-172-20-53-112.ap-northeast-1.compute.internal 1/1 Running 0 7m
kube-apiserver-ip-172-20-53-112.ap-northeast-1.compute.internal 1/1 Running 2 5m
kube-controller-manager-ip-172-20-53-112.ap-northeast-1.compute.internal 1/1 Running 0 6m
kube-dns-782804071-dhf9t 4/4 Running 0 7m
kube-dns-782804071-l12g0 4/4 Running 0 4m
kube-dns-autoscaler-2813114833-x08qm 1/1 Running 0 7m
kube-proxy-ip-172-20-38-170.ap-northeast-1.compute.internal 1/1 Running 0 3m
kube-proxy-ip-172-20-43-5.ap-northeast-1.compute.internal 1/1 Running 0 3m
kube-proxy-ip-172-20-53-112.ap-northeast-1.compute.internal 1/1 Running 0 6m
kube-scheduler-ip-172-20-53-112.ap-northeast-1.compute.internal 1/1 Running 0 5m
$
Addons(Dashboard) のインストール
$ kubectl create -f https://raw.githubusercontent.com/kubernetes/kops/master/addons/kubernetes-dashboard/v1.5.0.yaml
deployment "kubernetes-dashboard" created
service "kubernetes-dashboard" created
Dashboard へのアクセスは、ブラウザから 以下の URL にアクセスします。
- https://api.<clustername>/ui
アクセスすると、以下のような画面が確認できます。
なお、ユーザ名は、admin です。
パスワードは、以下のコマンドを実行し確認してください。
$ kops get secrets kube --type secret -oplaintext
詳細については、以下を参照ください。
最後に、Kubernetes Cluster の削除方法です。
Kubernetes Cluster の削除
$ kops delete cluster --name ${NAME} --yes
AWS サービスとして、Amazon EC2 Container Service (ECS) が用意されておりますが AWS 上に Kubernetes Cluster を構築しコンテナーを管理することによって、どのようなメリットや デメリットが生まれるのか、おいおい検証して行きたいなと考えております。
ひとまず、構築編は以上です。


