
Amazon Neptuneに対しGremlin MCPサーバーを利用して自然言語でクエリしてみた
データ事業本部のueharaです。
今回は、Amazon Neptuneに対しGremlin MCPサーバーを利用して自然言語でクエリ実行をしてみたいと思います。
はじめに
AWSのグラフDBサービスにAmazon Neptuneがありますが、SQLと比較し慣れないGremlinに苦労している方は多いのではないでしょうか。
Amazon NeptuneのMCPサーバーとして、awslabsでも公開されていますが本検証ではそちらは利用しません。
今回は純粋に、Apache Tinkerpop(Gremlinが利用される大元のフレームワーク)のリポジトリにあるGremlinのMCPサーバー実装を利用したいと思います。
構成について
MCPサーバーはローカルで動作させます。
Neptuneはプライベートサブネットで動作させ、AWS SSMのポートフォワーディング機能を用いて、ローカル端末からリモートホストへ安全にアクセスする形を取りたいと思います。
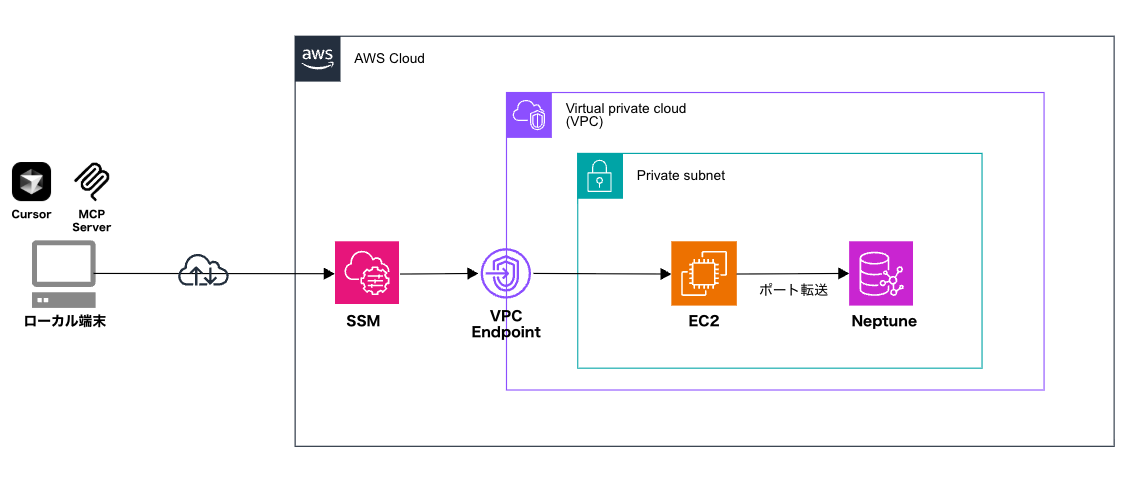
※厳密には、Neptuneのサブネットグループには2つのプライベートサブネットを指定しますが、図の簡略化のため1つのみ記載しています。
なお、今回はMCPクライアントとしてはCursorを利用しますが、Calude Code等その他ツールでも問題ありません。
インフラの作成
以下のCloudFormationテンプレートを利用して、Amazon Neptune (Serverless)とポートフォワーディングのためのEC2を作成します。
なお、ここではVPCやサブネットは既に構築済みであり、SSMのVPCエンドポイントもVPCに設定済みであることを想定しています。
AWSTemplateFormatVersion: '2010-09-09'
Description: Neptune cluster and bastion ec2 instance

Parameters:
  VpcId:
    Type: AWS::EC2::VPC::Id
    Description: VPC ID where the Aurora instance will be launched

  PrivateSubnet01Id:
    Type: AWS::EC2::Subnet::Id
    Description: First private subnet ID where the Neptune cluster will be launched

  PrivateSubnet02Id:
    Type: AWS::EC2::Subnet::Id
    Description: Second private subnet ID where the Neptune cluster will be launched

  Ec2InstanceType:
    Type: String
    Default: t3.micro
    Description: EC2 instance type for bastion host

  Ec2ImageId:
    Type: AWS::SSM::Parameter::Value<AWS::EC2::Image::Id>
    Default: /aws/service/ami-amazon-linux-latest/al2023-ami-kernel-default-x86_64
    Description: AMI ID for bastion host (Amazon Linux 2023)

Resources:
  # Bastion EC2 Security Group
  EC2SecurityGroup:
    Type: AWS::EC2::SecurityGroup
    Properties:
      GroupName: !Sub ${AWS::StackName}-bastion-ec2-sg
      GroupDescription: Security group for bastion EC2 instance
      VpcId: !Ref VpcId
      SecurityGroupEgress:
        - IpProtocol: -1
          CidrIp: 0.0.0.0/0

  # Neptune Security Group
  NeptuneSecurityGroup:
    Type: AWS::EC2::SecurityGroup
    Properties:
      GroupName: !Sub ${AWS::StackName}-neptune-sg
      GroupDescription: Security group for Neptune cluster
      VpcId: !Ref VpcId
      SecurityGroupIngress:
        - IpProtocol: tcp
          FromPort: 8182
          ToPort: 8182
          SourceSecurityGroupId: !Ref EC2SecurityGroup
          Description: Allow Neptune traffic from bastion EC2
      SecurityGroupEgress:
        - IpProtocol: -1
          CidrIp: 0.0.0.0/0

  # Neptune DB Subnet Group
  NeptuneSubnetGroup:
    Type: AWS::Neptune::DBSubnetGroup
    Properties:
      DBSubnetGroupName: !Sub ${AWS::StackName}-neptune-subnet-group
      DBSubnetGroupDescription: Subnet group for Neptune cluster
      SubnetIds:
        - !Ref PrivateSubnet01Id
        - !Ref PrivateSubnet02Id

  # Neptune Serverless Cluster
  NeptuneCluster:
    Type: AWS::Neptune::DBCluster
    Properties:
      DBClusterIdentifier: !Sub ${AWS::StackName}-neptune-cluster
      EngineVersion: 1.4.5.1
      DBSubnetGroupName: !Ref NeptuneSubnetGroup
      VpcSecurityGroupIds:
        - !Ref NeptuneSecurityGroup
      Port: 8182
      ServerlessScalingConfiguration:
        MinCapacity: 1
        MaxCapacity: 16
      IamAuthEnabled: false

  # Neptune Serverless Instance
  NeptuneInstance:
    Type: AWS::Neptune::DBInstance
    Properties:
      DBInstanceIdentifier: !Sub ${AWS::StackName}-neptune-instance
      DBClusterIdentifier: !Ref NeptuneCluster
      DBInstanceClass: db.serverless

  # EC2 Key Pair
  EC2KeyPair:
    Type: AWS::EC2::KeyPair
    Properties:
      KeyName: !Sub ${AWS::StackName}-bastion-keypair

  # IAM Role for EC2 (SSM access)
  EC2IAMRole:
    Type: AWS::IAM::Role
    Properties:
      RoleName: !Sub ${AWS::StackName}-bastion-ec2-role
      AssumeRolePolicyDocument:
        Version: 2012-10-17
        Statement:
          - Effect: Allow
            Principal:
              Service:
                - ec2.amazonaws.com
            Action:
              - sts:AssumeRole
      Path: /
      ManagedPolicyArns:
        - arn:aws:iam::aws:policy/AmazonSSMManagedInstanceCore

  # EC2 Instance Profile
  EC2InstanceProfile:
    Type: AWS::IAM::InstanceProfile
    Properties:
      Path: /
      Roles:
        - !Ref EC2IAMRole
      InstanceProfileName: !Sub ${AWS::StackName}-bastion-ec2-instanceprofile

  # Bastion EC2 Instance
  EC2Instance:
    Type: AWS::EC2::Instance
    Properties:
      InstanceType: !Ref Ec2InstanceType
      SubnetId: !Ref PrivateSubnet01Id
      ImageId: !Ref Ec2ImageId
      SecurityGroupIds:
        - !Ref EC2SecurityGroup
      IamInstanceProfile: !Ref EC2InstanceProfile
      BlockDeviceMappings:
        - DeviceName: /dev/xvda
          Ebs:
            VolumeSize: 100
            VolumeType: gp3
      EbsOptimized: true
      SourceDestCheck: true
      KeyName: !Ref EC2KeyPair
      Tags:
        - Key: Name
          Value: !Sub ${AWS::StackName}-bastion-ec2

Outputs:
  NeptuneClusterEndpoint:
    Description: Neptune cluster endpoint
    Value: !GetAtt NeptuneCluster.Endpoint
    Export:
      Name: !Sub ${AWS::StackName}-neptune-endpoint

  NeptuneClusterReadEndpoint:
    Description: Neptune cluster read endpoint
    Value: !GetAtt NeptuneCluster.ReadEndpoint
    Export:
      Name: !Sub ${AWS::StackName}-neptune-read-endpoint

  NeptuneClusterPort:
    Description: Neptune cluster port
    Value: !GetAtt NeptuneCluster.Port
    Export:
      Name: !Sub ${AWS::StackName}-neptune-port

  NeptuneSecurityGroupId:
    Description: Neptune security group ID
    Value: !Ref NeptuneSecurityGroup
    Export:
      Name: !Sub ${AWS::StackName}-neptune-sg-id

  BastionEC2InstanceId:
    Description: Bastion EC2 instance ID
    Value: !Ref EC2Instance
    Export:
      Name: !Sub ${AWS::StackName}-bastion-ec2-id

  BastionEC2SecurityGroupId:
    Description: Bastion EC2 security group ID
    Value: !Ref EC2SecurityGroup
    Export:
      Name: !Sub ${AWS::StackName}-bastion-ec2-sg-id

  BastionEC2KeyPairName:
    Description: Bastion EC2 key pair name
    Value: !Ref EC2KeyPair
    Export:
      Name: !Sub ${AWS::StackName}-bastion-keypair-name
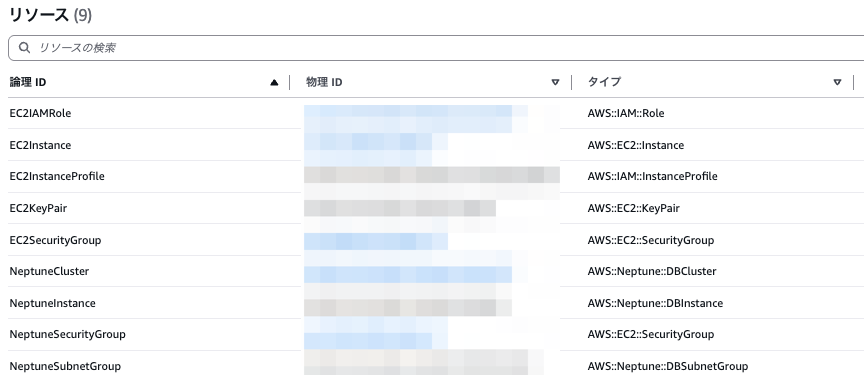
上記CloudFormationテンプレートの適用が完了すると、以下のようにリソースが作成されるかと思います。
Gremlin Consoleを利用した接続とデータ準備
インフラの作成が完了したら、Gremlin Consoleを利用してローカル端末からNeptuneにアクセスしてみます。
Gremlin Consoleのインストール
前置きとして、Gremlin Consoleには Java 8 または Java 11 が必要ですが、ここでは Java 11 の使用を前提とさせて頂きます。
まず、ApacheのWebサイトからGremlin Consoleをダウンロードします。
$ wget https://archive.apache.org/dist/tinkerpop/3.7.2/apache-tinkerpop-gremlin-console-3.7.2-bin.zip
※現在実行中のNeptuneのエンジンバージョンに対し、AWSの公式ドキュメントからサポートされているGremlin Consoleのバージョンを確認できます。
ダウンロードが完了したらzipファイルを解凍します。
$ unzip apache-tinkerpop-gremlin-console-3.7.2-bin.zip
設定ファイルの作成
次に、ディレクトリを解凍したディレクトリに変更します。
$ cd apache-tinkerpop-gremlin-console-3.7.2
接続設定は解凍されたディレクトリ配下にある conf に保存しますが、以下のような neptune-remote.yaml という名前のファイルを作成します。
hosts: [localhost]
port: 8182
connectionPool: {
  enableSsl: true
}
serializer: { className: org.apache.tinkerpop.gremlin.util.ser.GraphBinaryMessageSerializerV1, config: { serializeResultToString: true } }
今回は冒頭の通りSSMのポートフォワーディングを利用するため、ホスト名は localhost としています。
Gremlin Consoleの起動
準備が完了したら、まずGremlin Consoleから接続するため、別のターミナルでリモートホストへのポートフォワーディングを行います。
$ aws ssm start-session \
  --profile <YOUR AWS PROFILE> \
  --target <YOUR EC2 INSTANCE ID> \
  --region ap-northeast-1 \
  --document-name AWS-StartPortForwardingSessionToRemoteHost \
  --parameters '{"host":["<YOUR NEPTUNE CLUSTER HOST>"],"portNumber":["8182"], "localPortNumber":["8182"]}'
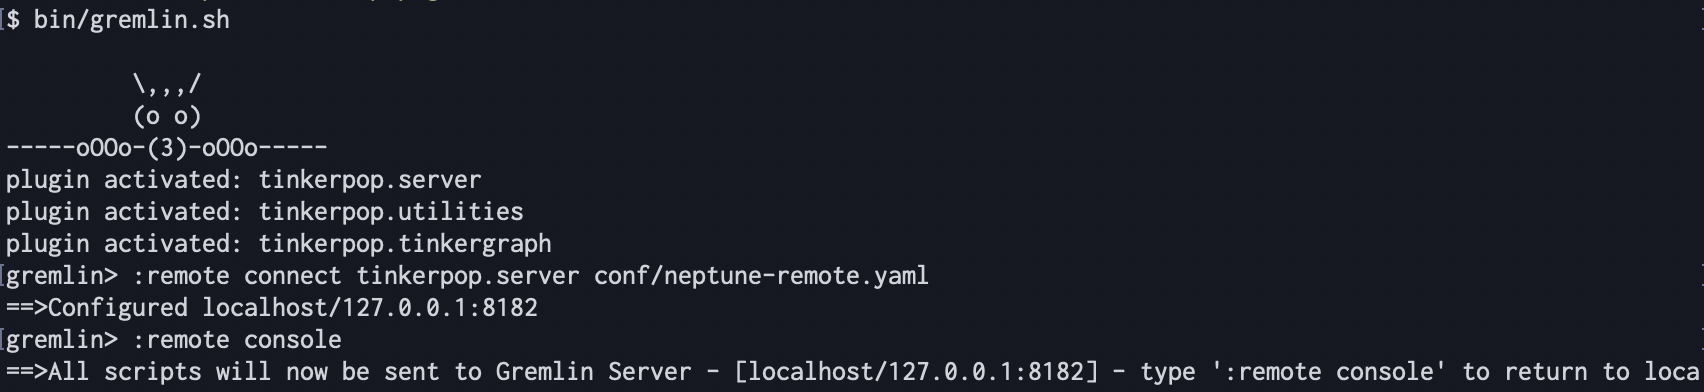
SSMのセッションを開始したら、元のターミナル(Gremlin Consoleのディレクトリを開いているターミナル)に戻り、Gremlin Consoleを起動します。
$ bin/gremlin.sh
Gremlin Consoleが起動したら、以下コマンドを実行しNeptuneに接続します。
:remote connect tinkerpop.server conf/neptune-remote.yaml
その後、以降のすべてのコマンドを自動的にリモートサーバーに送信するモードに切り替えます。
:remote console
ここまで完了すると、ターミナルは以下のようになっているかと思います。
データのロード
今回作成するグラフは、以前のブログ記事と同様、最短経路問題を解くための以下のグラフを利用したいと思います。

(引用元)
上記グラフの定義は以下の通りです。
- ノードはアルファベットに丸で、エッジはノードをつなぐ線で表現されている
- エッジの近くの数字は、エッジの重み(ノード間の距離)を表す
これをロードするため、Gremlin Consoleディレクトリ配下に graph.groovy という名前の以下ファイルを作成します。
g.addV('node').property('id', 'a').as('a').
  addV('node').property('id', 'b').as('b').
  addV('node').property('id', 'c').as('c').
  addV('node').property('id', 'd').as('d').
  addV('node').property('id', 'e').as('e').
  addV('node').property('id', 'f').as('f').
  addV('node').property('id', 'g').as('g').
  addV('node').property('id', 'h').as('h').
  addE('edge').from('a').to('b').property('cost', 1).
  addE('edge').from('a').to('c').property('cost', 7).
  addE('edge').from('a').to('d').property('cost', 2).
  addE('edge').from('b').to('a').property('cost', 1).
  addE('edge').from('b').to('e').property('cost', 2).
  addE('edge').from('b').to('f').property('cost', 4).
  addE('edge').from('c').to('a').property('cost', 7).
  addE('edge').from('c').to('f').property('cost', 2).
  addE('edge').from('c').to('g').property('cost', 3).
  addE('edge').from('d').to('a').property('cost', 2).
  addE('edge').from('d').to('g').property('cost', 5).
  addE('edge').from('e').to('b').property('cost', 2).
  addE('edge').from('e').to('f').property('cost', 1).
  addE('edge').from('f').to('b').property('cost', 4).
  addE('edge').from('f').to('c').property('cost', 2).
  addE('edge').from('f').to('e').property('cost', 1).
  addE('edge').from('f').to('h').property('cost', 6).
  addE('edge').from('g').to('c').property('cost', 3).
  addE('edge').from('g').to('d').property('cost', 5).
  addE('edge').from('g').to('h').property('cost', 2).
  addE('edge').from('h').to('f').property('cost', 6).
  addE('edge').from('h').to('g').property('cost', 2).iterate()
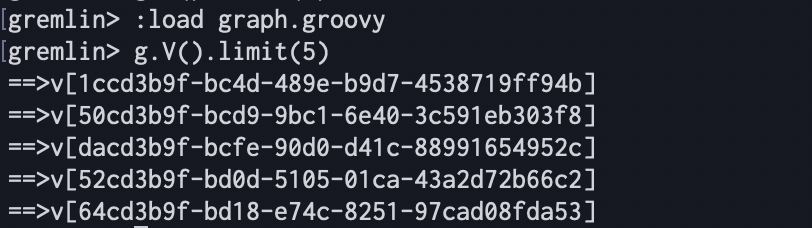
ファイルが作成できたら、Gremlin Consoleからロードを行います。
:load graph.groovy
ロードが完了したら、念のため確認しておきます。
g.V().limit(5)
以下のようになっていれば完了です。
Gremlin MCPサーバーの用意
次にGremlin MCPサーバーの準備を行います。
TinkerpopのリポジトリはMCPサーバーの実装以外にも様々なディレクトリがあるので、冒頭で示したURLだけダウンロードするよう以下手順でダウンロードを行います。
# 1. リポジトリをクローン(filter + sparse オプション付き)
git clone --filter=blob:none --sparse https://github.com/apache/tinkerpop.git

# 2. クローンしたディレクトリに移動
cd tinkerpop

# 3. sparse-checkout で欲しいフォルダを指定
git sparse-checkout set gremlin-mcp/src/main/javascript
上記実行が完了すると gremlin-mcp/src/main/javascript ディレクトリのみダウンロードができているかと思います。
これからビルドが必要なのですが、その前に1ファイルだけ書き換えを行います。
今回SSMのポートフォワーディングでlocalhostとして接続するため、そのままの状態だと証明書の検証でエラーが発生します。
対策はいくつかあるのですが、今回は検証のため一旦エラーが発生しても接続を拒否しない設定を入れたいと思います。(本番運用では推奨される設定ではないためご留意下さい。)
gremlin-mcp/src/main/javascript 配下の、 src/gremlin/connection.ts の一部を以下のように修正します。
  const connection = yield* Effect.try({
    try: () =>
      new DriverRemoteConnection(url, {
        traversalSource,
        authenticator: Option.getOrUndefined(authenticator),
        rejectUnauthorized: false, // 追加
      }),
    catch: error => Errors.connection('Failed to create remote connection', { error }),
  });

  const g = AnonymousTraversalSource.traversal().withRemote(connection);
  const client = new Client(url, {
    traversalSource,
    authenticator: Option.getOrUndefined(authenticator),
    rejectUnauthorized: false, // 追加
  });
修正が完了したら、 gremlin-mcp/src/main/javascript 配下に移動しビルドを行います。
# 1. ディレクトリの移動
$ cd gremlin-mcp/src/main/javascript

# 2. 必要なファイルのインストール
$ npm install

# 3. ビルド
$ npm run build
これでGremlin MCPサーバーの準備は完了です。
Cursorから自然言語でのクエリ実行
MCPサーバーの用意ができたので、Cursorから自然言語でクエリを実行してみます。(SSMのポートフォワーディングが引き続き実行されていることを確認して下さい)
適当なディレクトリをCursorで開き、 .cursor/mcp.json ファイルとして以下を作成します。
{
  "mcpServers": {
    "gremlin": {
      "command": "npx",
      "args": ["<YOUR PATH>/tinkerpop/gremlin-mcp/src/main/javascript/dist/server.js"],
      "env": {
        "GREMLIN_MCP_ENDPOINT": "localhost:8182",
        "GREMLIN_MCP_LOG_LEVEL": "info",
        "GREMLIN_MCP_USE_SSL": "true"
      }
    }
  }
}
<YOUR PATH> については前項の「Gremlin MCPサーバーの用意」で作業をしたご自身のパスを設定して下さい。
設定したらそのままCursorでMCPサーバーを起動し、以下のようになっていれば成功です。
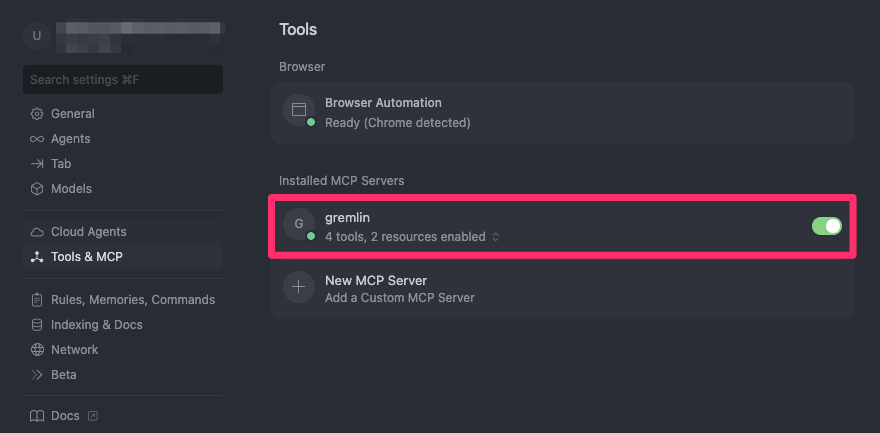
MCPサーバーの起動が確認できたので、Cursorのチャット欄から、以下メッセージを送信してみます。
グラフDBに接続して、ノードaからノードhまでの最短経路(エッジの総コストが最小)を知りたい。
グラフDBのスキーマも教えず結構雑な感じで依頼してみましたが、スキーマの確認から必要だと判断し適切に動作をしています。
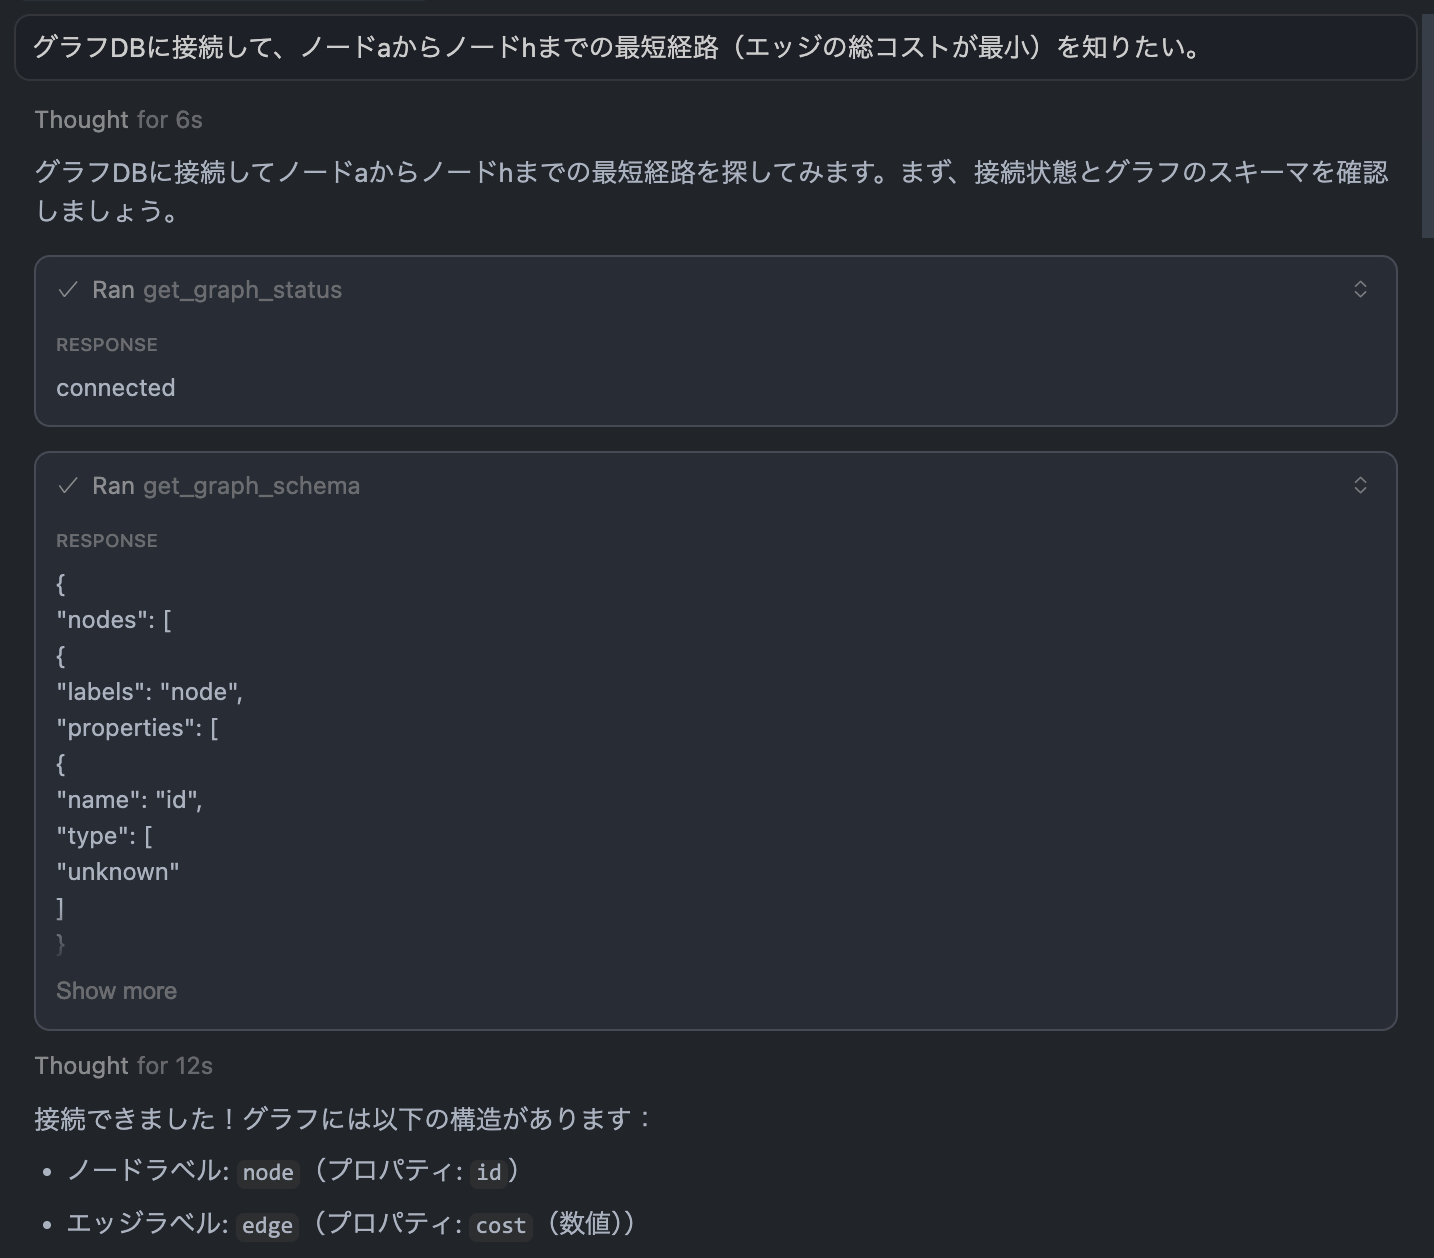
いくつかのクエリ実行の後、最終的に、ノードaからノードhまでの正しい最短経路を出力してくれました。

最後に
今回は、Amazon Neptuneに対しGremlin MCPサーバーを利用して自然言語でクエリ実行をしてみました。
参考になりましたら幸いです。


