
CloudFormation StackSetsで、メンバーアカウントごとに異なるパラメータ(Security Hub通知先)を設定しスタックを作成する
この記事は公開されてから1年以上経過しています。情報が古い可能性がありますので、ご注意ください。
はじめに
以前、Security HubのアラートをMicrosoft Teamsにメンション付きで通知する仕組みをCloudFormationテンプレート化した記事を執筆しました。このテンプレートでは、メンション先のユーザー名やメールアドレスをパラメータとして指定することで、通知をカスタマイズできるようにしています。
今回の記事では、この仕組みをさらに拡張し、複数のAWSアカウントに適用する方法を紹介します。具体的には、CloudFormation StackSetsを活用して、各メンバーアカウントごとに、異なるパラメータ(メンション先のユーザー名やユーザーのメールアドレス)を個別に設定する方法を紹介します。これにより、アカウントごとに異なる通知設定を行うことが可能になります。
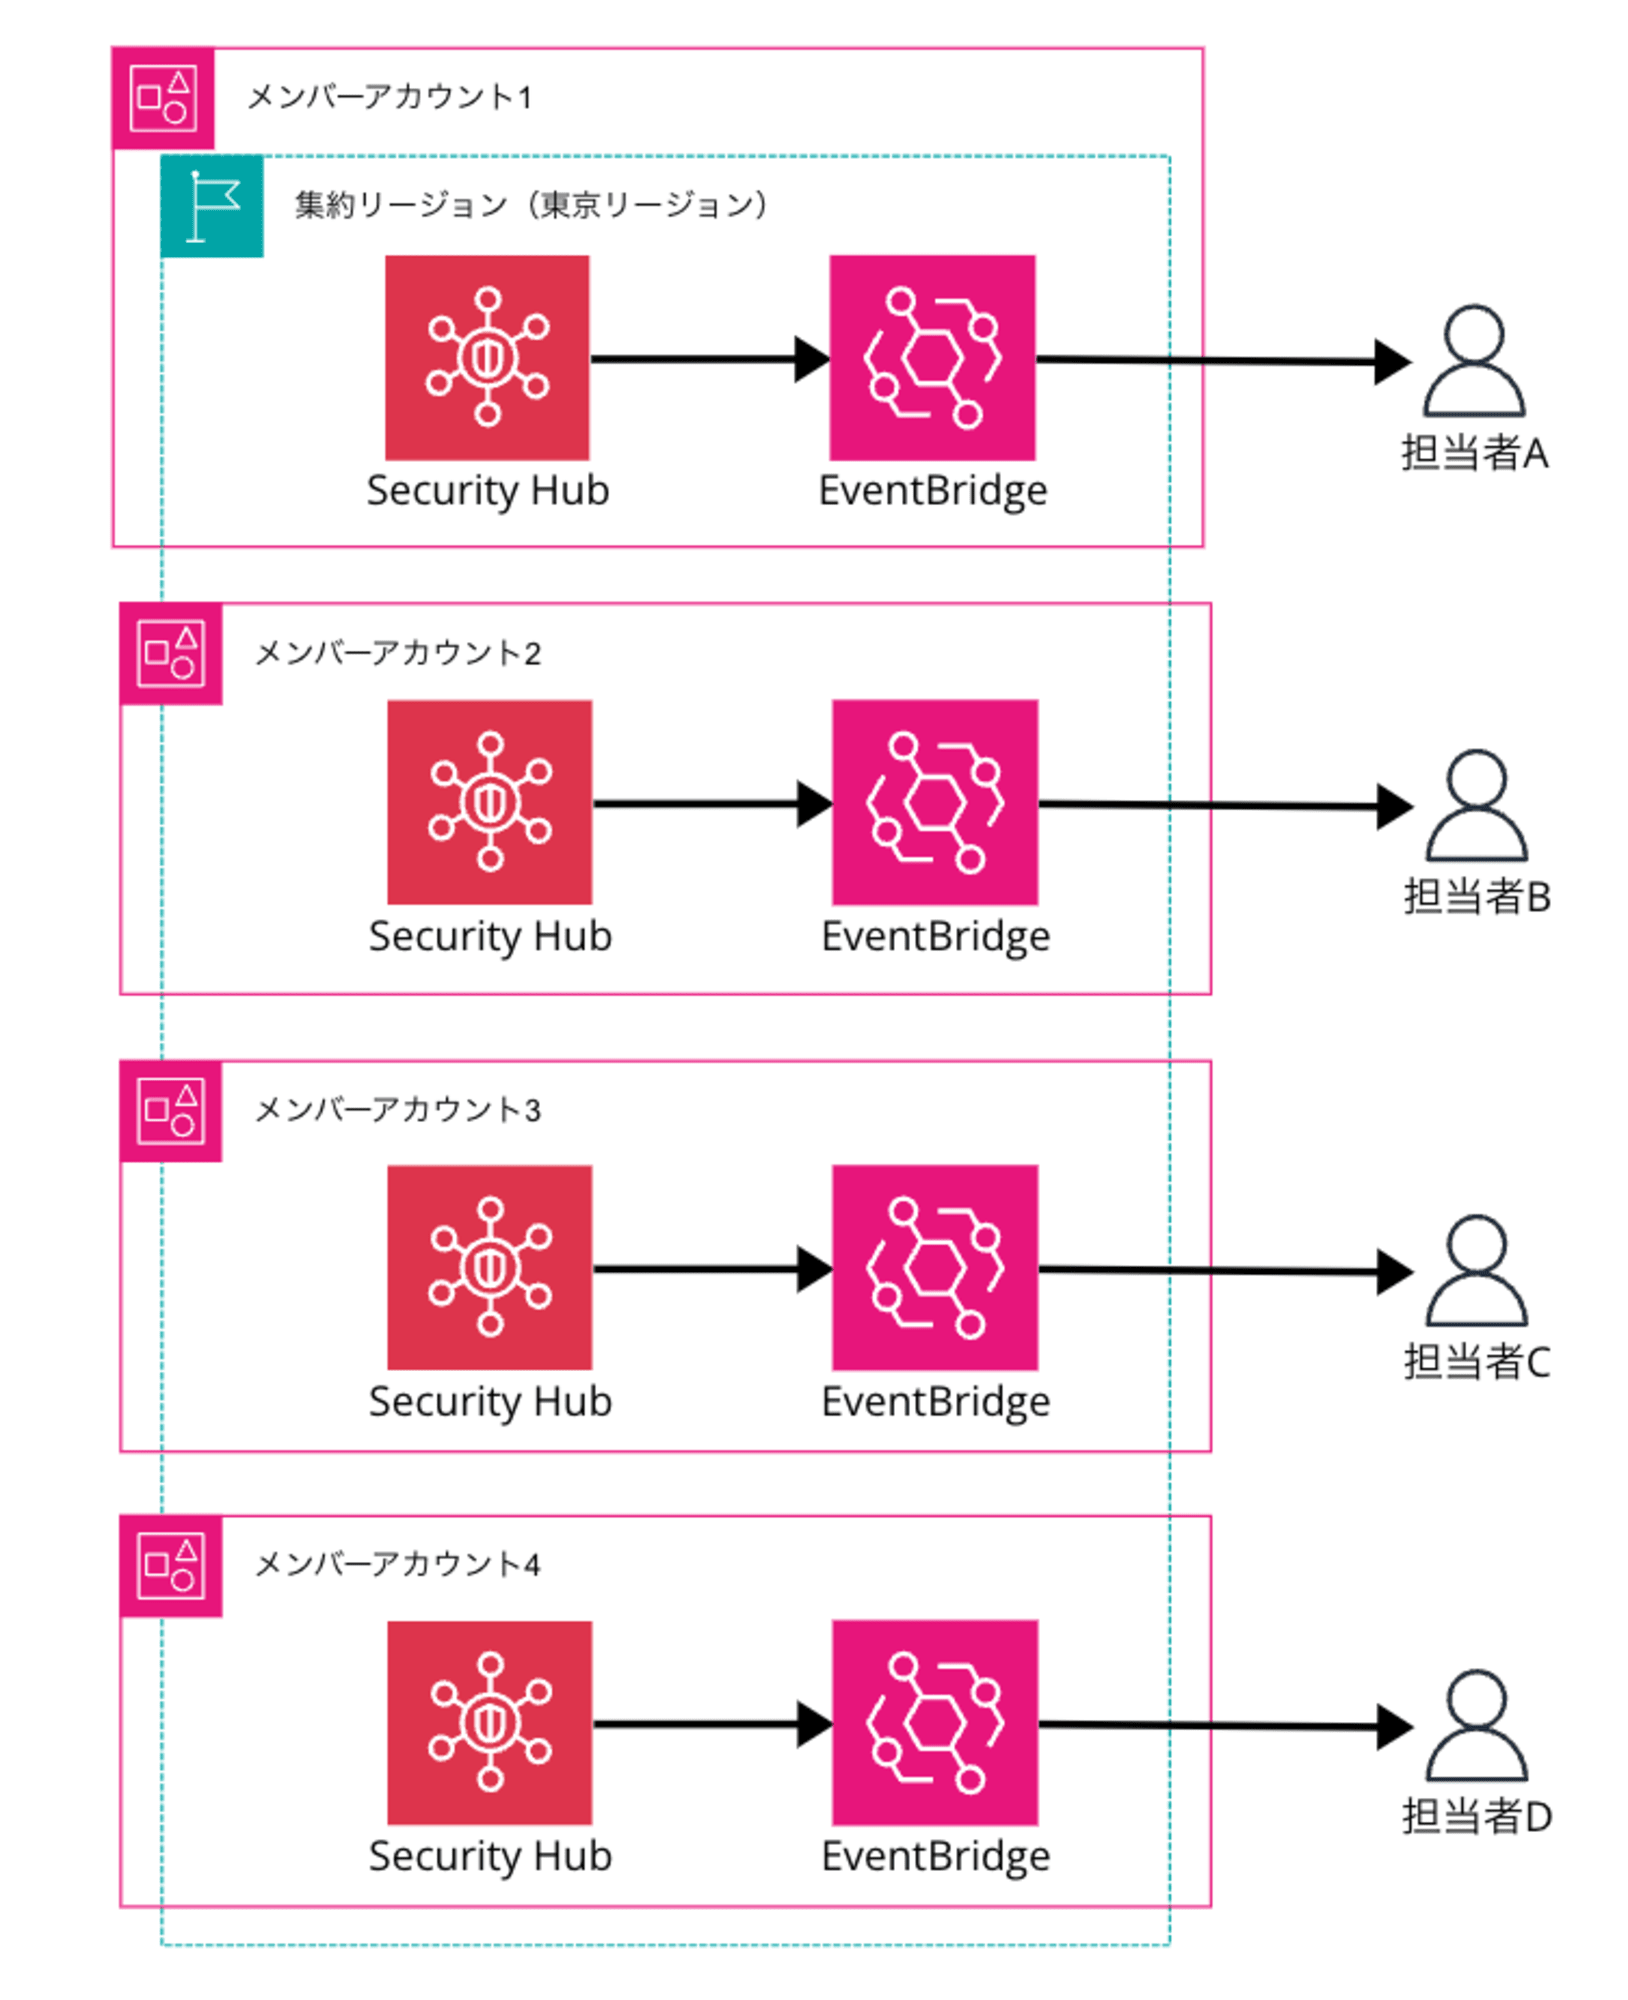
AWS CloudFormation StackSetsは、複数のAWSアカウントやリージョンにわたってスタックを一元管理できる機能です。
少数のアカウントであれば、AWS マネジメントコンソールから手動で設定可能です。しかし、多数のアカウントを管理する場合、この方法は非効率的です。そのため、本記事ではAWS CLIを使用したスクリプトによる効率的な作成方法を紹介します。
本記事で説明する実装の流れは以下のとおりです。
- CloudFormation StackSetの作成
- アカウントごとにCloudFormation StackSetのパラメータを上書きし、スタックインスタンスを作成
スタックインスタンスについては、次章で説明します。マネジメントコンソールの表示に合わせてStack instancesではなくスタックインスタンスとします。
スタックインスタンスとは
スタックインスタンスとは、ターゲットアカウント内のリージョンにデプロイされたスタックへの参照です。主な特徴は以下の通りです。
- StackSetの1つのスタックインスタンスは、ターゲットアカウントの特定のリージョンにデプロイされたスタックを表します。
- スタックインスタンスはスタックなしで存在することもあります。例えば、スタックの作成に失敗した場合などです。
- 1つのスタックインスタンスは1つのStackSetにのみ関連付けられます。
- スタックインスタンスには、関連するスタックのステータス情報が含まれます。
- スタックインスタンスのステータスコード(CURRENT、OUTDATED、FAILEDなど)により、StackSetとの同期状態を確認できます。
- StackSetを更新すると、関連するすべてのスタックインスタンスが更新されます。
StackSetが全体的な管理ツールであるのに対し、スタックインスタンスはStackSetとスタックを結びつける中間的な概念です。
StackSetsを使用することで、複数のアカウントやリージョンにまたがるスタックインスタンスを通じて、スタックを一貫して効率的に管理できます。
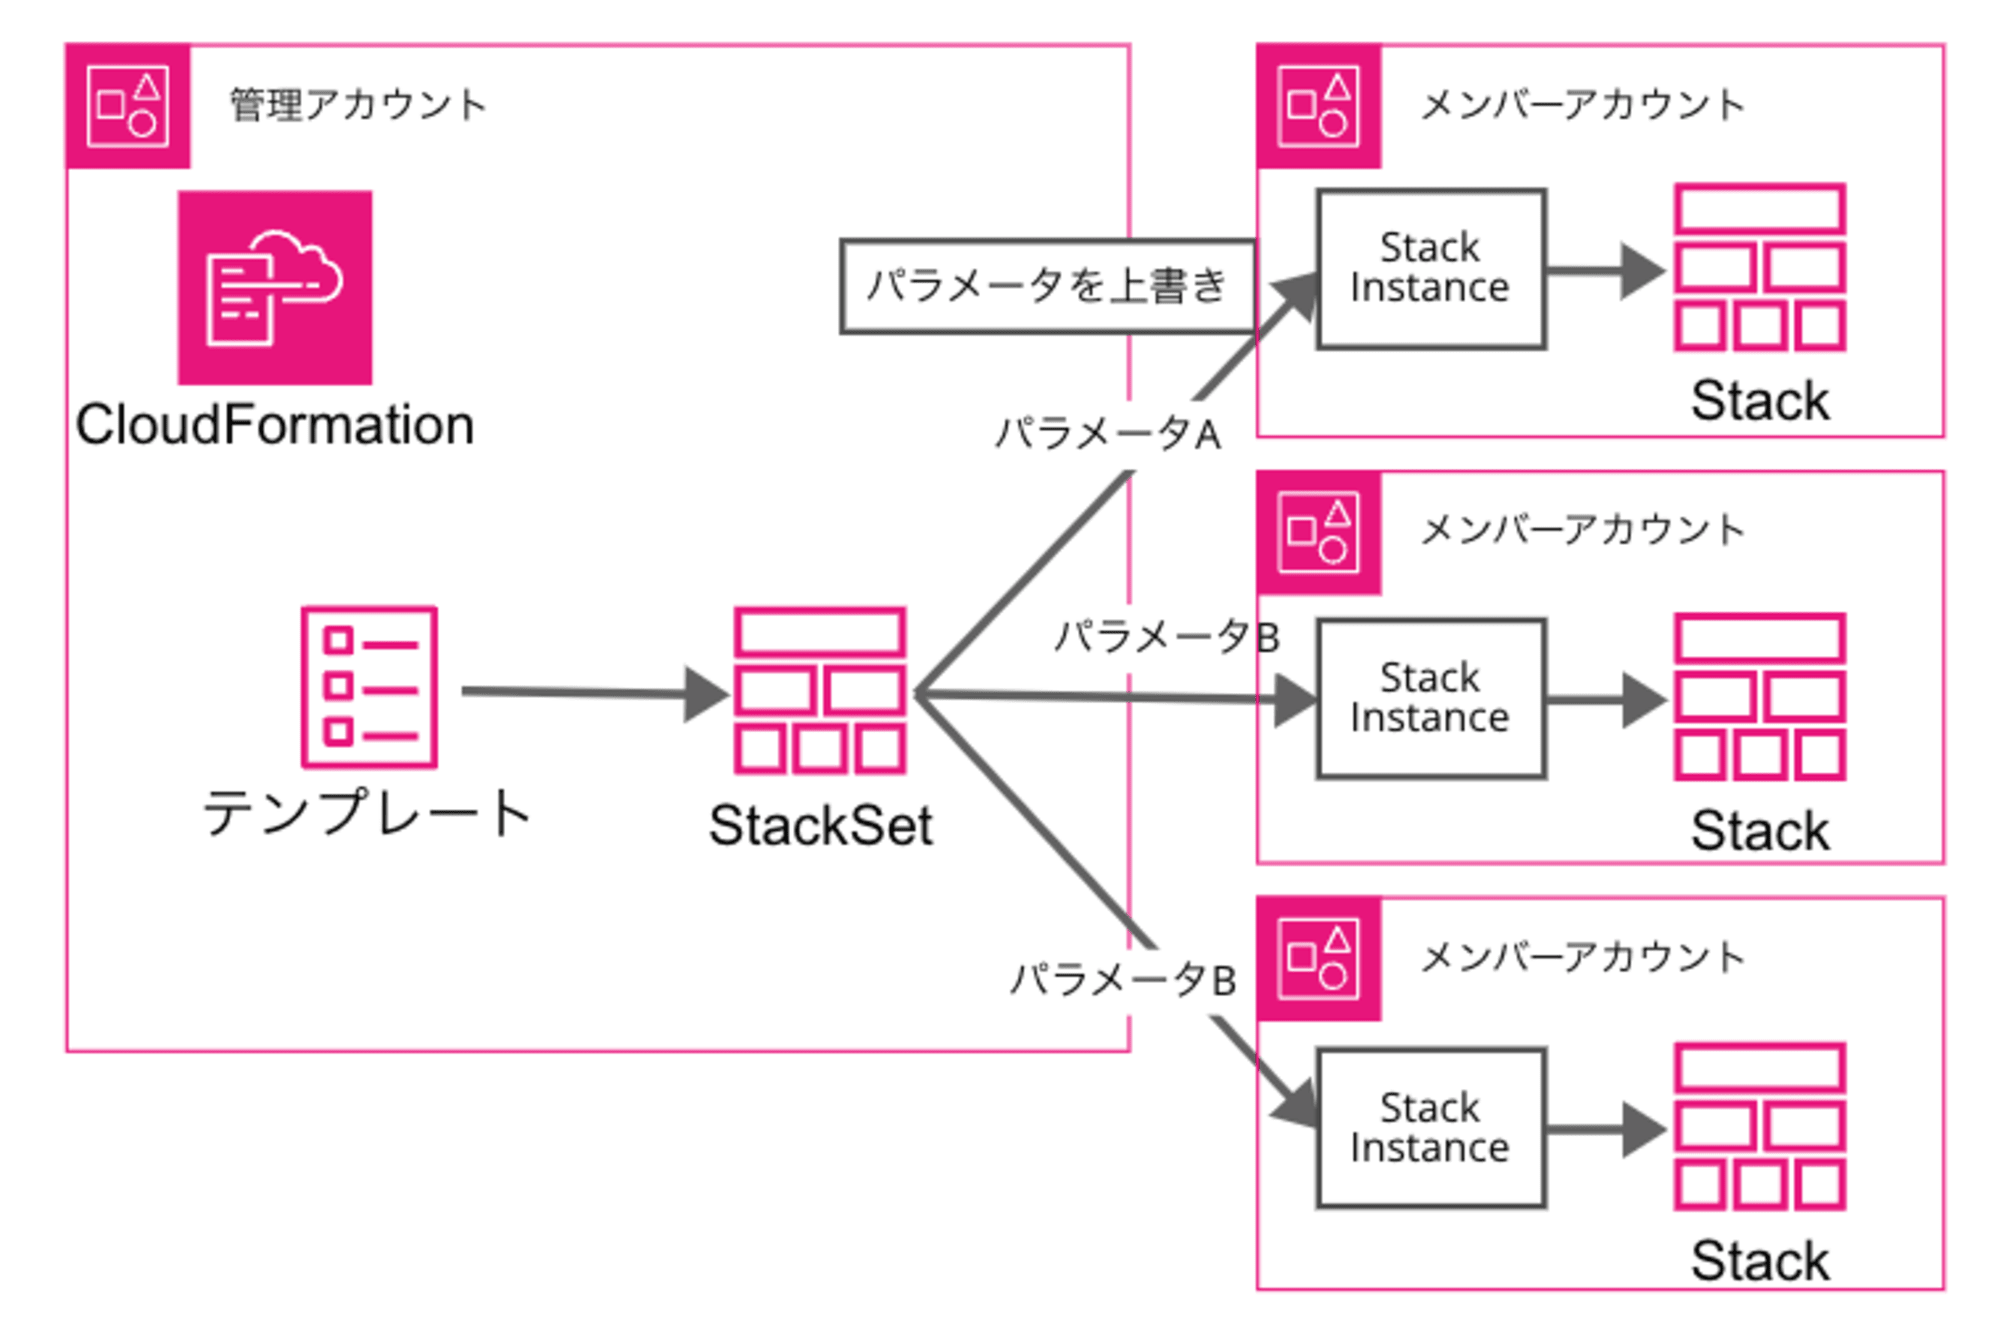
本実装では、アカウントごとに異なるパラメータを設定するために、各スタックインスタンスに対してパラメータを上書きすることで実現します。
前提条件
- Security Hubは東京リージョンを集約リージョンとしているため、各メンバーアカウントの東京リージョンに通知用のリソースを作成します。
- 本記事で説明するすべての操作は、AWS Organizations の管理アカウントから実行します。
- 冒頭で紹介した記事で使用された
cfn-sh-teams.yamlというCloudFormationテンプレートを使用します。このテンプレートは、Security HubのアラートをMicrosoft Teamsに通知するための設定を含んでいます。
テンプレート(クリックで展開)
AWSTemplateFormatVersion: '2010-09-09'
Description: ''
Parameters:
SystemPrefix:
Type: String
EnvPrefix:
Type: String
WebhookURL:
Type: String
MentionedUserMailAddress:
Description: xxx@example.com
Type: String
MentionedUserName:
Type: String
Resources:
IAMManagedPolicy:
Type: AWS::IAM::ManagedPolicy
Properties:
ManagedPolicyName: EventBridgePolicyForSecurityHubNotifytoTeams
Path: /service-role/
PolicyDocument:
Version: 2012-10-17
Statement:
- Effect: Allow
Action:
- events:InvokeApiDestination
Resource:
- !GetAtt EventsApiDestination.Arn
IAMRole:
Type: AWS::IAM::Role
Properties:
Path: /service-role/
RoleName: !Sub ${SystemPrefix}-${EnvPrefix}-eventbridge-teams-api-dest-role
AssumeRolePolicyDocument:
Version: 2012-10-17
Statement:
- Effect: Allow
Principal:
Service: events.amazonaws.com
Action: sts:AssumeRole
MaxSessionDuration: 3600
ManagedPolicyArns:
- !Ref IAMManagedPolicy
EventsRule:
Type: AWS::Events::Rule
Properties:
Name: !Sub ${SystemPrefix}-${EnvPrefix}-securityhub-notify-teams
EventPattern:
detail-type:
- Security Hub Findings - Imported
source:
- aws.securityhub
detail:
findings:
Severity:
Label:
- HIGH
- CRITICAL
ProductName:
- Security Hub
State: ENABLED
Targets:
- Arn: !GetAtt EventsApiDestination.Arn
HttpParameters:
HeaderParameters: {}
QueryStringParameters: {}
Id: EventsRuleName
InputTransformer:
InputPathsMap:
AwsAccountId: '$.detail.findings[0].AwsAccountId'
FirstObservedAt: '$.detail.findings[0].FirstObservedAt'
LastObservedAt: '$.detail.findings[0].LastObservedAt'
RecommendationUrl: '$.detail.findings[0].ProductFields.RecommendationUrl'
Region: '$.detail.findings[0].Resources[0].Region'
ResourceId: '$.detail.findings[0].Resources[0].Id'
ResourceType: '$.detail.findings[0].Resources[0].Type'
SeverityLabel: '$.detail.findings[0].Severity.Label'
Title: '$.detail.findings[0].Title'
InputTemplate: !Sub |
{
"type": "message",
"attachments": [
{
"contentType": "application/vnd.microsoft.card.adaptive",
"content": {
"type": "AdaptiveCard",
"body": [
{
"type": "TextBlock",
"text": "\u003cat\u003e${MentionedUserName}\u003c/at\u003e",
"weight": "bolder",
"size": "medium"
},
{
"type": "TextBlock",
"text": "SecurityHubで重大度<SeverityLabel>のアラートを検知しました",
"size": "Large",
"weight": "Bolder"
},
{
"type": "Table",
"columns": [
{
"width": 1
},
{
"width": 2
}
],
"rows": [
{
"type": "TableRow",
"cells": [
{
"type": "TableCell",
"items": [
{
"type": "TextBlock",
"text": "タイトル",
"weight": "Bolder"
}
]
},
{
"type": "TableCell",
"items": [
{
"type": "TextBlock",
"wrap": true,
"text": "<Title>"
}
]
}
]
},
{
"type": "TableRow",
"cells": [
{
"type": "TableCell",
"items": [
{
"type": "TextBlock",
"text": "重要度",
"weight": "Bolder"
}
]
},
{
"type": "TableCell",
"items": [
{
"type": "TextBlock",
"wrap": true,
"text": "<SeverityLabel>"
}
]
}
]
},
{
"type": "TableRow",
"cells": [
{
"type": "TableCell",
"items": [
{
"type": "TextBlock",
"text": "修復手順",
"weight": "Bolder"
}
]
},
{
"type": "TableCell",
"items": [
{
"type": "TextBlock",
"wrap": true,
"text": "[こちらをクリック](<RecommendationUrl>)"
}
]
}
]
},
{
"type": "TableRow",
"cells": [
{
"type": "TableCell",
"items": [
{
"type": "TextBlock",
"text": "アカウントID",
"weight": "Bolder"
}
]
},
{
"type": "TableCell",
"items": [
{
"type": "TextBlock",
"wrap": true,
"text": "<AwsAccountId>"
}
]
}
]
},
{
"type": "TableRow",
"cells": [
{
"type": "TableCell",
"items": [
{
"type": "TextBlock",
"text": "リージョン",
"weight": "Bolder"
}
]
},
{
"type": "TableCell",
"items": [
{
"type": "TextBlock",
"wrap": true,
"text": "<Region>"
}
]
}
]
},
{
"type": "TableRow",
"cells": [
{
"type": "TableCell",
"items": [
{
"type": "TextBlock",
"text": "リソースタイプ",
"weight": "Bolder"
}
]
},
{
"type": "TableCell",
"items": [
{
"type": "TextBlock",
"wrap": true,
"text": "<ResourceType>"
}
]
}
]
},
{
"type": "TableRow",
"cells": [
{
"type": "TableCell",
"items": [
{
"type": "TextBlock",
"text": "リソースID",
"weight": "Bolder"
}
]
},
{
"type": "TableCell",
"items": [
{
"type": "TextBlock",
"wrap": true,
"text": "<ResourceId>"
}
]
}
]
},
{
"type": "TableRow",
"cells": [
{
"type": "TableCell",
"items": [
{
"type": "TextBlock",
"text": "初回検出日時",
"weight": "Bolder"
}
]
},
{
"type": "TableCell",
"items": [
{
"type": "TextBlock",
"wrap": true,
"text": "<FirstObservedAt>"
}
]
}
]
},
{
"type": "TableRow",
"cells": [
{
"type": "TableCell",
"items": [
{
"type": "TextBlock",
"text": "最終検出日時",
"weight": "Bolder"
}
]
},
{
"type": "TableCell",
"items": [
{
"type": "TextBlock",
"wrap": true,
"text": "<LastObservedAt>"
}
]
}
]
}
]
}
],
"$schema": "http://adaptivecards.io/schemas/adaptive-card.json",
"version": "1.4",
"msteams": {
"width": "full",
"entities": [
{
"type": "mention",
"text": "\u003cat\u003e${MentionedUserName}\u003c/at\u003e",
"mentioned": {
"id": "${MentionedUserMailAddress}",
"name": "${MentionedUserName}"
}
}
]
}
}
}
]
}
RoleArn: !GetAtt IAMRole.Arn
EventBusName: default
EventsConnection:
Type: AWS::Events::Connection
Properties:
Name: !Sub ${SystemPrefix}-${EnvPrefix}-teams-conn
AuthorizationType: API_KEY
AuthParameters:
ApiKeyAuthParameters:
ApiKeyName: Content-Type
ApiKeyValue: application/json
EventsApiDestination:
Type: AWS::Events::ApiDestination
Properties:
Name: !Sub ${SystemPrefix}-${EnvPrefix}-teams-api-dest
ConnectionArn: !GetAtt EventsConnection.Arn
InvocationEndpoint: !Ref WebhookURL
HttpMethod: POST
InvocationRateLimitPerSecond: 300
Outputs:
EventsApiDestinationArn:
Description: The ARN of the EventBridge API Destination
Value: !GetAtt EventsApiDestination.Arn
Export:
Name: EventsApiDestinationArn
- CloudFormation StackSetは、サービス管理型(service-managed)を利用するため、管理アカウントでは通知用のリソースは作成できません。CloudFormation StackSetではなく、CloudFormationスタックを別で作成ください。利用するテンプレートは同じでかまいません。
StackSetを作成
AWS CloudShellを開き、cfn-sh-teams.yamlファイルをアップロードします。
その後、以下のコマンドでStackSetを作成します。
StackSet名は、create-sh-teamsとします。
cfn-sh-teams.yamlのテンプレートには、5つのパラメータ(SystemPrefixやEnvPrefix)がありますが、この段階ではStackSetのみを作成し、スタックインスタンスは作成しないため、仮の値を設定します。次章で説明しますが、スタックインスタンス作成時に、各アカウントごとに適切なパラメータを上書きして作成します。
$ aws cloudformation create-stack-set \
    --stack-set-name create-sh-teams \
    --template-body file://cfn-sh-teams.yaml \
    --capabilities CAPABILITY_NAMED_IAM \
    --parameters \
        ParameterKey=SystemPrefix,ParameterValue=cm1 \
        ParameterKey=EnvPrefix,ParameterValue=dev \
        ParameterKey=WebhookURL,ParameterValue=https://example.com/webhook \
        ParameterKey=MentionedUserMailAddress,ParameterValue=example@example.com \
        ParameterKey=MentionedUserName,ParameterValue=example \
    --permission-model SERVICE_MANAGED \
    --auto-deployment Enabled=false \
    --managed-execution Active=true

{
    "StackSetId": "create-sh-teams:2c9136cf-4708-49d1-82ca-300a2d070863"
}
--managed-execution Active=trueオプションを使用することで、次章で紹介するスタックインスタンスの作成時に、オペレーションが並列で実行されます。これにより、多数のアカウントに対するデプロイメントを効率的に行うことができます。
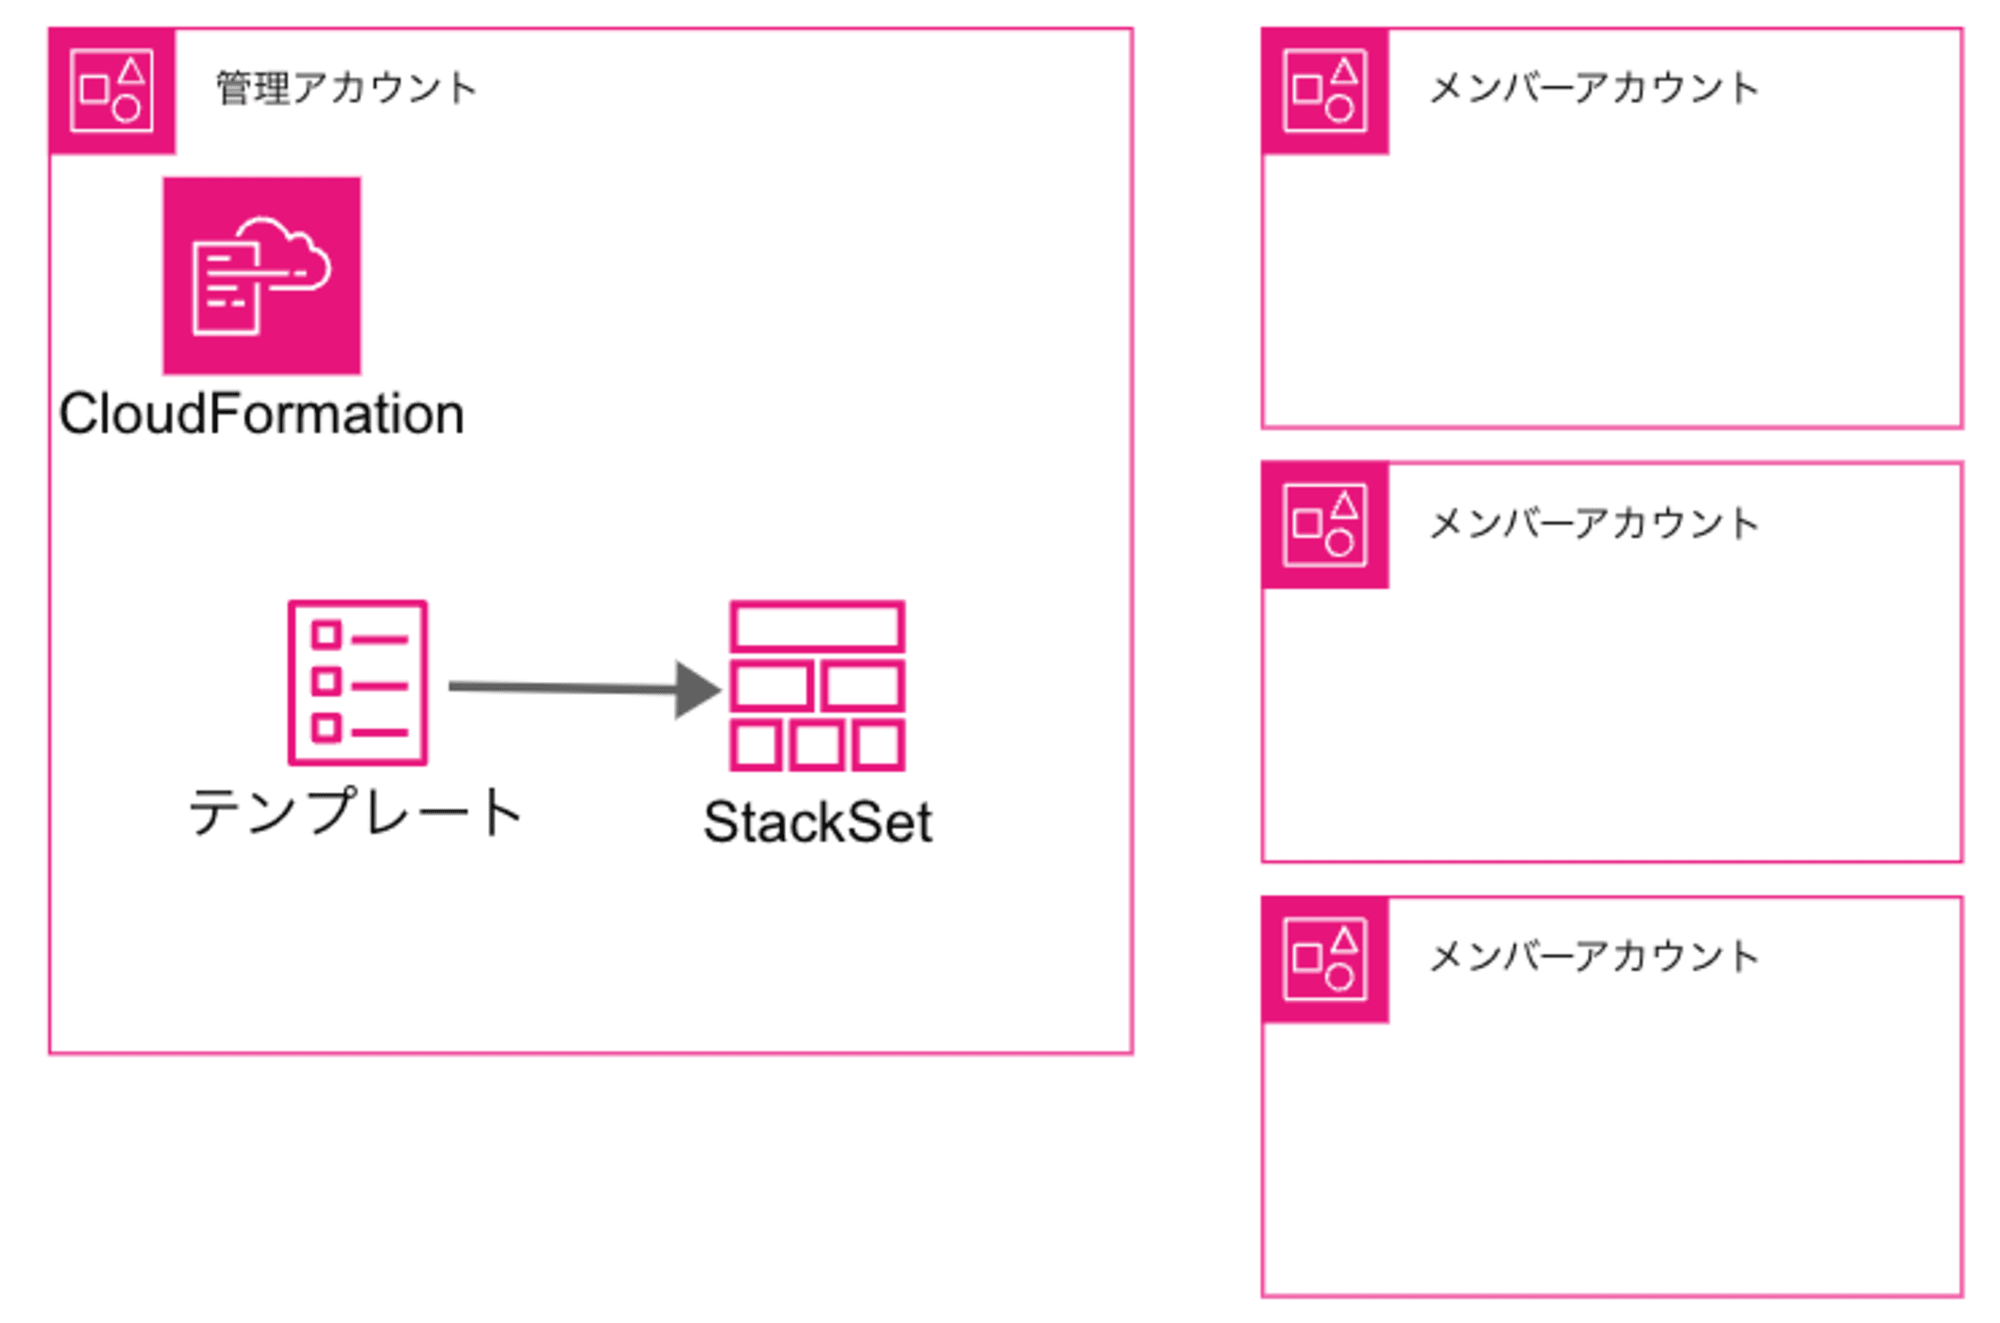
現段階ではスタックインスタンスは作成されないため、現時点での構成は以下のとおりです。
各アカウントに異なるパラメータでスタックを作成
次のステップでは、メンバーアカウントごとに異なるパラメータを設定するために、各スタックインスタンスに対してパラメータを上書きしてスタックを作成します。
構成としては、以下のとおりです。

まず、アカウントごとに5つのパラメータを定義したJSONファイル(account_parameters.json)を作成します。
このファイルには、アカウントID、システム名、環境名、通知用のWebhookURL、メンションするユーザー名とメールアドレスを指定します。
{
  "111111111111": {
    "SystemPrefix": "cm1",
    "EnvPrefix": "dev",
    "WebhookURL": "https://xx/workflows/xx",
    "MentionedUserMailAddress": "example@example.com",
    "MentionedUserName": "example-user-1"
  },
  "222222222222": {
    "SystemPrefix": "cm2",
    "EnvPrefix": "poc",
    "WebhookURL": "https://xx/workflows/xx",
    "MentionedUserMailAddress": "example@example.com",
    "MentionedUserName": "example-user-2"
  }
}
以下のスクリプトファイル(create-stack-instances.sh)を作成します。
OU_ID(デプロイターゲットのOU)は、各自で適切な値に設定してください。なお、対象のOU内でも、account_parameters.jsonで定義したアカウントのみにスタックが作成されます。
# アカウントごとのパラメータを定義したJSONファイル
ACCOUNT_PARAMETERS_FILE="account_parameters.json"

# StackSet名
STACK_SET_NAME="create-sh-teams"

# リージョン(東京リージョン)
REGION="ap-northeast-1"

# デプロイターゲットのOU
OU_ID="ou-xxxx-xxxxxxxx"

# 各アカウントに対して異なるパラメータでデプロイ
for account in $(jq -r 'keys[]' $ACCOUNT_PARAMETERS_FILE); do
  # 各アカウントのパラメータを取得
  SYSTEM_PREFIX=$(jq -r --arg account "$account" '.[$account].SystemPrefix' $ACCOUNT_PARAMETERS_FILE)
  ENV_PREFIX=$(jq -r --arg account "$account" '.[$account].EnvPrefix' $ACCOUNT_PARAMETERS_FILE)
  WEBHOOK_URL=$(jq -r --arg account "$account" '.[$account].WebhookURL' $ACCOUNT_PARAMETERS_FILE)
  MENTIONED_USER_MAIL=$(jq -r --arg account "$account" '.[$account].MentionedUserMailAddress' $ACCOUNT_PARAMETERS_FILE)
  MENTIONED_USER_NAME=$(jq -r --arg account "$account" '.[$account].MentionedUserName' $ACCOUNT_PARAMETERS_FILE)

  echo "Deploying to account $account with SystemPrefix-EnvPrefix=$SYSTEM_PREFIX-$ENV_PREFIX"

  # AWS CLIコマンドを実行
  aws cloudformation create-stack-instances \
      --stack-set-name $STACK_SET_NAME \
      --deployment-targets OrganizationalUnitIds=$OU_ID,Accounts=$account,AccountFilterType=INTERSECTION \
      --regions $REGION \
      --parameter-overrides \
        ParameterKey=SystemPrefix,ParameterValue=$SYSTEM_PREFIX \
        ParameterKey=EnvPrefix,ParameterValue=$ENV_PREFIX \
        ParameterKey=WebhookURL,ParameterValue=$WEBHOOK_URL \
        ParameterKey=MentionedUserMailAddress,ParameterValue=$MENTIONED_USER_MAIL \
        ParameterKey=MentionedUserName,ParameterValue=$MENTIONED_USER_NAME
done
以下のコマンドでスクリプトを実行します。
$ chmod +x create-stack-instances.sh

$ ./create-stack-instances.sh
Deploying to account 111111111111 with SystemPrefix-EnvPrefix=cm1-dev
{
    "OperationId": "fa7a34d9-e5d7-4f04-9ecc-8e6fba917f05"
}
Deploying to account 222222222222 with SystemPrefix-EnvPrefix=cm2-poc
{
    "OperationId": "48afacfd-5234-46c0-a98d-533fbd0265e6"
}
--parameter-overridesオプションを使用してStackSetのパラメータを上書きしています。account_parameters.jsonに記載されている各アカウントに対して、StackSetのパラメータを上書きしてスタックインスタンスを作成するため、アカウントごとにスタックインスタンスのオペレーションが発生します。
ただし、--managed-execution Active=trueオプションを設定しているため、これらのオペレーションは並列で実行されます。
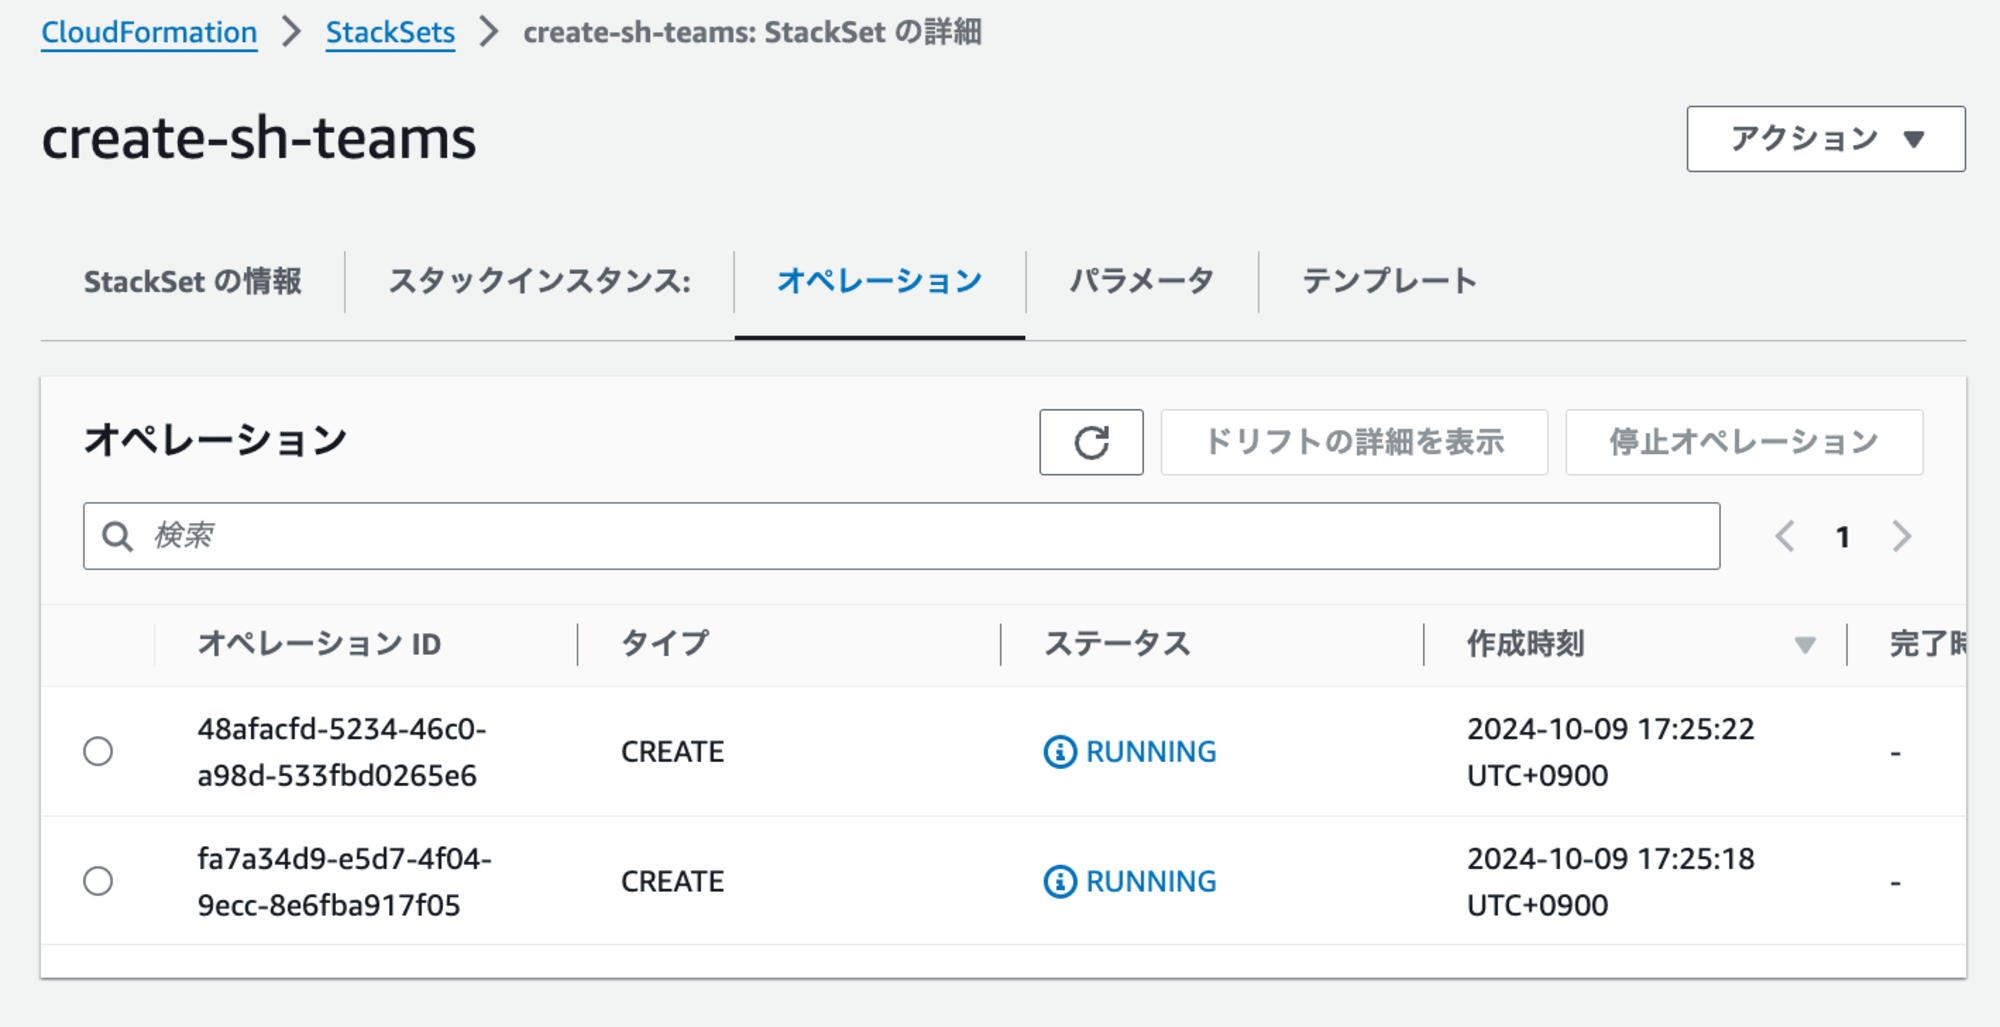
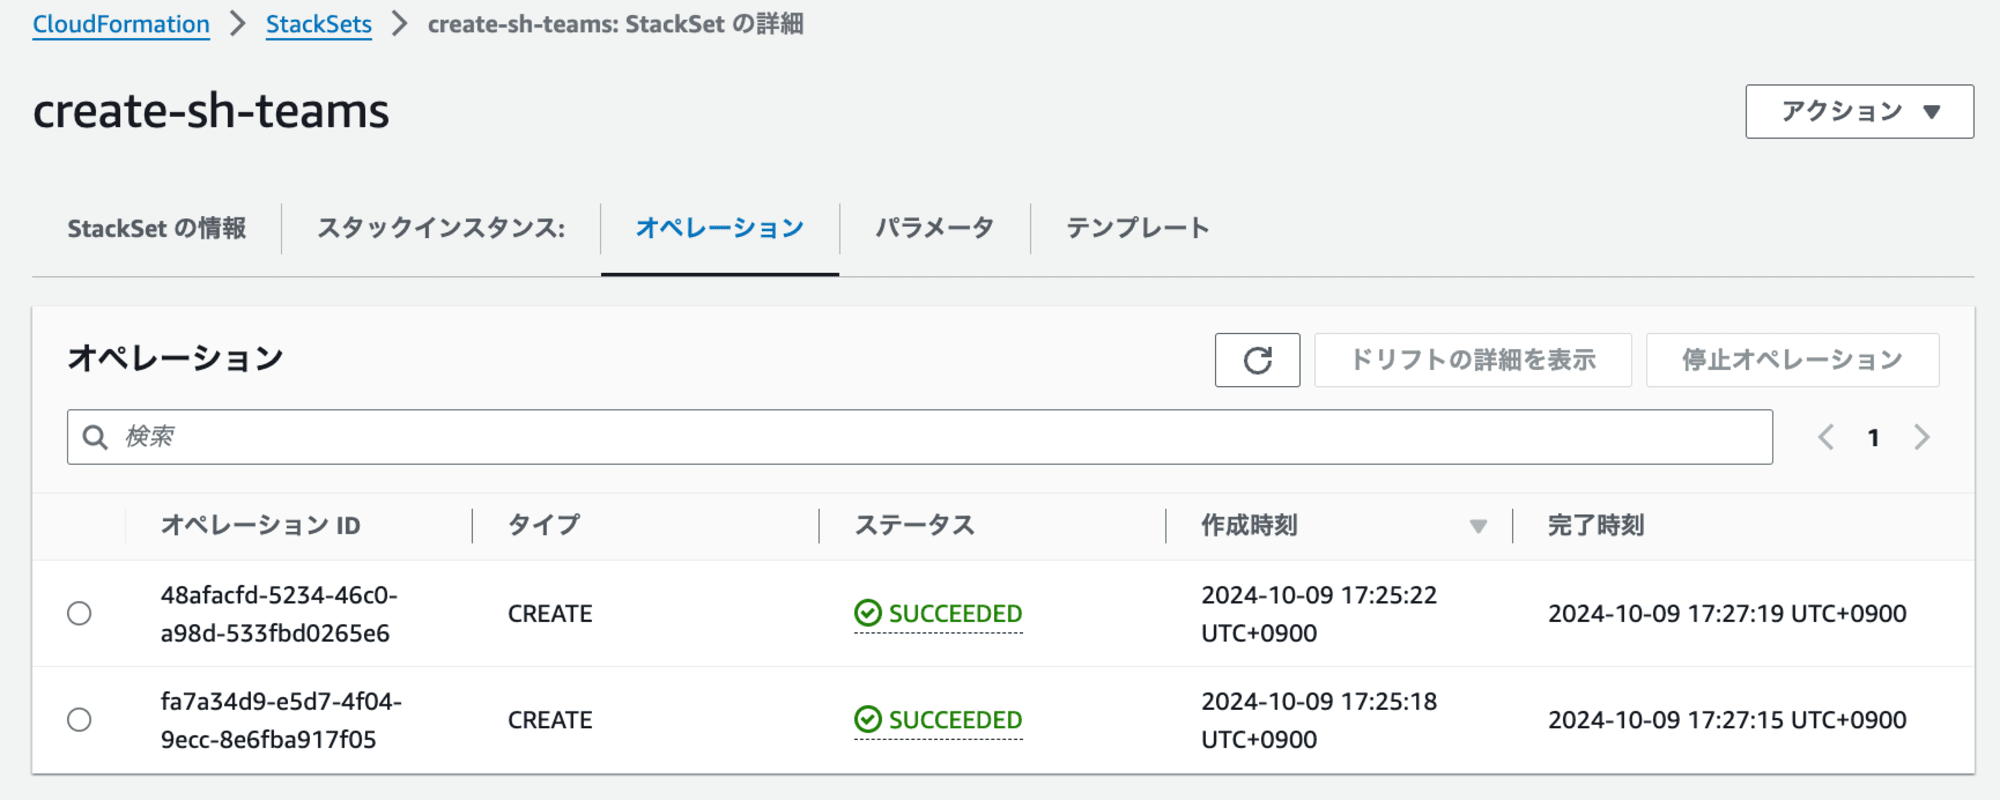
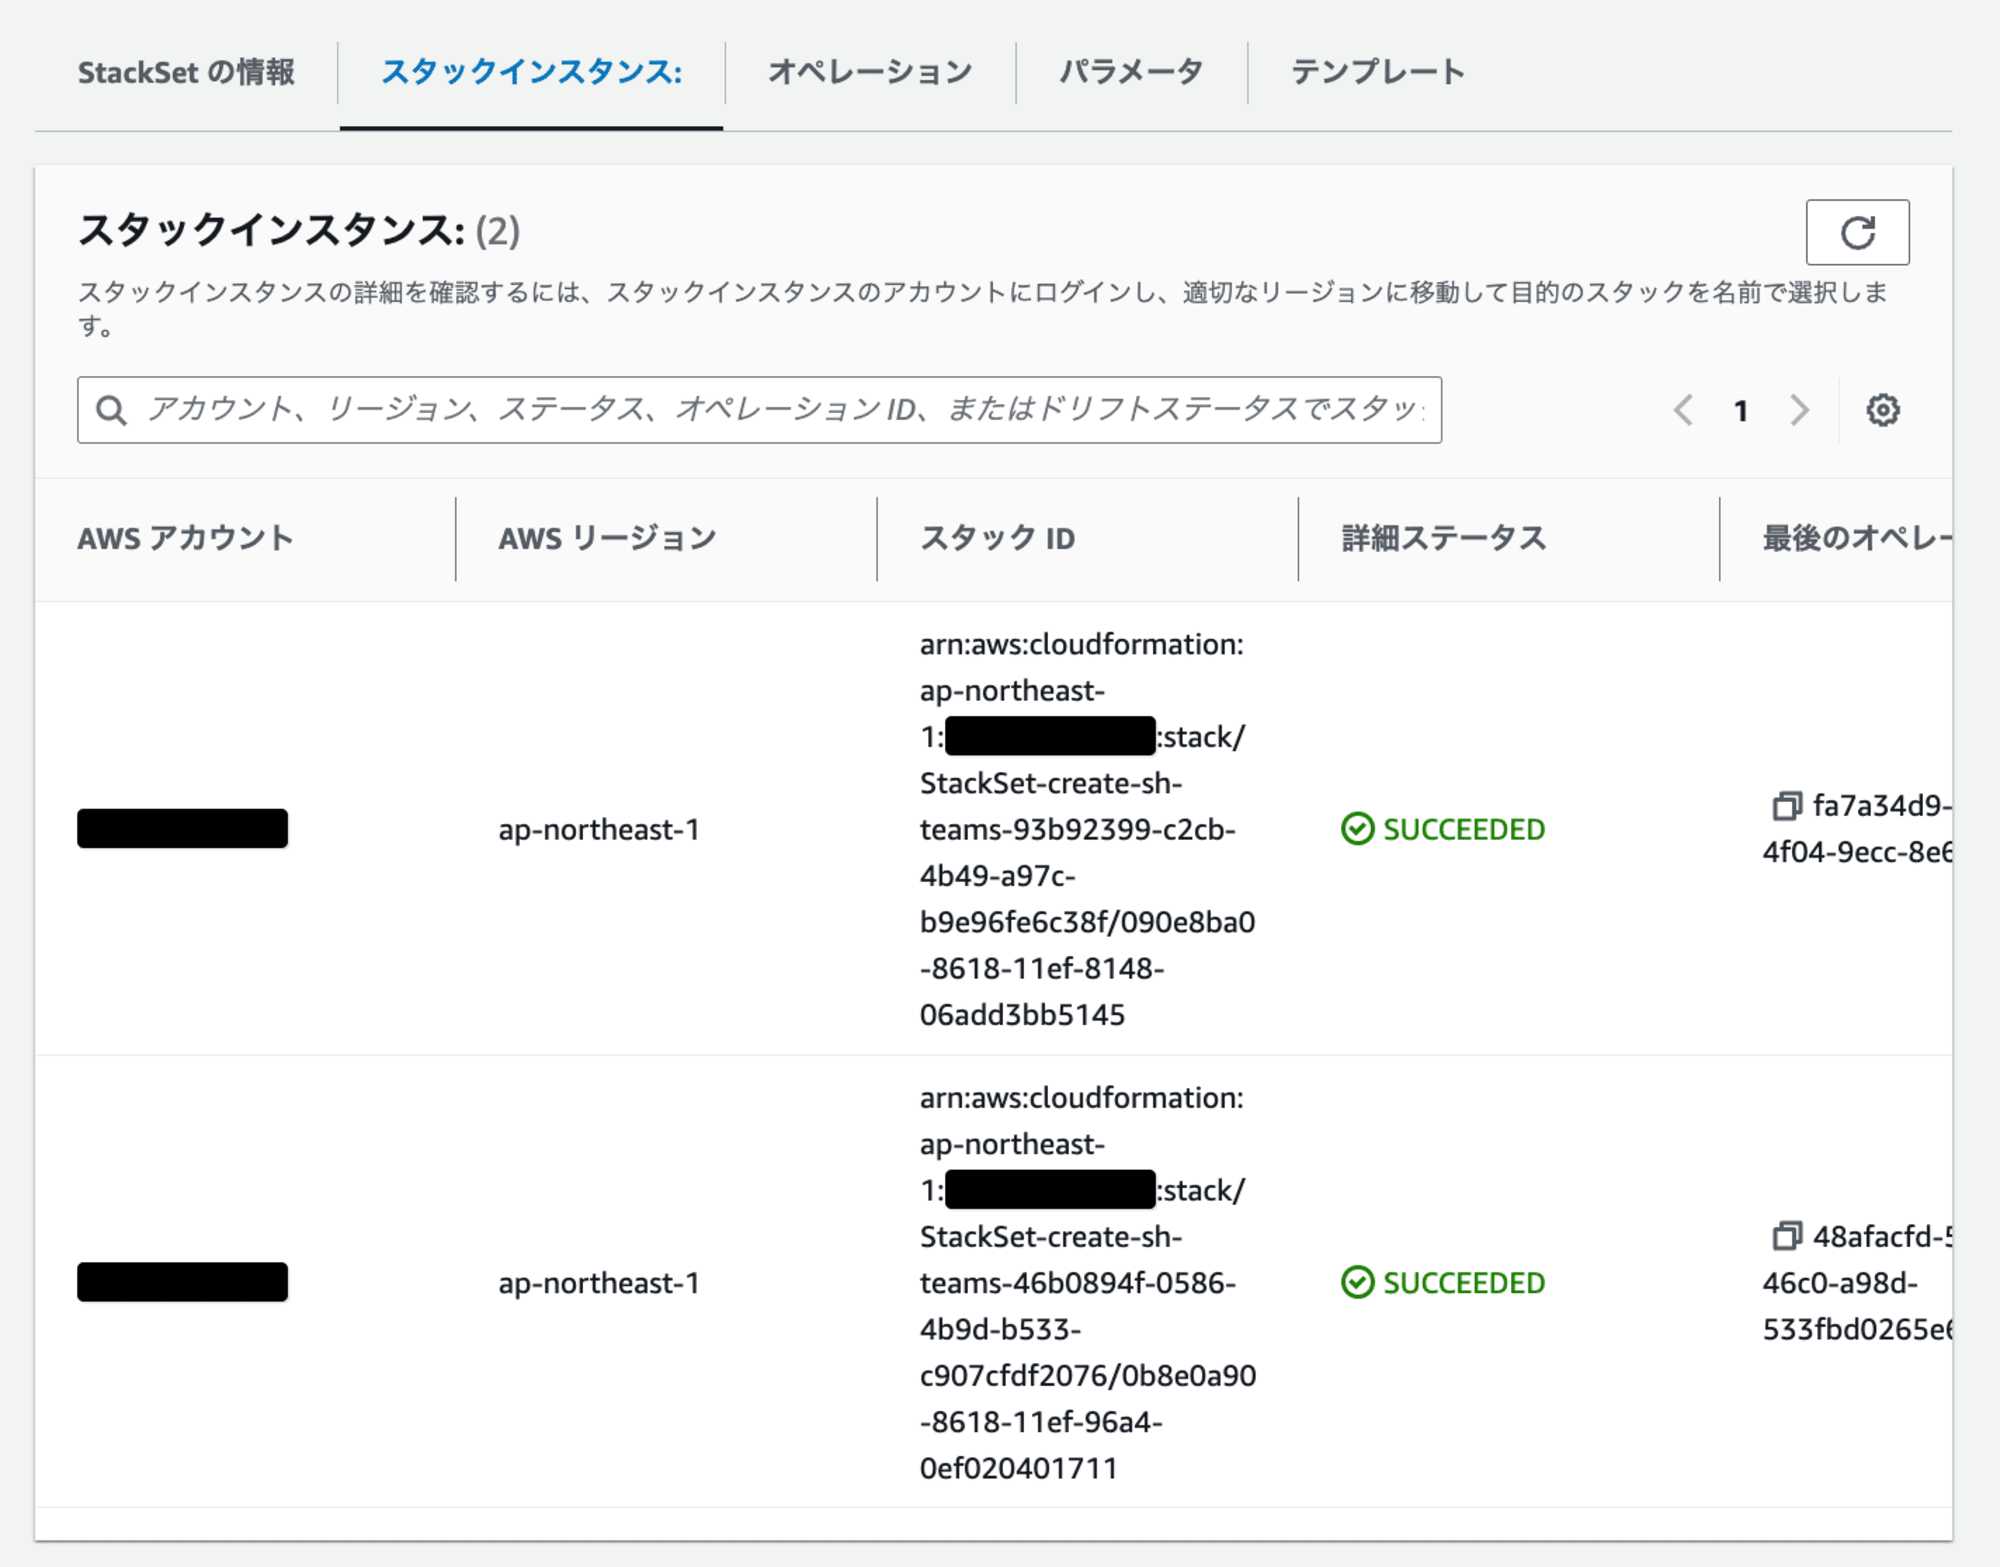
スタックの作成が成功したかどうかは、、AWS マネジメントコンソールの[オペレーション]もしくは[スタックインスタンス]タブから容易に確認できます。
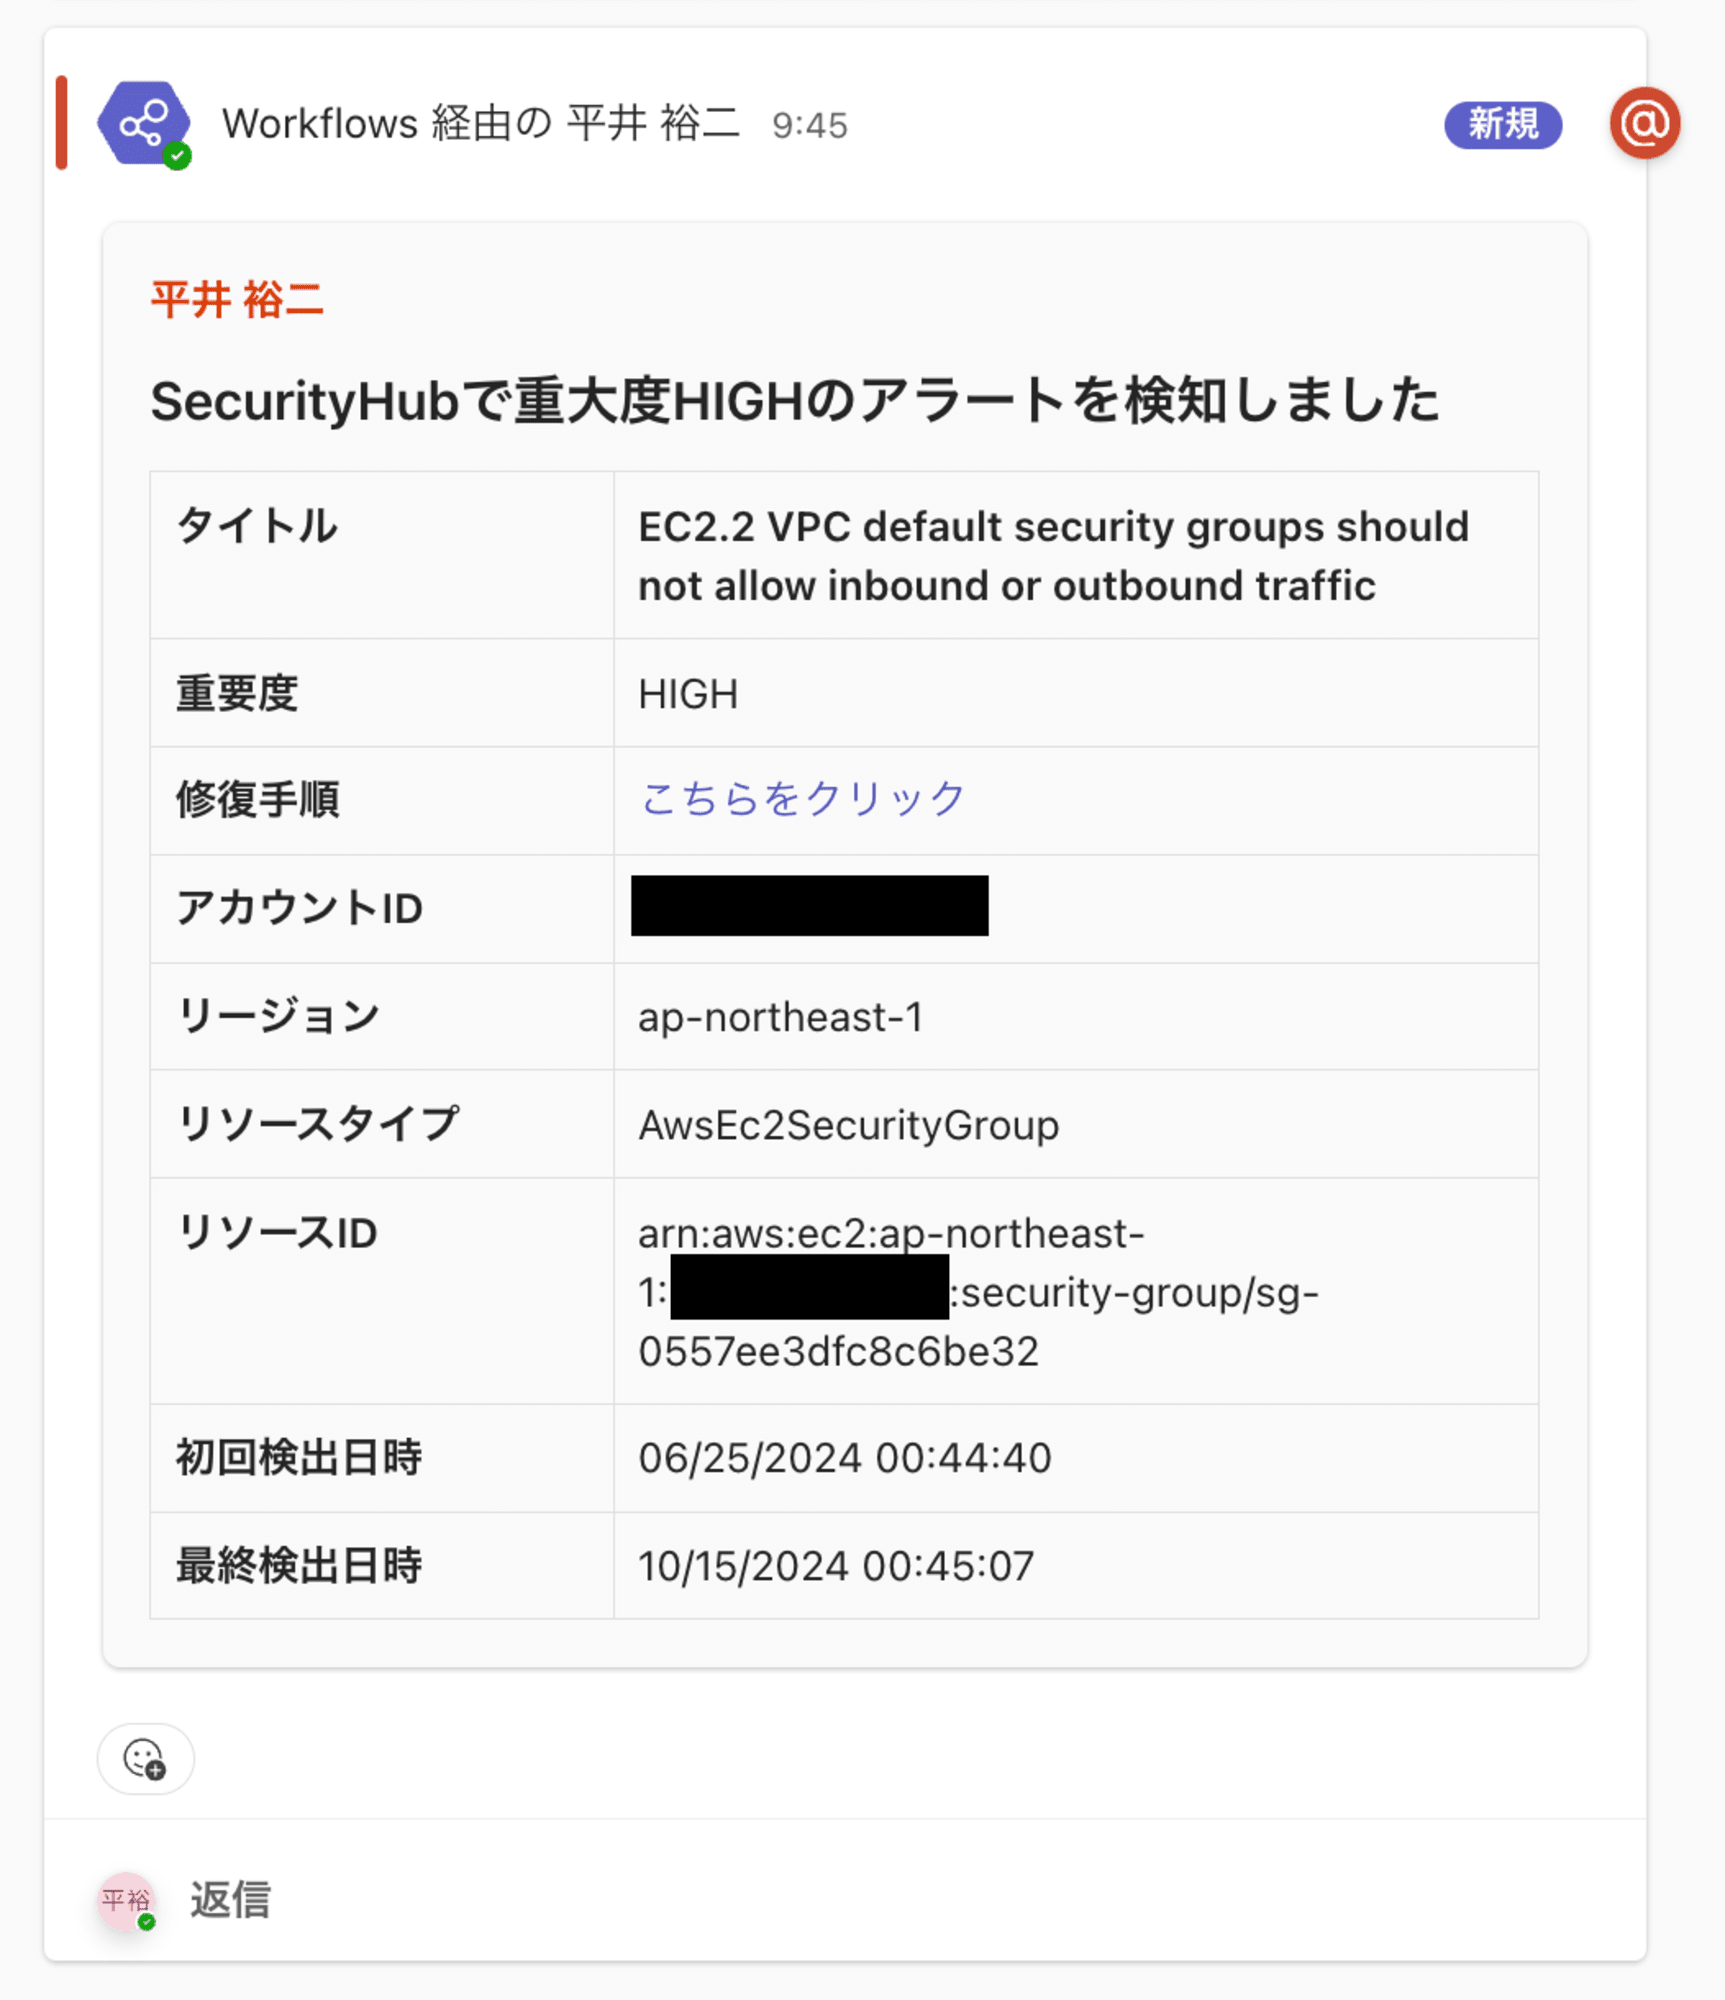
設定したアラートも問題なく通知されることを確認しました。
更新方法
スタック作成後、運用中にStackSetで作成したスタックを修正する必要が生じる場合があります。
主に以下のようなケースが考えられます。
- テンプレートの内容を修正したい場合
- 例:通知のメッセージフォーマットを変更する
- テンプレートのパラメータを変更したい場合
- 全メンバーアカウントのパラメータを一括で変更する。
- 例:通知メッセージを変更する
- 特定メンバーアカウントのパラメータのみを変更する。
- 例:担当者の変更に伴い、特定アカウントのメンション先を変更する
- 全メンバーアカウントのパラメータを一括で変更する。
- テンプレートを別アカウントにも導入したい場合
- 例:発行した新規アカウントに通知設定を導入したい場合
次章で、それぞれの更新方法を解説します。
テンプレートの内容を修正したい場合
テンプレートのパラメータはそのままで、テンプレートの内容を変更したい場合の手順を解説します。
アップロード済みのcfn-sh-teams.yamlを修正した後、以下のコマンドでStackSetを更新します。
$ aws cloudformation update-stack-set \
    --stack-set-name create-sh-teams \
    --template-body file://cfn-sh-teams.yaml \
    --capabilities CAPABILITY_NAMED_IAM \
    --parameters \
        ParameterKey=SystemPrefix,ParameterValue=cm1 \
        ParameterKey=EnvPrefix,ParameterValue=dev \
        ParameterKey=WebhookURL,ParameterValue=https://example.com/webhook \
        ParameterKey=MentionedUserMailAddress,ParameterValue=example@example.com \
        ParameterKey=MentionedUserName,ParameterValue=example

{
    "OperationId": "ed7ba295-323b-4e74-97df-367e871ca63a"
}
StackSetを更新すると、以下の通り作成済みのメンバーアカウントのスタックにもテンプレートの変更が反映されます。
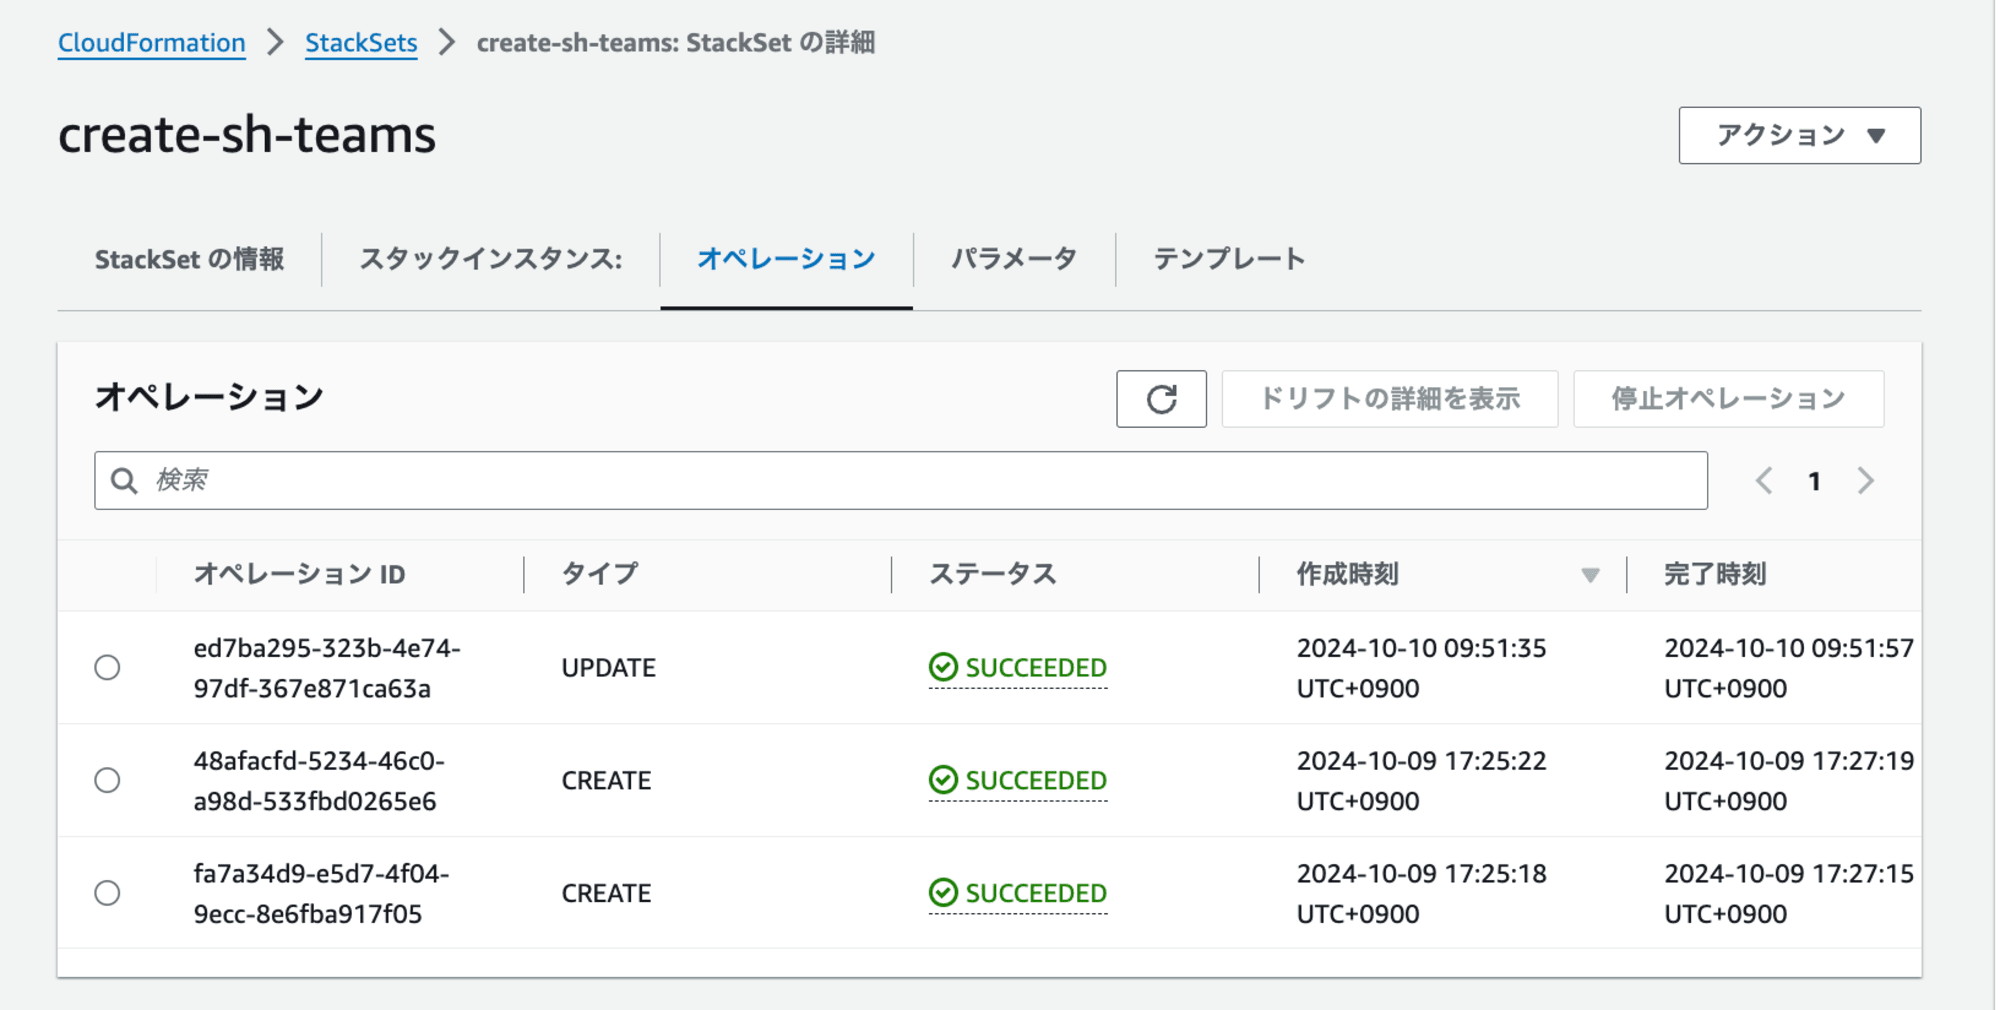
これは、StackSetの更新時に、デフォルトで既存のスタックインスタンスにも変更が適用されるためです。
スタックセットを更新すると、関連付けられているすべてのスタックインスタンスは、すべてのアカウントおよびリージョンで更新されます。
https://docs.aws.amazon.com/ja_jp/AWSCloudFormation/latest/UserGuide/what-is-cfnstacksets.html
update-stack-setコマンドを実行すると、以下の動作が行われます。
- StackSetのテンプレートが更新される。
- 既存のスタックインスタンスに対しても、テンプレートの変更が反映される。
問題にはならないと思いますが、注意点として、特定のアカウントのみテンプレートを変更することはできません。対象のアカウント全てテンプレートが更新されます。
テンプレートのパラメータを変更したい場合
全メンバーアカウントもしくは特定メンバーアカウントのテンプレートのパラメータを変更したい場合の更新方法を解説します。
account_parameters.jsonの内容を変更します。
例として、特定メンバーアカウントのSystemPrefix名を修正します。
update-stack-instances.shスクリプトを作成しアップロードします。
{
  "111111111111": {
+    "SystemPrefix": "new-cm1",
-    "SystemPrefix": "cm1",
    "EnvPrefix": "dev",
    "WebhookURL": "https://xx/workflows/xx",
    "MentionedUserMailAddress": "example@example.com",
    "MentionedUserName": "example-user-1"
  },
  "222222222222": {
    "SystemPrefix": "cm2",
    "EnvPrefix": "poc",
    "WebhookURL": "https://xx/workflows/xx",
    "MentionedUserMailAddress": "example@example.com",
    "MentionedUserName": "example-user-2"
  }
}
# アカウントごとのパラメータを定義したJSONファイル
ACCOUNT_PARAMETERS_FILE="account_parameters.json"

# StackSet名
STACK_SET_NAME="create-sh-teams"

# リージョン(東京リージョン)
REGION="ap-northeast-1"

# デプロイターゲットのOU
OU_ID="ou-xxxx-xxxxxxxx"

# 各アカウントに対して異なるパラメータでスタックインスタンスを更新
for account in $(jq -r 'keys[]' "$ACCOUNT_PARAMETERS_FILE"); do
  # 各アカウントのパラメータを取得
  SYSTEM_PREFIX=$(jq -r --arg account "$account" '.[$account].SystemPrefix' "$ACCOUNT_PARAMETERS_FILE")
  ENV_PREFIX=$(jq -r --arg account "$account" '.[$account].EnvPrefix' "$ACCOUNT_PARAMETERS_FILE")
  WEBHOOK_URL=$(jq -r --arg account "$account" '.[$account].WebhookURL' "$ACCOUNT_PARAMETERS_FILE")
  MENTIONED_USER_MAIL=$(jq -r --arg account "$account" '.[$account].MentionedUserMailAddress' "$ACCOUNT_PARAMETERS_FILE")
  MENTIONED_USER_NAME=$(jq -r --arg account "$account" '.[$account].MentionedUserName' "$ACCOUNT_PARAMETERS_FILE")

  echo "Updating stack instances for account $account with SystemPrefix-EnvPrefix=$SYSTEM_PREFIX-$ENV_PREFIX"

  # AWS CLIコマンドを実行してスタックインスタンスを更新
  aws cloudformation update-stack-instances \
      --stack-set-name "$STACK_SET_NAME" \
      --deployment-targets OrganizationalUnitIds=$OU_ID,Accounts=$account,AccountFilterType=INTERSECTION \
      --regions "$REGION" \
      --parameter-overrides \
        ParameterKey=SystemPrefix,ParameterValue="$SYSTEM_PREFIX" \
        ParameterKey=EnvPrefix,ParameterValue="$ENV_PREFIX" \
        ParameterKey=WebhookURL,ParameterValue="$WEBHOOK_URL" \
        ParameterKey=MentionedUserMailAddress,ParameterValue="$MENTIONED_USER_MAIL" \
        ParameterKey=MentionedUserName,ParameterValue="$MENTIONED_USER_NAME"
done
スクリプトを実行すると、account_parameters.jsonで設定したパラメータに基づいて、SystemPrefix名が更新されます。
$ chmod +x update-stack-instances.sh
$ ./update-stack-instances.sh

Updating stack instances for account 111111111111 with SystemPrefix-EnvPrefix=new-cm1-dev
{
    "OperationId": "aa41e657-e116-48e3-ad88-78ac265c4ebe"
}
Updating stack instances for account 222222222222 with SystemPrefix-EnvPrefix=cm2-poc
{
    "OperationId": "f3e0a8cc-17d1-4fde-8044-2896622fff0f"
}
この更新プロセスの挙動として、パラメータを特定のアカウント(111111111111)のみ変更した場合でも、各アカウントごとにスタックインスタンスの更新オペレーションが実行されます。
ただし、パラメータが変更されていないアカウント(222222222222)のスタックは実際には更新されません。
スタックが更新されたかどうかは、マネジメントコンソール上の各メンバーアカウントごとのスタックインスタンスで確認できます。
パラメータを変更しなかったアカウント(222222222222)に対しても、以下のとおり更新オペレーションは実行されます。

ただし、アカウント(222222222222)のスタックインスタンスの[状況の理由]には、No updates are to be performed.(更新が実行されません)と記載されています。これは、実際にスタックが更新されていないことを示しています。
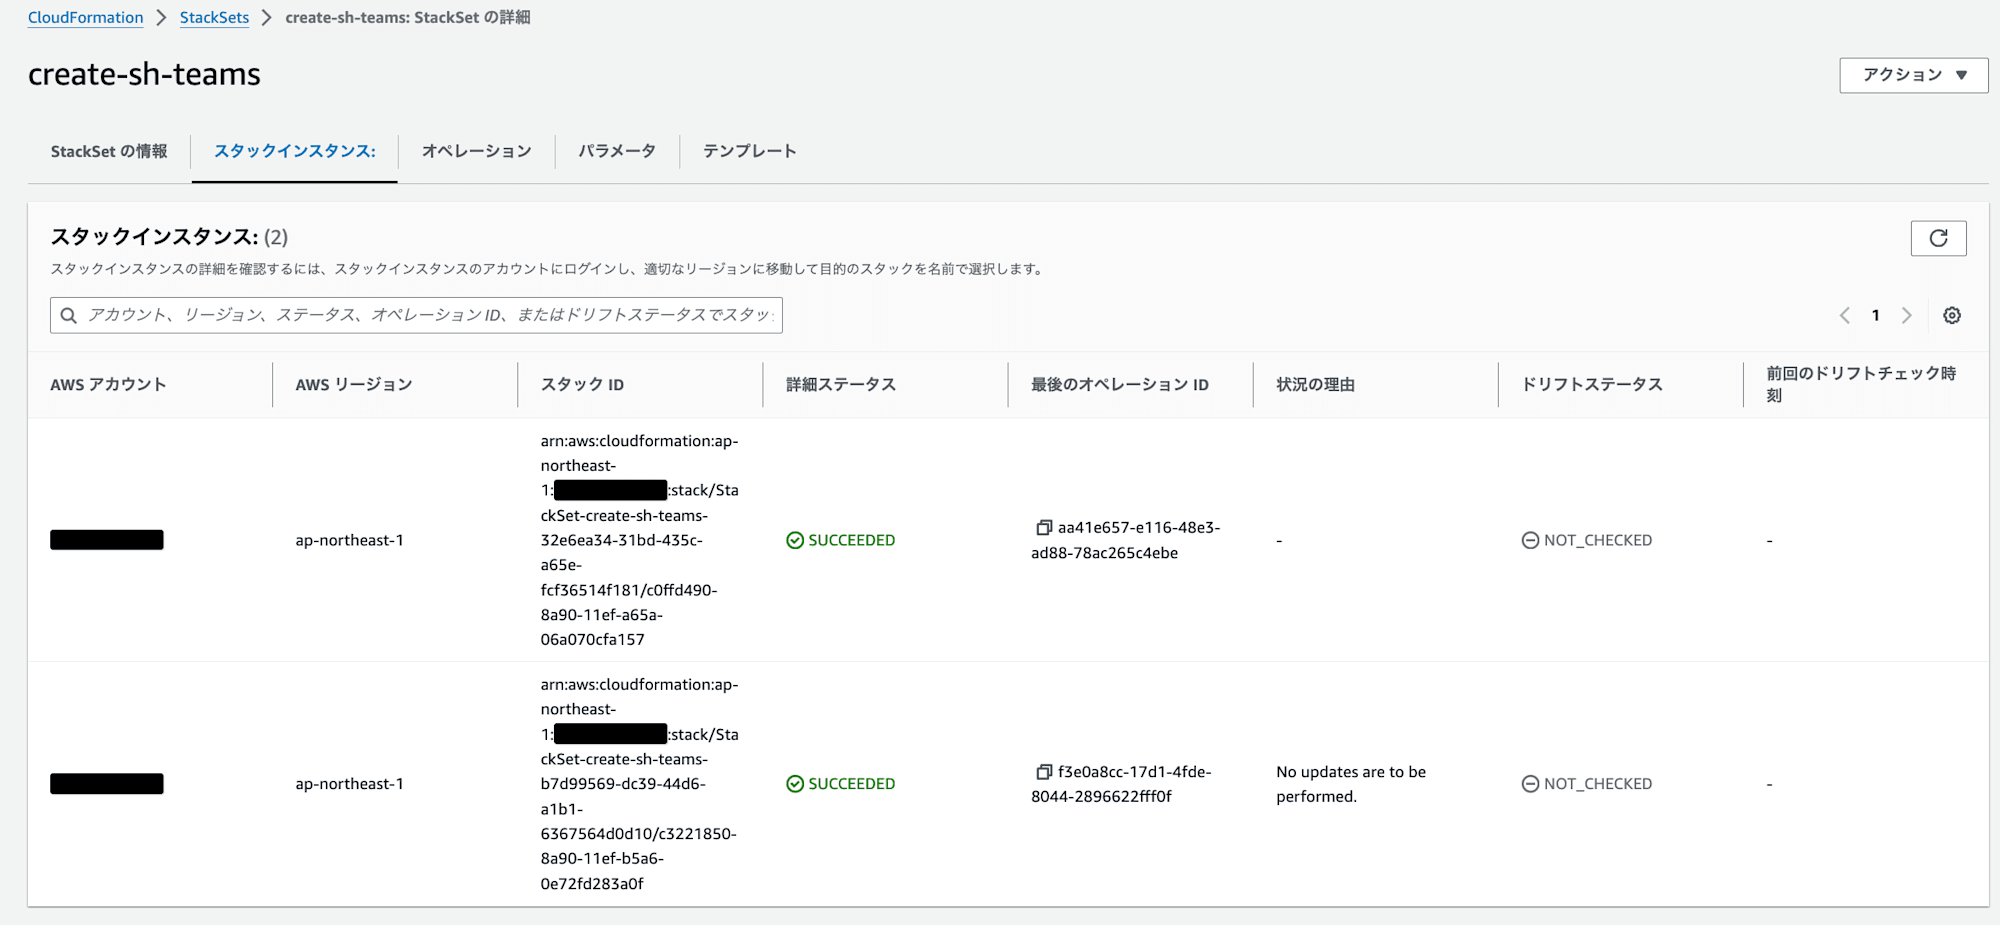
一方、パラメータを変更したアカウント(111111111111)のスタックインスタンスの[状況の理由]には、-と記載されており、これはスタックが正常に更新されたことを示しています。
テンプレートを別アカウントにも導入したい場合
発行した新規アカウントに通知設定を導入したい場合の手順を解説します。
私の検証環境の都合上、メンバーアカウントは2つしかないため、以下のaccount_parameters.jsonのように、111111111111アカウントのみにスタックが作成されている状態を仮定します。
{
  "111111111111": {
    "SystemPrefix": "cm1",
    "EnvPrefix": "dev",
    "WebhookURL": "https://xx/workflows/xx",
    "MentionedUserMailAddress": "example@example.com",
    "MentionedUserName": "example-user-1"
  }
}
新規アカウント(222222222222)にも通知用のスタックを作成するため、account_parameters.jsonに以下のように追加します。
{
  "111111111111": {
    "SystemPrefix": "cm1",
    "EnvPrefix": "dev",
    "WebhookURL": "https://xx/workflows/xx",
    "MentionedUserMailAddress": "example@example.com",
    "MentionedUserName": "example-user-1"
  },
+  "222222222222": {
+    "SystemPrefix": "cm2",
+    "EnvPrefix": "poc",
+    "WebhookURL": "https://xx/workflows/xx",
+    "MentionedUserMailAddress": "example@example.com",
+    "MentionedUserName": "example-user-2"
+  }
}
create-stack-instances.shのスクリプトを実行します。
$ ./create-stack-instances.sh
Deploying to account 111111111111 with SystemPrefix-EnvPrefix=cm2-poc
{
    "OperationId": "4d3ed00b-bd38-4624-8792-38c874648a22"
}
Deploying to account 222222222222 with SystemPrefix-EnvPrefix=cm3-test
{
    "OperationId": "07798b45-e23c-4db3-9c3a-2bbaf3e4d250"
}
実行結果を確認すると、以下のようになります。
- アカウント(111111111111)のスタックインスタンスの[状況の理由]には、
No updates are to be performed.(更新が実行されません)と記載されています。これは、既存のスタックに変更がないため、更新が行われなかったことを示しています。 - 新規アカウント(222222222222)には、新たにスタックが作成されました。
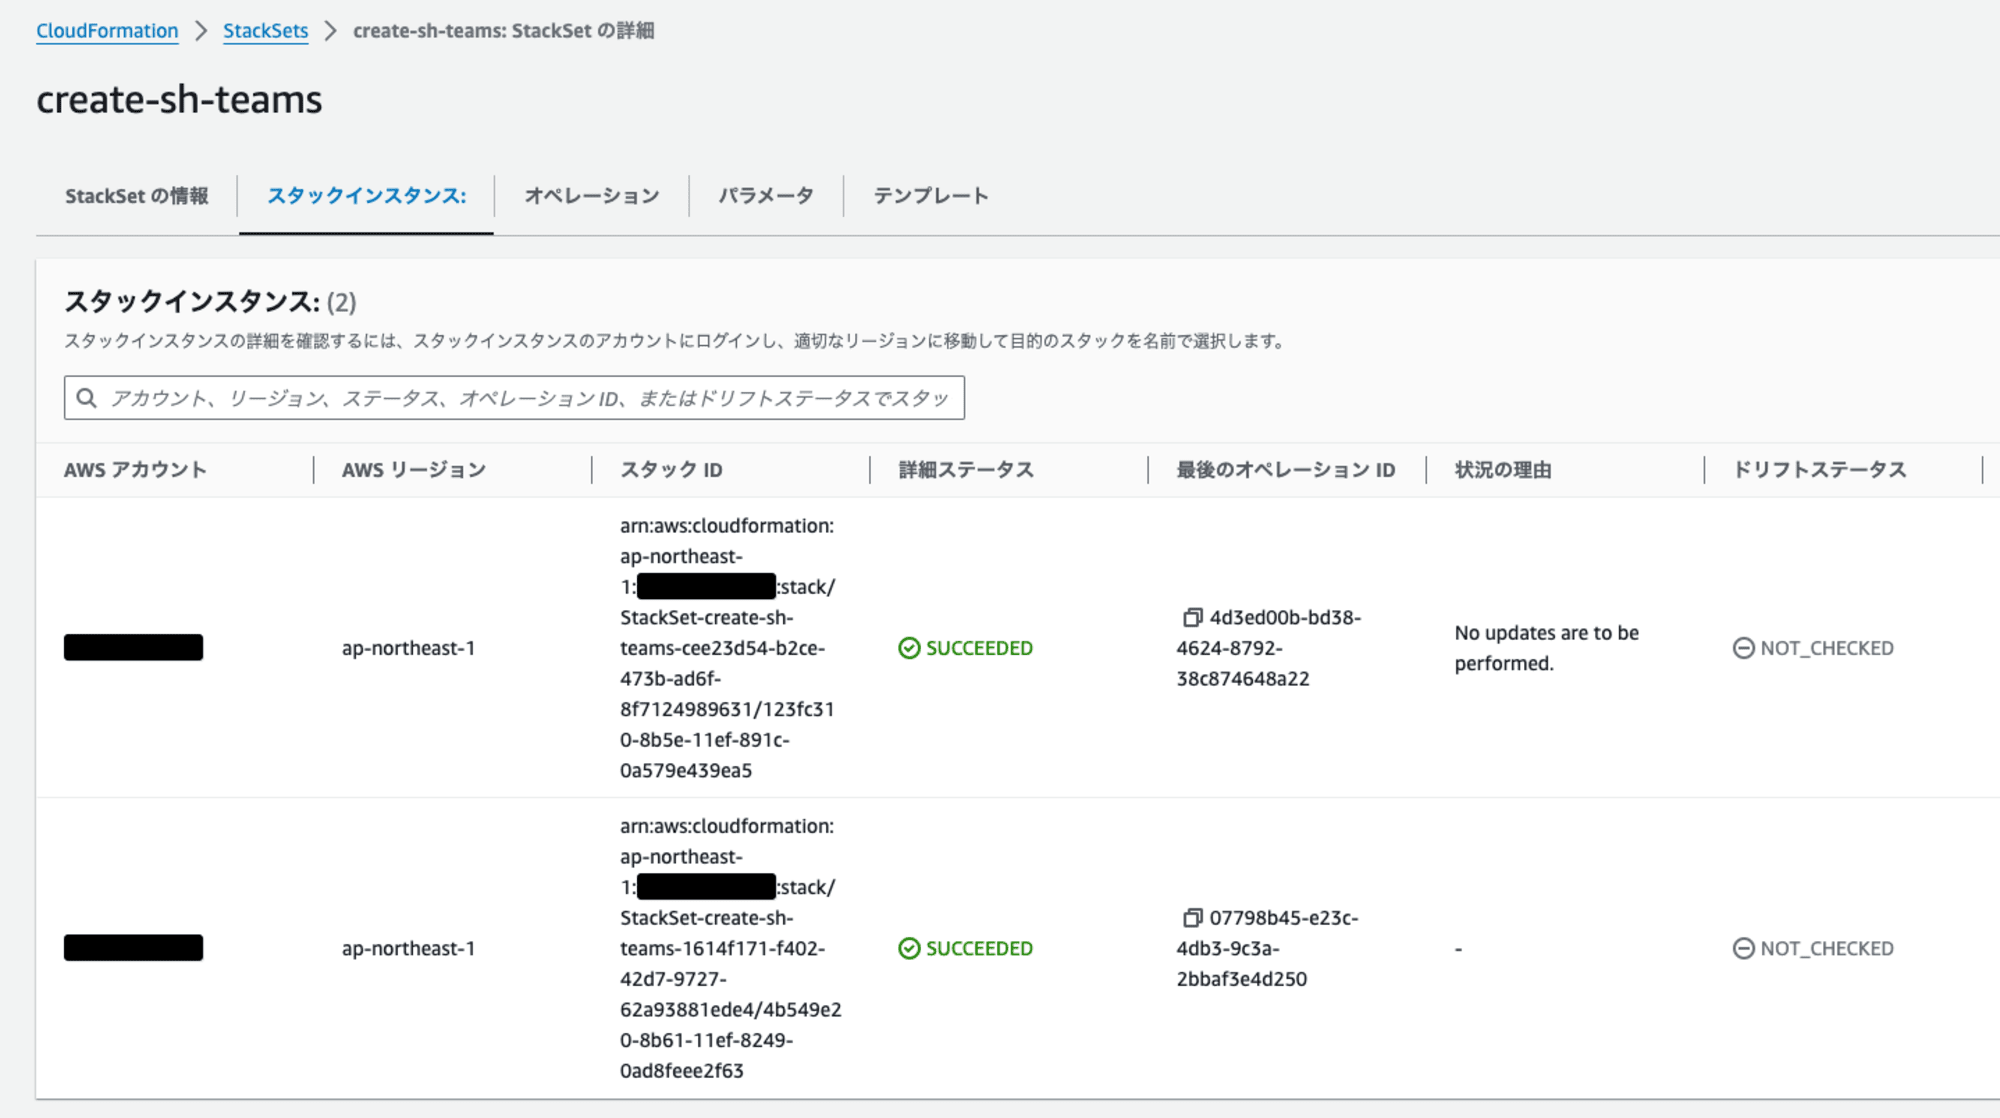

この手順により、既存のアカウントの設定を維持しつつ、新規アカウントに対して通知設定を追加することができます。
パラメータが不適切な場合
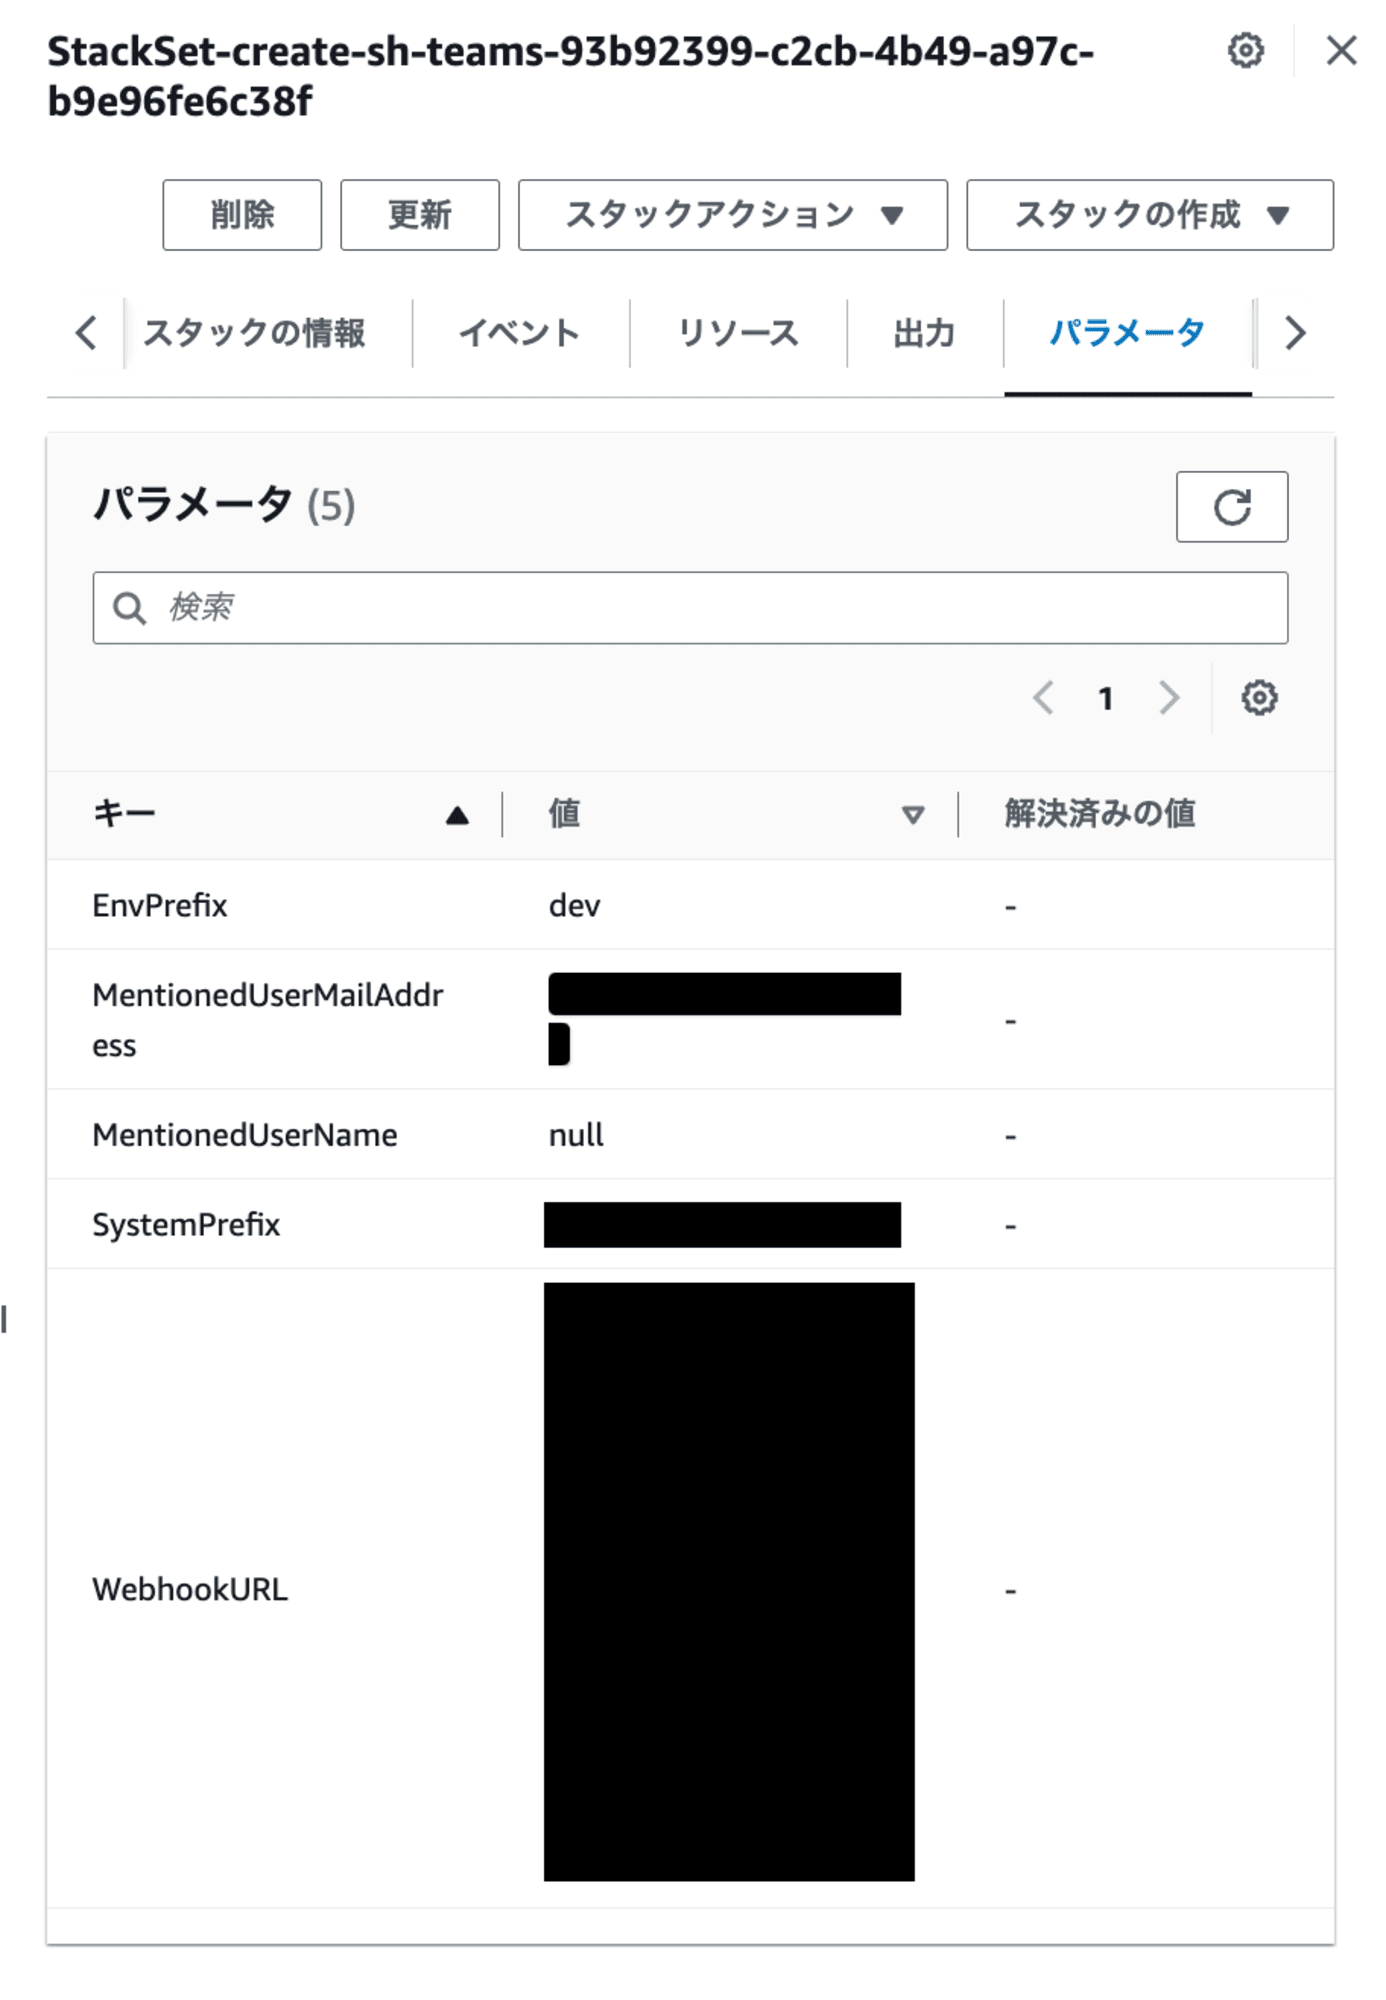
本実装のupdate-stack-instances.shスクリプトでは、account_parameters.json内のパラメータが欠けている場合でも、必ずしもエラーが発生するわけではありません。
例えば、以下のように、MentionedUserNameパラメータが存在しない場合、その値はnullとして扱われ、スタック更新が成功します。
{
  "111111111111": {
    "SystemPrefix": "cm1",
    "EnvPrefix": "dev",
    "WebhookURL": "https://xx/workflows/xx",
    "MentionedUserMailAddress": "example@example.com",
-    "MentionedUserName": "example-user-1"
  },
  "222222222222": {
    "SystemPrefix": "cm2",
    "EnvPrefix": "poc",
    "WebhookURL": "https://xx/workflows/xx",
    "MentionedUserMailAddress": "example@example.com",
    "MentionedUserName": "example-user-2"
  }
}
一方、エラーが発生するパターンも存在します。以下にその例を示します。
{
  "111111111111": {
    "SystemPrefix": "cm1",
    "EnvPrefix": "dev",
+    "WebhookURL": "https://example.com",
-    "WebhookURL": "https://xx/workflows/xx",
    "MentionedUserMailAddress": "example@example.com",
    "MentionedUserName": "example-user-1"
  },
  "222222222222": {
    "SystemPrefix": "cm2",
    "EnvPrefix": "poc",
    "WebhookURL": "https://xx/workflows/xx",
    "MentionedUserMailAddress": "example@example.com",
    "MentionedUserName": "example-user-2"
  }
}
上記のように、存在しないWebhookURLを指定した場合、[ステータス]がFAILEDとなり、[状況の理由]にはエラー内容が記載されます。この場合、スタック更新は失敗し、スタックは更新されません。
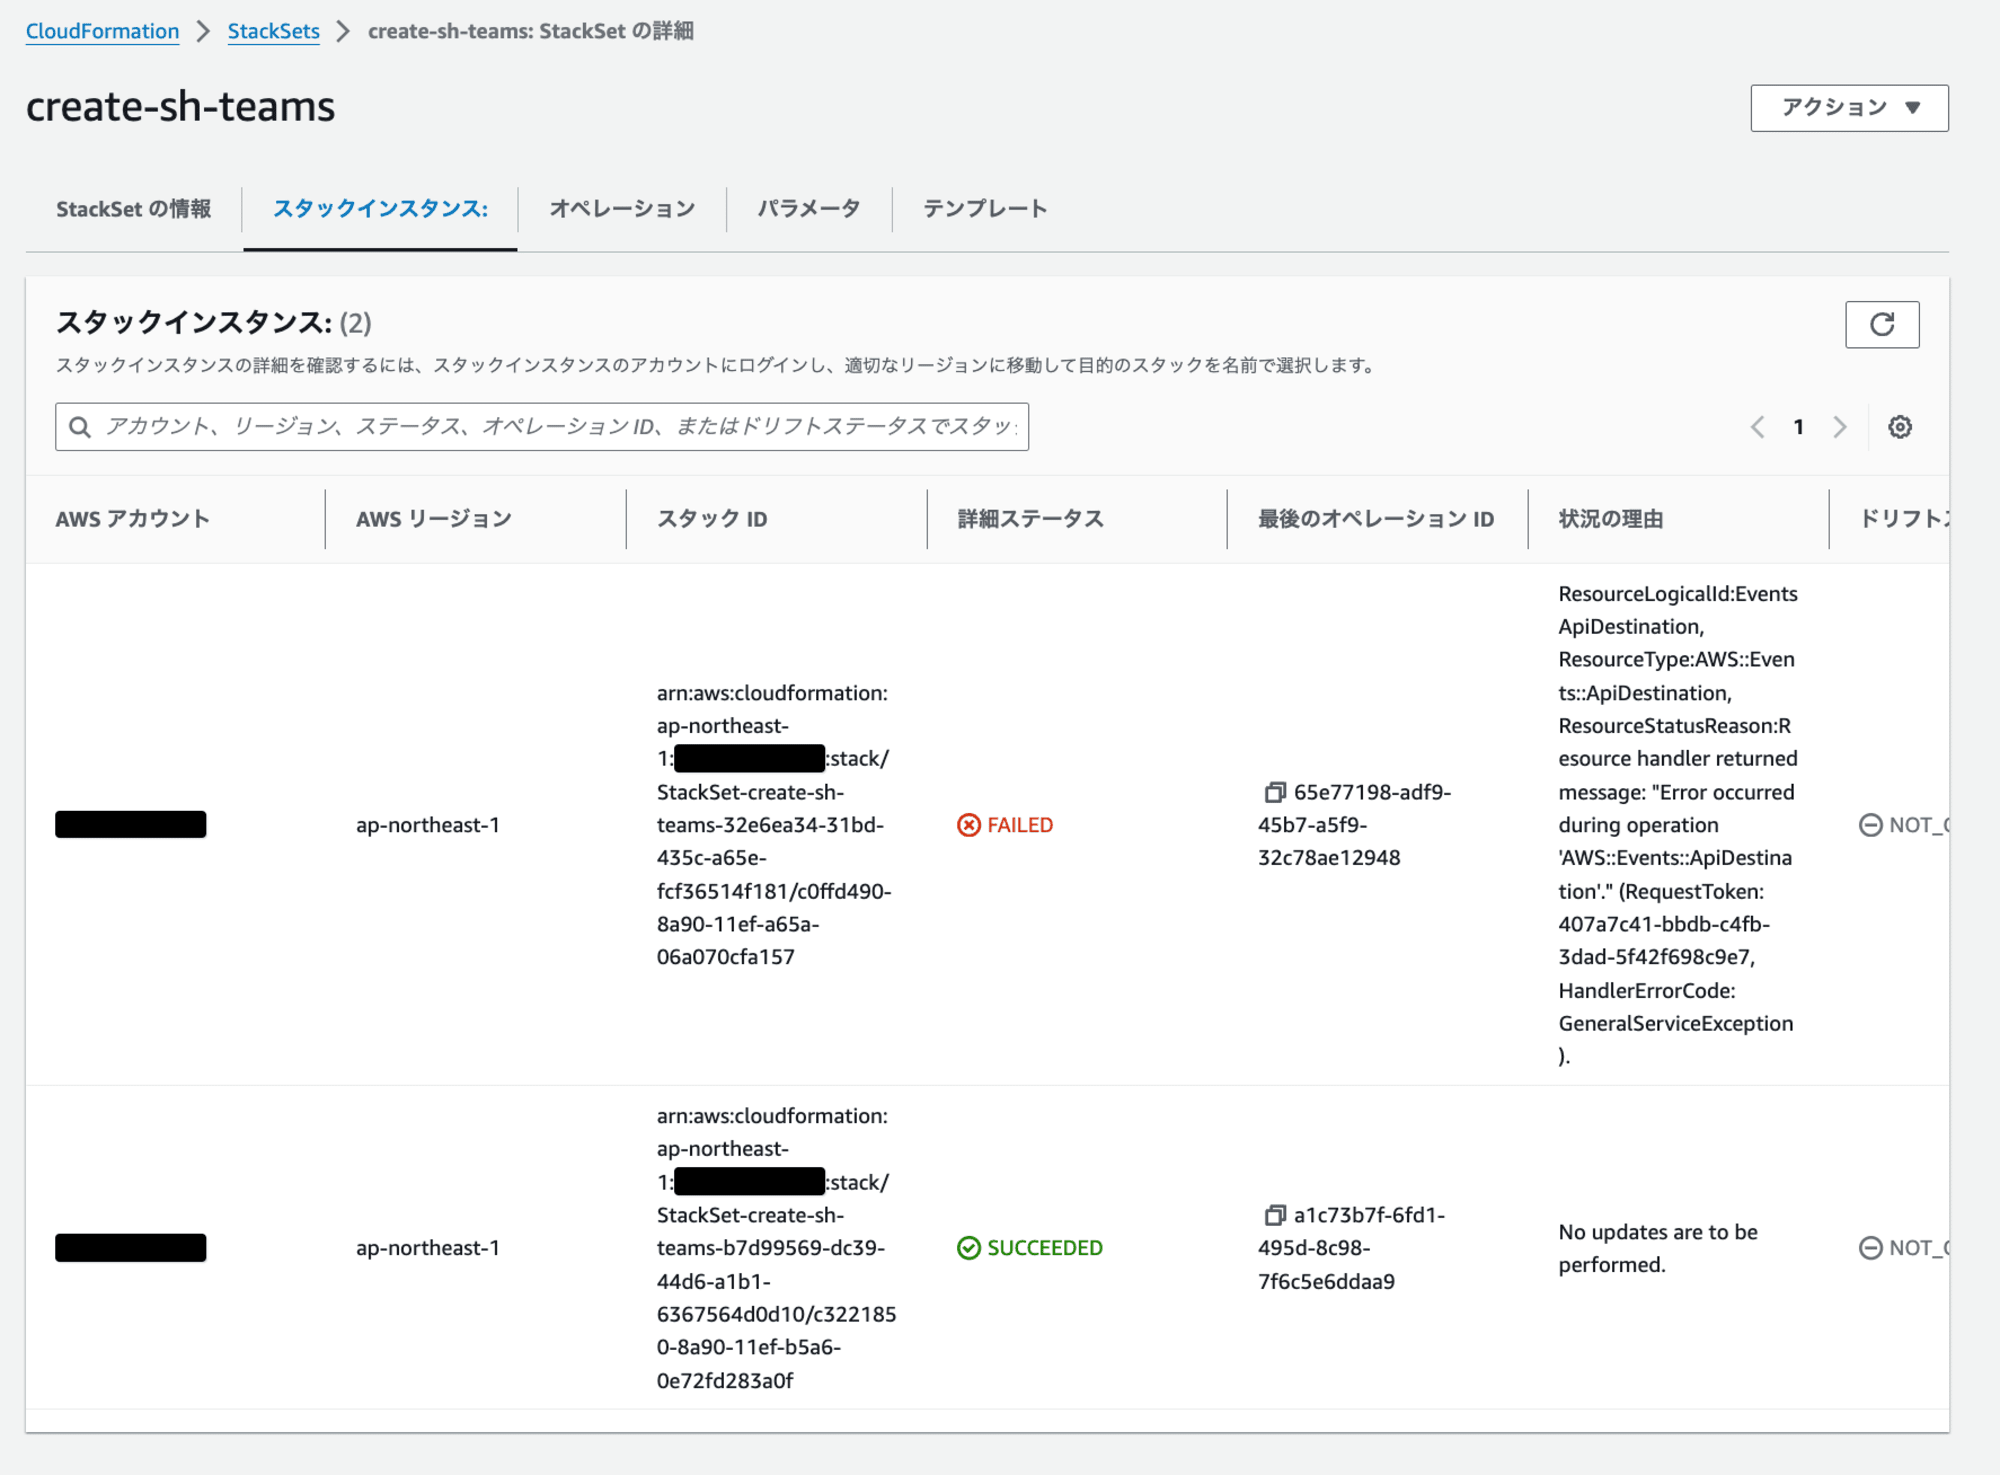
各パラメータが適切に設定されていない場合の挙動には十分な注意が必要です。要件に応じて、パラメータが未設定の場合に更新をスキップしたり、明示的にエラーを発生させたりするなどのエラーハンドリングをスクリプトに追加することをお勧めします。
リソース名
本実装のテンプレートでは、リソース名にプロジェクト名や環境名を含めています。しかし、実際にCloudFormation StackSetを使用してメンバーアカウントごとに異なるパラメータでスタックを作成する場合、各アカウントのプロジェクト名や環境名を個別に調査し、account_parameters.jsonで管理する必要があります。
ただし、メンバーアカウントごとに環境名やプロジェクト名を個別に管理する手間を省くため、これらのパラメータを省略することも可能です。
省略する場合、テンプレートは以下になります。環境名やプロジェクト名のパラメータを削除し、リソース名は固定にしています。
(クリックで展開)
AWSTemplateFormatVersion: '2010-09-09'
Description: ''
Parameters:
WebhookURL:
Type: String
MentionedUserMailAddress:
Description: xxx@example.com
Type: String
MentionedUserName:
Type: String
Resources:
IAMManagedPolicy:
Type: AWS::IAM::ManagedPolicy
Properties:
ManagedPolicyName: EventBridgePolicyForSecurityHubNotifytoTeams
Path: /service-role/
PolicyDocument:
Version: 2012-10-17
Statement:
- Effect: Allow
Action:
- events:InvokeApiDestination
Resource:
- !GetAtt EventsApiDestination.Arn
IAMRole:
Type: AWS::IAM::Role
Properties:
Path: /service-role/
RoleName: eventbridge-teams-api-dest-role
AssumeRolePolicyDocument:
Version: 2012-10-17
Statement:
- Effect: Allow
Principal:
Service: events.amazonaws.com
Action: sts:AssumeRole
MaxSessionDuration: 3600
ManagedPolicyArns:
- !Ref IAMManagedPolicy
EventsRule:
Type: AWS::Events::Rule
Properties:
Name: securityhub-notify-teams
EventPattern:
detail-type:
- Security Hub Findings - Imported
source:
- aws.securityhub
detail:
findings:
Severity:
Label:
- MEDIUM
- HIGH
- CRITICAL
ProductName:
- Security Hub
State: ENABLED
Targets:
- Arn: !GetAtt EventsApiDestination.Arn
HttpParameters:
HeaderParameters: {}
QueryStringParameters: {}
Id: EventsRuleName
InputTransformer:
InputPathsMap:
AwsAccountId: '$.detail.findings[0].AwsAccountId'
FirstObservedAt: '$.detail.findings[0].FirstObservedAt'
LastObservedAt: '$.detail.findings[0].LastObservedAt'
RecommendationUrl: '$.detail.findings[0].ProductFields.RecommendationUrl'
Region: '$.detail.findings[0].Resources[0].Region'
ResourceId: '$.detail.findings[0].Resources[0].Id'
ResourceType: '$.detail.findings[0].Resources[0].Type'
SeverityLabel: '$.detail.findings[0].Severity.Label'
Title: '$.detail.findings[0].Title'
InputTemplate: !Sub |
{
"type": "message",
"attachments": [
{
"contentType": "application/vnd.microsoft.card.adaptive",
"content": {
"type": "AdaptiveCard",
"body": [
{
"type": "TextBlock",
"text": "\u003cat\u003e${MentionedUserName}\u003c/at\u003e",
"weight": "bolder",
"size": "medium"
},
{
"type": "TextBlock",
"text": "SecurityHubで重大度<SeverityLabel>のアラートを検知しました",
"size": "Large",
"weight": "Bolder"
},
{
"type": "Table",
"columns": [
{
"width": 1
},
{
"width": 2
}
],
"rows": [
{
"type": "TableRow",
"cells": [
{
"type": "TableCell",
"items": [
{
"type": "TextBlock",
"text": "タイトル",
"weight": "Bolder"
}
]
},
{
"type": "TableCell",
"items": [
{
"type": "TextBlock",
"wrap": true,
"text": "<Title>"
}
]
}
]
},
{
"type": "TableRow",
"cells": [
{
"type": "TableCell",
"items": [
{
"type": "TextBlock",
"text": "重要度",
"weight": "Bolder"
}
]
},
{
"type": "TableCell",
"items": [
{
"type": "TextBlock",
"wrap": true,
"text": "<SeverityLabel>"
}
]
}
]
},
{
"type": "TableRow",
"cells": [
{
"type": "TableCell",
"items": [
{
"type": "TextBlock",
"text": "修復手順",
"weight": "Bolder"
}
]
},
{
"type": "TableCell",
"items": [
{
"type": "TextBlock",
"wrap": true,
"text": "[こちらをクリック](<RecommendationUrl>)"
}
]
}
]
},
{
"type": "TableRow",
"cells": [
{
"type": "TableCell",
"items": [
{
"type": "TextBlock",
"text": "アカウントID",
"weight": "Bolder"
}
]
},
{
"type": "TableCell",
"items": [
{
"type": "TextBlock",
"wrap": true,
"text": "<AwsAccountId>"
}
]
}
]
},
{
"type": "TableRow",
"cells": [
{
"type": "TableCell",
"items": [
{
"type": "TextBlock",
"text": "リージョン",
"weight": "Bolder"
}
]
},
{
"type": "TableCell",
"items": [
{
"type": "TextBlock",
"wrap": true,
"text": "<Region>"
}
]
}
]
},
{
"type": "TableRow",
"cells": [
{
"type": "TableCell",
"items": [
{
"type": "TextBlock",
"text": "リソースタイプ",
"weight": "Bolder"
}
]
},
{
"type": "TableCell",
"items": [
{
"type": "TextBlock",
"wrap": true,
"text": "<ResourceType>"
}
]
}
]
},
{
"type": "TableRow",
"cells": [
{
"type": "TableCell",
"items": [
{
"type": "TextBlock",
"text": "リソースID",
"weight": "Bolder"
}
]
},
{
"type": "TableCell",
"items": [
{
"type": "TextBlock",
"wrap": true,
"text": "<ResourceId>"
}
]
}
]
},
{
"type": "TableRow",
"cells": [
{
"type": "TableCell",
"items": [
{
"type": "TextBlock",
"text": "初回検出日時",
"weight": "Bolder"
}
]
},
{
"type": "TableCell",
"items": [
{
"type": "TextBlock",
"wrap": true,
"text": "<FirstObservedAt>"
}
]
}
]
},
{
"type": "TableRow",
"cells": [
{
"type": "TableCell",
"items": [
{
"type": "TextBlock",
"text": "最終検出日時",
"weight": "Bolder"
}
]
},
{
"type": "TableCell",
"items": [
{
"type": "TextBlock",
"wrap": true,
"text": "<LastObservedAt>"
}
]
}
]
}
]
}
],
"$schema": "http://adaptivecards.io/schemas/adaptive-card.json",
"version": "1.4",
"msteams": {
"width": "full",
"entities": [
{
"type": "mention",
"text": "\u003cat\u003e${MentionedUserName}\u003c/at\u003e",
"mentioned": {
"id": "${MentionedUserMailAddress}",
"name": "${MentionedUserName}"
}
}
]
}
}
}
]
}
RoleArn: !GetAtt IAMRole.Arn
EventBusName: default
EventsConnection:
Type: AWS::Events::Connection
Properties:
Name: teams-conn
AuthorizationType: API_KEY
AuthParameters:
ApiKeyAuthParameters:
ApiKeyName: Content-Type
ApiKeyValue: application/json
EventsApiDestination:
Type: AWS::Events::ApiDestination
Properties:
Name: teams-api-dest
ConnectionArn: !GetAtt EventsConnection.Arn
InvocationEndpoint: !Ref WebhookURL
HttpMethod: POST
InvocationRateLimitPerSecond: 300
Outputs:
EventsApiDestinationArn:
Description: The ARN of the EventBridge API Destination
Value: !GetAtt EventsApiDestination.Arn
Export:
Name: EventsApiDestinationArn
また、WebhookURLも全アカウントで共通であれば、パラメータではなくテンプレートにベタ書きでもよいです。
別のセキュリティサービスの通知設定
本記事では、Security Hubの通知用のテンプレートを利用しましたが、他のセキュリティサービスであるGuard DutyやInspectorなどのサービスからの通知も同様の方法で実装できます。
これらの追加サービスの通知を設定するには、以下の手順を行います。
- 現在のテンプレートに、Guard DutyやInspector用の新しいEventBridgeルールを追加します。
- 各サービスに対して、適切なイベントパターンを設定します。
- 通知内容を各サービスの特性に合わせてカスタマイズします。
この方法により、1つのテンプレートで複数のセキュリティサービスからの通知を管理できます。
スタックインスタンス削除
最後に作成したスタックやStackSetを削除します。
以下のスクリプトでスタックインスタンスを削除できます。
# アカウントごとのパラメータを定義したJSONファイル
ACCOUNT_PARAMETERS_FILE="account_parameters.json"

# StackSet名
STACK_SET_NAME="create-sh-teams"

# リージョン(東京リージョン)
REGION="ap-northeast-1"

# デプロイターゲットのOU
OU_ID="ou-xxxx-xxxxxxxx"

# 各アカウントに対してスタックインスタンスを削除
for account in $(jq -r 'keys[]' "$ACCOUNT_PARAMETERS_FILE"); do
  echo "Deleting stack instances for account $account"

  # AWS CLIコマンドを実行してスタックインスタンスを削除
  aws cloudformation delete-stack-instances \
      --stack-set-name "$STACK_SET_NAME" \
      --deployment-targets OrganizationalUnitIds=$OU_ID,Accounts=$account,AccountFilterType=INTERSECTION \
      --regions "$REGION" \
      --no-retain-stacks
done
delete-stack-instances.sh をアップロード後、スクリプトを実行します。
$ chmod +x delete-stack-instances.sh

$ ./delete-stack-instances.sh

Deleting stack instances for account 111111111111
{
    "OperationId": "ae790e70-b8ed-4d4b-af96-afe7d9060a97"
}
Deleting stack instances for account 222222222222
{
    "OperationId": "01c1ca2b-cebb-43f0-9f50-788432d8481b"
}
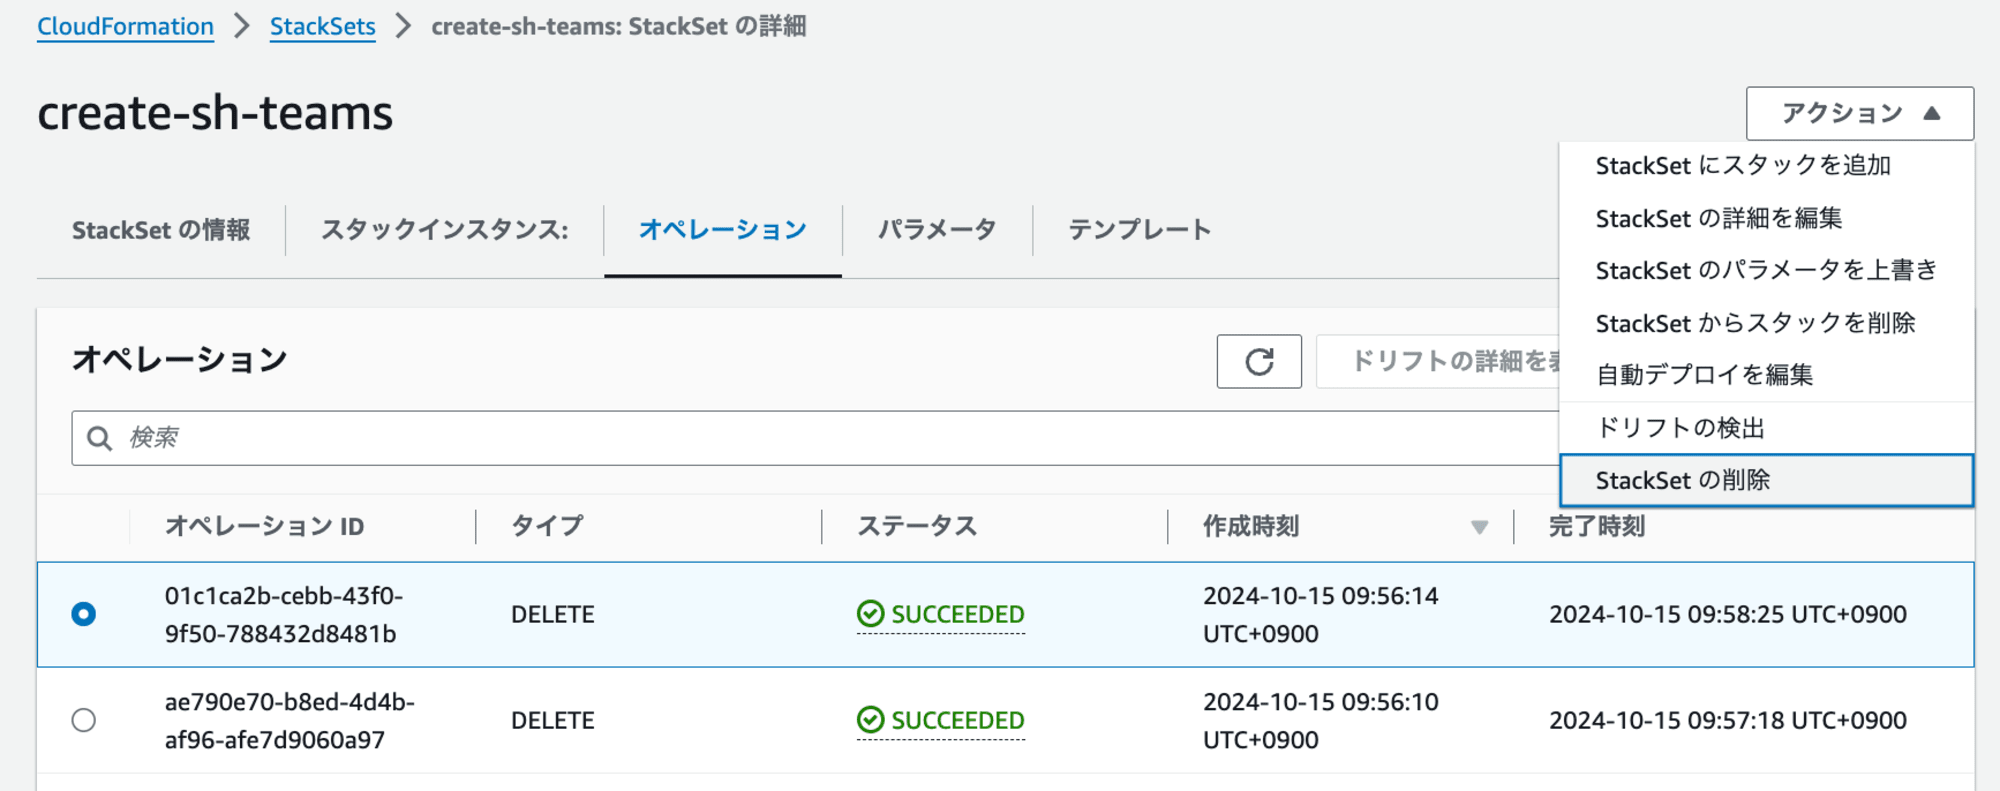
スタックインスタンス削除後、マネジメントコンソール上からStackSetを削除すると、完了です。
まとめ
本記事では、CloudFormation StackSetを使用して、複数のメンバーアカウントに対して異なるパラメータでスタックを作成する方法を解説しました。主なポイントは以下の通りです。
- CloudFormation StackSetを使用することで、複数のAWSアカウントに対して一括でリソースをデプロイできます。
- アカウントごとに異なるパラメータを設定することで、各アカウントの要件に合わせた柔軟な設定が可能です。
- AWS CLIとシェルスクリプトを組み合わせることで、多数のアカウントに対する効率的な運用が実現できます。
- パラメータの管理や更新時の挙動には注意が必要で、特に不適切なパラメータに対するエラーハンドリングは要件に応じて適切に対処することが重要です。
- サービス管理型(service-managed) StackSetを使用しているため、管理アカウント用の通知は別途スタックを作成する必要があります。
- この手法はSecurity Hubだけでなく、Guard DutyやInspectorなど他のセキュリティサービスの通知設定にも応用可能で、1つのテンプレートで複数サービスの通知を管理できます。
この方法を活用することで、大規模な環境でも効率的にリソースを管理し、包括的なセキュリティ管理を実現することができます。
参考


