CloudWatch Alarmでアラーム発生時にStep Functionsステートマシンを起動する
この記事は公開されてから1年以上経過しています。情報が古い可能性がありますので、ご注意ください。
こんにちは、CX事業本部 IoT事業部の若槻です。
今回は、CloudWatch Alarmでアラーム発生時にStep Functionsステートマシンを起動する方法を確認してみました。
ステートマシンはどこから起動できるか
まず、なるべく簡潔な構成にするという前提で、アラーム発生時にステートマシンをどのようにして起動できるかを確認してみます。
CloudWatch Alarmの場合
まずCloudWatch Alarmからステートマシンを直接起動できるか。
CloudWatch Alarmのアクションの設定を見ると、ターゲットとしてSNS Topicしか指定できないようです。
ドキュメントを見る限りでもアラームアクションへのSNS Topic以外のサービスの指定については記述がありません。
よってCloudWatch Alarmからはステートマシンの直接起動はできないようです。
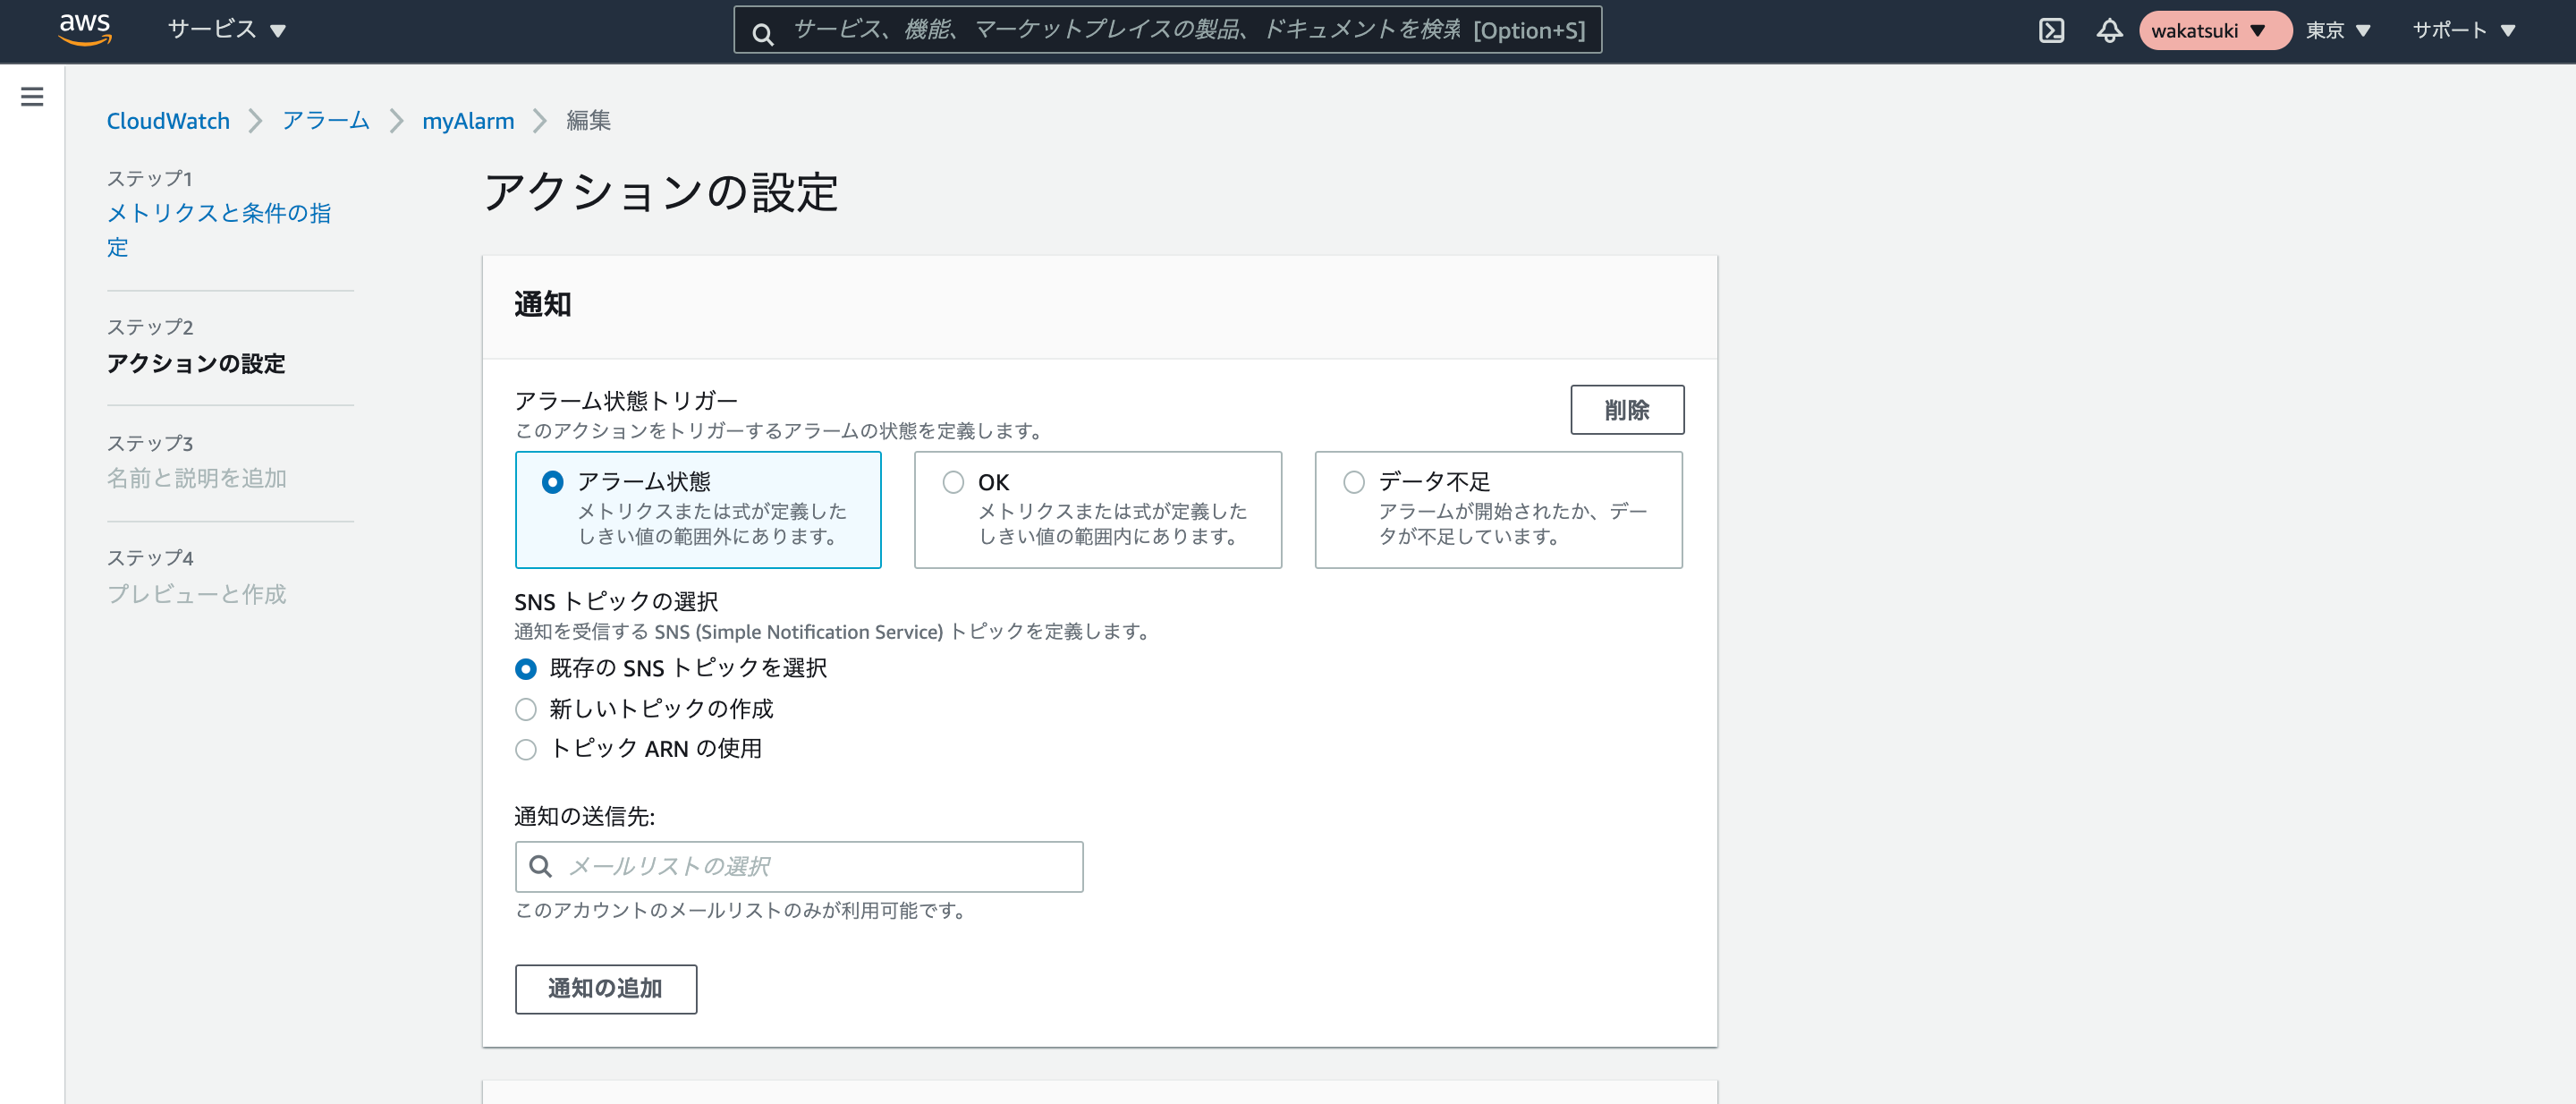
SNS Topicの場合
続いてCloudWatch Alarmのアクションの唯一の発行先となるSNS Topicからは起動できるのか。
Topicのサブスクリプションの設定を確認すると、サブスクライブするエンドポイントのプロトコルは以下が指定可能となっています。ステートマシンは一覧にありません。
- HTTP/HTTPS
- Email/Email-JSON
- Amazon Kinesis Data Firehose
- Amazon SQS
- AWS Lambda
- プラットフォームアプリケーションエンドポイント
- SMS
このうち聞き慣れないものとしてプラットフォームアプリケーションエンドポイントがありますが、こちらはモバイルアプリケーションのエンドポイントに通知を送信する際に使用するものとのことです。
なのでステートマシンのArnを指定しようとしてもエラーとなります。
考えられる構成
よって現時点で考えられる、アラーム発生時にステートマシンを起動させる最も簡単な構成は以下となりそうです。(※)

※2022/5 追記:Amazon EventBridgeを使用した構成であればさらに簡略化できました。記事末尾に詳細記載しています。
実装
上記構成を実装してみます。
CDKコード
import * as cdk from '@aws-cdk/core';
import * as sfn from '@aws-cdk/aws-stepfunctions';
import * as cloudwatch from '@aws-cdk/aws-cloudwatch';
import * as cloudwatchActions from '@aws-cdk/aws-cloudwatch-actions';
import * as sns from '@aws-cdk/aws-sns';
import * as lambda from '@aws-cdk/aws-lambda';
import * as lambdaNodejs from '@aws-cdk/aws-lambda-nodejs';
import { SnsEventSource } from '@aws-cdk/aws-lambda-event-sources';
import * as iam from '@aws-cdk/aws-iam';

export class AwsCdkAppStack extends cdk.Stack {
  constructor(scope: cdk.Construct, id: string, props?: cdk.StackProps) {
    super(scope, id, props);

    //SNS Topic
    const cloudwatchAlarmNotifyTopic = new sns.Topic(
      this,
      'cloudwatchAlarmNotifyTopic'
    );

    //CloudWatch Alarm
    const sampleAlarm = new cloudwatch.Alarm(this, 'sampleAlarm', {
      alarmName: 'sampleAlarm',
      metric: new cloudwatch.Metric({
        namespace: 'StateMachinePublish',
        metricName: 'temperature',
      }),
      evaluationPeriods: 1,
      threshold: 5,
      statistic: cloudwatch.Statistic.MAXIMUM,
      comparisonOperator:
        cloudwatch.ComparisonOperator.LESS_THAN_OR_EQUAL_TO_THRESHOLD,
      period: cdk.Duration.minutes(3),
    });

    //Alarmアクション追加
    sampleAlarm.addAlarmAction(
      new cloudwatchActions.SnsAction(cloudwatchAlarmNotifyTopic)
    );

    //ステートマシン
    const stateMachine = new sfn.StateMachine(this, 'sampleStateMachine', {
      stateMachineName: 'sampleStateMachine',
      definition: new sfn.Pass(this, 'pass', {}),
    });

    //Lambda関数
    const startStateMachineFunc = new lambdaNodejs.NodejsFunction(
      this,
      'startStateMachineFunc',
      {
        functionName: 'startStateMachineFunc',
        entry: 'src/lambda/startStateMachineHandler.ts',
        handler: 'handler',
        runtime: lambda.Runtime.NODEJS_14_X,
        environment: {
          STATE_MACHINE_ARN: stateMachine.stateMachineArn,
        },
      }
    );

    //ステートマシン起動権限付与
    startStateMachineFunc.addToRolePolicy(
      new iam.PolicyStatement({
        actions: ['states:StartExecution'],
        resources: [stateMachine.stateMachineArn],
      })
    );

    //Lambdaイベントソース追加
    startStateMachineFunc.addEventSource(
      new SnsEventSource(cloudwatchAlarmNotifyTopic)
    );
  }
}
Lambdaコード
import * as AWS from 'aws-sdk';

const STATE_MACHINE_ARN = process.env.STATE_MACHINE_ARN!;

const sfn = new AWS.StepFunctions();

export const handler = async () => {
  await sfn
    .startExecution({
      stateMachineArn: STATE_MACHINE_ARN,
    })
    .promise();
};
動作
監視対象のメトリクスがしきい値を下回り、CloudWatch Alarmがアラーム状態となりました。
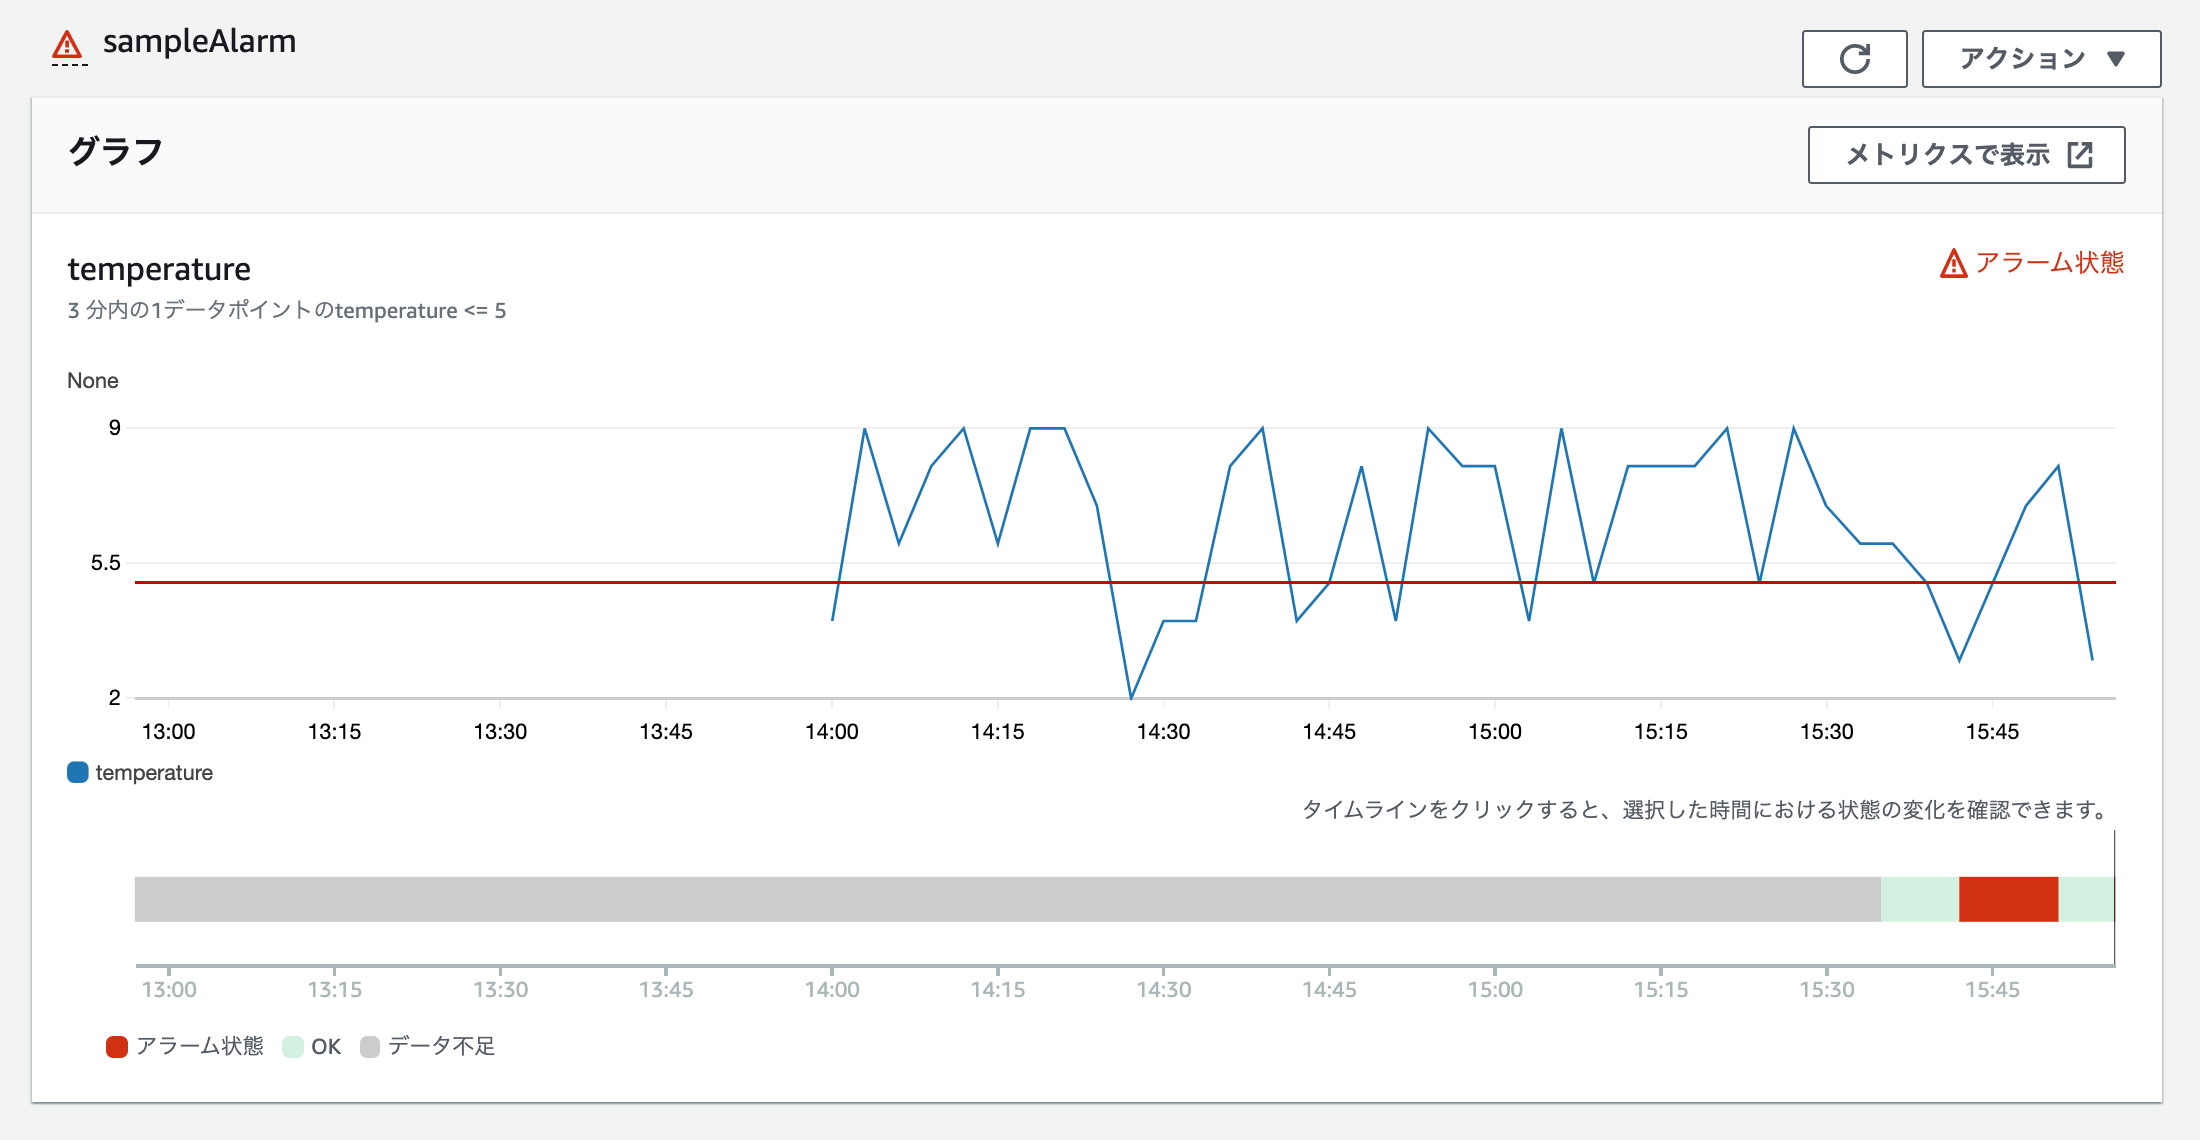
するとLambda実行を介してステートマシンがちゃんと起動しました。
まとめ
- CloudWatch Alarmのアラーム発生時にステートマシンを起動したい場合、現在取りうる最も簡潔な構成は、
CloudWatch Alarm -> SNS topic -> Lambda関数 -> ステートマシンとなる。 - せめてSNS topicからステートマシンを直接起動できるようになると嬉しい。
2022/5 追記:Amazon EventBridgeを使用した方が良い場合もある
Amazon EventBridgeのRuleを使用するとさらに構成を簡略化することができました。
<div class="mxgraph" style="max-width:100%;border:1px solid transparent;" data-mxgraph="{"highlight":"#0000ff","nav":true,"resize":true,"toolbar":"zoom layers tags lightbox","edit":"_blank","xml":"<mxfile scale="1.5" border="0"><diagram id="wlil6eIq3ImAZShQtSz2" name="Page-1"><mxGraphModel dx="904" dy="1075" grid="1" gridSize="10" guides="1" tooltips="1" connect="1" arrows="1" fold="1" page="1" pageScale="1" pageWidth="850" pageHeight="1100" math="0" shadow="0"><root><mxCell id="0"/><mxCell id="1" parent="0"/><mxCell id="2" value="AWS Cloud" style="sketch=0;outlineConnect=0;gradientColor=none;html=1;whiteSpace=wrap;fontSize=12;fontStyle=0;shape=mxgraph.aws4.group;grIcon=mxgraph.aws4.group_aws_cloud;strokeColor=#858B94;fillColor=none;verticalAlign=top;align=left;spacingLeft=30;fontColor=#858B94;dashed=0;" parent="1" vertex="1"><mxGeometry x="110" y="146" width="610" height="250" as="geometry"/></mxCell><mxCell id="7" value="" style="edgeStyle=none;html=1;" parent="1" source="3" target="5" edge="1"><mxGeometry relative="1" as="geometry"/></mxCell><mxCell id="3" value="" style="sketch=0;outlineConnect=0;fontColor=#232F3E;gradientColor=none;fillColor=#B0084D;strokeColor=none;dashed=0;verticalLabelPosition=bottom;verticalAlign=top;align=center;html=1;fontSize=12;fontStyle=0;aspect=fixed;pointerEvents=1;shape=mxgraph.aws4.alarm;" parent="1" vertex="1"><mxGeometry x="170" y="216" width="78" height="78" as="geometry"/></mxCell><mxCell id="4" value="CloudWatch Alarm" style="text;html=1;align=center;verticalAlign=middle;resizable=0;points=[];autosize=1;strokeColor=none;fillColor=none;" parent="1" vertex="1"><mxGeometry x="154" y="306" width="110" height="20" as="geometry"/></mxCell><mxCell id="12" value="" style="edgeStyle=none;html=1;" parent="1" source="5" target="9" edge="1"><mxGeometry relative="1" as="geometry"/></mxCell><mxCell id="5" value="" style="sketch=0;points=[[0,0,0],[0.25,0,0],[0.5,0,0],[0.75,0,0],[1,0,0],[0,1,0],[0.25,1,0],[0.5,1,0],[0.75,1,0],[1,1,0],[0,0.25,0],[0,0.5,0],[0,0.75,0],[1,0.25,0],[1,0.5,0],[1,0.75,0]];outlineConnect=0;fontColor=#232F3E;gradientColor=#FF4F8B;gradientDirection=north;fillColor=#BC1356;strokeColor=#ffffff;dashed=0;verticalLabelPosition=bottom;verticalAlign=top;align=center;html=1;fontSize=12;fontStyle=0;aspect=fixed;shape=mxgraph.aws4.resourceIcon;resIcon=mxgraph.aws4.eventbridge;" parent="1" vertex="1"><mxGeometry x="360" y="216" width="78" height="78" as="geometry"/></mxCell><mxCell id="8" value="EventBridge Rule" style="text;html=1;align=center;verticalAlign=middle;resizable=0;points=[];autosize=1;strokeColor=none;fillColor=none;" parent="1" vertex="1"><mxGeometry x="344" y="306" width="110" height="20" as="geometry"/></mxCell><mxCell id="9" value="" style="sketch=0;points=[[0,0,0],[0.25,0,0],[0.5,0,0],[0.75,0,0],[1,0,0],[0,1,0],[0.25,1,0],[0.5,1,0],[0.75,1,0],[1,1,0],[0,0.25,0],[0,0.5,0],[0,0.75,0],[1,0.25,0],[1,0.5,0],[1,0.75,0]];outlineConnect=0;fontColor=#232F3E;gradientColor=#FF4F8B;gradientDirection=north;fillColor=#BC1356;strokeColor=#ffffff;dashed=0;verticalLabelPosition=bottom;verticalAlign=top;align=center;html=1;fontSize=12;fontStyle=0;aspect=fixed;shape=mxgraph.aws4.resourceIcon;resIcon=mxgraph.aws4.step_functions;" parent="1" vertex="1"><mxGeometry x="550" y="216" width="78" height="78" as="geometry"/></mxCell><mxCell id="11" value="Step Functions<br>State Machine" style="text;html=1;align=center;verticalAlign=middle;resizable=0;points=[];autosize=1;strokeColor=none;fillColor=none;" parent="1" vertex="1"><mxGeometry x="544" y="301" width="90" height="30" as="geometry"/></mxCell></root></mxGraphModel></diagram></mxfile>"}"></div>
<script type="text/javascript" src="https://viewer.diagrams.net/js/viewer-static.min.js"></script>
ただし注意点として、EventBridge Ruleからステートマシンを起動する場合は任意の実行名を指定できません。指定したい場合は本記事で紹介した方法の方が良いかと思います。
参考
- amazon web services - How to call a step funtion from Node.js Lambda function? - Stack Overflow
- AWS SNSからLambda連携をCDKで
- Amazon CloudWatch SyntheticsによるURL監視のアラームをメール通知してみた(AWS CDK) | DevelopersIO
以上


