
プライベートサブネットに Storage Gateway の EC2 ゲートウェイを作成してアクティベーションしてみた
はじめに
猫とアポロチョコが好きな m.hayakawa です。
今回は、オンプレミス環境から Storage Gateway を使用する際の構成として、プライベートサブネットに Storage Gateway アプライアンス EC2 を作成する場合の手順を紹介します。
想定の構成図
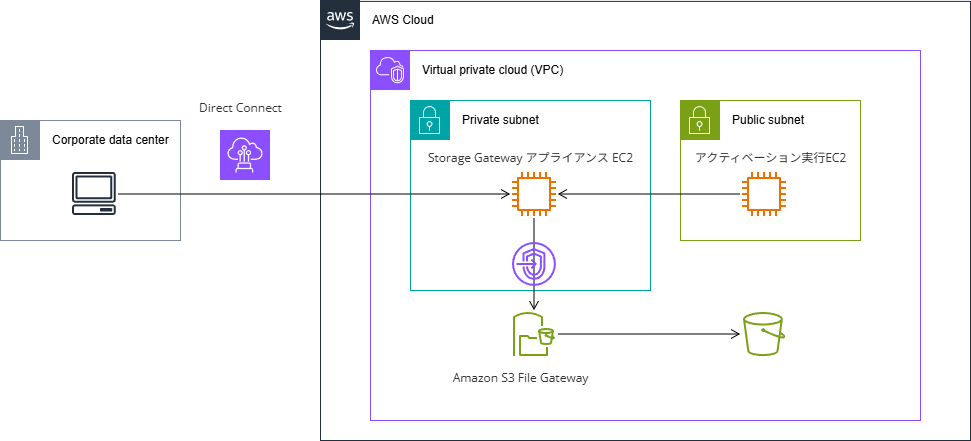
本来は Storage Gateway アプライアンス EC2のアクティベーションを、オンプレミス環境のサーバーから行う方法を取りますが、今回は検証目的であるため、パブリックアクセス可能な EC2 へ Systems Manager Session Manager を用いてログインをし、アクティベーションを実行する方法を取ります。
手順
VPC 環境の作成(CloudFormation)
下記の要件を満たす CloudFormation スタックを作成します。
- 東京リージョン
- VPC(10.0.0.0/16)の中に2つのアベイラビリティゾーン
- アベイラビリティゾーンごとに1つずつプライベートサブネットとパブリックサブネット
- NATゲートウェイは不要
- プライベートサブネットに下記のVPCエンドポイントを作る
- S3 インターフェースエンドポイント
- Storage Gateway インターフェースエンドポイント
- VPCエンドポイントはDNS名を無効
- セキュリティグループはインバウンドルールですべてのポートとTCP/UDPに対して、10.0.0.0/16からのアクセスを許可する
AWSTemplateFormatVersion: '2010-09-09'
Description: 'VPC with public/private subnets across 2 AZs and VPC endpoints (without NAT Gateway)'

Resources:
  # VPC
  VPC:
    Type: AWS::EC2::VPC
    Properties:
      CidrBlock: 10.0.0.0/16
      EnableDnsHostnames: true
      EnableDnsSupport: true
      Tags:
        - Key: Name
          Value: MyVPC

  # Internet Gateway
  InternetGateway:
    Type: AWS::EC2::InternetGateway
    Properties:
      Tags:
        - Key: Name
          Value: MyIGW

  AttachGateway:
    Type: AWS::EC2::VPCGatewayAttachment
    Properties:
      VpcId: !Ref VPC
      InternetGatewayId: !Ref InternetGateway

  # Public Subnets
  PublicSubnet1:
    Type: AWS::EC2::Subnet
    Properties:
      VpcId: !Ref VPC
      CidrBlock: 10.0.1.0/24
      AvailabilityZone: ap-northeast-1a
      MapPublicIpOnLaunch: true
      Tags:
        - Key: Name
          Value: PublicSubnet1

  PublicSubnet2:
    Type: AWS::EC2::Subnet
    Properties:
      VpcId: !Ref VPC
      CidrBlock: 10.0.2.0/24
      AvailabilityZone: ap-northeast-1c
      MapPublicIpOnLaunch: true
      Tags:
        - Key: Name
          Value: PublicSubnet2

  # Private Subnets
  PrivateSubnet1:
    Type: AWS::EC2::Subnet
    Properties:
      VpcId: !Ref VPC
      CidrBlock: 10.0.11.0/24
      AvailabilityZone: ap-northeast-1a
      Tags:
        - Key: Name
          Value: PrivateSubnet1

  PrivateSubnet2:
    Type: AWS::EC2::Subnet
    Properties:
      VpcId: !Ref VPC
      CidrBlock: 10.0.12.0/24
      AvailabilityZone: ap-northeast-1c
      Tags:
        - Key: Name
          Value: PrivateSubnet2

  # Route Tables
  PublicRouteTable:
    Type: AWS::EC2::RouteTable
    Properties:
      VpcId: !Ref VPC
      Tags:
        - Key: Name
          Value: PublicRouteTable

  PrivateRouteTable:
    Type: AWS::EC2::RouteTable
    Properties:
      VpcId: !Ref VPC
      Tags:
        - Key: Name
          Value: PrivateRouteTable

  # Routes
  PublicRoute:
    Type: AWS::EC2::Route
    DependsOn: AttachGateway
    Properties:
      RouteTableId: !Ref PublicRouteTable
      DestinationCidrBlock: 0.0.0.0/0
      GatewayId: !Ref InternetGateway

  # Route Table Associations
  PublicSubnetRouteTableAssociation1:
    Type: AWS::EC2::SubnetRouteTableAssociation
    Properties:
      SubnetId: !Ref PublicSubnet1
      RouteTableId: !Ref PublicRouteTable

  PublicSubnetRouteTableAssociation2:
    Type: AWS::EC2::SubnetRouteTableAssociation
    Properties:
      SubnetId: !Ref PublicSubnet2
      RouteTableId: !Ref PublicRouteTable

  PrivateSubnetRouteTableAssociation1:
    Type: AWS::EC2::SubnetRouteTableAssociation
    Properties:
      SubnetId: !Ref PrivateSubnet1
      RouteTableId: !Ref PrivateRouteTable

  PrivateSubnetRouteTableAssociation2:
    Type: AWS::EC2::SubnetRouteTableAssociation
    Properties:
      SubnetId: !Ref PrivateSubnet2
      RouteTableId: !Ref PrivateRouteTable

  # Security Group for VPC Endpoints
  VPCEndpointSecurityGroup:
    Type: AWS::EC2::SecurityGroup
    Properties:
      GroupDescription: Security group for VPC endpoints
      VpcId: !Ref VPC
      SecurityGroupIngress:
        - IpProtocol: tcp
          FromPort: 0
          ToPort: 65535
          CidrIp: 10.0.0.0/16
        - IpProtocol: udp
          FromPort: 0
          ToPort: 65535
          CidrIp: 10.0.0.0/16
      Tags:
        - Key: Name
          Value: VPCEndpointSecurityGroup

  # S3 VPC Endpoint (Interface) - DNS?????
  S3VPCEndpoint:
    Type: AWS::EC2::VPCEndpoint
    Properties:
      VpcId: !Ref VPC
      ServiceName: com.amazonaws.ap-northeast-1.s3
      VpcEndpointType: Interface
      SubnetIds:
        - !Ref PrivateSubnet1
        - !Ref PrivateSubnet2
      SecurityGroupIds:
        - !Ref VPCEndpointSecurityGroup
      PrivateDnsEnabled: false
      PolicyDocument:
        Version: '2012-10-17'
        Statement:
          - Effect: Allow
            Principal: '*'
            Action:
              - 's3:*'
            Resource: '*'

  # Storage Gateway VPC Endpoint (Interface) - DNS?????
  StorageGatewayVPCEndpoint:
    Type: AWS::EC2::VPCEndpoint
    Properties:
      VpcId: !Ref VPC
      ServiceName: com.amazonaws.ap-northeast-1.storagegateway
      VpcEndpointType: Interface
      SubnetIds:
        - !Ref PrivateSubnet1
        - !Ref PrivateSubnet2
      SecurityGroupIds:
        - !Ref VPCEndpointSecurityGroup
      PrivateDnsEnabled: false

Outputs:
  VPCId:
    Description: VPC ID
    Value: !Ref VPC
    Export:
      Name: !Sub "${AWS::StackName}-VPC-ID"

  PublicSubnet1Id:
    Description: Public Subnet 1 ID
    Value: !Ref PublicSubnet1
    Export:
      Name: !Sub "${AWS::StackName}-PublicSubnet1-ID"

  PublicSubnet2Id:
    Description: Public Subnet 2 ID
    Value: !Ref PublicSubnet2
    Export:
      Name: !Sub "${AWS::StackName}-PublicSubnet2-ID"

  PrivateSubnet1Id:
    Description: Private Subnet 1 ID
    Value: !Ref PrivateSubnet1
    Export:
      Name: !Sub "${AWS::StackName}-PrivateSubnet1-ID"

  PrivateSubnet2Id:
    Description: Private Subnet 2 ID
    Value: !Ref PrivateSubnet2
    Export:
      Name: !Sub "${AWS::StackName}-PrivateSubnet2-ID"

  VPCEndpointSecurityGroupId:
    Description: VPC Endpoint Security Group ID
    Value: !Ref VPCEndpointSecurityGroup
    Export:
      Name: !Sub "${AWS::StackName}-VPCEndpointSG-ID"

  S3VPCEndpointId:
    Description: S3 VPC Endpoint ID
    Value: !Ref S3VPCEndpoint
    Export:
      Name: !Sub "${AWS::StackName}-S3VPCEndpoint-ID"

  StorageGatewayVPCEndpointId:
    Description: Storage Gateway VPC Endpoint ID
    Value: !Ref StorageGatewayVPCEndpoint
    Export:
      Name: !Sub "${AWS::StackName}-StorageGatewayVPCEndpoint-ID"
EC2 の作成
パブリックサブネットにアクティベーション用の EC2 を作成
パブリックサブネットに、Systems Manager の Session Manager でログインが可能な Amazon Linux 2023 インスタンスを作成します。
Amazon Linux 2023 も SSM エージェントがプリインストールされています。
インスタンスタイプは t3.micro で問題ありません。
セキュリティグループも VPC エンドポイントにアタッチされているものと同一で問題ありません。
詳細は下記のブログが詳しいです。
セッションマネージャーを使って鍵ストレスの無いEC2アクセス! | DevelopersIO
Storage Gateway 環境の作成
やっとここから本題です。
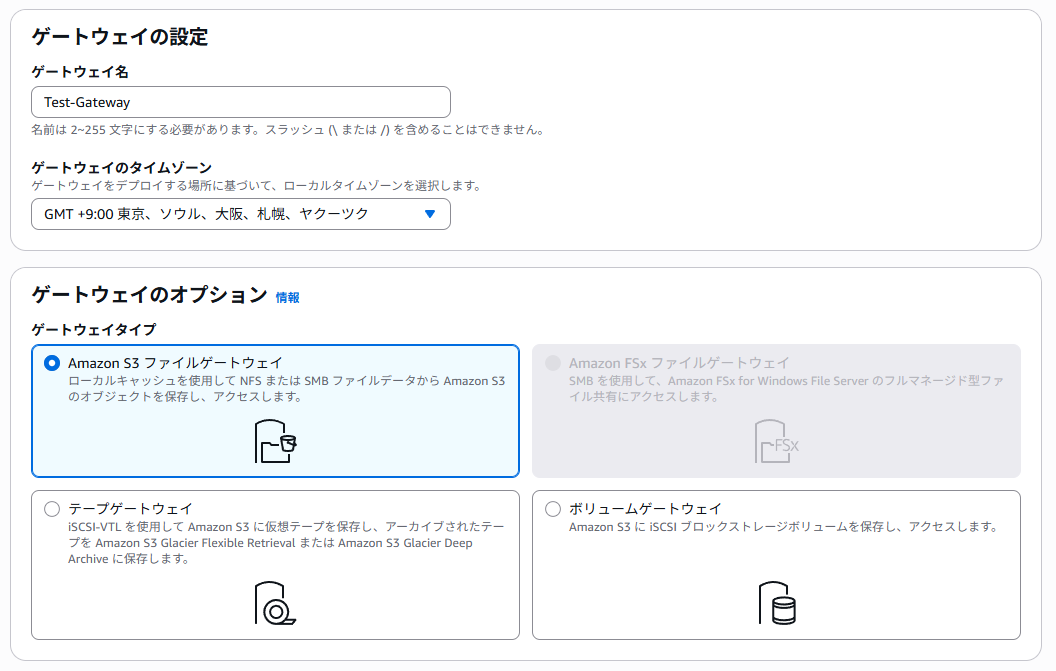
Storage Gateway コンソールへ移動し、ゲートウェイの作成ボタンを押下します。
ゲートウェイ名に好きな名前を付け、ゲートウェイタイプを「Amazon S3 ファイルゲートウェイ」にします。
ゲートウェイアプライアンス用の EC2 を作成
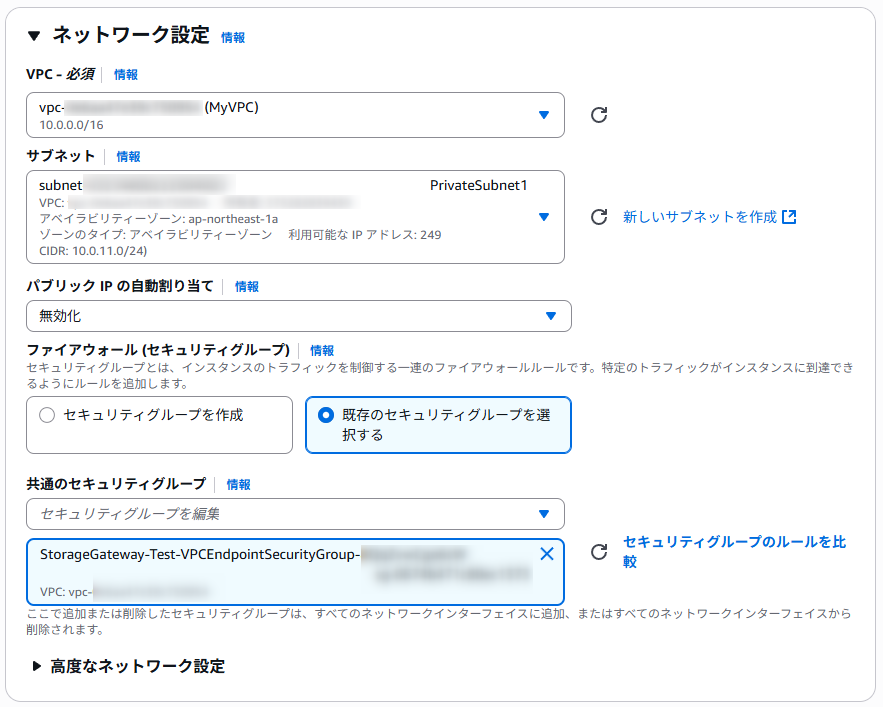
プライベートサブネットに、EC2 ゲートウェイを作成するため、ホストプラットフォームを「Amazon EC2」、「設定をカスタマイズ」を選択します。
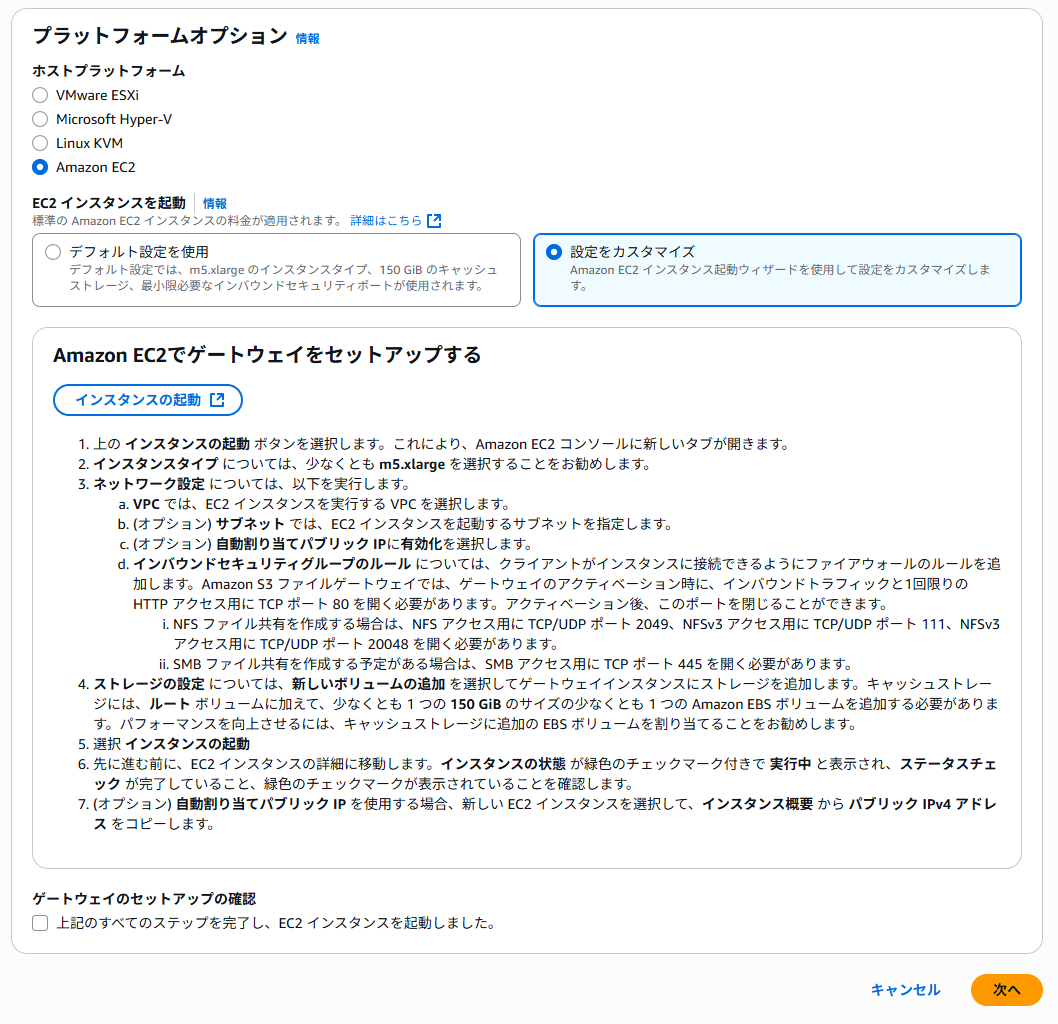
「インスタンスを起動」ボタンを押下し、開いたブラウザタブへ移動します。
この部分で実行することは下記の 3 点です。
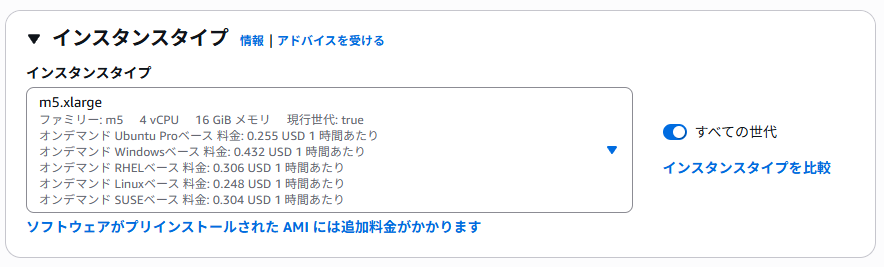
- インスタンスタイプを m5.xlarge にする
- キャッシュ用 EBS(150GiB) を作成し、アタッチする
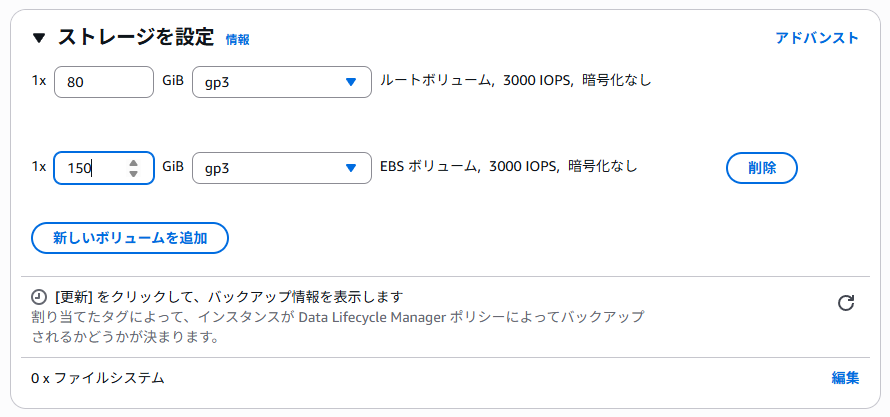
- セキュリティグループを VPC エンドポイントにアタッチされているものと同一にする
上記を設定したら、インスタンスを作成し、ステータスチェックが 2/2 になるまで待ちましょう。
インスタンスが作成されたら、「上記のすべてのステップを完了し、EC2 インスタンスを起動しました。」にチェックを入れて、次へを押下します。
アクティベーションをする
ゲートウェイ接続オプションを「アクティベーションキー」に選択します。
アクティベーション用の EC2 へ Systems Manager Session Manager を用いて接続し、下記のコマンドを実行します。
curl "http://gateway_ip_address/?activationRegion=region_code&vpcEndpoint=&no_redirect"
なお、検証時に実際に実行したコマンドは下記です。(リソース名はマスクしています)
curl "http://10.0.11.88/?activationRegion=ap-northeast-1&vpcEndpoint=vpce-SAMPLE123SAMPLE4-SAMPLE56.storagegateway.ap-northeast-1.vpce.amazonaws.com&no_redirect"

01234-SAMPL-56789-SAMPL-ABCDE
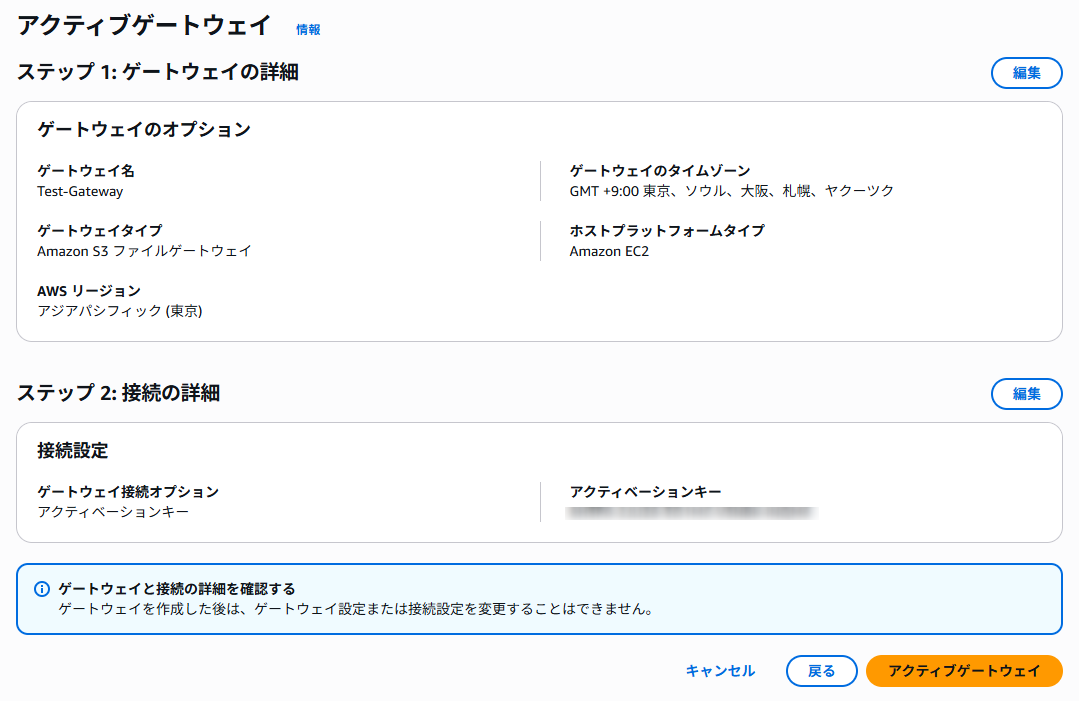
アクティベーションキーが取得できるため、Storage Gateway のコンソールに入力し、次へボタンを押します。

設定内容を確認の上、「アクティブゲートウェイ」ボタンを押下します。
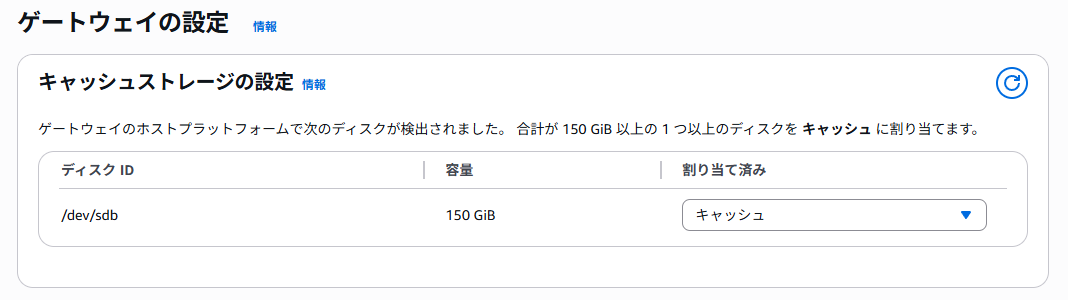
その後、キャッシュストレージの設定の画面に推移しますが、キャッシュを割り当てる EBS を選択できるようになるまで、数分待ちが発生することがあります。気長に待ちましょう。
CloudWatch ロググループや、CloudWatch アラームは任意に設定してください。
ファイル共有を作成する
ゲートウェイの作成が完了したら、ファイル共有を作成します。
ファイル共有のURLへ移動し、ファイル共有の作成ボタンを押下します。
始めに、「設定をカスタマイズボタン」を押下します。
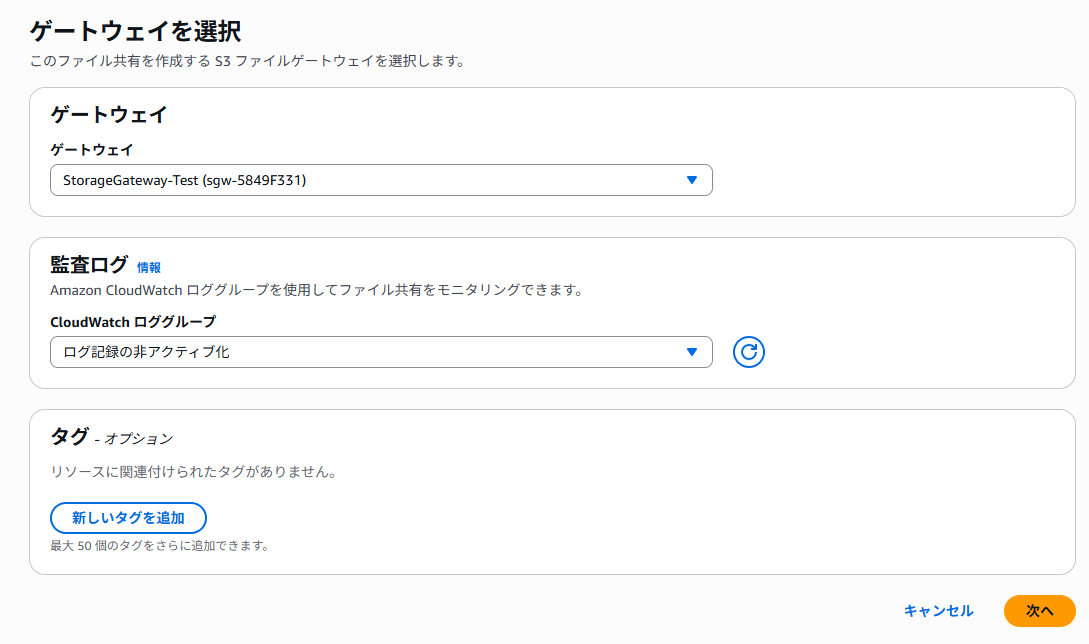
作成したゲートウェイを選択し、次へを押下します。
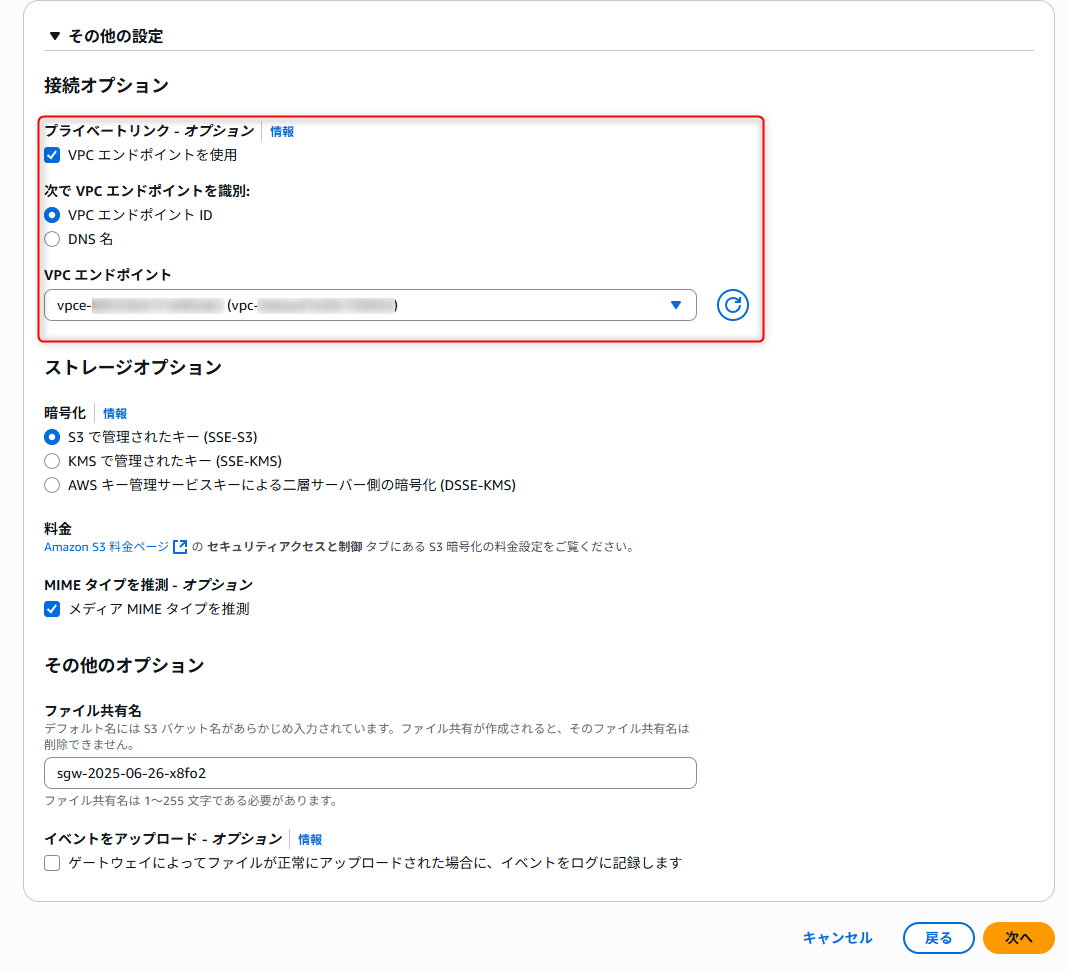
S3 バケットを新規に作成し、接続オプションの「VPC エンドポイントを使用」をONにして、S3 エンドポイントを選択してください。
※ここが一番重要です!
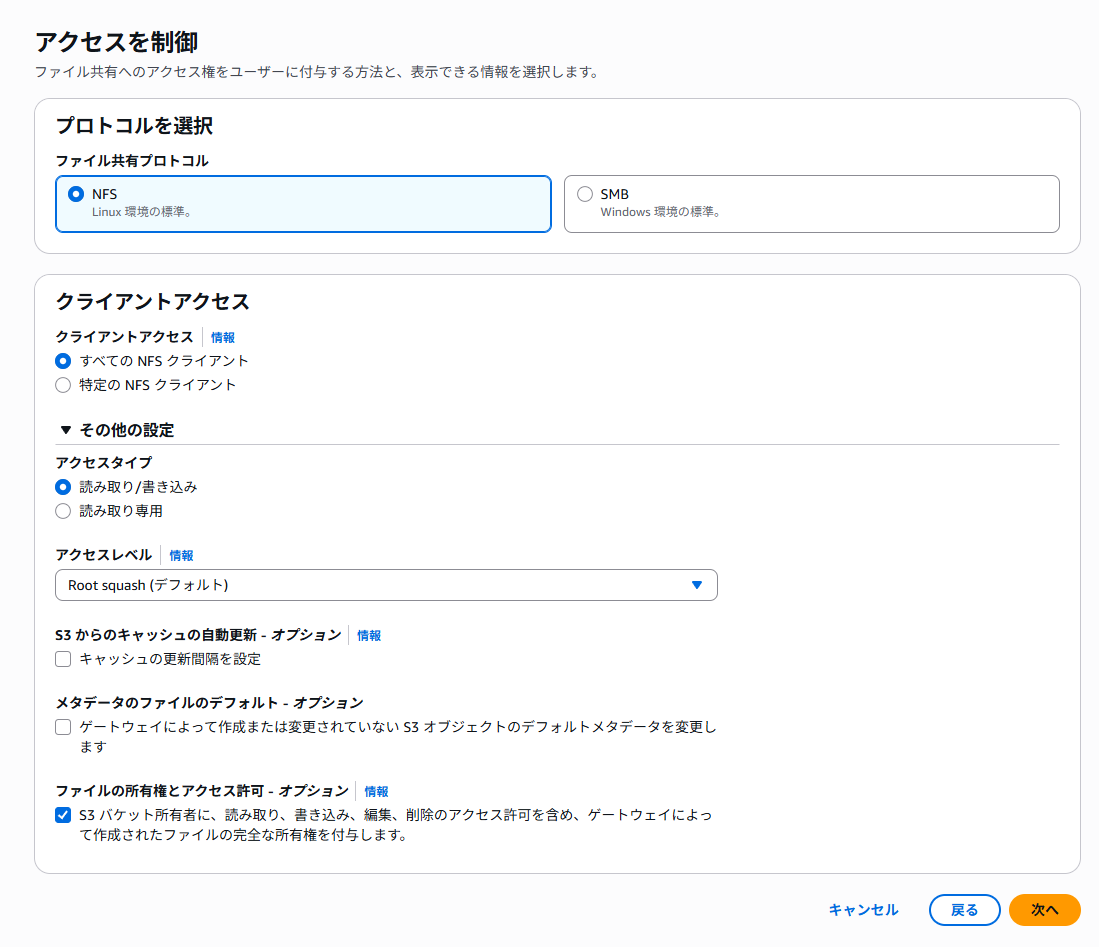
アクセス制御はそのまま、次へを押下します。
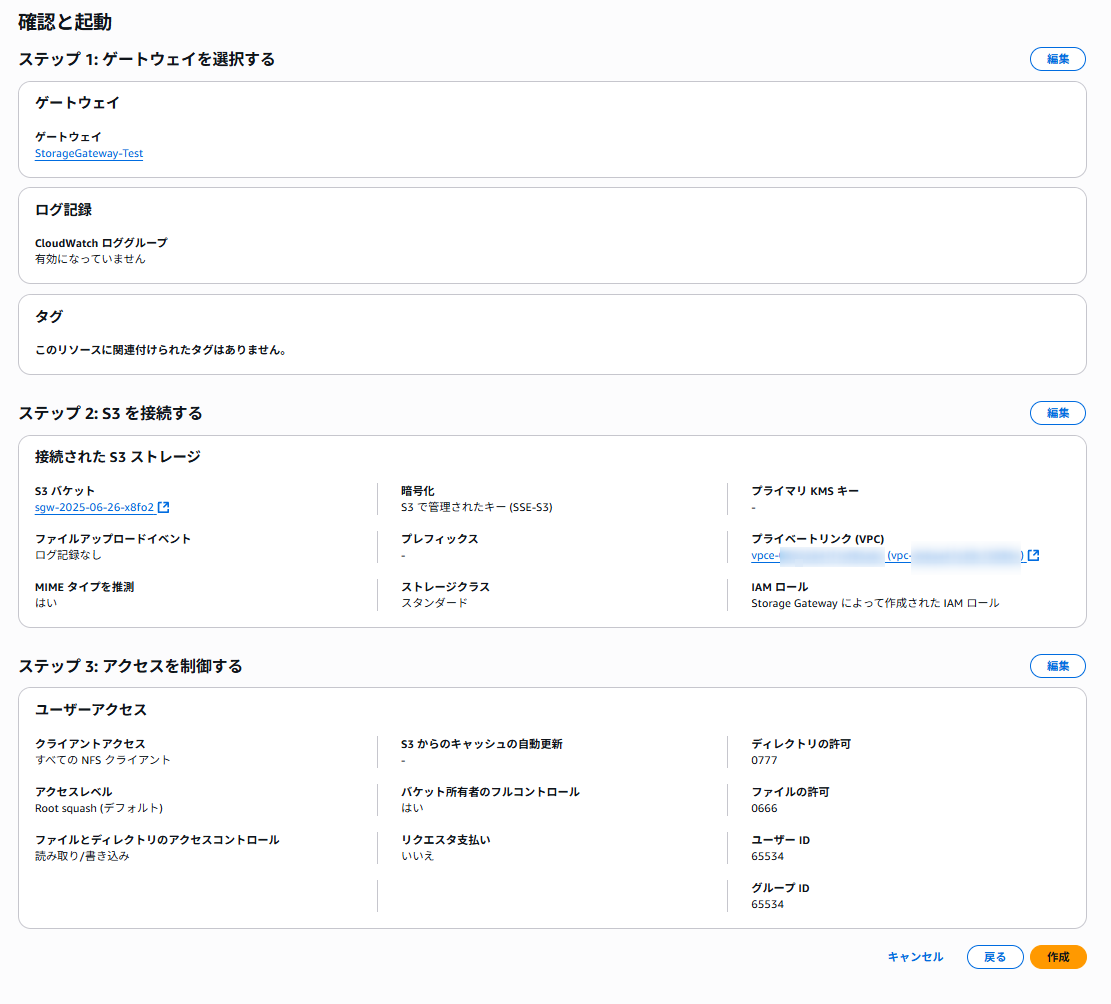
確認画面で問題がないことを確認し、作成ボタンを押下します。
少し時間がかかりますが、利用可能になるまで待ちます。
マウントコマンドの例を控えておきます。
sudo mount -t nfs -o nolock,hard 10.0.11.88:/sgw-2025-06-26-x8fo2 [MountPath]
アクティベーション用の EC2 からマウントする
アクティベーション用の EC2 に Systems Manager Session Manager で接続します。
その後、下記のようにコマンドを実行してください。
## 現在の設定を確認
$ df -h
Filesystem Size Used Avail Use% Mounted on
devtmpfs 4.0M 0 4.0M 0% /dev
tmpfs 453M 0 453M 0% /dev/shm
tmpfs 181M 408K 181M 1% /run
/dev/nvme0n1p1 8.0G 1.6G 6.4G 20% /
tmpfs 453M 0 453M 0% /tmp
/dev/nvme0n1p128 10M 1.3M 8.7M 13% /boot/efi
## マウントポイント(空ディレクトリ)を作成
$ cd ~
$ pwd
/home/ssm-user
$ sudo mkdir storage
## マウントする
$ sudo mount -t nfs -o nolock,hard 10.0.11.88:/sgw-2025-06-26-x8fo2 ~/storage
$ ls -l
total 0
drwxrwxrwx. 1 nobody nobody 0 Jun 26 08:25 storage
$ df -h
Filesystem Size Used Avail Use% Mounted on
devtmpfs 4.0M 0 4.0M 0% /dev
tmpfs 453M 0 453M 0% /dev/shm
tmpfs 181M 412K 181M 1% /run
/dev/nvme0n1p1 8.0G 1.6G 6.4G 20% /
tmpfs 453M 0 453M 0% /tmp
/dev/nvme0n1p128 10M 1.3M 8.7M 13% /boot/efi
10.0.11.88:/sgw-2025-06-26-x8fo2 8.0E 0 8.0E 0% /home/ssm-user/storage
## ファイルを作成する
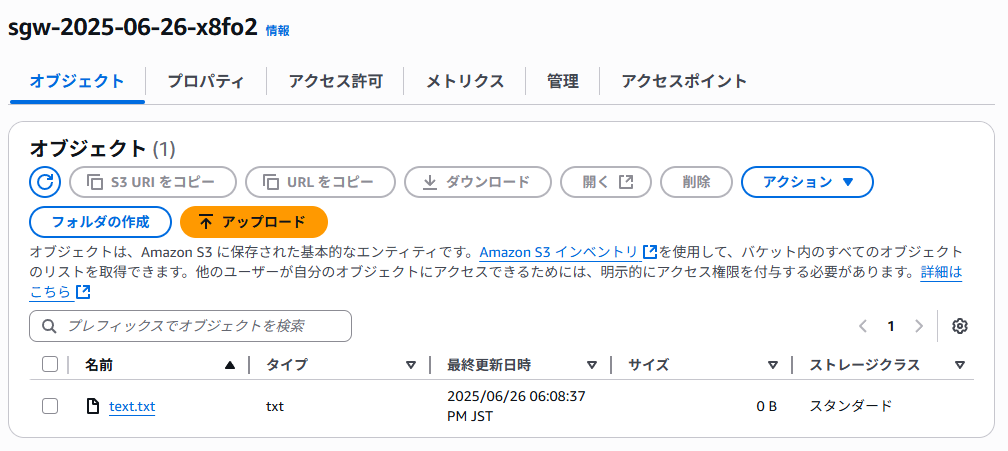
$ cd storage
$ touch text.txt
同期にしばらく時間がかかりますが、S3 バケットに下記のようにファイルが保存されていれば成功です!
後片付け
下記の手順で実施します。
- ファイル共有を削除
- ゲートウェイを削除
- EC2(ゲートウェイとアクティベーション用)を削除
- 150 GiB の EBS を削除 (忘れがちなので注意!)
- CloudFormation スタックの削除
まとめ
パブリックサブネットにゲートウェイを作成する場合は、ウィザードの通りに実施すれば問題はありませんが、プライベートサブネットにゲートウェイを作成する場合は、このように一工夫必要になります。
ファイル共有作成時に S3 エンドポイントを指定する必要があるところが、結構なハマりポイントなので、ステップバイステップで作業していきましょう。
この記事がどなたかの役に立ちますように。


