
ECSとStep Functionsでdbtを動かし、Redshiftへデータを連携するデータパイプラインを構築する
この記事は公開されてから1年以上経過しています。情報が古い可能性がありますので、ご注意ください。
データアナリティクス事業本部のueharaです。
今回は、ECSとStep Functionsでdbtを動かし、Redshiftへデータを連携するデータパイプラインを構築してみたいと思います。
はじめに
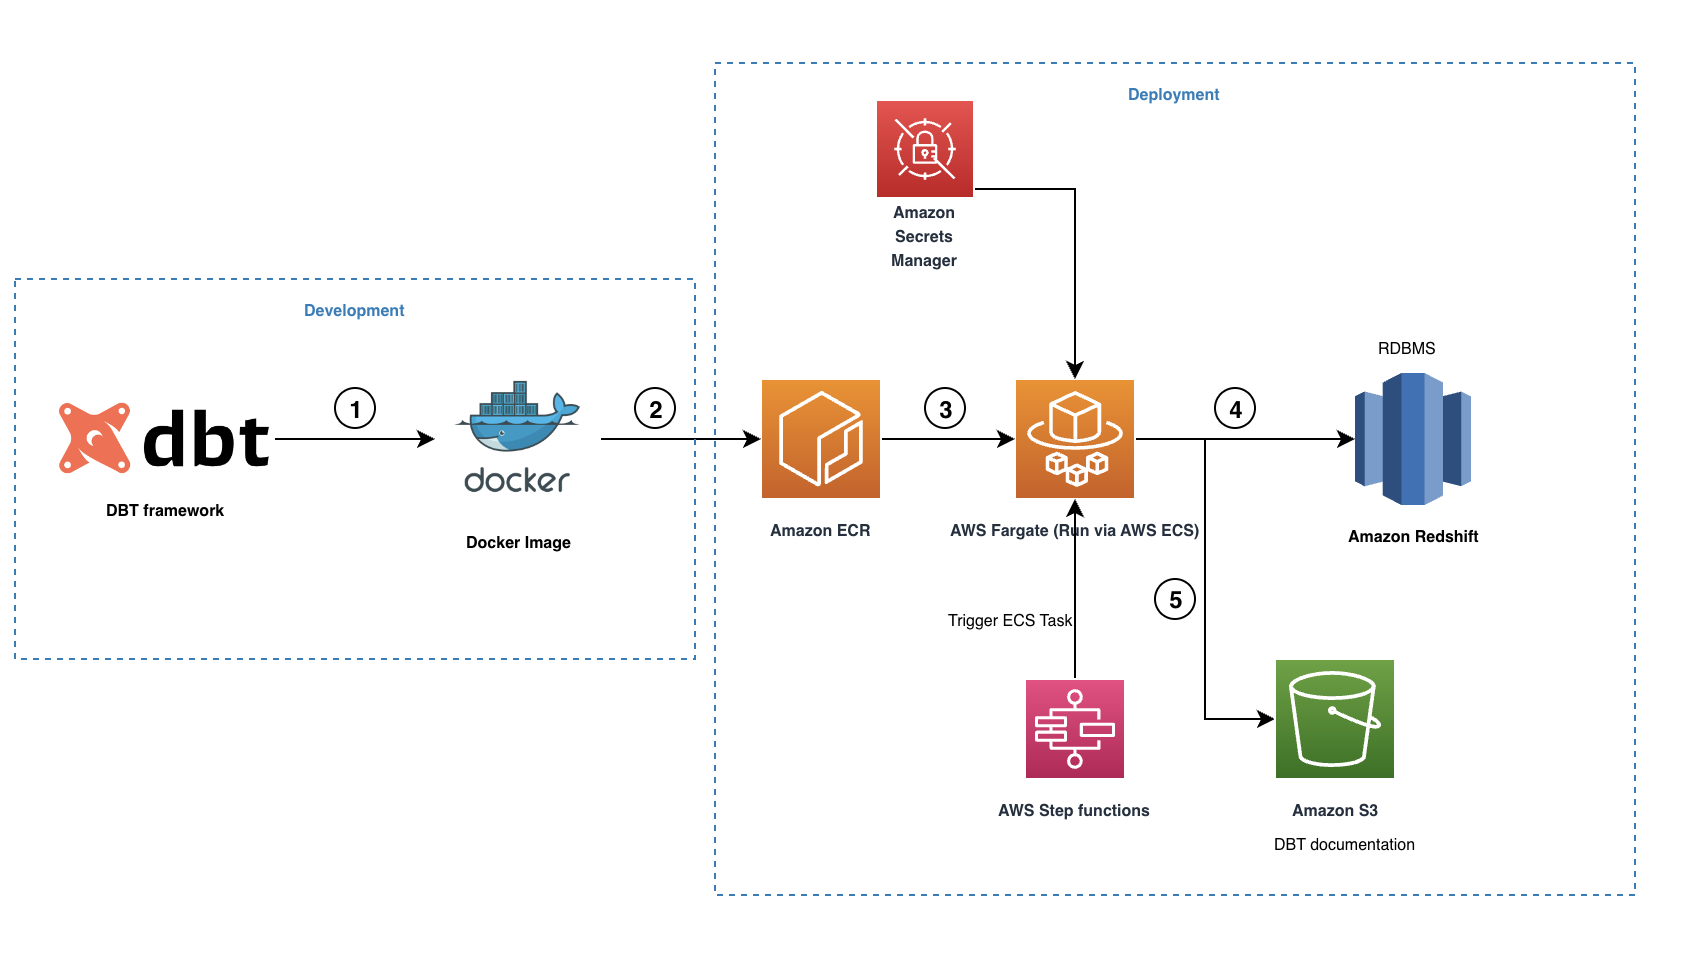
今回作成するアーキテクチャは、AWSビッグデータブログのこちらの記事で紹介されている以下のアーキテクチャです。

dbtを含むDockerイメージをECRで管理し、それをStep FunctionsからトリガーされるECSタスクとしてFargateで実行します。
その他、Redshiftへの接続情報はSecrets Managerで管理し、dbtの実行により作成されるドキュメントはS3に保存する形になります。
前提
今回は、VPCやサブネットが準備されており、そこでRedshift Serverlessが既に動いていることを想定します。(RedshiftはServerlessでなくても問題ありません)
また、今回はECSをプライベートサブネットで起動するので、以下のVPCエンドポイントが既に構築され、適切にセキュリティグループが設定されていることととします。
| サービス | エンドポイントの種類 |
|---|---|
| com.amazonaws.ap-northeast-1.s3 | Gateway |
| com.amazonaws.ap-northeast-1.secretsmanager | Interface |
| com.amazonaws.ap-northeast-1.ecr.dkr | Interface |
| com.amazonaws.ap-northeast-1.ecr.api | Interface |
| com.amazonaws.ap-northeast-1.logs | Interface |
| com.amazonaws.ap-northeast-1.monitoring | Interface |
CloudFormationテンプレートの準備
ここでは、適用する順番でCloudFormationテンプレートを記載します。
Secrets Manager
Secrets Managerのテンプレートは以下の通りです。
AWSTemplateFormatVersion: "2010-09-09"
Transform: AWS::SecretsManager-2020-07-23

Parameters:
  RedshiftSecretName:
    Type: String
    Default: "my-redshift-secret"
  RedshiftHostName:
    Type: String
  RedshiftDBName:
    Type: String
  RedshiftUserName:
    Type: String
  RedshiftUserPassword:
    Type: String
    NoEcho: true

Resources:
  # Secrets Manager
  DbtRedshiftSecret:
    Type: 'AWS::SecretsManager::Secret'
    Properties:
      Name: !Ref RedshiftSecretName
      Description: for dbt elt
      SecretString: !Sub
        - '{"engine":"redshift","username":"${username}","password":"${passwd}","host":"${host}","dbClusterIdentifier":"${dbname}"}'
        - username: !Ref RedshiftUserName
          passwd: !Ref RedshiftUserPassword
          host: !Ref RedshiftHostName
          dbname: !Ref RedshiftDBName

Outputs:
  DbtRedshiftSecret:
    Value: !Ref DbtRedshiftSecret
    Description: secret for dbt elt
    Export:
      Name: DbtRedshiftSecret

  RedshiftSecretName:
    Value: !Ref RedshiftSecretName
    Description: redshift secret name
    Export:
      Name: RedshiftSecretName
パラメーターは以下の通りです。
| Parameter | 設定値 | 例 |
|---|---|---|
| RedshiftSecretName | シークレット名 | my-redshift-secret |
| RedshiftHostName | Redshiftのホスト名 | (クラスタ名).(AccountID).ap-northeast-1.redshift-serverless.amazonaws.com |
| RedshiftDBName | DB名 | dev |
| RedshiftUserName | ユーザ名 | dbt_user |
| RedshiftUserPassword | パスワード | dbt_Pass_#123 |
ECR
ECRのテンプレートは以下の通りです。
AWSTemplateFormatVersion: "2010-09-09"
Description: "Create ECR"

Resources:
  # ECR
  DbtEcr:
    Type: "AWS::ECR::Repository"
    Properties:
      RepositoryName: "my-dbt-ecr"

Outputs:
  DbtEcrRepoUri:
    Value: !Sub "${AWS::AccountId}.dkr.ecr.${AWS::Region}.amazonaws.com/my-dbt-ecr"
    Export:
      Name: DbtEcrRepoUri
ここではレポジトリ名を決め打ちでmy-dbt-ecrとしています。
ECS
ECSのテンプレートは以下の通りです。
AWSTemplateFormatVersion: "2010-09-09"
Description: "Create ECS"

Parameters:
  MyVpcId:
    Type: String

Resources:
  # ECS Cluster
  DbtEcsCluster:
    Type: "AWS::ECS::Cluster"
    Properties:
      ClusterName: "my-dbt-ecs-cls"

  # ECS LogGroup
  DbtEcsLogGroup:
    Type: "AWS::Logs::LogGroup"
    Properties:
      LogGroupName: "/ecs/logs/my-dbt-ecs-lg"

  #  ECS TaskDefinition
  DbtEcsTaskDefinition:
    Type: "AWS::ECS::TaskDefinition"
    Properties:
      Cpu: 256
      ExecutionRoleArn: !Ref DbtEcsTaskExecutionRole
      TaskRoleArn: !Ref DbtEcsTaskRole
      Family: "my-dbt-ecs-task"
      Memory: 512
      NetworkMode: awsvpc
      RequiresCompatibilities:
        - FARGATE
      ContainerDefinitions:
        - Name: "my-dbt-container"
          Image: !ImportValue DbtEcrRepoUri
          LogConfiguration:
            LogDriver: awslogs
            Options:
              awslogs-group: !Ref DbtEcsLogGroup
              awslogs-region: !Ref "AWS::Region"
              awslogs-stream-prefix: "ecs"
          MemoryReservation: 128
          Environment:
            - Name: secret_name
              Value: !ImportValue RedshiftSecretName
            - Name: region_name
              Value: !Ref "AWS::Region"

  # IAM Role
  DbtEcsTaskExecutionRole:
    Type: "AWS::IAM::Role"
    Properties:
      AssumeRolePolicyDocument:
        Version: '2012-10-17'
        Statement:
          - Effect: Allow
            Principal:
              Service: ecs-tasks.amazonaws.com
            Action: sts:AssumeRole
      Path: "/"
      Policies:
        - PolicyName: ECSTaskExecutionPolicy
          PolicyDocument:
            Version: '2012-10-17'
            Statement:
              - Effect: Allow
                Action:
                  - "logs:CreateLogStream"
                  - "logs:PutLogEvents"
                  - "logs:CreateLogGroup"
                  - "ecr:GetAuthorizationToken"
                  - "ecr:BatchCheckLayerAvailability"
                  - "ecr:GetDownloadUrlForLayer"
                  - "ecr:BatchGetImage"
                Resource: '*'

  DbtEcsTaskRole:
    Type: "AWS::IAM::Role"
    Properties:
      AssumeRolePolicyDocument:
        Version: '2012-10-17'
        Statement:
          - Effect: Allow
            Principal:
              Service: ecs-tasks.amazonaws.com
            Action: sts:AssumeRole
      ManagedPolicyArns:
        - "arn:aws:iam::aws:policy/AmazonS3FullAccess"
        - "arn:aws:iam::aws:policy/AmazonRedshiftDataFullAccess"
      Path: "/"
      Policies:
        - PolicyName: ECSTaskPolicy
          PolicyDocument:
            Version: '2012-10-17'
            Statement:
              - Effect: Allow
                Action:
                  - "secretsmanager:GetSecretValue"
                  - "secretsmanager:DescribeSecret"
                Resource: '*'

  # SG
  DbtEcsSecurityGroup:
    Type: AWS::EC2::SecurityGroup
    Properties:
      GroupName: "my-dbt-ecs-sg"
      GroupDescription: Security Group for ECS Task
      VpcId: !Ref MyVpcId
      Tags:
        - Key: "Name"
          Value: "my-dbt-ecs-sg"

Outputs:
  DbtEcsClusterArn:
    Description: "ECS Cluster ARN"
    Value: !GetAtt DbtEcsCluster.Arn
    Export:
      Name: DbtEcsClusterArn

  DbtEcsLogGroup:
    Description: "LogGroup"
    Value: !Ref DbtEcsLogGroup
    Export:
      Name: DbtEcsLogGroup

  DbtEcsTaskExecutionRole:
    Description: "Role for ECS Exec"
    Value: !Ref DbtEcsTaskExecutionRole
    Export:
      Name: DbtEcsTaskExecutionRole

  DbtEcsTaskExecutionRoleArn:
    Description: "Role ARN"
    Value: !GetAtt DbtEcsTaskExecutionRole.Arn
    Export:
      Name: DbtEcsTaskExecutionRoleArn

  DbtEcsTaskRole:
    Description: "Role for ECS"
    Value: !Ref DbtEcsTaskRole
    Export:
      Name: DbtEcsTaskRole

  DbtEcsTaskRoleArn:
    Description: "Role ARN"
    Value: !GetAtt DbtEcsTaskRole.Arn
    Export:
      Name: DbtEcsTaskRoleArn

  DbtEcsTaskDefinition:
    Description: "ARN of the ECS Task Definition"
    Value: !Ref DbtEcsTaskDefinition
    Export:
      Name: DbtEcsTaskDefinition

  DbtEcsSecurityGroup:
    Description: "SG for ECS"
    Value: !Ref DbtEcsSecurityGroup
    Export:
      Name: DbtEcsSecurityGroup
ここではクラスタ名をmy-dbt-ecs-cls、ロググループ名を/ecs/logs/my-dbt-ecs-lg、タスク定義をmy-dbt-ecs-taskで決め打ちしています。
タスク定義の環境変数にはSecret ManagerのURIと、リージョンを設定しています。(ECSタスク実行時に認証情報を取得するのに必要なため)
パラメーターは以下の通りです。
| Parameter | 設定値 | 例 |
|---|---|---|
| MyVpcId | VpcId | vpc-xxxxx |
Step Functions
今回はStep FunctionsもCloudFormationで作成してみます。
テンプレートは以下の通りです。
AWSTemplateFormatVersion: "2010-09-09"
Description: Step Functions to run ECS task

Parameters:
  MyVpcId:
    Type: String

  MyPrivateSubnet1:
    Type: String

  MyPrivateSubnet2:
    Type: String

  MyPrivateSubnet3:
    Type: String

Resources:
  DbtSfn:
    Type: "AWS::StepFunctions::StateMachine"
    Properties:
      StateMachineName: "my-run-task-sf"
      DefinitionString: !Sub
        - |-
            {
              "Comment": "State Machine to run a dbt ECS task",
              "StartAt": "RunEcsFargateTask",
              "States": {
                "RunEcsFargateTask": {
                  "Type": "Task",
                  "Resource": "arn:aws:states:::ecs:runTask.sync",
                  "Parameters": {
                    "Cluster": "${DbtEcsClusterArn}",
                    "LaunchType": "FARGATE",
                    "TaskDefinition": "${DbtEcsTaskDefinition}",
                    "NetworkConfiguration": {
                      "AwsvpcConfiguration": {
                        "Subnets": [
                          "${MyPrivateSubnet1}",
                          "${MyPrivateSubnet2}",
                          "${MyPrivateSubnet3}"
                        ],
                        "SecurityGroups": [
                          "${SecurityGroup}"
                        ],
                        "AssignPublicIp": "DISABLED"
                      }
                    }
                  },
                  "End": true
                }
              }
            }
        - DbtEcsClusterArn: !ImportValue DbtEcsClusterArn
          DbtEcsTaskDefinition: !ImportValue DbtEcsTaskDefinition
          SecurityGroup: !ImportValue DbtEcsSecurityGroup
          MyPrivateSubnet1: !Ref MyPrivateSubnet1
          MyPrivateSubnet2: !Ref MyPrivateSubnet2
          MyPrivateSubnet3: !Ref MyPrivateSubnet3
      RoleArn: !GetAtt DbtSfnExecutionRole.Arn

  DbtSfnExecutionRole:
    Type: 'AWS::IAM::Role'
    Properties:
      AssumeRolePolicyDocument:
        Version: 2012-10-17
        Statement:
          - Effect: Allow
            Principal:
              Service: states.amazonaws.com
            Action: sts:AssumeRole
      Policies:
        - PolicyName: my-state-machine-policy
          PolicyDocument:
            Version: 2012-10-17
            Statement:
              - Effect: Allow
                Action:
                  - ecs:RunTask
                Resource:
                  - !ImportValue DbtEcsTaskDefinition
              - Effect: Allow
                Action:
                  - iam:PassRole
                Resource:
                  - !ImportValue DbtEcsTaskExecutionRoleArn
                  - !ImportValue DbtEcsTaskRoleArn
              - Effect: Allow
                Action:
                  - logs:CreateLogStream
                  - logs:PutLogEvents
                Resource: "*"
              - Effect: Allow
                Action:
                  - ecs:StopTask
                  - ecs:DescribeTasks
                Resource: "*"
              - Effect: "Allow"
                Action:
                  - "events:PutTargets"
                  - "events:PutRule"
                  - "events:DescribeRule"
                Resource: "*"

Outputs:
  DbtSfn:
    Description: "StepFunctions to run ECS task"
    Value: !Ref DbtSfn
    Export:
      Name: DbtSfn
ステートマシン名はmy-run-task-sfで決め打ちしています。
Redshift ServelessはVPC内の3つのAZに配置された3つ以上のサブネットが必要であり、今回は3つのサブネットを利用した環境を想定しているため、パラメーターの設定も以下の通りとしています。
| Parameter | 設定値 | 例 |
|---|---|---|
| MyVpcId | VpcId | vpc-xxxxx |
| MyPrivateSubnet1 | プライベートサブネット1 | subnet-xxxxx |
| MyPrivateSubnet2 | プライベートサブネット2 | subnet-xxxxx |
| MyPrivateSubnet3 | プライベートサブネット3 | subnet-xxxxx |
デプロイ
CloudFormationの準備ができたので、デプロイをします。
CloudFormationの適用
上記で準備したCloudFormationを順番に適用して下さい。
プロジェクトの作成
インフラが用意できたら、Dockerイメージを作成します。
まず、適当なフォルダを作成し、dbt initによりプロジェクトを作成します。
なお、ここではあくまで プロジェクトファイルを用意したいだけなので、対話形式で聞かれる接続情報等は全てダミーでOK です。(作成されるprofiles.ymlは後で置き換えます)
$ dbt init dbt_src --profiles-dir .
... # 接続情報等聞かれるがダミーでOK
実行が完了すると以下のようにプロジェクトフォルダが作成されているかと思います。logsはいらないので削除します。
.
├ dbt_src
└ logs # いらないので削除
次に、dbt_src内のprofiles.ymlを以下に書き換えます。
dbt_src:
  target: dev
  outputs:
    dev:
      type: redshift
      host: "{{ env_var('DBT_REDSHIFT_HOST') }}"
      user: "{{ env_var('DBT_REDSHIFT_USER') }}"
      password: "{{ env_var('DBT_REDSHIFT_PASSWORD') }}"
      port: 5439
      dbname: dev
      schema: public
      threads: 4
      keepalives_idle: 240
      connect_timeout: 10
      sslmode: require
追加ファイルの作成
次に、dbt_srcフォルダにexport_redshift_connection.pyを作成します。
import boto3
from botocore.exceptions import ClientError
import json
import os

secret_name = os.environ.get("secret_name")
region_name = os.environ.get("region_name")

# Create a Secrets Manager client
session = boto3.session.Session()
client = session.client(
    service_name='secretsmanager',
    region_name=region_name
)

try:
    get_secret_value_response = client.get_secret_value(
        SecretId=secret_name
    )
except ClientError as e:
    # For a list of exceptions thrown, see
    # https://docs.aws.amazon.com/secretsmanager/latest/apireference/API_GetSecretValue.html
    raise e

# Decrypts secret using the associated KMS key.
secret = get_secret_value_response['SecretString']

db_secret = json.loads(secret)

dbhost = db_secret['host']
dbname = db_secret['dbClusterIdentifier']
username = db_secret['username']
password = db_secret['password']

host = dbhost.split(":")[0]


with open(".redshift_credentials",'w') as file:
    file.write(f"export DBT_REDSHIFT_HOST={host}")
    file.write("\n")
    file.write(f"export DBT_REDSHIFT_USER={username}")
    file.write("\n")
    file.write(f"export DBT_REDSHIFT_DB={dbname}")
    file.write("\n")
    file.write(f"export DBT_REDSHIFT_PASSWORD='{password}'")

file.close()
これはSecret ManagerからRedshiftの接続情報を取得するスクリプトで、AWS公式サンプルのこちらをそのまま利用させて頂いてます。
スクリプト上部で環境変数からsecret_nameとregion_nameを取得していますが、こちらが先のECSのCloudFormationテンプレートで設定した環境変数の値になります。
同様に、dbt_srcフォルダrun_dbt.shを作成し、以下を記載します。
#!/bin/bash

set -e

echo "Running python script to retreive redshift connection params"
python3 ./export_redshift_connection.py

echo "Exporting Redshift credentials as environment variables to be used by dbt"
. ./.redshift_credentials

echo "Running DBT commands"
echo "Run all model files holding business logic"
dbt run --profiles-dir . --project-dir .

echo "Generate documentation files"
dbt docs generate --profiles-dir . --project-dir .
echo ""

echo "Copying dbt documentation files for hosting"
aws s3 cp --recursive --exclude="*" --include="*.json" --include="*.html" target/ s3://<バケット名>/dbt_poc_test/
こちらにはECSタスク起動時に実行されるスクリプトを記載しています。
流れとしては「Redshift接続情報取得 → dbt run実行 → dbt docs generate実行 → ドキュメントをS3にコピー」となっています。
※最後のコピー先のS3バケット名はご自身の環境に置き換えて下さい。
dbt initをした際にデフォルトでサンプルファイルが入っているので、今回はそちらの動きを確認します。
ここまでできたらフォルダは以下のようになっているかと思います。
.
└ dbt_src
  ├ ... (その他プロジェクトファイル)
  ├ profiles.yml
  ├ export_redshift_connection.py
  └ run_dbt.sh
Dockerイメージの作成、Push
各種ファイルが用意できたので、Dockerイメージを作成します。
dbt_srcフォルダと同じ階層にDockerfileを作成します。
.
├ dbt_src
└ Dockerfile
Dockerfileは次の通り記載をします。
FROM python:3

ADD dbt_src /dbt_src

RUN pip install -U pip

# Install DBT libraries
RUN pip install --no-cache-dir dbt-core

RUN pip install --no-cache-dir dbt-redshift

RUN pip install --no-cache-dir boto3

RUN pip install --no-cache-dir awscli

WORKDIR /dbt_src

RUN chmod -R 755 .

ENTRYPOINT [ "/bin/sh", "-c" ]

CMD ["./run_dbt.sh"]
記載内容を簡単に説明すると、まずベースイメージはPython3です。
ADDを使用して、先に作成したdbt_srcフォルダをコンテナ内の/dbt_srcにコピーしています。
その後、pipによる必要モジュールのインストールや、Workディレクトリの設定、権限設定をしています。
最終的にCMDにrun_dbt.shを指定し、コンテナが起動したときにスクリプトが走るようにしています。
これで準備は完了したので、ビルドをPushをしたいと思います。
AWSマネジメントコンソールからECRにアクセスし、リポジトリからmy-dbt-ecrを開くと「プッシュコマンド表示」とあるので、ここからビルドとPush方法を確認することができます。


私は明示的にAWSで使用するアカウントのプロファイルを設定したいのと、M1 Mac上でのビルドであったため以下手順で実行しました。
# プロファイルを明示的に指定
$ aws ecr get-login-password --region ap-northeast-1 --profile (AWSプロファイル) | docker login --username AWS --password-stdin (AccountID).dkr.ecr.ap-northeast-1.amazonaws.com

# アーキテクチャを明示的に指定
$ docker build -t my-dbt-ecr . --platform=linux/amd64

$ docker tag my-dbt-ecr:latest (AccountID).dkr.ecr.ap-northeast-1.amazonaws.com/my-dbt-ecr:latest

$ docker push (AccountID).dkr.ecr.ap-northeast-1.amazonaws.com/my-dbt-ecr:latest
Pushができたら、マネジメントコンソールからアップロードできているか確認して下さい。
実行確認
最後に、Step Functionsを実行し動作確認を行います。
AWSマネジメントコンソールのStep Functionsから作成したmy-run-task-sfにアクセスします。
「実行を開始」ボタンから実行を開始し、RunEcsFargateTaskが成功したら処理が正常に実行できています。

Redshiftのクエリエディタv2を用いて、サンプルデータがRedshiftにロードできていることが確認できます。

S3バケットにも、ドキュメントがアップロードできていることが確認できました。

最後に
今回は、ECSとStep Functionsでdbtを動かし、Redshiftへデータを連携するデータパイプラインを構築してみました。
参考になりましたら幸いです。


