Hugging FaceでOpenAIの音声認識”Whisper”をFine Tuningする方法が公開されました
この記事は公開されてから1年以上経過しています。情報が古い可能性がありますので、ご注意ください。
こんちには。
データアナリティクス事業本部 機械学習チームの中村です。
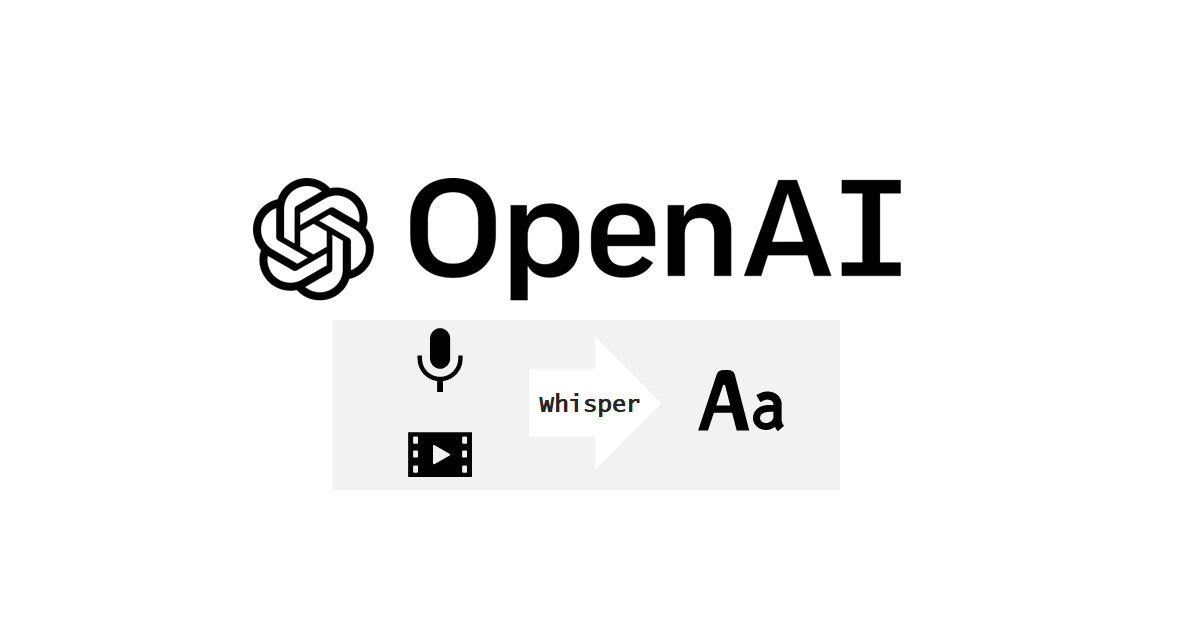
OpenAIがリリースしたWhisperについて、先日Hugging FaceのブログでHugging Faceのフレームワークを用いたfine-tuningの実行方法が紹介されました。
fine-tuningにより、自社で蓄積された音声や書き起こしのデータセットがある場合は、特化した学習をすることが可能です。
また著名なHugging Faceからfine-tuningの実装がリリースされたことで、今後様々なシーンでの応用の可能性を感じます。
Hugging FaceブログではHindi語を例として実施していますが、今回はこちらについて、日本語データを例にしながら動作を確認していきたいと思います。
概要
本記事では、Hugging Faceのフレームワークを用いたfine-tuningの実行を、日本語データセットを例に見ていきます。
なお本記事の内容は実験の簡易化として、以下の前提条件で実行しています。
- fine tuning用のデータセットは一部のみを使用
- Whisperのモデルサイズはsmallを使用
- 学習のstep数をHugging Faceブログの記載値から1/100に縮小
実行環境
今回はGoogle Colaboratory環境で実行しました。
ハードウェアなどの情報は以下の通りです。
- GPU: Tesla P100 (GPUメモリ16GB搭載)
- CUDA: 11.1
- メモリ: 13GB
主なライブラリのバージョンは以下となります。
- transformers: 4.25.0.dev0
- datasets: 2.6.1
インストール
各種パッケージのインストールはHugging Faceブログに従います。
!add-apt-repository -y ppa:jonathonf/ffmpeg-4
!apt update
!apt install -y ffmpeg

!pip install datasets>=2.6.1
!pip install git+https://github.com/huggingface/transformers
!pip install librosa
!pip install evaluate>=0.30
!pip install jiwer
!pip install gradio
データセットの取得
今回はCommon Voiceデータセットの日本語サブセットを使用します。以下でサンプルを試聴することも可能です。
Common VoiceはMozillaが、誰でも自由に音声データを使った音声認識モデル開発ができることを目的として、ボランティアによる協力によりデータセットを作成しているプロジェクトです。
以下ページでアカウントを作って、「話す」と「聞く」を隙間時間で実施することで誰でもデータ収集に貢献することができます。(私自身もデータ収集を何回か実施したことがあります)
興味がある方はアクセスしてみてください。
HuggingFace Hubへのログイン
データセットの取得には認証が必要であるため、以下でログインをします。
from huggingface_hub import notebook_login
notebook_login()
ノートブック上でログイン画面が出力されるため、トークンを入力してください。
トークンが無い場合は、Hugging Faceのアカウントを作成の上、設定画面でAccess Tokensを選択して、アクセストークンを作成します。
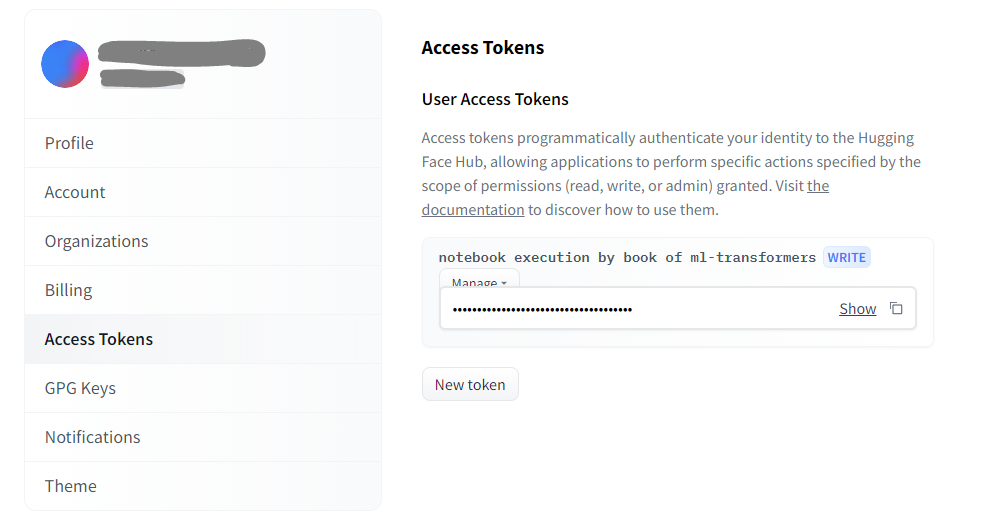
トークンを入力すると以下で成功したことが確認できます。
Login successful
Your token has been saved to /root/.huggingface/token
データセットのロード
次に、Datasetを取得します。use_auth_token=Trueとしておけば、Colab環境の~/.huggingfaceに保存されているトークン情報を自動で使用します。
from datasets import load_dataset, DatasetDict

common_voice = DatasetDict()

common_voice["train"] = load_dataset("mozilla-foundation/common_voice_11_0"
    , "ja", split="train", use_auth_token=True)
common_voice["validation"] = load_dataset("mozilla-foundation/common_voice_11_0"
    , "ja", split="validation", use_auth_token=True)
common_voice["test"] = load_dataset("mozilla-foundation/common_voice_11_0"
    , "ja", split="test", use_auth_token=True)
DatasetDictは以下のような構成になっています。
print(common_voice)
DatasetDict({
    train: Dataset({
        features: ['client_id', 'path', 'audio', 'sentence', 'up_votes', 'down_votes'
            , 'age', 'gender', 'accent', 'locale', 'segment'],
        num_rows: 6505
    })
    validation: Dataset({
        features: ['client_id', 'path', 'audio', 'sentence', 'up_votes', 'down_votes'
            , 'age', 'gender', 'accent', 'locale', 'segment'],
        num_rows: 4485
    })
    test: Dataset({
        features: ['client_id', 'path', 'audio', 'sentence', 'up_votes', 'down_votes'
            , 'age', 'gender', 'accent', 'locale', 'segment'],
        num_rows: 4604
    })
})
データセットのサンプル確認
ひとつサンプルを確認してみましょう。
common_voice["train"][0]
{'client_id': '02a8841a00d762472a4797b56ee01643e8d9ece5a225f2e91c007ab1f94c49c99e50d19986ff3fefb18190257323f34238828114aa607f84fbe9764ecf5aaeaa',
 'path': '/root/.cache/huggingface/datasets/downloads/extracted/0bd2523a2521d7780854389657031a0664717a7eec1f7dc907e32a8ea92856aa/cv-corpus-11.0-2022-09-21/ja/clips/common_voice_ja_25310216.mp3',
 'audio': {'path': '/root/.cache/huggingface/datasets/downloads/extracted/0bd2523a2521d7780854389657031a0664717a7eec1f7dc907e32a8ea92856aa/cv-corpus-11.0-2022-09-21/ja/clips/common_voice_ja_25310216.mp3',
  'array': array([-2.1230822e-08,  1.3050334e-08,  1.8151752e-08, ...,
          2.8415348e-05,  3.8682865e-05,  2.0064232e-05], dtype=float32),
  'sampling_rate': 48000},
 'sentence': 'わたしは音楽がすきです。',
 'up_votes': 2,
 'down_votes': 0,
 'age': '',
 'gender': '',
 'accent': '',
 'locale': 'ja',
 'segment': ''}
'audio'カラムの部分を見ると、音声ファイル自体は/root/.cacheというキャッシュディレクトリに保存されていることが分かります。
またこの中'audio'カラムの中にarrayという名前で音声データのバイナリが格納されているようです。
発話内容は'sentence'というカラムに格納されているようです。
これらの情報は自作のデータセットを準備する場合にヒントになりそうですね。
不要なカラムの削除
不要なカラムは以下で削除します。
common_voice = common_voice.remove_columns(["accent", "age", "client_id"
    , "down_votes", "gender", "locale", "path", "segment", "up_votes"])
common_voice
DatasetDict({
    train: Dataset({
        features: ['audio', 'sentence'],
        num_rows: 6505
    })
    validation: Dataset({
        features: ['audio', 'sentence'],
        num_rows: 4485
    })
    test: Dataset({
        features: ['audio', 'sentence'],
        num_rows: 4604
    })
})
また、ここで実験の簡易化のために必要に応じてデータセットを縮小します。
# 実験のためデータセットを縮小したい場合はコチラを有効化
common_voice = DatasetDict({
    "train": common_voice['train'].select(range(100)),
    "validation": common_voice['validation'].select(range(100)),
    "test": common_voice['test'].select(range(100)),
})
DatasetDict({
    train: Dataset({
        features: ['audio', 'sentence'],
        num_rows: 100
    })
    validation: Dataset({
        features: ['audio', 'sentence'],
        num_rows: 100
    })
    test: Dataset({
        features: ['audio', 'sentence'],
        num_rows: 100
    })
})
データセットの前処理
サンプリングレートの設定
"audio"カラムをキャストすることで、16,000Hzのサンプリングレートを設定することができます。
from datasets import Audio

common_voice = common_voice.cast_column("audio", Audio(sampling_rate=16000))
この設定は、後述するmapなどで実際にデータ処理する際にサンプリングレートの変換が実行される形となります。
元データ自体を変換するようなキャストではないのでご注意ください。
FeatureExtractorのロード
音声データを音響特徴量に変換するFeatureExtractorをロードします。
from transformers import WhisperFeatureExtractor

feature_extractor = WhisperFeatureExtractor.from_pretrained("openai/whisper-small")
サンプルデータでテストをしてみます。
# サンプル
batch = common_voice["train"][0]

# 変換実行
audio = batch["audio"]
input_features = feature_extractor(audio["array"]
    , sampling_rate=audio["sampling_rate"]).input_features[0]

print(input_features.shape)
(80, 3000)
input_features[0]の[0]は、feature_extractorは30秒単位でデータを分割して処理するためと考えられます。
今回はその先頭のみを取得しているようです。そのため自作のデータを準備する際は30秒単位で、音声データと発話内容のペアにまとめてデータセットを構成する必要がありそうです。
得られた音響特徴量は、80次元の特徴量が、10msec単位で生成されるため、30秒分の3000個作成されています。
音響特徴量については以下の記事でも言及しましたので、興味のある方はご覧ください。
Tokenizerのロード
次にTokenizerをロードします。
from transformers import WhisperTokenizer

tokenizer = WhisperTokenizer.from_pretrained("openai/whisper-small"
    , language="Japanese", task="transcribe")
こちらもサンプルデータでテストしてみます。(これはHugging Faceブログに記載された通りです)
input_str = common_voice["train"][0]["sentence"]
labels = tokenizer(input_str).input_ids
decoded_with_special = tokenizer.decode(labels, skip_special_tokens=False)
decoded_str = tokenizer.decode(labels, skip_special_tokens=True)

print(f"Input:                 {input_str}")
print(f"Decoded w/ special:    {decoded_with_special}")
print(f"Decoded w/out special: {decoded_str}")
print(f"Are equal:             {input_str == decoded_str}")
Input:                 わたしは音楽がすきです。
Decoded w/ special:    <|startoftranscript|><|ja|><|transcribe|><|notimestamps|>わたしは音楽がすきです。<|endoftext|>
Decoded w/out special: わたしは音楽がすきです。
Are equal:             True
Processorのロード
FeatureExtractorとTokenizerが結合されたProcessorというクラスも準備されています。
from transformers import WhisperProcessor

processor = WhisperProcessor.from_pretrained("openai/whisper-small"
    , language="Japanese", task="transcribe")
こちらを使用してFeatureExtractorとTokenizerの処理を実施できますので、以降はこちらを使用します。
データセットへの適用
データセットへのmap処理のため、関数を定義します。
def prepare_dataset(batch):
    # load and resample audio data from 48 to 16kHz
    audio = batch["audio"]

    # compute log-Mel input features from input audio array
    batch["input_features"] = processor.feature_extractor(audio["array"]
        , sampling_rate=audio["sampling_rate"]).input_features[0]

    # encode target text to label ids
    batch["labels"] = processor.tokenizer(batch["sentence"]).input_ids
    return batch
map処理をします。スペックに応じてnum_procを調整してください。
私は安定実行のためnum_proc=1で実施しました。(Hugging Faceブログの通りにnum_proc=4とすると途中で止まってしまいました)
common_voice = common_voice.map(prepare_dataset
    , remove_columns=common_voice.column_names["train"], num_proc=1)
こちらの処理は30秒程度で終わります。
データセットを縮小しない場合、こちらの処理には30分程度かかりますので、ご注意ください。
学習の準備
DataCollatorクラスを定義
DataCollatorクラスを定義します。
import torch

from dataclasses import dataclass
from typing import Any, Dict, List, Union

@dataclass
class DataCollatorSpeechSeq2SeqWithPadding:
    processor: Any

    def __call__(self, features: List[Dict[str, Union[List[int]
        , torch.Tensor]]]) -> Dict[str, torch.Tensor]:

        # 音響特徴量側をまとめる処理
        # (一応バッチ単位でパディングしているが、すべて30秒分であるはず)
        input_features \
            = [{"input_features": feature["input_features"]} for feature in features]
        batch = self.processor.feature_extractor.pad(input_features, return_tensors="pt")

        # トークン化された系列をバッチ単位でパディング
        label_features = [{"input_ids": feature["labels"]} for feature in features]
        labels_batch = self.processor.tokenizer.pad(label_features, return_tensors="pt")

        # attention_maskが0の部分は、トークンを-100に置き換えてロス計算時に無視させる
        # -100を無視するのは、PyTorchの仕様
        labels \
            = labels_batch["input_ids"].masked_fill(labels_batch.attention_mask.ne(1), -100)

        # BOSトークンがある場合は削除
        if (labels[:, 0] == self.processor.tokenizer.bos_token_id).all().cpu().item():
            labels = labels[:, 1:]

        # 整形したlabelsをバッチにまとめる
        batch["labels"] = labels

        return batch
このクラスは、バッチ単位で実行する必要のある学習直前の前処理を担当するイメージです。
確認のためちょっと単体で動かしてみます。音響特徴量の部分はスキップしてtokenizer.padからです。
features = common_voice["train"][0:5]
label_features = [{"input_ids": labels} for labels in features["labels"]]
labels_batch = processor.tokenizer.pad(label_features, return_tensors="pt")
labels_batch
{'input_ids': tensor([[50258, 50266, 50359, 50363,  9206,  3368,  2849,  3065, 18034, 35479,
          5142,  2659,  7016,  4767,  1543, 50257, 50257, 50257, 50257, 50257,
         50257, 50257],
        [50258, 50266, 50359, 50363,  3203, 20258, 42540,  1231,  8661, 12979,
          2972, 14765,  4035,  3065,  7391,   120, 32156,  1764,  9311, 11046,
          1543, 50257],
        [50258, 50266, 50359, 50363, 24168,  5998, 34719, 18549,  1764,  7625,
          9311,  5591,  1543, 50257, 50257, 50257, 50257, 50257, 50257, 50257,
         50257, 50257]]), 'attention_mask': tensor([[1, 1, 1, 1, 1, 1, 1, 1, 1, 1, 1, 1, 1, 1, 1, 1, 0, 0, 0, 0, 0, 0],
        [1, 1, 1, 1, 1, 1, 1, 1, 1, 1, 1, 1, 1, 1, 1, 1, 1, 1, 1, 1, 1, 1],
        [1, 1, 1, 1, 1, 1, 1, 1, 1, 1, 1, 1, 1, 1, 0, 0, 0, 0, 0, 0, 0, 0]])}
tokenizer.padにより、バッチ単位で長さが統一され、input_idsに何かしらのトークンがpaddingされています。
加えてattention_maskも得られます。(今回は正解データの方なので、attention_maskは入力としては使用しません)
paddingに使用されているトークンは、endoftextトークンのようです。
processor.tokenizer.decode(labels_batch["input_ids"][0])
<|startoftranscript|><|ja|><|transcribe|><|notimestamps|>わたしは音楽がすきです。<|endoftext|><|endoftext|><|endoftext|><|endoftext|><|endoftext|><|endoftext|><|endoftext|>
ここから、attention_maskを使ってinput_idsを-100に置き換えています。
labels = labels_batch["input_ids"].masked_fill(labels_batch.attention_mask.ne(1), -100)
labels
tensor([[50258, 50266, 50359, 50363,  9206,  3368,  2849,  3065, 18034, 35479,
          5142,  2659,  7016,  4767,  1543, 50257,  -100,  -100,  -100,  -100,
          -100,  -100],
        [50258, 50266, 50359, 50363,  3203, 20258, 42540,  1231,  8661, 12979,
          2972, 14765,  4035,  3065,  7391,   120, 32156,  1764,  9311, 11046,
          1543, 50257],
        [50258, 50266, 50359, 50363, 24168,  5998, 34719, 18549,  1764,  7625,
          9311,  5591,  1543, 50257,  -100,  -100,  -100,  -100,  -100,  -100,
          -100,  -100]])
これでpaddingのトークンを-100にすることにより、PyTorchでロス計算時に無視させることが可能です。
これはPyTorchの仕様になっていて、例えば以下のCrossEntropyLossではignore_index=-100として与えられています。
少し話がそれてしまいましたが、DataCollatorを以下でインスタンス化します。
data_collator = DataCollatorSpeechSeq2SeqWithPadding(processor=processor)
評価関数の準備
評価にはWER(Word Error Rate)を使用します。計算にはevaluateというモジュールを使用します。
ただし日本語は単語間に空白がないため、Hugging Faceブログから少し修正が必要です。
以下の記事を参考に、Ginza経由でmecab-ipadic-NEologdを使います。
まずはパッケージを追加で入れます。
!pip install ginza==4.0.5 ja-ginza
!pip install sortedcontainers~=2.1.0
import pkg_resources, imp
imp.reload(pkg_resources)
評価関数を以下のようにします。(ハイライトが手を入れた箇所です)
import evaluate
import spacy
import ginza

metric = evaluate.load("wer")
nlp = spacy.load("ja_ginza")
ginza.set_split_mode(nlp, "C") # CはNEologdの意らしいです

def compute_metrics(pred):
    pred_ids = pred.predictions
    label_ids = pred.label_ids

    # replace -100 with the pad_token_id
    label_ids[label_ids == -100] = processor.tokenizer.pad_token_id

    # we do not want to group tokens when computing the metrics
    pred_str = processor.tokenizer.batch_decode(pred_ids, skip_special_tokens=True)
    label_str = processor.tokenizer.batch_decode(label_ids, skip_special_tokens=True)

    # 分かち書きして空白区切りに変換
    pred_str = [" ".join([ str(i) for i in nlp(j) ]) for j in pred_str]
    label_str = [" ".join([ str(i) for i in nlp(j) ]) for j in label_str]

    wer = 100 * metric.compute(predictions=pred_str, references=label_str)

    return {"wer": wer}
モデルのロード・設定
Whisperのモデルをロードします。
from transformers import WhisperForConditionalGeneration

model = WhisperForConditionalGeneration.from_pretrained("openai/whisper-small")
モデルのconfigを以下のように設定します。
model.config.forced_decoder_ids \
    = processor.get_decoder_prompt_ids(language = "ja", task = "transcribe")
model.config.suppress_tokens = []
ここは、Hugging Faceブログからmodel.config.forced_decoder_idsの部分を変更しています。
model.config.forced_decoder_idsはデコード時に与えるトークンをあらかじめ指定することが可能です。
言語判定など、どこから含めてfine tuningするかによって、model.config.forced_decoder_idsに設定すべきものが変わってきます。
今回は、WERなどをもっともらしくするために、あらかじめ与えた形で実施します。
この設定で具体的には以下のトークンがデコーダに強制的に挿入されます。
processor.tokenizer.decode([i[1] for i in model.config.forced_decoder_ids])
<|ja|><|transcribe|><|notimestamps|>
TrainingArugumentsの定義
通常のHugging FaceでのTransformersの学習と同様に、TrainingArgumentsを定義します。
今回は省略のため、Hugging Faceブログよりもstep数を1/100と少なくしています。
from transformers import Seq2SeqTrainingArguments

training_args = Seq2SeqTrainingArguments(
    output_dir="./whisper-small-ja",  # change to a repo name of your choice
    per_device_train_batch_size=16,
    gradient_accumulation_steps=1,  # increase by 2x for every 2x decrease in batch size
    learning_rate=1e-5,
    # warmup_steps=500, # Hugging Faceブログではこちら
    warmup_steps=5,
    # max_steps=4000, # Hugging Faceブログではこちら
    max_steps=40,
    gradient_checkpointing=True,
    fp16=True,
    group_by_length=True,
    evaluation_strategy="steps",
    per_device_eval_batch_size=8,
    predict_with_generate=True,
    generation_max_length=225,
    # save_steps=1000, # Hugging Faceブログではこちら
    save_steps=10,
    # eval_steps=1000, # Hugging Faceブログではこちら
    eval_steps=10,
    logging_steps=25,
    report_to=["tensorboard"],
    load_best_model_at_end=True,
    metric_for_best_model="wer",
    greater_is_better=False,
    push_to_hub=False,
)
Trainerの定義
Trainerを定義します。
from transformers import Seq2SeqTrainer

trainer = Seq2SeqTrainer(
    args=training_args,
    model=model,
    train_dataset=common_voice["train"],
    eval_dataset=common_voice["validation"],
    data_collator=data_collator,
    compute_metrics=compute_metrics,
    tokenizer=processor.feature_extractor,
)
学習
学習前の性能チェック
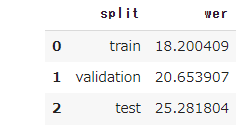
一応事前に性能をチェックしておきます。trainer.predictを実行すればreturnされるPredictionOutputのmetricsにWERが保存されていますので、そちらを参照します。
import pandas as pd
pd.DataFrame([
    {"split":"train"
        , "wer": trainer.predict(common_voice["train"]).metrics["test_wer"]},
    {"split":"validation"
        , "wer": trainer.predict(common_voice["validation"]).metrics["test_wer"]},
    {"split":"test"
        , "wer": trainer.predict(common_voice["test"]).metrics["test_wer"]}
])
学習実行
学習は以下のコードで実行します。
trainer.train()
以下が実行ログとなります。
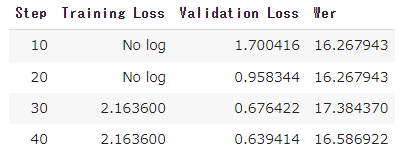
学習は10分以下で完了しました。
ちなみにstep数を1/100にしない場合は、学習に6時間程度かかると予測がでていましたので、ご参考にされてください。
学習後の性能チェック
一応以下が結果となります。学習前より少し改善していますが、性能としてはまだまだな印象です。

ただし再掲ですが、本記事の実行は以下の制約がある前提となりますのでご承知おきください。
- fine tuning用のデータセットは一部のみを使用
- Whisperはsmallモデルを使用
- 学習のstep数を1/100に縮小
今後機会があれば、これらの制約を取り払って実行してみたいと思います。
参考までに少しだけlargeを動かしてみたので、その際に気づいた注意点を挙げておきます。
- Colabのメモリ設定をハイメモリとする必要がありました。
- ハイメモリではない場合、モデルのロードでこけてしまいました
- Whisper単体では、標準メモリでも動作しますので、用途に応じて使い分けを検討
推論方法の確認
最後に推論方法について、Hugging Faceでの実行方法を確認しておきます。
既に音響特徴量が作成されていれば、trainer.predictを実行してその後tokenizer.decodeで結果を得られます。
prediction_output = trainer.predict(common_voice["test"].select([0]))
pred_ids = prediction_output.predictions
processor.tokenizer.decode(pred_ids[0], skip_special_tokens=True)
私は松井さんが書いた作文を読みました。
データセットから実行し直す場合は、以下の方法でも可能なようです。
# カラムを消してしまったため再度ロード
common_voice_test = load_dataset("mozilla-foundation/common_voice_11_0"
    , "ja", split="test", use_auth_token=True)
common_voice_test = common_voice_test.select(range(1))
common_voice_test = common_voice_test.cast_column("audio", Audio(sampling_rate=16000))

device = "cuda" if torch.cuda.is_available() else "cpu"

# 推論
speech_data = common_voice_test['audio'][0]["array"]
inputs = processor.feature_extractor(speech_data
    , return_tensors="pt", sampling_rate=16_000).input_features.to(device)
predicted_ids = model.generate(inputs, max_length=480_000)
processor.tokenizer.batch_decode(predicted_ids, skip_special_tokens=False)[0]
私は松井さんが書いた作文を読みました。
まとめ
いかがでしたでしょうか。
Whisperのfine tuningについて、著名なHugging Faceからの実装がリリースされたことで、 今後様々なシーンで応用が広がりそうということで本記事でも紹介しました。 自社のデータが蓄積されている方は、ぜひお試ししてみてはいかがでしょうか。
データセットを自作する方法については、あと少し調査が必要そうですので、また今後ブログにしたいと思います。
本記事がWhisperを活用してみようと思われる方の参考になれば幸いです。